manuals.online logo
Brands
  1. Home
  2. •
  3. Brands
  4. •
  5. Fisher & Paykel
  6. •
  7. Dishwasher
  8. •
  9. Fisher & Paykel DishDrawer DD60DI9 User manual

Fisher & Paykel DishDrawer DD60DI9 User manual

Keep this document handy for easy reference.
● For detailed information on the features of your dishwasher, see your ‘User guide’.
● Before using your dishwasher, make sure you read the full ‘User guide’, with special attention to the ‘Safety and warnings’ section.
● For contact information or if you require service, assistance or replacement parts, see the end of this document or your ‘Service &
warranty’ booklet.
continued >
YOUR MODEL
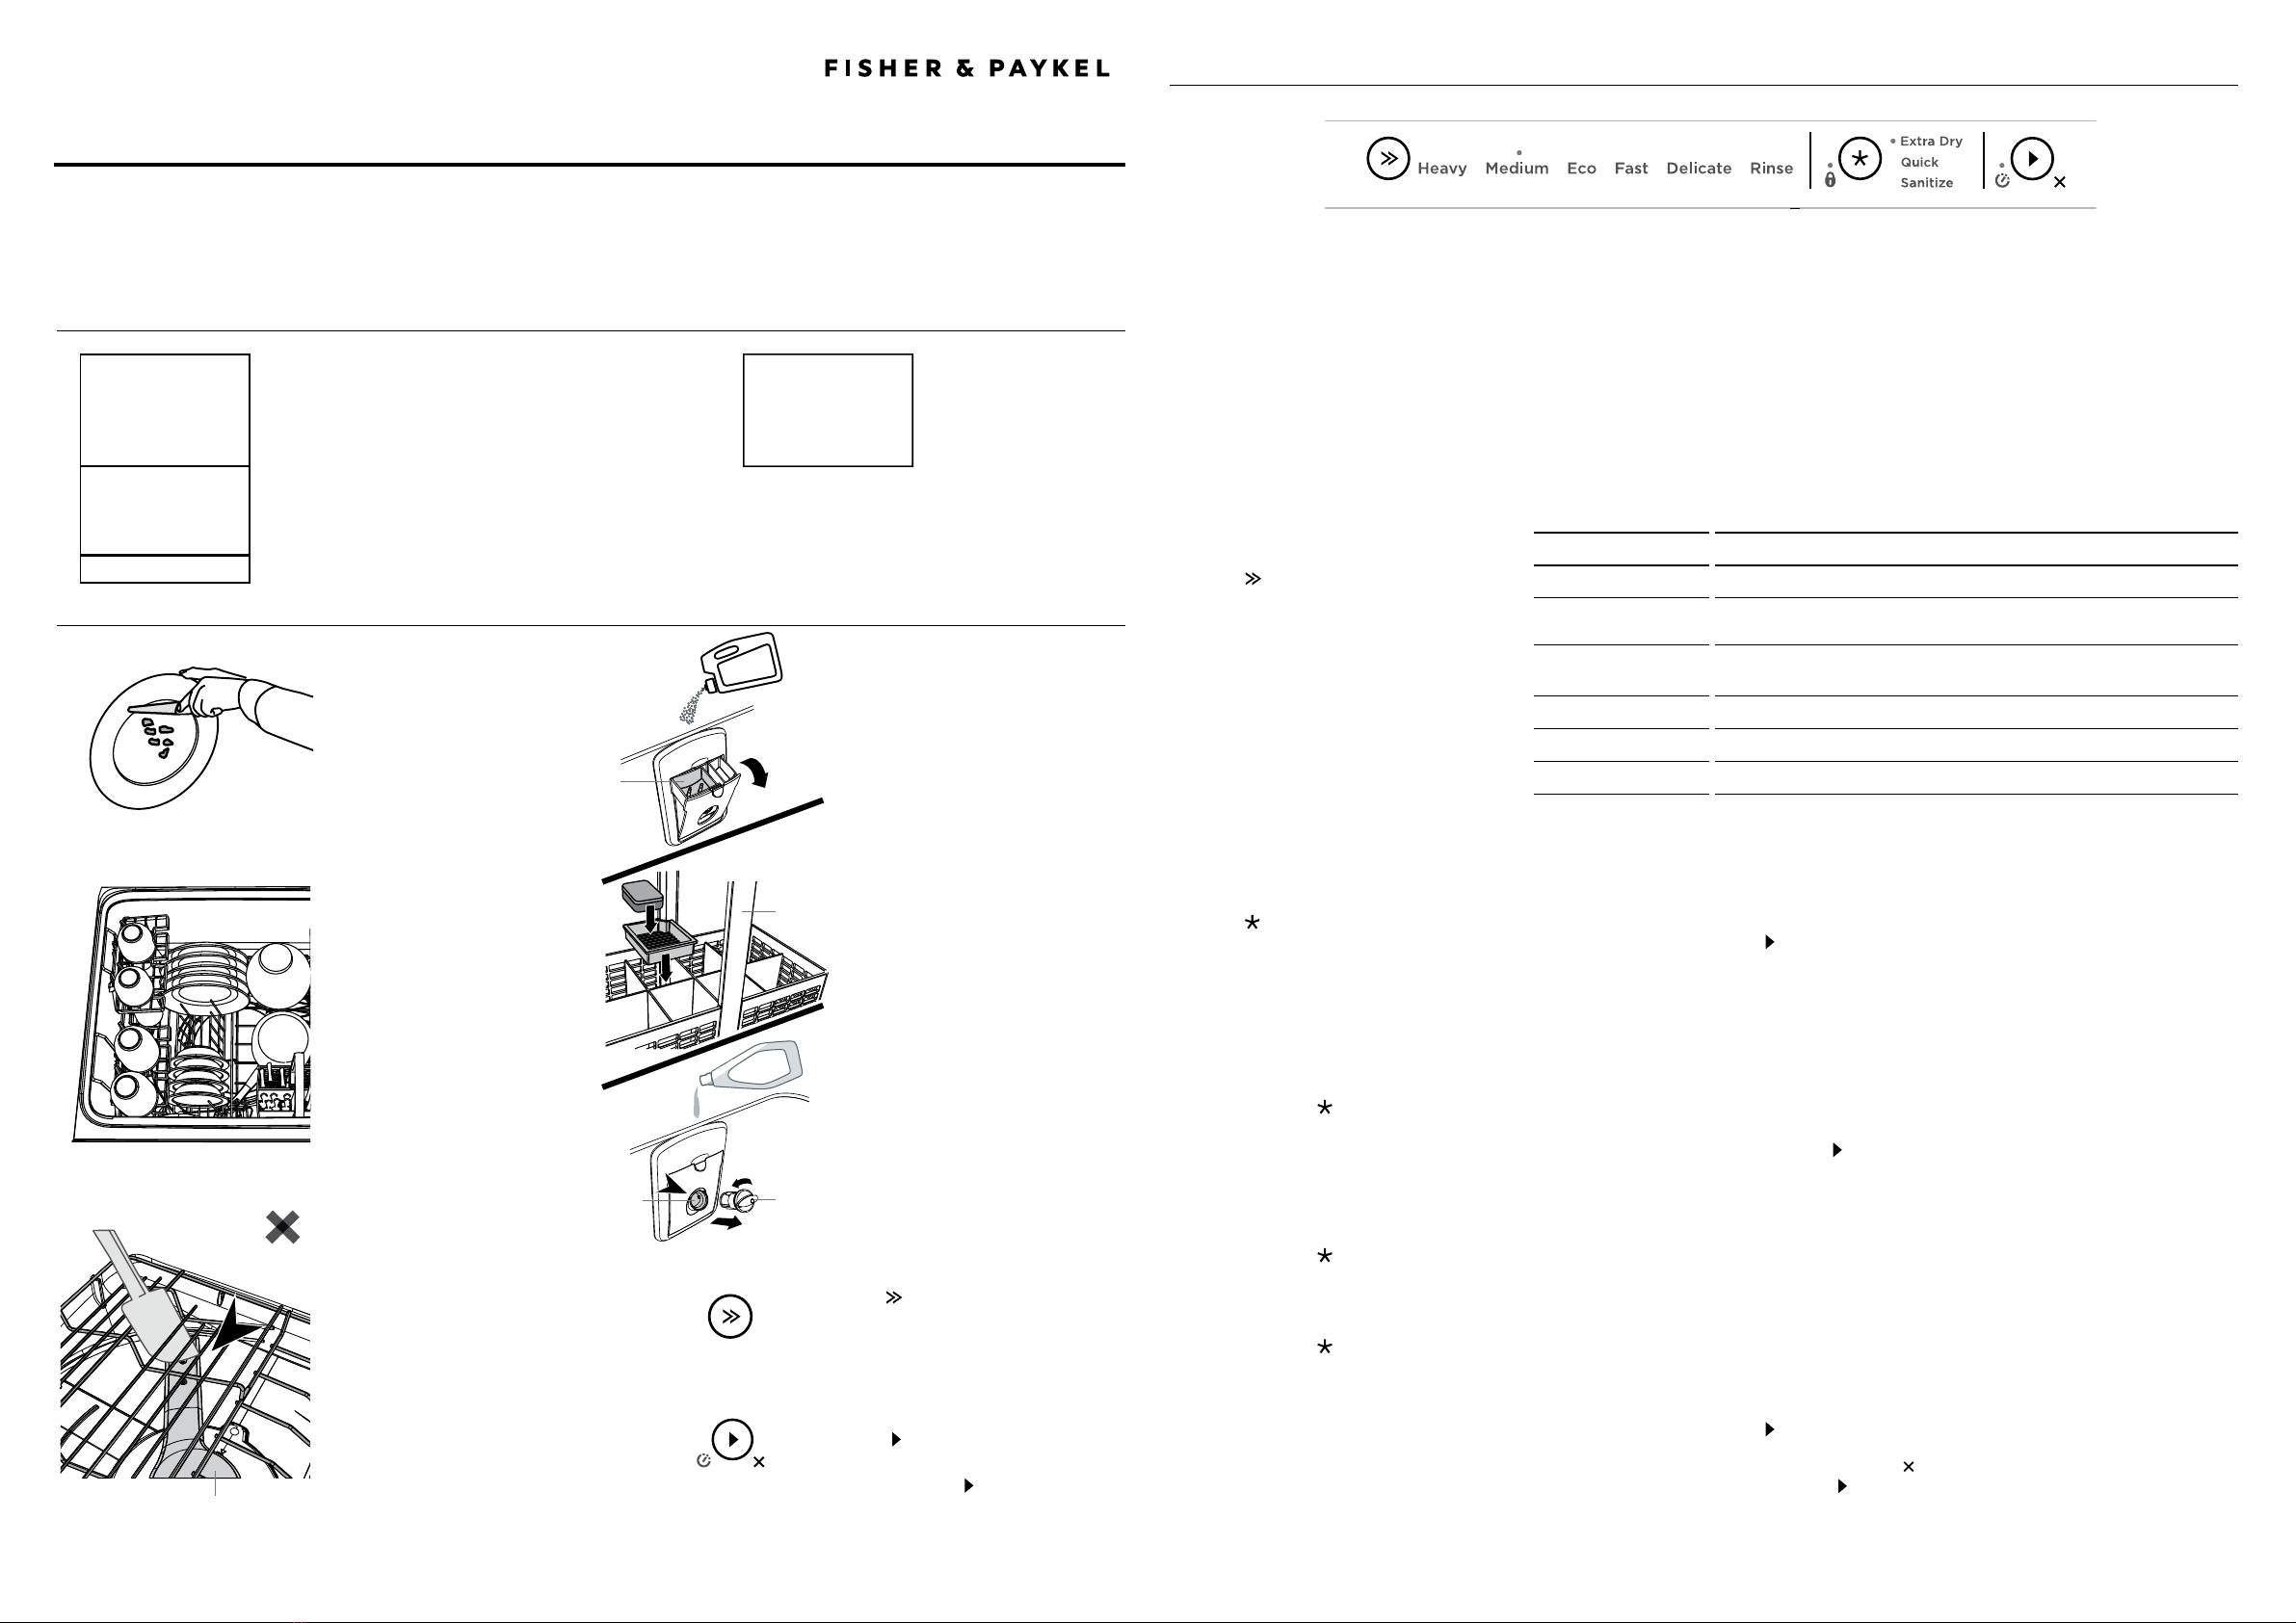
OPERATING INSTRUCTIONS - STARTING A WASH
CONTROLS AND INDICATORS
Note: each drawer can
run independently of
the other drawer.
A
C
B
D
Double models
DD60DI9
DD60DHI9
DD24DI9
DD24DTI9
DD24DHTI9
Single models
DD60SI9
DD60STI9
DD60SLI9
DD60SHI9
DD60SHTI9
DD24SI9
DD24STI9
DD24SHTI9
Discard scraps
Scrape large food particles
off (e.g. bones, fruit stones)
and remove any foreign
objects (e.g. toothpicks,
strings, paper).
Start wash or set Delay start
To start wash:
Press and close the drawer.
To set delay start:
Press and hold to set the delay
start time, then close the drawer.
Note: Each tone indicates a 1h delay.
Select wash
Press to select a wash
program.
Load dishes carefully
To help with wash
performance,
arrange dishes so they are
evenly spaced and not
nesting.
14
5
6
2
Rinse aid
Powdered
Detergent
Tablet or Gel Pouch
A
B
13
4
2
Indicators Description
Controls Description
Off/On
Opening the drawer will automatically
turn the dishwasher on.
If the dishwasher is in an idle state,
touch any button to reactivate it.
WASH PROGRAM SELECTOR
Press to scroll through the wash
program options.
See opposite table for program
descriptions.
WASH MODIFIER SELECTOR
Press to scroll through the wash modifier
options.
Note: Not all modifiers are available for all wash
programs.
Keylock
Disables all the buttons
(helpful when cleaning the dishwasher).
To activate:
Press and hold until you hear a tone. The lock
indicator will light up.
Childlock
Disables all the buttons and locks the drawer closed
(preventing unauthorised use by children).
To activate:
Press and hold until you hear two tones. The lock
indicator will light up.
To cancel keylock/childlock:
If the drawer is open
Press and hold until you hear a tone.
The lock indicator will go out.
If the drawer is closed
Knock three times on the door.
START SELECTOR (either on door or inner control panel)
To start wash:
Press to start the wash.
To Pause:
Knock twice on the door of the dishwasher.
● Wait for three short and one long tone before opening the
drawer.
● Forcing it open mid cycle may cause damage or injury.
● If the drawer is not restarted within seven minutes it will
sound intermittently until it is restarted.
Delay start
Press and hold to set the delay start time. Each tone
indicates a 1h delay (up to 12h). The delay start indicator will
light up.
● If you scroll past 12h the dishwasher will exit delay start.
To re-enter delay start follow step 1 above.
● The wash will start when the delay time is over, provided the
drawer is closed.
DD24 models only (USCA)
If drawer is not closed within 4 seconds of setting delay
start, OR If the drawer is opened after delay start has been
set (for example, to load more dishes), delay start will be
suspended.
To resume:
Press and close the drawer .
Cancel wash/delay start
Press and hold .
● If there is any water in the drawer, it will automatically
drain before the dishwasher turns off.
Wash program indicators
If lit:
The wash program has been selected.
Lock indicator
If lit:
Keylock or childlock is activated.
Wash modifier indicators
If lit:
The wash modifier has been selected. The
wash program length and temperature will
be modified accordingly.
Delay start indicator
If lit:
Delay start is set. The wash program will
start after the selected time delay (1-12h)
3
Rotating Spray arm
Check spray arm(s) are
mounted correctly and
can rotate fully around
Check the spray arm is
mounted correctly by
physically rotating it
around with your hand.
Before a wash, ensure there
are no items blocking the
spray arm(s) from rotating.
Control Panel
ABC
12
3
4
C
NZ AU US CA GB IE
DISHDRAWERTM DISHWASHER
QUICK START GUIDE
Add detergent
Fill the detergent dispenser (A) with
powdered detergent and close the
dispenser door.
IMPORTANT!
Do not place liquid detergent or
tablets in the detergent dispenser.
If using a tablet or gel pouch, place
it in the cutlery basket (B) or at the
edge of the base rack
(see user guide for details).
Check rinse aid
If the indicator on its plug (C) glows
bright red, refill the rinse aid
dispenser (D) with liquid rinse aid.
Make sure you then refit the rinse
aid plug back into its original
position, by rotating the plug back
into an upright position.
WASH PROGRAM DESCRIPTION
Heavy Heavily soiled pots, pans and dishes.
Medium Dishes that are quite heavily soiled or food soils that have
been left to dry overnight.
Eco
(default setting)
Normally soiled dishes for optimum water and energy usage.
The US/Canada Energy Guide is based on this program.
Fast Lightly soiled dishes.
Delicate Lightly soiled and heat sensitive crockery.
Rinse Prevents odours and soils from drying on dishes.
DOS AND DON’TS OF LOADING
PREFERENCE OPTIONS
FOR MORE INFORMATION
DURING AND AFTER THE WASH
During the wash the button on the dishwasher door will be illuminated.
At the end of the wash the dishwasher will beep six times and the button will stop being illuminated.
You may notice the following noises at the end of the wash. These are all part of normal operation:
● Both drawers may be draining simultaneously.
● The drying fan may continue to run after a wash program has finished for a set time or until the drawer is opened.
The fan assists with drying and uses negligible amounts of energy.
For best drying results, we recommend unloading the dishes within a few hours after a wash program has finished.
A neatly arranged load with evenly
spaced dishes helps wash performance.
Sharp or pointed items must be placed
horizontally or with sharp edges/points
facing down to avoid risk of injury.
Overcrowding reduces wash
performance.
Protruding items will stop the
internal lid of the dishwasher from
sealing properly, which could result
in a service call.
Ensure there is enough space between
plates. Mix spoons, knives and forks
within the cutlery basket to prevent
them from nesting.
If plates and cutlery are nesting,
they are less likely to be cleaned
well.
Ensure that water reaches all
items on the racks. Dishware is blocking water from
reaching items on the racks.
You can change the setting of these options to suit your preferences or circumstances. We recommend selecting the most suitable
settings before you start using your dishwasher.
OPTION RINSE AID WATER SOFTENER
(SOME MODELS ONLY)
OPEN DRAWER
AUTO POWER-ON
(SUITABLE AS A
SABBATH OPTION)
TURN TONES OFF CLOSED DRAWER
AUTOLOCK
What
does
it do?
Regulates the amount
of rinse aid dispensed.
Reduce this setting if
there is excess foam after
a wash. Increase this
setting if dishes are wet
or streaky after a wash.
Refer to the ‘Water
softener’ section of
the ‘User guide’ for
details.
Your dishwasher
is factory-set to
automatically power
on for 30 seconds
whenever you open
the drawer.
You can turn this
setting off.
This turns all
tones off except
for fault alerts.
When this setting is on,
the drawer will automatically
lock 30 seconds after it’s
closed.
It can then be unlocked
by knocking once on the
dishwasher door. Useful in
boats or motor homes.
For detailed information on the
features of your dishwasher
For warranty information
If you…
● have any questions or comments
● need a Fisher & Paykel authorized
technician to service your product
● need replacement parts or accessories
● want to register your product
see your ‘User guide’
see your ‘Service and warranty’ booklet
or contact us via our website:
www.fisherpaykel.com
How to change the setting of an option
1CHECK
Check that there is no wash underway, then open the drawer.
2ENTER MENU
To enter the menu: Press and hold the and together for four seconds.
● You are now in the Rinse aid option of the preference options menu.
● To change the Rinse aid setting, go to step 4 now.
3SCROLL TO OPTION
Press to scroll to the next option. The wash modifier indicators will display which option is selected (see table below).
When you have scrolled to the end of the sequence, the menu will start again with Rinse aid.
4CHANGE SETTING
Press to change the setting within an option.
The wash program indicators will display which setting is selected (see table below).
5SAVE SETTING & QUIT MENU
Press to save the new setting and quit the preference options menu.
Double models only:
You can use either drawer to change the settings. Changing the settings in one tub will set your preferences for the whole dishwasher.
591379 A 08.17
OPTION RINSE AID WATER SOFTENER
(SOME MODELS ONLY)
OPEN DRAWER
AUTO POWER-ON
(SUITABLE AS A
SABBATH OPTION)
TONES AT END
OF WASH
CLOSED DRAWER
AUTOLOCK
Which option
am I in?
Possible
settings
0 to 5 (max) 0 to 5 (max) On or Off On or Off On or Off
Example 4 indicators lit = setting 4
1 indicator lit = setting 1
On
Off

Other manuals for DishDrawer DD60DI9

2

This manual suits for next models

12

Other Fisher & Paykel Dishwasher manuals

Fisher & Paykel DishDrawer DD603 PREFINISHED User manual

Fisher & Paykel

Fisher & Paykel DishDrawer DD603 PREFINISHED User manual

Fisher & Paykel DishDrawer DD603 PREFINISHED User manual

Fisher & Paykel

Fisher & Paykel DishDrawer DD603 PREFINISHED User manual

Fisher & Paykel DW60 Mounting instructions

Fisher & Paykel

Fisher & Paykel DW60 Mounting instructions

Fisher & Paykel DD60SC9 User manual

Fisher & Paykel

Fisher & Paykel DD60SC9 User manual

Fisher & Paykel DishDrawer DD60SDFHTX6 User manual

Fisher & Paykel

Fisher & Paykel DishDrawer DD60SDFHTX6 User manual

Fisher & Paykel DOUBLE DISHDRAWER DD24DI User manual

Fisher & Paykel

Fisher & Paykel DOUBLE DISHDRAWER DD24DI User manual

Fisher & Paykel DISHDRAWER DD60SHTI9 User manual

Fisher & Paykel

Fisher & Paykel DISHDRAWER DD60SHTI9 User manual

Fisher & Paykel DishDrawer DD24SHTI7 User manual

Fisher & Paykel

Fisher & Paykel DishDrawer DD24SHTI7 User manual

Fisher & Paykel DishDrawer DS605 User manual

Fisher & Paykel

Fisher & Paykel DishDrawer DS605 User manual

Fisher & Paykel DishDrawer DD60S Series User manual

Fisher & Paykel

Fisher & Paykel DishDrawer DD60S Series User manual

Fisher & Paykel DishDrawer DD90STI2 User manual

Fisher & Paykel

Fisher & Paykel DishDrawer DD90STI2 User manual

Fisher & Paykel DD60SLI7 User manual

Fisher & Paykel

Fisher & Paykel DD60SLI7 User manual

Fisher & Paykel DishDrawer DD603 PREFINISHED User manual

Fisher & Paykel

Fisher & Paykel DishDrawer DD603 PREFINISHED User manual

Fisher & Paykel DW60 User manual

Fisher & Paykel

Fisher & Paykel DW60 User manual

Fisher & Paykel DD60SHTI7 User manual

Fisher & Paykel

Fisher & Paykel DD60SHTI7 User manual

Fisher & Paykel DW60FC4W1 User manual

Fisher & Paykel

Fisher & Paykel DW60FC4W1 User manual

Fisher & Paykel DishDrawer DD603HDishDrawer DD603I User manual

Fisher & Paykel

Fisher & Paykel DishDrawer DD603HDishDrawer DD603I User manual

Fisher & Paykel DishDrawer DD605I Operating instructions

Fisher & Paykel

Fisher & Paykel DishDrawer DD605I Operating instructions

Fisher & Paykel DD24STX6HI1 User manual

Fisher & Paykel

Fisher & Paykel DD24STX6HI1 User manual

Fisher & Paykel DD24D 7 User manual

Fisher & Paykel

Fisher & Paykel DD24D 7 User manual

Fisher & Paykel DD60SDFHX7 User manual

Fisher & Paykel

Fisher & Paykel DD60SDFHX7 User manual

Fisher & Paykel DD60SHTLI7 User manual

Fisher & Paykel

Fisher & Paykel DD60SHTLI7 User manual

Fisher & Paykel DISHDRAWER DD24STI9 User manual

Fisher & Paykel

Fisher & Paykel DISHDRAWER DD24STI9 User manual

Fisher & Paykel DOUBLE DISHDRAWER DD60DDFHB9 User manual

Fisher & Paykel

Fisher & Paykel DOUBLE DISHDRAWER DD60DDFHB9 User manual

Popular Dishwasher manuals by other brands

Bosch SMS2ITI11E user manual

Bosch

Bosch SMS2ITI11E user manual

Siemens SN67ZX86DM INFORMATION FOR USE

Siemens

Siemens SN67ZX86DM INFORMATION FOR USE

GE GHDA690P owner's manual

GE

GE GHDA690P owner's manual

Gaggenau DF 250 operating instructions

Gaggenau

Gaggenau DF 250 operating instructions

Bosch 100 Plus Series Quick start and safety guide

Bosch

Bosch 100 Plus Series Quick start and safety guide

Sharp QW-NS24F44DI-FR user manual

Sharp

Sharp QW-NS24F44DI-FR user manual

Bosch SPS4HMI61E user manual

Bosch

Bosch SPS4HMI61E user manual

BALAY 3VW560BD - annexe 1 instructions

BALAY

BALAY 3VW560BD - annexe 1 instructions

Zanussi ZDT 5053 Instruction book

Zanussi

Zanussi ZDT 5053 Instruction book

Grundig 6466 I user manual

Grundig

Grundig 6466 I user manual

Saba LVSLS11C45GZ17S manual

Saba

Saba LVSLS11C45GZ17S manual

Maytag MDB6759AWQ - 24 Inch Fully Integrated... User instructions

Maytag

Maytag MDB6759AWQ - 24 Inch Fully Integrated... User instructions

Russell Hobbs RHTTDW6 instruction manual

Russell Hobbs

Russell Hobbs RHTTDW6 instruction manual

Hotpoint LST 114 operating instructions

Hotpoint

Hotpoint LST 114 operating instructions

Caple Di627 instruction manual

Caple

Caple Di627 instruction manual

Hotpoint Ariston PFT 834 Operating	 instruction

Hotpoint Ariston

Hotpoint Ariston PFT 834 Operating instruction

Tesla WD630M user manual

Tesla

Tesla WD630M user manual

Gorenje GDV641XL user manual

Gorenje

Gorenje GDV641XL user manual

manuals.online logo
manuals.online logoBrands
  • About & Mission
  • Contact us
  • Privacy Policy
  • Terms and Conditions

Copyright 2025 Manuals.Online. All Rights Reserved.