Fisker Karma User manual

Touch-Screen User Manual
© 2011 Fisker Automotive, Inc.
All rights reserved. Information contained in this document is based on the latest information available at the time of printing and
is subject to the copyright and other intellectual property rights of Fisker Automotive, Inc. (Fisker), its affiliated companies and its
licensors. All rights are reserved to make changes at any time without notice. No part of this document may be reproduced, stored
in a retrieval system, or transmitted in any form or by any means, electronic, mechanical, photocopying, recording, or otherwise,
nor may these materials be modified or reposted to other sites, without the prior expressed written permission of the publisher.
Touch-screen user manual.book Page 2 Tuesday, September 20, 2011 3:03 PM

Touch-screen user manual.book Page 3 Tuesday, September 20, 2011 3:03 PM

Document Number: C1810ASD0043.01 (July 2011)
©2011 Fisker Automotive, Inc. All rights reserved. 1
Touch-Screen User Manual
Introduction................................................. 2
Using the Touch-Screen ............................. 3
Climate Control ........................................... 6
Audio........................................................... 7
Phone........................................................ 16
Navigation ................................................. 20
System ...................................................... 23
Touch-screen user manual.book Page 1 Tuesday, September 20, 2011 3:03 PM

Introduction
2
Introduction
Touch-Screen User ManualIntroduction
ABOUT THIS MANUAL
This manual provides all the information
needed to gain the maximum benefit from
the controls and features that are accessed
through the touch-screen.
The information is divided into sections.
Each section deals with a system, i.e.
Navigation and each section provides
information on a specific device or feature
that the user, will need to operate.
Each section is listed on the contents page,
for easy access.
Please read carefully and familiarise
yourself with all the systems before driving.
Keep this manual in your vehicle as a
reference for the safe and enjoyable use of
your vehicle. Should you resell your car,
leave this manual with it for the next owner.
SYMBOLS GLOSSARY
The following symbols used within this
manual call your attention to specific types
of information.
WARNING: Indicates either an
instruction which must be followed
precisely, or information that should be
considered with great care in order to avoid
the possibility of personal injury or injury to
others.
CAUTION: Indicates either an
instruction which must be followed
precisely, or information that should be
considered with great care in order to avoid
the possibility of damage to your vehicle.
NOTES ABOUT THIS MANUAL
All specifications and descriptions are
accurate at the time of printing. Because
improvement is a constant goal at Fisker
Automotive, we reserve the right to make
changes at any time, without notice and
without obligation.
Copyright © 2011 Fisker Automotive, Inc.
All rights reserved.
Touch-screen user manual.book Page 2 Tuesday, September 20, 2011 3:03 PM

Using the Touch-Screen
3
Using the Touch-Screen
OVERVIEW
1. Compass
2. Current operating mode
3. Secondary time zone
4. Primary time zone
5. Climate
6. Audio
7. Phone
8. Navigation
9. System
10. Volume
11. Left-hand front heated seat
12. Windshield defogger
13. Rear window heater
14. Electronic Stability Control (ESC)
15. Park Distance Control (PDC)
16. Exterior mirror fold
17. Right-hand front heated seat
Touch-screen user manual.book Page 3 Tuesday, September 20, 2011 3:03 PM

Using the Touch-Screen
4
Using the Touch-Screen
USING THE TOUCH-SCREEN
WARNING: Only operate, adjust or
view the touch-screen when it is safe
to do so. If necessary, stop the vehicle to
make changes, or operate features of the
touch-screen system.
The touch-screen can be operated
whenever the vehicle recognizes a key fob
within the vehicle.
Immediately after start-up, the touchscreen
will display a message warning you off the
dangers of operating the touchscreen while
the vehicle is in motion.
You must touch AGREE to confirm you are
aware of these dangers before you can
operate any of the touch-screen features.
The touch-screen has two main areas of
control. Icons down the left-hand side
which control features of the touch-screen,
and icons along the bottom which control
features on the vehicle.
To activate a feature, touch its respective
icon with your finger. Ensure that only one
finger at a time is in contact with the screen,
to prevent incorrect entries.
Note: A short, light press is sufficient to
operate functions. Do not use excessive
pressure.
Touch-screen features
WARNING: For your safety, ensure
that you do not become distracted
from the task of driving, through use of any
of these systems.
Touching the icon for a feature will change
the main display to that features screen and
give you access to additional options.
Below is a list of the top level features for
the system:
Climate
Audio
Radio
Satellite Radio
USB Audio
Bluetooth Audio
AUX (Auxiliary) Input
Phone
Navigation
System
Diagnostics
Settings
Solar energy
Energy flow
Touch-screen user manual.book Page 4 Tuesday, September 20, 2011 3:03 PM

Using the Touch-Screen
5
The following pages explain in detail how to
use all of the touch-screen features except
the Climate Control system. For detailed
information on the Climate control system,
please refer to the “Owner’s Manual”.
Note: For your convenience, you can
change between the touch-screen features
using the voice command system.
Care points
To ensure that the touch-screen continues
to operate correctly, some basic care points
are listed below.
•Clean only with a lightly moistened soft
cloth.
•Do not use chemical agents, or
domestic cleaners, to clean any part of
the touch-screen or its surround.
•Do not allow any sharp, hard or abrasive
objects to come into contact with the
touch-screen.
•Where possible, try to park the vehicle
so as to avoid exposing the touchscreen
to direct sunlight for long periods.
Touch-screen user manual.book Page 5 Tuesday, September 20, 2011 3:03 PM

Climate Control
6
Climate Control
Climate Control
CLIMATE CONTROL
1. Temperature/blower speed adjustment
Touch and drag the indicators to
increase or decrease the setting.
2. Interior temperature zone settings
3. Outside air temperature
4. OFF
Turns off all heating and ventilation.
5. AUTO climate
Automatically adjusts the heating and
ventilation to maintain the temperature
selected using the temperature
adjustment slider.
6. Dual zone temperature
Select DUAL mode to be able to
independently adjust the temperature
for driver and passenger side of the
cabin.
7. Blower speed
Touch to adjust blower speed
8. Air conditioning
Touch to switch on/off air conditioning
9. Heating
Touch to switch on heating
10. Air distribution
•Face level vents
•Face and foot level vents
•Windshield and foot level vent
•Foot level vents
11. Automatic air recirculation
12. Manual air recirculation
13. Temperature option
Touch and hold to change between
temperature units.
Touch-screen user manual.book Page 6 Tuesday, September 20, 2011 3:03 PM

Audio
7
Audio
TUNER
1. Tuner
2. Satellite radio
3. USB connected audio device
4. Bluetooth connected audio device
5. Auxiliary input device
6. AM / FM radio auto store
7. Manual/seek - frequency increase
8. Manual/seek - frequency decrease
9. Tuner display
10. Frequency wave
Touch and drag to change the
frequency.
11. Presets
12. Choose preset bank
Three banks each with six presets.
13. Auto store
14. Scan button
15. Sound settings
•Bass
•Treble
•Fade
•Balance
Touch-screen user manual.book Page 7 Tuesday, September 20, 2011 3:03 PM

Audio
8
Audio
AM/FM TUNER
Touch the TUNER icon to access the
AM/FM tuner.
Auto storing stations
The tuner has two wavebands; AM
(Amplitude Modulation) and FM (Frequency
Modulation).
AM is a medium frequency waveband and
has a range from 535 kHz to 1720 kHz.
FM is a very high frequency waveband with
a range from 88 MHz to 108 MHz.
Select required frequency band, AM or FM.
Touch and hold the AM icon
or
touch and hold the FM icon to
automatically store the eighteen
radio stations with the strongest signals.
Manually storing stations
To manually store a radio station,
search for the station using the seek
(up or down) icons.
When the desired station is found,
touch and hold one of the preset
icons.
Your chosen station will be stored on that
preset overwriting any previously stored
station.
It is also possible to manually search for a
radio station by touching and dragging the
marker on the frequency scale to manually
set the radio frequency.
Choosing a preset station
To choose a preset station, simply touch the
respective preset icon.
A total of eighteen preset stations are
available in three banks of six. To
change between the banks of preset
stations, touch the bank icon.
Touch and hold on FM icon, this will
store the strongest stations into 18
presets button. There are a total of three
auto store banks A1, A2, and A3. By
pressing on that button you can go to the
next bank.
Touch the SCAN button to scan the
band twice.
Touch-screen user manual.book Page 8 Tuesday, September 20, 2011 3:03 PM

Audio
9
AUDIO SETTINGS
Adjusting the volume
Touch the AUDIO SETTINGS button
on the touch-screen to access the
audio settings.
To adjust the volume of the audio system,
touch the + or - icons. Each touch will
adjust the volume by one increment
between 0(mute) and 30 (MAX).
The current audio setting will be briefly
shown overlaid in the center of the screen.
Adjusting the sound settings
The following sound settings can be
adjusted:
•Bass
•Treble
•Fader
•Balance
Touch the AUDIO SETTINGS button
on the touch-screen to access the
sound settings.
Slide the marker of the scale to adjust the
setting to the required level.
Touch-screen user manual.book Page 9 Tuesday, September 20, 2011 3:03 PM

Audio
10
Audio
TUNER SETTINGS
Touch the TUNER SETTINGS button
on the touch-screen to access the
tuner settings.
Set the RDS option to ON or OFF as
required.
Radio Data System (RDS) is a system which
allows digital data to be sent to radio
receivers at the same time as the FM audio
signal.
On the FM waveband, RDS enables the
tuner to receive the radio station name,
programme name and programme
information. RDS also allows the audio
system to automatically re-tune to stations
that are linked to the same network if that
network allows this.
Touch-screen user manual.book Page 10 Tuesday, September 20, 2011 3:03 PM

Audio
11
SATELLITE RADIO
Satellite radio is a direct broadcast radio
service, which provides digitally encoded
audio signals. The signals can be received
directly by the satellite tuner in your vehicle.
As a digital signal is used, the audio system
is able to provide radio broadcasts with the
sound quality and clarity of CD playback.
Touch the SAT button on the
touch-screen.
Activation
As the satellite radio signals are encoded, a
subscription to the Broadcast operator
(SIRIUS) is required to receive the signals.
To subscribe, call the number shown on the
touch-screen and quote the Electronic
Subscriber Number (ESN) for your audio
system. The ESN can be viewed by
touching the icon for the satellite radio
settings.
Presets
A total of eighteen preset stations are
available in three banks of six. To
change between the banks of preset
stations, touch the bank icon.
There are a total of three auto store banks
SAT1, SAT2, and SAT3. By pressing on that
button you can go to the next bank.
Category button
To select a radio station by category,
touch the CATEGORY icon to
display the list of available catergories.
Touch the catergory scroll (up or
down) icons to scroll through list of
available catergories. Touch a catergory to
display the associated channels. The
selected catergory will be highlighted.
Touch the channel scroll buttons to scroll
through the list of available channels.
Touch the desired channel to listen to the
channel. The selected channel will be
highlighted.
If you are listening to a channel in one
catergory and navigate to an
alternative catergory, the current catergory
playing will be identified with an icon.
Note: Satellite radio differs from the FM
tuner in that tuning is NOT instantaneous.
The digital signal must be decoded. This
process can take several seconds to
achieve.
11
3
Bl
oom
b
ert
R
ew
i
n
d
Bl
oom
b
erg
R
a
di
o
S
S
S
S
S
S
E
ETTINGS
S
S
E
S
S
S
ET
ETTI
S
S
S
S
SOUND
D
S
Bl
oom
b
erg
R
a
dio
CHCH
CAT Channel
Channel
SCAN
Electric Area
BPM
Howard 100
ESPN XtraSpice RadioThe Loft
123
45
6
SW
1
1
1
2
2
2
:
:
:
45
45
45
AM
AM
AM
MAR 01, 2011 .
04
04
04
:
:
:
45
45
45
PM
PM
PM
Tok yo
Tok yo
Tok yo
.
.
SIRIUS SATELLITE RADIO
FOM0170
CATCAT
CHANNELCATEGORY
C
HANNEL
C
ATE
GO
RY
More Sports
Conservative Talk
Financial News
US News
Political Talk
NEWS/TALK
International News
Public Radio
Liberal Talk
Unltered Political Ta
SW
1
1
1
2
2
2
:
:
:
45
45
45
AM
AM
AM
MAR 01, 2011 .
04
04
04
:
:
:
45
45
45
PM
PM
PM
Tok yo
Tok yo
Tok yo
.
.
SATELLITE
FOM0171
Touch-screen user manual.book Page 11 Tuesday, September 20, 2011 3:03 PM
Audio
12
Audio
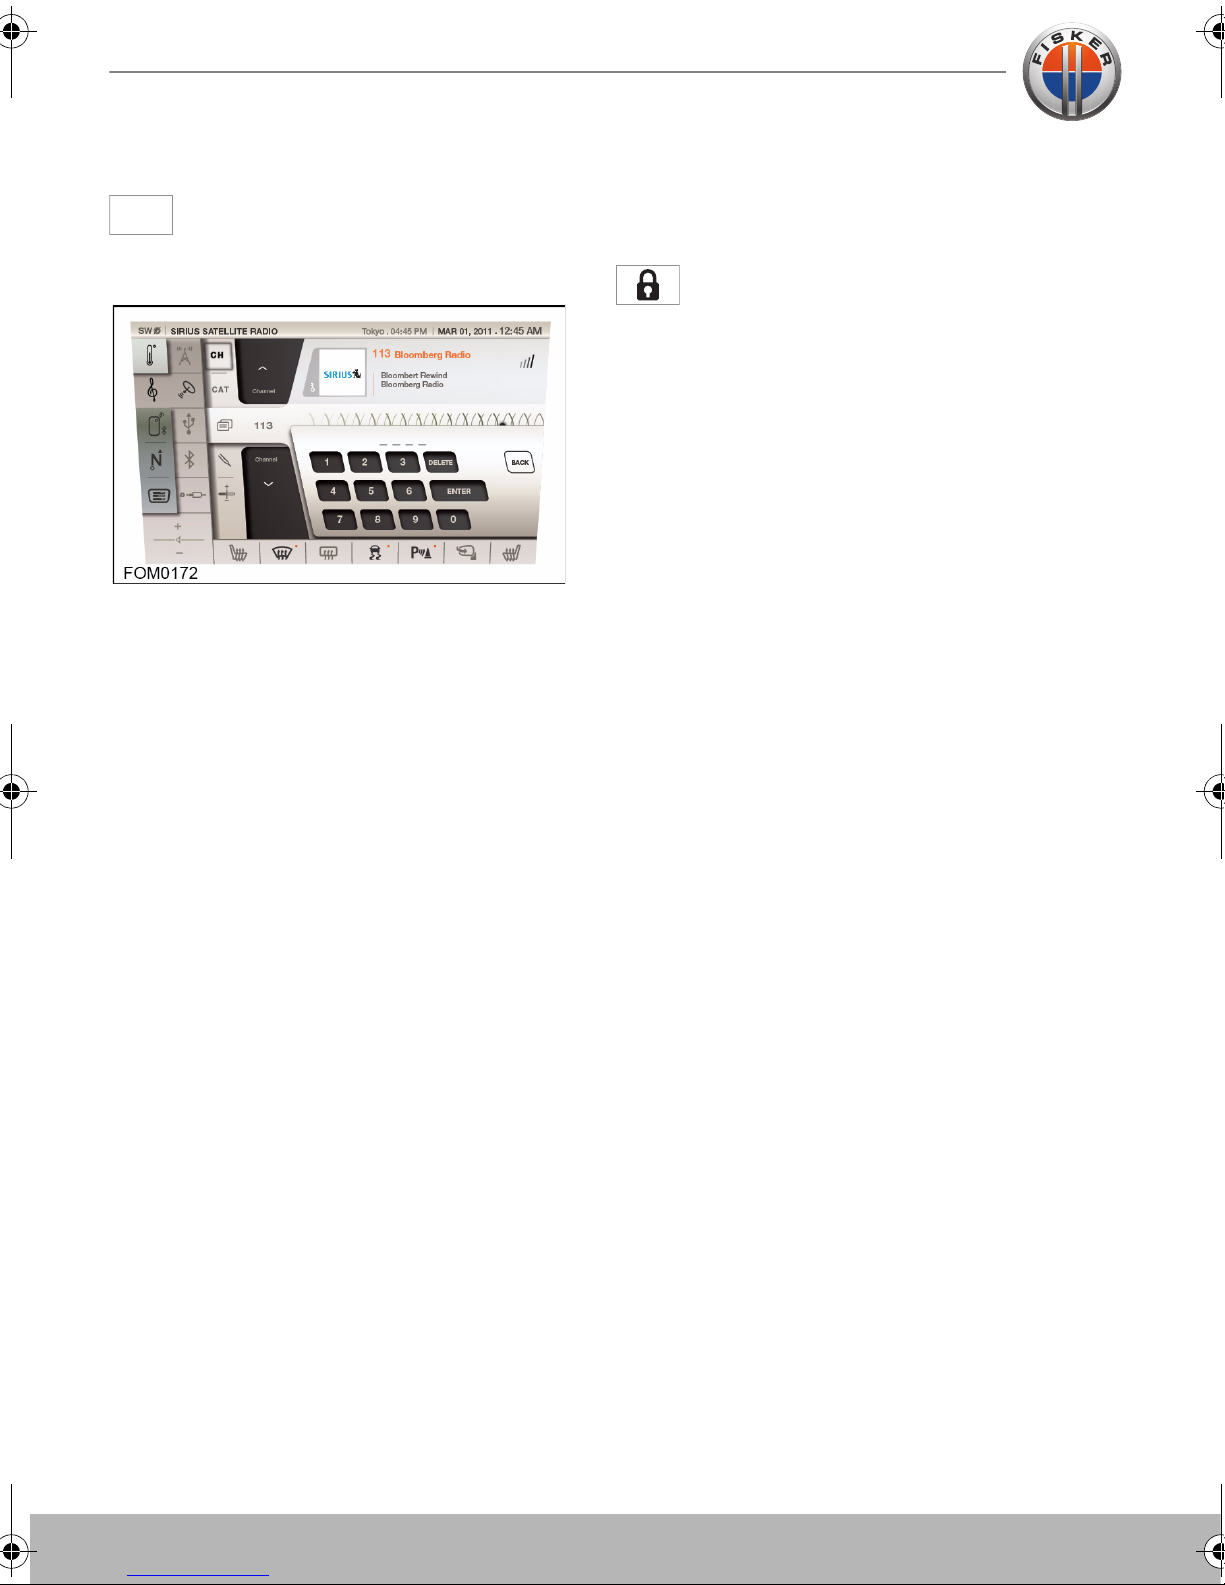
Direct channel input
To select a channel by entering the
channel number, touch the channel
icon.
Enter the channel number using the
numeric keypad displayed.
Note: It must be noted that satellite radio
differs from the FM tuner in that tuning is
NOT instantaneous. The digital signal must
be decoded. This process can take several
seconds to achieve.
Note: In the event that the selected channel
has been removed by the Broadcast
operator, then a message is shown and the
previous playing channel is reverted to. This
may occur if the broadcast operator
changes the active channel whilst the
vehicle is powered. The channel playlist is
updated each time the system is powered
up, therefore the next time the system is
powered up, the channel playlist will be
updated thereby preventing the invalid
channel from being selected.
Parental lock
Select a channel, either using the catergory
menu or the direct channel input.
To lock the channel, press the LOCK
button and enter the parental lock
code. To unlock, select the channel, press
the LOCK button and enter the parental
lock code again.
Loss of signal
Loss of Signal is displayed if no satellite
signal is being received.
Ensure that the vehicle is not in an enclosed
space, such as an underground car park.
CHCH
Touch-screen user manual.book Page 12 Tuesday, September 20, 2011 3:03 PM

Audio
13
USB MODE
A USB socket is located in the storage
compartment and can be used for
connecting a USB mass storage device
such as a memory stick to the audio
system, you can use the touch-screen to
search and operate the device.
The audio system support the following file
types:
•MP3
•WMA
•AAC
Note: It is recommended that only
compatible music files are loaded on the
USB device. This will speed up the
automatic searching of files.
Note: Some portable media players have
their own file system that is not supported
by this system. To use your portable media
player, you must set it to Mass Storage
Device mode (see the device
manufacturer's information for further
information). Only music that has been
added to the device in this mode can be
played via the vehicle's audio system.
You can connect an auxiliary device and a
USB device simultaneously to the audio
system and switch between them using the
touch-screen. The device docked first will
remain the active device until you choose to
change. If, after changing to the
newly-docked device, you change back to
the first device, play will resume at the point
you left it.
Note: You cannot use a USB hub to connect
more than one USB device to the audio
system.
Note: Any internal batteries fitted to your
device will be charged through the USB
port.
Insert the USB device into the USB socket
in the storage compartment.
The touch-screen will display USB
mode if music files are present on the
USB device. If the screen does not change,
touch the USB icon.
Touch-screen user manual.book Page 13 Tuesday, September 20, 2011 3:03 PM

Audio
14
Audio
1. Track information
2. Browser
3. Next/previous track
4. Fast forward/reverse
5. Play/Pause
6. Repeat
7. Shuffle
8. Audio settings
The audio system will begin to play the first
available file on the root of the USB device
in alphabetical order followed by files within
folders.
Press the browser button to list all
compatible track files and folders on the
USB device.
Touch the first track in the playlist, to
commence play. When the selected song is
finished, the media player will play the next
track on the album that the song was taken
from.
At the end of the album, the media player
will start at the beginning of the next folder.
Touch-screen user manual.book Page 14 Tuesday, September 20, 2011 3:03 PM

Audio
15
BLUETOOTH
You can connect a portable media player or
mobile phone with bluetooth capability to
the vehicle’s audio system, see the phone
section for further information.
Ensure that a device is paired to the
vehicle and touch the BT AUDIO
button on the touch-screen.
Use the device controls to control playback.
AUXILIARY MODE
A 3.5 mm auxiliary socket is located in the
storage compartment and can be used for
connecting a portable media player to the
audio system.
WARNING: Ensure that any portable
media players are stored securely
whilst the vehicle is in motion. Any loose
objects can present a serious hazard during
sudden manoeuvres, emergency braking, or
an accident.
Insert the 3.5 mm plug into the
auxiliary socket in the storage
compartment and touch the AUX icon.
Use the media player controls to control
playback.
Note: Any internal battery fitted to the
device will not be charged by the auxiliary
socket while it is connected.
Touch-screen user manual.book Page 15 Tuesday, September 20, 2011 3:03 PM

Phone
16
Phone
Phone
PAIRING A PHONE
Prior to pairing you phone, ensure that:
1. You phone is operating using the latest
software available.
2. Your phone meets the following
minimum specification:
•Bluetooth 2.0 + Enhanced Data Rate
(EDR);
•Advanced Audio Distribution Profile
(A2DP) 1.2;
•Hands Free Profile (HFP) 1.5;
•Audio/Video Remote Control Profile
(AVRCP) 1.0;
•Phone Book Access Profile (PBAP)
1.0.
Note: Please see your Fisker Retailer for
more information on compatible
phones.
Note: Your Service Provider and/or
Service Plan may disable some of the
features of a compatible phone.
Select the PHONE menu.
The PHONE menu can also be accessed
from the switch on the steering wheel.
Touch the CONNECT icon.
Ensure your Bluetooth enabled
phone is in search mode.
Touch the ADD PHONE icon.
Select Fisker_Karma displayed
among the devices on your phone. You will
be prompted to enter a PIN (Personal
Identification Number).
Enter the number displayed on your
vehicle's touch-screen into your phone.
Providing the vehicle and phone establish a
connection, your phone will be displayed on
the touch-screen.
Touch the back icon to close the pairing
menu.
Your phone is now paired to the vehicle.
If more than one phone is paired to
the vehicle, you can set the phone
priority using the priority icon.
Once your phone is paired to the vehicle,
you will be asked if you wish to download
your address book to the vehicle.
Touch-screen user manual.book Page 16 Tuesday, September 20, 2011 3:03 PM

Phone
17
CALLING A CONTACT USING THE
ADDRESS BOOK
Select the PHONE menu.
The PHONE menu can also be accessed
from the switch on the steering wheel.
Touch the ADDRESS BOOK icon.
Your address book will now be
displayed.
Select the entry required from the list and
touch the call icon. Your contact will now be
called.
Select the entry required from the list
and touch the CALL icon. Your
contact will now be called.
To hang up the call, touch the CALL
END icon on the touch-screen or
touch the phone switch on the steering
wheel.
DIALLING A NUMBER
To initiate a call to a number not contained
in the address book:
Select the PHONE menu.
The PHONE menu can also be accessed
from the switch on the steering wheel.
Enter the desired number on the key pad.
Touch the CALL icon, your number
will now be called.
To hang up the call. Touch the CALL
END icon on the touch-screen or,
alternatively, touch the phone switch on the
steering wheel.
Touch-screen user manual.book Page 17 Tuesday, September 20, 2011 3:03 PM

Phone
18
Phone
REDIALLING A NUMBER
To redial the last dialled number:
Select the PHONE menu.
The PHONE menu can also be accessed
from the switch on the steering wheel.
Touch the REDIAL button and the
number will be automatically dialled.
CALL HISTORY
To view the call history:
Select the PHONE menu.
The PHONE menu can also be accessed
from the switch on the steering wheel.
Touch the CALL HISTORY icon to
display a list of received calls, dialled
calls and missed calls.
Select a contact from any of the list
and touch the CALL icon, your
number will now be called.
REDIALREDIAL
Call
History
Call
History
Touch-screen user manual.book Page 18 Tuesday, September 20, 2011 3:03 PM
Table of contents
Popular Automobile Electronic manuals by other brands

BackStopper
BackStopper CA-5009.2 installation instructions

Intraphex
Intraphex MRB-UNO1 installation manual

CrimeStopper
CrimeStopper CS-880 OEM user manual

Waeco
Waeco MAGIC WATCH MWE-850-4XXL Installation and operating manual

Car Solutions
Car Solutions PEUGEOT PAS TD 208 user manual

Audiotechnik Dietz
Audiotechnik Dietz 66103 instruction manual


