FiT MD41W0 User manual

DIGITAL AUTOMATIC
BLOOD PRESSURE MONITOR
USER MANUAL
MODEL : MD41W0/MD41W1

1
INTRODUCTION
Thank you for purchasing this blood pressure monitor. Please read this manual thoroughly before use. Contact
your physician if you have any queries about your blood pressure.
This fully automatic instrument utilizes the non-invasive oscillometric method, which detects your blood
movement through you brachial artery, for measuring your blood pressure and pulse rate, and the result will
display on a digital panel. Without using a stethoscope, you can get the readings promptly and easily.
This device conforms to European Council Directive 93/42/EEC concerning medical devices. This is made
evident by the CE mark of conformity accompanies by the reference number of the designated authority.
This device complies with :
• EN ISO 81060 standard relating to non-invasive sphygmomanometers Part 1: Requirements and test methods
for non-automated measuremnt types and EN 1060 standard relating to non-invasive sphygmomanometers
Part 3: Supplementary requirements for electro-mechanical blood pressure measuring systems.
• EN 60601 standard relating to medical electrical equipment – Part 1-2: General requirements for basic safety
and essential performance and essential performance – Collateral standard: Electromagnetic compatibility –
Requirements and tests.
• EN 1060-4:2004 standard relating to non-invasive sphygmomanometers - Part 4: Test procedures to determine
the overall system accuracy of automated non-invasive sphygmomanometers.
• ISO 81060-2:2013 standard relating to non-Invasive sphygmomanometers - Part 2: Clinical validation of
automated measurement type.
• IEC 80601-2-30:2009+A1:2013 standard relating to medical electrical equipment - Part 2-30: Particular
requirements for the basic safety and essential performance of automated type non-invasive
sphygmomanometers.
Indication for Use
This device is for use by medical professional or home users. It is intended to measure the systolic and diastolic
blood pressure of an adult individual by using a non-invasive technique, in which an inflatable cuff is wrapped
around the upper arm.
2
WARNING indicates a hazardous situation which, if not avoided,
could result in death or serious injury.
• Consult your physician before starting to measure your blood pressure.
• Like any oscillometric blood pressure measurement devices, certain medical conditions can affect the
measurement accuracy, among others:
- Disorder of the cardiac rhythm
- Very low blood pressure
- Very low blood perfusion
- Patients in shock
- Diabetes
- Vessel anomalies
- People with electrical implants such as a cardiac pacemaker
- Women who are pregnant
- Patient who are pre-eclamptic
- Patient motion during measurement
Due to their condition the oscillometric measurement method can produce incorrect readings. This represents a
risk for your health, since values may be interpreted incorrectly. Always consult your physician to determine
what will be suitable for you.
• This product does not and is not intended to provide a medical diagnosis. Measurement results are for
reference only. Self-diagnosis and treatment, e.g. regarding medication, using measured results represents a risk
for your health. Always consult with a licensed physician for determination of appropriate medication and
dosage thereof. Follow the instructions of your physician or licensed healthcare provider.
SAFETY NOTES
WARNING
WARNING
CAUTION indicates a hazardous situation which, if not avoided,
may result in minor or moderate injury.
CAUTION

3
• Please note that technically related measuring tolerances are possible. Please see the section “TECHNICAL
SPECIFICATION”.
• Any cuff related blood pressure measurement in high repetition rates, can lead to severe measurement side
effects, e.g.
- A nerve compression with temporary wrist/ hand paralysis
- The release of an arterial or venous thrombus, which can cause a life threatening situation.
Please contact your physician about the specific risks of cuff pressure in your specific case.
• The “irregular heartbeat” function does not replace a cardiac examination, but may help to detect potential heart
rate irregularities at an early stage. Always consult your physician to determine what will be suitable for you.
• The “irregular heartbeat” function is not designed for diagnosing or treating an arrhythmic disorder. Arrhythmia
can only be ascertained by a licensed physician.
• The “WHO BLOOD PRESSURE CLASSIFICATION” chart is not intended to replace a medical diagnosis. This
chart is only for reference for different classifications of blood pressure.
• If you notice abnormal or suspicious variations in blood pressure measurements, consult your physician
immediately.
• Women who underwent a breast or axillaries lymph node removal operation should consult a physician or
licensed healthcare provider before starting blood pressure measurements.
• This device must be used in accordance to the specified ambient conditions, otherwise the accuracy of readings
might be affected. See “TECHNICAL SPECIFICATION” for details.
• Do not wrap the cuff around body parts other than your upper left arm. Misuse represents a risk to your health.
• This product is not intended for use by or on children, toddlers and infants or on persons who cannot express
their consent, e.g. persons with mental disorders or the like. Consult your physician for alternative methods of
measuring a child’s blood pressure.
• Packaging materials are a deadly hazard for children and can cause suffocation. Remove all packaging
materials immediately and keep them away from children at all times.
• This product contains small parts that may present a choking hazard to children. Keep the unit and all parts out
of reach of children.
SAFETY NOTES

4
• Proper cuff size is important for accurate measurements. Only use the device on adults who have the right
upper arm circumference for this unit. See “TECHNICAL SPECIFICATION” for suitable arm circumferences.
• Electromagnetic interference: Avoid strong electrical or electromagnetic fields in the direct vicinity of the device
(e.g. mobile phones, microwave ovens) while it is in operation, an inaccurate measurements may result. To
prevent such interference, use the unit at a sufficient distance from such devices or turn the disturbances off.
• Batteries should not be charged or reactivated by any other means. The batteries may explode.
• Take extra precaution to keep a leaking battery away from fire as there is a risk of ignition or explosion.
• In case battery fluid leaks and come into contact with your eyes or skin, do not rub and immediately rinse with
plenty of clean water and seek medical advice.
• Do not use the equipment where flammable gas (e.g. anaesthetics gas, oxygen or hydrogen) or flammable
liquid (e.g. alcohol) are present.
• Do not use any cuffs and accessories other than those explicitly recommended by the manufacturer for use with
this product. Cuffs and accessories not approved for use with this device may cause damage to your health and
to the product.
• The tubing presents a strangulation hazard. Keep this product away from children and those who require close
supervision, e.g. people with mental disorders.
• Do not drape tube around neck. This presents a strangulation hazard.
SAFETY NOTES

5
SAFETY NOTES
• This device should not be used when your arm has been wounded/ injured or when a catheter has been
inserted. Such use may result in injury.
• Remove any kind of arm jewellery or the like before taking a measurement. This could cause bruises.
• Do not place the arm cuff over heavy clothing (e.g. a jacket or sweater sleeve) as the blood pressure monitor
will not be able to take a proper measurement and there is an elevated danger of acquiring hematoma or skin
marks during the course of the measurement.
• In case the cuff does not stop inflating, interrupt the measurement by pressing the ON/OFF button and open the
cuff at once.
• In case battery fluid leaks, do not touch the battery fluid. Avoid skin contact (e.g. put on protective gloves) and
clean the battery compartment with dry cloth.
• Do not disassemble the device, it may cause damage to yourself and to the product. If you cannot fix the
problem using the “TROUBLESHOOTING” instructions, request service from your dealer.
• When applying the cuff, make sure there are no wrinkles in the cuff as this could cause bruises.
• Blood pressure measurements can lead to temporary marks on the skin at the site of the cuff placement. This is
especially the case in high repetition rates, in hypertonic patients and in patients with weak heart rates. In rare
cases a mark may persist for couple of days. Please contact your physician about these specific risks of cuff
pressure in your specific case.
• Do not exert any kind of pressure on the hose during measurement, e.g. laying your arms or any other object on
the hose. This could cause incorrect measurements.
CAUTION

6
• The blood pressure monitor is constructed by precision electronic components. Accuracy of readings and the
instrument’s service life depend on careful handling. Protect the unit against hard knocks (e.g. dropping the unit),
moisture, water, dirt, dust, chemicals, extreme hot or cold temperatures, major temperature fluctuations, direct
exposure to sunlight and heat sources which are too close (e.g. stoves, heating radiators). This may damage the
unit. The device must be stored in the specified ambient conditions. Please see section “Technical Specification”
for details.
• The device is designed and manufactured for a long service life. However it is generally recommended to have the
monitor inspected every 2 years to ensure proper functioning and accuracy. Please contact your dealer for
maintenance.
• Never immerse and/or spill water or any other liquid onto the monitor or any components, otherwise liquid may
enter it and cause damage.
• Never use rechargeable batteries. This may damage the unit.
• Replace all batteries at the same time and use batteries of the same type. Do not mix old and new batteries.
• Never attempt to repair, open and/or disassemble the unit or adjust it yourself. This may cause damage to the unit
and impair functions. If you cannot fix the problem using the “TROUBLESHOOTING” instructions, request service
from your dealer.
• Do not drop or insert any object into any openings or hoses. This may damage the unit.
• Do not press the buttons with excessive force or with pointed objects.
• Clean your device and cuff carefully only with a slightly moistened soft cloth and dry it immediately with a soft dry
cloth. Do not press.
• Do not use any aggressive solvents, cleaning agents, detergents or any other strong chemicals (e.g. thinner,
alcohol, benzene) to clean the device.
• When storing the device, make sure that no heavy objects are placed on top of it.
• Do not fold the cuff and tubing tightly. The cuff tube should not have any sharp kinks and keep it away from sharp edges.
• Leaking batteries may damage the unit. If you do not intend to use the unit for longer periods, remove the batteries
from the battery compartment before placing the device in storage.
• Used equipment, parts and batteries are not treated as ordinary household waste, and must be disposed according
to applicable local regulations for material disposal. Unlawful disposal may cause environmental pollution.
MAINTENANCE AND STORAGE

7
PART IDENTIFICATION
Button Operations
• Go to standby mode
Press button.
* The device goes to clock mode if idle for 2 min.
• Recalling average data
Press button.
• Select between different users
(User 1 / User 2 / User 3 / User 4)
Press [ < ] or [ > ] button
Air socket
Start / Stop
Button
Increase
Button
Decrease
Button Memory
Button
Air Connector Plug
Index Mark
Arm Cuff
Air Hose
DC Jack
Display
Battery Door

8
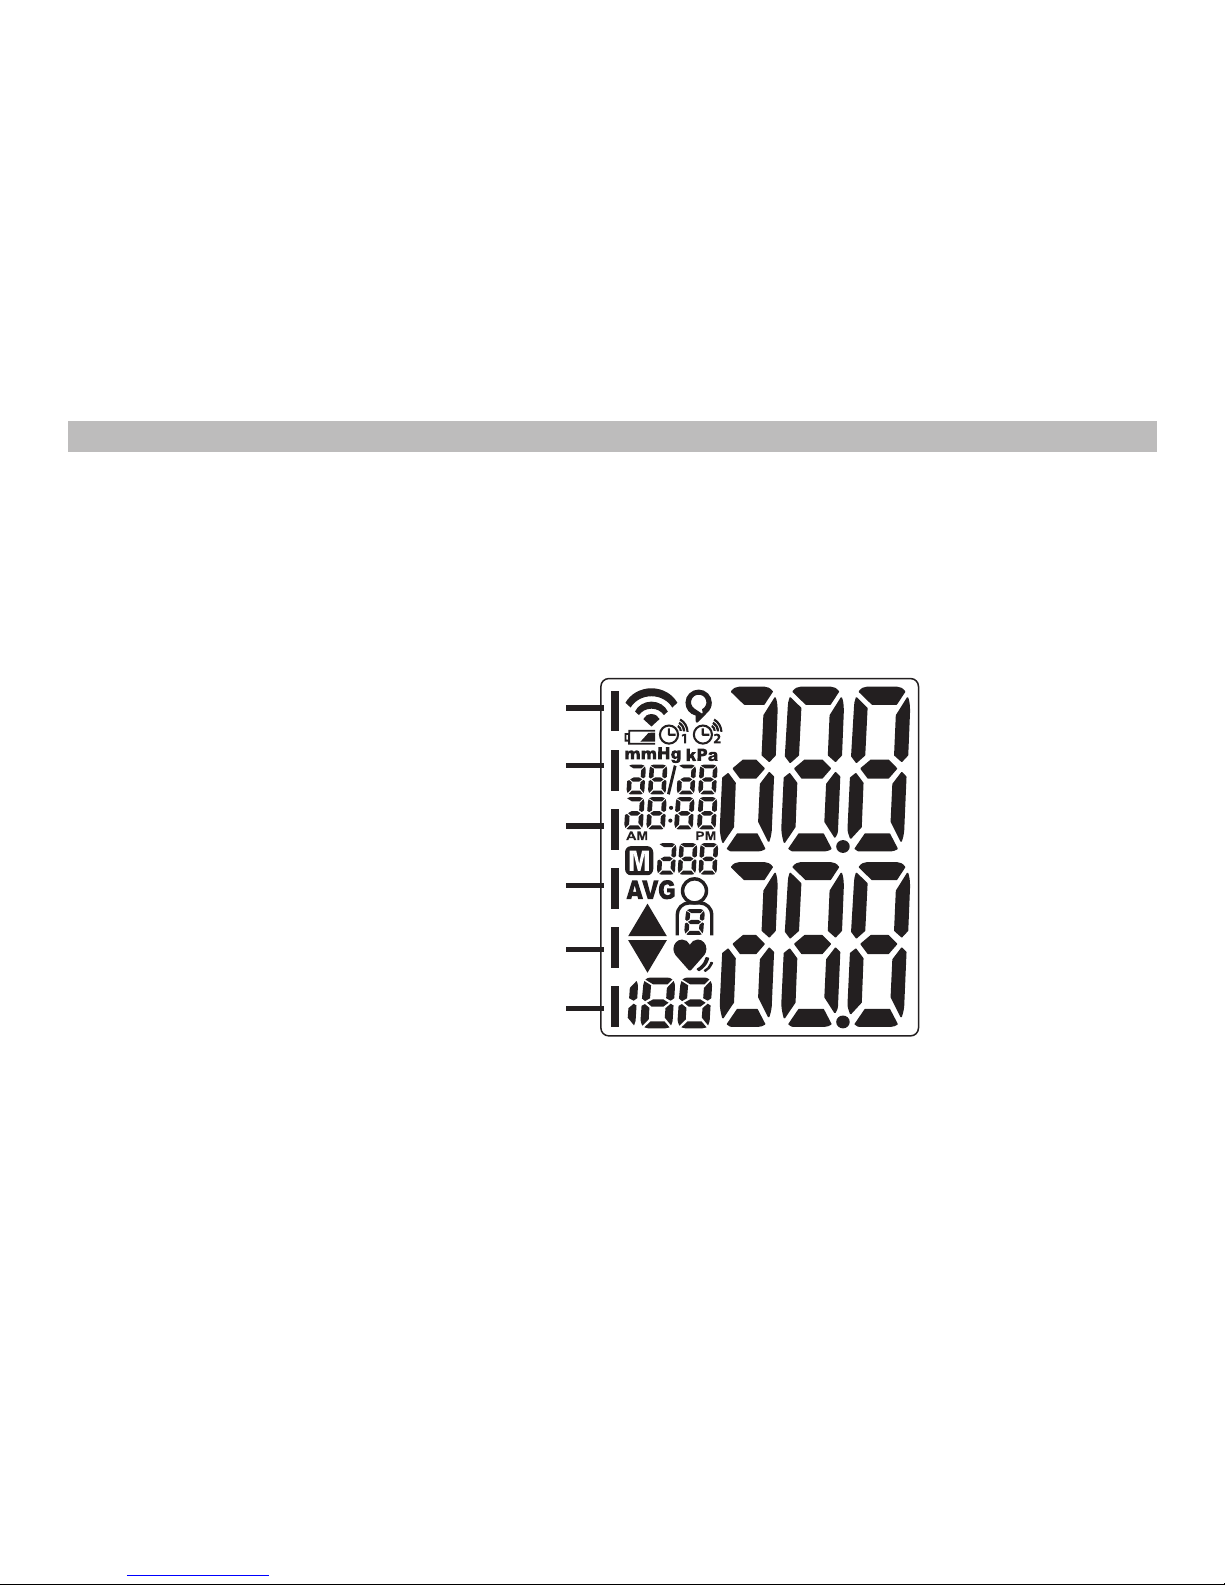
DISPLAY READINGS
Date
Time
Pressurizing USER
Releasing Air
Average of Previous
Measurement
Memory
WIFI Transmission Icon
Communicating Icon
Low Battery Indicator
Irregular Heartbeat
Indicator
Diastolic Pressure
Systolic Pressure
Pulse Rate
Severe Hypertension
Moderate Hypertension
Mild Hypertension
High Normal
Normal
Optimal
Alarm 1
Alarm 2
9
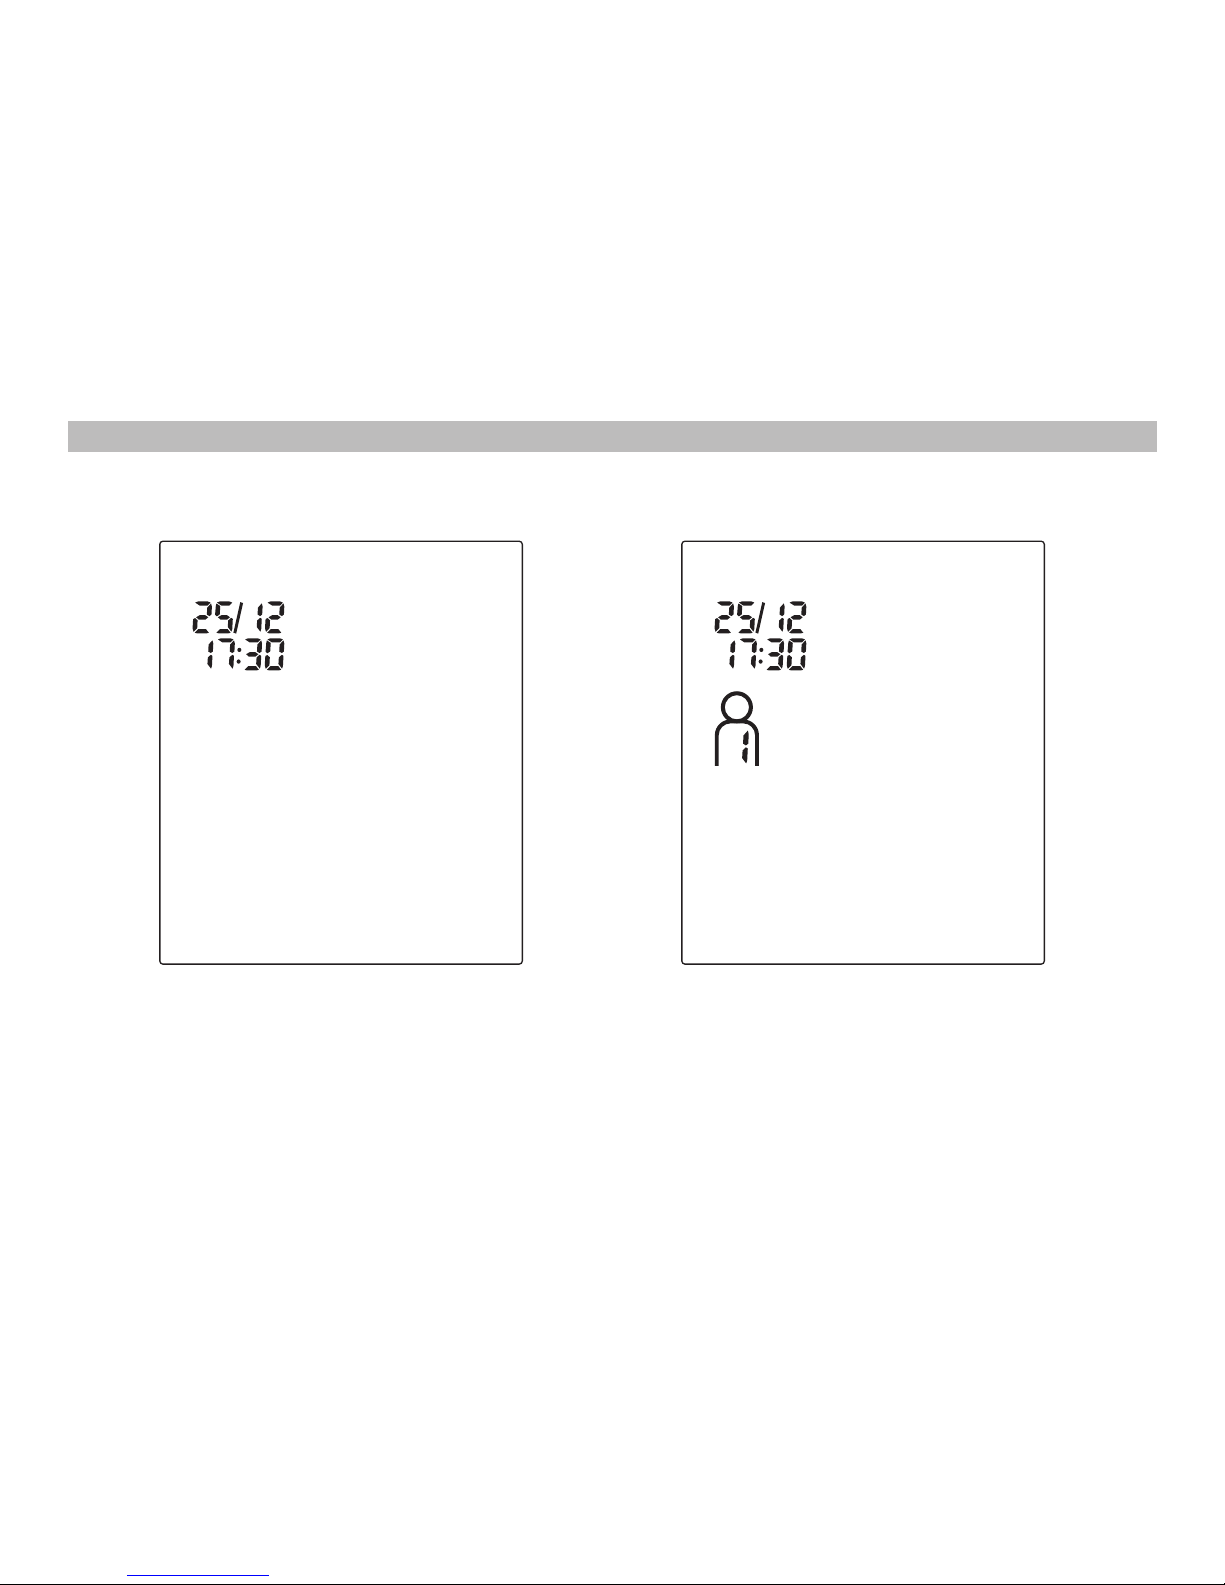
CLOCK MODE & STANDBY MODE
Clock Mode Standby Mode
10
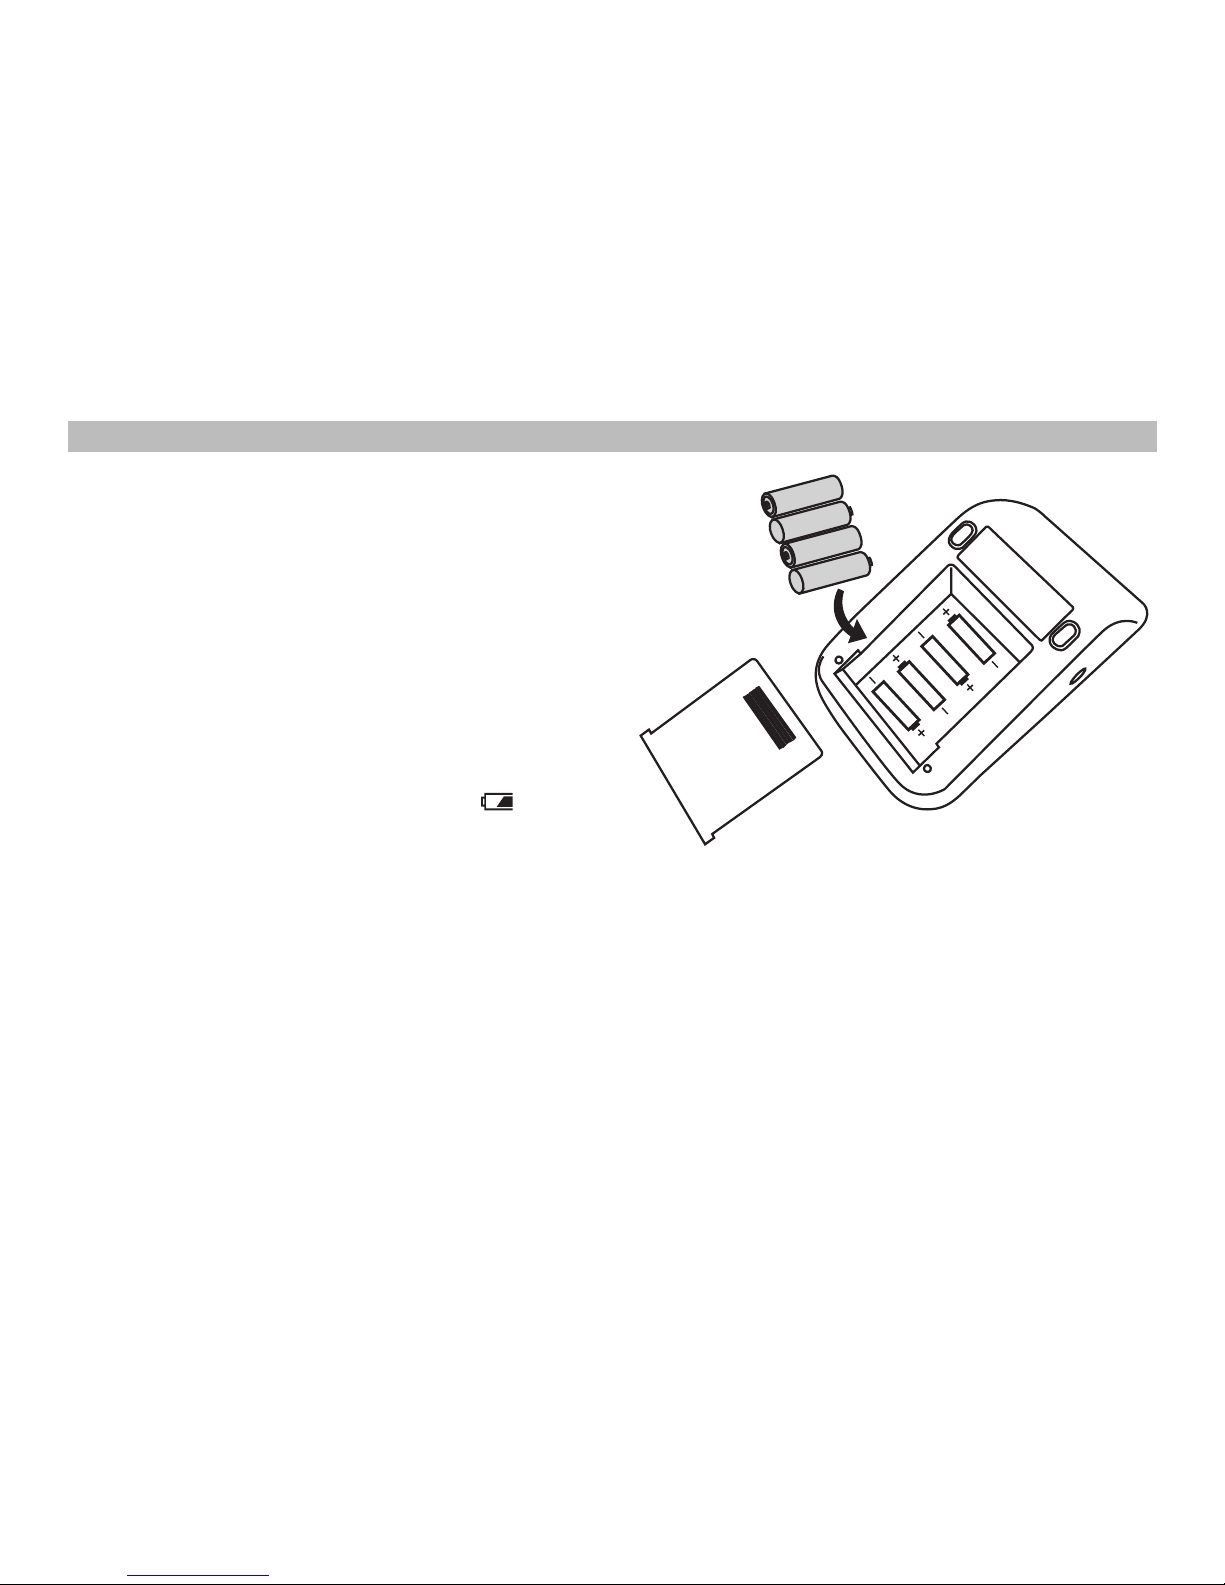
INSTALL/ CHANGE BATTERIES
1. Push the battery cover located on the bottom side on
the unit as shown in the figure.
2. Remove old batteries and insert new ones. Use LR03 or
AAA alkaline batteries and use batteries of the same type
only.
3. Make sure the battery polarities (+) and (-) match the
making on the battery compartment.
4. Place back the battery door.
NOTE:
• Insert the batteries as shown in the battery
compartment. If not, the device will not work or even be
damaged.
• When battery power becomes weak, the [ ] icon and
“E6” appear in the display, replace all batteries with
new ones. Do not mix old and new batteries.
• Never use rechargeable batteries. This may damage the
unit.
• Battery life may vary with ambient temperature and may
be shorter at low temperature.
11
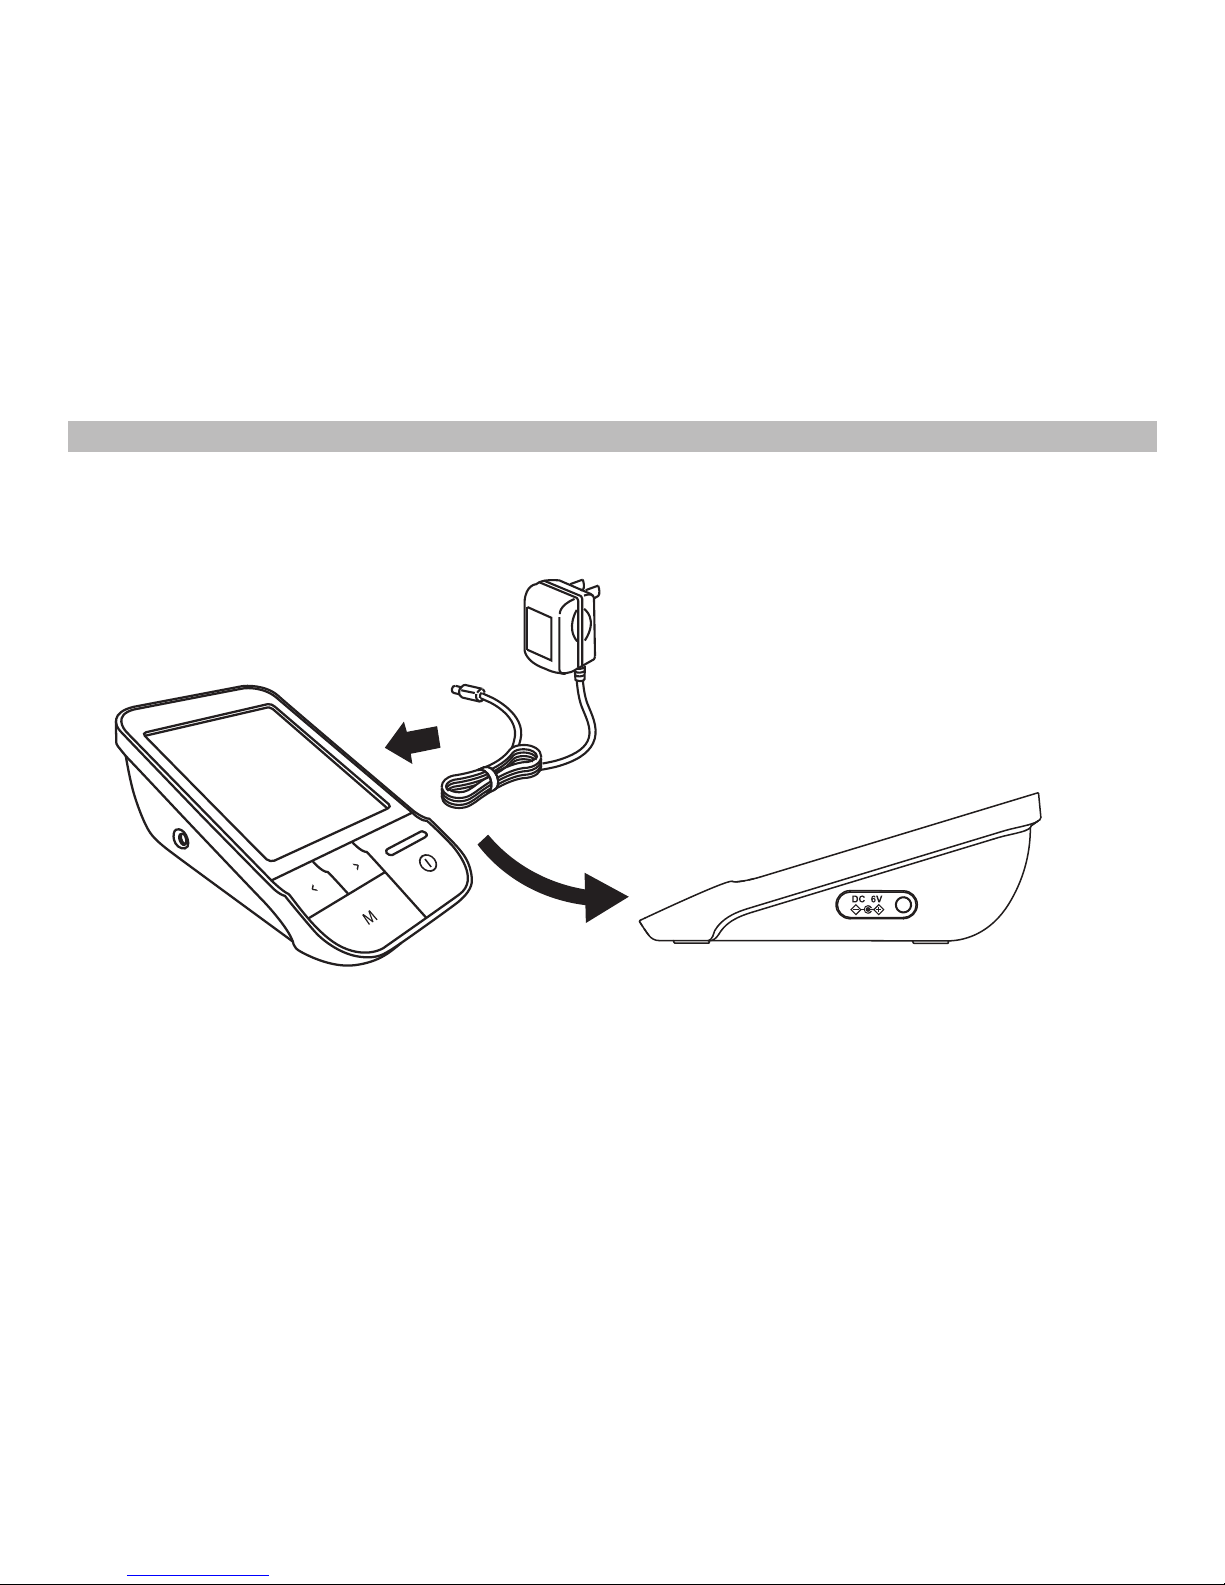
USE OPTIONAL AC ADAPTOR (Accessory item sold separately)
1. Insert the AC adapter cord into the socket on the right side of the device.
2. Insert the AC adapter plug into the outlet.
3. To remove the AC adapter, first disconnect the adapter plug from the AC outlet, then the adapter cord from the
device.
NOTE:
• Optional AC adaptor should comply with the requirement of IEC 60601-1 standard.
• Use only the exclusive AC adapter specified by authorized dealers. Other AC adapter may vary in output voltage
and polarities and may represent a risk on your life and damaging the device.
• When the AC adapter is in use, the device does not draw power from batteries.
12
TO SET CLOCK / WIFI
After inserting batteries or press and hold [ ] button for 5 sec to enter clock setting mode
1. "Year” will blink on display automatically
2. Press [<] / [>] button to select year
3. Press [ ] button to confirm and "Month" will blink
4. Press [<] / [>] button to select month
5. Press [ ] button to confirm and "Day" will blink
6. Press [<] / [>] button to select day
7. Press [ ] button to confirm and "Hour" will blink
8. Press [<] / [>] button to adjust to desired hour
9. Press [ ] button to confirm and "Minute" will blink
10. Press [<] / [>] button to adjust to desired minute
11. Press [ ] button to confirm
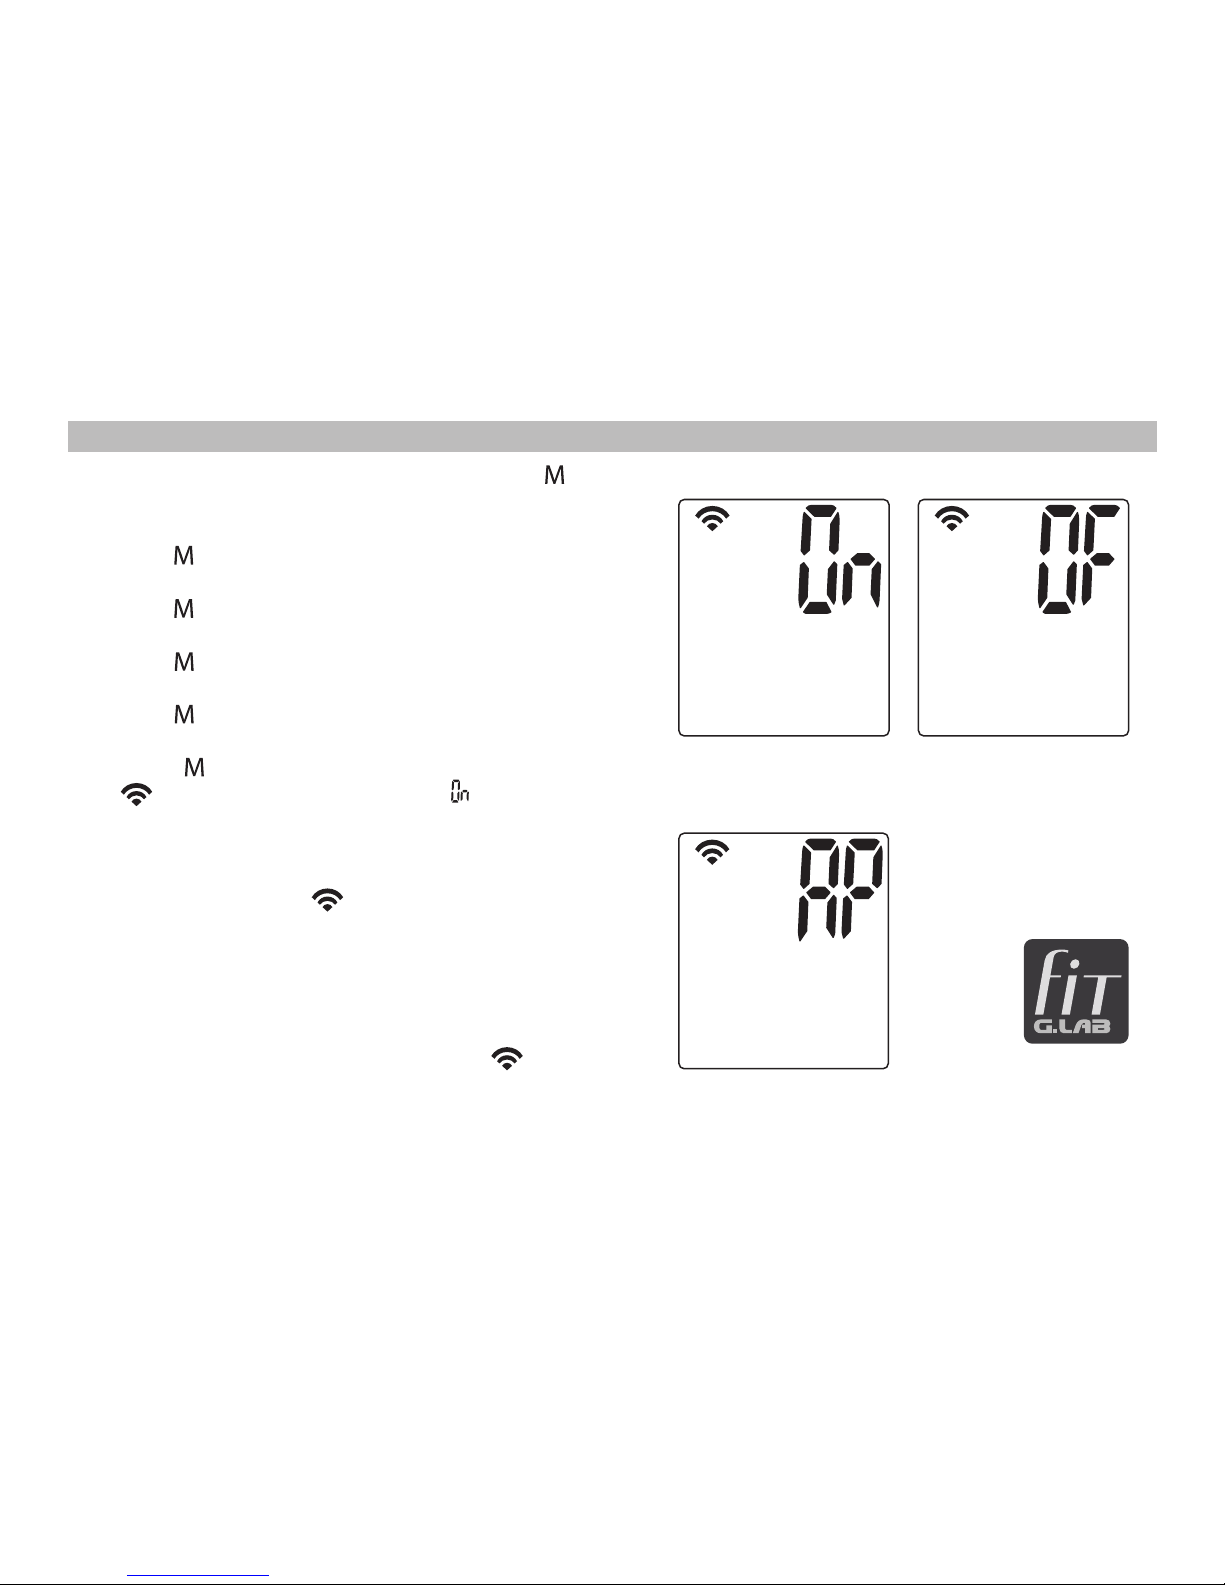
12. “ ” WIFI icon is displayed and “ ” will blink
13. Press [<] / [>] button to select WIFI on or off.
14. Set the WIFI to “On” mode, press and hold
[<] and [>] buttons for 3 seconds to enter “AP” mode.
15. “AP” is shown and “ ” WIFI icon will blink.
16. Install and open the application (APP) - G.LAB fit
on your smartphone or tablet. Go to the setting manual
and click [Change WIFI network].
17. The APP will search and list all the available signal.
Select your blood pressure monitor on the list. After
connected to your WIFI network, the “ ” icon on
the blood pressure monitor will turn on and stop
blinking, settings are done.
Note: Please repeat the above steps when using new WIFI network.
Press [<] / [>] button to select WIFI on or off
Press [<] and [>] button
for 3 seconds to enter
“AP” mode.
Install the
application
(APP) -
G.LAB fit.
13
TO SET ALARM CLOCK
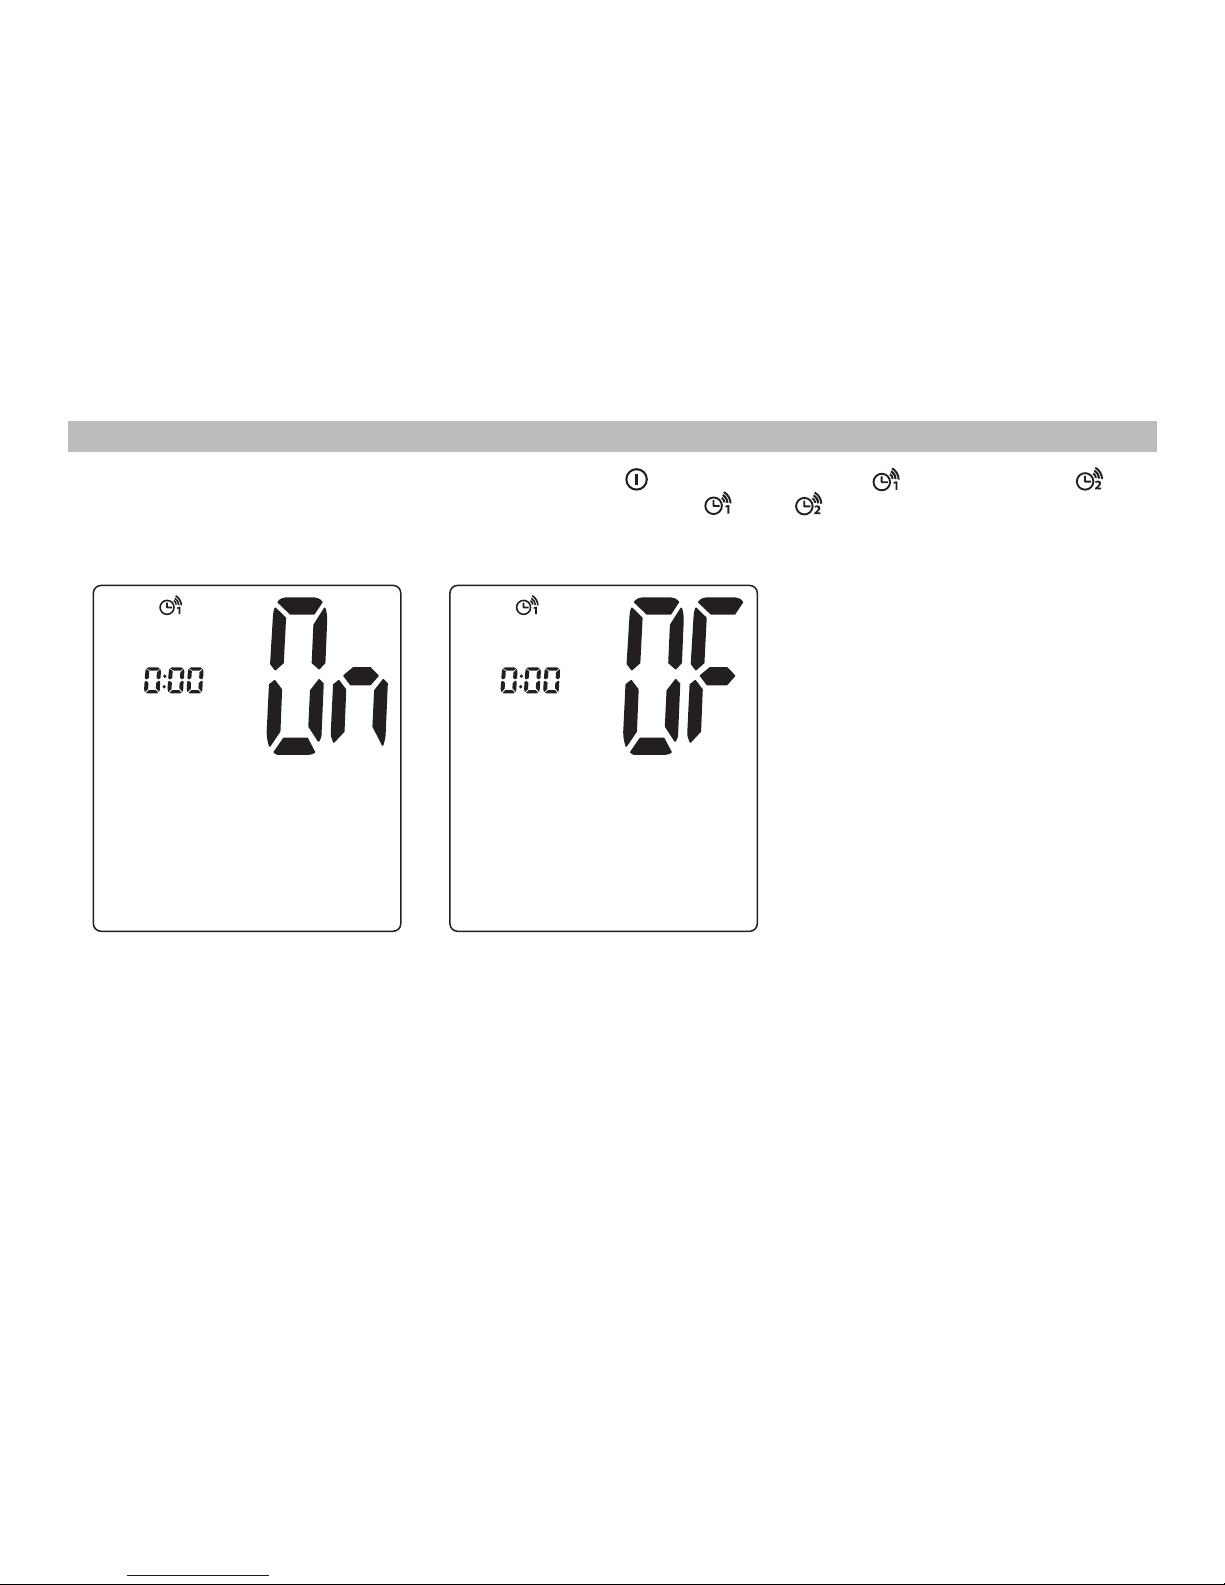
1. To enter the alarm clock setting mode, press and hold [ ] button until Alarm 1 [ ] icon or Alarm 2 [ ]
icon is flashing on the display. Press [<] / [>] to select between [ ] and [ ]. Press [M] button to confirm your
selection.
2. [On] or [OF] icon will blink, press [<] / [>] button to switch between ON and OFF. Press [M] button to confirm.
3. When [On] icon is selected, “Hour” will blink. Press [<] / [>] button to adjust to desired hour. Press [M] button to
confirm.
4. “Minute” will blink. Press [<] / [>] button to adjust to desired minute. Press [M] button to confirm and settings
are done. The alarm icon is turned on on the display.
5. To turn off the alarm, enter the alarm clock setting mode and select the desired alarm icon. Press [M] button to
confirm your selection. Press [<] / [>] button to switch to [OF] and press [M] button to confirm. The alarm is
turned off.

14
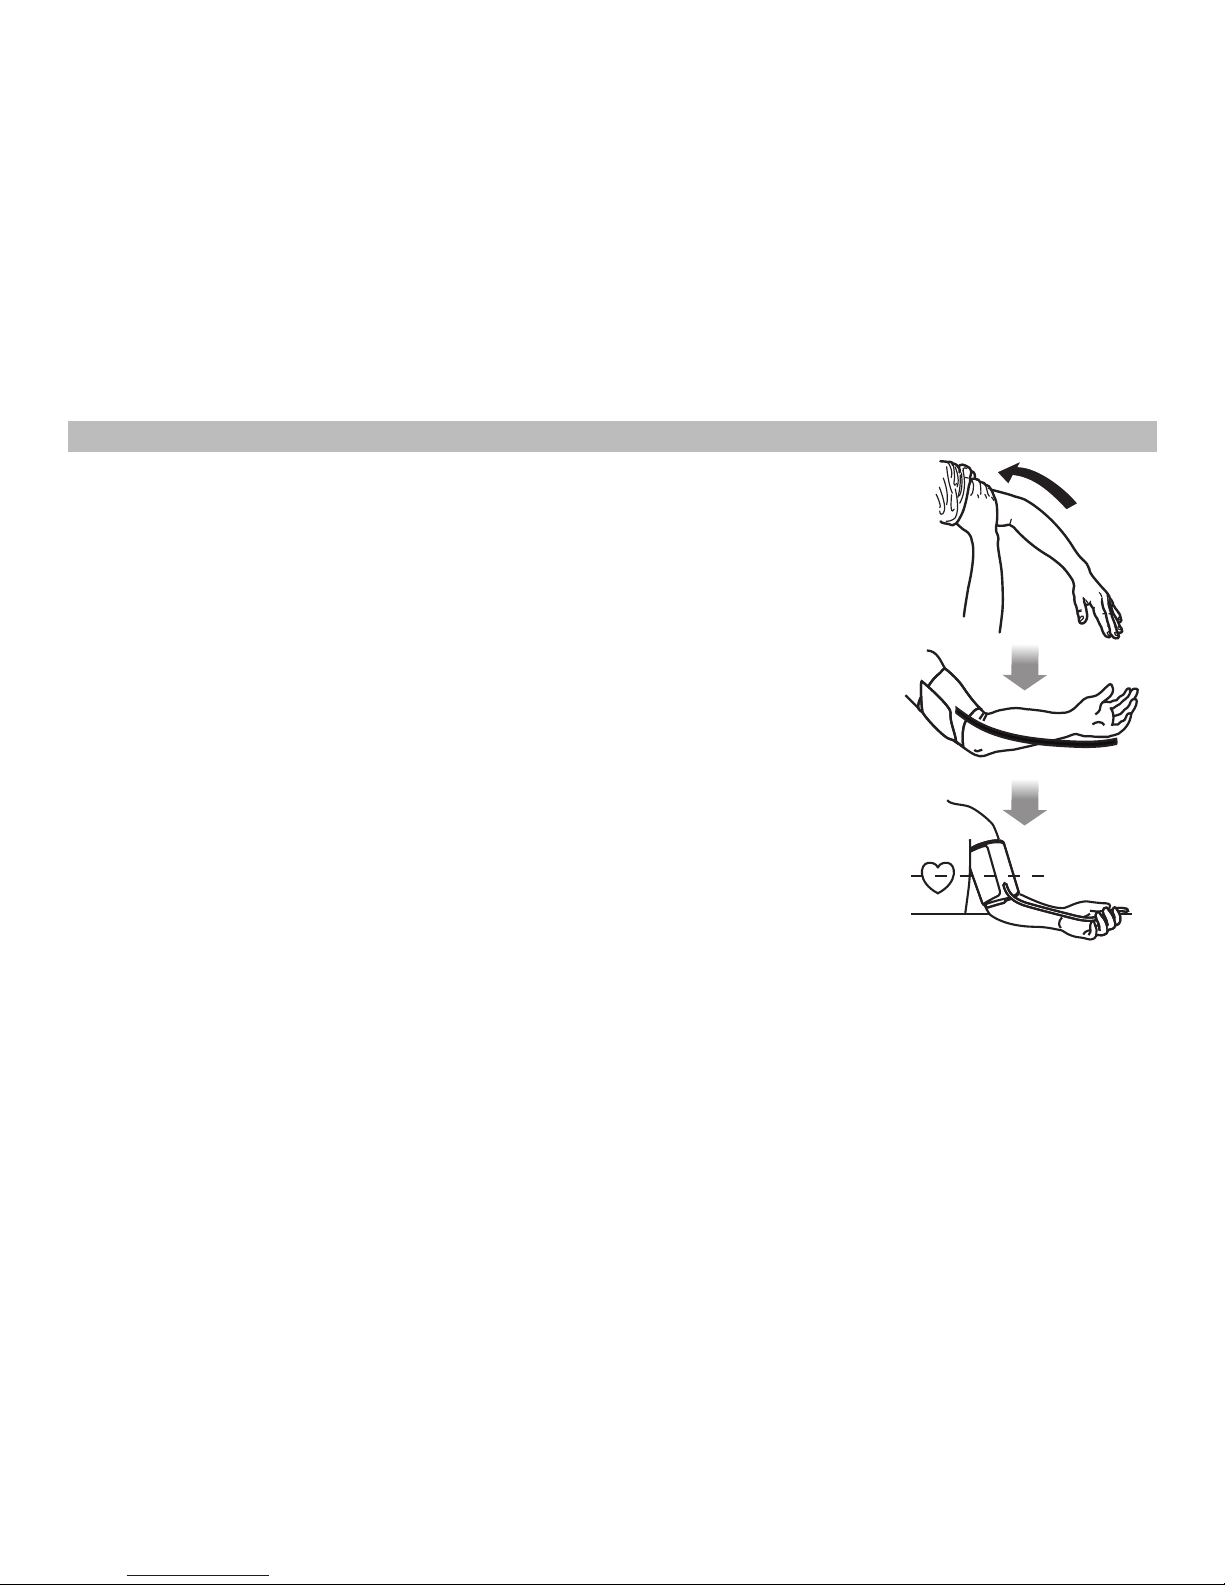
TO APPLY ARM CUFF
1. Pass the end of the cuff furthest from the tubing through the metal ring to form a loop. The smooth cloth should
be the inside of the cuff loop.
2. Put your left arm through the cuff loop. The bottom of the cuff should be approximately 2 – 3 cm above the
elbow. The white artery mark on the cuff should lie over the brachial artery on the inside of the arm. The tube
should run down the centre of arm and even with the middle finger. Do not place the arm cuff over heavy
clothing (e.g. jacket or sweater sleeve) as the blood pressure monitor will not be able to take proper
measurement. Blood circulation in the arm should not be restricted by tight clothing or other objects.
3. Pull the cuff so that the top and bottom edges are fitted evenly around your arm.
4. When the cuff is positioned correctly, press the sewn hook material firmly against the pile side of the cuff.
5. Make sure the cuff fits snugly around your arm. The cuff should make good contact with your skin.
6. If the cuff is assembled correctly, the sewn hook material will be on the outside of the cuff loop and the metal
ring will not touch your skin.
7. Insert the cuff tubing into the socket on the left side of the unit. Make sure it is inserted firmly in the main unit
that there are no kinks in the cuff tubing.
2-3 cm
15
BEFORE MEASURING BLOOD PRESSURE
1. Applying the arm cuff, following the instruction in “TO APPLY ARM CUFF”.
2. Rest at least for 5 minutes before each measurement. Otherwise there may be
erroneous results.
3. Sit comfortably on a chair with your feet flat on the floor. Do not cross your feet.
Place your left arm on a table so the cuff is level with your heart.
4. Relax your arm and turn your palm upward.
5. Relax, keep still and do not talk during the measurement in order not to distort
the result.
NOTE:
• This instrument is intended for use on and by adult only. Do not use this device
on or by children, toddlers and infants.
• For reliable monitoring and reference of blood pressure, it is recommended to do
the measurement daily at the same time.
•In order to obtain a resting condition blood pressure, do not take alcoholic and
caffeinated beverages, smoke, exercise or bath for at least 30 minutes before
taking a measurement.
• To minimize measurement variations due to physical activity, relax for five to ten
minutes before taking a measurement. If you are excited by emotional stress or
muscular movement, the measurement result may be inaccurate.
• You should not be physically tired or exhausted while taking measurement.
• Perform measurements in a quiet and relaxed environment at room temperature.
• Remain relax, still and do not speak during measurement since the accuracy of
any blood pressure measurement with this device can be affected by those
multitude of causes.
• Always wait at least 5 minutes between measurements to allow the blood circulation in your arm to return to
normal. You may need to increase the waiting time depending on your individual physiological characteristic.
• Should the device detect an abnormal condition, it stops the measurement and will display an error code. See
“TROUBLESHOOTING” for more details.
• This device measures blood pressure based on heartbeat. If you have a very weak or an irregular heartbeat, the
device may have difficulty in determining your blood pressure. (An irregular heartbeat is defined as a heartbeat
that varies by 25% from the average of all heartbeats during measurement.)
• Do not exert any kind of pressure on the air tube during measurement, e.g. laying your arm or any other object
on the air tube. This could cause incorrect measurements.
16
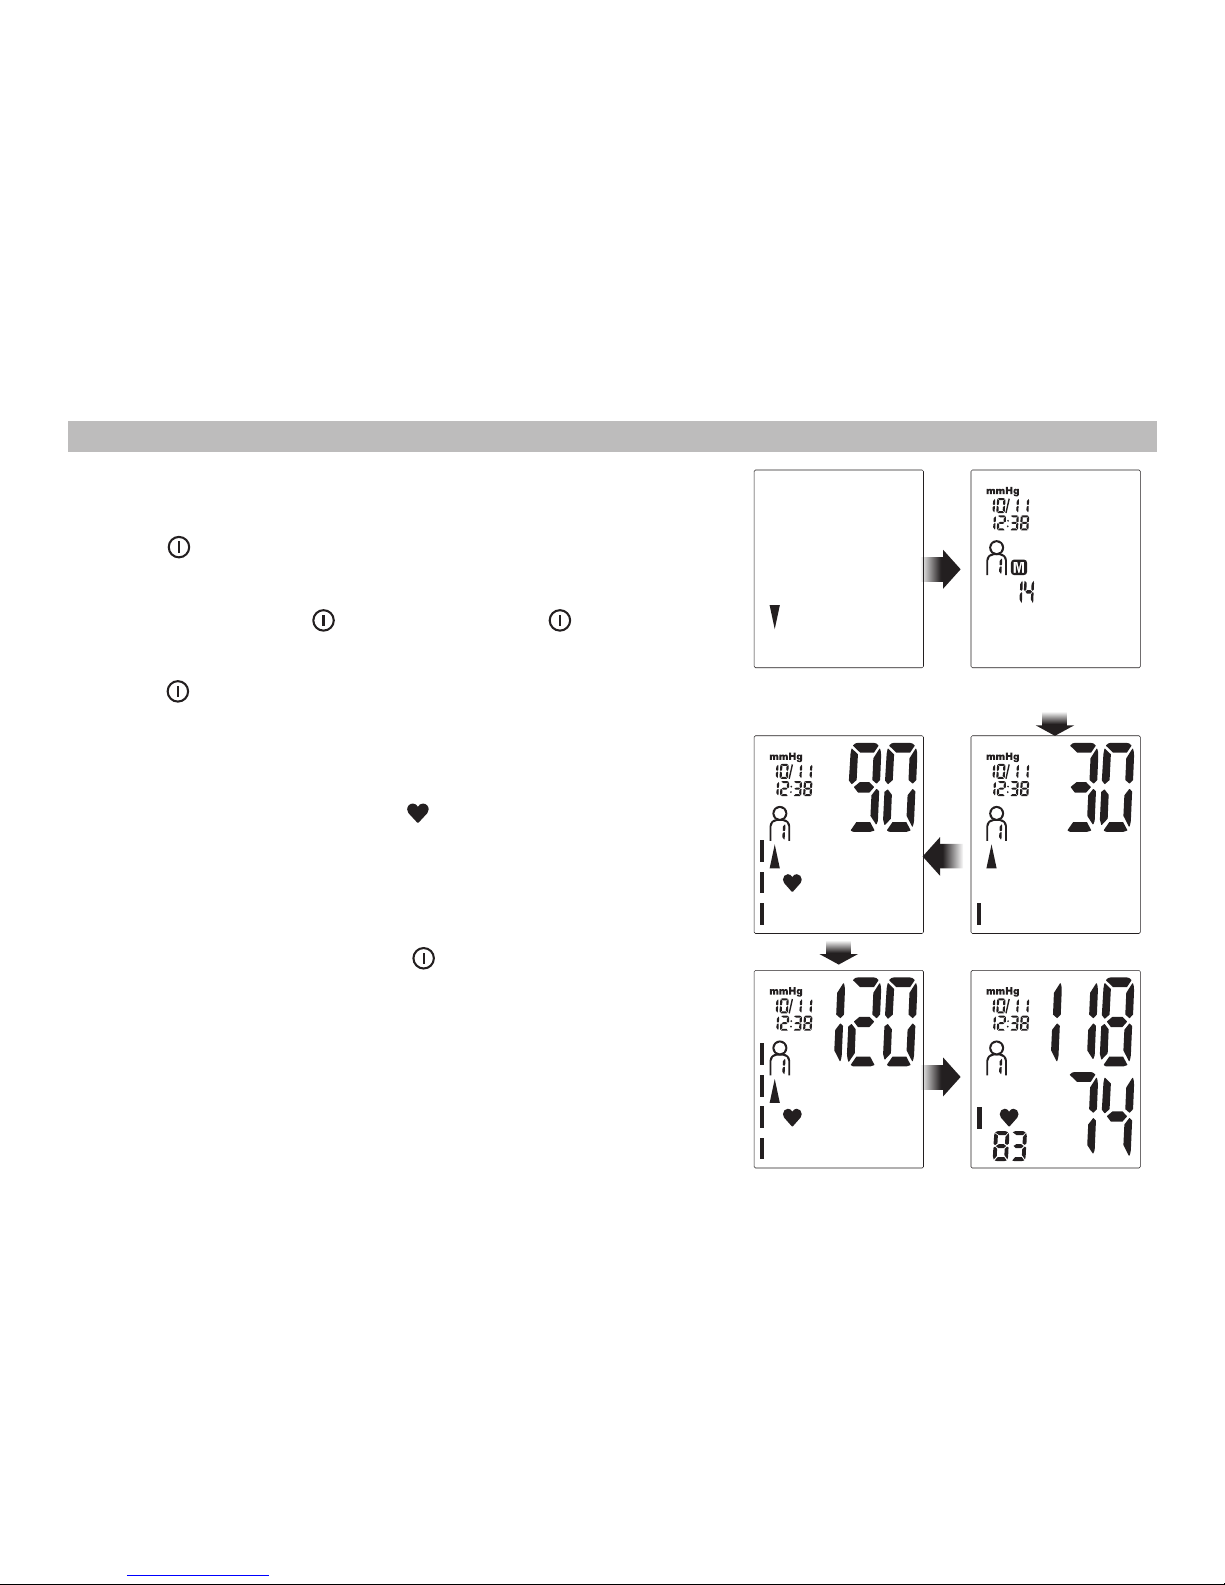
TO MEASURE YOUR BLOOD PRESSURE
1. Follow the instruction in “BEFORE MEASURING BLOOD
PRESSURE” to make yourself ready.
2. Press [ ] button to turn the device from clock mode to
standby mode.
3. Press [<] / [>] to select user memory 1,2,3 or 4. Confirm
selection by pressing [ ] button. Then press [ ] to start the
measurement.
OR
Press [ ] second time to start the blood pressure
measurement.
4. The cuff starts to inflate. It is normal for the cuff to feel very tight.
A pressure bar indicator is displayed during measurement. See
“PRESSURE BAR INDICATOR” for more details.
5. Once the pulse is detected, the [ ] blinks with each pulse beat,
indicating that the measurement is in progress.
6. When the measurement is complete, the systolic and diastolic
pressure and pulse rate are displayed and stored.
NOTE:
You can stop inflation by pressing [ ] button at any time.
Deflation for start measuring Record number and
User ID are displayed
Inflation in progress
Measurement result shown

17
PRESSURE BAR INDICATOR
The indicator monitors the progress of pressure during measurement.
Pressurizing
Measurement in progress
18
WHO CLASSIFICATION INDICATOR
Each of the six segments of the bar indicator corresponds to the WHO blood pressure classification.
WHO Classification Indicator:
Severe Hypertension
Moderate Hypertension
Mild Hypertension
High Normal
Normal
Optimal

19
TO RECALL AVERAGE AND PREVIOUS MEASUREMENT DATA
This device has a memory capability to store the measurement readings for each user. Every time you complete
the measurement, the device automatically stores the measurement result.
1. Press [ ] button in standby mode to enter the memory mode, the average blood pressure for the latest 3
measurements is displayed.
2. Press [>] button to view average data for lastest 7 days AM record (5:00 - 9:00 am).
3. Press [>] button to view average data for lastest 7 days PM record (6:00 - 8:00 pm).
4. Press [>] button to view the lastest measurement record.
5. Continue to press [>] button to view older measurement records.
6. Press [<] button to view previous measurement records.
This manual suits for next models
1
Table of contents


