Fit4Home F4H-ES-LME350TS-RD User manual

1
F4H-ES-LME350TS-RDPlease Keep For Future Reference
IMPORTANT - Please Read Instructions Fully Before Assembly Or Use
These instructions contain important information which will help you get the best
from your equipment and ensure safe and correct assembly, use and maintenance.
If you need help or have damaged or missing parts,
call the Customer Helpline: 0330 124 0718 (Opening hours: Mon-Fri 9:00am-6:00pm)
or Email: customerservices@fit4home.co.uk
USER MANUAL
LME-350TS SCOOTER

2
CONTENTS
Safety Information 03,04
Folding Stages 05
Product Diagram 06
Unfolding Instructions 07-09
Step 1 07
Step 2 07
Step 3 08
Step 4 08
Step 5 09
Step 6 09
Unfolding Instructions 10-12
Step 1 10
Step 2 10
Step 3 11
Step 4 11
Step 5 12
Step 6 12
Handlebar Introduction 13
Operating the Monitor 14
Parameter Table 15
Riding Instructions 16
Battery & Charger 17
Maintenance 18
Warm Up & Cool Down 19,20
Fit4Home 21
Declaration 22

3
IMPORTANT SAFETY INFORMATION
IMPORTANT SAFETY INFORMATION
BE SURE TO READ THE ENTIRE MANUAL BEFORE YOU ASSEMBLE OR
OPERATE YOUR MACHINE. IN PARTICULAR, NOTE THE FOLLOWING SAFETY
PRECAUTIONS:
WARNING: Riding the electric scooter can be a dangerous activity. Certain conditions may cause
components to fail without fault of the manufacturer. Like other electric vehicles, the scooter
can and is intended to move, and it is therefore possible to lose control, fall o and/or get into
dangerous situations that no amount of care, instruction or expertise can eliminate. If such
things occur you can become seriously injured or die, even when using safety equipment and
other precautions. RIDE AT YOUR OWN RISK.
This manual contains many warnings and cautions concerning the consequences of failing to
inspect, maintain or properly use your electric scooter. Since any incident can result in serious
injury or even death, we do not repeat the warning of possible serious injury or death each time
such a possibility is mentioned.
APPROPRIATE RIDER USE AND ADULT SUPERVISION
This manual contains important safety information. It is your responsibility to review this
information and make sure that all riders understand all warnings, cautions, instructions and
safety topics and ensure that young riders are able to safely and responsibly use this product.
UN LTD recommends that you periodically review and reinforce the information in this manual
with younger riders, and that you inspect and maintain your children’s vehicle to ensure their
safety.
The recommended rider age is 18yrs and older. Any rider unable to t comfortably on the
scooter should not attempt to ride it. A parent’s decision to allow his or her child to ride this
product should be based on the child’s maturity, skill and ability to follow rules.
Keep this product away from small children and remember that it is intended for use only by
persons who are, at a minimum, completely comfortable and competent while operating the
scooter.
Persons with any mental or physical conditions that may make them susceptible to injury,
impair their physical dexterity or mental capabilities to recognize, understand, and follow
safety instructions and to be able to understand the hazards inherent in LME-350TS use,
should not use or be permitted to use products inappropriate for their abilities. Persons with
heart conditions, head, back or neck ailments (or prior surgeries to these areas of the body), or
pregnant women, should be cautioned not to operate such products.
DO NOT EXCEED WEIGHT LIMIT OF 100kg. Rider weight does not necessarily mean a person’s
size is appropriate to t or maintain control of the scooter. Do not touch the brakes or motor on
your scooter when in use as these parts can become very hot. Refer to the section on safety for
additional warnings.
ACCEPTABLE RIDING PRACTICES AND CONDITIONS: Always check and obey any laws

4
IMPORTANT SAFETY INFORMATION
or regulations which may aect the locations where the electric scooter may be used. Ride
carefully. Watch out for potential obstacles that could catch your wheel or force you to swerve
suddenly or lose control. Be careful to avoid pedestrians, skaters, skateboards, scooters, bikes,
children or animals who may enter your path, and respect the rights and property of others.
Do not activate the speed control on the hand grip unless you are on the scooter and in a safe,
outdoor environment suitable for riding.
Do not attempt or do stunts or tricks on your scooter. The scooter is not made to withstand
abuse from misuse such as jumping, grinding or any other type of stunts.
Maintain a hold on the handlebars at all times.
Never allow more than one person at a time to ride the scooter. Keep your ngers and other
body parts away from the belt, steering system, wheels and all other moving components. Never
use headphones or a mobile phone when riding.
Never use another vehicle to pull the scooter along. Do not ride your scooter in wet or icy
weather and never immerse the scooter in water, as the electrical and drive components
could be damaged by water or create other possibly unsafe conditions. The electric scooter
is intended for use on at, dry surfaces with level ground, without loose debris such as sand,
leaves, rocks or gravel. Wet, slick, bumpy, uneven or rough surfaces may impair traction and
contribute to possible accidents. Do not ride your scooter in mud, ice, puddles or water. Avoid
excessive speeds that can be associated with downhill rides. Do not use the electric scooter
indoors. Do not ride at night or when visibility is limited. The scooter should be used with caution
since skill is required to avoid falls or collisions causing injury to the user or third parties.
APPROPRIATE RIDING ATTIRE.
Always wear proper protective equipment such as:
• Approved safety helmet. Helmet may be legally required by law or regulation in your area.
• Elbow pads and knee pads.
• Long sleeved shirt, long trousers and gloves.
• Lace up shoes with rubber soles, never ride barefoot or in sandals, and ensure that shoelaces
are tied and kept out of the way of the wheels and drive system.
USING THE CHARGER
The charger supplied with the electric scooter should be regularly examined for damage to the
cord, plug, enclosure and other parts, and in the event of such damage,
the scooter must not be charged until the charger has been repaired or replaced.
• Use only with the recommended charger • Use caution when charging • The charger is not a toy
• Charger should be operated by an adult
• Do not operate charger near ammable materials • Unplug charger and disconnect from
scooter when not in use • Do not exceed charging time
Always disconnect from the charger prior to wiping down and cleaning your scooter with a damp
cloth.
USE WITH APPROPRIATE CAUTION AND SERIOUS ATTENTION TO SAFE OPERATION.
Warning! Controller will auto cut the circuit if overloaded / steep slope to protect the motor. The
scooter will automatically recover after 30 seconds.
5
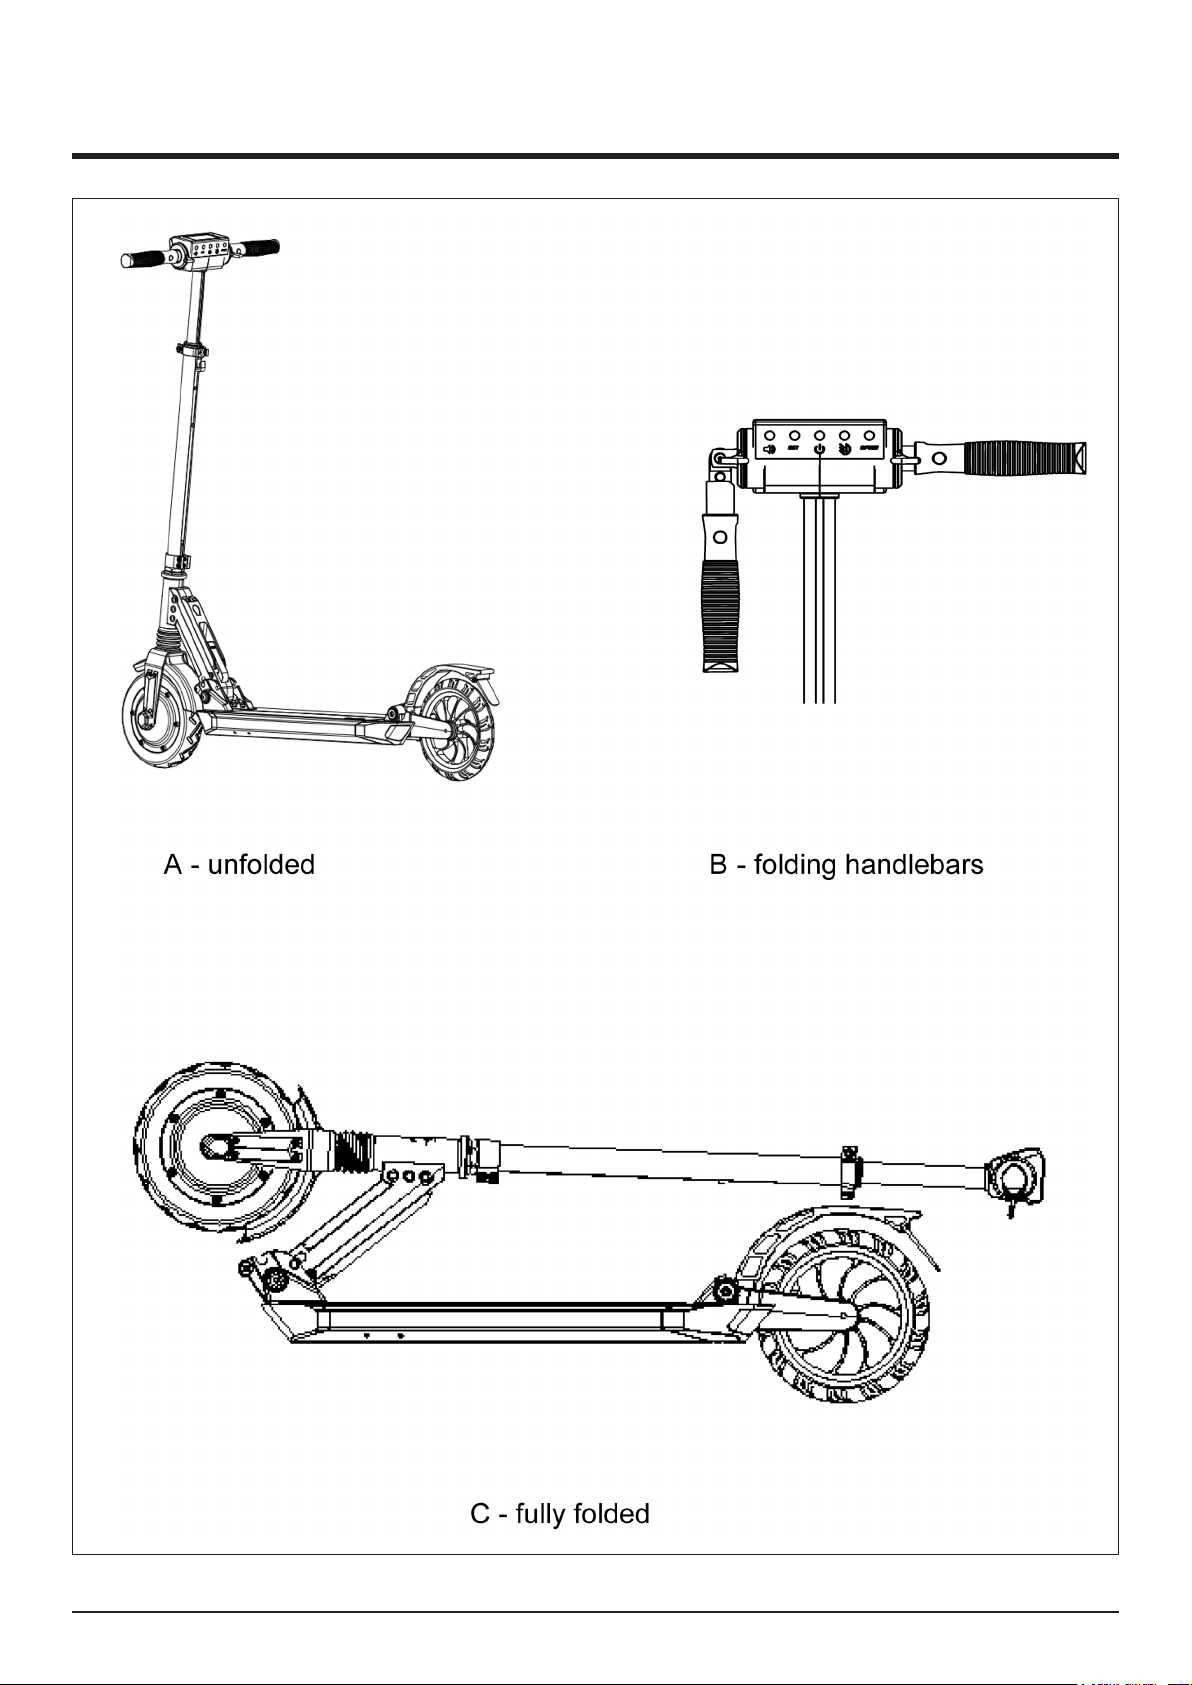
FOLDING STAGES

6
PRODUCT DIAGRAM

7
UNFOLDING INSTRUCTIONS
STEP 1
Take the scooter out of the package.
STEP 2
Gently hold the handlebar, and lift it until it reaches the working position.
Important: press down the stand pipe a little when pull the folding lever

8
UNFOLDING INSTRUCTIONS
STEP 3
The locking bolt comes into the locked position.
STEP 4
Push the lock lever in the direction of the arrow and lift handlebars to desired height.

9
UNFOLDING INSTRUCTIONS
STEP 5
Press the lock lever to lock the handlebar.
STEP 6
Raise the two handles of the handlebar until they automatically return to the work position.

10
FOLDING INSTRUCTIONS
STEP 1
Open the lock lever, in the direction of the arrow.
STEP 2
Press the telescopic button, at the same time press down handlebars to the lowest position and
push the lock lever to the lock position.

11
FOLDING INSTRUCTIONS
STEP 3
Hold the handlebar with both hands, push folding buttons,Pull out the handlebar grips, up to the
maximum and fold downwards. to maximum
STEP 4
Important, Push the stand pipe forward when you pull the folding lever.

12
FOLDING INSTRUCTIONS
STEP 5
1. Gently hold the handlebar, and push it until it reaches the lock position.
STEP 6 : Install the Seat Post
Finish folding.

13
HANDLEBAR INTRODUCTION
HANDLEBAR
1. Thumb Accelerator
2. Thumb Electronic Magnetic Brake
3. Horn Button
4. Setting Button
5. Switch ON/OFF Button
6. Light Button
7. LCD Display
8. Speed Level

14
OPERATING THE MONITOR
OPERATING THE MONITOR
1. ON/OFF
Press the switch for 1 sec, and the display will light indicating the power is on.
Press for 3 seconds if you want to turn it o. It will turn o if you don’t use it for 3 minutes.
2. SPEED CONTROL
Press the right thumb accelerator to control the speed (1-25km/h). There are three speed level
and press the speed level button to change.
3. BREAKING CONTROL
Press the left thumb and the electronic magnetic brake will operate. The greater angle you press,
the greater breaking force will be.
4. HORN
Turn on the power, when pressing the horn button, it will hoot.
5. LED HEADLIGHT
In manual mode: Press the Light button when needed and there will be a sign in display indicates
the light is turn on. Press the button again when you do not need the light.
6. MILEAGE SHOW
When power o, it shows time. When the display is powered on, it displays three modes: total,
trip and time. You can change it by pressing the settings button. In ‘trip’ mode, press the setting
button (S) for 3 seconds and it will clear the trip.
7. EMERGENCY
In an emergency, it’s recommended to use the foot brake. Electronic magnetic brake and rear
wheel friction brake; under normal circumstances, please do not use the emergency brake
at high speed to avoid the wheel damage and the company shall not be responsible for this
damage.
DISPLAY FACTORY SETTING
There are 5 buttons. They are Horn button (K5), Setting button (K4), Switch button (K3), Light
button (K2), Speed level (K1).
Press the K5 and K4 for 3sec to enter parameter table.
K5 button: Short according to return to the running state,the modication is not eective.
K4 button: Short press to the next parameter; Grow by more than 2 seconds, save the changes
made, and return the running state.
K3 button: Not eective
K2 button: Short press, reverse adjust parameter.
K1 button: Short press, adjust parameter.

15
PARAMETER TABLE
PARAMETER TABLE

16
RIDING INSTRUCTIONS
RIDING INSTRUCTIONS
READY
1. Choose a suitable venue for riding.
2. Expand the scooter in accordance with the description.
3. Adjust the T-pipe to the suitable height according to your height.
START
1. Press the power button to turn on the power.
2. Stand one foot on the scooter and leave another foot on the ground.
3. Gently press down on the right thumb accelerator, the scooter will immediately move forward
slowly. Gently place the foot which is on the ground on to the scooter. Press the right thumb
accelerator with your thumb of right hand, the greater pressure applied, the faster you move.
BRAKE
1. Under normal circumstances, pressing the left thumb electronic magnetic brake, the scooter
will be immediately de-energized and will stop. The greater pressure applied; the greater the
breaking force.
2. The scooter also has a rear foot brake that triggers the motor brake immediately in addition
to a friction brake on the back wheel. So, whatever the situation is, if the rst system is
deactivated you can still use the foot brake. Under normal circumstances, please do not use
the emergency brake at high speed.

17
BATTERY & CHARGER
BATTERY & CHARGER INSTRUCTIONS
Each electric scooter is equipped with a special lithium polymer battery and special smart
charger. These accessories that come with each scooter have a dedicated number, please do
not use the chargers from other brands. If the battery or charger will be damaged owing to these,
our company will not be responsible.
BAT TERY
When you get the electric scooter for the rst time, please charge the battery fully before using.
The battery can be charged at any time, in order to ensure that the battery has power, during
which the battery will not charge for any damage.
Warning: Do not use batteries from other brands, it will not work with scooter.
Please charge the battery once every three months if stop using the scooter. Water immersion,
collisions, and other abnormal factors will lead to battery damage, which is not covered under
warranty.
CHARGER
The company provides dedicated charger which has a charging protection function, when the
battery is 100% charged, the charger will automatically stop charging. Charging time is no more
than 5 hours.
Due to water immersion, collisions, and other abnormal factors will lead to charger damage,
which is not covered under warranty.
CHARGE DESCRIPTION
Open the charging hole rubber protective cover, put the charger connector into the charging
hole. Connect the charger plug into the power socket. It means it is charging when charger light
is red, charger light turns green when the battery is fully charged.

18
MAINTENANCE
PRODUCT MAINTENANCE
BAT TERY
Please do not put the battery in a high temperature of more than 50 degrees or lower than -20
degrees, Don’t put the battery in the re, otherwise it may lead to battery failure, overheating,
even re risk.
Avoid full depletion of the charge, charge, as far as possible with the use, so that greatly extend
the service life of the battery.
In addition, the battery can be used at room temperature with high mileage and performance, the
battery life and performance will decline if it is used below 0 degrees. Under typical conditions,
at -20 degrees centigrade environment, Mileage may be only half or lower. After the temperature
rises, the battery mileage will resume.
Note: fully charged about 60~90 days after the use of its stored power consumption; incomplete
power consumption in about 20~40days after the power consumption. If you do not charge in
time, it is likely to cause excessive discharge of the battery and damage. This damage is not
recoverable and voids your warranty.
PLACEMENT AND DAILY CARE
Do not expose the scooter under the sun or wet places for too long time. Please keep the
scooter clean and dry.
For cleaning use a damp cloth and a mild detergent.
Do not use alcohol, gasoline, kerosene or other corrosive, volatile chemical solvents to clean,
otherwise it will damage the appearance and internal structure of the body.
When the scooter not in use, put in dry, cool storage, as far as possible to avoid prolonged
storage outdoors. Sun exposure / overheated / over cooled outdoor environments will
accelerate the appearance and aging of tires and reduce the service life of batteries.
TROUBLESHOOTING
PROBLEM POTENTIAL CAUSES SOLUTION
LED display black
screen
Exposure under the sun for too
long.
Place it in shadow and it
will return to normal after a
period.
Values appeared
do not t the actual
values
Parameters are set incorrectly or
missing.
Please reset the display
to the factory settings
following the instructions.
Digital display dim Bad battery contacts or the battery
is dead.
Turn o the power then
restart again.

19
WARM UP AND COOL DOWN ROUTINE
The WARM-UP is an important part of any workout. The purpose of warming up is to prepare your body
for exercise and to minimize injuries. Warm up for two to ve minutes before aerobic exercising.It should
begin every session to prepare your body for more strenuous exercise by heating up and stretching your
muscles, increasing your circulation and pulse rate, and delivering more oxygen to your muscles.
COOL DOWN at the end of your workout, repeat these exercises to reduce soreness in tired muscles. The
purpose of cooling down is to return the body to its resting state at the end of each exercise session. A
proper cool-down slowly lowers your heart rate and allows blood to return to the heart.
HEAD ROLLS
Rotate your head to the right for one count,
you should feel a stretching sensation up the
left side of your neck. Then rotate your head
back for one count, stretching your chin to the
ceiling and letting your mouth open. Rotate
your head to the left for one count, then drop
your head to your chest for one count.
SHOULDER LIFTS
Lift your right shoulder toward your ear for one
count. Then lift your left shoulder up for one
count as you lower your right shoulder.
SIDE STRETCHES
Open your arms to the side and lift them until
they are over your head. Reach your right arm
as far toward the ceiling as you can for one
count. Repeat this action with your left arm.

20
WARM UP AND COOL DOWN ROUTINE
QUADRICEP STRETCH
With one hand against a wall for balance, reach
behind you and pull your right foot up.Bring
your heel as close to your buttocks as possible.
Hold for 15 counts and repeat with left foot.
INNER THIGH STRETCH
Sit with the soles of your feet together and
your knees pointing outward. Pull your feet as
close to your groin as possible. Gently push
your knees toward the oor. Hold for 15 counts.
TOE TOUCHES
Slowly bend forward from your waist, letting
your back and shoulders relax as you stretch
toward your toes.Reach as far as you can and
hold for 15 counts.
HAMSTRING STRETCHES
Extend your right leg. Rest the sole of your
left foot against your right inner thigh. Stretch
toward your toe as far as possible. Hold for 15
counts.Relax and then repeat with left leg.
CALF/ACHILLES STRETCH
Lean against a wall with your left leg in front of
the right and your arms forward.Keep your right
leg straight and the left foot on the oor; then
bend the left leg and lean forward by moving
your hips toward the wall.Hold, then repeat on
the other side for 15 counts.
Table of contents


