FiveCo F700A User manual
USER’S MANUAL
T R U S T T H E S O U N D T R U S T T H E S O U N D T R U S T T H E S O U N D
T R U S T T H E S O U N D
C A R M U L T I M E D I A - S Y S T E M U S B / A U X / B T 2 D I N R E C E I V E R
1GB
R A M
16GB
ROM
A N D R O I D 1 0 .0M U L T I - T O U C H
6.8"
D I S P L A Y
B T M U S I C G P S
50Wx4
M A X P O W E R


Precautions
Please read before using
F700A front panel description
F710A front panel description
Main menu
Radio
Bluetooth (phone)
BT music
Settings
Steering wheel control settings
Video playing menu
Audio playing menu
AUX
File manager
Easy Connection Mode
Navigation
Sound settings
Web browser
Google play market
Diagram circuit
Specifications
Troubleshooting guide
Simple trouble shooting
4
5
6
7
8
10
11
13
14
15
16
16
17
17
18
19
20
21
22
23
24
25
27
СO N T E N T S

P R E C O U T I O N S
A T T E N T I O N !
If you encounter any difficulties in operating the device, contact an authorized service center.
The device has a built-in liquid crystal monitor, so be extremely careful when transporting and
installing it.
It is not recommended to wipe the surface of the device with abrasive detergents. The operating
voltage of the receiver is 12V (+ / - 2V), DC. If the voltage is lower or higher, it is not recommended
to use the device, as it can easily be damaged.
Before turning on the device, make sure that the temperature inside the car is in the range from
0 to +45 degrees.
For replacement, use fuses that are rated for the current shown on the fuse holder. If the fuse
blows several times in a row, carefully check the electrical connections for short circuits. Also
check the voltage in the vehicle's on-Board network.
To avoid damage, do not expose the unit to direct sunlight, heat radiation, or hot air. If the
temperature inside the car is too high, do not turn on the machine until the temperature inside
the car is too high. Do not expose the appliance to sudden changes in temperature decreases.
The receiver is equipped with an interactive touch
screen. Remove the protective film before using it for
the first time. Otherwise, the touch screen may not
work properly. Settings are controlled by tapping and
moving your fingers on the screen.
ATTENTION!
Do not use metal or sharp objects to control of the touch interactive display. Also, do not use
excessive efforts when touching the screen.
4

P L E A S E R E A D
B E F O R E U S I N G
5
In order to improve traffic safety, do not distract your attention by performing complex system
control operations.
Any operations requiring increased attention of the driver should be performed only after the
vehicle has come to a complete stop in a safe place. Failure to comply with this requirement may
result in a ROAD TRANSPORTATION ACCIDENT.
Adjust the volume so that you can hear external noises while driving.
Failure to comply with this requirement may result in a TRAFFIC ACCIDENT.
Minimize viewing of the display while driving.
Failure to comply with this requirement may result in a ROAD ACCIDENT.
Do not disassemble or modify this unit.
Doing so may result in accident, fire, or electric shock.
Connect the system to 12V DC only.
Using other power sources may result in fire, electric shock, or other damage.
When replacing fuses - use only those of the same rating.
Using an incorrect fuse can damage the device.
6
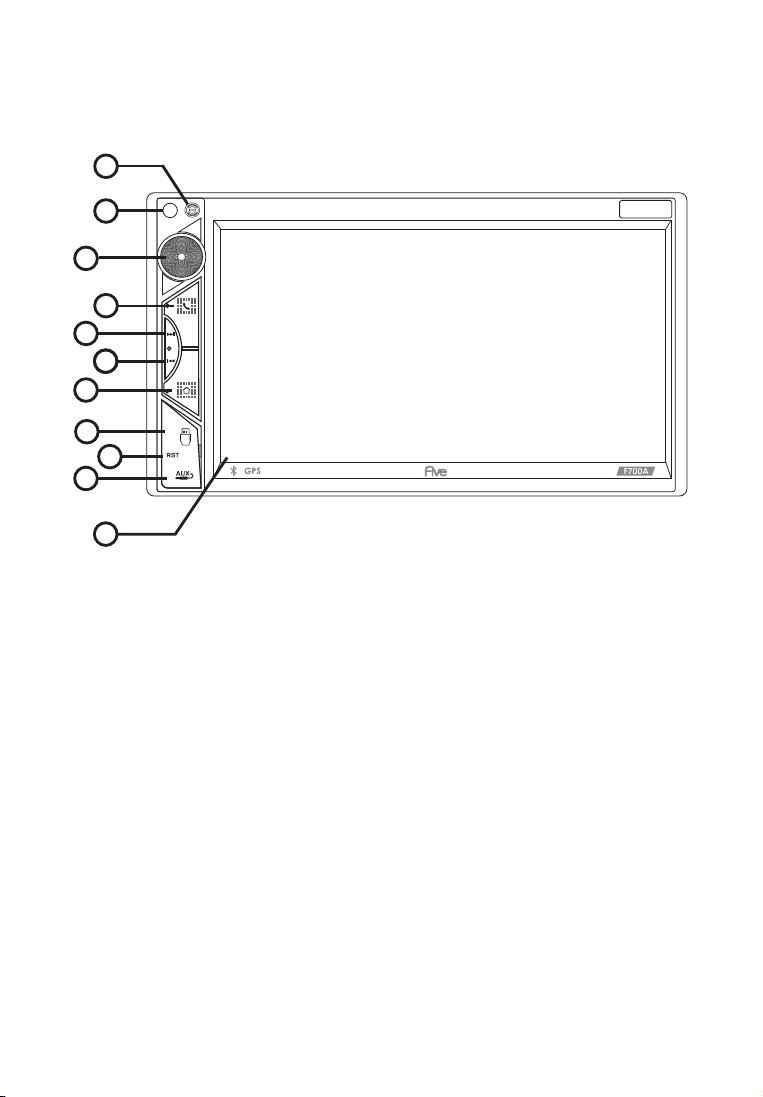
F 7 0 0 A F R O N T P A N E L
D E S C R I P T I O N
11
2
3
4
5
6
7
8
9
10
1
1. Microphone (used for Bluetooth)
2. Encoder - volume control
3. Bluetooth communication button, answer incoming calls
4. Scroll forward button in Multimedia mode / skip to next radio station
in radio mode
5. Backward button in Multimedia mode / skip to previous radio station
in radio mode
6. Menu - button to go to the main menu screen
7. USB slot
8. Reset - button to reset the receiver
9. AUX - audio input
10. Touch screen
11. IR receiver (for models with remote control).
7
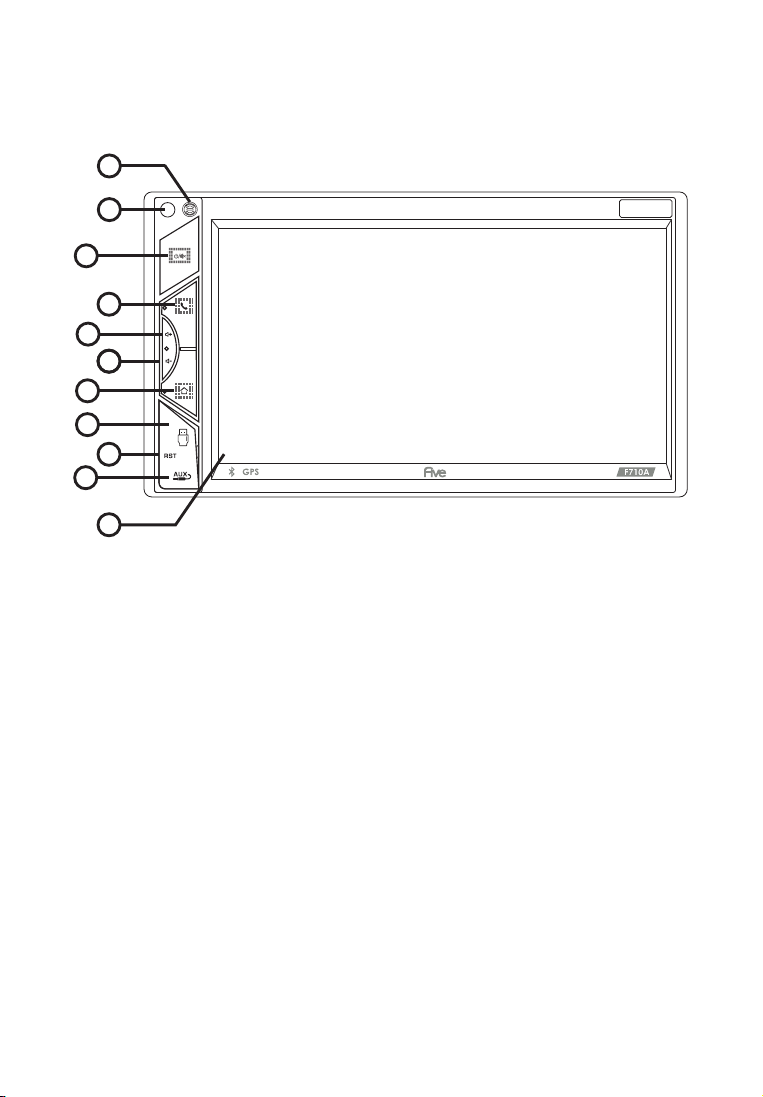
F 7 1 0 A F R O N T P A N E L
D E S C R I P T I O N
11
2
3
4
5
6
7
8
9
10
1
1. Microphone (used for Bluetooth)
2. Button on / off the receiver / mute sound MUTE
3. Bluetooth communication button, answer incoming calls
4. Volume control button (+)
5. Volume control button (-)
6. Menu - button to go to the main menu screen
7. USB slot
8. Reset - button to reset the receiver
9. AUX - audio input
10. Touch screen
11. IR receiver (for models with remote control).

When you turn on the device, the main page is loaded by default. For selection the function or
application you are interested in, click the corresponding icon. To remove an icon or application,
touch and hold and drag it to the delete icon that appears.
Main functions:
1. Navigation
2. Bluetooth
3. Radio
4. Music
5. Settings
6. APPs
7. Time/date
To go to the application menu, touch the icon.
To launch the required application, touch the corresponding icon.
M A I N M E N U
8

To create a link on the main screen, touch the icon, and hold, drag to an empty space on the
home screen. In app mode to change pages touch the display and slide your finger across the
display left or right to select desired mode.
Top panel (status bar)
Icons at the top left of the screen - notifications about messages, events.
The icons at the top right are device status indicators.
When a message arrives or a new event will be displayed on the top bar on the left, tap and
swipe down from the status bar. Then you can choose message or event and view its content.
Quick settings and notifications panel
Pull down from the top edge of the display to open the panel.
9
MAIN page
Back
Notifications about
messages and events
GPS
BT
Wi-Fi
Current time
Hiory menu

Device keyboard
Input on the virtual keyboard is done in the same way as on the physical one.
To change the language, press or hold:
The Radio settings menu provides the user with the ability to configure the basic modes according
to personal preference.
Automatic station search
To start searching, touch the icon The receiver starts scanning from the beginning of the range.
At the end of the scan, the stations found will be stored in the memory cells. To stop scan, touch one
of the number icons 1-18 at the bottom of the display, while the frequency on the display stops
flashing. In each of the FM1 / FM2 / AM subbands, you can save - 18 stations. In total, you can store up
to 54 stations (36 FM stations and 18 AM stations).
Manual setting
For manual configuration, use the icons When you click on the icons , you move along
the range scale with a step of 0.05 MHZ. To stop, click on the icon again. In this way, an accurate tuning
to the desired radio station. To store a tuned station in memory, press and hold the number button (1-18).
10
R A D I O
This receiver is equipped with a high quality radio that supports reception in band FM/AM with
automatic band scanning, frequency indication the received radio station, etc.

11
Stereo mode (ST)
We recommend using stereo mode if reception is good. When moving away from the city, the
reception starts to deteriorate, and noise appears. In some cases, switching to mono mode (by
touching the “ST” icon in the settings) can reduce interference and improve reception.
Note. Radio Data System RDS with TA and TP functions - OPTIONAL not supported by this receiver!
B L U E T O O T H ( P H O N E )
Dialing interface
Phone book interface
Call book interface
Audio player interface
To go to the Phone application on the main menu, touch the “Phone” icon. Or press the button (2) on
the front panel. After completing the pairing, the BT icon on the screen
will change color from gray to white.

12
Pairing phone and head unit
Please make sure your phone supports this function before connecting. Turn on Bluetooth on your
phone, then search for devices by touching the Add device ”on the screen of the head unit. After
finding the device, it will appear on the list.
Dialing a number
To go to the dialing menu, touch the Next icon with the number keypad dial the number and press
the call icon. To reset, touch the icon cancellation.
Call log
To go to the call log menu, touch the icon
To make a call, select a contact from the list and click on it.
Contacts
To go to the contacts menu, tap the icon
On first use contact list will be empty. The head unit will download the contact list from the paired
phone. For call from the contact list, after selecting the number, activate the call icon.
13
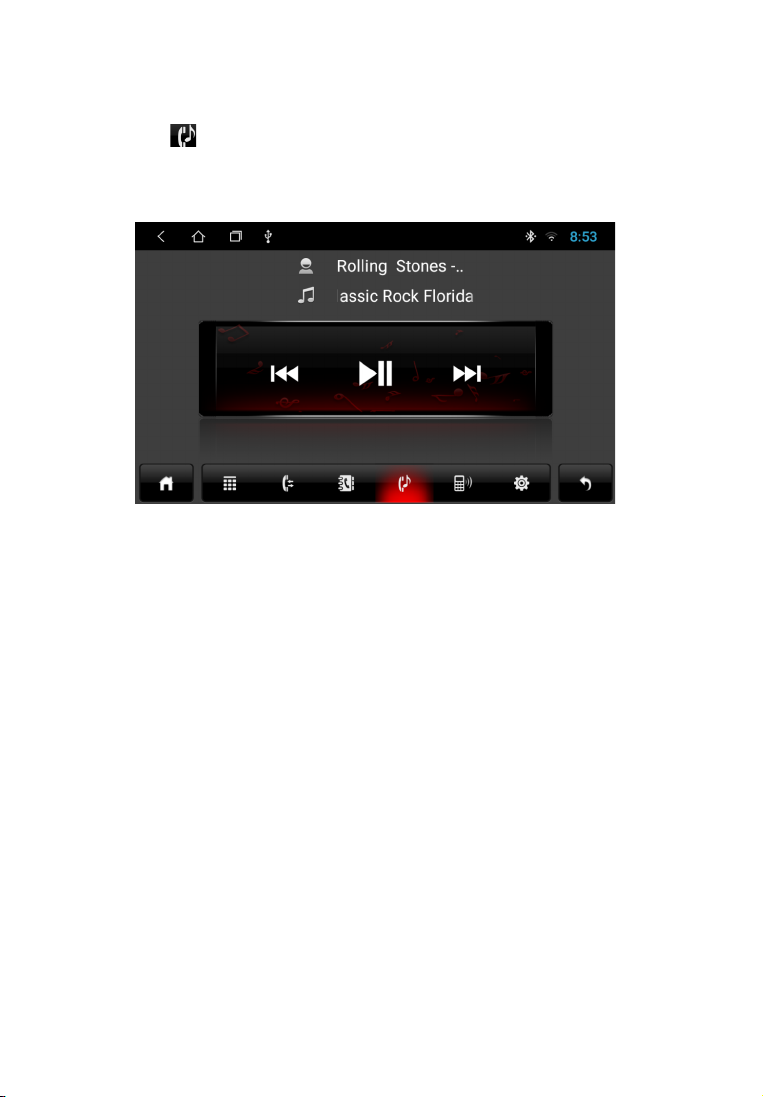
Touch the icon in the application menu to go to the audio player. Receiver supports the Bluetooth
A2DP protocol. Use icons to control: previous track, play / pause, next track. The head unit will play
tracks saved on a connected device that supports the Bluetooth protocol A2DP.
B Т M U S I C
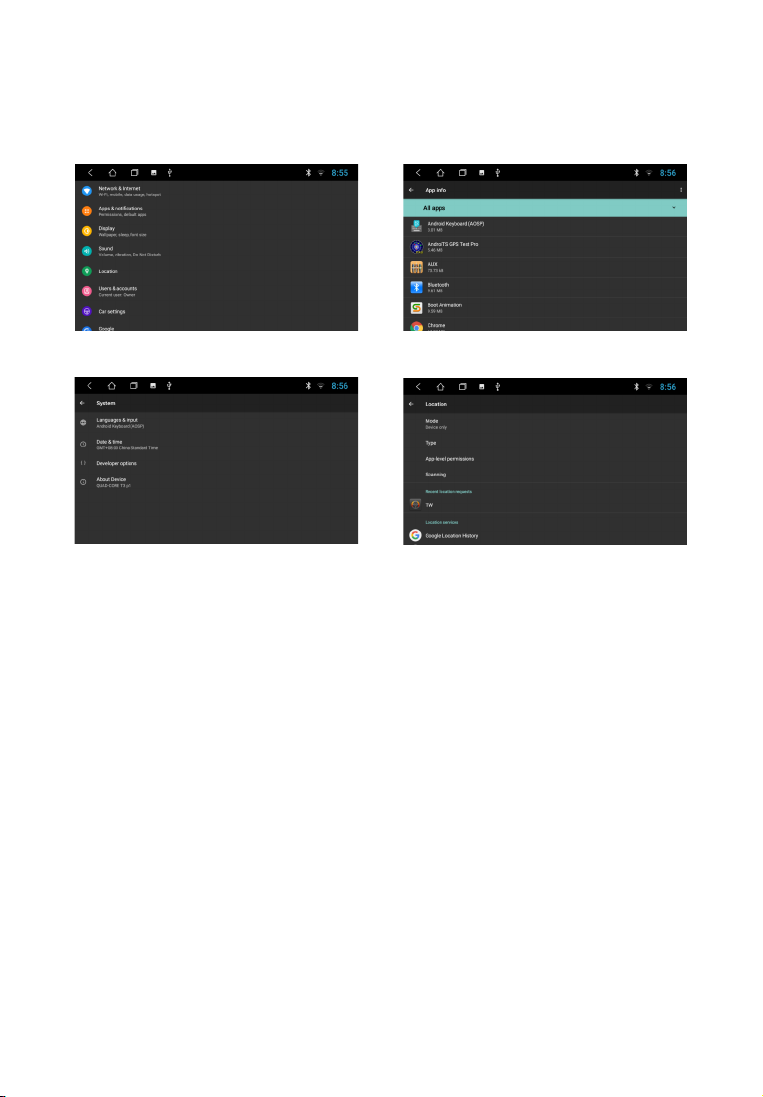
To enter the mode, touch the "Settings" icon.
S E T T I N G S
The settings available to the user allow you to adapt the device to individual preferences both in
terms of sound quality and communication, and in a wider range. More you can get detailed
information about the settings by reading the description to the publicly available Android system.
Note. Password to enter Extra settings mode: 123456
14

S T E E R I N G W H E E L
C O N T R O L S E T T I N G
Customizing the steering wheel buttons interface
To adjust, touch the "Steering Wheel" icon on the APP screen. Select the icon of interest function, then
press the corresponding button on the steering wheel. After finishing the setting tap the Save & Exit
icon.
Note. Operating voltage range with the remote control buttons connected — from 0.3 up to 5V. the
minimum difference in operating voltages that are set at the output of the remote control after
pressing the buttons must be at least 0.3 V (otherwise, in some cases different buttons can be
programmed for the same parameter). Adjustment is only possible with steering buttons with analog
(resistive signals).
15
ATTENTION!
The manufacturer does not guarantee correct operation of the device with all types and models
of vehicles. The manufacturer is not responsible for any possible problems with the vehicle or
device that may occur if this device is incorrectly connected to the vehicle's standard wiring. To
properly connect the standard resistive remote control, consult Your car's authorized dealer or
contact a certified installation center.

To view the video files, click on the icon of the “Video” application. Playback possible
video files both from the device memory and from external drives (USB).
The device supports playback of H.263 P3, MPEG-4, H.264 / AVC codecs, etc.
For more information on playable file formats, see technical characteristics of the device.
next video
play and pause
previous video
full screen view
V I D E O P L A Y I N G M E N U
After launching the application, playback of video content from the connected disc (USB or iNand).
The bottom pop-up menu allows you to select a video file to view. Go to the explorer of video files,
you can go to the list of connected media and select the desired file to view.
Note. The built-in video player supports most common (popular) formats, but the codecs used by
media producers are constantly are developing and the manufacturer cannot guarantee support
for all formats video files.
To listen to music, click on the "Music" icon on the main menu. Track playback possible both from the
device memory (iNand) and from external drives (USB). The device supports playback of most popular
formats MP3, M4A, WAV, AMR, WMA, OGG, AAC, FLAC, MID, etc. More information on playable file
formats, you can find in the technical specifications of the device.
A U D I O P L A Y I N G M E N U
16

After launching the application, playback of audio files from the connected disc. The bottom
pop-up menu allows you to select a file to listen to
next track
play and pause
previous track
repeat / shuffle mode
equalizer
A U X
To play video from external media connected to the AV input, press the "AUX" icon from
the application menu.
F I L E M A N A G E R
In addition to the applications located on the main screen, a large number of convenient and
necessary tools for the user can be found by clicking on the "Applications" icon
on the home screen. One of the most requested tools needed by an experienced user
Android devices is a “File manager”.
To start the program, click the File manager icon in the application menu. Interface manager is made
in a classic design and is intuitive. All operations are performed by touching the corresponding icons.
Short touch to navigate to folder / file. To highlight the corresponding object. need to put square on
the right side of the screen. Appearing after that the pop-up menu provides a choice of three
actions: copy / cut / delete.
To cancel, remove the mark from the subject.
17

Installing third-party applications
To install the application, download the APK file of this application and copy it on USB stick.
Then launch the application on the head unit for installation.
18
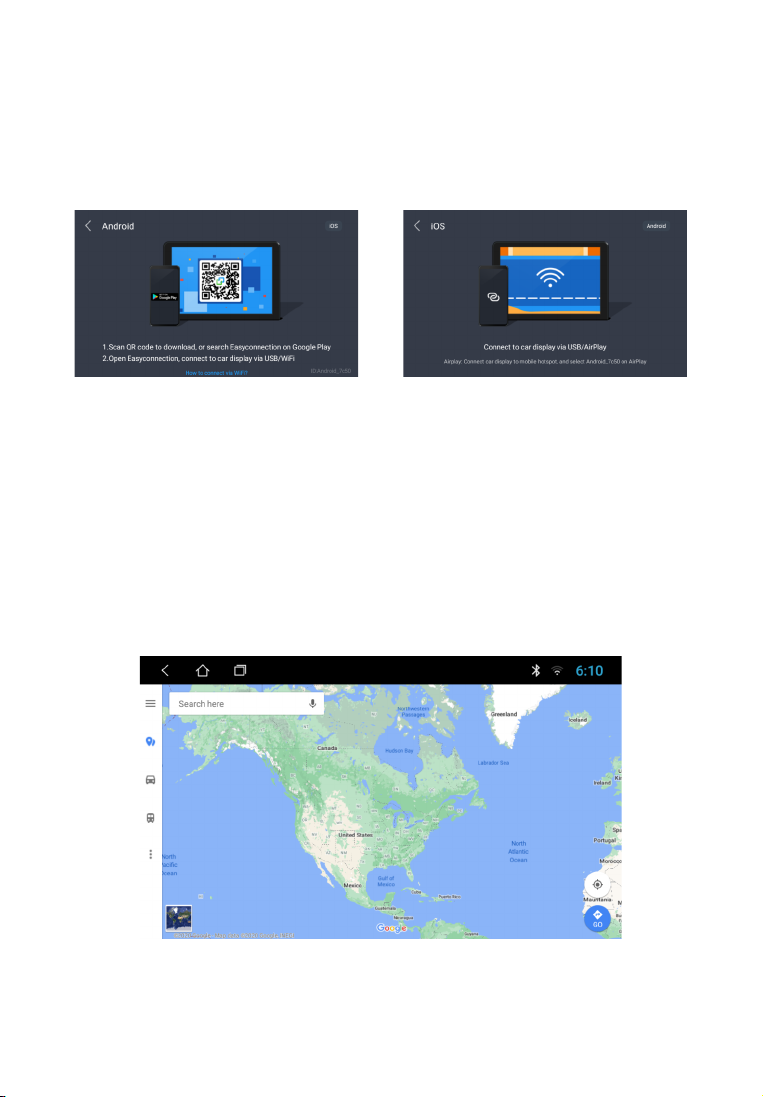
The Easy Connected APP allows you to connect Android and iOS mobile devices to the receiver
and display the operating system of the mobile devices on the receiver's screen.
Turn on "Easy Connected", touch “How to connect?” and follow the instructions displayed on the
screen head unit. When working with a device on OS Android, a "two way" algorithm is
implemented. It becomes possible to control the smartphone using the head unit. When working
with an iOS device, a "one way" algorithm of work is carried out. That is, on the receiver displays
the screen of the mobile device, and the control is carried out from the mobile device only.
E A S Y C O N N E C T I O N M O D E
ATTENTION!
The user bears full responsibility for incorrect operation head unit after installing third-party
applications.
Note. The manufacturing company cannot guarantee support for future iOS, Android software versions
and correct operation of smartphones from different manufacturers. Please, check if your smartphone
supports this feature before purchasing head unit.
Turn on "Easy Connected", touch “How to connect?” and follow the instructions displayed on
the screen head unit. When working with a device on OS Android, a "two way" algorithm is
implemented. It becomes possible to control the smartphone using the head unit.
When working with an iOS device, a "one way" algorithm of work is carried out. That is, on the
receiver displays the screen of the mobile device, and the control is carried out from the
mobile device only.
By default, the “Google Maps” navigation app is installed on the head unit. Quick access to the
selected navigation program is available from the main screen by clicking the corresponding icon
or from the application menu.
N A V I G A T I O N
19

To enter the sound settings, use the EQ icon from the app menu. The settings interface offers two
screens with settings.
S O U N D S E T T I N G S
In the first submenu, the device user is offered a 12-band equalizer.
You can adjust the equalizer to your sound preferences by moving the volume sliders of the
corresponding frequencies, or choose one of the suggested schemes: Normal, Jazz, Pop,
Classic, Rock, News, Urban, Techno.
In the balance settings submenu, you can adjust the relative volume of the speakers to achieve the
desired sound. Setting is done by dragging the point according to the car interior scheme. The user
is also given the opportunity to adjust the overall sound picture to the selected place in the car.
In addition, this menu allows you to set the tone compensation mode, you can enable (or disable)
the sound gain.
20
This manual suits for next models
1
Table of contents
Other FiveCo Car Video System manuals


