Flavour Blaster PRO 2 User manual

USER MANUAL

CONGRATULATIONS
CONGRATULATIONS ON YOUR PURCHASE OF THIS FLAVOUR BLASTER PRO 2!
FOR THE BEST EXPERIENCE PLEASE CAREFULLY READ AND FOLLOW THIS USER MANUAL.
For the latest information and to be part of a great andgrowing community please visit:
Facebook: https://www.facebook.com/FlavourBlaster/
Instagram: https://www.instagram.com/theflavourblaster/
Order Site: https://flavourblaster.com/
If you have any questions or suggestions please contact us at:
P +44 208 1243014
+1 469 469 31814
CONGRATULATIONS 01

WARNING
PLEASE READ THIS SECTION CAREFULLY TO ENSURE YOU RECEIVEMAXIMUM BENEFITS FROM
YOURFLAVOUR BLASTER PRO 2 AND ENJOY THE PRODUCTIN THE MOST SAFE EFFECTIVE WAY.
1. This Flavour Blaster is designed to be used with Flavour Blaster Aroma’s and Bubble X only. It is not designed to be
used with any e-liquids or loose tobacco leaf or herbal substances!
2. This product is only intended for use by adults (18+) and should not be used by children, women who are pregnant
or breastfeeding, or persons withor at risk of heart disease, high blood pressure, diabetes or taking medicine for
depression or asthma, or who otherwise may be sensitive to Aroma’s. l.e. toxic by inhalation, in contact with the
skin or eyes, or if swallowed. Ingestion of the non-vaporized concentrated Aroma ingredients can be poisonous.
Keep away from children and pets.
3. TheFlavour Blaster has not been evaluated by the FDA and is not intended to be a smoking device or treat,
mitigate, prevent or cure any disease or condition.
4. The Tank & Coils must be stored outof the reach of children and pets. All spare and used Tanks and Coils must also
be disposed of properly and out the reach of children and pets.
5. TheFlavour Blaster includes small parts such as the Tank Coil. Always keep any small parts out of reach ofchildren
and pets to prevent swallowing or other harm.
6. Do not misuse,mishandleor store your Flavour Blaster improperly. Even though it is made ofdurable plastic and
metal it may become damaged when dropped or otherwise mishandled.
7. Do not attempt to repair the unit by yourself as damage orpersonal injury may occur.
8. In order to guarantee the normalfunctioning of your Flavour Blaster we strongly advise that you charge the battery
when the power level drops below 10%.
WARNING 02

9. In order to prolong the operation of your Flavour Blaster, please do not place or store in excessively hot or cold
environments. Keep away from sources of excessive heat as damages may occur.
10. Obey local laws or regulations regarding Electronic Cigarettes when producing Aroma Clouds. If you are in an area where
there are any bans or potential dangers, please do not use your Flavour Blaster.
11.Your Flavour Blaster is not waterproof, please keep it dry at all times, especially the USB Port. Place the USB Mag Cover in
the USB Port when not charging the Flavour Blaster to protect the USB Port from liquid damage.
12. Do not allow any Aroma, Bubble X, or liquid to enter the device through the USB port. Ifany liquids enter the device, or
come into contact with internal components, please discontinue using or charging the device and contact JetChill
immediately.
13. Do not drop, throw, mishandle your Flavour Blaster as the Casing or inner components may become damaged.
14. JetChill is not responsible for batteryandcharger explosions, ormalfunctions, due to the use ofa low-quality charger.
Only use the original Flavour Blaster Mirco USB Cable to charge your Flavour Blaster. We strongly recommend that you
always use a high quality USB wall charger (CE & UL Certified). The Flavour Blaster is not designed for use with a car
charger and the Kit does not include a car charger.
15. JetChill is not responsible for anytank or battery damage due to the use ofe-liquid or dry herb.
16. Do not ingest Aroma direct from the Bottle. In case of Aroma contact with skin, wash immediately and thoroughly with
soap and water. In case of contact with eyes, rinse immediately and thoroughly with water and seek full medical advice
immediately. In case of an accident, or if you feelunwell, seek full medical advice.
17. Do not ingest Bubble X direct from the bottle. If swallowed, rinse mouth immediately with plenty of water and drink a
glassof water. Do not induce vomiting. Rinse off the skin and eyes immediately should the liquid come into contact
with them.
WARNING 03

BATTERY
04
CHARGING THE BATTERY
To charge your Flavour Blaster Battery connect the correctly powered Micro Mag USB Cable to the Micro USB Input
Port. The Screen will show the Batterycharge %. A full Battery charge will take 8 hours, giving the Flavour Blaster 8
hours ofusage time.
PLEASE READ AND ADHERE TO THE FOLLOWING WARNINGS WHEN CHARGING YOUR DEVICE:
- Only charge the Flavour Blaster with a high quality CE & UL
Certified wall charger.
- Never charge a Batterythat has been damaged or dropped.
- Never plug a Charger into a non-approved Mains
Power Transformer.
- Do not overcharge, remove the Micro Mag USB Cable from
the Flavour Blaster when complete to prolong battery life.
- Remove Tank before charging.
- Never leave a charging batteryunattended.
- Only use the included high quality Mirco Mag USB
Charging Cable.
- Do not charge your Flavour Blaster in your car.
- Remove the Tank from the Flavour Blaster when shipping
or travelling.
- If there are any issues with the device please contact
JetChill immediately.

BUBBLES
BUBBLES 05
Create bubbles filled with aromatics, fill cloches with aromatic clouds, make your own
aromatic clouds for cocktail & drinks, add theatrical clouds for desserts, and much more.
BUBBLE QUANTITIES
1. 180ml bottle of Bubble X makes 1000 bubbles.
2. 10ml bottle of Aroma makes 250 aroma clouds.
5.
Glassware must be clean and washed
correctly. Residue detergent from a glass
washer may compromise the forming of the
bubble.
4.
Sharp glass edges, shaped
glassware, plastic rim and drinks
containing ice will be very difficult to
form a bubble upon. We recommend
using glassware with soft rolled
edges.
6.
Always try and keep the bubble
mixture at 18c room temperature. If it gets too
warm it can make it harder to form bubbles!
2.
Bubbles can be created on both wet and
dry rims. You can create a wet rim by rinsing
the glass or by using a fine mist spray bottle
like an atomiser. Sometimes bubbles are
fragile so it’s always best to prepare the glass
for the best chance of achieving the perfect
bubble.
1.
Bubble mixture should be shaken
gently prior to use or every 24 hours
3.
Carbonated drinks can occasionally pop
your bubble as gas bubbles hit the rim of the
glass, breaking the surface tension. Always
leave a 2cm to 3cm gap between top of drink
and rim. Note if alcohol is strong or neat, the
bubble is harder to form, as the alcohol will
evaporate the water in the film of the bubble.

05PARTS LIST
PARTS LIST
1. Mag-Base-Assem
2. 5mm-LED
3. 5V-Battery
4. Switch-Assem
5. BM4515-DC-BLOWER
6. DNA75c-BODIES
7. Fix-Screw
8. Trig-Spring
9. Mag-Badge
10. Controller-Assem
11.Budget-Display
12.ReShell-Dust
13.RGB-Assem
14.RGB-PCB
15.USB-Cover
16.BT-Tank-Assem
17. RGB-Assem-R
18.Rubber-Foot
19.RB-INLAY-L
20.RB-INLAY-R
21.RGB-Select
FLAVOUR BLASTER KIT INCLUDES:
1x Flavour Blaster Pro 2
1x Micro Mag USB Cable
1x Tank
5x Coil
5x Aroma
1x Bubble X
13
11
12
5
2
1
18
10
315
19
20
4
21
2
06
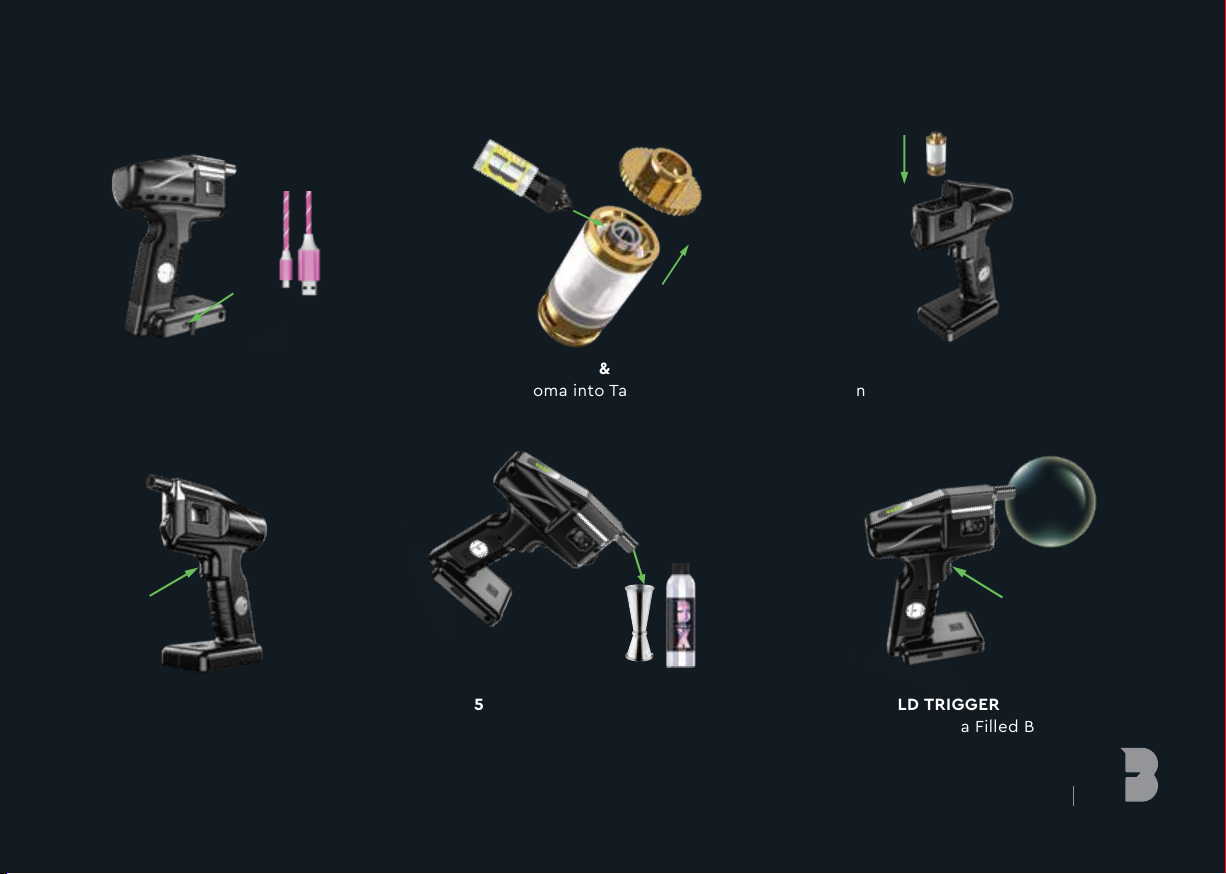
QUICK START 07
1. CHARGE BLASTER
Insert Micro Mag USB Cable
4. TURN ON
Press Trigger 3 times
2. PRIME COIL & FILL TANK
Pour Aromainto Tank
5. DIPNOZZLE TIP
Into BubbleX Jigger
6. HOLD TRIGGER
Creates AromaFilled Bubbles
3. INSERT TANK
Insert Tank & add Nozzle
QUICK START

1. OPEN TANK
Empty Tank then
carefully unscrew Top & Cover
4. MAX FILL2ml
Don’t under / over fill
Replace Top
2. PRIME COIL WITH AROMA
Pour small amount directly onto
Coil Cotton to prevent leaking
5. REST FOR 2 MINUTES
So Aroma absorbs into Coil
If Aroma leaks retighten Coil
6. CONNECT TANK
Ensure outside of Tank is dry,for good
connection & rustprevention
3. FILL TANK
Pour Aroma into Outer Chamber
not into centre Airflow Hole
FILL TANK
FILL TANK
08
LIQUIDS
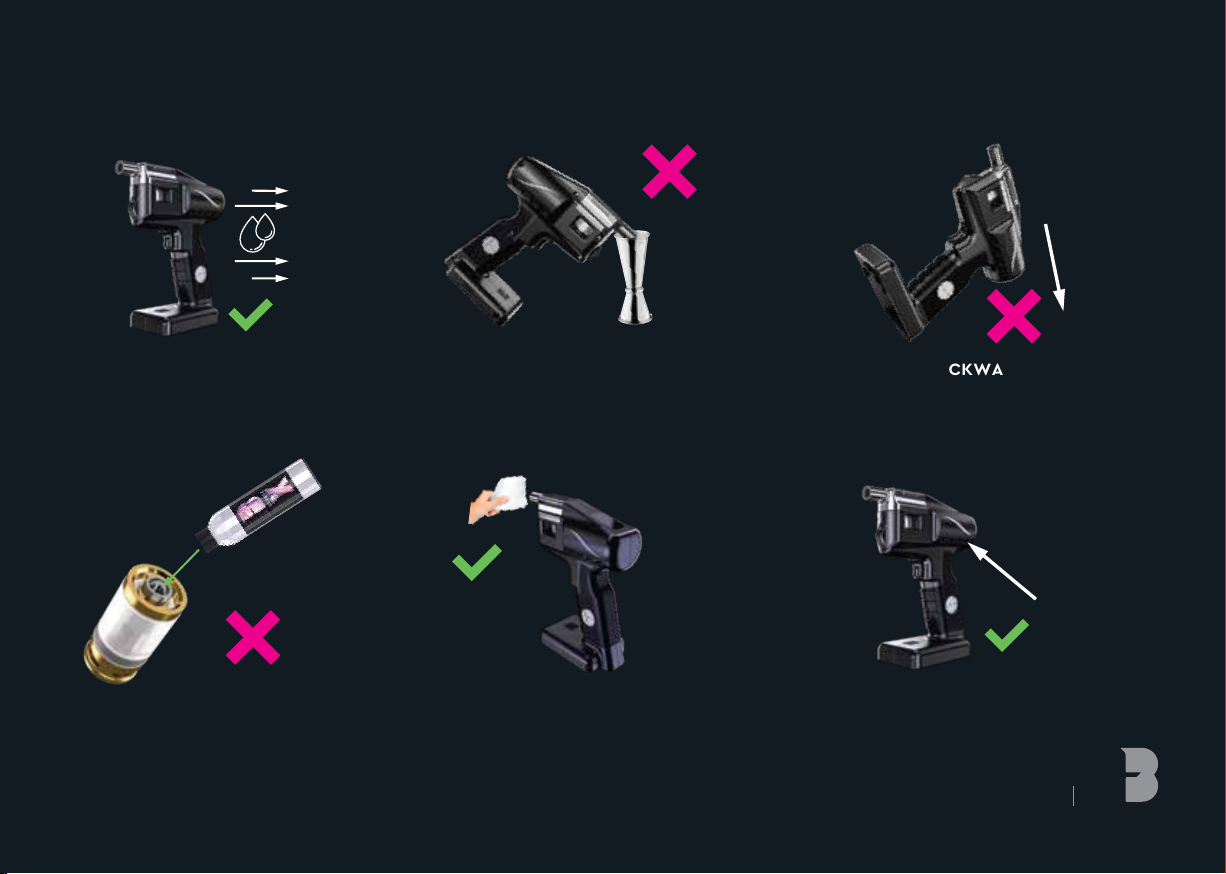
LIQUIDS 09
1. NOT FULLY WATERPROOF
Handle with care around liquids
4. NO BUBBLE X IN TANK
To prevent Tank damage and leaking
3. DON’T TIP BACKWARDS
To prevent Bubble X leaking into Blaster
2. ONLY DIP NOZZLE END
Don’t dip whole Nozzle into Bubble X
6. STORE UPRIGHT
To prevent liquid getting into Fan holes
5. CLEAN / DRY NOZZLE
After each session

CLEAN TANK
CLEAN TANK 10
1. UNSCREW TANK LID
2. UNSCREW COVER LID 3. PULL OFF GLASS COVER
4. UNSCREW COIL
5. PULL OFF COIL BASE 6. CLEANING
Clean all parts with an alcohol wipe
Except for the Coil
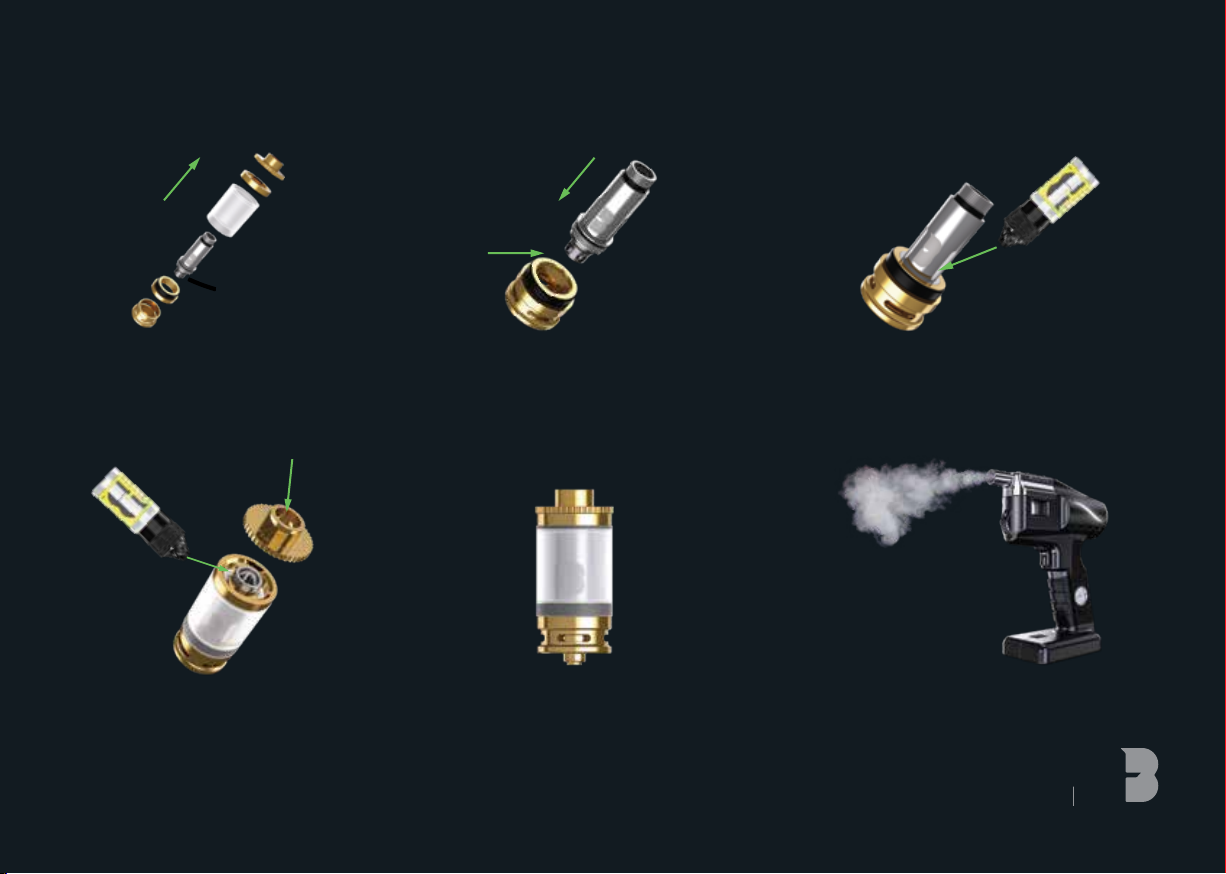
1. UNSCREW COIL
Unscrew (empty) Tank pieces apart
& unscrew Coil
4. FILL TANK
Add 2ml Aroma & keep Tank
full to prevent Coil burning
2. REPLACE COIL
Screw in tight new Coil & ensure
black O Rings are in place
5. REST FOR 2 MINUTES
So Aroma absorbs into Coil
If Aroma leaks retighten Coil
6. REPLACE COIL AGAIN
Every 2–3 weeks or once Aroma
Cloud smellsburnt
3. PRIME COIL WITH AROMA
Pour small amount directly onto Coil
Cotton to preventleaking
COIL CHANGE
COIL CHANGE 11
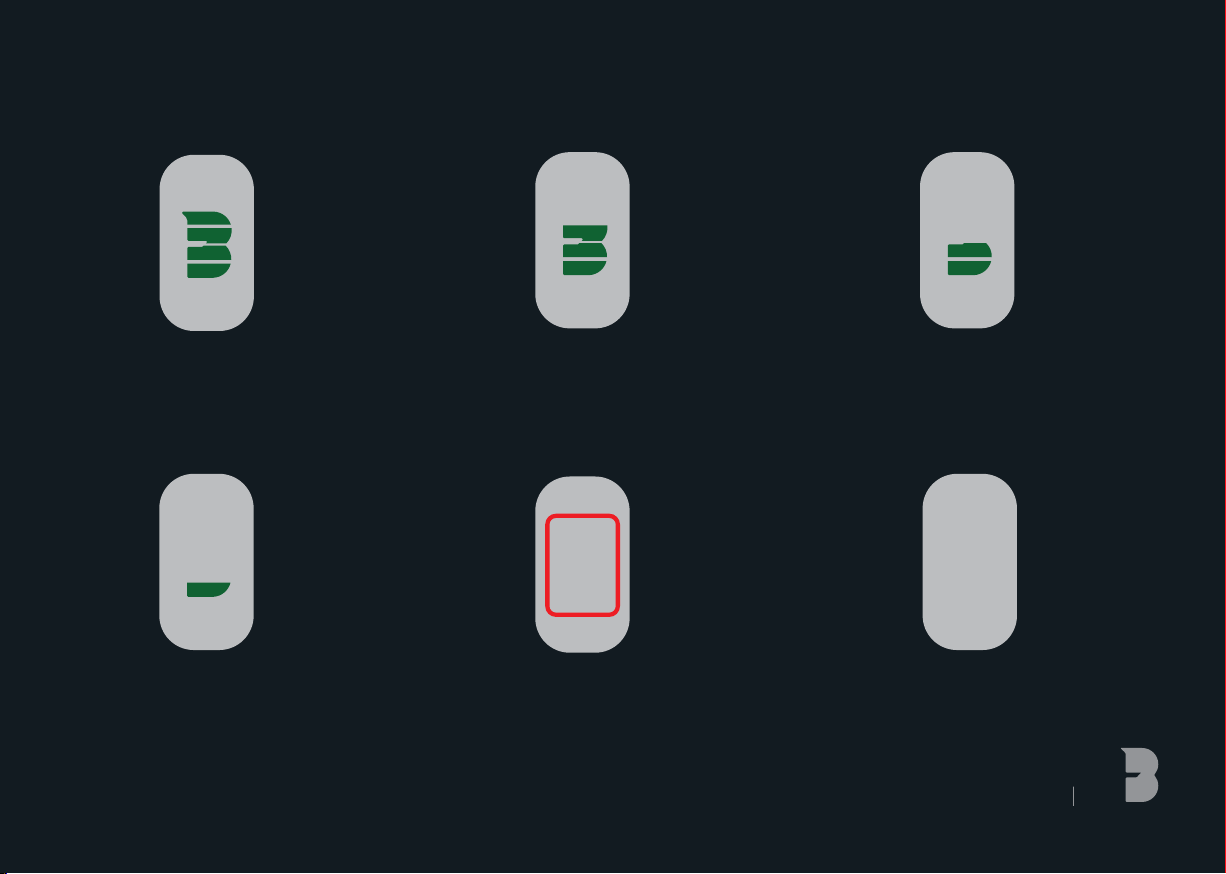
SCREEN12
1. 100% BATTERY
Bars indicate battery charge
2. 80% BATTERY 3. 60% BATTERY
SCREEN
4. 40% BATTERY
5. LOW BATTERY
Red light indicates 20% battery life
6. NO BATTERY
Red light flashes when less
than 10%
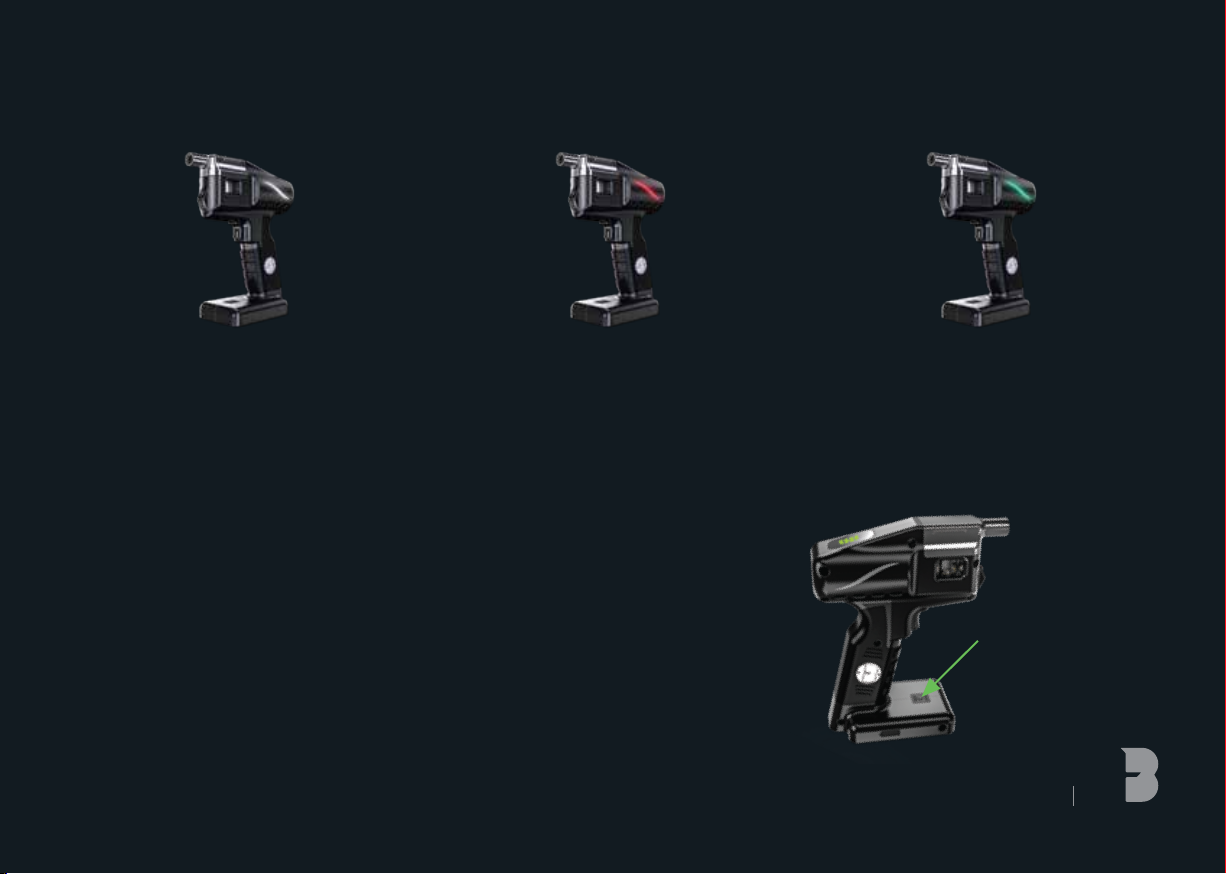
RGB 13
2. RED LED FLASHES
RGB COLOUR CHANGE
i) Press and hold RGB button for 3 seconds to turn on 4 colours
RGB starts auto colour cycle mode
Each color switching time is 3 seconds
ii) Press for 3 seconds to exit cycle mode
iii) Press 3 times (within 2 seconds) to select colour
iv) Press 1 time to change a color
v) Press for 3 seconds to enter cycle mode
RGB WARNING
3. GREEN LED FLASHES
x3 Coil needs replacing
x5 Tank detected
x3 Tank not detected
x5 Battery wattage low
1. WHITE LED FLASHES
x3 Temperature too high
x4 Excess use heat protection
x5 Power On/Off

SAFETY14
SAFETY
ALWAYS STORE THE FLAVOUR BLASTER IN AN UPRIGHT POSITION:
THIS WILL PREVENT ANY LIQUIDS ENTERING INSIDE THE CASING.
POWERING THE FLAVOUR BLASTER ON & OFF:
Press the Trigger three times in quick succession to turn on the Flavour Blaster.
Press the Trigger three times in quick succession to turn off the Flavour Blaster.
Always power off the Flavour Blaster when it is not being used and remove the Tank.
8 SECOND CUT OFF:
If Trigger ispressedfor 8seconds Flavour Blaster will stop firinguntil Trigger is released and pressed again.
TANK:
Do not pour alcohol into tank, this can cause fire.
Tank / Coil will get hot during use soensure Tank is allowed to cool down before removing Tank from Blaster.
SHIPPING & TRAVELLING:
Remove Tank when shipping or traveling to prevent Tank activating ifFlavour Blaster inadvertently turns on.
Follow rules regarding shipping or traveling with a device with 2 permanently installed Lithium Ion Batteries.
The Batteries are not removable or loose in the device.
SHORT CIRCUIT PROTECTION:
Short Circuit Protection prevents the Flavour Blaster against short circuiting and will stop the unit from functioning in
unsafe conditions. The Flavour Blaster features automatic real-time Tank Ohms detection.
OVER CHARGE PROTECTION:
Flavour Blaster monitors the battery voltage and will automatically power off when the battery is over charged.

FURTHER INFORMATION 15
TECHNICAL SPECIFICATIONS
Battery (Lithium Ion): 5,000 mAh, 2x 3.6 V (INR18650–30Q )
Output Power: 30 W
Output Voltage: 2.99–3.7 V
Output Current (continuous): 4.0-10.0 A
Atomizer Resistance (cold): 0.1–1.2 Ohm
Temperature Limit: 200–600 oF
Input Voltage (unloaded): 5 V 1 A
Input Current: 8.0–10.0 A
Screen On Current: <20 mA
Quiescent Current: <50 mA
Power Down Current: 32-106 uA
%90:ycneicfifE
WARRANTY INFORMATION
JetChill provides a 12 month warranty on parts and labour for the Flavour Blaster.
Please consult www.jetchill.com for full terms and conditions.
For warranty assement the Flavour Blaster needs to be returned to the factory (empty Tank before shipping):
i) JetChill Ltd, Unit 1A, Thornton Road Industrial Estate, Pickering, YO18 7JB, UK, [email protected], 0044 208 1243014
ii) Reference Order Number
iii) On Commercial Invoice enter package value as '£10' and reason for shipment as 'warranty return'

BUBBLE HEADS CLUB 16

www.flavourblaster.com
www.jetchill.com
info@jetchill.com
(uk): 00 44 (0) 208 1243014
(usa): 00 1 (469) 469-3181
JetChill Ltd
The Printcentre Building
Fulwell Road
Sunderland
UK
SR6 0HR
Table of contents
Popular Commercial Food Equipment manuals by other brands

Costan
Costan GRANVISTA INTEGRAL WATER LOOP Cleaning instruction

Hatco
Hatco CSUR Series Installation and operating manual

Stoelting
Stoelting IntelliTec M202 series Operator's manual

Diamond
Diamond DD-LVB/1-NP instructions

Prodew
Prodew VersaFresh installation manual

AHT
AHT AC-COOLER AC-S Operating and maintenance instructions


Waldorf
Waldorf Bold PCB8140E-7 Installation and operating manual

Silver King
Silver King SKPZ92-EDUS2 Technical manual and replacement parts list

Nordcap
Nordcap RRS 090 C INSTALLATION AND USE BOOKLET

Pitco
Pitco RTG18 Installation and operation manual

Kneader
Kneader RS201 user manual

Diamond
Diamond OL104/B5-R/R2 manual