Flexia Reformer User manual
Assembling the Flexia™ Reformer
Foot End
Head End
Foot Strap Anchor
Long Rail
Springbar
Welcome to the Flexia™ Community! Thank you for your purchase. Easy to follow videos on
Assembly, Introduction & Safety, and how to properly store your Flexia™ Reformer can be
found at http://Assembly.FlexiaPilates.com.
TOOLS NEEDED
Your Flexia™ Reformer comes with three wrenches and all of the bolts necessary to assemble:
5/32” Allen wrench
9/16” Open Ended Wrench
7/16” Open Ended Wrench
Bag of bolts, nuts, and washers
Note: If you have a ratchet and socket at home, these can be helpful. Pictured in the
assembly video is a 9/16” socket with an extender arm, and a smaller 7/16” socket.
PREPARE YOUR REFORMER FOR ASSEMBLY
Arrange your reformer in a rectangle on the floor. Consider padding the floor with a blanket
or carpet to protect your floor and your Flexia™ Reformer from damage. You will be
assembling your Flexia™ Reformer frame upside down. Upside down assembly is the easiest
way for one person. It will be easy, we promise.
1
Foot End Outer Corner
Foot End Inner Corner
Head End Inner Corner
Head End Outer Corner
PREPARE THE HEAD END
1. Place the head end frame (the short piece of wood
with a notched end)
2. Place the head end outer corners that do not have
wheels on them at the head end.
3. Place the head end inner corners with round knobs
at the head end.
4. Find and place the long wood rails (Right side and
Left side). Align them so that the rubber stoppers on
the metal rails are toward the head end.
PREPARE THE FOOT END
1. Arrange the Springbar assembly, which is the U-shaped
metal assembly on the floor as shown, with the
eyehook openings pointing toward the floor.
2. Place the foot end frame (short wood piece without
a notch) between the long rails.
3. On either side of the foot end frame, place the outer
corners with wheels attached, and make sure that
the wheels are pointing in the long axis direction.
4. Place foot end inner corners with lever knobs next
to the outer corners.
5. Place the foot strap anchors and the foot strap just
below the short wood piece.
6. Double check to make sure that your long rails are positioned
correctly. The metal rails should have three holes visible, facing toward the foot end.
INSTALL HEAD END
Note: Grab the bag of hardware containing 16 carriage bolts, 16 nuts, and 16 washers.
Start with the left corner.
1. Make sure that the flat side of the metal on the long rail
is facing upward. The rubber stopper should be facing down.
2. Sandwich the long rail right between the inner and outer
corners and line the bolt holes up.
3. Send one carriage bolt through each of the holes
from the outside.
Note: The carriage bolt has a square head, so it has
to be positioned properly to seat all the way in the
hole in the outer corner.
4. Make sure that the bolt goes all the way flat, and hold it in place with your fingers.
Note: You might have to do some wiggling here. 2

INSTALL HEAD END CONTINUED
5. In your hardware bag, find one washer and one nut.
6. Place the washer, then the nut, and finger tighten only. It will only tighten a certain amount
before it gets tough to spin.
7. Ensure the short wood rail piece has the notch facing the floor. Sandwich the short wood
piece with the notch between inner and outer corners.
8. Insert the carriage bolt, one washer, and nut, and assemble.
9. Repeat for all 4 holes at that corner. Hand-tighten only, so the frame is loosely assembled
but has wiggle room.
Note: You may notice everything is a bit loose. That's normal. You will assemble the entire
frame by hand first, and then at the very end, go around and tighten everything.
Repeat the process on the right corner.
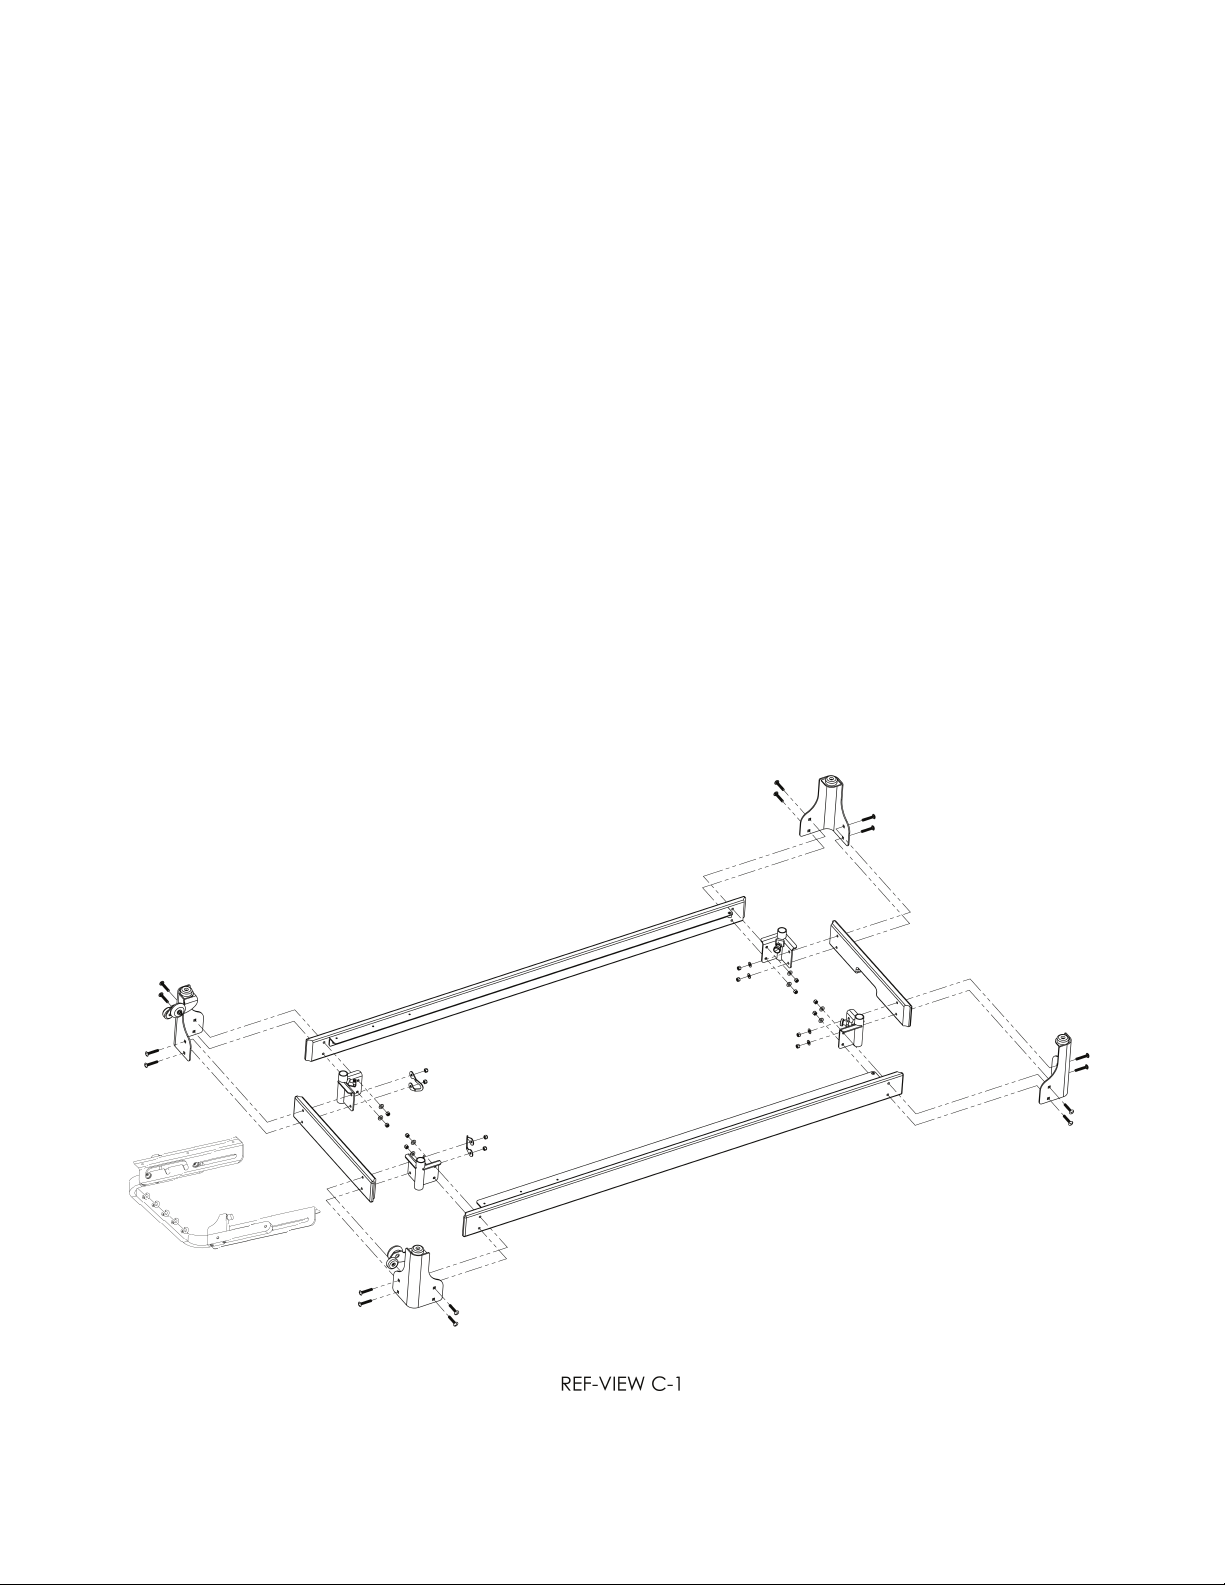
INSTALL FOOT END: ASSEMBLE THE CORNERS
1. Sandwich the long wood rail in between the inner and outer corners (reference image C1).
Note: Double check the inner corner has a plunger with a lever on it, and that your portage
wheels are pointing straight along the long axis.
2. Grab a carriage bolt, and install it from the outside.
Note: You may need to wiggle the pieces back and forth to get these holes to line up here.
3. Install the washer and the nut. Repeat the carriage bolt, washer, and nut installation on
the other hole.
Note: The short wood piece does not have a notch, there is no upside down.
4. Sandwich the short wood piece between the inner and outer corners. There’s an additional
piece to add here that we didn't have at the head end: the foot strap anchor and the
padded foot strap.
a. Align the foot strap with the short wood piece so that the Flexia™ logo is upside down
and facing away from the wood.
b. Send one of the foot strap anchors through the looped end of the foot strap, and then
place it right over the two holes on the inner corner.
c. Send the carriage bolt through the outer corner, short wood piece, inner corner, and
foot strap anchor from the outside.
d. Now, install the washer and nut on the carriage bolt. Finger-tighten.
e. Repeat the carriage bolt, washer, and nut installation for the other hole.
f. Slide the remaining footstrap anchor through the other end of the foot strap and repeat
the carriage bolt, washer, and nut installation on that side.
INSTALL SPRINGBAR
Note: Grab the bag of hardware containing 6 flathead bolts, 6 washers, and 6 nuts.
1. Grab the springbar and place it upside down on the metal rails.
Note: You want to make sure that it is upside down . The eye hook openings should face the
floor in this position.
3
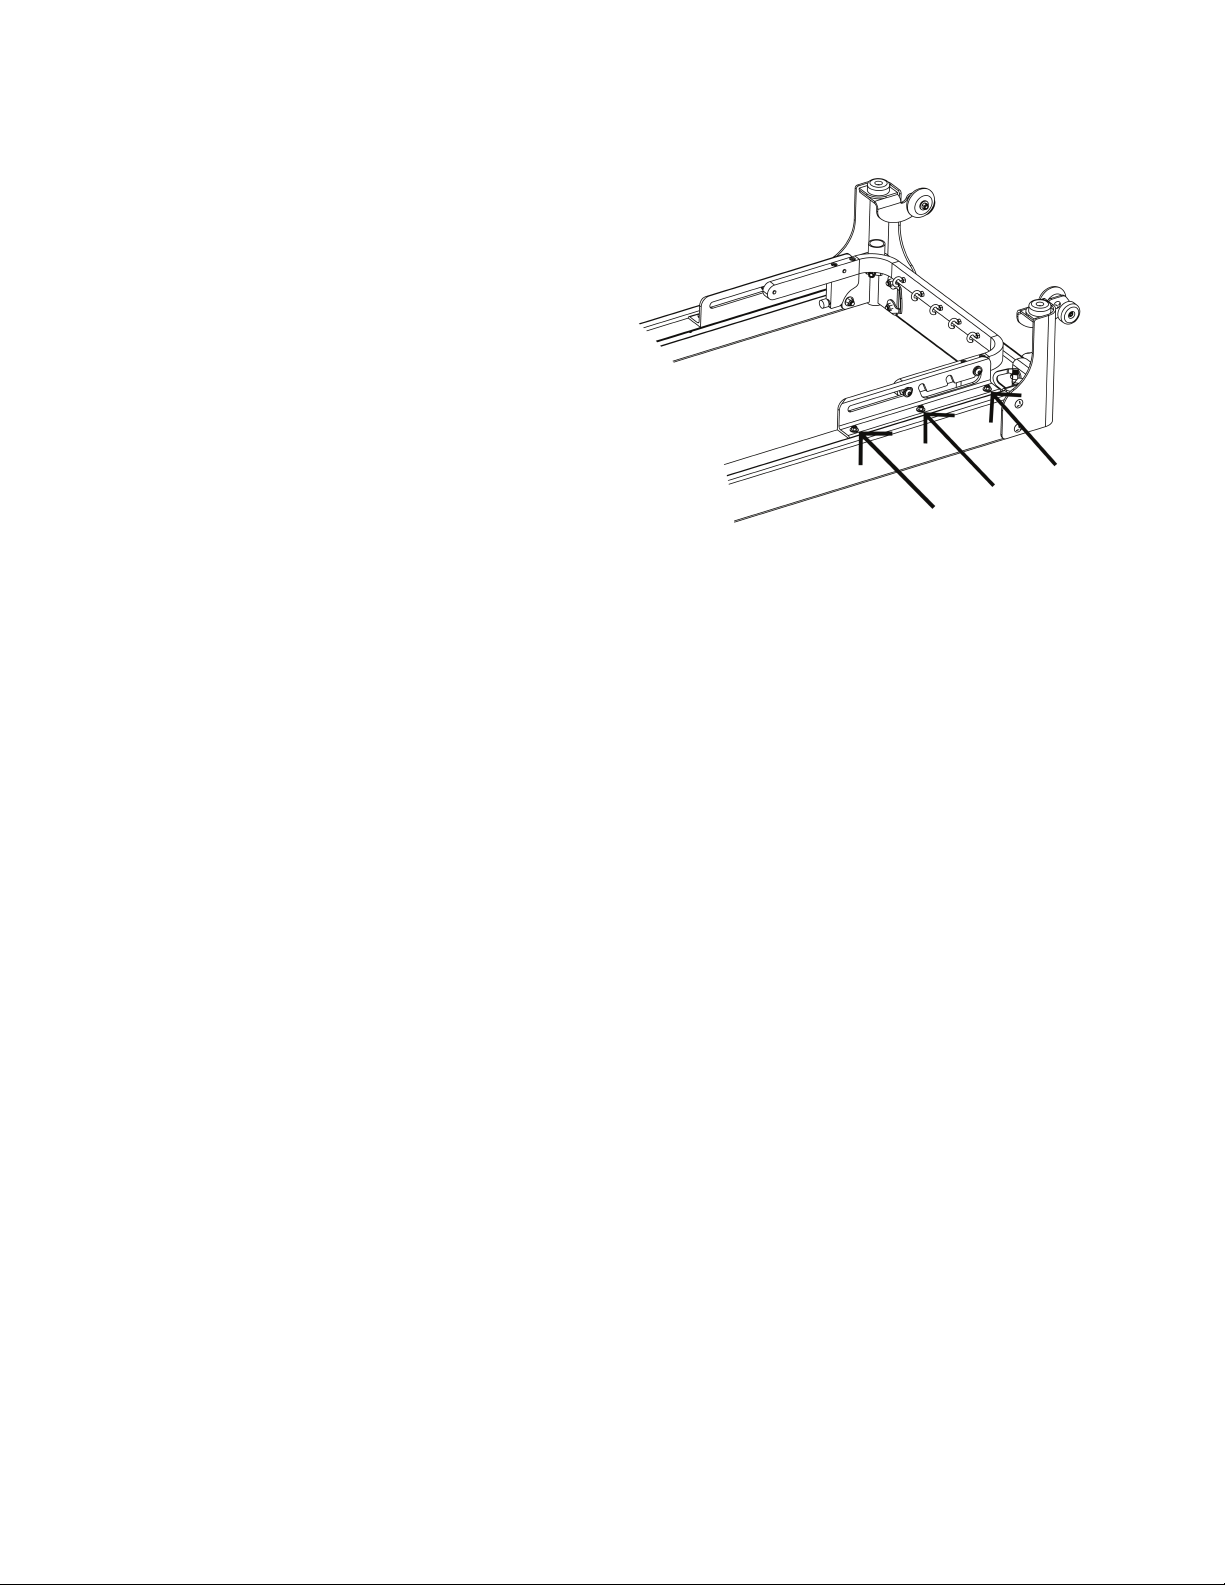
INSTALL SPRINGBAR, CONTINUED
2. Place the springbar in the gear closest to the footbar.
This is the home position. Check that the gear is in the
same position side to side.
3. Position it so that you can see all six holes are aligned.
Note: Arrows on image are the three holes on
the right side.
4. Find flat head bolts, washers, and nuts.
5. Place one bolt through the rail first, then the
springbar bracket starting from the side closest
to the floor.
6. Put the washer and the nut on the top where you can
see them. Use your fingers to hold it up and tighten.
7. Repeat for all six holes. Remember, just finger tight.
Now that you have your springbar hand tightened to the rails, you’re ready to tighten all of the
bolts that you just installed.
Allen Wrench
7/16” wrench
9/16” wrench; option to use a socket and ratchet and extender for speed
SPRINGBAR
1. Use the Allen wrench on one side of the bolt to keep it still, and then the 7/16” wrench (or
ratchet and socket) on the other side to tighten the nut. You want them to be snug but
don't over-tighten.
2. Repeat for all 6 bolts that secure the springbar.
CORNERS
3. Use the 9/16” wrench (or ratchet and socket with an extender arm) to tighten the corners.
In order to be able to reach these bolt heads easier, move the spring bar out toward the
head end into the third gear position.
4. Hold the head of the bolt flush with the outside of the frame with one hand as you tighten
the bolts in the corners with the other. That ensures the square head fits within the
square hole on the outer corner.
TIGHTEN & FLIP: TOOLS NEEDED
FLIP THE REFORMER FRAME
You’re now ready to turn the Flexia ™ Reformer right-side-up!
1. Before you flip the reformer, make sure that you have padded your floor to protect it and
the reformer. Make sure you have enough space for the side that you're going to flip it
towards.
4

FLIP THE FRAME, CONTINUED
2. Stand on one long side of the Reformer. Lift the side closest to you up and away from you,
until the frame is on its side.
3. Balance the frame on its side and position yourself to easily control the Reformer on its
descent into the right-side-up position.
4. Once you have it turned over, reposition the reformer where you need it in the room to
finish assembly.
INSTALL THE CARRIAGE
Note: The carriage is attached to the ropes and risers. One strong person can manage this
process, but it helps to have a second person help manage the ropes, loops, and risers. It
can also be helpful to have a second person lift the carriage into the frame.
Note: There are two wings on the top corners of the carriage, one on each side. You must
install the carriage at the head-end of the frame because those wings must go right down in
between the knob and the rail so they will be positioned underneath the metal frame rail
when in use.
1. Position the risers and ropes on the floor near the head-end. Make sure that the ropes are
not tangled underneath the bottom of the carriage. The carriage is heavy so if you think
you might need help, grab a second person.
2. Gently place the carriage into the frame.
a. Put the foot-end of the carriage down first while keeping the carriage as horizontal
as possible.
b. Slide the carriage so that the wings tuck right in underneath the rails. These wings fit
between the end ofthe rail that has the rubber bumper on it, and the round knobs
on the corner.
c. Double check to make sure the ropes are not tangled. If they are, lift the carriage
untangle the rope, and set back down.
d. The carriage should slide easily back and forth in the frame.
5
INSTALL THE RISERS
1. Grab one riser, ensuring the rope is not tangled or crossed. Make sure that the eyebolts
and pulleys point straight toward the carriage, and the arm curves inward.
2. Pull out the knob in the corner, and lower the riser until it snaps into place.
3. Repeat on the other side.
INSTALL THE SPRINGS
The springs go on in a particular order. The color end is going to be pointed in the direction
that you can see and then the uncolored end is positioned underneath.
1. Add the black spring to the middle hook.
a. Slide it under the carriage and hook it on.
b. When it's installed, it should rest on the spring rest.

INSTALL THE FOOTBAR
Important Safety Tip: Always make sure the footbar is locked into place with both
plunger levers before use.
1. Flip your levers so they point up. They should lock into place. It doesn't matter which
direction you turn them, as long as they're facing up.
2. Place your footbar into the corners, and slide it all the way down.
3. Flip the knobs in either direction to unlock them and they will spring into place.
4. Wiggle the footbar up and down to ensure it is locked into place.
5. If you would like to raise the foot bar to the highest position, flip the levers up.
a. Lift your footbar up but not so much that you can see the holes on the inside.
b. Unflip your levers in either direction, and then continue pulling up until it locks into
place. And then, you're all set.
INSTALL SHOULDER RESTS
1. The shoulder rests simply drop into place on either side of the headrest.
Note: Remember you've got a few options for the shoulder rest positions to Find Your Fit.
You can view videos on all of the shoulder adjustments in the Online Studio.
6
2. Next, add the blue springs. The two blues go on either side of your black spring.
3. The orange spring goes on the outside. It doesn't matter which side, just one the outside.
4. Finally the white spring goes on the other outside position.
5. Hook up the colored spring ends to their corresponding hook on the spring bar.
6. Ensure the gear bar is in the home (first gear) position. If not, lift up on the gear bar, slide it
toward the foot-end, and it will drop in place.
Note: The springs can be either attached or unattached when moving the springbar. For ease
of adjustment, be sure to grab the center of the springbar.

SAFETY & USAGE
Safety Warning Instructions
To reduce the risk of injury or damage, read all instructions and the following important
precautions before using the Flexia™ Reformer. Flexia Inc. assumes no liability towards use
or misuse of the equipment.
Use the Flexia™ Reformer only as directed in these instructions and the assembly and
Find Your Fit videos.
— It is your responsibility to ensure all users of the Reformer understand and are
following safety precautions.
— Use the Reformer only on a level surface.
— When the Reformer is not in use, leave all springs connected to the frame.
WARNING: Keep body, clothing, personal items, and hair away from all moving parts.
NEVER STAND ON THE CARRIAGE WITHOUT SPRINGS ATTACHED. Keep children or
pets away from equipment without adult supervision. Use of the reformer is only
safe for one person at a time. Do not wear jewelry while exercising on the equipment.
— Keep children and pets away from the Flexia™ Reformer at all times.
— Do not stand or bear weight on the headrest.
HEADREST WARNING: DO NOT STEP OR STAND ON THE HEADREST. May cause
injury and/or equipment damage. Standing or stepping on the headrest will cause
the carriage to eject from rails and may cause serious injury.
— Before beginning any exercise program, consult your physician.
— If you feel pain, dizziness, or shortness of breath, stop exercising immediately.
— Do not stand the Flexia™ Reformer on end without the reformer in its proper
upright setting. Footbar locked in the highest position. All springs attached to the
springbar. Springbar in the home (first gear) position. Always secure it upright
with the safetystrap.
UPRIGHT STORAGE WARNING: HEAVY EQUIPMENT, Lift with care. Use proper
lifting techniques to lift upright. DO NOT STORE WITHOUT SAFETY STRAP. Please
refer to Safety Warning Instructions for placement.
7

SAFETY STRAP TO WALL WARNING: SAFETY STRAP MUST BE INSTALLED BY A
PROFESSIONAL. When storing a reformer upright, ALWAYS attach to the safety strap
anchored to a wall stud. Failure to do so may result in injury, death, and/or
equipment damage.
STANDING PLATFORM WARNING: Always secure the platform ONLY at the foot
end or head end of the reformer. Do not place the platform in the middle of the
equipment. Failure to do so could cause the platform to become unstable and cause
injury and/or equipment damage.
SITTING BOX WARNING: Always sit on top of the box. DO NOT SIT ON SIDES OR
UPSIDE DOWN. Risk of injury and/or damage to equipment.
YOU ACKNOWLEDGE AND AGREE THAT YOU, AND/OR ANY OTHER THIRD PARTYYOU
ENGAGE TO ASSISTYOU, AND NOT FLEXIA INC., ARE RESPONSIBLE FOR ALL INJURIES,
INCLUDING DEATH, TO YOURSELF OR OTHERS, AND ALL DAMAGES TO PROPERTY,
INCLUDING THE REFORMER AND ASSOCIATED EQUIPMENT, OF ANY NATURE CAUSED BY
OR RESULTING FROM: (A) THE INSTALLATION OF THE REFORMER; (B) ANY RELOCATION
(OR ATTEMPT) OF THE REFORMER AND ASSOCIATED EQUIPMENT; (C) AND ANY REPAIR
(OR ATTEMPT) OF THE REFORMER AND ASSOCIATED EQUIPMENT.
TO THE EXTENT PERMITTED BY APPLICABLE LAW, FLEXIA INC. SHALL HAVE NO, AND
HEREBY DISCLAIMS ALL, LIABILITY OF ANY KIND WITH RESPECTTO: (A) THE INSTALLATION
OF THE REFORMER AND ASSOCIATED EQUIPMENT; (B) ANY RELOCATION OF (OR
ATTEMPT TO RELOCATE) THE REFORMER AND ASSOCIATED EQUIPMENT; AND (C) ANY
REPAIR OF (OR ATTEMPTTO REPAIR) THE REFORMER AND ASSOCIATED EQUIPMENT. ALL
CLAIMS FOR ANY INJURIES OR DAMAGES INCURRED DURING OR AS A RESULT OF THE
INSTALLATION, ANY RELOCATION, OR ANY REPAIR OF THE REFORMER AND ASSOCIATED
EQUIPMENT MUST BE BROUGHT BY YOU DIRECTLY AGAINSTANY THIRD PARTYYOU
ENGAGE TO ASSIST YOU, AND NOT AGAINST FLEXIA INC..
8
SAFETY & USAGE
Safety Warning Instructions
Table of contents
Popular Fitness Equipment manuals by other brands

Eleiko
Eleiko 3002382 Assembly instructions

Body Flex Sports
Body Flex Sports Body Power BRM8981 owner's manual

Kettler
Kettler Astro Assembly instructions

Abisal
Abisal SKY SVP07 Manual instruction

HOMCOM
HOMCOM A90-289 Assembly & instruction manual

BH FITNESS
BH FITNESS SK Line H800 Instructions for assembly and use


