FLEXTEND AC Installation guide


INSTRUCTION MANUAL FOR THE FLEXTEND® AC
Exercise System for The Acromioclavicular (AC) / Shoulder Joint
FLEXTEND®-AC:
Congratulations! You have chosen to use the FLEXTEND®-AC Upper
Extremity Training System, a tremendous training tool for increasing strength
and dexterity of the entire upper extremity; including the shoulders, biceps,
triceps, forearms chest and back.
FLEXTEND®-AC provides assists in providing relief from upper extremity
conditions by correcting the strength/length imbalance between the posterior
and anterior shoulder girdle. Creating strength equality between these
muscle groups decreases pressure on the shoulder and reduces soft-tissue
impingement, irritation and inflammation, thus correcting many types of
musculoskeletal disorders affecting the upper extremity / shoulder.
The FLEXTEND®-AC Exercises and its Exercise Programs target specific
muscles and injury sites using a variety of physician recommended exercises.
Choose specific exercises or exercise program based on recommendations
from your therapist or physician. You will find the exercises quick and easy to
perform in just minutes a day!
FLEXTEND®-AC corrects muscle imbalances within and around the shoulder
joint, providing long-lasting results so you can continue to do the things you
love!
“With FLEXTEND®-AC, YOUR HEALTH is in YOUR HANDS...”
02

INDEX_____________________________________________________
Welcome to FLEXTEND®-AC
Welcome 2
Index 3
Exercise Precautions
Safety Precautions 4
Parts and Accessories 4
Choosing the Correct Resistance 4
FLEXTEND®-AC Assembly
Step 1: Attaching the Anchor Strap to the Front of FLEXTEND® 5
Step 2: Attaching the Anchor Strap to the Back of FLEXTEND® 5
Step 3: Attaching the Anchor Strap to a Single Side of Flextend 5
Step 4: Attaching the Anchor Strap to Both Sides of Flextend 5
Step 5: Connecting Anchor Strap to Door-Jam & Door-Knob 6
Step 6: Connecting Anchor Strap to Stationary Object & Foot 7
FLEXTEND®-AC Exercises
Figure 1: Shoulder Press 8
Figure 2: Shoulder Abduction – Angled 8
Figure 3: Shoulder Abduction –Vertical 8
Figure 4: Shoulder Abduction – Horizontal 8
Figure 5: Shoulder Adduction – Vertical 9
Figure 6: Shoulder Adduction – Horizontal 9
Figure 7: Shoulder Flexion 9
Figure 8: Shoulder Flexion - Diagonal #1 9
Figure 9: Shoulder Flexion - Diagonal #2 10
Figure 10: Shoulder Flexion w/ Supination 10
Figure 11: Shoulder Extension 10
Figure 12: Shoulder Extension - Diagonal #1 10
Figure 13: Shoulder Extension - Diagonal #2 11
Figure 14: Triceps Extension 11
Figure 15: Triceps - Overhead Extension 11
Figure 16: Brachialis Curl – Standing 11
Figure 17: Biceps Curl: Standing 12
Figure 18: Biceps Curl – Seated 12
Figure 19: External Rotation 90-Degrees / Standing 12
Figure 20: External Rotation / Seated 12
Figure 21: External Rotation 45-Degrees / Standing 13
Figure 22: Internal Rotation 90-Degress / Standing 13
Figure 23: Shoulder Scaption 13
Figure 24: Supraspinatus - Thumb Down 13
Figure 25: Shoulder Elevation – Shrugs 14
Figure 26: Shoulder Protraction 14
Figure 27: Shoulder Retraction 14
Figure 28: Incline Chest Press / Shoulder Elevation 14
Figure 29: Flat Chest Press 15
Figure 30: Back - Bent Over Row 15
Figure 31: Back / Seated Row 15
Figure 32: Back / Pull Down 15
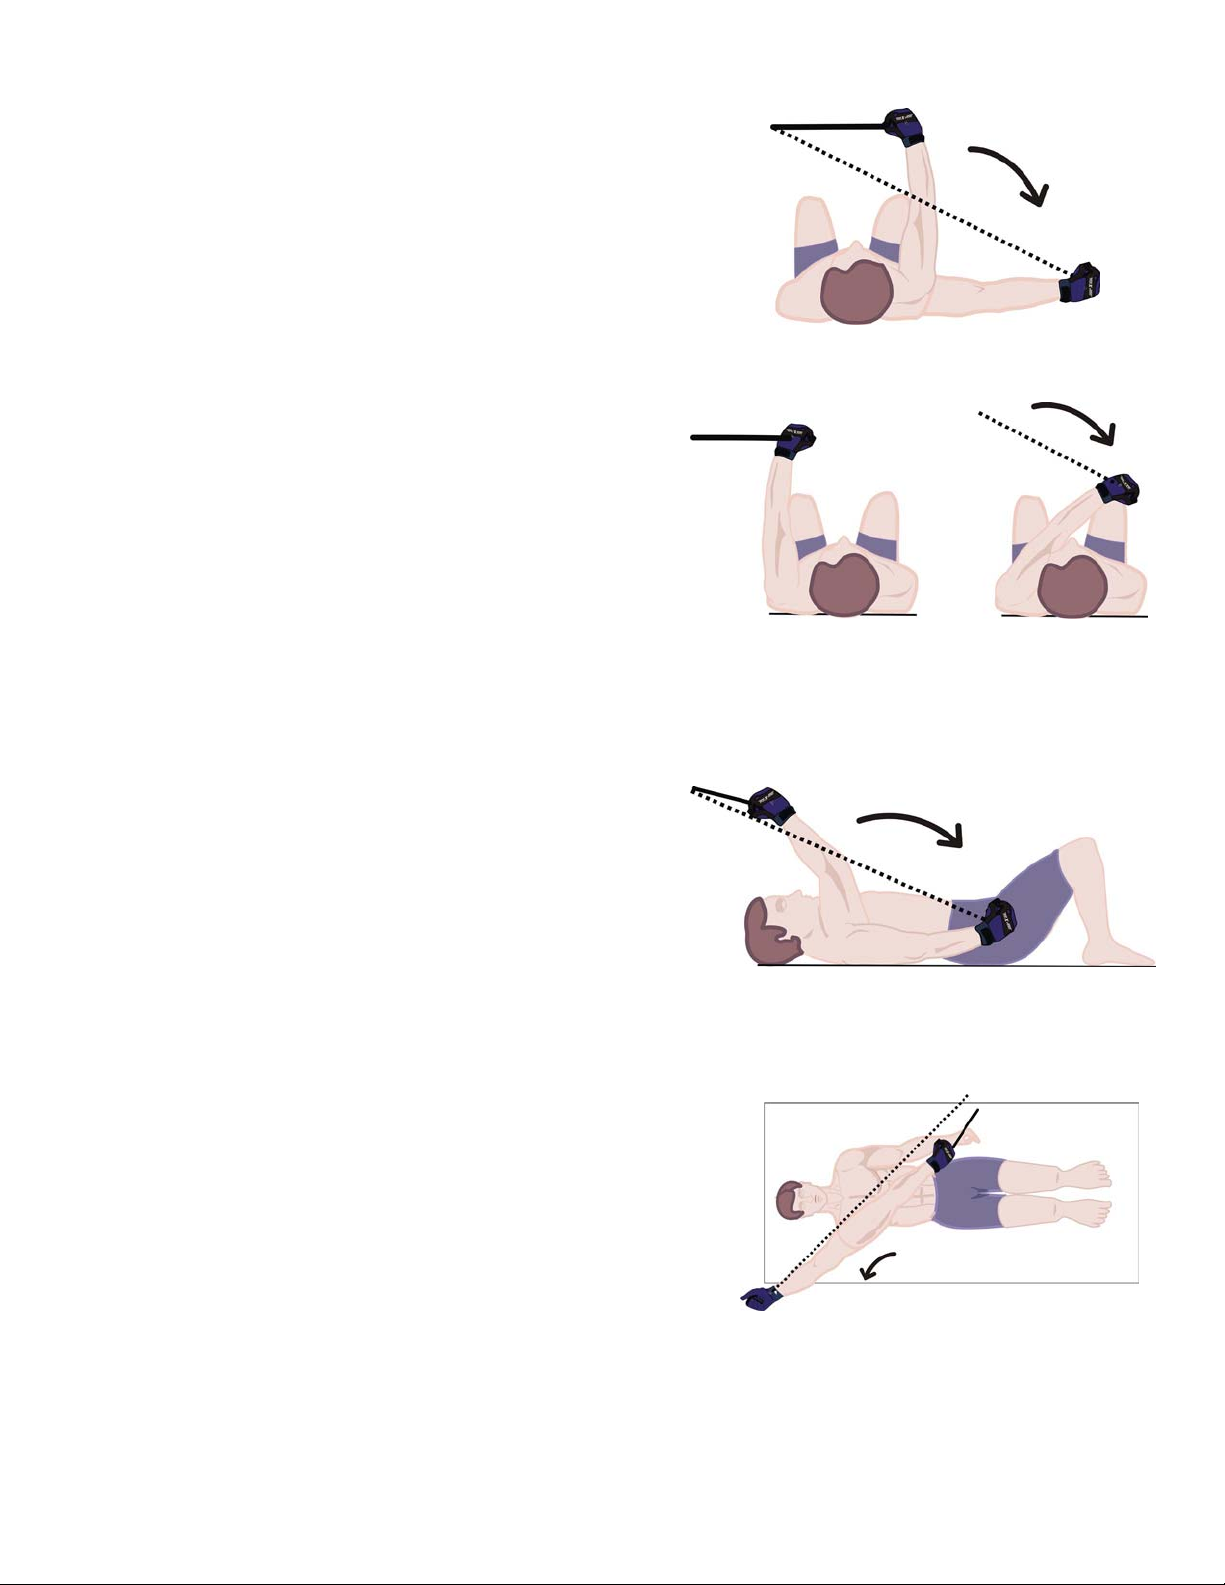
Figure 33: Horizontal Shoulder Abduction – Supine 16
Figure 34: Horizontal Shoulder Adduction – Supine 16
Figure 35: Diagonal Shoulder Extension - Supine #1 16
Figure 36: Diagonal Shoulder Extension - Supine #2 16
Figure 37: Diagonal Shoulder Flexion - Supine #1 17
Figure 38: Diagonal Shoulder Flexion - Supine #2 17
Figure 39: External Rotation 45-Degrees / Supine 17
Figure 40: External Rotation 90-Degrees / Supine 17
Figure 41: Protraction – Supine 18
Figure 42: Wrist / Elbow Pronation 18
Figure 43: Wrist / Elbow Supination 18
Figure 44: Wrist Flexion 18
Figure 45: Wrist Extension 18
FLEXTEND®-AC Exercise Reference Guide
Exercise Programs / Conditions 19-26
03

Safety Precautions___________________________________________
Safety Precautions
• Always consult your Physician before starting any type of exercise
program. Bring FLEXTEND®-AC and Instruction Manual with you to assist
the therapist or physician in recommending the correct exercise(s) for you.
• FLEXTEND®-AC is for use by adults who have read this instruction
manual and understand how to use the FLEXTEND®-AC system properly.
• The FLEXTEND®-AC is not intended to diagnose, prevent or cure any
condition or disease.
• Keep the FLEXTEND®-AC and any spare parts out of children’s reach.
• The FLEXTEND®-AC cannot be subjected to heavy resistance as the
glove may become damaged or may tear and cause injury. The
FLEXTEND®-AC may ONLY be used with the resistance bands that it
came with or the warranty is void.
Note: The FLEXTEND® GLOVE is NOT machine washable! Hand wash
using a warm, damp cloth with a mild liquid detergent. For spills on leather,
use damp cloth only followed by a leather cleaner (if necessary). Let dry
completely before re-assembling and further use.
Parts and Accessories
The FLEXTEND®-AC Kit comes with the following parts and accessories:
• Anchor Strap (1)
• Resistance Band
Interlocking Hook (1)
• 4’ Foot Light/Medium
Resistance Band (1)
• 4’ Foot Medium/Heavy
Resistance Band (1)
• 6’ Foot Medium/Heavy
Resistance Band (1)
• FLEXTEND®-AC
Instruction Manual CD
Choosing the Correct Resistance
FLEXTEND®-AC comes with light and medium resistance bands. To know
which resistance best suites your needs, please obtain the advice of your
therapist or healthcare professional.
! IMPORTANT: The FLEXTEND® glove cannot be subjected to heavy
resistance exercises as the glove may tear, causing injury and/or damage.
04
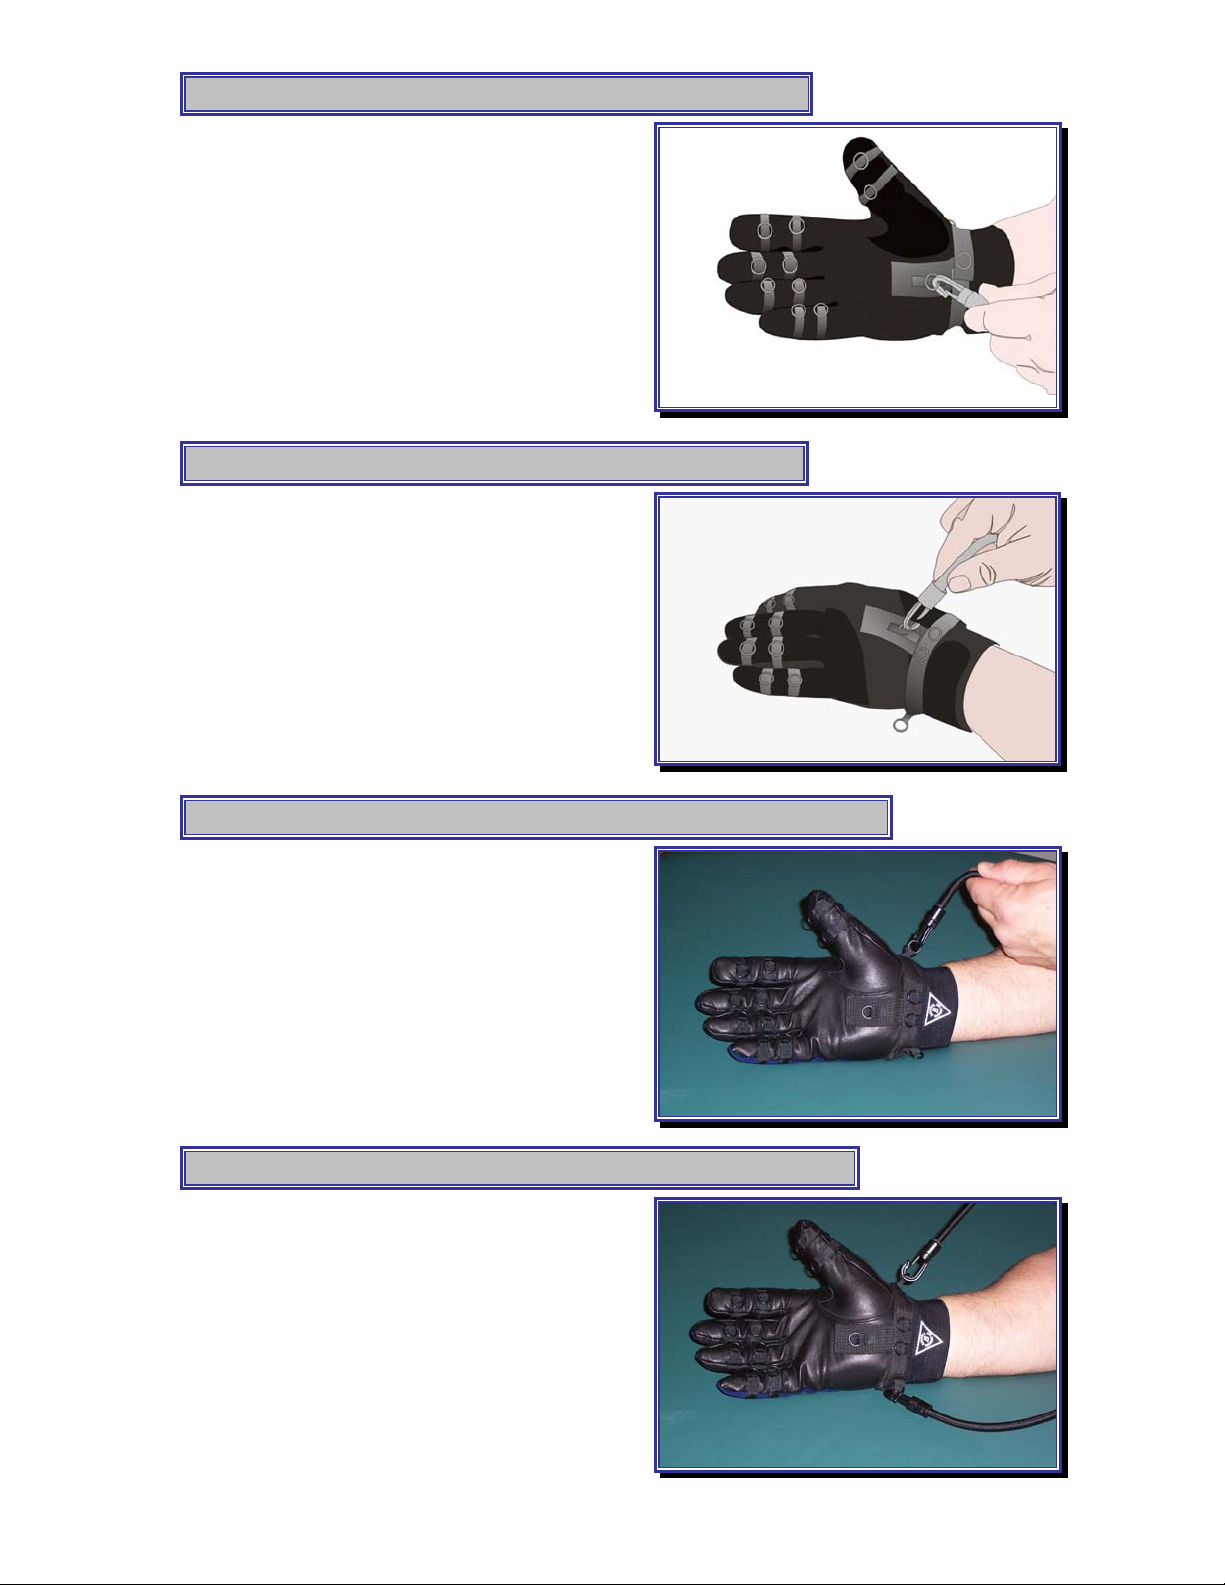
Securing Anchor Strap to FLEXTEND®: (Front)
Attach the secure hook
system of one end of the
Anchor Strap to the O-Ring
located on the front / palm
area of the FLEXTEND®
glove.
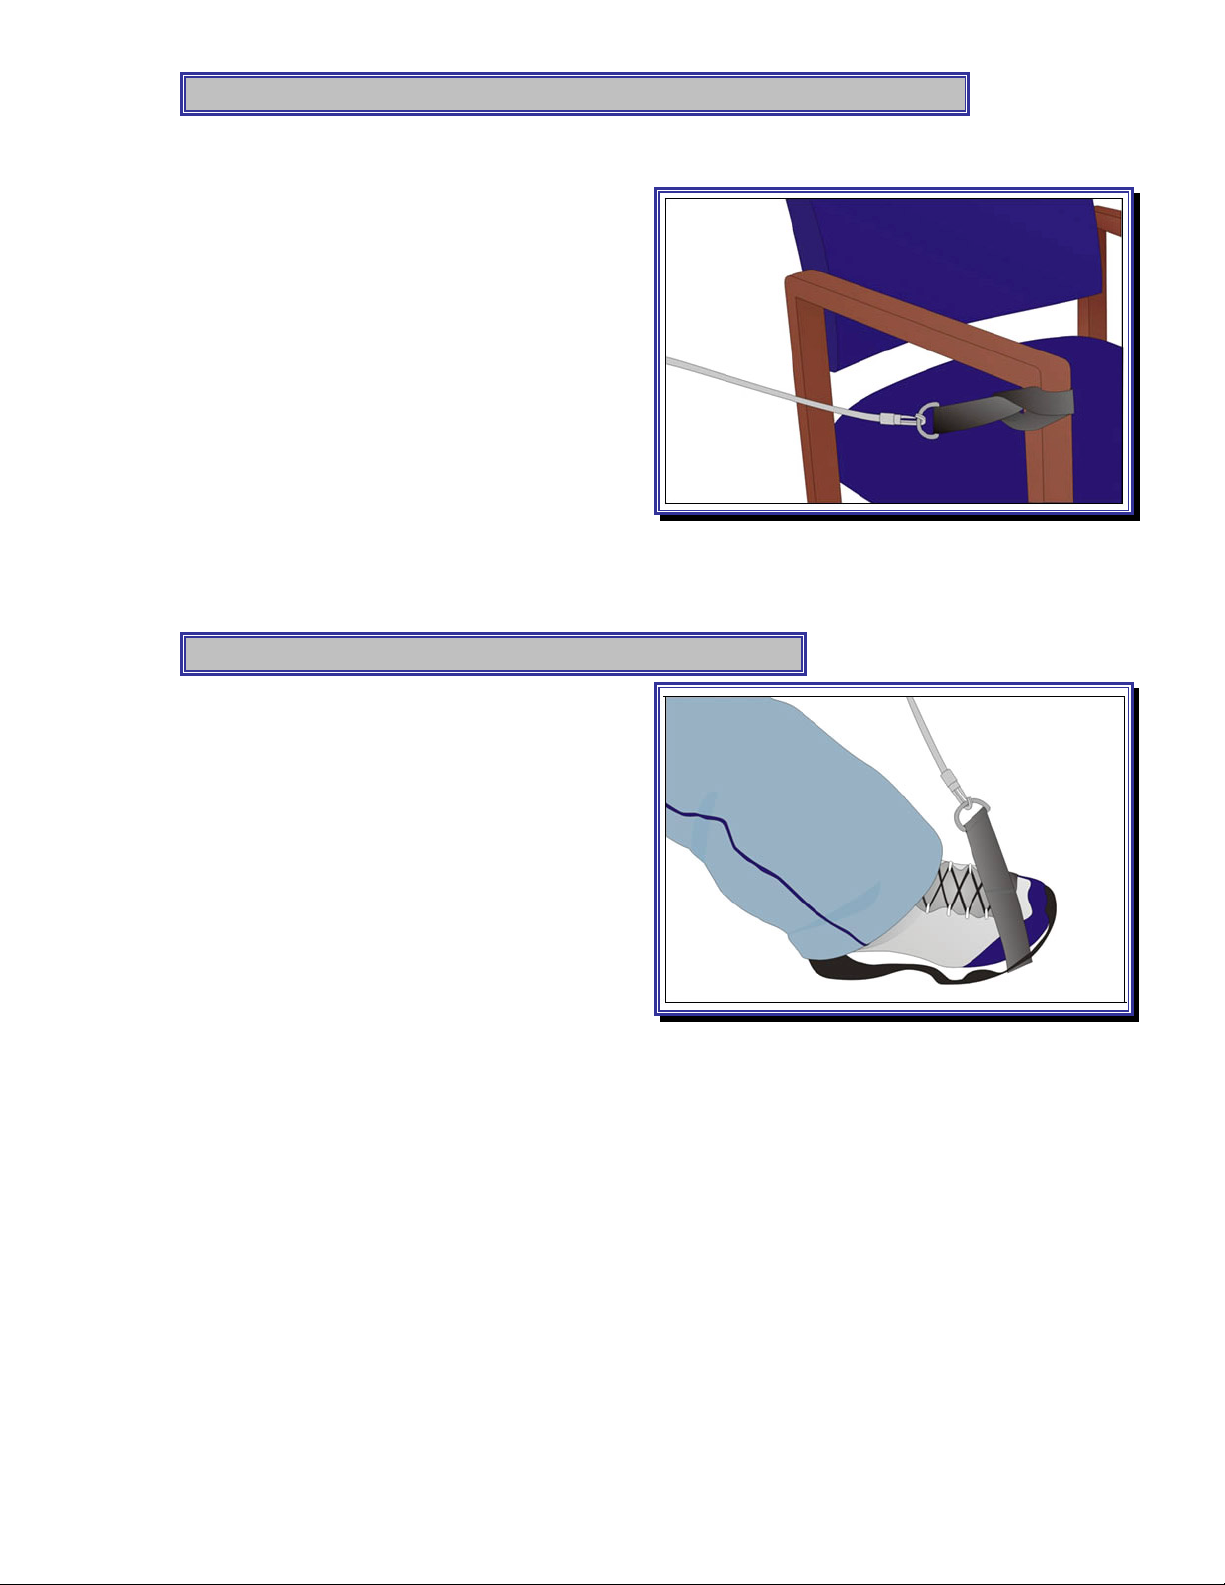
Securing Anchor Strap to FLEXTEND®: (Back)
Attach the secure hook
system of one end of the
Anchor Strap to the O-Ring
located on the Back of the
FLEXTEND® glove.
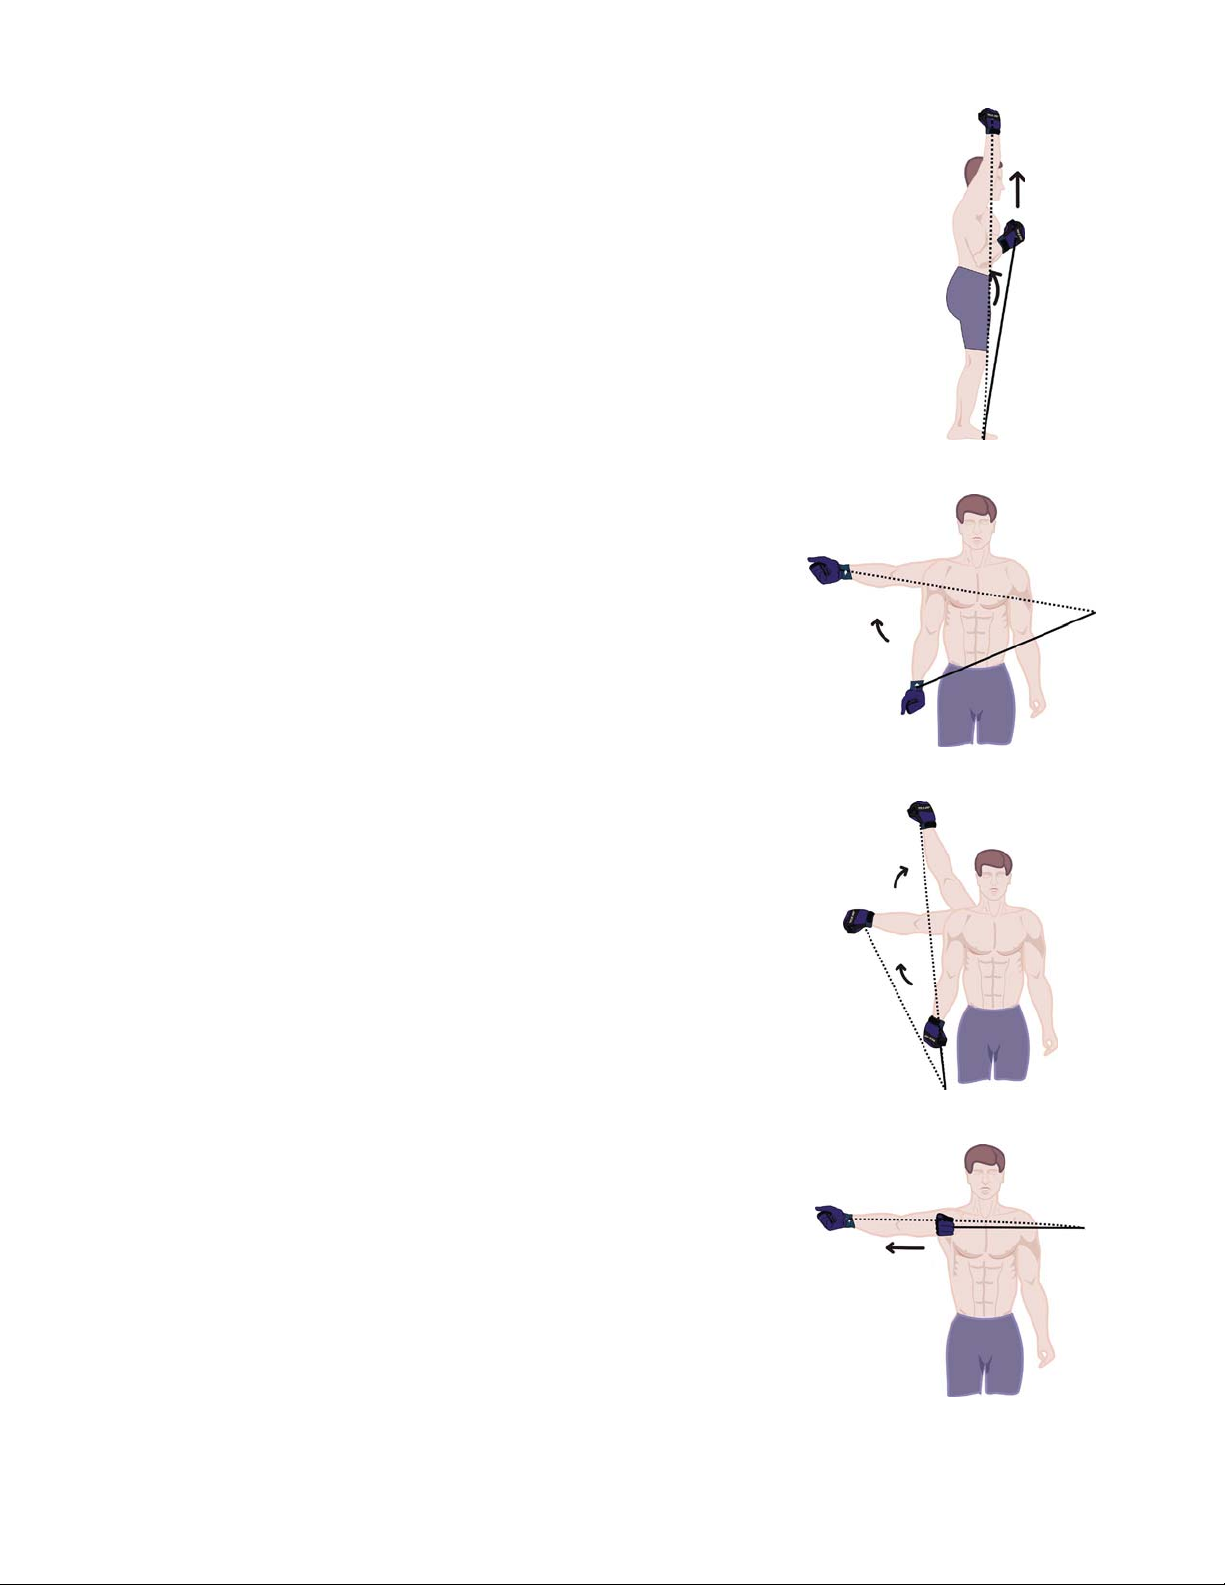
Securing Anchor Strap to FLEXTEND®: (Single Side)
Attach the secure hook
system of one end of the
Anchor Strap to the O-Ring
located on either side of the
wrist area of the FLEXTEND®
glove. NOTE: Attachment to the thumb
or little finger side of FLEXTEND® is based
on the type of exercises that are performed.
(i.e. Thumb-Up Triceps Press Downs /
Biceps Curls, etc.)
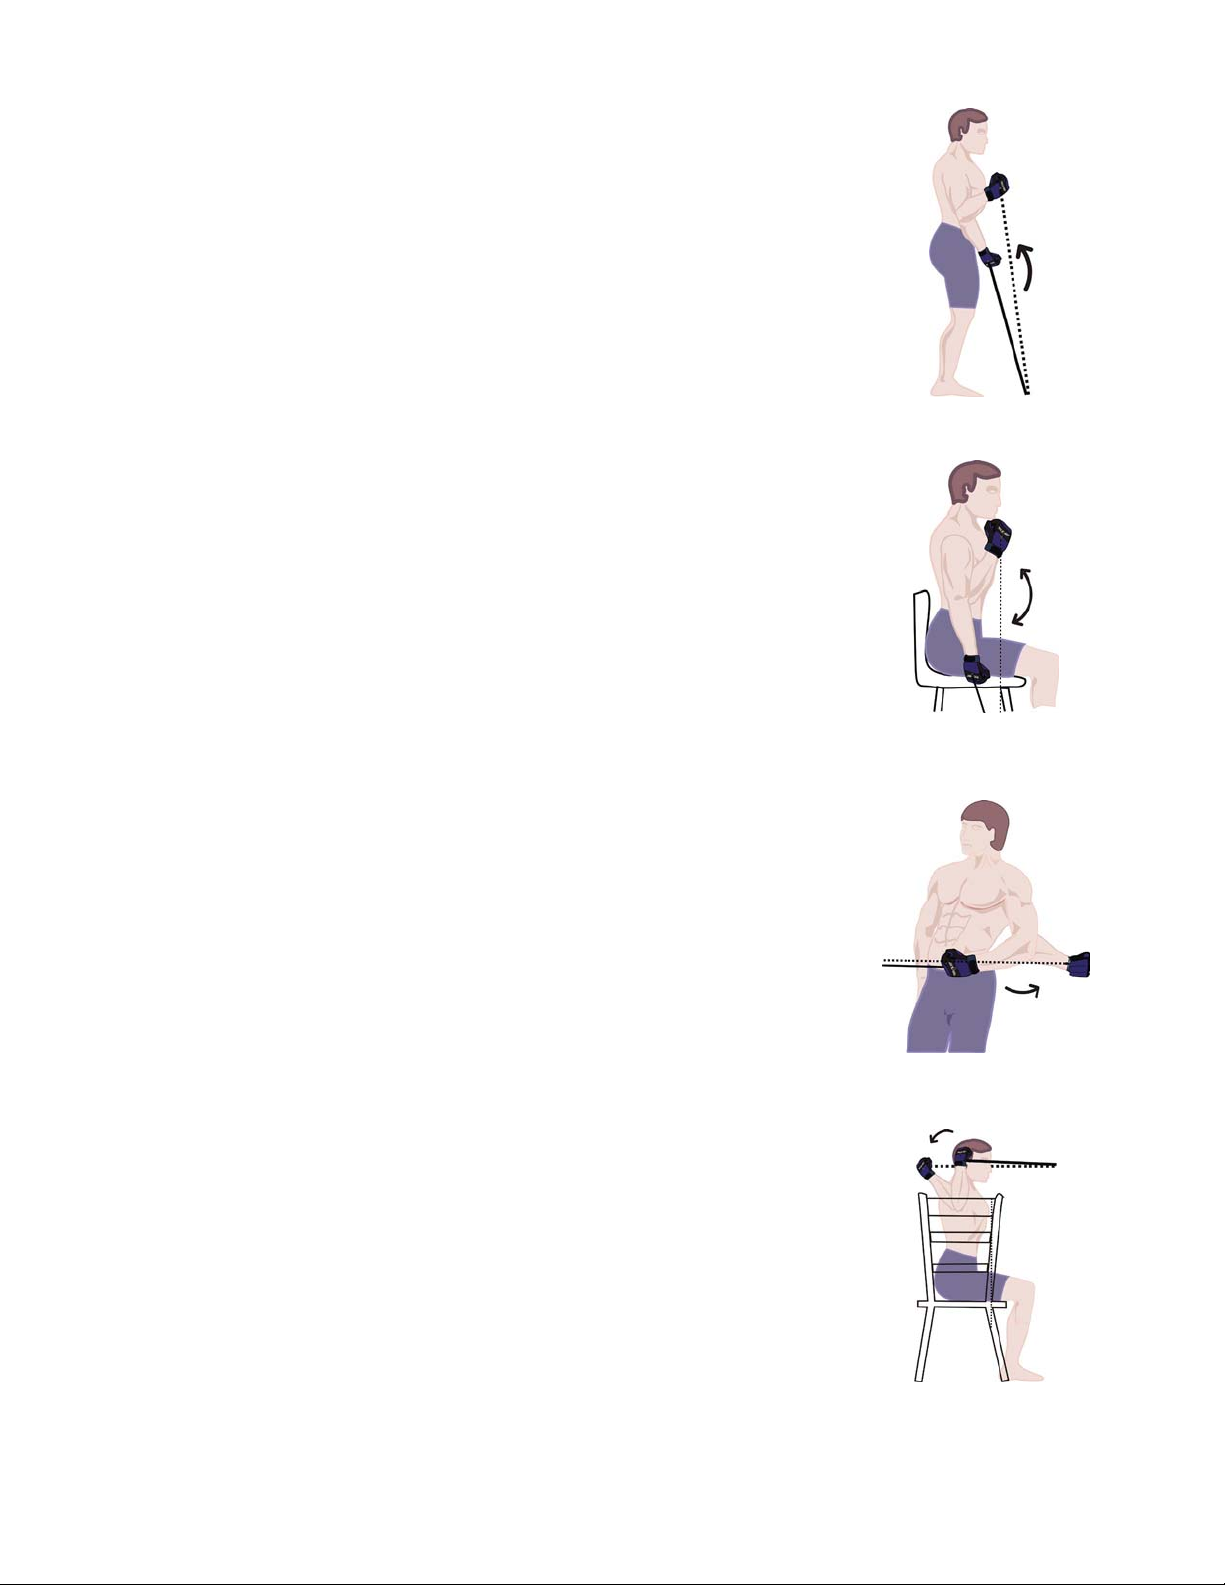
Securing Anchor Strap to FLEXTEND®: (Both Sides)
Attach the secure hook
system of each end of the
Anchor Strap to the both O-
Rings located on each side of
the wrist area of the
FLEXTEND® glove.
05

Methods for Securing Door-Jam Strap in Door-Jam
Door-Jam: Perform exercise
on side of door without
hinges. Place “Safety Knot”
on opposite side of door-jam.
Close and lock or latch door
securely. Secure resistance
band to D-Ring on end of
Anchor strap. Attach
resistance band to D-Ring.
Pull slowly to be sure that the
Anchor Strap is tight and
secure before performing
exercises.
Methods for Securing Door-Jam Strap on Doorknob
Door Knob: Perform exercises
on side of door without hinges.
Place Anchor Strap on the
OPPOSITE side of the door in
which you are standing. The
side of door that has hinges.
Place loop on doorknob, keep
safety stop on side with looped
doorknob. Be sure to securely
close and lock or latch door
securely. Secure resistance
band to D-Ring on end of
Anchor Strap. Pull slowly to be
sure that the Anchor Strap is
tight and secure before
performing exercises.
! NOTE: Exercises are to be
performed on the opposite side
of the door than what is shown
below.
06
Methods for Securing Door-Jam Strap to Stationary Object
Stationary Object: Connect
Anchor Strap to stationary /
non-movable object. Place
either large loop end through
small loop or vice versa.
Once the Anchor Strap is
secure, attach resistance
band to D-Ring of loop end
that has been pulled through
opposing loop end. Pull
slowly to be sure Anchor
Strap is secure before
performing exercises.
Methods for Securing Door-Jam Strap on Foot
Foot: Place large loop of
Door-Jam Strap around foot
and secure resistance band
to D-Ring of small loop. Pull
slowly to be sure that the
Door-Jam Strap is tight and
secure before performing
exercises.
07
Shoulder Press
Attach: Front or back of Wrist
Action: Begin Palm-Forward with the
elbow bent at a 90-degree angle. Push
your hand upward until it reaches a 180-
degree angle/position above your head.
Return to the starting position.
Muscles Utilized: Anterior & Middle
Deltoid.
Figure 1: Shoulder Press
Shoulder Abduction: Angled
Attach: Front of wrist.
Action: Begin Palm-Down with the arm
at your side. Raise your arm to the side
at a 90-degree angle. Return to the
starting position.
Muscles Utilized: Supraspinatus,
Anterior, Middle & Posterior Deltoid.
Figure 2: Shoulder Abduction – Angled
Shoulder Abduction: Vertical
Attach: Front or back of Wrist
Action: Begin Thumb-Up, with the arm
straight down at your side. Raise your
arm to a 180-degree angle/position
above your head. Return to the starting
position.
Muscles Utilized: Supraspinatus,
Anterior, Middle, Posterior Deltoid &
Trapezius.
Figure 3: Shoulder Abduction - Vertical
Shoulder Abduction: Horizontal
Attach: Front of wrist.
Action: Begin Thumb-Up with the arm
straight in front of you at a 90-degree
angle. Extend your arm laterally away
from you. Return to the starting position.
Muscles Utilized: Rear Deltoid,
Infraspinatus, Teres Minor, Rhomboid &
Middle Trapezius.
Figure 4: Shoulder Abduction – Horizontal
08

Shoulder Adduction: Vertical
Attach: Back of Wrist
Action: Begin Palm-Down with your
arm straight to the side at a 90-degree
angle. Lower your arm down to your
side until you come into contact with
your upper thigh. Return to the starting
position.
Muscles Utilized: Pectoralis Major,
Latissimus Dorsi, Long Head of Triceps,
Coracobrachialis & Teres Major.
Figure 5: Shoulder Adduction - Vertical
Shoulder Adduction: Horizontal
Attach: Back of Wrist
Action: Begin Thump-Up with the arm
straight to the side at a 90-degree angle.
Move your arm in front of you past
midline. Return to the starting position.
Muscles Utilized: Pectoralis Major,
Anterior Deltoid, Coracobrachialis,
Pectoralis Minor & Serratus Anterior.
Figure 6: Shoulder Adduction – Horizontal
Shoulder Flexion
Attach: Front of wrist.
Action: Begin Palm-Down with the arm
straight down at your side. Raise your
arm straight out in front, ending between
a 90-120 degree angle. Return to the
starting position.
Muscles Utilized: Pectoralis Major,
Anterior Deltoid, Biceps Brachii,
coracobrachialis, Trapezius.
Figure 7: Shoulder Flexion
Diagonal Shoulder Flexion: #1
Attach: Back of Wrist
Action: Begin Palm-Up with the hand at
your side. Raise your arm through a 45-
degree angle across the front of your
body, reaching across to the opposite
shoulder and above your head. Return
to the starting position.
Muscles Utilized: Upper Division of
Pectoralis Major, Anterior Deltoid,
Coracobrachialis, Biceps Brachii,
Subscapularis & Teres Major.
Figure 8: Shoulder Flexion - Diagonal #2
09

Diagonal Shoulder Flexion: #2
Attach: Back of Wrist
Action: Begin Palm-Down, with the arm
above your head at a 45-degree angle.
Lower your arm across the front of your
body until it reaches the opposite hip.
Return to the starting position.
Muscles Utilized: Lower Division of
Pectoralis Major, Latissimus Dorsi,
Anterior Deltoid, Teres Major
Subscapularis, Serratus Anterior,
Coracobrachialis.
Figure 9: Shoulder Flexion - Diagonal #2
Shoulder Flexion with Supination
Attach: Front of Wrist
Action: Begin Palm-Down, with your
arm at your side. As you begin to raise
your arm, rotate the hand so that it ends
in the Palm-up position at a 90-degree
angle out in front of you. Return to the
starting position.
Muscles Utilized: Pectoralis Major,
Anterior Deltoid, Coracobrachialis &
Biceps Brachii.
Figure 10: Shoulder Flexion w/ Supination
Shoulder Extension
Attach: Front or Back of Wrist
Action: Begin Palm-Up, Palm-Down or
Thumb-Up, the arm straight in front of
you. Extend the arm backwards at the
shoulder until your arm is straight down
at your side or a few degrees back.
Return to the starting position.
Muscles Utilized: Posterior Deltoid &
Long Head of Triceps.
Figure 11: Shoulder Extension
Diagonal Shoulder Extension: #1
Attach: Front of Wrist
Action: Begin Palm-Up with the arm
angled across the front of the body,
reaching above the opposite shoulder.
Extend your arm at a 45-degree angle
across your body and end with your arm
straight down at your side. Return to the
starting position.
Muscles Utilized: Posterior Deltoid,
Latissimus Dorsi, Long Head of Triceps,
Infraspinatus, Teres Minor, Rhomboid &
Middle Trapezius.
Figure 12: Shoulder Extension - Diagonal #1
10

Diagonal Shoulder Extension: #2
Attach: Front of Wrist
Action: Begin Palm-Down with the arm
at a 45-degree angle across the front of
the body with the hand placed on the
opposite hip. Extend the arm across the
body, ending with the hand at a 145-
degree angle above the head. Return to
the starting position.
Muscles Utilized: Supraspinatus,
Posterior Deltoid, Teres Minor,
Infraspinatus, Rhomboid & Middle
Trapezius.
Figure 13: Shoulder Extension - Diagonal #2
Triceps Extension
Attach: Front or Back of Wrist
Action: Begin Palm-Down, Palm-Up or
Thumb-Up, elbow flexed to a 90-degree
angle. Extend the elbow until your arm
is straight down at your side. Return to
the starting position.
Muscles Utilized: Triceps Brachii &
Anconeus. (Emphasis on specific heads changes
depending upon your hand position, i.e. Palm-Down,
Palm-Up or Thumb-Up.)
Figure 14: Triceps Extension
Triceps Overhead Extension
Attach: Front or Back of Wrist
Action: Begin Palm-Down, Palm-Up or
Thumb-Up, hand above your head with
elbow flexed to a 90-degree angle.
Extend the elbow into your arm is
straight out in front of you. Return to the
starting position.
Muscles Utilized: Triceps Brachii &
Anconeus. (Emphasis on specific heads changes
depending upon hand position, i.e. Palm-Down, Palm-
Up or Thumb-Up.)
Figure 15: Triceps - Overhead Extension
Brachialis Curl: Standing
Attach: Front of Wrist
Action: Begin Palm-Down with the
elbow straight down at your side. Flex
the elbow until your hand reaches
between 90-160 degrees. Return to the
starting position.
Muscles Utilized: Biceps Brachii,
Brachialis & Brachioradialis (Emphasis on
specific muscles changes depending upon hand
position, i.e. Palm-Down, Palm-Up or Thumb-Up.)
Figure 16: Brachialis Curl – Standing
11
Biceps Curl: Standing
Attach: Front or Back of Wrist
Action: Begin Palm-Down, Palm-Up or
Thumb-Up with the elbow straight down
at your side. Flex the elbow until your
hand reaches between 90-160 degrees.
Return to the starting position.
Muscles Utilized: Biceps Brachii,
Brachialis & Brachioradialis (Emphasis on
specific muscles changes depending upon hand
position, i.e. Palm-Down, Palm-Up or Thumb-Up.)
Figure 17: Biceps Curl: Standing
Biceps Curl: Seated
Attach: Front or Back of Wrist
Action: Begin Palm-Down, Palm-Up or
Thumb-Up with the elbow straight down
at your side. Flex the elbow until your
hand reaches between 90-160 degrees.
Return to the starting position.
Muscles Utilized: Biceps Brachii,
Brachialis & Brachioradialis. (Emphasis on
specific muscles changes depending upon your hand
position, i.e. Palm-Down, Palm-Up or Thumb-Up.)
Figure 18: Biceps Curl - Seated
External Rotation: 90-Degrees /
Standing
Attach: Front of Wrist
Action: Begin Thumb-Up, elbow bent at
a 90-degree angle and placed on the
opposite hip. Rotate the hand outward
and away from the opposite hip towards
the same-arm side of the body. Return
to the starting position.
Muscles Utilized: Posterior Deltoid,
Teres Minor & Infraspinatus.
Figure 19: External Rotation 90-Degrees / Standing
External Rotation: 90-Degress / Seated
Attach: Front of Wrist
Action: Begin Palm-Forward, arm
straight out to the side with elbow bent
at a 90-degree angle. Rotate the hand
backward. Return to the starting
position.
Muscles Utilized: Posterior Deltoid,
Teres Minor & Infraspinatus.
Figure 20: External Rotation / Seated
12

External Rotation: 45-Degrees
Attach: Front of Wrist
Action: Begin Thumb-Up, elbow bent at
a 90-degree angle and hand placed on
the hip, same-arm side. Rotate the
hand outward, upward and away from
the immediate hip. Return to the
starting position.
Muscles Utilized: Posterior Deltoid,
Teres Minor & Infraspinatus.
Figure 21: External Rotation 45-Degrees / Standing
Internal Rotation: 90-Degrees
Attach: Back of Wrist
Action: Begin Thumb-Up, elbow bent at
a 90-degree angle with hand straight out
in front. Rotate the hand inward across
the front of the body toward the opposite
hip. Return to the starting position.
Muscles Utilized: Pectoralis Major,
Anterior Deltoid, Subscapularis, Teres
Major & Latissimus Dorsi.
Figure 22: Internal Rotation 90-Degress / Standing
Variations: Shoulder - Internal Rotation
Action: 45-Degree Angle Standing, Seated & Supine. Refer to Figures 19 & 20.
Shoulder Scaption
Attach: Front or back of Wrist
Action: Begin Thumb-Up with the arm
straight down at your side. Raise your
arm to a 180-degree angle/position
above your head. Return to the starting
position.
Muscles Utilized: Upper Division of
Pectoralis Major, Anterior Deltoid,
Coracobrachialis, Biceps Brachii &
Trapezius.
Figure 23: Shoulder Scaption
Supraspinatus / Thumb-down
Attach: Front of wrist.
Action: Begin Thumb-Down, hand
straight in front of you, waist-high.
Raise your arm straight out in front until
your hand is between a 45-90 degree
angle. Return to the starting position.
Muscles Utilized: Supraspinatus &
Anterior Deltoid.
Figure 24: Supraspinatus - Thumb Down
13

Shoulder Elevation / Shrugs
Attach: Front or Back of Wrist
Action: Begin with the arms straight
down at your sides. Shrug the shoulder
upwards as high as you can. Return to
the starting position.
Muscles Utilized: Upper Trapezius,
Levator Scapula & Rhomboid.
Figure 25: Shoulder Elevation - Shrugs
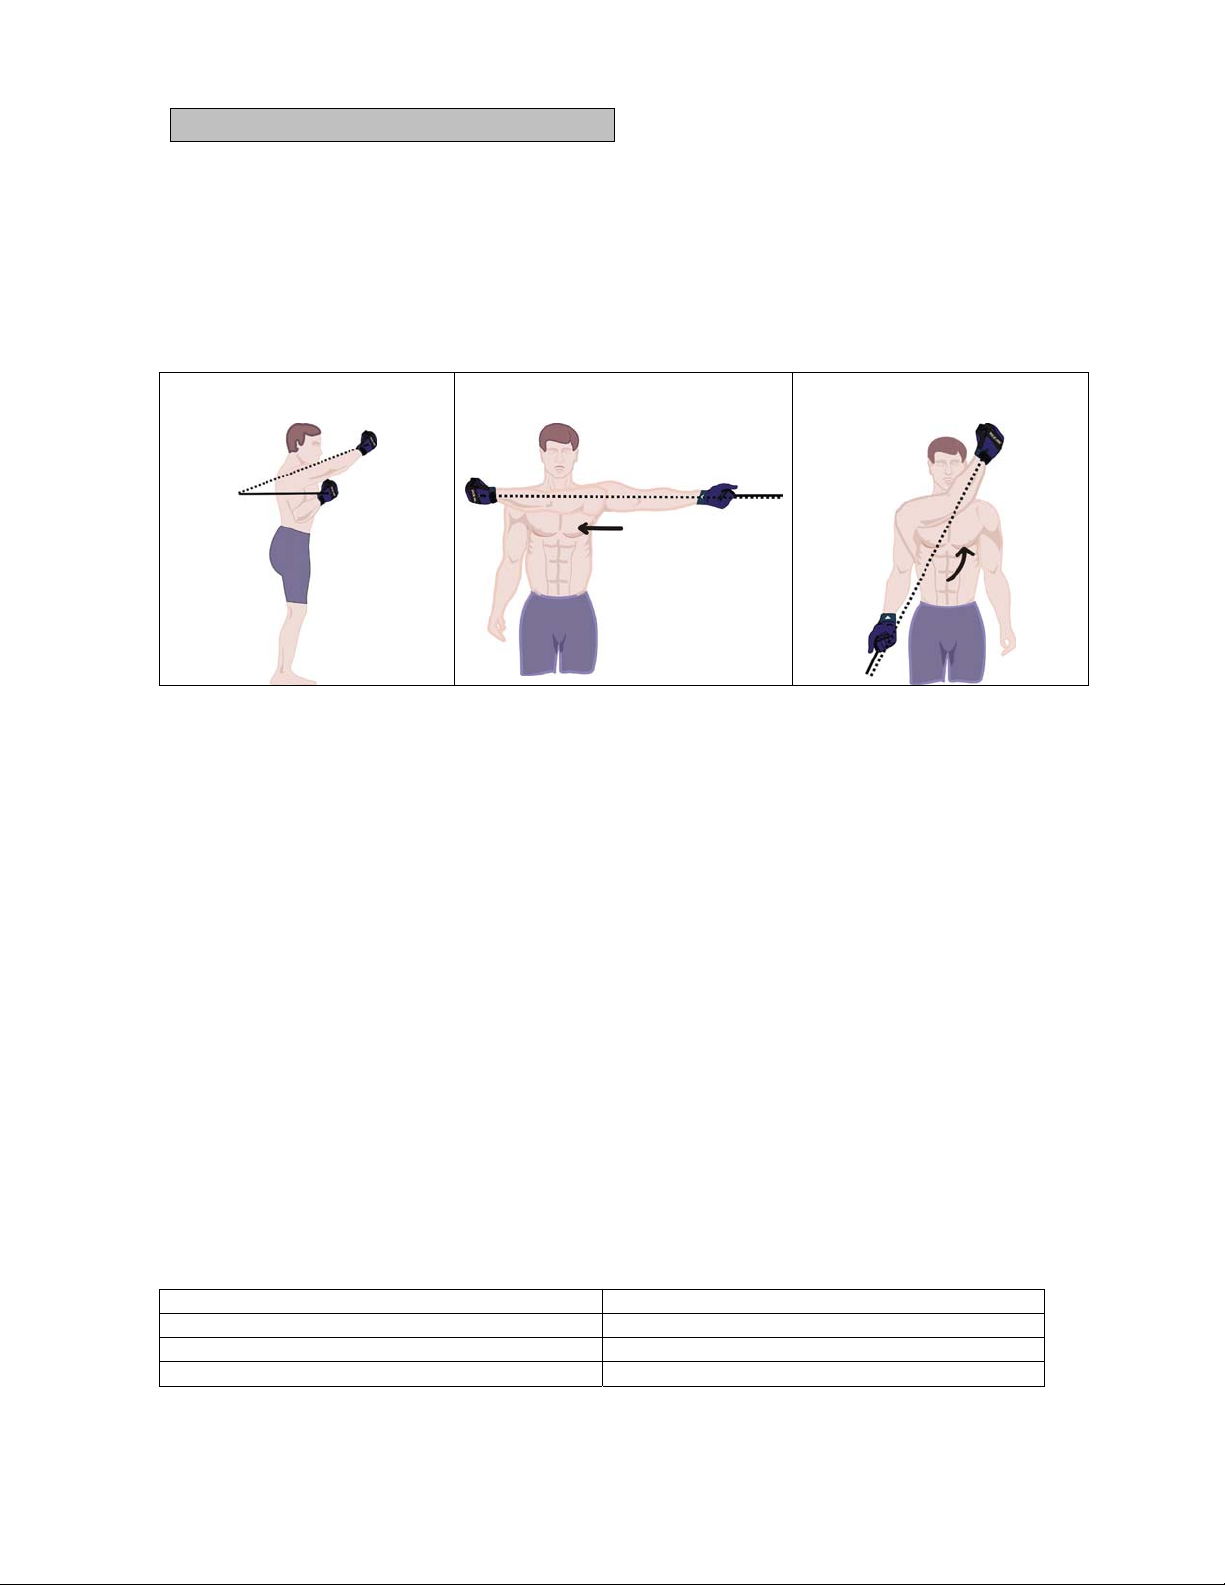
Shoulder Protraction
Attach: Front or back of wrist.
Action: Begin Palm-Down or Thumb-
Up, Arm straight out in front. Push your
hand out in front until your arm is fully
extended. Return to the starting
position.
Muscles Utilized: Pectoralis Major &
Anterior Deltoid.
Figure 26: Shoulder Protraction
Shoulder Retraction
Attach: Front or back of wrist.
Action: Begin Palm-Down or Thumb-
Up, Arm straight out in front. Pull your
shoulder backward as if squeezing your
shoulder blades together. Return to the
starting position.
Muscles Utilized: Rhomboids,
Trapezius & Posterior Deltoid.
Figure 27: Shoulder Retraction
Incline Chest / Shoulder Elevation
Attach: Front or back of wrist.
Action: Begin Palm-Down or Thumb-
Up, Arm at your side with elbow bent at
a 90-degree angle. Push your hand out
in front at a 45-degree angle until your
arm is fully extended. Return to the
starting position.
Muscles Utilized: Upper Division of
Pectoralis Major, Anterior Deltoid.
Coracobrachialis, Pectoralis Minor,
Serratus Anterior & Triceps Brachii
Figure 28: Incline Chest Press / Shoulder Elevation
14

Flat Chest
Attach: Front or back of wrist.
Action: Begin Palm-Down or Thumb-
Up, Arm at your side with elbow bent at
a 90-degree angle. Push your hand
straight out in front until your arm is fully
extended. Return to the starting
position.
Muscles Utilized: Pectoralis Major,
Anterior Deltoid, Coracobrachialis,
Pectoralis Minor, Serratus Anterior &
Triceps Brachii.
Figure 29: Flat Chest Press
Variations: Chest Exercises
Other chest exercise variations that can be performed either seated, standing or lying
down (Supine): *Decline Chest Press *Incline Fly’s *Flat Fly’s *Decline Fly’s
Back / Bent Over Row
Attach: Front or back of wrist.
Action: Begin Palm-Up, Palm-Down or
Thumb-Up, leaning over slightly with
knees bent and the arm straight out in
front. Pull back until the elbow is bent to
a 90-degree angle. Return to the
starting position.
Muscles Utilized: Latissimus Dorsi,
Posterior Deltoid, Trapezius, Rhomboids
& Teres Major.
Figure 30: Back - Bent Over Row
Back / Seated Row
Attach: Front or back of wrist.
Action: Begin Palm-Up, Palm-Down or
Thumb-Up, seated on the floor, with the
arm straight out in front. Pull back until
the elbow is bent to a 90-degree angle.
Return to the starting position.
Muscles Utilized: Latissimus Dorsi,
Posterior Deltoid, Trapezius, Rhomboids
& Teres Major.
Figure 31: Back / Seated Row
Back / Pull Down
Attach: Front or back of wrist.
Action: Begin Palm-forward with the
arm(s) above your head. Pull down until
the elbow is bent to a 75- 90degree
angle. Return to the starting position.
Muscles Utilized: Latissimus Dorsi,
Posterior Deltoid, Trapezius, Rhomboids
& Teres Major.
Figure 32: Back / Pull Down
15
Horizontal Shoulder Abduction: Supine
Attach: Front of wrist.
Action: Begin Thumb-Up with the arm
straight in front of you at a 90-degree
angle. Extend your arm laterally away
from you. Return to the starting position.
Muscles Utilized: Posterior Deltoid,
Infraspinatus, Teres Minor, Rhomboid &
Middle Trapezius.
Figure 33: Horizontal Shoulder Abduction - Supine
Horizontal Shoulder Adduction: Supine
Attach: Back of Wrist
Action: Begin Thump-Up with the arm
straight to the side at a 90-degree angle.
Move your arm in front of you past
midline. Return to the starting position.
Muscles Utilized: Pectoralis Major,
Anterior Deltoid, Coracobrachialis,
Pectoralis Minor & Serratus Anterior.
Figure 34: Horizontal Shoulder Adduction –Supine
Diagonal Shoulder Extension: Supine #1
Attach: Front of Wrist
Action: Begin Palm-Up with the hand
located above the opposite shoulder.
Extend the arm across the body at a 45-
degree angle until it is straight down at
your side. Return to the starting position.
Muscles Utilized: Posterior Deltoid,
Latissimus Dorsi, Long Head of Triceps,
Infraspinatus, Teres Minor, Rhomboid &
Middle Trapezius.
Figure 35: Diagonal Shoulder Extension - Supine #1
Diagonal Shoulder Extension: Supine #2
Attach: Front of Wrist
Action: Begin Palm-Down with the hand
placed on the opposite hip. Extend your
arm at a 45-degree angle across the
body, ending with the hand at a 145-
degree angle above the head. Return to
the starting position.
Muscles Utilized: Supraspinatus,
Posterior Deltoid, Middle Deltoid, Teres
Minor, Infraspinatus, Rhomboid &
Middle Trapezius.
Figure 36: Diagonal Shoulder Extension - Supine #2
16

Diagonal Shoulder Flexion: Supine #1
Attach: Back of Wrist
Action: Begin Palm-Up with the arm at
your side. Flex the arm at a 45-degree
angle across the front of the body,
reaching across to the opposite
shoulder and above your head. Return
to the starting position.
Muscles Utilized: Upper Division of
Pectoralis Major, Anterior Deltoid,
Coracobrachialis, Biceps Brachii,
Subscapularis & Teres Major.
Figure 37: Diagonal Shoulder Flexion - Supine #1
Diagonal Shoulder Flexion: Supine #2
Attach: Back of Wrist
Action: Begin Palm-Down, with the arm
above your head at a 45-degree angle.
Lower your arm across the front of your
body until it reaches the opposite hip.
Return to the starting position.
Muscles Utilized: Lower Division of
Pectoralis Major, Latissimus Dorsi,
Anterior Deltoid, Teres Major
Subscapularis, Serratus Anterior,
Coracobrachialis.
Figure 38: Diagonal Shoulder Flexion - Supine #2
External Rotation: 45-Degrees / Supine
Attach: Front of Wrist
Action: Begin Thumb-Up, elbow bent at
a 90-degree angle and hand placed on
the hip, same-arm side. Rotate the
hand outward, upward and away from
the immediate hip. Return to the
starting position.
Muscles Utilized: Posterior Deltoid,
Teres Minor & Infraspinatus.
Figure 39: External Rotation 45-Degrees / Supine
External Rotation: 90-Degrees / Supine
Attach: Back of Wrist
Action: Begin Thumb-Up, elbow bent at
a 90-degree angle with hand straight out
in front. Rotate the hand inward across
the front of the body toward the opposite
hip. Return to the starting position.
Muscles Utilized: Posterior Deltoid,
Teres Minor & Infraspinatus.
Figure 40: External Rotation 90-Degrees / Supine
17

Protraction: Supine
Attach: Back of wrist.
Action: Begin Thumb-Up, Arm at your
straight out in front. Push your hand
straight out in front until your arm is fully
extended. Return to the starting
position.
Muscles Utilized: Pectoralis Major,
Pectoralis Minor & Anterior Deltoid.
Figure 41: Protraction - Supine
Wrist / Elbow Pronation
Attach: Thumb-Side of Wrist
Action: Begin Palm-Up, elbow at the
side and bent at a 90-degree angle.
Rotate your hand so that it ends in the
Thumb-Up or Palm-Down position.
Return to the starting position.
Muscles Utilized: Wrist and Elbow
Pronators.
Figure 42: Wrist / Elbow Pronation
Wrist / Elbow Supination
Attach: Side of Wrist
Action: Begin Palm-Down, elbow at the
side and bent at a 90-degree angle.
Rotate your hand so that it ends in the
Palm-Up position. Return to the starting
position.
Muscles Utilized: Wrist and Elbow
Pronators.
Figure 43: Wrist / Elbow Supination
Wrist Flexion
Attach: Back of Wrist
Action: Begin Palm-Up, arm straight out
in front or elbow down at the side and
bent at a 90-degree angle. Flex your
hand/wrist forward (Up). Return to the
starting position.
Muscles Utilized: Wrist Flexors.
Figure 44: Wrist Flexion
Wrist Extension
Attach: Front of Wrist
Action: Begin Palm-Down, arm straight out
in front or elbow down at the side and
bent at a 90-degree angle. Extend your
hand/wrist backward (Up). Return to the
starting position.
Muscles Utilized: Wrist Extensors.
Figure 45: Wrist Extension
18

Anterior Shoulder Impingement:
Symptoms: Pain in anterior (front) of shoulder(s) when raising arm above head or reaching across
the front of the body as if trying to touch the opposing shoulder.
Solution: Strengthen posterior (back) and posterior shoulder muscles in order to relieve
compression on the anterior shoulder joint. (Pulls head of the humerus posterior in the AC-Joint.)
QuickTIME Routine: Perform each exercise for 20-Seconds Straight. You are finished!
Regular Routine: Perform the exercise program as outlined below.
Back / Bent Over Row
(Fig. #30)
Shoulder Abduction:
Horizontal (Fig. #4)
Diagonal Shoulder
Extension (Fig. #12)
Week #1: Perform 1x Daily, 3-Days per week.
2-Sets, 10 Repetitions Figure #30
2-Sets, 10 Repetitions Figure #4
2-Sets, 10 Repetitions Figure #12
Week #2-4: Perform 1x Daily, 4-Days per week.
3-Sets, 10-12 Repetitions Figure #30
3-Sets, 10-12 Repetitions Figure #4
3-Sets, 10-12 Repetitions Figure #12
Week #5-8: Perform 1x Daily, 5-Days per week OR 2x Daily 3-Days per week.
4-Sets, 12-15 Repetitions Figure #30
4-Sets, 12-15 Repetitions Figure #4
4-Sets, 12-15 Repetitions Figure #12
NOTE: ALTERNATE EXERCISES: If one exercise bothers you, or if you want to vary
the program, you may exchange the following exercises:
EXERCISE EXCHANGE FOR
30 31
4 34
12 35, 34, 13
19
Posterior Shoulder Impingement:
Symptoms: Pain in posterior (back) of shoulder(s) when pushing or lifting objects.
Solution: Strengthen chest and anterior (front) shoulder muscles in order to relieve compression
on the anterior shoulder joint. (Pulls head of the humerus posterior in the AC-Joint.)
QuickTIME Routine: Perform each exercise for 20-Seconds Straight. You are finished!
Regular Routine: Perform the exercise program as outlined below.
Chest Presses
(Fig. #28)
Shoulder Adduction:
Horizontal (Fig. #6)
Diagonal Shoulder
Flexion (Fig. #8)
Week #1: Perform 1x Daily, 3-Days per week.
2-Sets, 10 Repetitions Figure #28
2-Sets, 10 Repetitions Figure #6
2-Sets, 10 Repetitions Figure #8
Week #2-4: Perform 1x Daily, 4-Days per week.
3-Sets, 10-12 Repetitions Figure #28
3-Sets, 10-12 Repetitions Figure #6
3-Sets, 10-12 Repetitions Figure #8
Week #5-8: Perform 1x Daily, 5-Days per week OR 2x Daily 3-Days per week.
3-Sets, 12-15 Repetitions Figure #28
3-Sets, 12-15 Repetitions Figure #6
3-Sets, 12-15 Repetitions Figure #8
NOTE: ALTERNATE EXERCISES: If one exercise bothers you, or if you want to vary the program,
you may exchange the following exercises:
EXERCISE EXCHANGE FOR
28 29
6 34
8 9, 37, 38
20
Table of contents


