FLIR Elara R-290 User manual

427-0101-01-12 Revision 100 September 2020
This document does not contain any export-controlled information.
Installation and
User Guide
ElaraTM Radar
R-290

427-0101-01-12 Revision 100 September 2020
This document does not contain any export-controlled information.
© 2020 FLIR Systems, Inc. All rights reserved worldwide. No parts of this manual, in whole or in part, may be
copied, photocopied, translated, or transmitted to any electronic medium or machine readable form without the
prior written permission of FLIR Systems, Inc.
Names and marks appearing on the products herein are either registered trademarks or trademarks of FLIR
Systems, Inc. and/or its subsidiaries. All other trademarks, trade names, or company names referenced herein are
used for identification only and are the property of their respective owners.
This product is protected by patents, design patents, patents pending, or design patents pending.
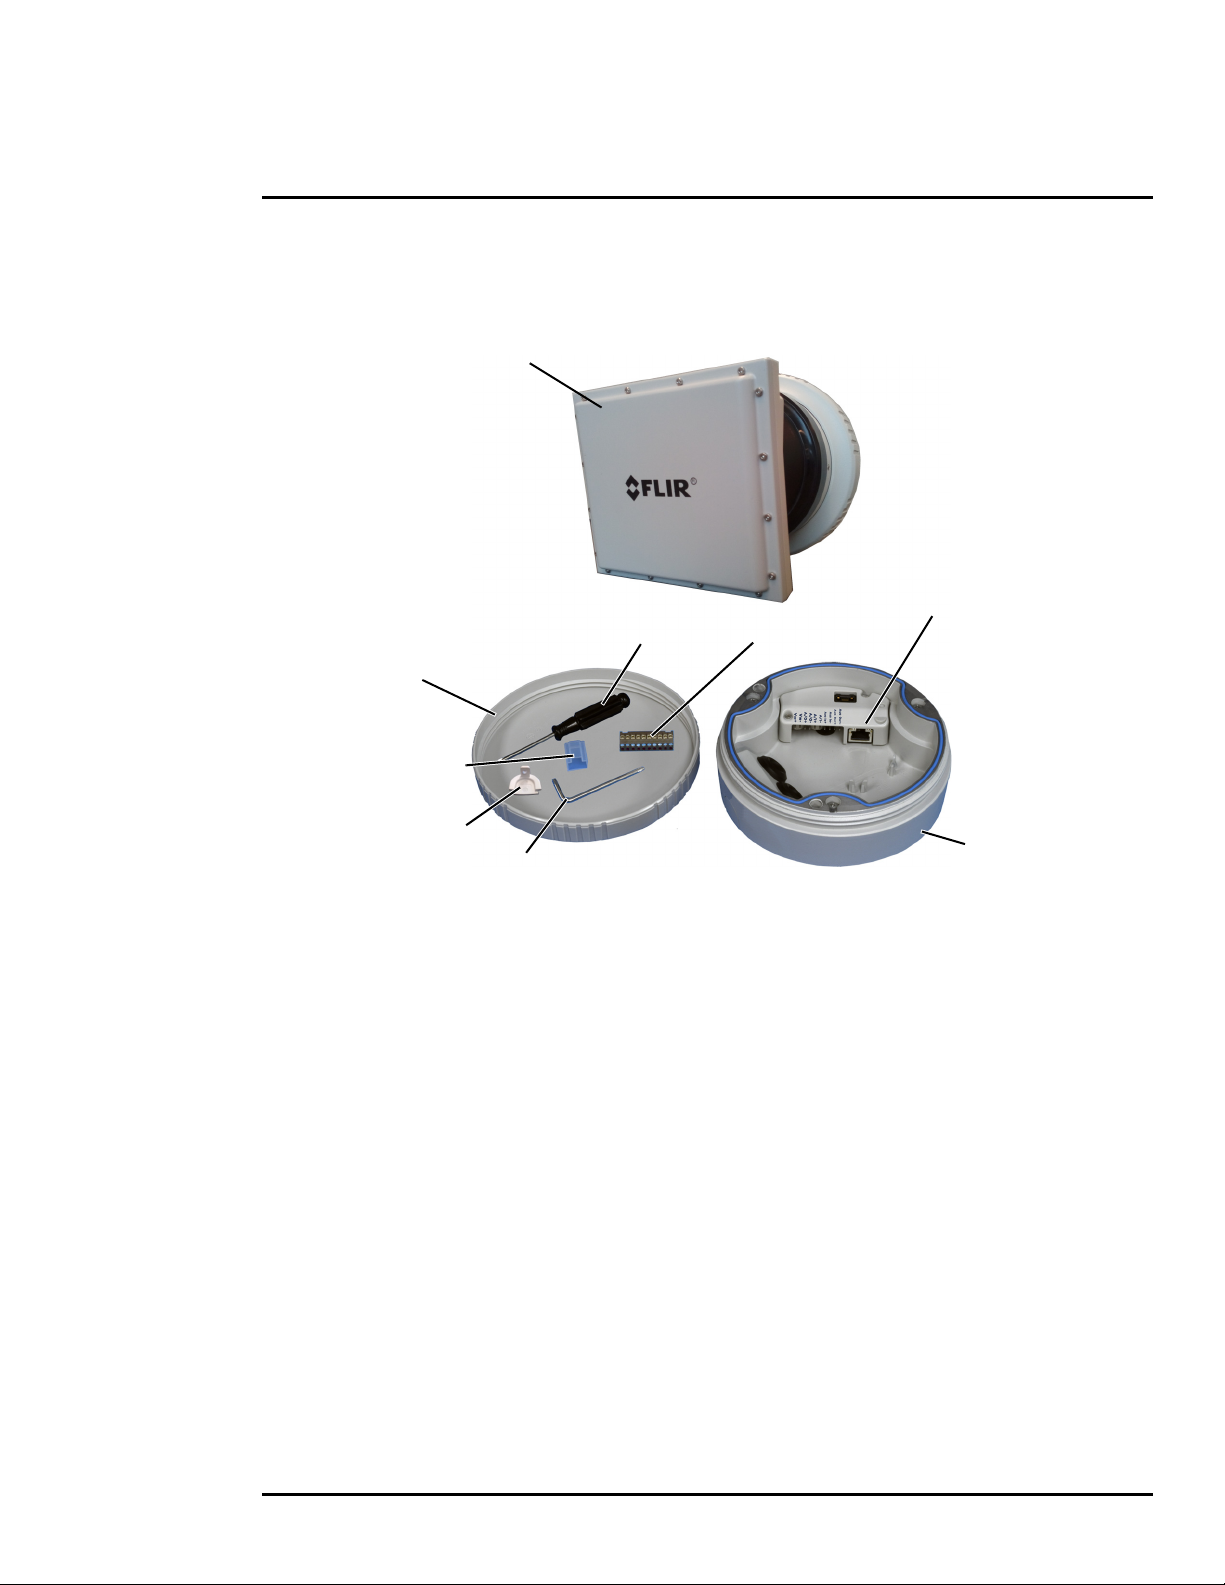
Photographs and images appearing in this manual may have been modified for illustrative purposes using
commercial image editing software and may not always reflect an actual product configuration.
The contents of this document are subject to change without notice.
For additional information visit www.flir.com or write to FLIR Systems, Inc.
FLIR Systems, Inc.
6769 Hollister Avenue
Goleta, CA 93117
Support: https://www.flir.com/support/.
Important Instructions and Notices to the User:
This device complies with part 15 of the FCC Rules and ISED’s license-exempt RSSs. Operation is subject to the
following two conditions: (1) This device may not cause harmful interference, and (2) this device must accept any
interference received, including interference that may cause undesired operation.
L'appareil est conforme à la section 15 des règles de la FCC et aux RSS exempts de licence de ISED. Le
fonctionnement de l'appareil est soumis aux conditions suivantes: (1) Il ne doit pas causer d'interférences
nuisibles, and (2) il peut accepter toute interférence, y compris celle susceptible de provoquer un fonctionnement
indésirable de l'appareil.
This equipment complies with FCC radiation exposure limits and Canada radiation RF exposure limits set forth in
CFR 47 Section 2.1091 and ISED RSS-102 set forth for an uncontrolled environment. This equipment should be
installed and operated with a minimum distance of 20cm between the user and/or bystanders and this device. This
device must not be co-located or operating in conjunction with any other antenna or transmitter, unless permitted
under existing FCC certification condition.
Cet appareil est conforme aux limites d'exposition aux rayonnements de la FCC et aux limites d'exposition aux RF
du Canada établies dans le CFR 47, section 2.1091 et ISED RSS-102 pour un environnement non contrôlé. Cet
équipement doit être installé et utilisé avec une distance minimale de 20 cm entre l'utilisateur et / ou des tiers et cet
appareil. Cet appareil ne doit pas être co-localisé ou fonctionner en conjonction avec une autre antenne ou un autre
émetteur.
Modification of this device without the express authorization of FLIR Systems, Inc. may void the user’s authority
under FCC rules to operate this device.
Note 1: This equipment has been tested and found to comply with the limits for a Class A digital device, pursuant to
part 15 of the FCC Rules. These limits are designed to provide reasonable protection against harmful interference
when the equipment is operated in a commercial environment. This equipment generates, uses, and can radiate
radio frequency energy and, if not installed and used in accordance with the instruction manual, may cause harmful
interference to radio communications. Operation of this equipment in a residential area is likely to cause harmful
interference in which case the user will be required to correct the interference at the user’s own expense.
Note 2: If this equipment came with shielded cables, it was tested for compliance with the FCC limits for a Class A
digital device using shielded cables and therefore shielded cables must be used with the device
Industry Canada Notice:
This Class A digital apparatus complies with Canadian ICES-003.
Avis d’Industrie Canada:
Cet appareil numérique de la classe A est conforme à la norme NMB-003 du Canada.
Proper Disposal of Electrical and Electronic Equipment (EEE)
The European Union (EU) has enacted Waste Electrical and Electronic Equipment Directive 2002/
96/EC (WEEE), which aims to prevent EEE waste from arising; to encourage reuse, recycling, and
recovery of EEE waste; and to promote environmental responsibility.
In accordance with these regulations, all EEE products labeled with the “crossed out wheeled bin”
either on the product itself or in the product literature must not be disposed of in regular rubbish bins,
mixed with regular household or other commercial waste, or by other regular municipal waste
collection means. Instead, and in order to prevent possible harm to the environment or human
health, all EEE products (including any cables that came with the product) should be responsibly
discarded or recycled.

427-0101-01-12 Revision 100 September 2020
This document does not contain any export-controlled information.
To identify a responsible disposal method nearby, please contact the local waste collection or recycling service, the
original place of purchase or product supplier, or the responsible government authority in the area. Business users
should contact their supplier or refer to their purchase contract.
Document History
Revision Date Comment
100 September 2020 Initial release of Elara Radar

Table of Contents
427-0101-01-12 Revision 100 September 2020 iv
This document does not contain any export-controlled information.
Ta b l e o f C o n t e n t s
Radar Overview
1.1 Supplied Components ................................................................................................ 2
1.2 Additional Supplies ..................................................................................................... 2
1.3 Specifications .............................................................................................................3
Installation
2.1 Configuring the Radar for Networking ........................................................................ 5
2.2 Radar Placement and Orientation .............................................................................. 9
2.3 Site Preparation ........................................................................................................ 11
2.4 Installing the Wall Mount Bracket ............................................................................. 11
2.5 Connecting the Radar and Installing the Back Box .................................................. 12
2.6 Installing the Radar Assembly .................................................................................. 14
2.7 Uploading a Map Image and Configuring Georeference Settings ............................ 14
2.8 Aiming the Radar and Testing Target Detection ...................................................... 15
2.9 Defining Analytics Regions ....................................................................................... 15
2.10 Pairing a PTZ Camera with the Radar (Optional) ................................................... 15
2.10.1 Open the camera’s web page and select the radar ....................................... 15
2.10.2 Enable and Configure an Automatic Radar Mode ......................................... 16
Operation
3.1 Accessing the Elara Radar ....................................................................................... 19
3.2 View Settings Home Page ........................................................................................ 20
3.3 Video Page ............................................................................................................... 21
3.4 Radar Page .............................................................................................................. 22
3.5 Georeference Page .................................................................................................. 24
Configuration
4.1 Network Page ........................................................................................................... 25
4.2 Date & Time Page .................................................................................................... 26
4.3 Users Page ............................................................................................................... 27
4.4 Cyber Page .............................................................................................................. 29
4.4.1 Certificates ...................................................................................................... 29
4.4.2 IEEE 802.1X-Compliant Communication ........................................................ 30

427-0101-01-12 Revision 100 September 2020 v
This document does not contain any export-controlled information.
Table of Contents
4.4.3 Transport Layer Security (TLS) and Secure HTTP (HTTPS) Communication 31
4.4.4 Other Cybersecurity Services .......................................................................... 31
4.5 Map Page ................................................................................................................. 32
4.6 Radar Fusion Page .................................................................................................. 34
4.7 Firmware & Info Page ...............................................................................................35
Maintenance and Troubleshooting Tips
5.1 Cleaning ...................................................................................................................37
5.2 Troubleshooting ........................................................................................................ 37

1
427-0101-01-12 Revision 100 September 2020 1
This document does not contain any export-controlled information.
Radar Overview
The Elara Radar is a perimeter security radar that supplements PTZ camera installations. Multiple
simultaneous target tracking and superior performance in poor environmental conditions make the
Elara Radar a critical component for complete security solutions. It features inclusion and exclusion
(masking) zone configuration.
When the radar is connected to an IP network, it functions as a server, providing services such as
network communications. The server uses an open, standards-based communication protocol to
communicate with FLIR and third-party video management system (VMS) clients, including systems
that are compatible with ONVIF®.1For a list of supported VMS clients, refer to the individual product
web page at FLIR.com.
The radar’s display is viewed by streaming it as video over an IP network using M-JPEG encoding.
The Elara Radars are components within the FLIR Thermal Fence, which combines FLIR Elara
Radars, thermal security cameras, and control and management software in a fully integrated
perimeter security solution. The FLIR Thermal Fence provides automated perimeter surveillance,
intrusion detection, and alert capabilities for perimeter security applications. The FLIR Thermal Fence
gives you instant, automated threat detection and visual threat assessment capability around the clock
in one easy-to-use package.
If help is needed during the installation process, contact the local FLIR service representative or call
the appropriate support number that appears on the product's page at https://www.flir.com/support/. All
installers and integrators are encouraged to take advantage of the training offered by FLIR; visit
https://www.flir.com/support-center/training/ for more information.
For safety, and to achieve the highest levels of performance from the Elara Radar, always follow the
warnings and cautions in this manual when handling and operating it.
Warning!
Caution!
1. ONVIF is a trademark of Onvif, Inc.
Before drilling into surfaces for mounting, verify that electrical or other utility service lines are not
present. Serious injury or death may result from failure to heed this warning.
Except as described in this manual, do not open the Elara Radar for any reason. Damage can
occur as the result of careless handling or electrostatic discharge (ESD). Always handle it with
care to avoid damage to electrostatic-sensitive components.
Prior to making any connections, ensure the power supply or circuit breaker is switched off.
Operating the Elara Radar outside of the specified input voltage range or the specified operating
temperature range can cause permanent damage.
No user serviceable components are inside.
External connections (trigger, relay, audio) are not user accessible.

427-0101-01-12 Revision 100 September 2020 2
This document does not contain any export-controlled information.
Radar Overview
1.1 Supplied Components
The Elara Radar kit includes these standard components:
1.2 Additional Supplies
The installer might need to supply the following items as required (specific to the installation).
• PoE power supply or PoE switch for radar power.
• Cat5e or Cat6 Ethernet cable for IP communication and PoE for system power.
• Ten-conductor accessory cable for auxiliary power.
• Radar grounding strap, radar mount, electrical hardware, connectors, and tools.
Items Included in Kit
Back box cover
10-pin connector
Ethernet port
Torx
wrench
Radar assembly
Screwdriver
RJ45 cover
Back box
to wall
bracket
mount
attached
Side cover

427-0101-01-12 Revision 100 September 2020 3
This document does not contain any export-controlled information.
Radar Overview
1.3 Specifications
Specification Unit Elara Radar Model R-290
Performance
Radar FOV ° 90 x 30
Radar Frequency GHz
USA: 24.075-24.175 GHz ISM Band
Europe: 24.000-24.250 GHz ISM Band
RF Transmit Power dBm
FCC: 14 (0.025W)
EU: 6 (0.005W)
Radar Detection Range meters
FCC
Human: 250
Car: 600
EU
Human: 150
Car: 300
Target Detection Speed Minimum: 0.1 m/sec
Maximum: > 100 km/h
Number of Tracks 64
Range Resolution meters
FCC: 1.5
EU: 0.6
Distance Accuracy meters < 1
Azimuth Accuracy ° 0.6
Sensor Scan Rate Hz 10 Hz, 5 Hz, or 2 Hz (user-configurable)
Coverage Acres (m2)
FCC Human Detection: 12 acres (48,500 m2)
EU Human Detection: 4 acres (16,000 m2)
Object Data
GPS coordinates, velocity, RCS, range, azimuth angle/
direction, heading, course/track, doppler width, object type,
target ID, duration
Object Classification Human, vehicle
Analytics Embedded tracker and classifier
Data Streaming All object data
Wi-Fi Range meters 50
GPS Spec TBD
Pan Range ° +/- 43°
Tilt Range ° +30° / -60°
Interface
Number of I/O 1 in, 1 out (isolated, 4 conductors)
Connectors 10/100 Ethernet
I/O and power terminal block
System
Integration
Connectivity 10/100 Ethernet
Network APIs FLIR SDK, FLIR CGI, ONVIF Profile S
Supported Protocols AXML, XML, KML, Google Earth

427-0101-01-12 Revision 100 September 2020 4
This document does not contain any export-controlled information.
Radar Overview
Installation Features
Minimize installation tools
Blind mate
Position lock
Mechanical
Weight Lbs. <10
Height in. 6.5
Width in. 6.5
Depth in. 7.75
Environmental
Operating Temperature °C -40°C to 70°C continuous operation
Storage Temperature °C -50°C to 85°C
IP Rating IP66
Dust/Sand (Operating) IP66
Wind Loading mph No slip at 100
Power Input Voltage 12 VDC, 24 VAC, and PoE
Power Consumption W <25

2
427-0101-01-12 Revision 100 September 2020 5
This document does not contain any export-controlled information.
Installation
Installing the Elara Radar consists of:
Step 1 Configuring the Radar for Networking
Step 2 Radar Placement and Orientation
Step 3 Site Preparation
Step 4 Installing the Wall Mount Bracket
Step 5 Connecting the Radar and Installing the Back Box
Step 6 Installing the Radar Assembly
Step 7 Uploading a Map Image and Configuring Georeference Settings
Step 8 Aiming the Radar and Testing Target Detection
Step 9 Defining Analytics Regions
Step 10 Pairing a PTZ Camera with the Radar (Optional)
2.1 Configuring the Radar for Networking
You can configure the radar for networking before or after mounting it.
By default, Dynamic Host Configuration Protocol (DHCP) is enabled on the radar and a DHCP server
on your network assigns the radar an IP address. If there is no DHCP server on the network, the
radar’s IP address defaults to 192.168.0.250 and the netmask defaults to 255.255.255.0.
You can specify another IP address for the radar and configure it for networking with the FLIR
Discovery Network Assistant (DNA) software tool or with the radar’s web page.
To configure the radar for networking before
mounting it:
Step 1 The radar assembly and the back box
are shipped in separate boxes. Remove
the radar assembly from its shipping box
and place it on a table, desk, or other flat
surface with the THIS SIDE UP marking
on the radar assembly facing up.
DNA tool Radar’s web page
Discover radar IP address •
Configure IP address, mask, and gateway • •
Configure DNS settings and MTU •
Configure more than one radar at the same time •
This side up Front panel

427-0101-01-12 Revision 100 September 2020 6
This document does not contain any export-controlled information.
Installation
Important
Step 2 Using a Power over Ethernet (PoE) switch or injector, connect an Ethernet cable to the
Ethernet connector on the radar assembly’s back panel.
Make sure the PC and the radar are on the same network.
To configure the Elara Radar for networking using the DNA tool:
Step 1 In the DNA tool, double-click the radar in the Discover List. Identify the radar by model
name (R-290) and name. The default name is R-290 followed by the radar’s serial
number.
The DNA tool does not require a license to use and is a free download from the product's
web page on FLIR.com. Download the DNA tool; unzip the file; and then double-click to
run the tool (DNA.exe). The Discover List appears, showing compatible devices on the
VLAN and their current IP addresses.
Do not provide power to the radar when it is resting on its flat front panel or with it
pointing at metallic surfaces that are closer than one meter away.
Ethernet
Guide pins
connector
Hardware
reset button
Connector
to back box

427-0101-01-12 Revision 100 September 2020 7
This document does not contain any export-controlled information.
Installation
Step 2 Authenticate the radar.
Right-click the radar and select Login, or click the Login icon in the navigation bar.
In the DNA - Login window, type the password for the admin user (default: admin). Then,
click Login.
In the DNA Discover List, verify that the radar’s status is Online and Authenticated.
Step 3 Configure the radar’s networking settings.
Right-click the radar and select IP Setup, or click the IP Setup icon in the navigation bar.
In the DNA - IP Setup window, you can clear Use DHCP and manually specify the radar’s
IP Address, Mask, and Gateway. Then, click Update and wait for Ok status to appear.
To configure the Elara Radar for networking using its web page:
Step 1 Open the radar’s web page either by double-clicking the radar in the DNA Discover List or
by typing the radar’s IP address in a web browser’s address bar. The radar’s web page
supports the latest versions of popular web browsers.

427-0101-01-12 Revision 100 September 2020 8
This document does not contain any export-controlled information.
Installation
Step 2 On the login screen, type admin for the user name and the
password for the admin user (default: admin).
When logging in to the radar’s web page for the first time or for the
first time after performing a factory default, specify a new password
for the admin user. Use a strong password consisting of at least 12
characters and at least one uppercase letter, one lowercase letter,
and one number. Passwords can include the following special
characters: |@#~!$&<>+_-.,*?= .
Log back in with the new password. The radar’s View Settings home page opens.
Step 3 Click System Settings, and make
sure the Network page appears.
Step 4 You can click Static IP addressing and
manually specify the radar's
Hostname, IP, Netmask, and
Gateway. You can also specify the
DNS Mode, Name Servers, and MTU
(maximum transmission unit).
For more information about these
settings, see Network Page.
Step 5 Click Save. The radar reboots to
apply the new settings.

427-0101-01-12 Revision 100 September 2020 9
This document does not contain any export-controlled information.
Installation
2.2 Radar Placement and Orientation
The Elara Radar is designed for outdoor security applications. Typically, the radar faces out from the
perimeter it is protecting. The following factors determine the optimal location:
• Unobstructed line of sight to the area under surveillance
• Radar height above ground
• Proximity to large metallic radar-reflective objects such as buildings, trucks, or aircraft
• Power and connectivity availability
Mount the radar in a location where it has an unobstructed view of the area to be monitored.
Understanding that it might not be possible to get an unobstructed line of sight out to the
instrumented range, select the mounting location to maximize the area the radar can monitor.
Consider terrain contour. FLIR recommends pointing the radar at an angle aligned with the general
slope of the terrain under surveillance. Also consider seasonal vegetation changes; and potential
obstruction from ground vehicles such as cars, trucks and trains, as well as aircraft and ships,
because it may change over time.
FLIR recommends installing the Elara Radar at a height of approximately 2 m (6.5 ft) or higher.
In addition to the line of sight considerations, there shouldn’t be any large metallic object or structure
in front of the radar within the first 100 meters (330 ft) over a 180° azimuth sector. It should also face
away from walls or fences that can cause reflections.
Important
Peak gain for the radar is at -3°, which appears as Peak Gain Ray in the dead zone modeling
diagram below. It is slightly below the vertical pointing angle (the purple line in the diagram).
Therefore, for optimum detection distance, locate and aim the radar so that the farthest targets
coincide with the Peak Gain Ray, which appears as Peak Gain Distance in the diagram.
Do not point the radar at metallic surfaces that are closer than one meter away.
Dead zone modeling

427-0101-01-12 Revision 100 September 2020 10
This document does not contain any export-controlled information.
Installation
To improve detection of closer targets, you can aim the radar lower, at the expense of detecting
targets further away. For example, at a road intersection when detecting close-range pedestrians
and cyclists is more important than detecting cars 500 meters away.
The diagrams below show the radar’s dead zone distances according to vertical pointing angle at
mounting heights of 4 m and 6 m (20 ft). The distances are for flat ground with no slope.
To provide full radar coverage for a sector, the ranges of two or more radars might overlap. After you
configure them so that their radar frequencies do not interfere with other on the Radar Page, you can
configure an Elara Radar to fuse tracking information from one or more other Elara Radars with its
own tracking information; see the Radar Fusion Page. With accurate georeference information
configured, the radar performing the fusion can determine whether it and a fused radar are tracking
the same object; see Uploading a Map Image and Configuring Georeference Settings.
You can mount the radar directly on a wall or, using an optional mounting accessory, in a corner or
onto a pole. Ensure that the radar is on a stable mount with minimal vibrations and resistance to
wind. For information about the mounting accessories available for the Elara Radar, see the FLIR
Security Cameras - Accessory Guide.
Regarding orientation, note the following:
• The two guide pins on the radar assembly that fit only one way into the corresponding holes on
the back box.
• There are three possible ways to secure the back box onto the wall mount bracket. However,
only one way allows you to route a conduit into the side opening of the back box and cable from
the conduit through the grommets, for surface mounting.
• The text stamped on the inside of the wall mount bracket that indicates the appropriate screw
holes for different types of electrical boxes.
Dead zone distances vs. vertical pointing angle - 4 m mounting height
Dead zone distances vs. vertical pointing angle - 6 m mounting height

427-0101-01-12 Revision 100 September 2020 11
This document does not contain any export-controlled information.
Installation
• The THIS SIDE UP marking and the FLIR logo on the radar assembly.
Note
2.3 Site Preparation
The following recommendations provide for proper installation and operation of the radar. Adhere to
all local and industry standards, codes, and best practices.
•Ambient Environment Conditions: Avoid positioning the radar near heaters or heating system
outputs. Avoid exposure to direct sunlight.
•Safety: Cables and electrical cords should be routed in a manner that prevents safety hazards.
Ensure that nothing rests on the radar’s cables or power cords.
•Ample Air Circulation: Leave enough space around the radar to allow free air circulation.
•Physical Security: The radar provides threat detection for physical security systems. In order to
ensure that the radar cannot be disabled or tampered with, the system should be installed with
security measures regarding physical access by trusted and untrusted parties.
•Network Security: The radar transmits over IP to security personnel for video surveillance.
Proper network security measures should be in place to assure networks remain operating and
free from malicious interference. Install the radar on the backbone of a trusted network.
•Electrostatic Discharge Safeguards: The radar and other equipment connected to it (relay
outputs, alarm inputs, racks, carpeting, etc.) shall be properly grounded to prevent electrostatic
discharge.
2.4 Installing the Wall Mount Bracket
The wall mount bracket fits standard electrical boxes. For surface mounting, route the conduit into
the side opening of the back box.
Step 1 Remove the back box cover by unscrewing it from the back box.
While it is possible to install the wall mount bracket so that the text on the inside of the wall mount
bracket is not upright, when you aim the radar, make sure the THIS SIDE UP marking on the
radar assembly faces up and the FLIR logo on the flat front panel is upright.
Twist-lock screws in back boxWall mount bracket

427-0101-01-12 Revision 100 September 2020 12
This document does not contain any export-controlled information.
Installation
Step 2 The wall mount bracket is shipped attached to the back box. Using the screwdriver,
unscrew the three quarter-turn twist-lock screws to release the wall mount bracket.
Step 3 Using the appropriate screw holes marked on the wall mount bracket, secure it to the
electrical box.
2.5 Connecting the Radar and Installing the Back Box
When mounted, all of the radar’s connections are made inside the back box. The radar assembly
plugs into the back box.
Power
The radar can be powered by Power over Ethernet (PoE) or with a conventional 24 VAC or 12 VDC
power supply. The Elara Radar is a Powered Device compliant with the IEEE 802.3af-2003
standard. To use PoE, connect the radar to either a IEEE 802.3af-2003 standard PoE switch or a
PoE injector.
The maximum Ethernet cable run is 100 meters, including the PoE power supply. Installations using
PoE and IP video only require a single Ethernet cable connection.
Grounding
Ensure the radar is properly grounded. Failure to properly ground it can lead to permanent damage
to the radar. Typical to good grounding practices, the radar back box chassis ground should be
connected to the lowest resistance path possible.
To connect the Elara Radar and install the back box:
Step 1 Ensure the power supply or circuit breaker is off.
Step 2 For each cable, use the Torx wrench to punch a hole in the center of the grommet from the
underside. Insert the cable from the conduit though the hole.
Step 3 Push the cable back through the seal so the seal extends out of the back box, as shown:
Step 4 Seal all exposed connections. Cable connections are not waterproof.
Punch through grommet
from underside here
For wall mount,
attach cover using
Torx wrench
Wrong
Correct
Inside back box

427-0101-01-12 Revision 100 September 2020 13
This document does not contain any export-controlled information.
Installation
Step 5 Route the Ethernet cable inside the back box as shown below.
Step 6 (Optional) If you are using the 10-pin connector, terminate cables and plug into
connectors.
10-Pin Power & I/O Connector
Step 7 Secure the back box onto the wall mount bracket using the screwdriver to tighten the three
quarter-turn twist-lock assemblies.
While it is possible to install the wall mount bracket so that the text on the inside of the wall
mount bracket is not upright, when you aim the radar, make sure the THIS SIDE UP
marking on the radar assembly faces up and the FLIR logo on the flat front panel is
upright.
Connector Connection
Ethernet Power and IP communications
10-pin connector
Power and I/O terminal: VAC or VDC power, along with
future release support for alarm I/O and audio I/O (see
table below)
Pin Connection Notes
1VAC/VDCpower+
12 VDC/24 VAC optional power when PoE is not available
2VAC/VDCpower-
3AlarmOutput+
Future release support
4AlarmOutput-
5 Alarm Input + Future release support
6 Alarm Input -
7AudioIn+ Future release support
8AudioIn-
9AudioOut+ Future release support
10 Audio Out -
Ethernet
10-pin
connector
port
Pin 1
Connector to
radar assembly

427-0101-01-12 Revision 100 September 2020 14
This document does not contain any export-controlled information.
Installation
2.6 Installing the Radar Assembly
Step 1 Secure the radar assembly onto the back box
using the guide pins on the radar assembly and
the guide holes on the back box.
Make sure the THIS SIDE UP marking and the
FLIR logo on the radar assembly’s front panel
face up.
Important
Step 2 Securely tighten the radar assembly’s outer
circular ring. Then, use the Torx wrench to securely tighten the set screw on the outer
circular ring.
Step 3 Make sure the radar assembly is pointed at the area under surveillance, but do not tighten
the set screws.
Step 4 Provide power to the radar. Wait one minute to allow the radar to fully power up, and then
proceed.
Important
Step 5 If you have not yet configured the radar for networking and would like to change the
radar’s default networking settings, proceed with Configuring the Radar for Networking.
2.7 Uploading a Map Image and Configuring Georeference Settings
Upload a reference map image upon which the radar will overlay its display. Uploading a map makes
aiming the radar easier and also makes the radar display more useful to operators. To upload a map
and configure the radar’s georeference settings, you need to access the radar’s web page.
Step 1 Access the radar’s web page by doing one of the following:
• In the DNA tool, double-click the radar in the DNA Discovery List.
• Type the radar’s IP address in a browser’s address bar (when the PC and the radar are
on the same network).
Log in using the admin user and password (default: admin). The View Settings home page
appears.
Step 2 Click System Settings, open the Map Page, and then upload and calibrate a map image.
Step 3 Click Back to View Settings, open the Georeference Page, and specify the radar’s
latitude, longitude, and orientation.
When removing the radar assembly from the
back box, take precautions to prevent it from
becoming a drop hazard for persons or
property.
Do not provide power to the radar when it is resting on its flat front panel or with it
pointing at any reflective surface closer than one meter away.
Radar assembly
set screw (2)
This side up
Radar assembly
outer circular ring

427-0101-01-12 Revision 100 September 2020 15
This document does not contain any export-controlled information.
Installation
2.8 Aiming the Radar and Testing Target Detection
Step 1 While viewing the radar’s display in View Settings, aim the radar by manipulating the
assembly to provide the desired field of view.
Step 2 On the Radar page, under Radar Mode, click On.
Step 3 Have a person walk in a straight line directly away from and the back towards the radar.
Verify the detection track appears in the radar display.
The following image shows an Elara Radar tracking two objects within previously defined
detection and alarm regions, and with a compatible FLIR PTZ camera mounted at the
same position as the radar:
Step 4 Tighten the two set screws and verify the camera's orientation setting.
2.9 Defining Analytics Regions
Open the Radar Page and define alarm, exclusion, or detection regions.
2.10 Pairing a PTZ Camera with the Radar (Optional)
Users assigned the expert or admin role can pair the following FLIR Security PTZ cameras (firmware
v1.6.1.0) to work with the Elara Radar, so that the camera follows targets detected and tracked by
the radar:
Important
Use the camera’s web page to pair the radar with a camera and enable an automatic radar mode.
The computer you are using to access the camera’s web page must have access to the internet.
2.10.1 Open the camera’s web page and select the radar
Step 1 Log in to the camera’s web page. For information about accessing the camera’s web
page, see the camera’s installation and user guide.
Visible Security Cameras Multispectral Thermal Cameras
Quasar 4K 22x IR-PTZ CP-6408-21-I DM-Series
Quasar 4K 33x IR-PTZ CP-6408-31-I DX-Series
The video tracking and advanced radar integration relies on accurate geographic location
information for the radar and for the camera. On both the radar’s and the camera’s Georeference
pages, make sure the settings are accurate.
Radar and PTZ camera
Detection region (green)
Tracked objects
Alarm region (red)
Table of contents
Other FLIR Radar manuals
Popular Radar manuals by other brands

Sensors & Software
Sensors & Software pulseEKKO Pro user guide

Raytheon
Raytheon R11X Operation card

Magnetrol
Magnetrol Eclipse 705-51A Series Safety manual

Motorline professional
Motorline professional MR30 User's and installer's manual

Endress+Hauser
Endress+Hauser Hart Micropilot FMR60B operating instructions

Endress+Hauser
Endress+Hauser Levelflex FMP51 technical information

Blickfeld
Blickfeld Qb2 Quick start manual

Endress+Hauser
Endress+Hauser Levelflex M FMP45 operating instructions

MicRadar
MicRadar R60ABD1 Applications manual

Endress+Hauser
Endress+Hauser Micropilot FMR66B technical information

JRC
JRC RADAR 1500 MKII instruction manual

Endress+Hauser
Endress+Hauser Levelflex FMP50 Safety instructions