Floorwash 1400B User manual

MANUALOF USE AND MAINTENANCE
1400B
2
Foreword 4
Manual content,useandmaintenance 4
Storageof manualof useandmaintenance 4
Updatingthemanual 4
Confidentiality 4
Machinedelivery 4
FloorwashTechnical description 4
Liabilitylimitations 5
Warranty 5
Serialnumber 6
Generalsafetyrules 6
Recommendations 6
Warnings 7
Li-Ion Battery 8
Li-Ion Battery Warnings 8
Li-Ion Battery Recommendations 9
Technicaldata 10
Batterytechnicaldata 10

3
Batterycharger technical data 10
Spareparts 11
Packagingspecificationsanddimensions 12
Machineunpacking 12
Machineassembly 13
Installing thebattery 14
Uninstalling thebattery 14
Chargingthebattery 15
Howtogetstarted 16
ON/OFF 17
Batterycharge level 18
Functioning 19
Transport 20
Aftercleaning 21
Maintenance 22
Troubleshooting tips 23

4
FOREWORD
Itisof outmostimportance tokeepthemachineat itsmaximum efficiencybycarryingoutthe
maintenancedescribedinthismanual carefully. It is important tokeepthisinstruction manualina
safeplaceso thatitcanbereferred towhen evernecessary.For furtherrequirements,pleasecontact
ourcustomerservice centeror your nearest authorized dealer.
MANUAL CONTENT,USE AND MAINTENANCE
The following manual hasbeendrawnuptoprovidecustomers with allnecessaryinformationin
ordertouse themachineassafelyandsmoothlyaspossible.
STORAGEOF MANUALOF USE AND MAINTENANCE
Themanualofuseandmaintenanceshouldbekept inasafeandeasyaccessibleplaceinthe
immediateproximitytothemachine.Toavoidcompromising itsreadability, keepthismanual
awayfromsources of heat, liquidsordetergents.
UPDATINGTHEMANUAL
The contents ofthismanualreflect thestateof theartatthetimetheappliance was launchedon
themarket. TheManufacturerreservestherighttomakechangestothemachines atanytimefor
any technical orcommercial reasons whatsoever without anypriornotice.
CONFIDENTIALITY
Thetechnicalinformation (texts,drawingsand illustrations)containedinthismanualaretheproperty
ofNamcoManufacturingInc.andmustbeconsidered confidential.It isstrictlyforbiddentodisclose,
reproduceor translate this document,evenpartially,withoutobtainingpriorwrittenpermissionfrom
NamcoManufacturingInc.
MACHINEDELIVERY
The Floorwashmachine isdelivered inaprotective packaging.Ensurethat thepackagingis fully
intact and that therearenosigns of tempering whentheproductistakenover. The customershould
notifyourcustomerserviceimmediatelyincaseof damages.
FLOORWASHTECHNICALDESCRIPTION
The Floorwashisa mechanical floorscrubber-dryer thatensureseffectivecleaningsurfaces
includingunevensurfaces.Thecombinedmechanical actionofbrush,waterandcentrifugalforce
will guaranteethebestresultswithminimumeffort. Itcleans,scrubsandcollectsthefilthanditis
perfect forconstant andfrequentuse.Thisscrubberdryerisparticularly suitedforthetreatment
andcleaningof floorsmadeof terra cotta, tile, rubber,resin,marble,linoleum,raw
concrete,flagstone, serizzo, granite,stone,carpetsandrugs.

5
LIABILITY LIMITATIONS
NamcoManufacturing Inc.declines anyresponsibility fordamagetopeople andproperty caused
by:
• Improperuseofthemachineorfailuretocomplywith theinstructions provided;
• Useofthemachinenotincompliancewiththe regulationsinforce;
• Usenotincompliancewithnationalsafetyandaccidentpreventionlaws;
• Tamperingwith evenasinglepartofthemachine;
• Incorrect installation and/orconnection totheforeseenpowersourcesoruseofnon-original
spareparts.
WARRANTY
Namco Manufacturing Inc.warrantsthisproductagainstmanufacturingormaterialdefectsfora
periodoftwoyearsfromthe dateofpurchase. Duringthisperiod, NamcoManufacturingInc.atits
discretion,shallrepairorreplaceanyfaultyproductatnocharge.However, NamcoManufacturing
Inc.specifiesthatthewarrantyisnotvalidinthefollowingcases:
• Improperuseof the machine;
• Lack of orimpropermaintenance;
• Useof non-originalspareparts;
• Damagefromnaturaleventssuchas earthquakes,floods, firesoraccidents;
• Tampering withormodifyingthemachine;
Thewarrantyconditionsneitherminimizenor modify thelegalprovisions inforceapplicabletothe
saleoftheproduct totheconsumer.
The Warrantydoesnotcovershipping costswhicharebornebythecustomer.

6
SERIALNUMBER
The label with theserial number islocatedbelow themachine,inthe underlyingpart ofthe
external left side.Thatnumbershall bealways notified fortechnical assistanceorrequestof
spareparts.
Recommendations
Themachine is not intended to be usedby persons (including children) whose physical,
sensoryandmental capacities are impaired,or with lack of the necessary experience and
knowledge, unless they are supervisedorinstructedin itsuseby personsresponsiblefor
theirsafety.
Childrenshallbesupervised toensurethat they donot playwith the machine.
If the power supply isdamaged,it shall bereplaced by the manufacturer orits authorized
technical assistance.
Donotusethemachine onslopes.
Useonly brushesprovided with the machine or supplied by an authorized dealerand/or
resellerto avoidcompromisingsafetyandwarranty.
The machine shallnot be left unattended, but stored in aprotected area to preventthe
machinefrombeing movedaccidentally.
GENERAL SAFETY RULES
Thisfloorscrubber-dryeriseasy touse; anyway,it isnecessarytoread thefollowing rulescarefully
inorder toavoiddamagestoboththeoperatorand themachine.

7
Warnings
Do notuseorkeepthe machineoutside inwet conditions,and
avoiddirect exposure to rain.
Themachine issuitable foruseindry conditionsatatemperature
range of+5°Cto +35°C(+41°Fto +95°F).
Do not insertobjects throughopenings. Donot use when
openingsareclogged.
Protect the machine from sunlight andUVradiation.
Do not suckgases,liquidsor potentially explosive andcombustible
dusts.Thesesubstancesmaycorrodematerialsusedinthe
construction ofthe machine.
Follow thebasicsafetyrules forusein hazardousareas,suchas
servicestation or gasdistributors.
Do not usethe machine inpotentially explosiveatmospheres.
Do notplace containers holding liquidson the machine.
For use in workenvironments, do not hit shelvesorscaffoldings
where there isa risk ofobjects falling.Theusershall be equipped
with adequate safetyequipment (gloves,footwear, helmet, goggles, etc.).
8
LI-ION BATTERY
Warnings
Please read thismanual carefullybeforeusing and checking the
battery andcharger.
The manufacturerdeclines anyresponsibilityfordamageto
property and/or people resulting from the failure to complywith
thewarnings stated inthe manual orthe improperuseofthe
battery.
Donot touchthe electrodes with eitheryourbody ormetal
elements.
Beforeremoving the battery,the device must be disconnected
from the powersupply.
Neitherpourliquidson the battery norimmerse the battery in any
kindofliquid whatsoever.
Donot burnorheatthe battery as it may violently explodeor
burstintoflames.
Donot leavethe battery directly exposed to sunlight.
Keepthe battery awayfrom heatsources.
Do notbreak,open,force, weld or puncture the battery pack.
Do notsoldercables tothe battery poles;do not short-circuit the
battery terminals.
Donotreversethe positiveandnegative terminalsduringuse.
Incaseofbattery leakage, avoid skinandeyecontact.
Incaseof skinandeyecontact with spilled liquids,seek immediate
medical attention.

9
Recommendations
•Inthe event ofbattery faults(odouremissions,excessive heatgeneration,
deformation,etc.)ormalfunctions,immediately removethebattery from
the unit orchargerandproceed with replacement anddisposal.
•Onlyusechargersthat arecompatible with the technical specifications
ofthe battery to be charged.Theuseofthe Battery Chargersuppliedis
fortheexclusivepurposeofchargingthe battery.
•Donotuse orleavethe battery exposedtohightemperatures.The
resulting overheatingcould compromise itsfunctionality anddurability.
• Do notusethe battery in environmentswith static electricity or
magnetic fields.
•Do not chargethe battery below 0degreescentigrade.
•Do not usetheFloorWasher when the battery islow..
•The presenceof dirt on thebattery terminalscouldcompromisethe
correct operationof the device.Clean the dirty terminals with adry cloth
beforeuse.
•Stock andstorethebattery inacool,dryplace.
• Do not carryorstorethe battery with metal objects.
•Do not dispersethe battery intheenvironment.
•The battery andchargerpresentmustbedisposedofinaccordance
with localregulations.The Customeris legally responsibleforthedanger
createdwhen disposingofbatteries.
•Ifthe battery isstocked fora long period (morethanthreemonths)store
it inacool,dry placeandperformachargeand discharge cycle every six
months.
10
TECHNICALDATA 1000Battery 5000Battery
Machine weight 5.5in 5.5in
Machine width 11in 15in
Machinelength 13in 13in
Frontbrush Ø86700 Rpm Ø86700 Rpm
Rearbrush Ø541145Rpm Ø54114 Rpm
Workingwidth 9in 15in
Workingcapacity 2150 sqft /hr 4305sqft /hr
Brushlessmotorpower 580Watt 580Watt
Voltage 36V DC 36V DC
Totalstorage capacity 1gal 1gal
Recoverytankcapacity 34oz 0.5gal
Totalempty weight
(without battery)
20lb 21lb
BATTERY TECHNICAL DATA
Suppliedvoltage 36Volt
SuppliedCurrent 5,8A/h-208,8Watt/h
Dimensions 4.5inX6.75inX4in
Maxautonomy 60min
Rechargetime 90min
Weight 3lb
CHARGER TECHINCAL DATA
Input voltage 100-240V
Outputcurrent 4A

11
SPARE PARTS
1COMPLETE NYLON EXTERNAL LEFT SIDE
1A NYLON EXTERNAL LEFT SIDE
DAD2 LOW SQUARE NUT4MA
CAF
MACHINEBODY
15 UNIVERSAL REAR BRUSH
16 UNIVERSAL FRONT BRUSH
18 COMPLETE HEXAGON SPRING PLUNGER CH10
18A HEXAGON PLUNGER INSERT BUTTON CH10
18B HEXAGON PLUNGER CH10
18C SPRING LATCH FOREXAG ON PLUNGER CH10
18D HEXAGON PLUNGER EJECT BUTTON CH10
20 COMPLETE HEXAGON SPRING PLUNGER CH7
20A HEXAGON PLUNGER INSERT BUTTON CH7
20B HEXAGON PLUNGER CH7
20C SPRING LATCH FOR HEXAGON PLUNGER CH7
20D HEXAGON PLUNGER EJECT BUTTON
CH7
37 COMPLETE NYLON EXTERNAL RIGHT SIDE
37A NYLON EXTERNAL RIGHT SIDE
38 COMPLETE COVER FB25
50 COMPLETE TANK
51 WASTE WATER TANK
SPA.BAT01
COMPLETE BATTERY
SPA.BAT04
COMPLETE HANDLE
SPA.BAT05
COMPLETECHARGER
15
50
38
51
18C 18D
VIT17 18A 18B
DAD2
37A
VIT19
39
16
DAD2 1A
1
18
VIT18
20A
20C
20D
20B 20
37
29
04
01
05
12
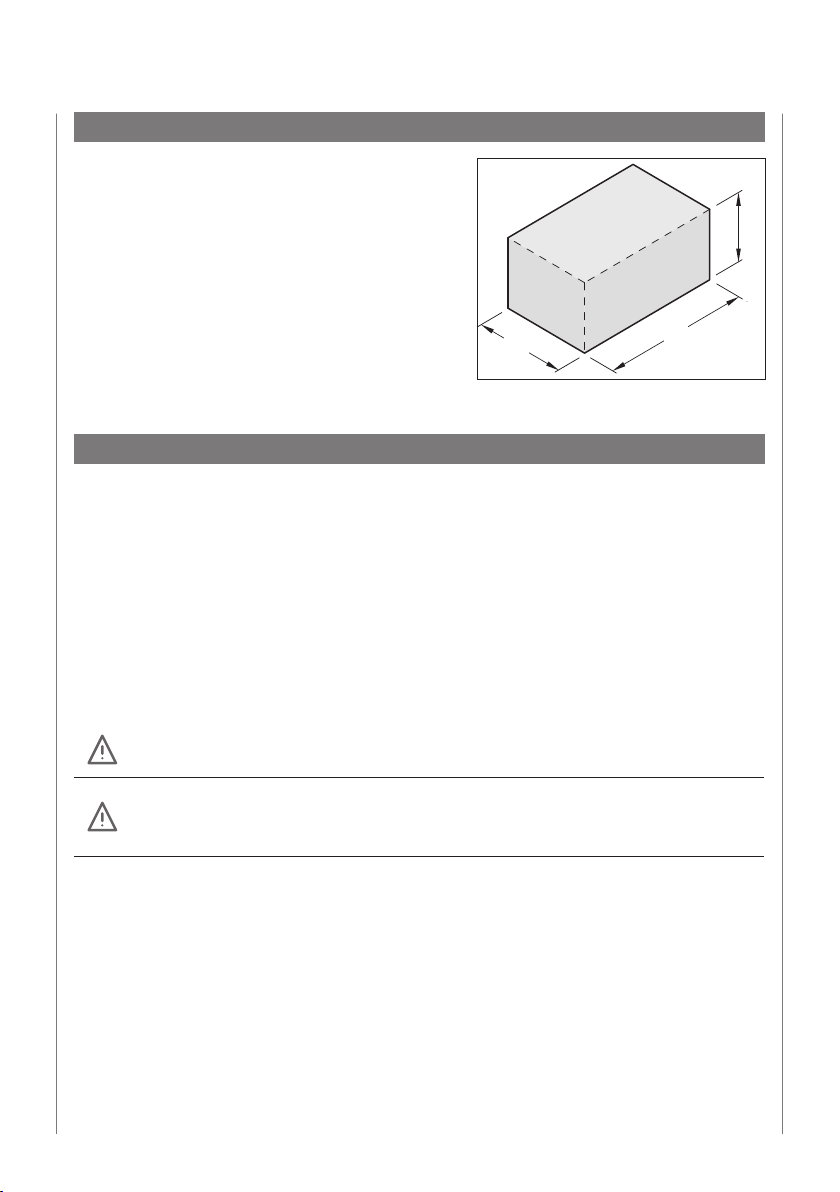
PACKAGINGSPECIFICATIONS ANDDIMENSIONS
The Floorwash machine is delivered in a
protective packaging. Ensurethat the packagingis
fully intact andthat thereare nosignsoftempering
when the product istakenover.In caseof damage,
the customer shall notify our customer service
immediately.
MACHINE UNPACKING
Followtheprocedure below:
1 Placethepackaging onthefloor/worktablesoftlybylayingitdownontherightpart.
2 Opentheexternalcardboardbyusingapairofscissors,whennecessary.(Donotuseanutility
knife).
3 Removethemachinebody,tankand extensibletube,andplacethemonthefloorsoftly.
4 Keepthe cardboard boxand its components away fromsourcesof heat, in a dry and easily
accessibleplace.
Donot breakor throw the packaging and its components away sothat it can beused
againforfuturetransportation.
For yoursafety, wearprotectivegloveswhencarryingouttheseoperations,inordertoavoid
injuriesincaseofaccidentalcontactwithsharpedgesofthecardboardbox,directcontact
withdetergentresiduesor metal edges.
35 80
31
13
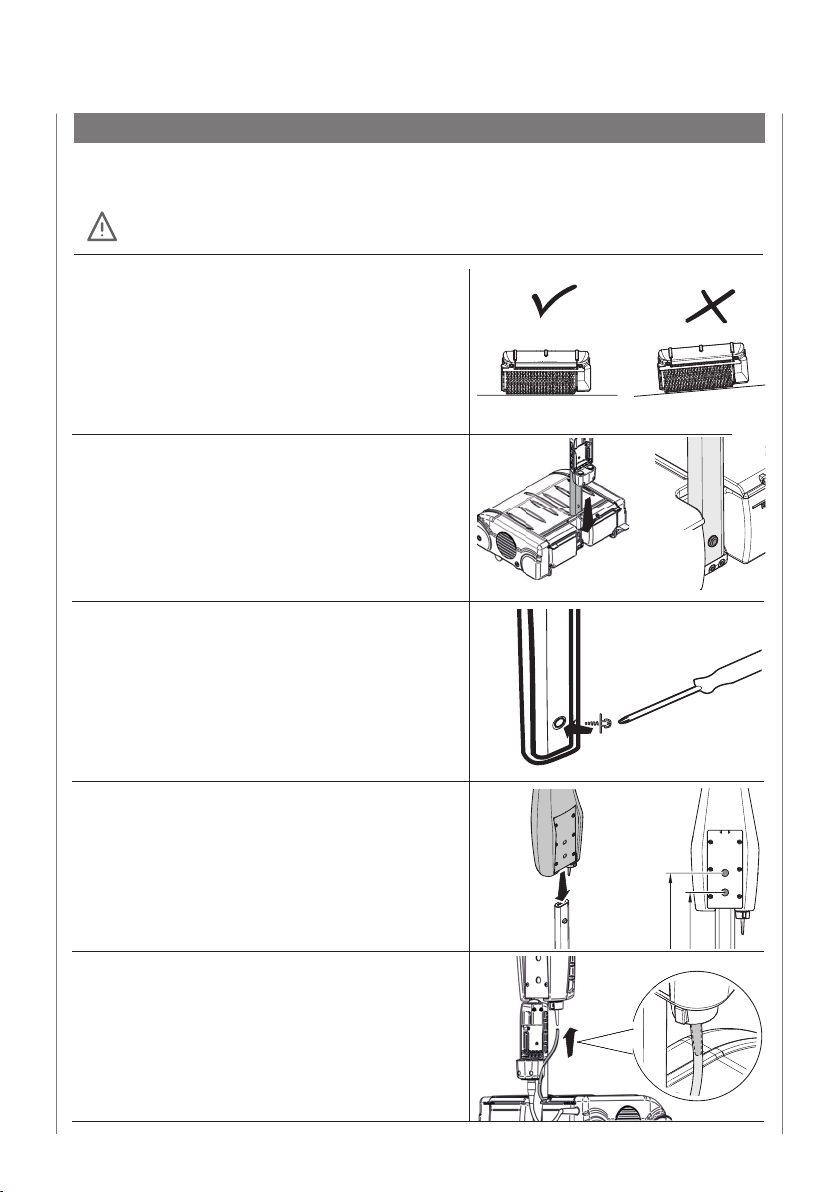
MACHINEASSEMBLY
Followtheprocedurebelow:
TheFloorwashmachinehasafastassemblysystemsince notools are required.Do
notuse any tool to avoid injuriesor damage tothemachine.
1Placethebodyof themachineona stablesurface
withoutslopes.
2Insertthehandleintheaxle ofthemachinebody.
3Inserttheappropriatescrew intotheholeand,
usingascrewdriver,fixthehandletothemachine
body.
4Insertthetankin thehandleatthedesired height
(2different heights).
5Insertthesmalltransparentwatertubeintherelief
valvesituatedon thelowerpartofthetank.
CLACK!
CLACK!
h1
h2

14
INSTALLING THE BATTERY
Followtheprocedurebelow:
Check the Battery chargelevel beforeuse.
1InserttheBatteryintoitsholder.
2Inserttheplugintothesocketlocatedonthe
bottomof thebatteryholder.
UNINSTALLING THEBATTERY
Followtheprocedurebelow:
1Push thereleaseleverupwardsand,
simultaneously,removetheplugfrom thesocket
locatedatthebottomof thebatteryholder.
2 Gently pushthebatterydownandat the same
timepull the releasebutton towardsyou.
Makesurethebatteryisoff beforeperformingany operations
Makesurethebatteryisoff beforeperforming anyoperations

15
CHARGING THE BATTERY
Followtheprocedurebelow:
Useonly theChargersuppliedbytheManufacturer.Anydamageormalfunction causedby
the useof Chargersotherthanthosesupplied by theManufacturershallnot becovered
bytheWarranty.
1Insert theplugof thepowercableof theCharger
intoa 230voltpower outlet.
2PlugtheChargerconnector into thesocket located
belowtheBattery.
Thecorrect chargingof the batterywill besignaledbytheintermittent lightingofoneof
theLED positionedonthemembraneand bythelightingof theredlightonthe charger.
When the battery is fully charged, theredlightonthe charger will turn green.
Incaseofoverheatingduringthechargingphase,thebattery will automatically suspend
thecharge.Oncethecorrect temperaturehasbeenrestored,the Battery will automatically
resumethe chargingphase.
Make surethebattery isoff beforeperforming any operations

16
HOW TOGET STARTED
The Floorwash machine is a mechanical collection device that can achieve
excellent resultseven withtheuse of water without detergent. An excellent result is
achieved withtheuseofspecific detergents.
Themachine comes with universal brushes (gr0.12).Anyway, it ispossible to request
specific brushestoourcustomerserviceaccording tothetypeofsurfacetobetreated.
Usefoam controlleddetergents toavoid excessivefoaming.Donotusepureacids.
Wearprotectiveglovesbeforehandlingdetergents,alkaline oracidsolutionstoavoidhand
injuries.
1Removethetankcap.
2Pour the liquid, clean water and/ordetergent in
theconcentrationspecifiedonthelabel.
3Replacethetankcap.
Fill the tank with clean water and/ordetergent for a maximumof 2lt. Use water at a
temperature not exceeding40°C or below10°C. (104°F– 50°F).

17
ON/OFF
Before the start-upof the device, checkthat the electrical cordand the machine are not
malfunctioninginanyway. If this isnot the case,donot usethe deviceand contactourservice
centre as soonas possible.
3While pressing thekick-startpedal, lowerthetank
towards youslowly. At thispoint,themachine
will switchonautomaticallyandbrusheswill start
rotating.
4Be carefulnottolower thehandleexcessively.
Maintaina sufficientdistancefrom thefloorso that
thebatterydoes not touchthe floor.
1
2
3
1Press thepower buttonlocatedon theleft sideof
thebattery.Payattentionto theCautionledlight
indicatingthecorrect ignitionof thebattery.
2Press thekick-startpedalsituatedat thebottom-
rightsideof themachine.
It is important topress thekick-start pedalcompletely before lowering thetanktowards
you,soas to avoidanydamage tothecentral axleof themachine body.
Donotpressthe kick-start pedal when returningthe tank totheoriginal position.
Make surethe batteryisoff beforeperforming anyoperations

18
5Themachine willswitchoffautomaticallywhen
returning thetanktoavertical position(rest
position).
6Presstheon/offbuttonlocatedonthebatteryfor3
secondstoswitchoff thebattery.
BATTERYCHARGE LEVEL
The batterycharge levelisindicatedbythe
appropriate ledlightsonthetopofthebattery.
Dependingonthenumberandcoloroftheled
lights,thebatterycharge levelcanbe:
Ledcolor Number Batterylevel
Green 3 67%-100%
Green 2 34%-66%
Green 1 0%-33%
Beforestarting theshutdownprocedure,continue tousetheapplianceforat leasttenseconds
withoutdispensingwater inordertocompletethedryingoperation.
Thebattery willturnoff automaticallyafter20minutesof inactivity.

19
FUNCTIONING
Checkthat allstepsdescribedabovehavebeencompletedcorrectlybeforeusingthemachine.
Before startingthe washing procedurewiththemachine, remove any solid residual suchas
dust,lumps,stones, glass, paper etc.from thesurface whichhastobe treated.
1Aftertheenginehasturnedon,move themachine
backandforthwith linearmovements.Thelever
placed beneaththehandlewill allow youto
dispensetheliquidpreviouslypoured inthetank.
The engineof this appliance is equipped withasafety device whichcutsit offincaseofoverload.
If this situation occurs,it isnecessarytoreturnthehandle to its initial position,turn off the
battery and turnitonagain,and thenresumenormal work.Intheevent thattheenginedoes
not workagain, contactourafter-salesservice.
Donot makecircularmovements with themachine sothatitcancollectthe dispensed liquid.
2Afterpullingthelever, theliquid willdistribute
uniformly onthefrontcylinder brush.
Intheongoing stagejust pull thelever halfway; in theretuningstage, releasethelever, thus
allowing the liquid recovery.
In thereturningstage, themachine shall passthrough thesamehallwayof theongoingstage,
thus allowing a completerecoveryof thedispensed liquid.

20
3Therecoveryof thedispensed liquidoccurs
automaticallybymeansofmechanicalcollection.
The liquidwillflowintothewastesituatedinthe
lowerpartofthemachine.
Itis importantto empty the waste when the seepliquidreaches themaximum mark printed
on the backof thewaste, thusavoidinganaccidentalreleaseofthesame.
TRANSPORT
Totransportthemachinesafely,followthesesteps:
1Themachinehas tworubberwheelssituatedin
thelowerpart.Bypullingthetanktowardsyou,
without pressing thekick-start pedal,thefront
partofthemachinewill beliftedup, guaranteeing
aneasy transportation..
If theliquidinthe waste hasreachedthehighest level,itisnecessaryto emptyitbefore
carrying themachine.
2Itispossibletolift theentiremachineup,inorder
tomoveittoanupperfloorofthehouse,byusing
thedesignatedslitsituated onthelowerpartof the
tank.
Donot lift themachineupbyusingtheupperknobof the tank.
For transportation withvehicles,ensure the machinesothatitcannot in anyway move.
CLACK!
Checkthat thetankisplacedinavertical position beforemoving themachine. The electrical
cordshallbeunpluggedfrom theoutlet.
Table of contents
Other Floorwash Ultrasonic Jewelry Cleaner manuals

Popular Ultrasonic Jewelry Cleaner manuals by other brands


Raytech
Raytech Turbo Sonic 6000 operating instructions

Pattfield Ergo Tools
Pattfield Ergo Tools PE-EFR 1410 Translation of the original instructions

JONARD TOOLS
JONARD TOOLS FCC-120 instruction manual

Makita
Makita CL070D Series instruction manual

ulsonix
ulsonix ULX-360-1 user manual

Jobsite
Jobsite CT5777 user manual

Miele professional
Miele professional IR 6001 operating instructions

NU-ICE AGE
NU-ICE AGE Commando 55 owner's manual

Makita
Makita 4076D instruction manual

Makita
Makita DCL142 instruction manual

Flexco
Flexco U-Type Secondary Cleaner Installation, operation and maintenance manual

Polaris
Polaris W 445 Installation and user manual