fluvial SIENA Series User manual

Instruction manual: LED Strip Lights and Aquarium
Mode d’emploi : Rampes d’éclairage à DEL et bac d’aquarium
Gebrauchsanleitung: LED-Balken und Aquarium
Manual de instrucciones: Tanque de acuario con luminaria LED
Návod k obsluze: pásové světlo LED a akvárium
Instruktionsvejledning: LED-lysstribe og Akvarium
Instructiehandleiding: Ledstrip en aquarium
Manual de instruções: Tira de luz LED e aquário
Használati útmutató: LED fénycső és akvárium
Manuale di istruzioni: Acquario con striscia di illuminazione a LED
Instrukcja obsługi: Listwa oświetleniowa LED i akwarium
Manual de instrucțiuni: Lampa cu bandă LED i acvariul
Инструкция по эксплуатации:
Návod na obsluhu: Pásik LED osvetlenia a akvárium
Bruksanvisning: LED-belysningsskena och akvarium
SIENA
32
EN English 411
FR Français 1219
DE Deutsch 2027
ES Español 2835
CZ Čeština 3643
DK Dansk 4451
NL Nederlands 5259
PT Português 6067
HU Magyar 6875
IT Italiano 7683
PL Polski 8491
RO Română 9299
RU Pycck 100107
SK Slovenčina 108115
SE Svenska 116123
TABLE OF CONTENTS
54
READ THOROUGHLY PRIORTO INSTALLATION AND OPERATION
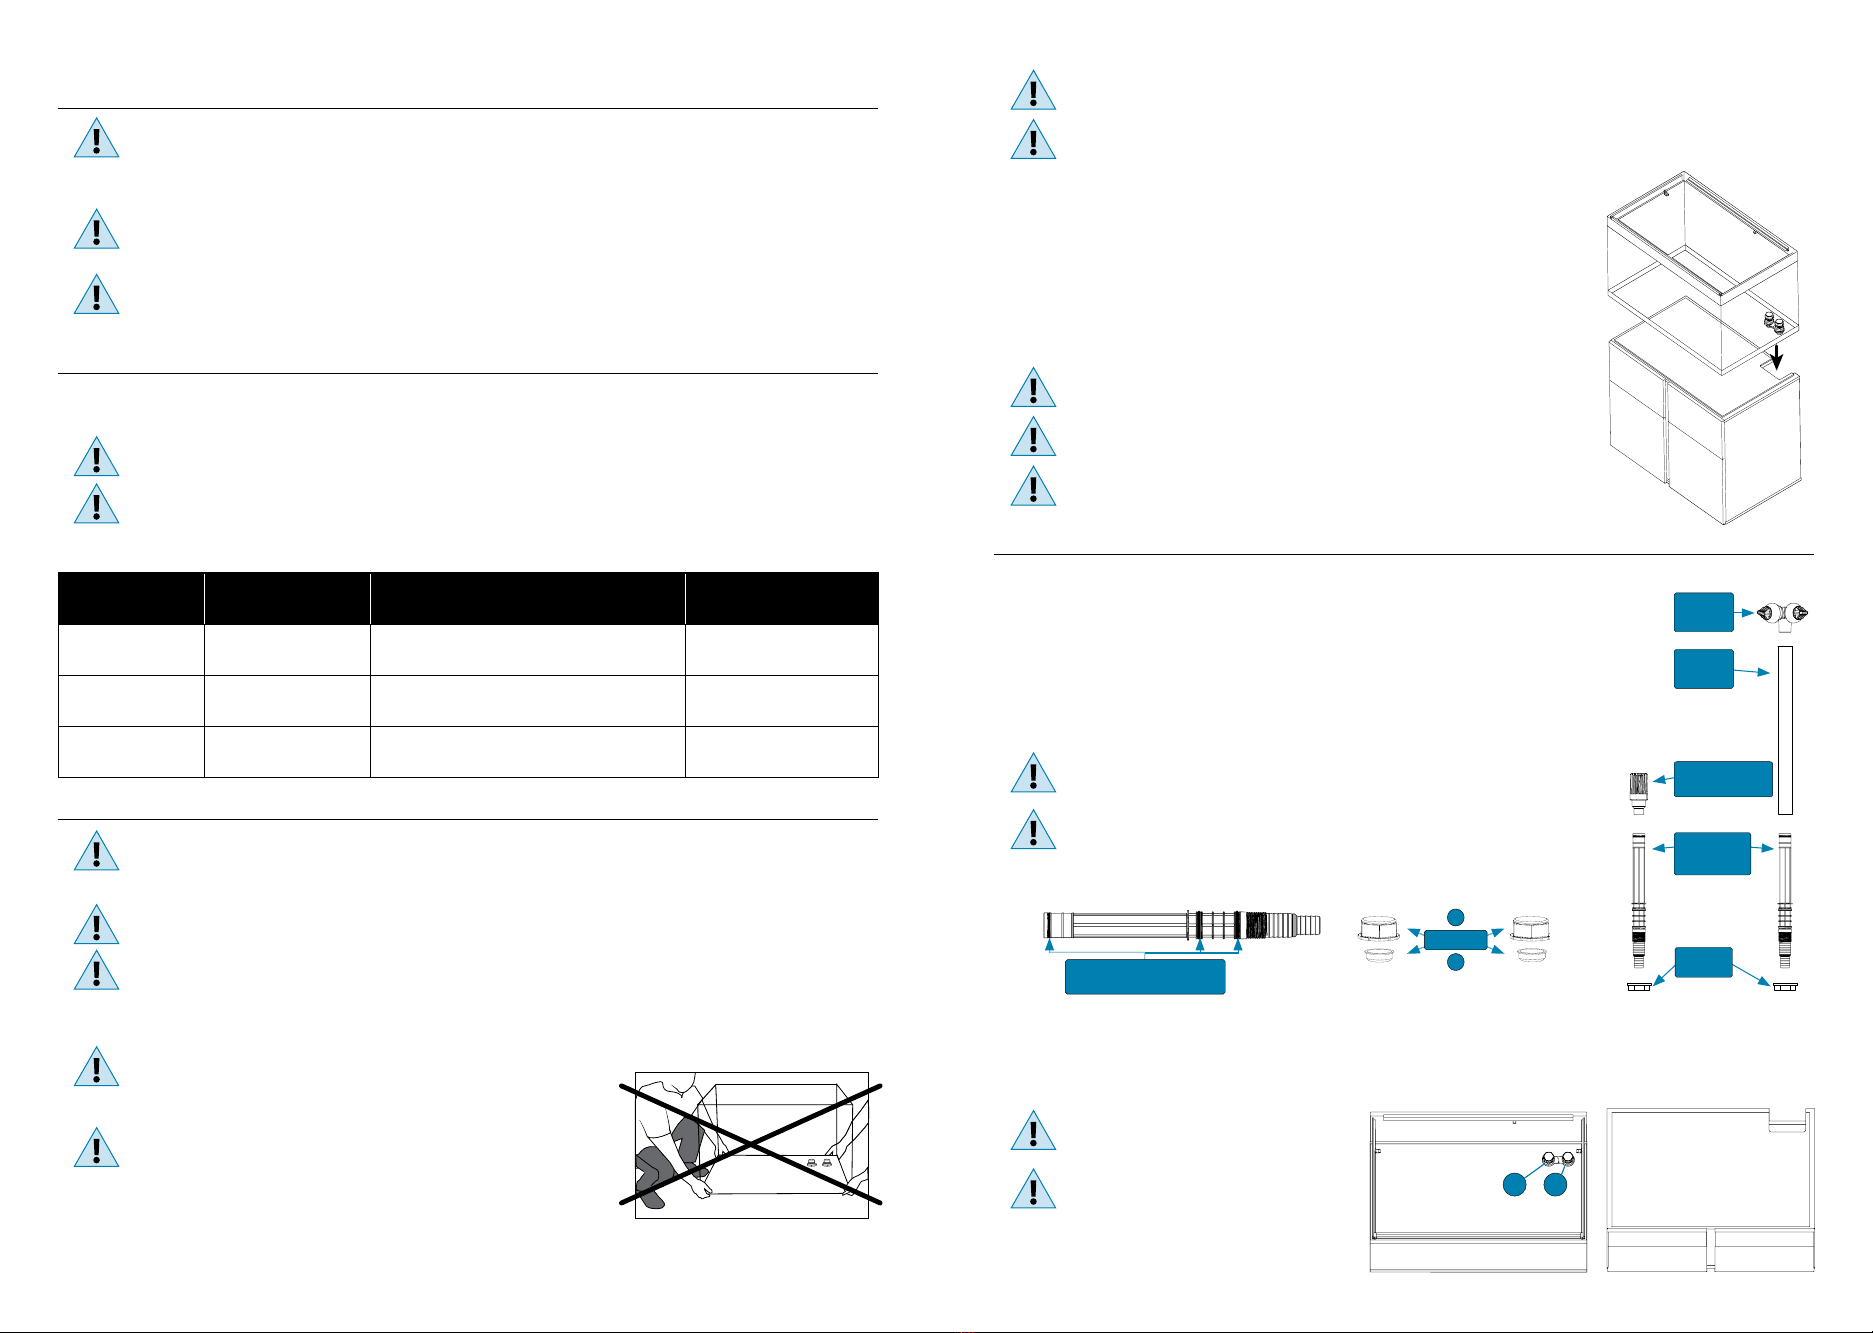
IMPORTANT: FULLY ASSEMBLE THE CABINET BEFORE REMOVING THE TANK FROM ITS BOX AND NEVER PLACE
THE AQUARIUM ON ANY SURFACE OTHERTHAN THE CABINET TO PREVENT DAMAGETO THE AQUARIUM BASE.
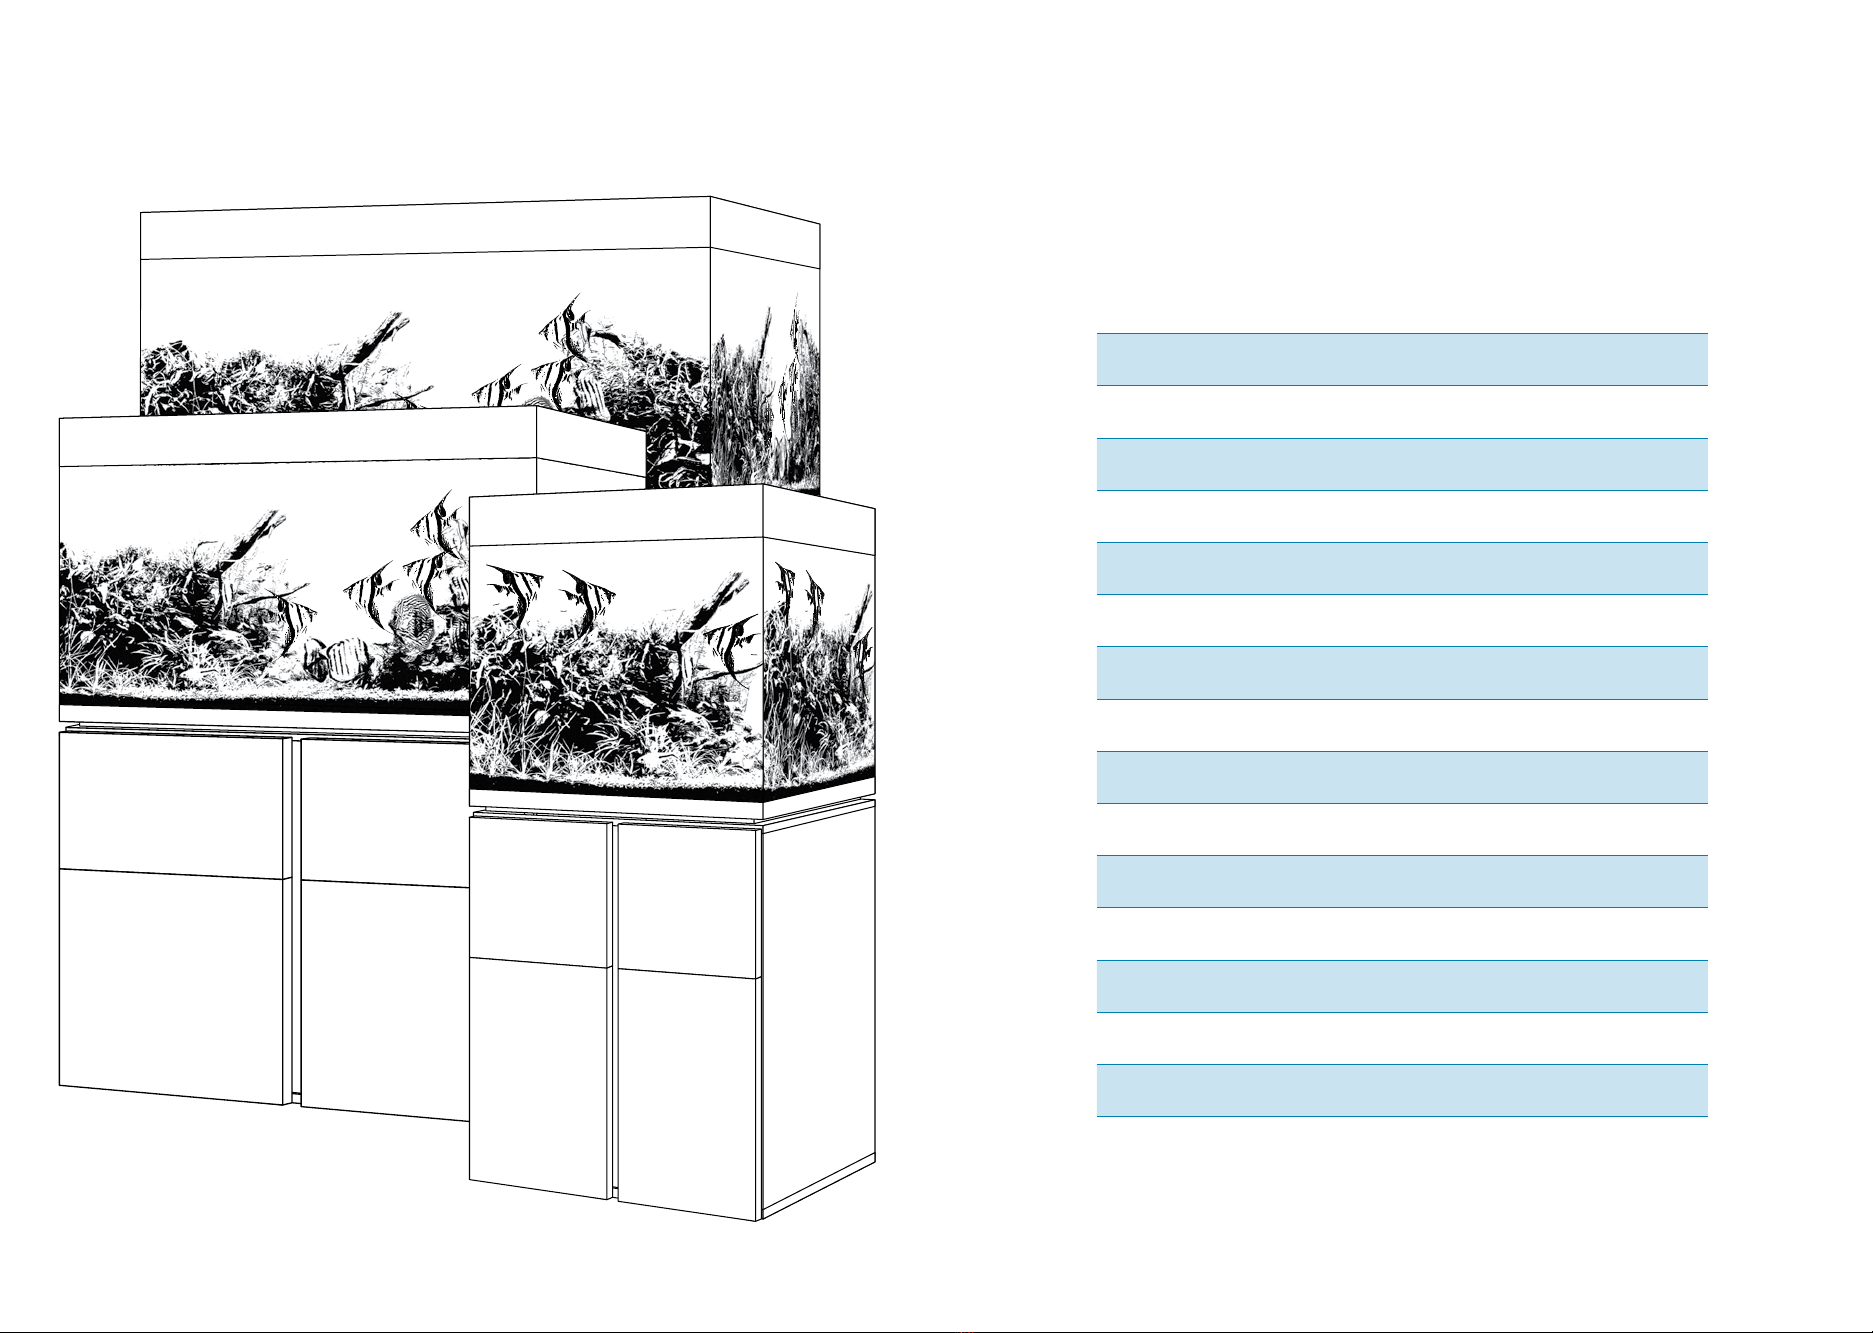
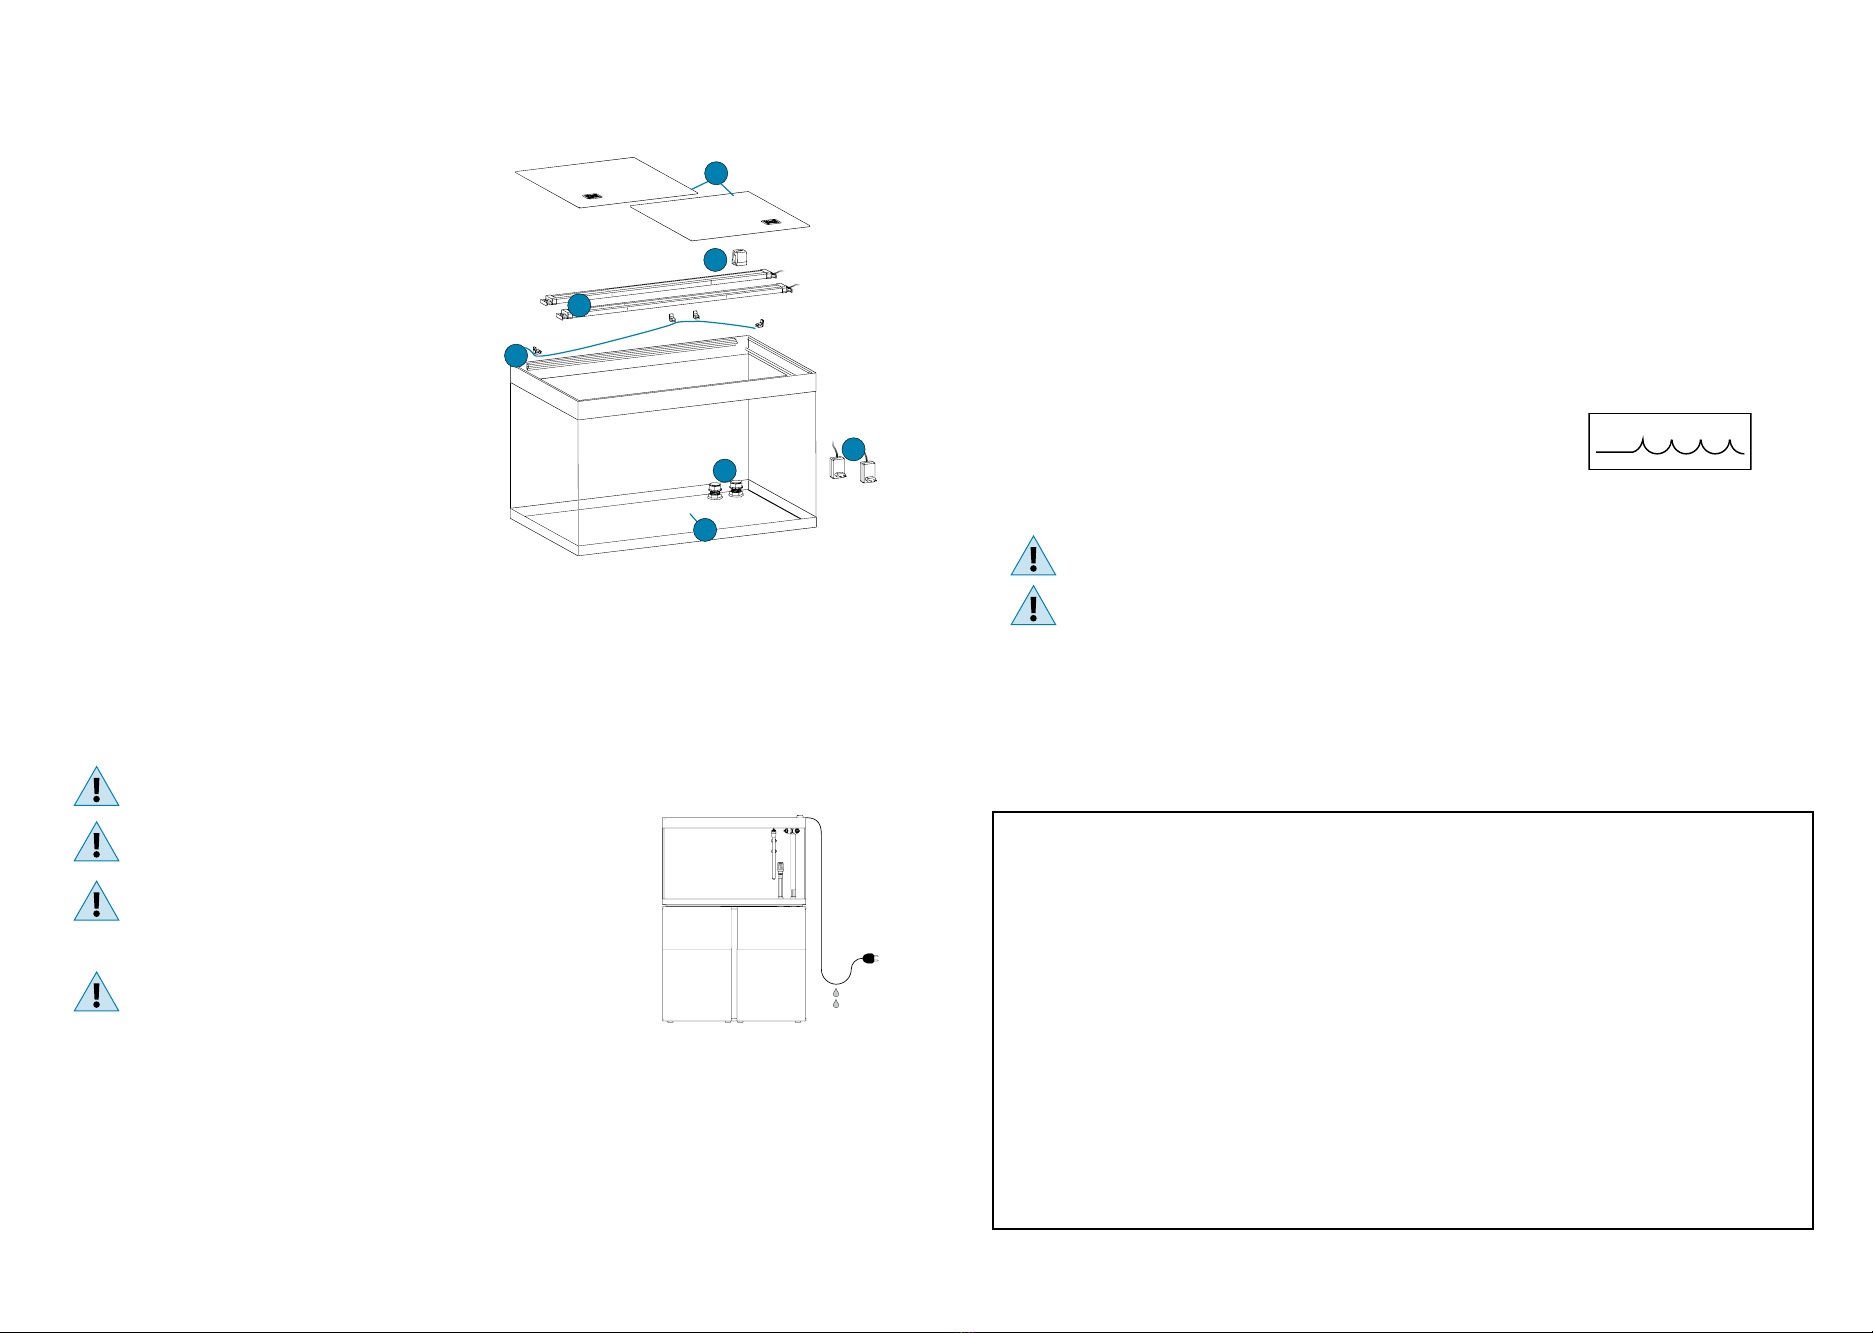
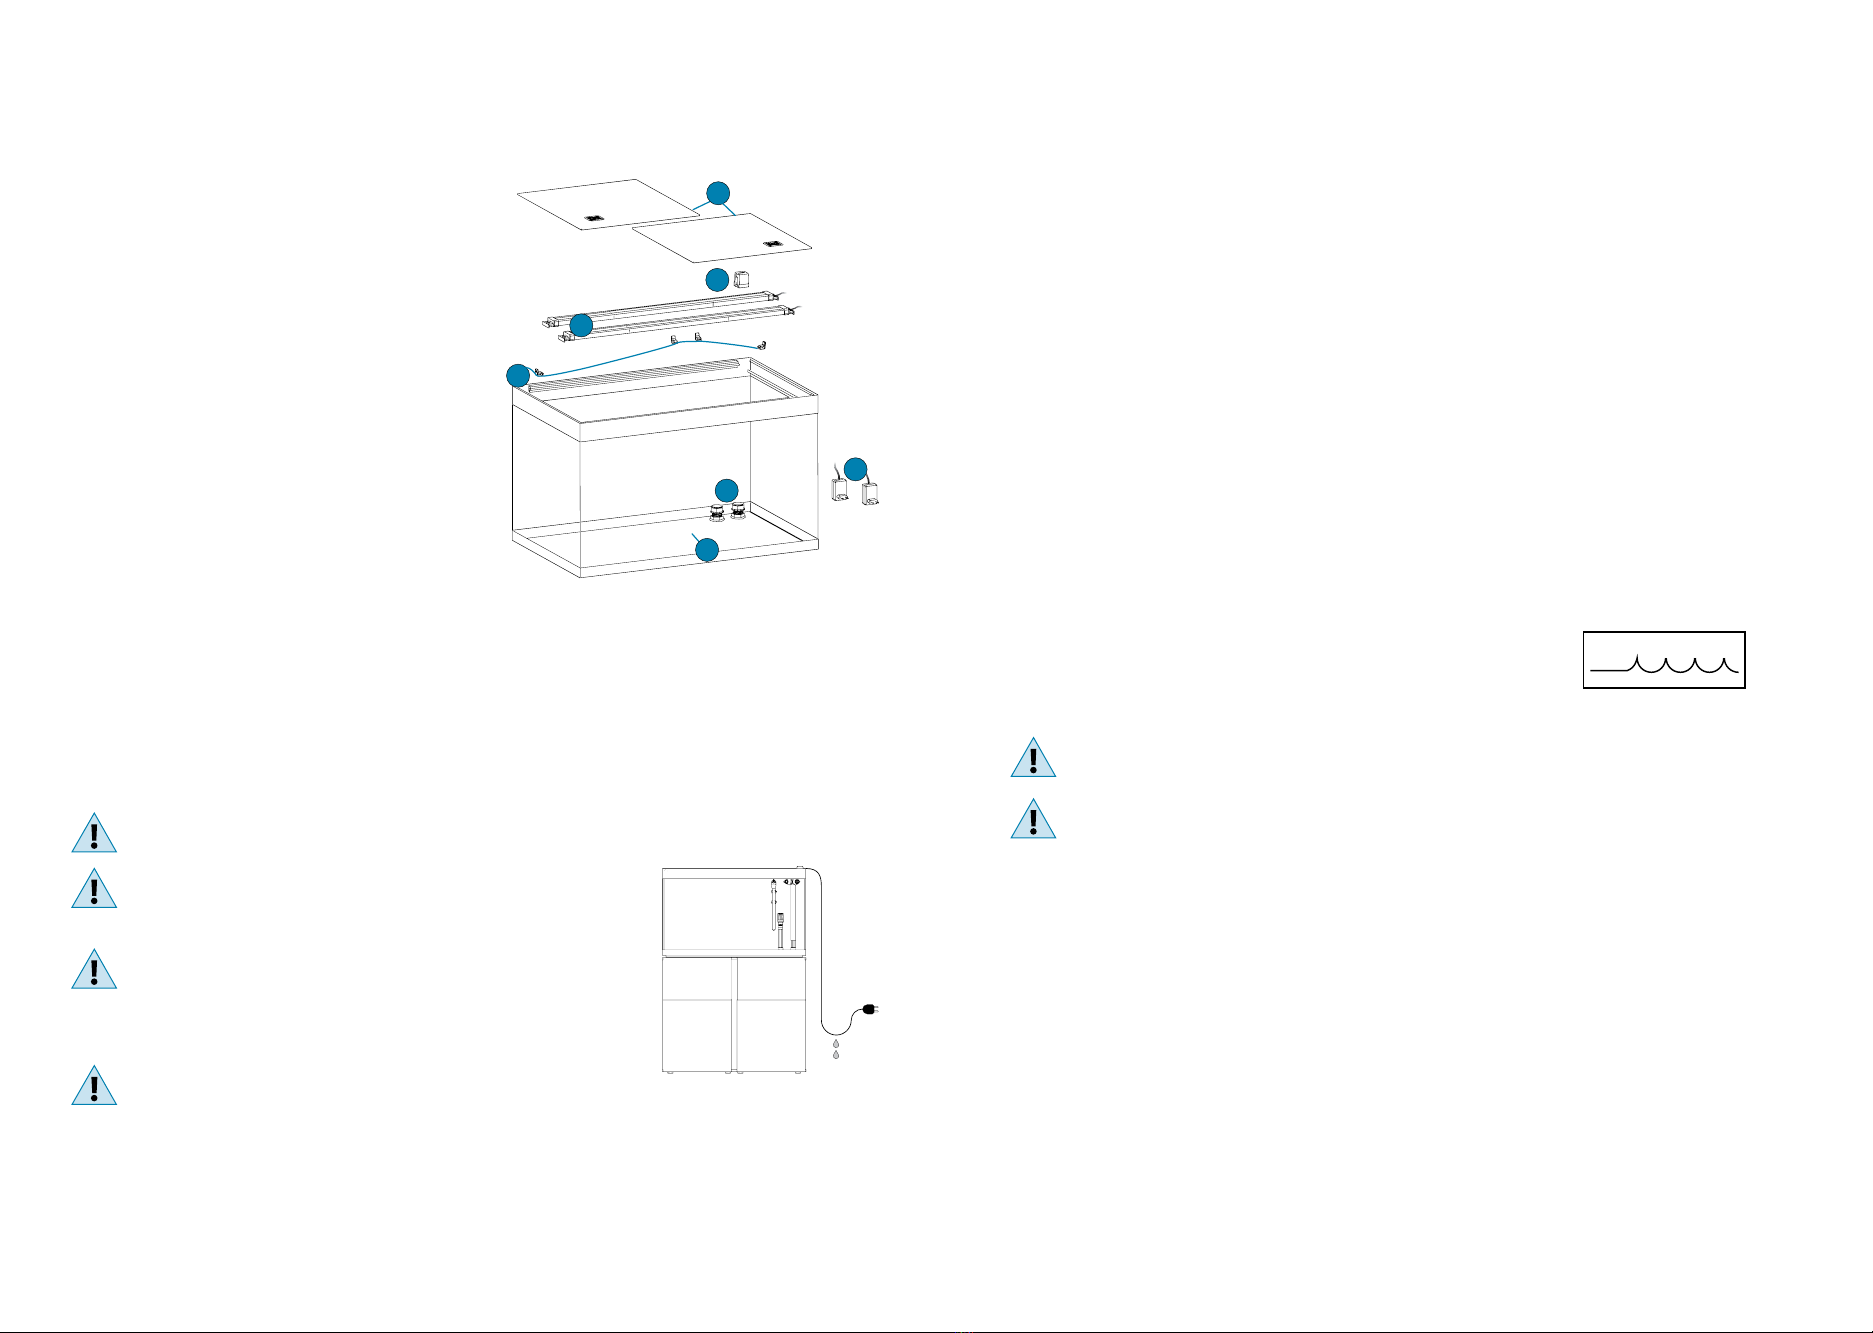
FLUVAL SIENA LED: PARTS
The SIENA Aquarium kit contains two separate packages. Carefully remove all components
from the packaging and make sure that nothing is missing or damaged.
1 package including:
1 x Glass tank (A)
2 x Sliding top covers (B)
2 x LED strip lights (C) + 2 x LED drivers
1 x Plastic bag with:
• 4 x Electrical cable hooks (D)
• 1 x Over rim cable guide (E)
• 2 x Bottom Sealing Plugs (F)
1 x Fluval filter, with its instruction manual
1 x Fluval heater, with its instruction manual
1 package (supplied separately) including:
the disassembled cabinet, with its instruction manual
IMPORTANT SAFETY
INSTRUCTIONS
WARNING: To guard against injury, basic safety precautions
should be observed when handling the LED Strip Lights,
including the following:
1. For the complete enjoyment, use and understanding of this product,
READ AND FOLLOW ALL SAFETY INSTRUCTIONS
and all-important notices on the appliance before using. Failure to do so may result in loss of fish life and/or personal injury or
damage to the unit.
2. DANGER –To avoid possible electrical shock, special care should be taken due to the close proximity of the LED Strip Lights to
water. For each of the following situations, do not attempt repairs yourself; return the appliance to an authorized service facility for
service or discard the appliance. (See Customer Service information at the end of this manual).
If the unit falls into the water, DON’T reach for it! First unplug it and then retrieve it.
If the electrical components of the appliance get wet, unplug the appliance immediately.
Carefully examine the appliance after installation. It should not be plugged
in if there is water on parts not intended to be wet.
Do not operate any appliance if it has a damaged cord or plug, or if it is
malfunctioning, dropped or damaged in any manner.The power cord of the
appliance cannot be replaced; if the cord is damaged, the appliance must be
discarded. Never cut the cord.
To avoid the possibility of the appliance plug or wall socket getting wet, position the
unit to one side of a wall mounted socket to prevent water from dripping onto the
socket or plug. A“drip loop”(see illustration) should be arranged to the socket. The
“drip loop”is that part of the cord below the level of the socket (or the connector if an extension cord is used), to prevent
water travelling along the cord and coming into contact with the wall socket. If the plug or socket does get wet, DON’T
unplug the cord. Disconnect the fuse or circuit breaker that supplies power to the appliance.Then unplug and examine for
presence of water in the wall socket.
3. WARNING - Close supervision is necessary when any appliance is used by or near children. This appliance can be used by children
ages 3 years and above and persons with reduced physical, sensory, or mental capabilities or lack of experience and knowledge
if they have been given supervision or instruction concerning the use of the appliance in a safe way and understand the hazards
involved. Children shall not play with the appliance. Cleaning and user maintenance shall not be made by children without
supervision.This product is not a toy.
FOR USA ONLY
FCC Statement
This device complies with part 15 of the FCC rules. Operation is subject to the following two conditions:
(1)This device may not cause harmful interference, and (2) this device must accept any interference received, including interference that
may cause undesired operation.
Change or modifications not expressly approved by the party responsible for compliance could void the user’s authority to operate the
equipment.
NOTE:This equipment has been tested and found to comply with the limits for a Class B digital device, pursuant to part 15 of the FCC
Rules.These limits are designed to provide reasonable protection against harmful interference in a residential installation.This equipment
generates uses and can radiate radio frequency energy and, if not installed and used in accordance with the instructions, may cause harmful
interference to radio communications. However, there is no guarantee that interference will not occur in a particular installation. If this
equipment does cause harmful interference to radio or television reception, which can be determined by turning the equipment off and on,
the user is encouraged to try to correct the interference by one or more of the following measures:
• Reorient or relocate the receiving antenna
• Increase the separation between the equipment and receiver
• Connect the equipment into an outlet on a circuit different from that to which the receiver is connected
• Consult the dealer or an experienced radio/TV technician for help
The device has been evaluated to meet general RF exposure requirement.The device can be used in portable exposure condition without
restriction.
4. To avoid injury, do not come into contact with moving parts or hot parts such as heaters, LED devices, etc.
5. CAUTION – Always unplug or disconnect all appliances in the aquarium from electricity supply before placing hands in water,
before putting on or taking off parts and when these LED Strip Lights are being installed, maintained, or handled. Never yank cord
to pull plug from outlet. Grasp the plug and pull to disconnect.
Always unplug an appliance from an outlet when not in use.
WARNING: BE SUREYOU UNPLUG THE LED DRIVER FROMTHE POWER OUTLET; JUST SWITCHING OFF THE APPLIANCE
WITH THE APP IS NOT ENOUGH BECAUSE IT DOES NOT STOP THE POWER SUPPLY.
Do not use the appliance for any purpose other than its intended use (i.e. don’t use in swimming pools, garden ponds, bathtubs,
etc.).The use of attachments not recommended or sold by the appliance manufacturer may result in a dangerous situation. Do not
try to repair any product component: in case of damage, replace the damaged component with genuine spare parts.
6. IMPORTANT: These LED Strip Lights are AQUARIUM LUMINAIRES suitable FOR INDOOR USE ONLY designed to be assembled onto
Fluval Siena Aquariums only. For fresh and saltwater ornamental aquariums with max 35°C water temperature. Do not install or
store the appliance anywhere where temperatures may drop below freezing.
7. IMPORTANT: Make sure that the LED Strip Lights are securely and correctly installed
before operating. The LED Strip Lights must never operate in water.
Fill the aquarium up to the level indicated on the label situated on the inside of the
aquarium (see the image on the right). IMPORTANT: Do not overll.
Overlling the aquarium can cause water to pass under the top frame which then runs down the outside of the
aquarium.
WARNING: Do not plug in the LED Strip Lights if there is water on parts not intended to be wet.
WARNING: Do not place any object(s) on the LED Strip Lights (C) or on the sliding top covers. Ensure sufficient airflow
around the LED Strip Lights.The safety of the appliance is only ensured provided that it has been properly installed.
8. Read and observe all the important notices on the appliance.
9. If an extension cord is necessary, a cord with a proper rating should be used. A cord rated for less amperes or watts than
the appliance rating may overheat. Care should be taken to arrange the cord so that it will not be tripped over or pulled.
10.
SAVE THESE INSTRUCTIONS.
MAX
B
E
C
D
A
C
F

76
FULL SETUP GUIDE
AQUARIUM CABINET INSTALLATION AND PREPARATION
Before handling the aquarium tank and cabinet, ensure you have sufficient people to move them without any risk.
ASSEMBLE THE AQUARIUM CABINET BEFORE REMOVING THE AQUARIUM FROM ITS PACKAGING.
You MUST place the Fluval aquarium on the appropriate Fluval cabinet which was designed with the correct dimensions
and structure to bear the weight of the aquarium full of water. The use of different cabinets, pieces of furniture,TV stands, etc.,
WILL invalidate your warranty and will compromise the product safety.
Please refer to the instruction manual of the aquarium cabinet. Do not attempt to set up the cabinet without reading
and following the instruction manual. If it is missing or unusable, contact the store or Hagen Customer Service.
Placing the aquarium with its cabinet in the nal location
Location of the aquarium is very important. Place the aquarium away from direct sunlight.This will reduce the risk of excessive algae build-up and avoid overheating the
aquarium by the sunrays. Keep your Fluval Aquarium away from other sources of heat (air ducts, radiators, etc.) for proper temperature maintenance. Drafts should also be
avoided. Do not locate your Fluval Aquarium where water spills will cause damage.
WARNING: Ensure that the selected position has an even and level surface which is able to support the total weight of the aquarium
full of water and the cabinet. Place your new Fluval Aquarium and cabinet close to an electrical outlet. After placing the cabinet,
assure that it is perfectly level by using an adequate leveling tool.
IMPORTANT: Fluval cabinets are designed to support the total weight of the aquarium.The table below shows the approx. height
of filling of the tank and approx. weight of the aquarium full of water (rocks, decorations or gravel have not been considered).
FLUVAL SIENA AQUARIUMS
THE AQUARIUM INSTALLATION
Before handling the aquarium tank and cabinet, ensure you have sufficient people to move them without any risk.
TAKE THE AQUARIUM TANK OUT FROM ITS PACKAGING
The aquarium glass tank comes with runners glued to it to support the LED Strip Lights and covers.
Do not try to remove the runners.
The tank is made of glass, always handle it with the utmost care. Make sure to lift it only by the base.
PLACE THE AQUARIUM TANK ONTO THE CABINET
IMPORTANT: Thoroughly clean the top side of the cabinet base and the lower side of the aquarium base.
Place the empty aquarium tank onto the cabinet, making sure that the connections
lie in the appropriate opening of the cabinet. NEVER place anything underneath
the aquarium.There should be NO additional support or lining (e.g., polystyrene mats)
between the aquarium and the cabinet.
WARNING: Risk of breaking the glass tank base.
The glass tank features protruding fittings at the bottom, which can never be used
as support points. Never try to lay the tank on any support except its cabinet, which
is fitted with a special cavity to accommodate the fittings. When placing the tank
onto its cabinet, remove the tank from the box and rest it on the cabinet paying
the utmost attention not to damage the bottom fittings.
MODEL External
Tank Dimensions
Height of Filling
(Up to the max water level line)
Weight of aquarium
filled only with water
FLUVAL SIENA 166 55 x 55 x 55 cm
21.5 x 21.5 x 21.5’’
49.5 cm / 19.5”
(Water capacity= 140 L / 37 US Gal) 166 kg / 366 lb
FLUVAL SIENA 272 90 x 55 x 55 cm
35.5 x 21.5 x 21.5’’
49.5 cm / 19.5’’
(Water capacity= 227 L / 60 US Gal) 277 kg / 611 lb
FLUVAL SIENA 332 110 x 55 x 55 cm
43.5 x 21.5 x 21.5’’
49.5 cm / 19.5’’
(Water capacity= 279 L / 74 US Gal) 340 kg / 750 lb
Never attempt to move or transport the cabinet with the glass tank or any other load on top of it.
Although the glass tank was manufactured with the maximum care and the most advanced techniques,
we still recommend making a simple inspection prior to the installation to verify that unexpected events
during handling and transportation have not damaged the tank or impaired its water-tightness.
1. Make a visual inspection of the glass tank to check for damage or cracks.
Do not continue the installation if the tank is damaged.
2. If no damages and cracks are detected, proceed with the normal aquarium set up.
3. After the full installation of the aquarium kit with filter, heater, LED strip lights, decorations, etc.,
has been completed, fill the tank with water 2”(5 cm) at a time, while making sure there are no leaks.
Never attempt to move or transport the tank if it is not completely empty
of water or any other material.
Always take care not to damage the seals at the edges of the glass panels
while maintaining your aquarium, ie: with planters or algae scrapers.
Never use toxic or aggressive substances to clean your aquarium,
such as household detergents.
EASY CONNECTION SYSTEM INSTALLATION
This section only applies to Fluval Aquariums with Fluval External lter and“EasyConnect”System.
INSTALLING WATER INTAKE/OUTPUT WITH “EASYCONNECT” SYSTEM
(Intake/output ttings are included in the lter packaging)
These Fluval Aquarium models feature the“EasyConnect”system, which allows the direct connection
of the tank to the external filter through the bottom glass by means of special fittings. Normally,
the same type of connection is achieved through specially made devices, which are complex and
require the intervention of expert technicians.
On the contrary, in just a few minutes the“EasyConnect”system can be easily and safely installed, giving your aquarium a
professional and tidy filtration solution.
Before proceeding, identify and count all parts required by referring to the exploded
view in the side illustration. If any part is missing, do not proceed with the installation
and contact your local supplier.
Before proceeding, check stems (A) for the presence of all 3 rubber rings (C). Do not proceed
with the installation if one of the rubber rings (C) is missing and contact your local supplier.
Locate the 2 openings in the tank bottom glass and assure that the corresponding opening in the cabinet is aligned with them.The 2 openings in the tank bottom glass are
complete with factory-installed special plastic fittings, which must never be removed, turned, or loosened and with 2 sealing plugs (P) and (Q).The output group should be
installed in the opening (O), whereas the intake group should be installed in the opening (I).
Do not force, loosen or turn the factory-installed special
fittings on tank openings (I) and (O).
Once the output/intake groups are installed,
do not shift the tank with respect to the cabinet
as this may damage the output/intake devices
and the glass tank.
TANK BOTTOM SEALING PLUGS
P
Q
Plugs
Connector Stem’s
Rubber Rings (C)
INTAKE
GROUP
OUTPUT
GROUP
Output
Nozzles (N)
Output
Stem (B)
Intake
Strainer (S)
Connector
Stems (A)
Ring Nuts
(R)
I O
98
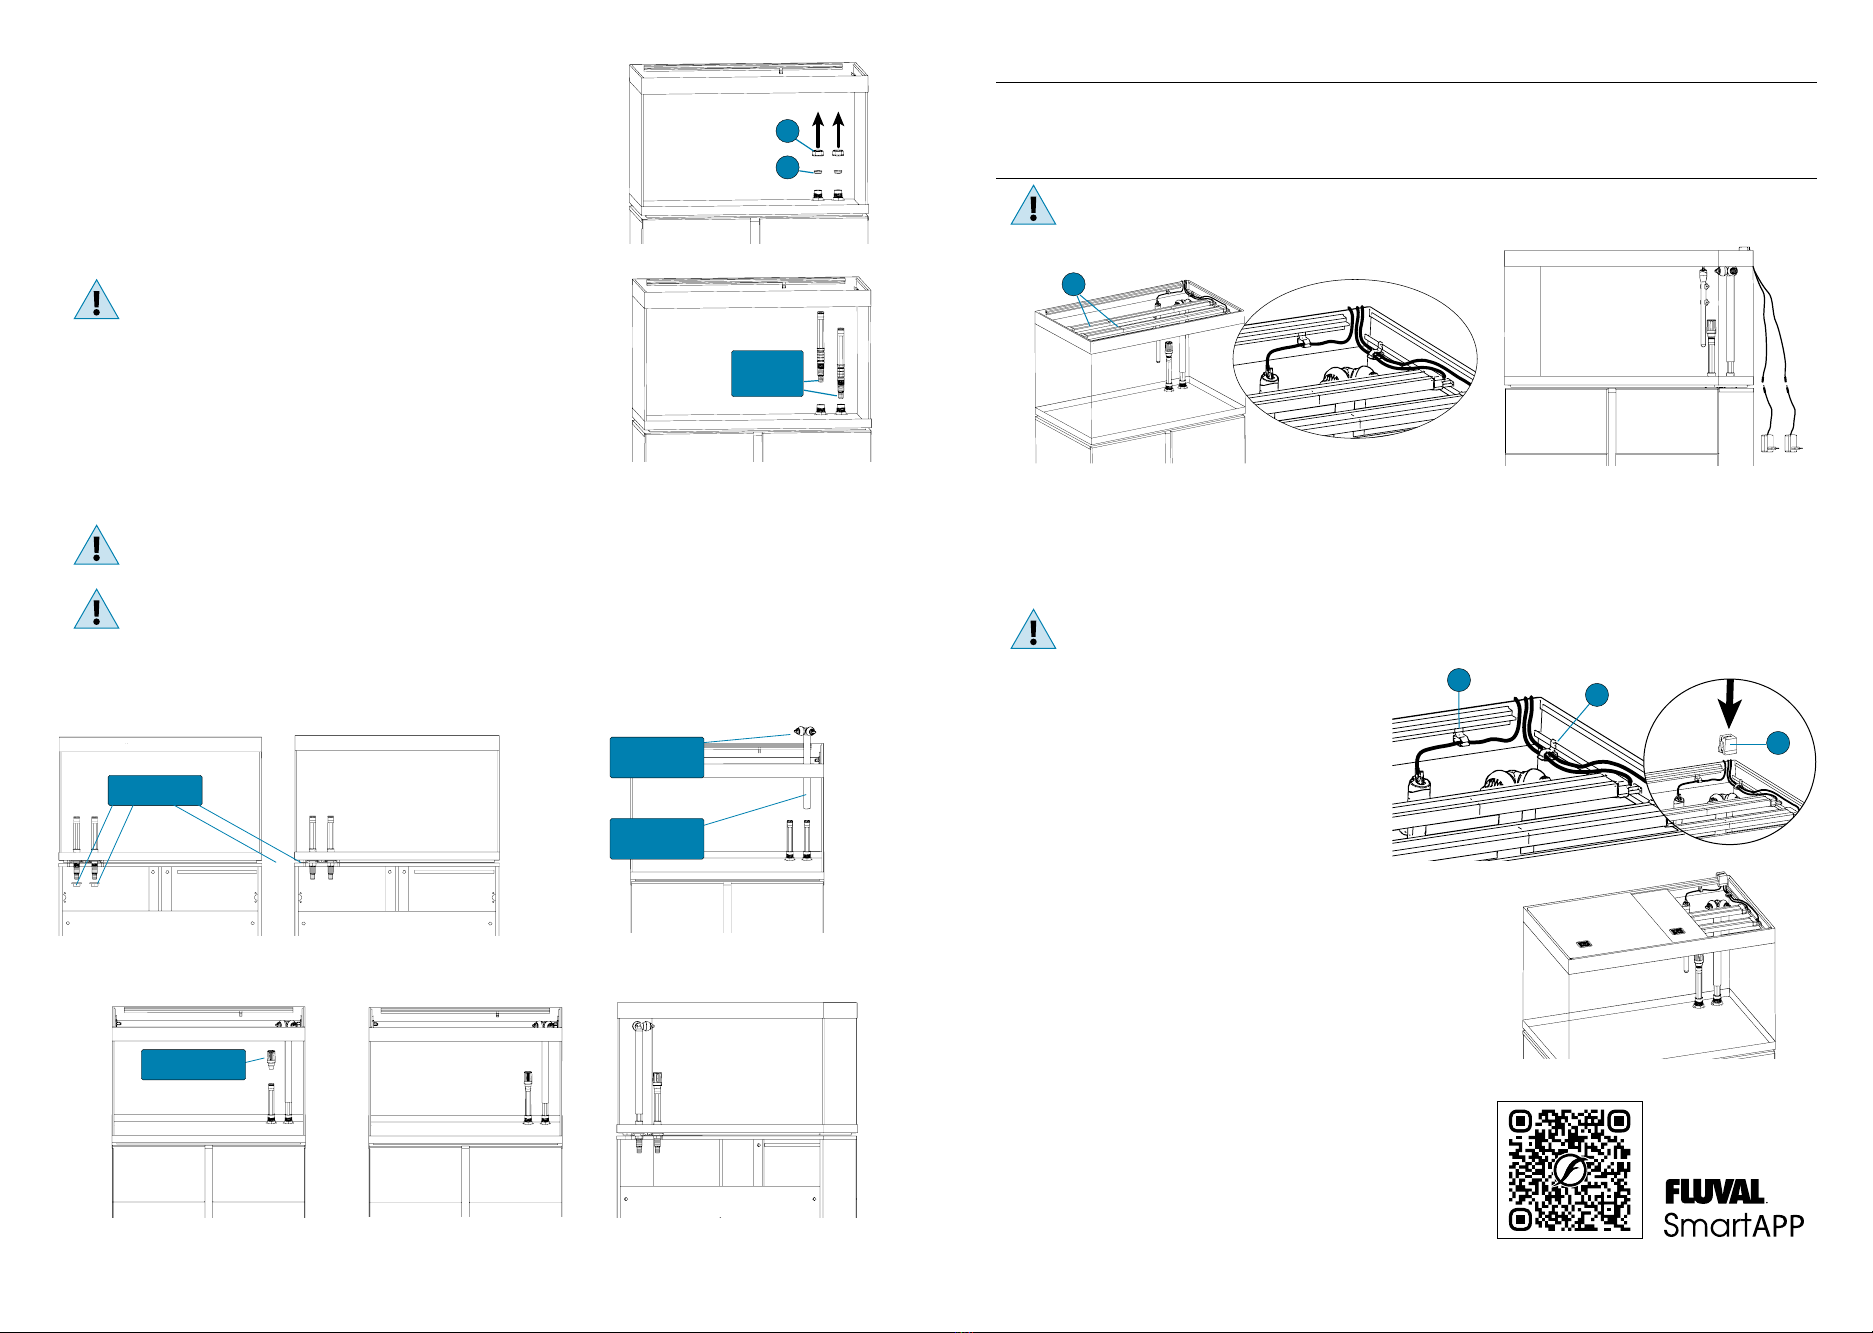
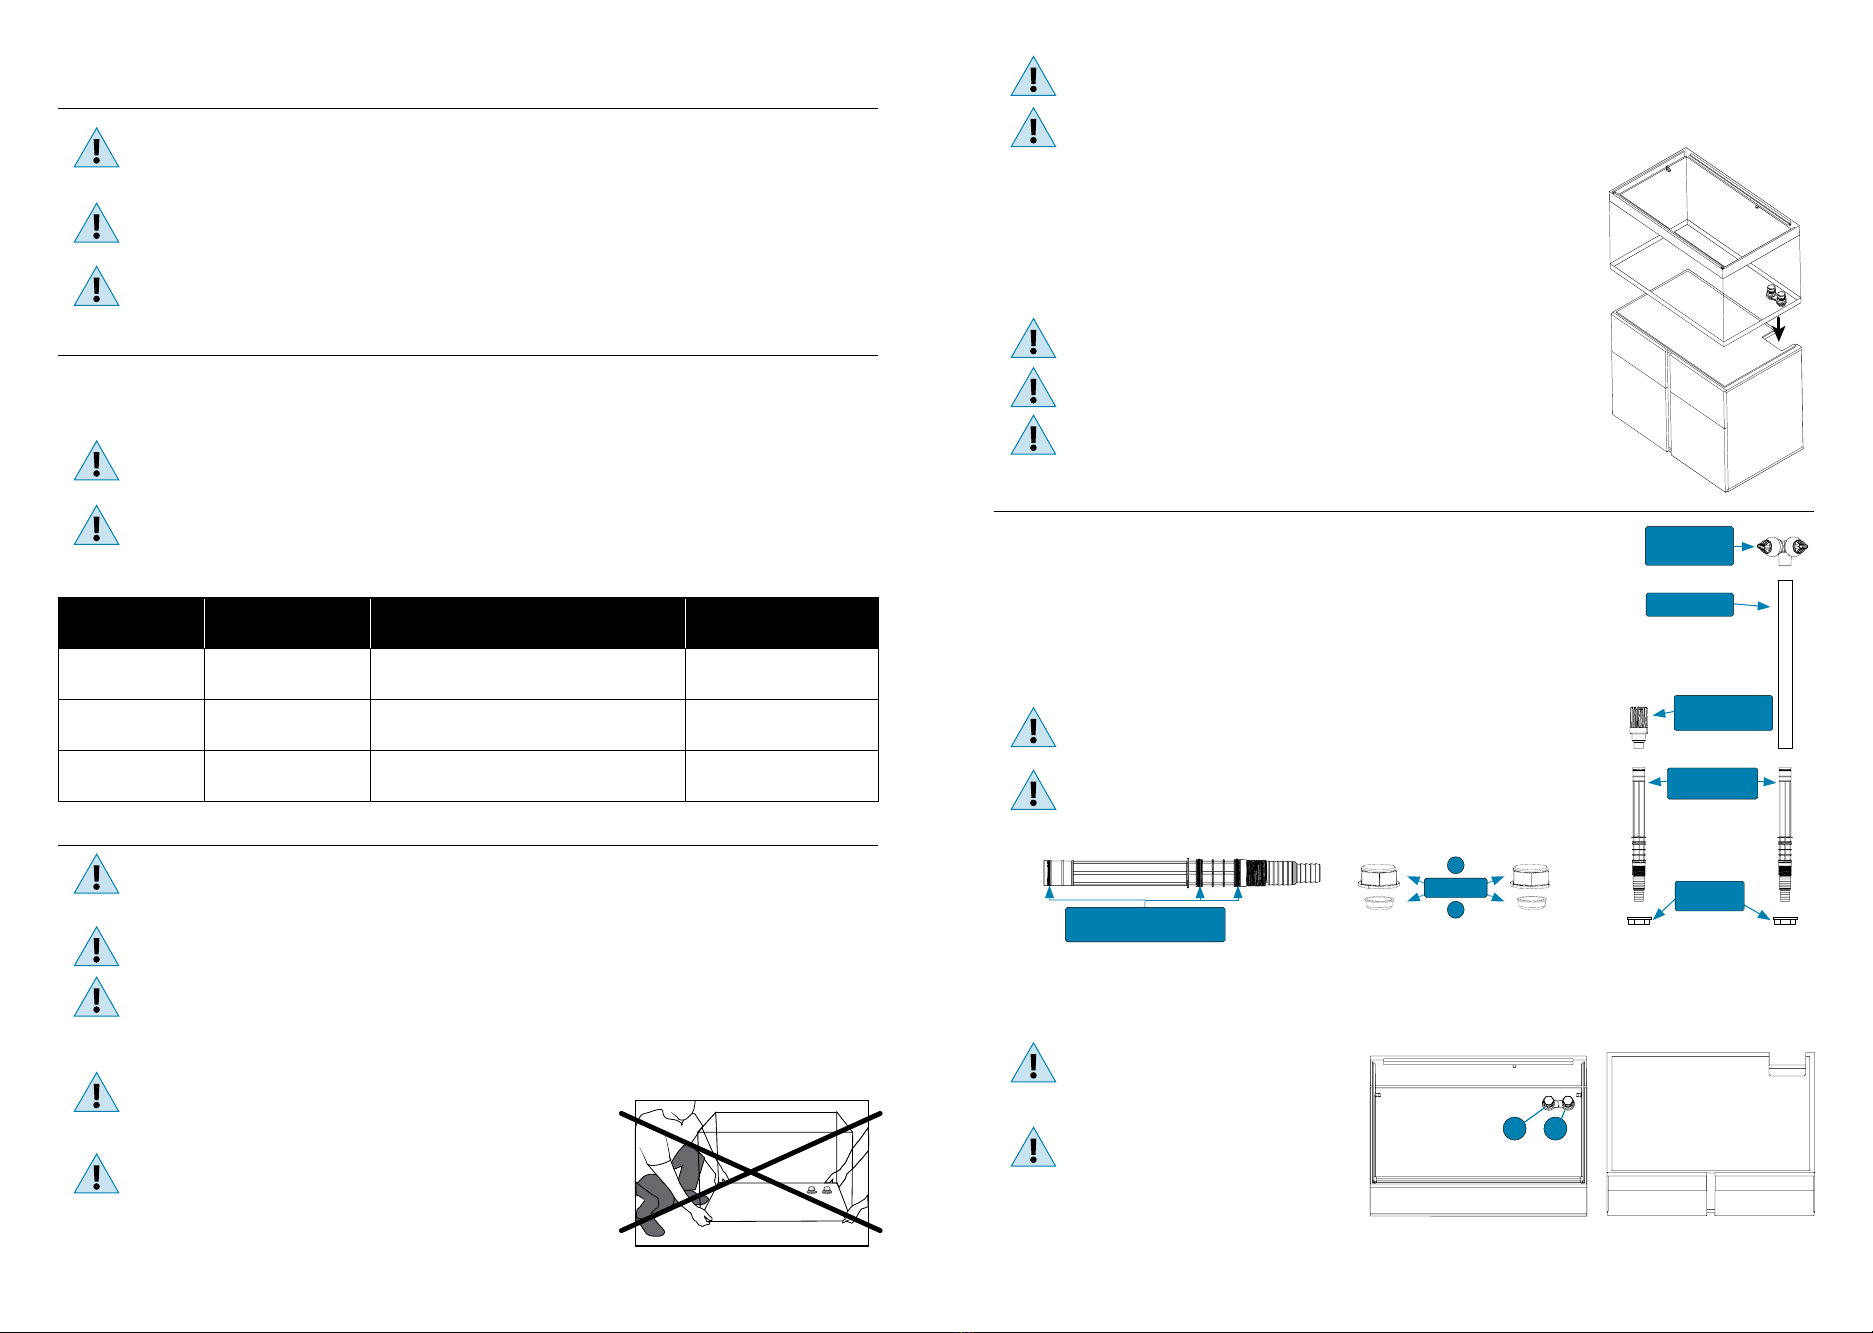
OUTPUT SYSTEM INSTALLATION
1. Manually unscrew plug (P) and remove plug (Q) from opening (O) (Pict. 1).
IMPORTANT: keep plugs (P) and (Q) for any future use.
2. Slip connector stem (A) fully through opening (O) until it stops (Pict. 2).
3. Open the cabinet. Screw and tighten the ring nut (R) onto the bottom end of stem (A) (Pict. 3).
4. Insert the output nozzle (N) into one end of output stem (B).
5. Insert output stem (B) onto connector stem (A) (Pict. 4).
6. Adjust the height of output nozzles according to your requirement by sliding outlet stem (B)
along connector stem (A).
7. The output nozzles (N) can be easily rotated to divert the water flow where desired.
Direct water jets so as not to let water overflow from the tank.
Avoid directing the water jets towards the LED Strip Lights.
INTAKE SYSTEM INSTALLATION
1. Manually unscrew plug (P) and remove plug (Q) from opening (I) (Pict. 1).
IMPORTANT: keep plugs (P) and (Q) for any future use.
2. Slip the second connector stem (A) fully through opening (I) until it stops (Pict. 2).
3. Open the cabinet. Screw and tighten the ring nut (R) onto the bottom end of
the second stem (A) (Pict. 3).
4. Insert the intake strainer (S) onto connector stem (A) (Pict. 5).The assembly end result
is shown on Pict. 6 and Pict. 7.
The height of the intake strainer is high enough to suit most standard aquarium decorations. When decorating the aquarium,
ensure it remains at least 2”(5 cm) from the gravel bottom at all times to prevent it from sucking gravel or sand and ensure that
no decorations block the passage of water. Ornaments and rocks should be positioned while the aquarium is still dry.
CAUTION!: Never force Connector Stems (A) sideways, as this may damage the Intake/Output systems and the glass tank.
In the event a different filtration system is used, which does not require the Intake/Output systems supplied with this unit
(e.g. an internal filter), restore the initial conditions by removing the 2 connector stems (A) and closing openings (O) and (I)
with plugs (P) and (Q). Plug (Q) ensures a watertight seal and has to be inserted into its seat by pressing it. Plug (P) is designed
to protect plug (Q) and ensure that plug (Q) remains in its seat properly. Screw plug (P) by hand only until it will no longer go
without forcing it. DO NOT USE ANY TOOLS, AS DOING SO MAY DAMAGETHE UNIT.
Connector
Stems (A)
Pict. 2
Pict. 1
FLUVAL FILTER & HEATER INSTALLATION, USE AND MAINTENANCE
Please refer to the instruction manual of the Fluval lter/heater. Do not attempt to set up the Fluval lter/heater without
reading and following the instruction manual. If it is missing or unusable, contact the store or Hagen Customer Service.
LED STRIP LIGHTS INSTALLATION INSTRUCTIONS
WARNING: Disconnect the plug of all electrical equipment used for the aquarium, before placing your hands in aquarium
water and/or performing any maintenance of any kind.
INITIAL STARTUP
1. Carefully place the LED Strip Lights (C) on the runner of the top frame in the final position.
2. Pull the LED Strip cables out of the tank (Pict. 8).
3. Hook up the lighting unit to the LED driver with its connector (Pict.9).
WARNING: Do not plug in the LED Strip Lights if there is water on parts not intended to be wet.
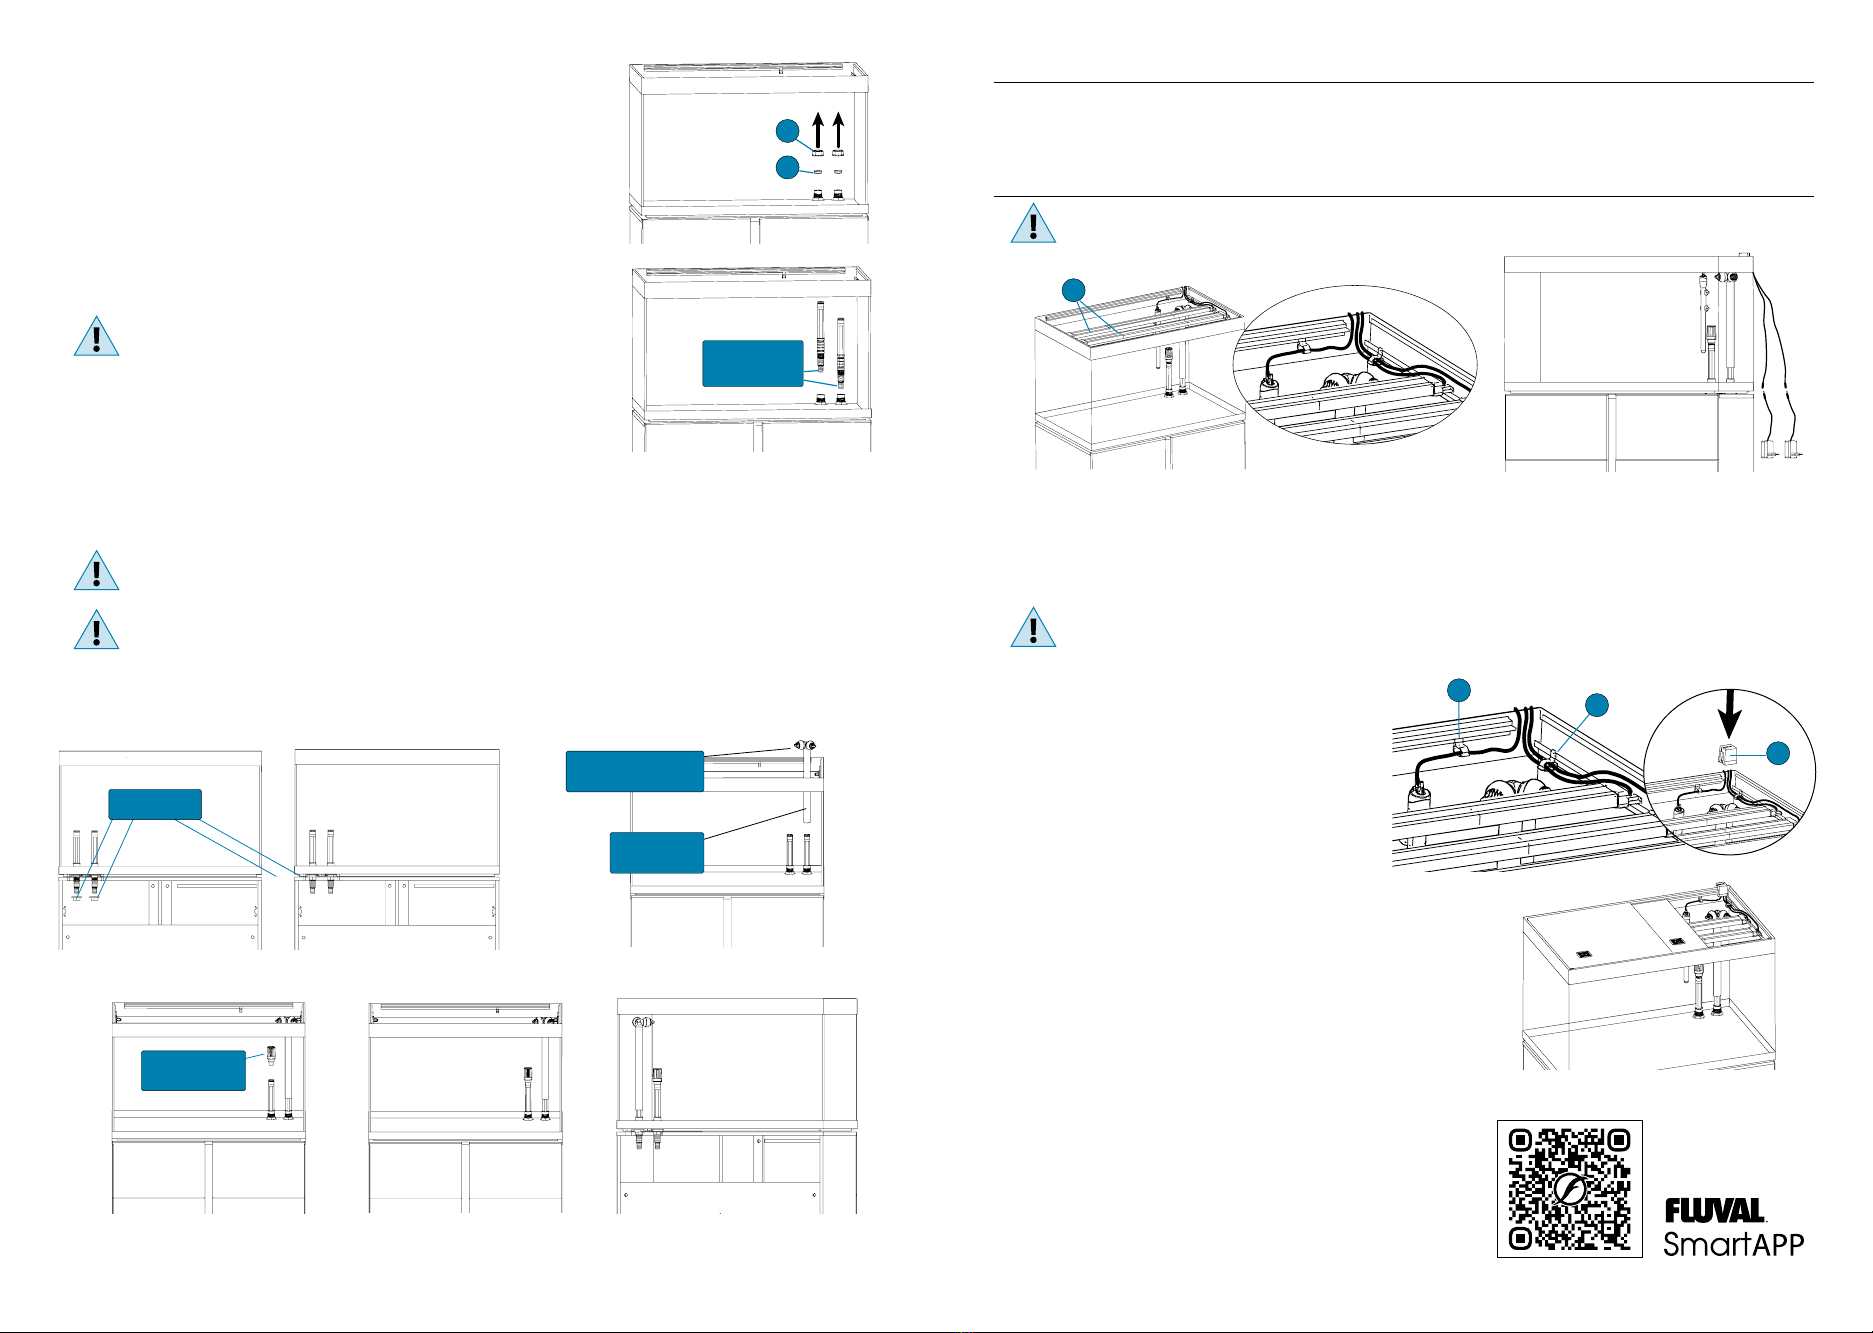
OVER RIM CABLE GUIDE
The power cables of the heater and the LED Strip Lights will be routed out
through the back of the aquarium using the provided over rim cable guide
which can be placed on the right or on the left. (TIP: Heaters are most effective
when positioned near the filter output stem).
1. Place the electrical cable hooks (D) where most appropriate, by sliding
them in the lower runner of both rails (Pict. 10) and pull
the cables out of the tank.
2. Apply the over rim cable guide (E) across the glass of the tank.
PLACING THE SLIDING COVERS ON THE TANK
Peel off the protective film from the two aquarium covers.
1. Lay the narrow cover in the lower sliding surface of the runners (support rails).
2. Lay the wider cover in the upper sliding surface of the runners (support rails).
3. If using Fluval PF2 Fish Feeder, remove one of the two ventilation grills to house the feeder.
SWITCHING THE LED STRIP LIGHTS ON
Plug in the units and use a smartphone or tablet with the FluvalSmart App
downloaded to connect to them.The FluvalSmart App can be downloaded from
the iOS or Android app stores or scan the QR code to download.
Use exclusively the LED drivers supplied with the LED Strip Lights.
In all cases, make sure that the LED drivers specifications comply to the
specifications indicated in the LED Strip Lights identification codes table below.
Pict. 8
Pict. 9
Ring Nuts (R)
Pict. 3 Pict. 4
Pict. 5 Pict. 6 Pict. 7
Output
Nozzles (N)
Output
Stem (B)
Intake Strainer (S)
P
Q
C
Pict. 10
DD
E
1110
TROUBLESHOOTING
If an LED Strip Light does not turn on, please proceed as follows:
LED STRIP LIGHTS AND TANK MAINTENANCE
CLEANING THE LED STRIP LIGHTS
Disconnect the plug of all the electrical equipment from power supply before any maintenance operation.
WARNING: Be sure you unplug the LED drivers from the power outlet; just switching off the lights with the APP is NOT enough because it does not stop the power supply.
Never place the LED Strip Lights under water jets or submerge in water.
For maximum LED performance, it is recommended that the fixtures and LED lens be cleaned on a weekly basis. Unplug the LED drivers prior to cleaning the light fixtures. Use
both hands when manipulating these appliances.Wipe exposed surfaces carefully with a damp cloth to remove any dust or mineral deposits that may collect over time. Do not
use detergents or harsh cleaners as it can damage the light fixtures.
Use Fluval LED Lens Cleaning Kit (A3969) to clean the LED portion of the light fixtures. Make sure all surfaces are dry before re-connecting the LED drivers to the power source.
No special maintenance is required for the Fluval LED Strip Lights and covers, other than periodic cleaning with a damp cloth (never use harsh chemical products or detergents).
To remove calcareous deposits, it is recommended to use a mild acid such as lemon juice, followed by a thorough wipe down with a damp cloth to remove any residue.
SALTWATER AQUARIUMS
It is commonly known that saltwater is far more corrosive, conductive (of electricity) and generally degrades both plastic and metal parts at an accelerated rate versus fresh
water. To minimize salt accumulations on the Fluval Covers and on the LED Strip Lights, it is recommended to take note of the following helpful tips:
1. Make sure filter outputs do not spray above the water surface; position them below the water surface with a slight downward angle,
but still allow for surface movement (contributes to oxygenation).
2. If an air pump must be used, frequent removal of salt deposits will be necessary.
3. Keep the water level as constant as possible (regular top-ups due to evaporation).This is beneficial in providing stable salinity and will help protect the cover.
4. It is recommended to regularly clean all LED Strip Light components that come into contact with saltwater on a weekly basis.The cleaning should be carried out with
a wet cloth (never use harsh chemical products or detergents). Simple lemon juice may be used to take away salt accumulation. Afterwards, rinse carefully to eliminate
every residue of acid.
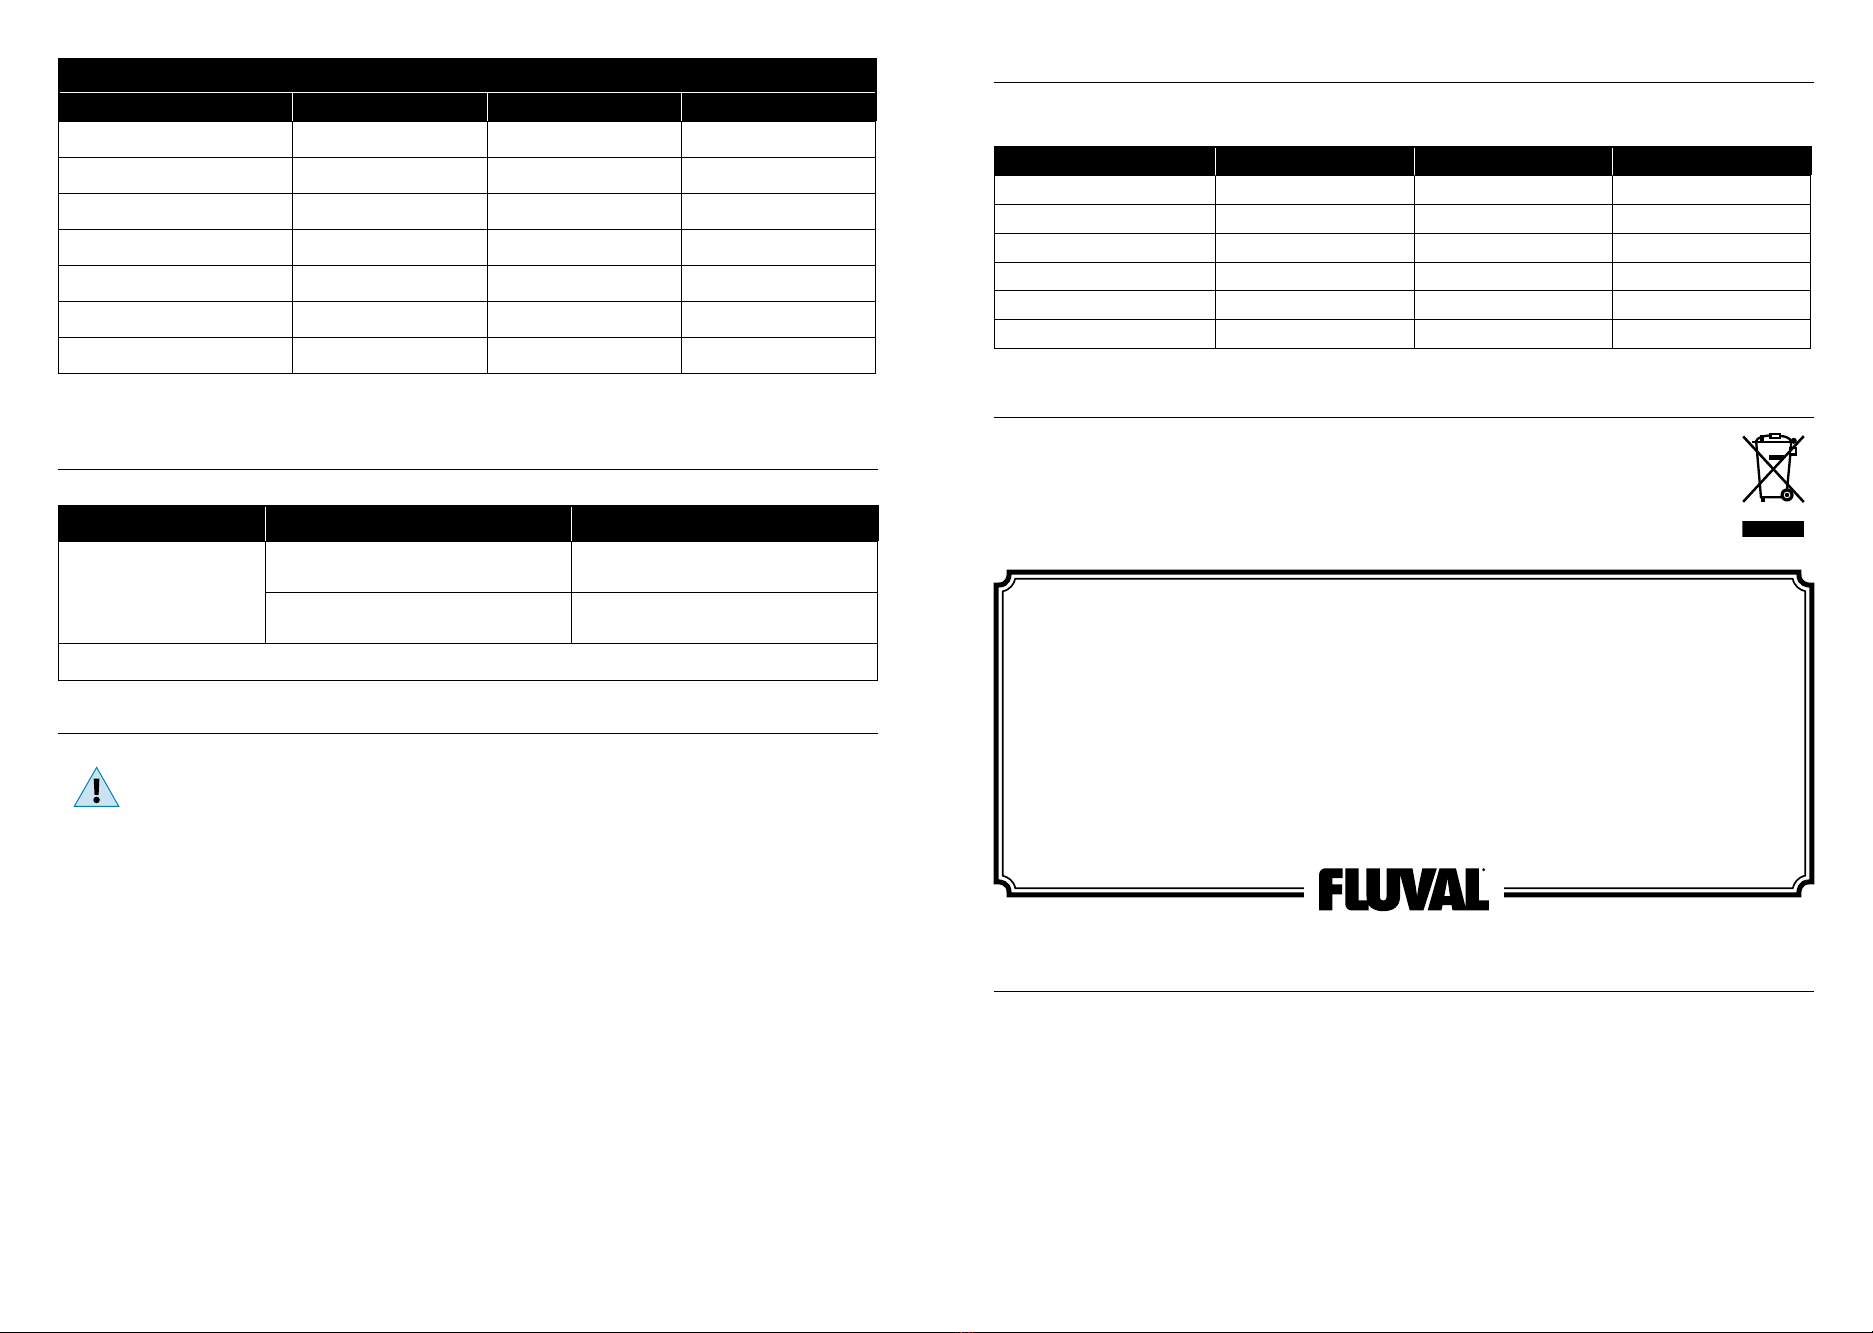
FLUVAL SIENA LED STRIP LIGHTS SPECIFICATIONS
Aquarium Model SIENA 166 SIENA 272 SIENA 332
LED STRIP LIGHT UNIT BT LED UNIT SIENA BT LED UNIT SIENA BT LED UNIT SIENA
LED STRIP LIGHT MODEL NUMBER A13253 A13254 A13255
LUMINAIRE WATTAGE 2 x 22W 2 x 36W 2 x 48W
LUMENS 2 x 2000 lm 2 x 3300 lm 2 x 4400 lm
LUMINAIRE OPERATING VOLTAGE 24Vdc 24Vdc 24Vdc
LED DRIVER TYPE (x 2) S024AM[X]2400100 S040Q[X]2400150 S050F[X]2400200
LED DRIVER INPUT VOLTAGE 100-240Vac 100-240Vac 100-240Vac
X= B For UK Plug X=V For EU Plug X= U For US Plug X= S For AUS Plug
PROBLEM CAUSE SOLUTION
The light isn’t working.
Missing connection of the LED driver
to the power outlet. Connect the LED driver to the power outlet.
Missing connection of the lighting unit
to the LED driver.
Connect the lighting unit to the LED driver
with its connector.
If the problem is not solved after following the above, please contact your Hagen retailer.
REPLACEMENT PARTS
Always use genuine Fluval Spare Parts to guarantee continued performance and safety.
For a full listing of replacement parts, please visit www.fluvalaquatics.com
RECYCLING
This product bears the selective sorting symbol for waste electrical and electronic equipment (WEEE). This means that this
product must be handled pursuant to European Directive 2012/19/EU in order to be recycled or dismantled to minimize its
impact on the environment. For further information, please contact your local or regional Authorities.
Electronic products not included in the selective sorting process are potentially dangerous for the environment and human
health due to the presence of hazardous substances.
FOR AUTHORISED GUARANTEE REPAIR SERVICE
For Authorised Guarantee Service, please return (well packaged and by registered post) to the address listed on the last page enclosing dated receipt and reason for return.
If you have any queries or comments about the operation of this product, please let us try to help you before you return the product to your retailer.
Most queries can be handled promptly with a phone call.
When you call (or write), please have all relevant information such as model number, age of product, details of aquarium setup, as well as the nature of the problem.
If you have any queries or comments about the operation of this product, please contact your Specialist Aquatic Retailer in the first instance.
Most queries can be handled easily at store level. In the unlikely event that it cannot, please return the item to the retailer, with your valid proof
of purchase, for repair or replacement under the two-year warranty terms.
Fluval Siena 166 Fluval Siena 272 Fluval Siena 332
2 xTop Sliding Covers A13313 A13314 A13315
1 x LED Strip Light A13253 A13254 A13255
1 x LED Driver A20432 A20433 A20435
1 x Over-rim Cable Guide A13866 A13866 A13866
1 xTop Cover Grid A13316 A13316 A13316
4 x Electrical Cable Hooks A13867 A13867 A13867
2 - YEAR LIMITED WARRANTY
Your Fluval Aquarium and LED Strip Lights are guaranteed for defective parts and workmanship for a period of two years from the
date of purchase. This guarantee is valid with proof of purchase only. The guarantee is limited to repair or replacement only and does
not cover consequential loss, loss or damage to livestock and personal property or damage to animate or inanimate objects,
irrespective of the cause thereof.
This guarantee is valid provided the aquarium is placed in a suitable location that is flat and level and has been installed in accordance
with the installation instructions and care guide. This guarantee excludes aquarium breakage due to misuse, chips, stress cracks caused
by improper support or other breakage. This guarantee is valid only under normal operating conditions for which the unit is intended.
It excludes any damage caused by unreasonable use, negligence, improper installation, tampering, abuse or commercial use.
The warranty does not cover wear and tear, breakage of glass or parts which have not been adequately or correctly maintained.
If at some time in the future you have cause to claim under this guarantee, you will need to provide proof and date of purchase.
We recommend that you retain your receipt for this purpose. Rolf C. Hagen Inc. wishes you many hours of enjoyment with your
Fluval aquarium.

1312
BIENLIRELESMESURESDESÉCURITÉAVANTD’INSTALLERETD’UTILISERL’AQUARIUM
IMPORTANT : ASSEMBLER COMPLÈTEMENT LE MEUBLE AVANT DE RETIRER LE BAC D’AQUARIUM DE SA BOÎTE. NE JAMAIS
PLACER LE BAC SURTOUTE SURFACE AUTRE QUE LE MEUBLE AFIN DE PRÉVENIR DES DOMMAGES À LA BASE DE L’AQUARIUM.
PIÈCES DE L’AQUARIUM SIENA FLUVAL AVEC ÉCLAIRAGE À DEL
L’aquarium équipé Siena comprend deux emballages individuels.
Retirer soigneusement toutes les pièces des emballages et s’assurer
qu’aucune pièce ne manque ou n’est endommagée.
1 emballage contenant :
1 bac en verre (A)
2 couvercles coulissants (B)
2 rampes d’éclairage à DEL (C) + 2 pilotes pour DEL
1 sac en plastique contenant:
• 4 crochets pour câble électrique (D)
• 1 guide-câble pour rebord (E)
• 2 bouchons mâles du fond (F)
1 filtre Fluval avec mode d’emploi
1 chauffe-eau Fluval avec mode d’emploi
1 emballage (fourni séparément) contenant :
le meuble démonté avec mode d’emploi
MESURES DE SÉCURITÉ
IMPORTANTES
AVERTISSEMENT : Pour éviter toute blessure, il faut observer des
précautions élémentaires de sécurité lors de la manipulation des
rampes d’éclairage à DEL, notamment celles qui suivent :
1. Afin de profiter pleinement de cet appareil, de l’utiliser et de le comprendre, il faut
LIRE ET RESPECTER TOUTES LES MESURES DE SÉCURITÉ
et tous les avis importants indiqués sur l’appareil avant de l’utiliser. Le non-respect de ces instructions peut entraîner la perte
de poissons, des blessures aux personnes ou des dommages à l’appareil.
2. DANGER – Pour éviter tout risque de choc électrique, il faut faire preuve de la plus grande prudence, puisque de l’eau est utilisée à proximité
des rampes d’éclairage à DEL. Dans chacune des situations suivantes, ne pas essayer de réparer l’appareil soi-même; le retourner plutôt à un
service de réparations autorisé ou le jeter. (Consulter l’information sur le Service à la clientèle à la fin du mode d’emploi).
Si l’appareil tombe dans l’eau, NE PAS tenter de le récupérer! Le débrancher d’abord, puis le sortir de l’eau.
Si des composants électriques de l’appareil sont mouillés, débrancher immédiatement l’appareil.
Examiner attentivement l’appareil après l’installation. Ne pas le brancher s’il y a de
l’eau sur des pièces qui ne doivent pas être mouillées.
Ne pas utiliser un appareil dont la fiche ou le cordon sont endommagés, qui ne
fonctionne pas bien ou qui est tombé ou qui a été endommagé de quelque manière
que ce soit. Le cordon d’alimentation de cet appareil ne peut pas être remplacé; si le
cordon est endommagé, il faut jeter l’appareil. Ne jamais couper le cordon.
Pour éviter toute possibilité que la fiche des appareils ou la prise soient mouillées,
placer l’aquarium à côté d’une prise de courant murale afin d’empêcher l’eau de
s’écouler dans la prise. L’utilisateur doit former une « boucle d’égouttement »
(voir l’illustration) avec le cordon d’alimentation qui relie l’appareil à la prise.
La « boucle d’égouttement » est la partie courbée du cordon d’alimentation qui se trouve sous la prise, ou le raccord si une
rallonge est utilisée, afin d’éviter que l’eau s’écoule le long du cordon et entre en contact avec la prise. Si la fiche ou la prise
de courant sont mouillées, NE PAS débrancher le cordon. Mettre d’abord hors circuit le fusible ou le disjoncteur qui fournit
l’électricité à la prise, puis débrancher l’appareil.Vérifier qu’il n’y a pas d’eau dans la prise.
3. AVERTISSEMENT – Il est nécessaire de surveiller étroitement les enfants qui utilisent cet appareil ou qui se trouvent à proximité.
Cet appareil peut être utilisé par des enfants de 3 ans et plus et par des personnes aux capacités physiques, sensorielles ou mentales
réduites, ou qui manquent d’expérience et de connaissances, si ces personnes sont placées sous la surveillance d’une personne
responsable ou ont reçu les directives nécessaires à l’utilisation sûre de l’appareil et en comprennent les dangers. Les enfants
ne doivent pas jouer avec l’appareil. Le nettoyage et l’entretien de l’appareil ne doivent pas être effectués par des enfants sans
surveillance. Ce produit n’est pas un jouet.
4. Afin d’éviter les blessures, ne pas toucher de pièces mobiles ou chaudes telles que chauffe-eau, appareils à DEL, etc.
5. ATTENTION –Toujours débrancher tous les appareils à l’intérieur de l’aquarium de la prise de courant avant de se mettre
les mains dans l’eau, d’insérer ou de retirer des pièces et avant d’installer, d’entretenir ou de manipuler les rampes d’éclairage
à DEL. Ne jamais tirer sur le cordon d’alimentation pour débrancher l’appareil. Prendre plutôt la fiche entre les doigts, puis la tirer.
Toujours débrancher les appareils de la prise de courant quand ils ne sont pas utilisés.
AVERTISSEMENT : TOUJOURS DÉBRANCHER LE PILOTE POUR DEL DE LA PRISE DE COURANT; ÉTEINDRE L’APPAREIL
D’ÉCLAIRAGE À L’AIDE DE L’APPLICATION MOBILE NE SUFFIT PAS, CAR CELA NE COUPE PAS L’ALIMENTATION
ÉLECTRIQUE À CE DERNIER.
Ne pas employer cet appareil pour un usage autre que celui pour lequel il a été conçu (c.-à-d. ne pas l’utiliser dans des piscines,
des bassins aquatiques, des baignoires, etc.). L’emploi d’accessoires ni recommandés ni vendus par le fabricant de l’appareil peut
être source de situations dangereuses. Ne pas essayer de réparer les composants de ces articles. En cas de dommage, remplacer les
pièces défectueuses par des pièces de rechange authentiques.
6. IMPORTANT : Ces rampes à DEL sont des APPAREILS D’ÉCLAIRAGE POUR AQUARIUMS destinés à un USAGE À L’INTÉRIEUR
SEULEMENT. L’appareil est conçu pour être installé sur les aquariums Siena Fluval seulement. L’appareil a été fabriqué pour
fonctionner dans des aquariums décoratifs d’eau douce ou d’eau de mer dont la température de l’eau ne dépasse pas 35 °C.
Ne pas installer ni ranger l’appareil où il sera exposé à des températures sous le point de congélation.
7. IMPORTANT : S’assurer que les rampes d’éclairage à DEL sont installées solidement
et correctement avant de les faire fonctionner. Ces rampes d’éclairage à DEL
ne doivent jamais être utilisées dans l’eau.
Remplir l’aquarium d’eau jusqu’au niveau indiqué sur l’étiquette apposée à l’intérieur de
l’aquarium (voir l’illustration à droite). IMPORTANT : Ne pas trop remplir le bac.
Un remplissage excessif peut causer un débordement de l’eau sous le rebord supérieur puis à l’extérieur de
l’aquarium.
AVERTISSEMENT : Ne pas brancher les rampes d’éclairage à DEL s’il y a de l’eau sur des pièces qui ne doivent pas
être mouillées.
AVERTISSEMENT : Ne pas mettre d’objets sur les rampes d’éclairage à DEL (C) ou sur les couvercles coulissants.
S’assurer que la circulation de l’air est adéquate autour des rampes d’éclairage à DEL. L’usage sécuritaire de cet appareil
n’est seulement garanti que s’il a été installé correctement.
8. Lire et observer tous les avis importants apparaissant sur l’appareil.
9. Si une rallonge électrique est nécessaire, vérifier qu’elle est d’un calibre suffisant. Un cordon électrique de moins d’ampères
ou de watts que l’appareil peut surchauffer. Des précautions doivent être prises afin d’éviter qu’on tire la rallonge ou qu’on
trébuche sur celle-ci.
10.
CONSERVER CES INSTRUCTIONS.
MAX
B
E
C
D
A
C
F
1514
GUIDE COMPLET D’INSTALLATION
INSTALLATION ET PRÉPARATION DU MEUBLE DE L’AQUARIUM
Avant de manipuler le bac et le meuble de l’aquarium, s’assurer d’être suffisamment de personnes pour les déplacer sans danger.
ASSEMBLER LE MEUBLE POUR AQUARIUM AVANT DE RETIRER L’AQUARIUM DE SON EMBALLAGE.
L’aquarium Fluval DOIT être placé sur le meuble Fluval approprié, dont les dimensions et la structure sont conçues
pour soutenir le poids de l’aquarium rempli d’eau. L’utilisation de tout autre meuble, article d’ameublement,
meuble-télévision, etc., ANNULE la garantie et compromet la sûreté du produit.
Consulter le mode d’emploi du meuble de l’aquarium. Ne pas essayer d’assembler le meuble sans lire et suivre
les instructions du mode d’emploi. Si ce dernier est manquant ou inutilisable, contacter un détaillant en aquariophilie
ou le Service à la clientèle de Hagen.
Mise en place du meuble et de l’aquarium à l’endroit nal
L’endroit choisi pour l’aquarium est très important. Placer l’aquarium loin de la lumière directe du soleil afin de prévenir la prolifération excessive d’algues et de réduire les
risques de surchauffer l’aquarium. Garder l’aquarium Fluval loin de toute autre source de chaleur (conduits d’air, radiateurs, etc.) pour maintenir l’eau à une température
appropriée. Éviter également les courants d’air. Ne pas placer l’aquarium Fluval à un endroit où des déversements d’eau pourraient causer des dommages.
AVERTISSEMENT : S’assurer que l’endroit choisi a une surface plane et de niveau capable de soutenir le poids de l’aquarium rempli et du meuble. Placer
l’aquarium et le meuble Fluval à proximité d’une prise électrique. Après l’installation du meuble, s’assurer qu’il est parfaitement horizontal à l’aide d’un niveau.
IMPORTANT : Les meubles Fluval sont conçus pour soutenir le poids total de l’aquarium. Le tableau ci-dessous présente les mesures approximatives de la
hauteur de remplissage d’eau et du poids de l’aquarium rempli d’eau (excluant le poids des pierres, des décorations et du gravier).
AQUARIUMS SIENA FLUVAL
INSTALLATION DE L’AQUARIUM
Avant de manipuler le bac et le meuble de l’aquarium, s’assurer d’être suffisamment de personnes pour les déplacer sans danger.
RETIRER LE BAC DE L’AQUARIUM DE SON EMBALLAGE.
Le bac en verre comprend des glissières collées pour soutenir les rampes d’éclairage
à DEL et les couvercles. Ne pas tenter de retirer les glissières.
Le bac est fait de verre; toujours le manipuler avec le plus grand soin.
S’assurer de soulever le bac par la base seulement.
POSER LE BAC DE L’AQUARIUM SUR LE MEUBLE.
IMPORTANT : Bien nettoyer le dessus du meuble et le dessous de la base de l’aquarium.
Déposer le bac vide de l’aquarium sur le meuble en s’assurant que les raccordements passent par
les bonnes ouvertures du meuble. NE JAMAIS placer quoi que ce soit sous le bac. Il ne devrait y
avoir AUCUN support ou revêtement supplémentaire (p. ex. tapis de polystyrène) entre le meuble
et l’aquarium.
ATTENTION : Risque de bris du bac en verre.
Il y a des raccords en saillie sous le bac en verre; ces raccords ne peuvent jamais être utilisés comme
points d’appui. Ne jamais tenter de poser le bac sur une autre surface que le meuble auquel il est
destiné, lequel comprend des cavités spécifiquement conçues pour les raccords. Lorsqu’on dépose le
bac sur son meuble, prendre le plus grand soin pour ne pas endommager les raccords sous le bac.
MODÈLE Dimensions
externes du bac
Hauteur de remplissage
(jusqu’à la ligne « niveau d’eau maximal »)
Poids de l’aquarium
rempli d’eau seulement
SIENA FLUVAL 166 55 x 55 x 55 cm
21.5 x 21.5 x 21.5 po
49,5 cm / 19,5 po
(Contenance = 140 L / 37 gal US) 166 kg / 366 lb
SIENA FLUVAL 272 90 x 55 x 55 cm
35.5 x 21.5 x 21.5 po
49,5 cm / 19,5 po
(Contenance = 227 L / 60 gal US) 277 kg / 611 lb
SIENA FLUVAL 332 110 x 55 x 55 cm
43.5 x 21.5 x 21.5 po
49,5 cm / 19,5 po
(Contenance = 279 L / 74 gal US) 340 kg / 750 lb
Ne jamais essayer de déplacer ou de transporter le meuble avec l’aquarium ou toute autre charge dessus.
Bien que le bac en verre ait été fabriqué le plus soigneusement possible et avec les meilleures techniques, une inspection simple du bac est recommandée avant
d’installer l’aquarium afin de vérifier qu’aucun incident n’est survenu lors de la manipulation et du transport, et qui pourrait avoir endommagé le bac ou en avoir
perturbé l’étanchéité.
1. Faire une inspection visuelle initiale du bac en verre afin de déceler tout dommage ou fissure.
Ne pas continuer l’installation si le bac est endommagé.
2. Si aucun dommage ni fissure ne sont visibles lors de l’inspection, continuer l’installation
normale de l’aquarium.
3. Après l’installation complète de l’aquarium équipé, y compris le filtre, le chauffe-eau, les rampes
d’éclairage à DEL, les ornements, etc., remplir le bac de 5 cm (2 po) d’eau à la fois, en vérifiant
qu’il n’y a pas de fuites.
Ne jamais essayer de déplacer ou de transporter l’aquarium quand il n’est pas
complètement vide d’eau ou de tout autre matériau.
Toujours faire attention de ne pas endommager les joints des parois en verre lors de
l’entretien de l’aquarium, c’est-à-dire avec des plantoirs ou des raclettes antialgues.
Ne jamais utiliser des produits toxiques ou nocifs pour nettoyer l’aquarium, comme
des détergents ménagers.
INSTALLATION DU SYSTÈME À CONNEXION RAPIDE
Cette section s’applique seulement aux aquariums Fluval munis d’un ltre extérieur
Fluval et du système à connexion rapide.
INSTALLATION DES TUBES D’ENTRÉE ET DE SORTIE D’EAU AVEC LE SYSTÈME À CONNEXION RAPIDE
(Les raccords d’entrée et de sortie d’eau sont inclus dans l’emballage du ltre)
Ces modèles d’aquariums Fluval comprennent le système à connexion rapide, lequel permet la connexion directe du filtre extérieur
à l’aquarium par le fond du bac en verre à l’aide de raccords spéciaux. Normalement, le même type de connexion est possible à l’aide
de dispositifs spécialement conçus, lesquels sont complexes et requièrent l’intervention de techniciens experts. Or, le système à
connexion rapide est facile et sûr à installer, et constitue une solution soignée et professionnelle agrémentant l’aquarium.
Avant de procéder, identifier et compter toutes les pièces requises en consultant l’illustration
ci-contre. S’il manque des pièces, ne pas procéder à l’installation et contacter un détaillant
local en aquariophilie.
Avant de procéder à l’installation, s’assurer que les tubes de raccordement (A) sont munis
de trois anneaux de caoutchouc (C). Ne pas procéder à l’installation s’il manque l’un des
anneaux (C), et contacter un détaillant local en aquariophilie.
Localiser les deux ouvertures dans le fond du bac en verre et les aligner avec les deux ouvertures correspondantes du meuble. Les deux ouvertures dans le fond du bac en verre
sont entièrement équipées de raccords spéciaux de plastique installés en usine, lesquels ne doivent jamais être retirés, tournés ou relâchés, ainsi que deux bouchons mâles (P)
et (Q). Installer l’ensemble de sortie d’eau dans l’ouverture (O), puis installer l’ensemble d’entrée d’eau dans l’ouverture (I).
Ne pas forcer, relâcher ou tourner les raccords
spéciaux installés en usine des ouvertures (I)
et (O) du bac.
Une fois les ensembles d’entrée et de sortie d’eau
installés, ne pas déplacer l’aquarium sur le meuble,
car cela risquerait d’endommager les dispositifs
d’entrée et de sortie ainsi que le bac en verre.
BOUCHONS MÂLES POUR LE FOND DU BAC
P
Q
Bouchons
Anneaux de caoutchouc des
tubes de raccordement (C)
ENSEMBLE
D’ENTRÉE
ENSEMBLE
DE SORTIE
Becs de
sortie
d’eau (N)
Tube de
sortie
d’eau (B)
Crépine
d’admission (S)
Tubes de
raccordement
(A)
Écrous à
œillet (R)
I O

1716
INSTALLATION DU SYSTÈME DE SORTIE D’EAU
1. Dévisser manuellement le bouchon (P) et retirer le bouchon (Q) de l’ouverture (O) (Fig. 1).
IMPORTANT : Conserver les bouchons (P) et (Q) pour l’usage ultérieur.
2. Glisser l’un des tubes de raccordement (A) entièrement dans l’ouverture (O) jusqu’à ce
qu’il s’arrête (Fig. 2).
3. Ouvrir le meuble. Visser et serrer l’écrou à œillet (R) à la partie inférieure du tube de
raccordement (A) (Fig. 3).
4. Insérer le bec de sortie d’eau (N) dans l’une des extrémités du tube de sortie d’eau (B).
5. Insérer le tube de sortie d’eau (B) dans le tube de raccordement (A) (Fig. 4).
6. Régler la hauteur du bec de sortie d’eau comme désiré en glissant le tube de sortie d’eau
(B) le long du tube de raccordement (A).
7. Les becs de sortie d’eau (N) se tournent aisément afin de diriger le débit d’eau dans la
direction souhaitée.
Diriger les jets d’eau de sorte que l’eau ne déborde pas de l’aquarium.
Éviter de diriger les jets vers les rampes d’éclairage à DEL.
INSTALLATION DU SYSTÈME D’ENTRÉE D’EAU
1. Dévisser manuellement le bouchon (P) et retirer le bouchon (Q) de l’ouverture (I) (Fig. 1).
IMPORTANT : Conserver les bouchons (P) et (Q) pour l’usage ultérieur.
2. Glisser le second tube de raccordement (A) entièrement dans l’ouverture (I) jusqu’à ce qu’il s’arrête (Fig. 2).
3. Ouvrir le meuble. Visser et serrer l’écrou à œillet (R) à la partie inférieure du second tube de raccordement (A) (Fig. 3).
4. Insérer la crépine d’admission (S) dans le tube de raccordement (A) (Fig. 5). Le résultat de l’assemblage final est affiché aux Fig. 6 et Fig. 7.
La hauteur de la crépine d’admission est assez élevée pour convenir à la plupart des décorations standards pour aquariums.
Lors de l’aménagement de l’aquarium, s’assurer de toujours laisser un espace d’au moins 5 cm (2 po) entre le lit de gravier et la crépine d’admission pour
empêcher que cette dernière n’aspire du gravier ou du sable, et qu’aucune décoration ne bloque le passage de l’eau. Les décorations et les pierres doivent être
placées lorsque l’aquarium est encore sec.
ATTENTION! : Ne jamais forcer les tubes de raccordement (A) de travers, car cela peut endommager les systèmes d’entrée et de sortie d’eau ainsi que le bac
en verre. Si un système de filtration différent qui ne requiert pas les systèmes d’entrée et de sortie d’eau fournis avec l’aquarium (p. ex. un filtre submersible)
est utilisé, rétablir les conditions initiales en retirant les deux tubes de raccordement (A) et en fermant les ouvertures (O) et (I) avec les bouchons (P) et (Q). Le
bouchon (Q) assure l’étanchéité et doit être inséré dans son siège à l’aide d’une pression. Le bouchon (P) est conçu pour protéger le bouchon (Q) et assurer que ce
dernier demeure bien en place.Visser le bouchon (P) à la main seulement, jusqu’à ce qu’il ne tourne plus, en prenant soin de ne pas le forcer. NE PAS UTILISER
D’OUTILS, CAR CEUX-CI PEUVENT ENDOMMAGER L’APPAREIL.
Fig. 3 Fig. 4
Tubes de
raccordement
(A)
Fig. 2
Fig. 5 Fig. 6 Fig. 7
INSTALLATION, UTILISATION ET ENTRETIEN DU FILTRE ET DU CHAUFFE-EAU FLUVAL
Consulter le mode d’emploi du ltre et du chaue-eau Fluval. Ne pas essayer d’installer le ltre ni le chaue-eau Fluval sans lire et suivre
les directives du mode d’emploi. Si ce dernier est manquant ou inutilisable, contacter un détaillant en aquariophilie ou le Service à la
clientèle de Hagen.
INSTALLATION DES RAMPES D’ÉCLAIRAGE À DEL
AVERTISSEMENT : Débrancher tous les appareils électriques de la prise de courant avant de se mettre les mains
dans l’eau ou avant d’effectuer tout entretien de l’aquarium.
DÉMARRAGE INITIAL
1. Placer soigneusement les rampes d’éclairage à DEL (C) dans leur position finale sur les glissières du rebord supérieur.
2. Pull the LED Strip cables out of the tank (Fig. 8).
3. Raccorder les appareils d’éclairage aux pilotes pour DEL avec leur raccords (Fig. 9).
AVERTISSEMENT : Ne pas brancher les rampes d’éclairage à DEL s’il y a de l’eau sur des
pièces qui ne doivent pas être mouillées.
GUIDECÂBLE POUR REBORD
Les câbles d’alimentation du chauffe-eau et des rampes d’éclairage à DEL
passent à l’arrière de l’aquarium grâce au guide-câble pour rebord inclus,
lequel peut être placé du côté droit ou gauche. (CONSEIL : Les chauffe-eau
sont plus efficaces lorsque placés près du tube de sortie d’eau du filtre).
1. Placer les crochets pour câble électrique (D) aux endroits les plus
appropriés en les insérant dans la glissière inférieure de chaque
barre (Fig. 10), puis sortir les câbles de l’aquarium.
2. Apposer le guide-câble (E) pour rebord le long du verre de l’aquarium.
PLACER LES COUVERCLES COULISSANTS SUR LE BAC
Retirer la pellicule protectrice des deux couvercles pour aquarium.
1. Déposer le couvercle étroit sur la glissière coulissante inférieure (rails de support).
2. Déposer le couvercle plus large sur la glissière coulissante supérieure (rails de support).
3. Si un distributeur d’aliments PF2 Fluval pour poissons est utilisé, enlever l’une des grilles
d’aération pour y intégrer le distributeur.
MISE EN FONCTION DES RAMPES D’ÉCLAIRAGE À DEL
Brancher les rampes d’éclairage. Utiliser un appareil mobile ou une tablette
comprenant l’application FluvalSmart pour se connecter aux rampes d’éclairage.
L’application FluvalSmart peut être téléchargée sur les boutiques d’applications d’iOS
ou d’Android, ou en scannant le code QR. Utiliser seulement les pilotes pour DEL
fournis avec les rampes d’éclairage à DEL.Toujours s’assurer que les spécifications
des pilotes pour DEL sont conformes aux spécifications indiquées dans le tableau
des codes d’identification des rampes d’éclairage à DEL ci-inclus.
Écrous à œillet (R)
Becs de sortie
d’eau (N)
Tube de sortie
d’eau (B)
Crépine
d’admission (S)
Fig. 10
DD
E
Fig. 8
Fig. 9
Fig. 1
P
Q
C

1918
4. Nettoyer régulièrement, au moins chaque semaine, tous les composants des rampes d’éclairage à DEL qui entrent en contact avec l’eau de mer. Se servir d’un linge humide
pour effectuer le nettoyage (ne jamais utiliser de produits ni de détergents chimiques nocifs). Employer tout simplement du jus de citron pour enlever les accumulations de
sel. Ensuite, rincer soigneusement afin d’éliminer tout résidu acide.
PIÈCES DE RECHANGE
Toujours utiliser des pièces de rechange Fluval authentiques an de garantir le rendement et la sûreté de l’aquarium.
Pour consulter la liste complète des pièces de rechange, visiter www.fluvalaquatics.com.
RECYCLAGE
Ce produit porte le symbole de la collecte sélective des déchets d’équipements électriques et électroniques (DEEE), ce qui signifie qu’on doit éliminer ce produit
conformément à la directive européenne 2012/19/EU afin de le recycler ou de le désassembler pour minimiser ses répercussions sur l’environnement.Vérifier
auprès d’agences locales pour l’environnement afin d’obtenir les instructions relatives à l’élimination des déchets ou apporter le produit à un point de collecte
agréé d’un conseil officiel reconnu.
Les produits électroniques non compris dans le processus de collecte sélective sont potentiellement dangereux pour l’environnement et la santé humaine en
raison de la présence de substances dangereuses.
POUR LE SERVICE DE RÉPARATIONS AUTORISÉ SOUS GARANTIE
Pour le service de réparations autorisé sous garantie, veuillez retourner l’article (bien emballé et par courrier recommandé) à l’adresse indiquée à la dernière page du présent
mode d’emploi, accompagné d’un reçu daté et d’une note expliquant la raison du retour. Si vous avez des questions ou des commentaires au sujet du fonctionnement de
cet aquarium équipé, veuillez nous permettre de vous aider avant de le retourner à votre détaillant. La plupart des problèmes peuvent être résolus rapidement par un appel
téléphonique. Lorsque vous nous téléphonez (ou écrivez), veuillez avoir en main tous les renseignements pertinents tels que le numéro de modèle, l’âge de l’article, les détails sur
l’aménagement de l’aquarium ainsi que des précisions sur le problème.
Si vous avez des questions ou des commentaires au sujet du fonctionnement de cet aquarium équipé, veuillez d’abord communiquer avec un spécialiste en aquariophilie. La
plupart des questions peuvent être traitées facilement au magasin. Si tel n’est pas le cas, veuillez retourner l’aquarium équipé au détaillant avec une preuve d’achat pour la
réparation ou le remplacement sous la garantie de deux (2) ans.
DÉPANNAGE
Si une rampe d’éclairage à DEL ne s’allume pas, suivre les directives suivantes :
ENTRETIEN DES RAMPES D’ÉCLAIRAGE À DEL ET DU BAC
NETTOYAGE DES RAMPES D’ÉCLAIRAGE À DEL
Débrancher les rampes d’éclairage de la prise de courant avant de procéder à l’entretien.
ATTENTION : Veiller à débrancher les pilotes pour DEL de la prise de courant; éteindre les appareils à l’aide de L’APPLICATION MOBILE ne suffit PAS, car cela n’empêche pas
l’alimentation électrique de se rendre à ces derniers. Ne jamais submerger les rampes d’éclairage à DEL ou les placer sous des jets d’eau.
Pour un rendement maximal des ampoules a DEL, il est recommandé de nettoyer les lentilles des rampes d’éclairage et des ampoules a DEL une fois par semaine. Avant de
nettoyer les rampes d’éclairage, débrancher les pilotes pour DEL. Utiliser ses deux mains pour manipuler les appareils. Afin d’enlever la poussiere ou les dépôts de minéraux
accumulés avec le temps, essuyer soigneusement les surfaces exposées a l’aide d’un linge humide. Ne pas utiliser de détergents ni d’autres nettoyants abrasifs, car cela pourrait
endommager les rampes d’éclairage.
Utiliser l’ensemble de nettoyage pour vitre Fluval (A3969) pour nettoyer les ampoules a DEL des rampes d’éclairage. S’assurer que toutes les surfaces sont seches avant de
rebrancher les pilotes pour DEL a la source de courant.
Aucun entretien particulier n’est nécessaire pour les rampes d’éclairage à DEL et les couvercles Fluval, autre qu’un nettoyage périodique avec un linge humide (ne jamais utiliser
de produits ni de détergents chimiques nocifs).
Pour éliminer les dépôts calcaires, utiliser un produit légèrement acide comme du jus de citron, puis bien essuyer avec un linge humide afin d’enlever tout résidu.
AQUARIUMS D’EAU DE MER
En général, l’eau de mer est beaucoup plus corrosive et conductrice d’électricité, et détériore les pièces de plastique et de métal à un rythme plus rapide que l’eau douce. Afin de
minimiser les accumulations de sel sur les couvercles et les rampes d’éclairage à DEL Fluval, suivre les conseils suivants :
1. Veiller à ce que les becs de sortie du filtre n’arrosent pas au-dessus de la surface de l’eau; les positionner en dessous de la surface de l’eau et légèrement orientés vers le bas,
tout en assurant un mouvement de l’eau à la surface afin de contribuer à l’oxygénation.
2. Si une pompe à air est utilisée, prendre soin d’éliminer les dépôts de sel fréquemment.
3. Conserver le niveau de l’eau aussi constant que possible; en raison de l’évaporation, ajouter de l’eau régulièrement est nécessaire pour maintenir la salinité de l’aquarium
stable ainsi que protéger les couvercles.
SPÉCIFICATIONS DES RAMPES D’ÉCLAIRAGE À DEL SIENA FLUVAL
Modèle d’aquarium SIENA 166 SIENA 272 SIENA 332
RAMPE D’ÉCLAIRAGE À DEL
APPAREIL À DEL SIENA
AVEC BLUETOOTH APPAREIL À DEL SIENA
AVEC BLUETOOTH APPAREIL À DEL SIENA
AVEC BLUETOOTH
NUMÉRO DE MODÈLE
A13253 A13254 A13255
PUISSANCE
2 x 22W 2 x 36W 2 x 48W
LUMENS
2 x 2000 lm 2 x 3300 lm 2 x 4400 lm
TENSION DE SERVICE
24Vdc 24Vdc 24Vdc
PILOTE POUR DEL (x 2)
S024AM[X]2400100 S040Q[X]2400150 S050F[X]2400200
TENSION D’ALIMENTATION
DU PILOTE POUR DEL
100-240Vac 100-240Vac 100-240 Vac
X = B pour prise UK X = V pour prise EU X = U pour prise US X = S pour prise AU
Siena Fluval 166 Siena Fluval 272 Siena Fluval 332
2 couvercles coulissants A13313 A13314 A13315
1 rampe d’éclairage à DEL A13253 A13254 A13255
1 pilote pour DEL A20432 A20433 A20435
1 guide-câble pour rebord A13866 A13866 A13866
1 couvercle supérieur grillagé A13316 A13316 A13316
4 crochets pour câble électrique A13867 A13867 A13867
GARANTIE LIMITÉE DE DEUX (2) ANS
L’aquarium et les rampes d’éclairage à DEL Fluval sont garantis contre tout défaut de matériaux et de fabrication pour une période de deux (2) ans
à partir de la date d’achat. La présente garantie est valide accompagnée d’une preuve d’achat seulement. La garantie se limite à la réparation ou au
remplacement seulement et ne s’applique ni aux pertes ni aux dommages directs ou indirects causés aux objets animés ou inanimés, peu importe
la cause. Elle est valide à condition que l’aquarium soit placé dans un endroit approprié sur une surface plate et de niveau, selon les directives
d’installation du mode d’emploi. La présentegarantie exclutle bris de l’aquariumà la suite d’un mauvais usage,defêlures et de fissuresdecontrainte
causées par un support inadéquat ou tout autre bris.
La garantie est valide seulement dans les conditions normales d’utilisation pour lesquelles l’appareil a été conçu. La garantie exclut tout dommage
causé par un usage inapproprié, la négligence, une installation incorrecte, une modification, un usage abusif ou un usage commercial. Elle ne couvre
pas l’usure normale, ni le bris de verre ou les pièces n’ayant pas été entretenues de manière adéquate. S’il arrivait à l’avenir que vous deviez faire une
réclamation sous garantie, vous aurez besoin de fournir la preuve et la date de l’achat. Nous vous recommandons de conserver votre reçu à cette fin.
Rolf C. Hagen inc. vous souhaite beaucoup d’heures d’agrément avec votre aquarium Fluval.
PROBLÈME CAUSE SOLUTION
La rampe d’éclairage ne
fonctionne pas.
Le raccordement du pilote pour DEL n’a pas été fait à
la prise de courant. Raccorder le pilote pour DEL à la prise de courant.
Le raccordement de l’appareil d’éclairage n’a pas été
fait au pilote pour DEL.
Raccorder l’appareil d’éclairage au pilote pour DEL
avec son raccord.
Si le problème persiste après avoir suivi les directives ci-dessus, contacter un détaillant de produits Hagen.
2120
3. WARNUNG – Sorgfältige Aufsicht ist notwendig, wenn ein Gerät von Kindern oder in der Nähe von Kindern benutzt wird. Dieses
Gerät kann von Kindern ab einem Alter von drei (3) Jahren und von Personen mit eingeschränkten physischen, sensorischen oder
geistigen Fähigkeiten oder einem Mangel an Erfahrung und/oderWissen verwendet werden, wenn sie beaufsichtigt werden oder
bezüglich des sicheren Gebrauchs des Geräts unterwiesen wurden und die daraus resultierenden Gefahren verstanden haben.
Kinder dürfen nicht mit dem Gerät spielen.Reinigung und Benutzerwartung dürfen nicht durch Kinder ohne Beaufsichtigung
durchgeführt werden. Dieses Produkt ist kein Spielzeug.
4. ZurVermeidung vonVerletzungen keine heißen oder beweglichen Teile berühren, wie beispielsweise Heizer, LEDs etc.
5. ACHTUNG –Trennen Sie immer alle Geräte im Aquarium vom Stromnetz, bevor Sie die Hände insWasser tauchen, bevorTeile
angebracht oder entfernt werden und bevor diese LED-Balken installiert oder gewartet werden. Nicht am Netzkabel ziehen, um
den Stecker aus der Steckdose zu lösen. Immer am Stecker anfassen und herausziehen.Trennen Sie Geräte vom Stromnetz, wenn
diese nicht in Gebrauch sind.
WARNUNG: ZIEHEN SIE UNBEDINGT DIE STECKER DER LED-TREIBER AUS DER STECKDOSE; ES REICHT NICHT
AUS, NUR DIE BELEUCHTUNG MIT DER APP AUSZUSCHALTEN, DA DIE STROMVERSORGUNG DADURCH NICHT
UNTERBROCHEN WIRD.
Benutzen Sie das Gerät nur für den vorgesehenenVerwendungszweck (d.h. nicht für Swimming-Pools, Gartenteiche, Badezimmer
usw.). DieVerwendung von Anbauteilen, die nicht vom Gerätehersteller empfohlen oder verkauft werden, kann zu einem
unsicheren Betriebszustand führen.Versuchen Sie nicht eine der Produktkomponenten zu reparieren: Im Falle einer Beschädigung
erneuern Sie die beschädigte Komponente mit einem Originalersatzteil.
6. WICHTIG: Diese LED-Balken sind ein BELEUCHTUNGSSYSTEM FÜR AQUARIEN, das AUSSCHLIESSLICH für den GEBRAUCH IN
GESCHLOSSENEN RÄUMEN geeignet ist und das für den Gebrauch auf dem Fluval Siena Aquarium konstruiert wurde. Es ist für den
Gebrauch in Süß- und Meerwasseraquarien mit einerWassertemperatur von max. 35°C geeignet. Installieren oder lagern Sie das
Gerät nicht an Stellen, an denen es derWitterung oderTemperaturen unter dem Gefrierpunkt ausgesetzt ist.
7. WICHTIG: Achten Sie darauf, dass die LED-Balken sicher und ordnungsgemäß installiert sind, bevor sie in Betrieb genommen
werden. Diese LED-Balken dürfen niemals unterWasser in Betrieb genommen werden.
Befüllen Sie das Aquarium bis zu der auf dem Etikett abgebildeten Linie, das
sich auf der Innenseite des Aquariums befindet (siehe Abbildung rechts).
WICHTIG: Füllen Sie das Aquarium nicht mit zu viel Wasser.
Zu viel Wasser kann unter dem oberen Rahmen hindurch und an der Außenseite des Aquariums herunterießen.
WARNUNG: Verbinden Sie die LED-Balken nicht mit dem Stromnetz, wenn sichWasser aufTeilen befindet, die nicht nass
werden dürfen.
WARNUNG: Stellen Sie keine Gegenstände auf den LED-Balken (C) oder der Abdeckung ab. Achten Sie darauf, dass
ausreichend Raum um die LED-Balken vorhanden ist. Die Sicherheit des Gerätes ist nur gewährleistet, wenn es
ordnungsgemäß installiert wurde.
8. Lesen und befolgen Sie alle wichtigen Hinweise auf dem Gerät.
9. Wenn ein Verlängerungskabel benötigt wird, muss ein Kabel geeigneter Leistung benutzt werden. EinVerlängerungskabel mit
einer kleineren Ampere- oder Wattzahl als das Gerät kann sich überhitzen. Achten Sie darauf, dasVerlängerungskabel so zu
verlegen, dass man nicht darüber stolpert oder es herauszieht.
10.
BEWAHREN SIE DIESE ANLEITUNG AUF.
BITTE VOR DER INSTALLATION UND INBETRIEBNAHME AUFMERKSAM LESEN
WICHTIG: BAUEN SIE DEN AQUARIENSCHRANK VOLLSTÄNDIG ZUSAMMEN, BEVOR SIE DAS AQUARIUM AUS DER VERPACKUNG NEHMEN.
STELLEN SIE DAS AQUARIUM NIEMALS AUF EINE ANDERE ABLAGE ALS DEN
AQUARIENSCHRANK, UM SCHÄDEN AM AQUARIENBODEN ZU VERMEIDEN.
FLUVAL SIENA LED: TEILE
Die Fluval Siena Aquarienkombination ist in zwei separatenVerpackungen
enthalten. Nehmen Sie vorsichtig alle Komponenten aus derVerpackung und
achten Sie darauf, dass keine Teile fehlen oder beschädigt sind.
1 Verpackung enthält:
1x Glasbecken (A)
2x schiebbare Abdeckungen (B)
2x LED-Balken (C) + 2x LED-Treiber
1x Plastikbeutel mit:
• 4x Haken fur die elektrischen Kabel (D)
• 1x Kabelführung über den Aquarienrand (E)
• 2x Verschlussstopfen für den Aquarienboden (F)
1x Fluval Filter mit Bedienungsanleitung
1x Fluval Heizer mit Bedienungsanleitung
1 weitere Verpackung enthält:
Die Teile des Aquarienschrankes mit Aufbauanleitung
WICHTIGE
SICHERHEITSHINWEISE
WARNUNG – Zum Schutz vorVerletzungen sind beim Umgang mit
den LED-Balken grundlegende Sicherheitsvorkehrungen zu
beachten, einschließlich der folgenden Hinweise:
1. Zur vollständigen Nutzung und zumVerständnis dieses Produkts
LESEN UND BEFOLGEN SIE ALLE SICHERHEITSHINWEISE
und alle wichtigen Hinweise auf dem Gerät vor der Inbetriebnahme. Bei Nichtbeachtung kann dies zu Schäden an diesem Gerät
und/oder zuVerletzungen und/oder Fischverlusten führen.
2. GEFAHR – Um einen möglichen elektrischen Schlag zu vermeiden, sollten Sie besonders vorsichtig sein, weil diese LED-Balken
in der unmittelbaren Nähe vonWasser verwendet werden. Wenn eine der nachfolgenden Situationen eintritt, sollten Sie nicht
versuchen, das Gerät selber zu reparieren, sondern dieses an eine autorisierte Kundendienststelle zur Reparatur geben oder das
Gerät entsorgen. (siehe die Informationen zu unserem Kundendienst am Ende dieser Anleitung)
Wenn das Gerät insWasser fällt, NICHT danach greifen! Erst die Netzsteckverbindung lösen und dann das Gerät
herausnehmen.Wenn die elektrischen Teile des Gerätes nass werden, sofort die Netzsteckverbindung lösen.
Gerät nach dem Einbau sorgfältig überprüfen. Es darf nicht an das Stromnetz
angeschlossen werden, wenn sichWasser aufTeilen befindet, die nicht nass
werden dürfen.
Kein Gerät mit beschädigtem Netzkabel oder beschädigtem Stecker benutzen oder
wenn dieses nicht richtig funktioniert oder heruntergefallen oder anderweitig
beschädigt wurde. Das Netzkabel des Gerätes kann nicht ausgewechselt werden;
wenn das Kabel beschädigt ist, sollte das Gerät weggeworfen werden. Niemals das
Kabel abschneiden.
Um die Möglichkeit zu vermeiden, dass der Gerätestecker oder die Steckdose nass
werden, sollte das Gerät neben einerWandsteckdose so abgestellt werden, dass keinWasser auf Steckdose oder Stecker
tropfen kann. Eine„Tropfschleife“ (siehe Abbildung) sollte zur Steckdose hin gebildet werden. Die„Tropfschleife“ ist der
Teil des Netzkabels, der unterhalb der Steckdose (oder des Anschlusses beiVerwendung einesVerlängerungskabels) liegt.
Damit wird verhindert, dassWasser das Kabel entlangwandert und mit der Steckdose in Berührung kommt. Wenn der
Stecker oder die Steckdose nass werden, ziehen Sie NICHT den Stecker. Sicherung oder Stromkreisunterbrecher für das
Gerät ausschalten. Erst danach das Netzkabel herausziehen und die Steckdose aufWasser überprüfen.
MAX
B
E
C
D
A
C
F
2322
AUFBAUANLEITUNG
VORBEREITUNG UND INSTALLATION DES AQUARIENSCHRANKES
Bevor Sie das Aquarienbecken oder den Schrank bewegen, achten Sie darauf, dass dabei genügend Leute helfen, um es risikofrei
zu bewegen.
BAUEN SIE DEN AQUARIENSCHRANK VOLLSTÄNDIG ZUSAMMEN, BEVOR SIE DAS AQUARIUM AUS DER VERPACKUNG NEHMEN.
Sie müssen Ihr Fluval Aquarium auf einen geeigneten Fluval Aquarienschrank stellen, der mit den passenden Abmessungen und Struktur konstruiert wurde,
um dem vollständig mitWasser gefüllten Aquarium standzuhalten. Durch den Gebrauch von nicht geeigneten Schränken, Möbelstücken, Fernsehschränken etc.
werden Ihre Gewährleistungsansprüche unwirksam und die Produktsicherheit ist beeinträchtigt.
Bitte beachten Sie die Aufbauanleitung des Aquarienschranks. Versuchen Sie nicht, den Schrank aufzustellen, ohne die Bedienungsanleitung gelesen und
befolgt zu haben.Wenn die Aufbauanleitung fehlt oder unbrauchbar ist, wenden Sie sich an das Geschäft, in dem Sie die Aquarienkombination gekauft haben,
oder an den HAGEN Kundendienst.
Positionierung des Aquariums mit Schrank am Bestimmungsort
Die Positionierung ist für das Aquarium sehr wichtig. Positionieren Sie das Aquarium nicht im direkten Sonnenlicht. So vermeiden Sie das Risiko einer übermäßigen Algenbildung
und verhindern die Überhitzung des Aquariums durch die Sonnenstrahlen. Halten Sie Ihr Fluval Aquarium entfernt von anderenWärmequellen (Lüftungskanälen, Heizungen etc.),
um dieTemperatur immer ordnungsgemäß beibehalten zu können. Zugluft sollte ebenfalls vermieden werden. Positionieren Sie Ihr Fluval Aquarium an einer Stelle, an der mögliche
Wasserspritzer kein Problem darstellen.
WARNUNG: Achten Sie darauf, dass der ausgewählte Ort eine ebene und gerade Fläche hat, die dem Gesamtgewicht sowohl des vollständig mitWasser
befüllten Aquariums als auch des Schrankes standhalten kann. Positionieren Sie Ihr neues Fluval Aquarium mit Schrank in der Nähe eines Stromanschlusses.
Nachdem Sie den Aquarienschrank am gewünschten Ort aufgestellt haben, müssen Sie mit einerWasserwaage sicherstellen, dass er exakt gerade ist.
WICHTIG: Die Fluval Aquarienschränke wurden konstruiert, um dem Gesamtgewicht des Aquariums standzuhalten. DieTabelle unten zeigt die ungefähre
Befüllungshöhe des Beckens und des ungefähren Gewichtes des vollständig mit Wasser gefüllten Aquariums (Felsen, Dekorationsgegenstände oder Kies wurden
nicht in Betracht gezogen).
FLUVAL SIENA AQUARIEN
INSTALLATION DES AQUARIUMS
Bevor Sie das Aquarienbecken oder den Schrank bewegen, achten Sie darauf, dass dabei genügend
Leute helfen, um es risikofrei zu bewegen.
NEHMEN SIE DAS AQUARIUM AUS DERVERPACKUNG.
Das Glasbecken ist mit Schienen ausgerüstet, auf denen die LED-Balken und die Abdeckung
montiert werden.Versuchen Sie nicht, diese Schienen zu entfernen.
Das Becken besteht aus Glas. Bitte behandeln Sie es immer mit der größtenVorsicht. Achten Sie darauf,
dass Sie es immer am Boden anfassen, um es anzuheben.
STELLEN SIE DAS AQUARIUM AUF DEN AQUARIENSCHRANK.
WICHTIG: Reinigen Sie die Oberseite des Aquarienschrankes und die untere Seite des Aquariums gründlich.
Stellen Sie das leere Aquarium auf den Schrank und achten Sie darauf, dass die Anschlüsse in der
entsprechenden Öffnung des Schranks liegen. Legen Sie NIEMALS etwas unter das Aquarium. Es
darf sich KEINE zusätzliche Unterlage oder Zwischenschicht (z. B. Styropormatten) zwischen dem
Aquarium und dem Schrank befinden.
WARNUNG: Bruchgefahr des Aquarienbodens. Das Glasbecken weist am Boden hervorstehende
Anschlüsse auf, die niemals als Stützpunkte eingesetzt werden dürfen. Versuchen Sie nie, das Becken
auf irgendeine Unterlage zu legen, außer direkt auf den dazugehörigen Aquarienschrank, der mit
speziellen Hohlräumen zur Aufnahme der Anschlüsse versehen ist. Nehmen Sie das Aquarium aus der
Verpackung und stellen Sie es auf den Schrank, wobei Sie darauf achten müssen, dass die Anschlüsse
nicht beschädigt werden.
MODELL Beckenabmessungen Befüllungshöhe
(bis zum max. Wasserlevel)
Gewicht des mitWasser befüllten
Aquariums
FLUVAL SIENA 166 l55 x 55 x 55 cm 49,5 cm
(Wasserkapazität = 140 l) 166 kg
FLUVAL SIENA 272 l90 x 55 x 55 cm 49,5 cm
(Wasserkapazität = 227 l) 277 kg
FLUVAL SIENA 332 l110 x 55 x 55 cm 49,5 cm
(Wasserkapazität = 279 l) 340 kg
Versuchen Sie nie, den Aquarienschrank mit dem Glasbecken oder einem anderen Gegenstand darauf zu bewegen
oder zu transportieren.
Obwohl das Aquarium mit größter Sorgfalt und den modernstenTechniken hergestellt wurde, empfehlen wir dennoch eine einfache Kontrolle, um
zu überprüfen, ob etwaige unerwartete Ereignisse während der Handhabung und desTransports das Becken beschädigt oder seineWasserdichtigkeit
beeinträchtigt haben.
1. Schauen Sie sich das Glasbecken zunächst an und überprüfen Sie so, dass keine Beschädigungen
oder Risse im Glas vorhanden sind. Brechen Sie den Aufbau ab, falls das Becken beschädigt sein sollte.
2. Wenn Sie keine Beschädigungen oder Risse feststellen können, fahren Sie mit dem normalen
Aquarienaufbau fort.
3. Nach dem vollständigen Aufbau der Aquarienkombination mit Filter, Heizer, LED-Balken,
Dekorationsgegenständen usw. befüllen Sie das Becken allmählich mitWasser (5 cmWasser zurzeit)
und überprüfen Sie, dass dabei keinWasser austritt.
Versuchen Sie nie, das Becken zu bewegen oder zu transportieren, wenn es nicht
vollständig leer ist und sich nochWasser oder andere Gegenstände darin befinden.
Sorgen Sie dafür, dass die Dichtungen an den Kanten der Glaswände beiWartungen
Ihres Aquariums nicht beschädigt werden, z.B. durch Pflanzenwerkzeuge oder Algenreiniger.
Verwenden Sie für die Reinigung Ihres Aquariums niemals giftige oder aggressive
Substanzen, wie z.B. Haushaltsreiniger.
INSTALLATION ÜBER DAS“EASYCONNECT” SYSTEM
Dieser Abschnitt bezieht sich nur auf Fluval Aquarien mit einem Fluval Außenlter
und einem„EasyConnect“ System.
INSTALLATION DES WASSEREINLASSES/AUSLASSES MIT DEM“EASYCONNECT”SYSTEM
(Einlass-/Auslassanschlüsse sind in der Filterverpackung enthalten)
Diese Fluval Aquarien verfügen über das„EasyConnect“ System, dass die direkteVerbindung zwischen dem Becken und dem
Außenfilter durch den Boden des Glasaquariums dank spezieller Anschlussstücke ermöglicht. Normalerweise entsteht die gleiche
Verbindung bei von Handwerkern gefertigten Geräten, die komplex sind und die nur mit einem Experten in Betrieb genommen
werden können. Dagegen kann das„EasyConnect“ System einfach und sicher in wenigen Minuten installiert werden und gibt Ihrem
Aquarium eine professionelle und saubere Filterlösung
Bevor Sie fortfahren, identifizieren und zählen Sie alle benötigtenTeile (s. Explosionszeichnung
auf dieser Seite). Sollte einTeil fehlen, brechen Sie die Montage ab und kontaktieren
Sie Ihren örtlichen Händler.
Bevor Sie fortfahren, überprüfen Sie die Rohre (A), ob alle 3 Gummiringe (C) vorhanden sind.
Sollte ein Ring (C) fehlen, brechen Sie die Montage ab und kontaktieren Sie Ihren örtlichen Händler.
Suchen Sie die 2 Öffnungen im Aquarienboden und stellen Sie sicher, dass die passenden Öffnungen im Aquarienschrank genau darunter liegen. An den 2 Öffnungen am
Aquarienboden wurden in der Fabrik bereits spezielle Anschlussstücke aus Plastik und zwei Dichtungsdeckel (P) und (Q) montiert. Die Anschlussstücke dürfen niemals entfernt,
gedreht oder gelockert werden. Das Auslasssystem sollte in der Öffnung (O) installiert werden. Das Einlasssystem sollte in der Öffnung (I) installiert werden.
Lockern oder drehen Sie die in der Fabrik
installierten speziellen Anschlussstücke an den
Beckenöffnungen (I) und (O) nicht und üben Sie
keinen Druck auf sie aus.
Sobald Sie die Einlass- bzw. Auslasssysteme
installiert haben, dürfen Sie das Aquarium auf dem
Aquarienschrank nicht mehr verschieben, da die
Einlass- bzw. Auslasssysteme und das Glasbecken
sonst beschädigt werden könnten.
VERSCHLUSSSTOPFEN FÜR DEN
AQUARIENBODEN
P
Q
Deckel
Gummiringe des
Verbindungsrohrs (C) EINLASSEINHEIT AUSLASSEINHEIT
Wasseraus-
trittsstutzen
(N)
Auslassrohr (B)
Ansaugkorb (S)
Verbindungsrohr
(A)
Ringmutter
(R)
I O
2524
INSTALLATION DES AUSLASSSYSTEMS
1. Drehen Sie den Deckel (P) mit der Hand heraus und entfernen Sie den Deckel (Q)
aus der Öffnung (O) (Abb. 1). WICHTIG: Bewahren Sie die Deckel (P) und (Q) auf.
2. Stecken Sie dasVerbindungsrohr (A) ganz durch die Öffnung (O), bis es nicht mehr geht (Abb. 2).
3. Öffnen Sie den Schrank. Drehen Sie die Ringmutter (R) auf das untere Ende des
Verbindungsrohres (A) und befestigen Sie die Ringmutter (Abb. 3).
4. Schieben Sie den Wasseraustrittsstutzen (N) in das eine Ende des Auslassrohres (B).
5. Schieben Sie das Auslassrohr (B) auf dasVerbindungsrohr (A) (Abb. 4).
6. Stellen Sie die Höhe desWasseraustrittsstutzens Ihren Bedürfnissen gemäß ein, indem Sie
das Auslassrohr (B) amVerbindungsrohr (A) entlang schieben.
7. Sie können dieWasseraustrittsstutzen (N) ganz leicht drehen, um denWasserfluss in die
gewünschte Richtung zu lenken.
Lenken Sie denWasserstrahl so, dass das Wasser nicht über das Becken spritzt.
Leiten Sie denWasserstrahl nicht in Richtung der LED-Balken.
INSTALLATION DES EINLASSSYSTEMS
1. Drehen Sie den Deckel (P) mit der Hand heraus und entfernen Sie den Deckel (Q) aus der
Öffnung (I). (Abb. 1). WICHTIG: Bewahren Sie die Deckel (P) und (Q) auf.
2. Stecken Sie das zweiteVerbindungsrohr (A) ganz durch die Öffnung (I), bis es nicht
mehr geht (Abb. 2).
3. Öffnen Sie den Schrank. Drehen Sie die Ringmutter (R) auf das untere Ende des zweiten
Verbindungsrohres (A) und befestigen Sie die Ringmutter (Abb. 3).
4. Schieben Sie den Ansaugkorb (S) auf dasVerbindungsrohr (A) (Abb. 5). Das Endergebnis ist in Abb. 6 und Abb. 7 zu sehen.
Die Höhe des Ansaugkorbs passt zu den meisten Standardaquariendekorationen.Wenn Sie das Aquarium dekorieren, achten Sie darauf, dass er stets mindestens
5 cm über der Kiesschicht am Boden bleibt, damit kein Kies oder Sand eingesaugt wird. Stellen Sie außerdem sicher, dass die Dekoration nicht denWasserfluss
behindert. Ornamente und Felsen sollten positioniert werden, wenn das Aquarium noch trocken ist.
ACHTUNG! Drücken Sie dieVerbindungsrohre (A) niemals zur Seite, da dies die Einlass- bzw. Auslasssysteme und das Glasbecken beschädigt. Falls Sie
ein anderes Filtersystem benutzen wollen, das die mitgelieferten Einlass- bzw. Auslasssysteme nicht benötigt (z.B. einen Innenfilter), entfernen Sie die 2
Verbindungsrohre (A) wieder und verschließen Sie die Öffnungen (O) und (I) mit den Deckeln (P) und (Q). Der Deckel (Q) gewährleistet dieWasserdichtigkeit und
muss in die Öffnung gedrückt werden. Der Deckel (P) soll den Deckel (Q) schützen und sicherstellen, dass der Deckel (Q) ordnungsgemäß festsitzt. Drehen Sie
den Deckel (P) mit der Hand ein, ohne dabei Gewalt anzuwenden. BENUTZEN SIE DABEI KEINEWERKZEUGE. DER GEBRAUCH VON WERKZEUGEN KANN
DIE EINHEIT BESCHÄDIGEN.
Verbindungsrohr
(A)
Abb. 2
INSTALLATION, GEBRAUCH UND WARTUNG DES FLUVAL FILTERS & HEIZERS
Bitte beziehen Sie sich auf die Bedienungsanleitung des Fluval Filters/Heizers.Versuchen Sie nicht, den Fluval Filter/Heizer zu installieren, ohne
die Bedienungsanleitung gelesen und befolgt zu haben. Wenn die Anleitung fehlt oder unbrauchbar ist, wenden Sie sich an das Geschäft, in dem
Sie den Filter bzw. Heizer gekauft haben, oder an den HAGEN Kundendienst.
INSTALLATION DER LED-BALKEN
WARNUNG: Trennen Sie immer alle Geräte im Aquarium vom Stromnetz, bevor Sie die Hände insWasser tauchen und/oder bevor SieWartungsarbeiten
durchführen.
ERSTE INBETRIEBNAHME
1. Setzen Sie die LED-Balken (C) vorsichtig auf die Schienen auf dem oberen Rahmen an die finale Position.
2. Führen Sie die Kabel der LED-Balken aus dem Becken heraus (Abb. 8).
3. Verbinden Sie die LED-Balken mit den LED-Treibern (Abb. 9).
WARNUNG: Die LED-Balken dürfen nicht an das Stromnetz angeschlossen werden, wenn sich Wasser
aufTeilen befindet, die nicht nass werden dürfen.
KABELFÜHRUNG ÜBER DEN AQUARIENRAND
Die Stromkabel des Heizers und der LED-Balken werden über die Rückseite des
Aquariums mithilfe einer Kabelführung über den Rand herausgeführt,
die auf der rechten oder der linken Seite angebracht werden kann.
(TIPP: Heizer sind am effektivsten, wenn sie in der Nähe
des Filterauslassrohrs positioniert werden).
1. Platzieren Sie die Haken für die elektrischen Kabel (D) dort, wo sie am besten
geeignet ist, indem Sie sie in den unteren Kanal der beiden Schienen
schieben (Abb. 10) und die Kabel aus dem Becken herausführen.
2. Bringen Sie die Kabelführung (E) über dem Glas des Beckens an.
SETZEN SIE DIE SCHIEBEABDECKUNGEN AUF DAS AQUARIUM.
Ziehen Sie die Schutzfolie von den beiden Aquarienabdeckungen ab.
1. Legen Sie die schmale Abdeckung in die untere Führungsbahn
der Schiene (Stützschienen) ein.
2. Legen Sie die breitere Abdeckung in die obere Führungsbahn der Schiene (Stützschienen) ein.
3. Wenn Sie den Fluval PF2 Fischfutterspender verwenden, entfernen Sie eines der beiden
Lüftungsgitter, um den Fischfutterspender hier einzusetzen.
SCHALTEN SIE DIE LEDBALKEN EIN
Verbinden Sie die Geräte mit dem Stromnetz und verwenden Sie ein Smartphone
oderTablet mit der heruntergeladenen FluvalSmart App, um eineVerbindung
herzustellen. Die FluvalSmart App kann aus dem iOS- oder Android-App-Store
heruntergeladen werden; Sie können zum Herunterladen auch den QR-Code
scannen.Verwenden Sie ausschließlich die LED-Treiber, die mit den LED-Balken
geliefert wurden. Stellen Sie unbedingt sicher, dass die Spezifikationen der
LED-Treiber mit den in derTabelle unten angegebenen LED-Balken-Kenncodes
übereinstimmen.
Abb. 3 Abb. 4
Abb. 5 Abb. 6 Abb. 7
Ringmutter (R)
Wasseraustrittsstutzen
(N)
Auslassrohr
(B)
Ansaugkorb
(S)
Abb. 1
P
Q
Abb. 10
DD
E
Abb. 8
Abb. 9
C

2726
3. Halten Sie denWasserstand so konstant wie möglich (regelmäßiges Auffüllen aufgrund von Verdunstung). Dies ist vorteilhaft für einen stabilen Salzgehalt und trägt zum
Schutz der Abdeckung bei.
4. Es ist empfehlenswert, alle Komponenten der LED-Balken, die mit Salzwasser in Berührung kommen, regelmäßig mindestens alle 15 Tage zu reinigen. Die Reinigung sollte
mit einem feuchtenTuch durchgeführt werden (verwenden Sie niemals aggressive chemische Produkte oder Reinigungsmittel). Einfacher Zitronensaft kann verwendet
werden, um Salzansammlungen zu entfernen. Danach sorgfältig feucht abwischen, um jeden Säurerückstand zu entfernen.
ERSATZTEILE
Benutzen Sie ausschließlich Original-Fluval-Ersatzteile, um eine dauerhafte Leistung und Sicherheit zu gewährleisten.
Eine vollständige Liste aller Ersatzteile finden Sie auf www.fluvalaquatics.com
RECYCLING
Dieses Produkt trägt dieWEEE-Kennzeichnung für die getrennte Entsorgung von Elektro- und Elektronikaltgeräten und muss daher gemäß der Europäischen
Richtlinie 2012/19/EU so entsorgt werden, dass es dem Recycling oder einer anderen umweltschonenden Form derVerwertung zugeführt wird.Wenden Sie
sich für weitere Informationen an die zuständigen Behörden. Elektronik-Geräte, die nicht der Abfalltrennung unterzogen werden, stellen eine potenzielle
Gefahr für unsere Umwelt und die menschliche Gesundheit dar, da sie gefährliche Stoffe enthalten
KUNDENDIENST
Sollten Sie im Hinblick auf den Gebrauch des Produktes Probleme oder Fragen haben, wenden Sie sich bitte zuerst an Ihren Fluval Fachhändler. Häufig können Probleme und
Fragen vom Fachhändler geklärt werden. Falls dies jedoch einmal nicht der Fall sein sollte, geben Sie das Gerät mit dem Kaufbeleg im Rahmen der Gewährleistung an den
Vertreiber in Ihrem Land zurück.Wenn Sie unseren Kundendienst kontaktieren (telefonisch oder schriftlich), halten Sie bitte alle relevanten Informationen, z.B. Modell-Nummer
und/oderTeile-Nummer sowie Angaben zum Problem, bereit.
PROBLEMBEHEBUNG
Wenn ein LED-Balken nicht leuchtet, gehen Sie bitte wie folgt vor:
WARTUNG DER LED-BALKEN UND DES AQUARIUMS
REINIGUNG DER LEDBALKEN
Trennen Sie die LED-Balken immer vor jeder Wartungsarbeit vom Stromnetz.
WARNUNG: Ziehen Sie unbedingt die Stecker der LED-Treiber aus der Steckdose; es reicht NICHT aus, nur die Beleuchtung mit der App auszuschalten, da die Stromversorgung
dadurch nicht unterbrochen wird. Setzen Sie die LED-Balken niemals einemWasserstrahl aus und tauchen Sie sie niemals unter Wasser.
Für die maximale LED-Leistung wird empfohlen, die LED-Balken und die LED-Linsen einmal wöchentlich zu reinigen.Trennen Sie die LED-Treiber vor der Reinigung der
LEDBalken vom Stromnetz. Verwenden Sie beide Hände, wenn Sie diese Geräte reinigen. Wischen Sie freiliegende Oberflächen vorsichtig mit einem feuchtenTuch ab, um Staub
oder mineralische Ablagerungen zu entfernen, die sich mit der Zeit ansammeln können. Verwenden Sie keine chemischen Produkte oder scharfen Reinigungsmittel, da diese
die LED-Balken beschädigen können.
Verwenden Sie das Fluval LED-Linsenreinigungsspray (A3969), um den LED-Teil der LED-Balken zu reinigen. Stellen Sie sicher, dass alle Oberflächen trocken sind, bevor die
LED-Treiber wieder mit dem Stromnetz verbunden werden.
Für die Fluval LED-Balken und die Abdeckungen sind keine besonderen Wartungsmaßnahmen notwendig. Sie müssen nur regelmäßig mit einem feuchtenTuch abgewischt
werden (benutzen Sie niemals aggressive chemische Produkte oder Reinigungsmittel).
Um kalkhaltige Ablagerungen zu entfernen, ist es empfehlenswert, eine milde Säure, wie z.B. Zitronensaft, zu benutzen und diese dann gründlich mit einem feuchtenTuch
abzuwischen, damit keine Rückstände zurückbleiben.
MEERWASSERAQUARIEN
Es ist gemeinhin bekannt, dass Salzwasser weitaus korrosiver und leitfähiger (von Elektrizität) ist und im Allgemeinen sowohl Kunststoff- als auch Metallteile schneller angreift
als Süßwasser. Um Salzablagerungen auf den Fluval Abdeckungen und auf den LED-Balken zu minimieren,
ist es empfehlenswert, die folgenden hilfreichenTipps zu beachten:
1. Achten Sie darauf, dass die Wasseraustrittsstutzen dasWasser nicht über die Wasseroberfläche sprühen. Positionieren Sie sie unter derWasseroberfläche in einem leichten
Abwärtswinkel, aber lassen Sie immer noch Oberflächenbewegungen zu (trägt zur Sauerstoffanreicherung bei).
2. Wenn eine Durchlüfterpumpe verwendet wird, müssen die Salzablagerungen regelmäßig entfernt werden.
FLUVAL SIENA LED-BALKEN-SPEZIFIKATIONEN
Aquarienmodell 166 l SIENA 272 l SIENA 332 l SIENA
LED-BALKEN-EINHEIT BT LED UNIT SIENA BT LED UNIT SIENA BT LED UNIT SIENA
LED-BALKEN-MODELL A13253 A13254 A13255
BELEUCHTUNGSLEISTUNG 2 x 22W 2 x 36W 2 x 48W
LUMEN 2 x 2000 lm 2 x 3300 lm 2 x 4400 lm
BELEUCHTUNGSSPANNUNG 24Vdc 24Vdc 24Vdc
LED-TREIBERTYP (x 2) S024AM[X]2400100 S040Q[X]2400150 S050F[X]2400200
LED-TREIBER-EINGANGSSPANNUNG 100-240Vac 100-240Vac 100-240Vac
X = B für UK-Stecker X = V für EU-Stecker X = U für US-Stecker X = S für AUS-Stecker
PROBLEM GRUND LÖSUNG
Die Beleuchtung funktioniert nicht. Der LED-Treiber ist nicht mit dem Stromnetz verbunden. Verbinden Sie den LED-Treiber mit dem Stromnetz.
Der LED-Balken ist nicht mit dem LED-Treiber
verbunden.
Verbinden Sie den LED-Balken mit demVerbinder an
dem LED-Treiber.
Sollte das Problem dennoch nicht behoben sein, kontaktieren Sie bitte Ihren Zoofachhändler oder Ihren HAGENVertreter in Ihrem Land.
Fluval Siena 166 Fluval Siena 272 Fluval Siena 332
2 x Schiebeabdeckungen
A13313 A13314 A13315
1 x LED-Balken
A13253 A13254 A13255
1 x LED-Treiber
A20432 A20433 A20435
1 x Kabelführung über den Aquarienrand
A13866 A13866 A13866
1 x Oberes Abdeckgitter
A13316 A13316 A13316
4 x Haken für die elektrischen Kabel A13867 A13867 A13867
GEWÄHRLEISTUNG
Dieses Fluval Aquarium und die LED-Balken haben eine Gewährleistung auf fehlerhafte Teile und Verarbeitung für einen Zeitraum von 2 Jahren ab
Kaufdatum. Diese Gewährleistung gilt nur mit dem Kaufnachweis. Die Gewährleistung beschränkt sich auf die Reparatur oder den Austausch und
umfasst keine Folgeschäden,Verluste oder Schäden anTieren und persönlichem Eigentum unabhängig von deren Ursache.
Diese Gewährleistung gilt nur unter denVoraussetzungen, dass das Aquarium an einem geeigneten Ort aufgestellt wurde, der flach und gerade ist,
und dass das Aquarium gemäß der Gebrauchsanleitung installiert wurde. Diese Gewährleistung gilt nur unter normalen Betriebsbedingungen, für
die das Produkt bestimmt ist. Ausgeschlossen sind Schäden, die durch unangemessene Verwendung, Fahrlässigkeit, unsachgemäße Installation,
Manipulation, Missbrauch oder kommerzielle Nutzung verursacht wurden. Die Gewährleistung erstreckt sich nicht auf den Verschleiß, Glasbruch
oder aufTeile, die nicht ordnungsgemäß gewartet wurden.
Ein Ausfall von weniger als 5% der Gesamtzahl der LEDs gilt nicht als Defekt gemäß den Bedingungen dieser Gewährleistung. DIES HAT KEINEN
EINFLUSS AUF IHRE GESETZLICHEN RECHTE
This manual suits for next models
3
Table of contents
Languages:
Popular Aquarium manuals by other brands

UK Jellyfish
UK Jellyfish MEDUSA DESKTOP care guide

TMC Aquarium
TMC Aquarium V2iLumenAir Compact Connect instructions

DeepReef
DeepReef DP1500 instruction manual

CAD Lights Aquariums
CAD Lights Aquariums Versa Series instructions

D-D The Aquarium Solution
D-D The Aquarium Solution Aqua-Pro Reef Series installation instructions

Kessil
Kessil A360X Refugium quick start guide


