LIMITED WARRANTY
KOLLER PRODUCTS LLC warrants this aquari-
um product to be free from defects in material
and workmanship under normal use and service
and according to the provisions as specified in
the accompanying assembly and operating
instructions, for a period of 1 year from date of
purchase.
This warranty does not cover and KOLLER
PRODUCTS LLC is not liable for the cost of
repair or replacement of parts which have been
subject to misuse, negligence, accident, improp-
er installation, damage during shipment or
handling, normal deterioration due to wear and
exposure or defects caused by unauthorized
parts or modification.
UNDER NO CIRCUMSTANCES WILL
KOLLER PRODUCTS LLC BE LIABLE FOR
ACCIDENTAL OR CONSEQUENTIAL DAM-
AGES, INCLUDING BUT NOT LIMITED TO
LOSS OF PROPERTY OR EQUIPMENT.
Some states do not allow the exclusion or
limitaon of incidental or consequenal
damages, or limitaon on how long an
implied warranty lasts, so the above
limitaons or exclusions may not apply to
you. This warranty gives you the legal
rights, which vary from state to state.
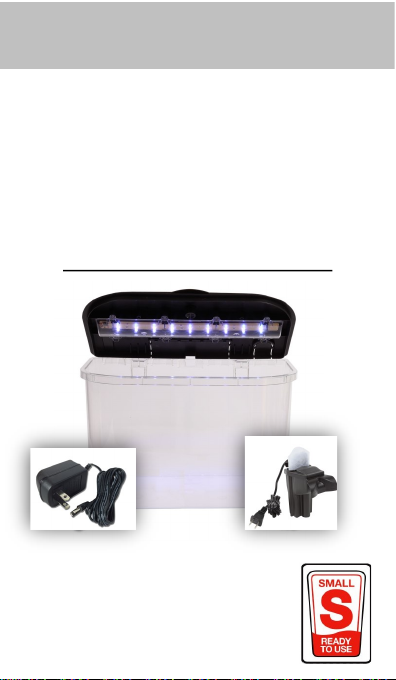
7. Installing Power Filter
Locate the adjustable hanger mounng
bracket inside the box. Place the hanger
bracket at 90° and align one of the
adjustment holes onto the mounng post,
rotang it upwards unl hanger is vercal.
Install the lter inside the aquarium by
hanging the lter onto the aquarium rim
in notch in center of tank.
PLACE HANGER AT 90
DEGREES ON POST
Remove knock-out with
small saw or hacksaw,
cung through the
connected tabs
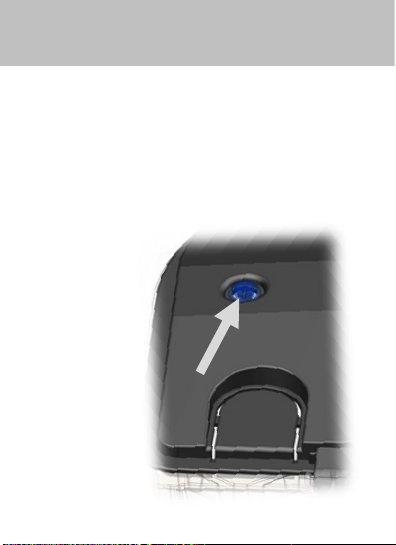
To select preferred color, press on the
BLUE BUTTON. Each consecuve press of
the buon changes the color or seng.
There are 7 color selecons along with 4
transioning and or color combinaons
plus o selecon.
ROTATE HOOK
VERTICAL, INSERT
POWER CORD INTO
HOLDER AT TOP OF
BRACKET
Select proper sized heater appropriate for
your aquarium size. Read and follow the heat-
er’s instrucons. Check with your retailer for
recommended heater sengs. Adjust heater
sengs as directed. Conrm water tempera-
ture with thermometer. Always use a power
strip with surge protector to safeguard your
electrical equipment.
Heater and Thermometer not included,
must be purchased separately
The water level of the lled aquarium should
be above the line on the front of the lter
housing. To raise or lower the Filter adjust
the hanger mounng bracket by rotang the
hanger bracket 90º, removing it, and replac-
ing it in an alternate alignment hole.
10. Oponal Heater
8. Water Level
9. Operang LED Light
LED LIGHT FCC COMPLIANT
FCC Vericaon Tested
Cercate Of Conformity
# PRSZ1707281E
This device complies with part 15 of the FCC
Rules. Operaon is subject to the following two
condions: (1) This device may not cause harmful
interference, and (2) this device must accept any
interference received, including interference that
may cause undesired operaon. Changes or mod-
icaons not expressly approved by the party
responsible for compliance could void the user's
authority to operate this device.
NOTE: This equipment has been tested and found
to comply with the limits for a Class B digital de-
vice, pursuant to part 15 of the FCC Rules. These
limits are designed to provide reasonable protec-
on against harmful interference in a residenal
installaon. This equipment generates, uses, and
can radiate radio frequency energy and, if not
installed and used in accordance with the instruc-
ons, may cause harmful interference to radio
communicaons. However, there is no guarantee
that interference will not occur in a parcular
installaon. If this equipment does cause harmful
interference to radio or television recepon,
which can be determined by turning the equip-
ment o and on, the user is encouraged to try to
correct the interference by one or more of the
following measures:
-Reorient or relocate the receiving antenna.
-Increase the separaon between the equipment
and receiver.
-Connect the equipment into an outlet on a cir-
cuit dierent from that to which the receiver is
connected.
-Consult the dealer or an experienced radio/TV
technician for help.
WARRANTY HELP
REPLACEMENT PARTS
OR
TECH SUPPORT
IF ANY COMPONENTS ARE
DAMAGED OR MISSING
DO NOT RETURN TO RETAILER
PLEASE CONTACT
customercare@kollerproducts.com
(800) 545-1344
Whisper® is a registered trademark of
Spectrum Brands.
Manufactured by Koller Products, LLC
Shawnee, KS 66218 USA