Fly Sky Meteor 280 User manual

Meteor 280
User manual
Version v1.0 2015-8-10


INDEX
M e t e o r 2 8 0 … … … … … … … … … … … … … … … … … … … … … … … … … … … … … … … … … … … … … … . . … 1
Us e r ma n u a l …………………………………………………………………………………………………………………………………1
Index…………………………………………………………………………………………………………………………………………2
DI SCLAIM ER …………… ………… ……… …… ………… ……… …… ………… ……… …… ………… ……… …… ……… …… .. …… 3
CAUTIONS…………………………………………………………………………………………………………………3
B A T T E R Y U S E A N D W A R N I N G F O R C H A R G I N G …………………………………………………………4
LIST PARTS IN BOX……………………………………………………………………………………………………..…………4
REQU I RED TOOL S ………………………………………………………………………………………………………………………..……5
S Y S T E M S P E C I F I C A T I O N ………………………………………………………………………………………5
A I R C R A F T & R A D I O I N S T R U C T I O N ……………………………………………………………….……………6
A C - 3 S 1 0 B A L A N C E C H A R G E R I N S T R U C T I O N … … … … … … … … … … … . … … … … … . 6
FL IG H T IN ST RU C TI O N …… …… … … … …… …… … …… … … … …… …… … …… … … …… … …… …… … … … . …… … … … 8
Gro u n d Sta t i o n IN S T RU C T I O N …… … … … … … … … … … …… … … … … … … … … … … …… … … … .. …… … … … … 1 1
Ra d i o Sy s t e m I N S T R U C T I O N …… … … … … … … … … … … … … … … … … … … … … … … … … … … . . … … … … … … . . 2 2
REFERENCE………………………………………………………………………………………………………………… .………………..28

DISCLAMER
Please read this disclaimer carefully before using this Meteor 280. By using this product, you hereby agree to this
disclaimer and signify that you have read it fully.
This product is not suitable for people under age of 16.
Meteor 280 is a excellent multi-copter which can offer easy indoor and outdoor flight when powered
normally and in a good working condition. Although the Meteor 280 features a built-in intelligent control
system, we have made its operation as safe as possible. However, we still recommend you to remove propeller
before system calibration and parameter setting. Be sure to check all connection and keep away from the crowd
and fragile or dangerous goods. Top RC will not bear the liability for personal injury or property loses caused
by the use of this product in following conditions:
1.Damage(s),injuries or any legal responsibilities incurred when users are drunk, taking drugs, under the influence of
anesthesia, dizziness, fatigue, nausea and any other conditions both physical and mental that could impair your ability.
2. Damage(s), injuries or any legal responsibilities caused by subjective intentional operations.
3. Any mental damage compensation caused by accident.
4. Failure to follow the guidance of the manual in assembly or operation.
5. Malfunctions caused by refit or replacement with non-TOP RC accessories and parts.
6. Damage(s), injuries or any legal responsibilities caused by using third party products or the fake TOP RC products.
7. Damage(s), injuries or any legal responsibilities caused by improper operation or subjective misjudgment.
8. Damage(s), injuries or any legal responsibilities caused by mechanical failures due to product aging and natural wear (more
than 100 hours flight time).
9. Damage(s), injuries or any legal responsibilities caused by continued flying after low voltage protection alarm is triggered.
10. Damage(s), injuries or any legal responsibilities caused by knowingly flying the aircraft in abnormal conditions (such as
when water, oil, soil, sand or other unknown material are inside the aircraft, incomplete assembly, the main components
have obvious faults, obvious defect or missing accessories).
11. Damage(s), injuries or any legal responsibilities caused by flying in the following situations such as the aircraft in magnetic
interference areas (such as high voltage lines, owe stations, broadcasting towers and mobile base stations), radio interference
areas, government regulated no-fly zones, if the pilot loses sight of the aircraft, suffer from poor eyesight or are otherwise not
suitable for aircraft operation.
12. Damage(s), injuries or any legal responsibilities caused by use in cold weather, such as a rain, heavy wind, snow, hail,
lightning, tornadoes and hurricanes.
13. Damage(s), injuries or any legal responsibilities caused when the aircraft is in the following situations: collision, fire,
explosion, floods, tsunamis, subsidence, ice trapped, avalanche, debris flow, landslide, earthquake, etc.
14. Damage(s), injuries or any legal responsibilities caused by infringement such as any data, audio or video material recorded
by the use of aircraft.
15. Damage(s), injuries or any legal responsibilities caused by the misuse of the battery, protection circuit, RC model and
battery chargers.

16. Other losses that not covered by the scope of TOP RC innovations liability.
Cautions
Please check the following points before flight.
Before flight, please be sure you have already gotten enough experience to operate this aircraft by flight
training or practice (such as practice by simulator or a professional guidance).
Please check if all parts are in good condition before flight .Do not start flying if there is any aging or damaged
parts.
Please check if the propellers and motors are installed correctly and firmly before every flight. The clockwise
propellers and the counterclockwise propellers should be installed correctly. To avoid injury ,please do not
touch or get close to the running motors or propeller when checking.
Please be sure that the flight weight is under 700g to avoid any danger.
Please avoid any interaction or interference between the radio and other wireless equipment.。
Please be sure the radio& battery and other related parts have enough power for flight.
Please switch on the radio firstly before power on the aircraft. (Please switch off the radio after powering on the
aircraft.)
For the high speed rotating propellers are dangerous and will destroy something, please keep at least 3 meters
distance away from the aircraft and other unsafe factors during the flight, such as obstacles, crowds and
high-voltage lines. Please be responsible for your flight.。
Please be sure that all the parts for aircraft should be put in the safe place where the children cannot touch it
Please call for emergency medical assistance immediately if any parts are swallowed by children.
The transmitter ( receiver) for Meteor 280 cannot be banded with other receiver ( transmitter).
Please be sure to correct the related parameters in the specified assistant software.
The built-in ESC of Meteor can only afford 3S(11.1V) power input ,please don’t use higher voltage battery.
Please use TOP RC original motors and 5/6 inch propellers. Other sizes of propellers are not suitable for this
aircraft.
Please be sure that the propellers and motors are installed correctly and firmly before every flight. Please check
if all the propellers are in good condition before each flight, if there is any aging or damaging problem, please
replace them before a flight.
Warning for using and charging the battery
1. Do not put the battery in the water. Please store the battery in the cool and dry place if the battery is not
used for a long time.
2. Do not use the battery with non-rechargeable batteries (such as dry battery) or different capability&
different model and different type of battery together.
3. Keep the battery out of reach of children. The emergency medical assistant is needed immediately if the
battery is swallowed by the children.
4. Do not store or use the battery near the heat source, such as fire or furnace.
5. Please use proper specified charger when charging.
6. Please check if the positive poles and negative poles are connected correctly.
7. Do not connect the battery to the wall socket or car cigarette plug directly.

8. Do not throw the battery into the fire or heat the battery.
9. Do not use the guided wire or other metal object, it may cause the short circuit for the positive pole and
negative poles of the battery.
10. Do not transport or store the batteries with necklace, hairpin or other metal object.
11. Do not strike or throw the battery, it will cause the impact of battery.
12. Do not solder the battery terminals directly.
13. Do not pierce the battery by nail or other sharp object. Do not hammer or pedal the battery.
14. Do not resolve the battery by any way.
15. Please do not expose batteries to extreme temperature, such as in direct sunlight or inside of vehicle on hot
days. Overheated batteries will burn (fire) to influence the performance of battery and short the battery using
life.
16. Do not use battery in strong electrostatic filed, or the electronic protection will be destroyed, which will
cause dangerous consequence.
17. Do not allow the electrolyte to get into eyes .Please wash affected areas immediately and call for
emergency medical help if they come into contact with electrolyte, or your eyes will be harmed.
18. Do not use the battery if it gives off an odor, generates heat, deformed, becomes discolored or appears
abnormal in any way. If such consequence happens during charging or using, please remove the battery from
aircraft or charger immediately and stop using.
19. If the battery terminals become dirty, please clean it by dry cloth before usage, otherwise the battery will be
bad contact, which will cause capability losing or no recharging.
20. Discarded battery may lead to a fire. Please discharge the battery and insulate the battery output terminal by
insulation tapes before battery disposal.
LIST PARTS IN BOX:
Airframe*1
Radio*1
Propeller
Screws and accessory Package
Battery
Balance charger
Adapter
Manual
Velcro strap for battery *2
808 Velcro strap *2
Velcro*2
2*140mm Velcro Straps *4
Decal*2
Required tools
1. inner hexagonal(1.5) screw driver
2. 4pcs AA battery
3. MINIUSB

SYSTEM SPECIFICATION
1、Aircraft Parameter
Main wing length:127mm
Dimension (Length*Width*Height): 228*236*74mm
Rotor distance: 280mm
Flight weight (Without battery):350g
Radio: FLYSKY-I4(With 6ch receiver)
Flight controller: SP Racing F3
Brushless motor: 1806-2300KV(CW/CWW)
Brushless ESC: 12A High speed brushless ESC(without BEC)
Li-Po battery: 11.1V 2200mAh 25C 3SLi-Po
Flight time:4-6 minutes
Operating temperature: -10℃~+40℃
2、Image transmitter parameter
Operating power: 600MW
Operating frequency: 5.645GHz~5.945GHz
Operating voltage: 6V-28V
Operating channel: 32CH
Channel selected type: Button + Nixie tube
Antenna Connector: SMA
3、Camera parameter
Version: Colored camera
Imaging devices: 1/4 SONY Super HAD CCD
System: NTSC:60Hz PAL:50Hz
Active pixel: N:510(H)*492(V)P:500(H)*582(V)
Image resolution: 700TVL
Video output: 1Vp-p75Ω
White balance: Automatic
Operating power input: 12V

AIRCRAFT&RADIO INSTRUCTION
1、CCW blushless
motor
2、5045R propeller
3、Arm
4、700 TVL camera
5、Frame
6、5045 Propeller
7、CW brushless
motor
8、SP Racing flight
controller
9、12A brushless
ESC
10、5V BEC circuit
board
11、2.4G receiver
12、EVA foot pad
13、808 camera
mount
14、Li-poly battery
15、5.8GHz Image
transmitter
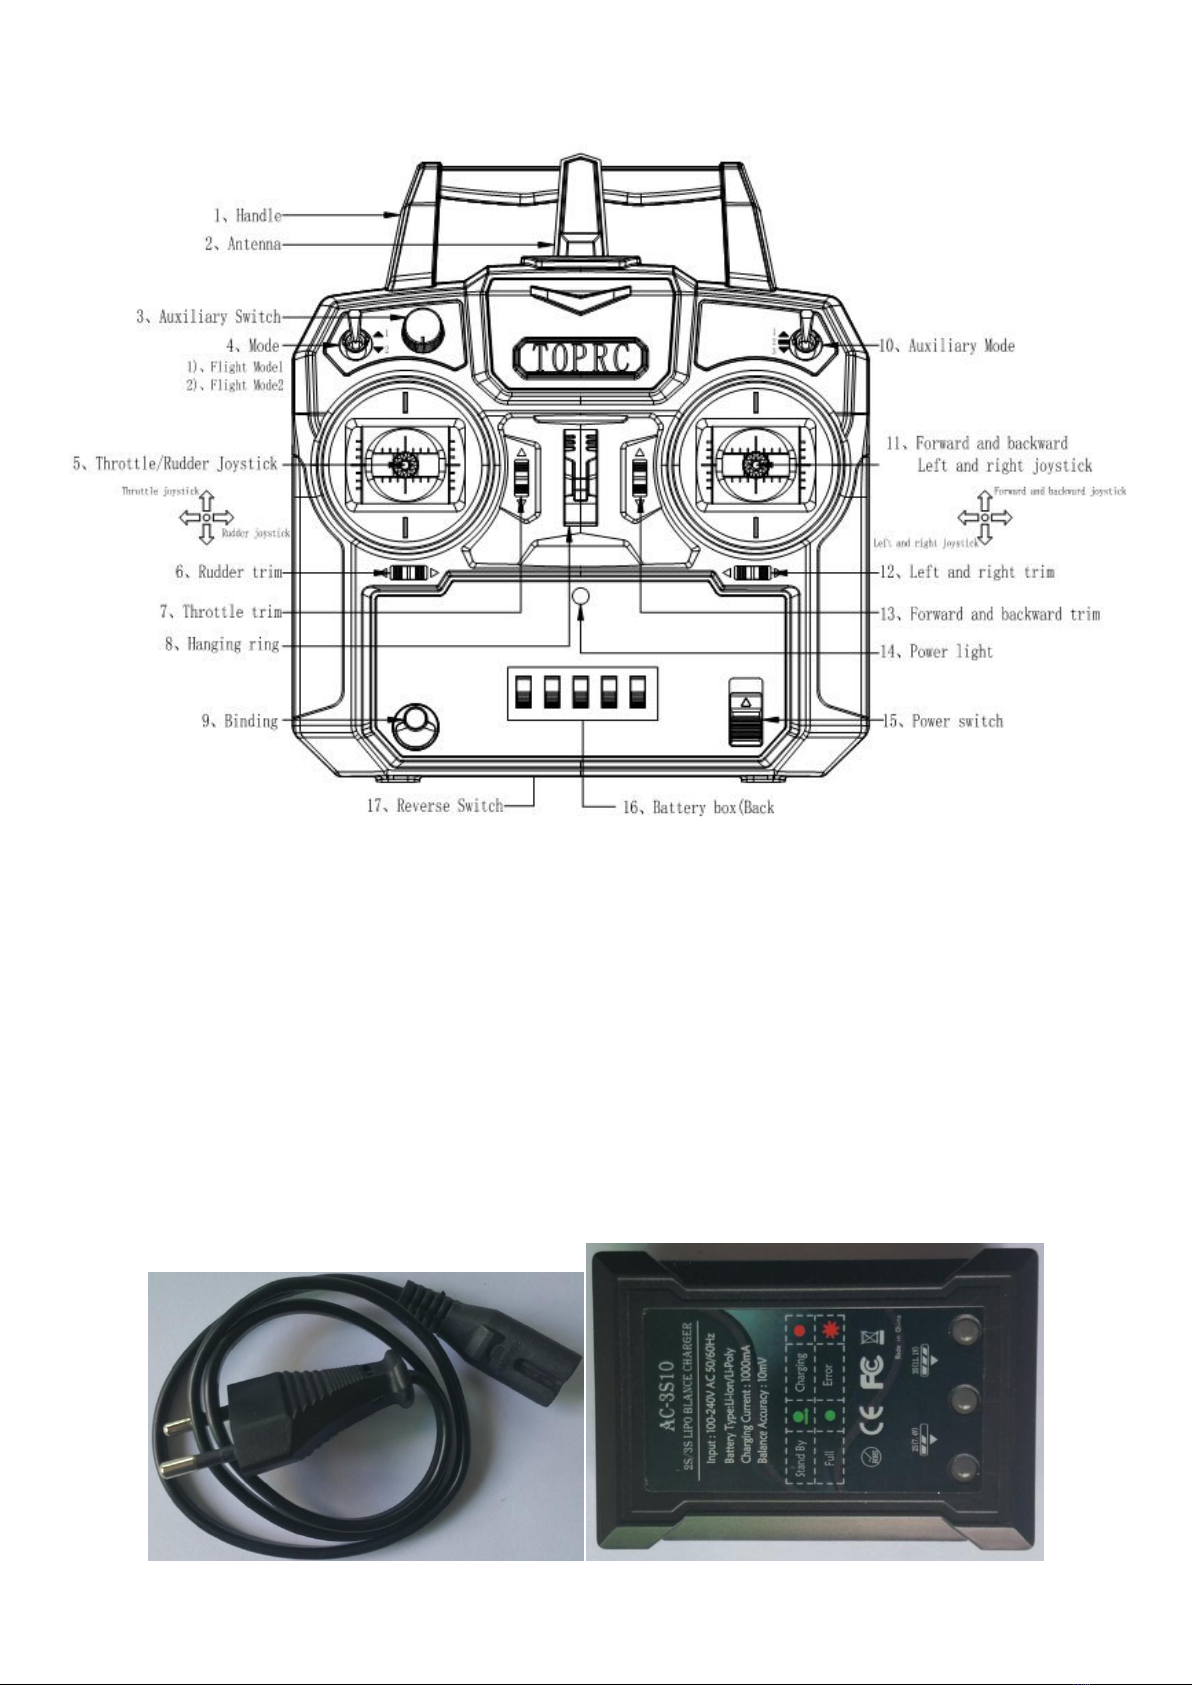
AC-3S10 balance charger instruction:
1、AC-3S10 balance mainly characters:
a)、AC-3S10 controls the whole charging process via microcomputer chip to charge in balance, and LED indicator light will
show the real-time state of charge.
b)、AC-3S10 balance charger connects with 100-240V voltage, and the input current is 1000mA.It is suitable for 7.4V/11.1V
Li-poly battery.
c)、It can automatically test the state of Li-poly battery. If voltage of one battery cell is too low, the battery cell will be charged
automatically and LED will show the battery is in the charging state (Red indicator light keeps on blinking).
In order to insure the voltage balance of each battery cell, you should make sure the voltage of one battery cell is 4.15V to
4.25V.The green indicator light keeps on blinking when battery is full charged.
2、AC-3S10 balance charger function introduction.

3、Warning for AC-3S10 balance changer:
1. AC-3S10 is for charging the lion battery or the Lipo battery.It only support the charging of only one pack which is
consisted of 2 or 3 cells. It cannot charge two or more lipo battery packs, otherwise the battery and the charger will be damaged.
2. While charging, the balance charger should be out at dry and ventilated place. And it should be (kept) away from heat
source & inflammable & explosive materials.
3. While charging, balance charger should be out of aircraft. In order to avoid accident, you should be kept an eyes on it
during charging.
4. Please don’t charge it immediately after the battery is used or when the surface temperature does not cool down. Otherwise
battery tends to get inflated easily or even leads to fire.
5. Please check if the positive pole and negative pole are connected correctly before you connect the battery and balance
charger.
6. When the battery is charged, please avoid any fall or external force. Otherwise it may cause the short circuit for the
positive pole and negative poles of the battery.
7. In order to make sure the safety in use, please use the original charger and battery on request. Please remember to change the
battery when it gets aging and bouffant after using for a long time.
8. After fully charged, the battery will discharge automatically if it is not removed from balance charger for a long time, and it
may cause power consumption. When the charging voltage is lower than nominal voltage, balance charger will recharge the
battery until it is fully charged. The battery lifetime will be shortened if it is repeatedly charged and discharged.
Flight instruction
1. Power on the radio
1)Open the battery hatch cover of radio.
2)Install 4pcs AA batteries into the radio
3)Close the battery hatch cover of radio.
Please use correct type of battery in the flight. In order to avoid reducing the life of battery, please don’t mix up the
new battery and old battery.
Please take off the battery from the radio if you don’t use it for a long time.
Please pay attention to the electric quantity in your flight. Please change the battery in time to avoid malfunction
caused by low voltage during flight.
7.4V battery charge interface
11.1V battery charge interface
Status indicator

2. Aircraft battery charging
Please use 3S Li-Poly battery with full charged.
The capacity of recommended battery in package is 2200mAh.In order to get a better flight, please make sure the battery
capacity is between 1500mAh and 2200mAh.
Please note the safety weight for taking-off is no more than 700g.
The ESC of Meteor 280 is only support 3S (11.1V) battery, please don’t use any battery with higher voltage
3. Please install propellers after you finish all on-line testing which is needed.
1) Please install the propellers with the corresponding colored hub to the aircraft. Please lock them per the marked
locking direction on propeller. The red arrow in below picture is the head direction.
2) To avoid finger cut by the thin blade, please take care when you install. And please keep away from the revolving
blade.
4. Turn on the radio.
1)Make sure the throttle rod is at the lowest point before starting up.
2) Please insure all switch is at the position of “1”(Otherwise it will cause the alarm and the alarm will be released
if return the switch back
3) Please check the power of the radio to ensure that the power is enough for the flight.
5. Power on the airframe
1)Keep airframe horizontal.
2)Install the battery to airframe.

3)Connect the battery connector with the airframe power connector.The ESC self-checking will chime at the same time.
4) Please do not move the joy stickers or touch the airframe while the airframe is self-checking and initializing (the blue
indicator light of flight controller blink fast).
5)The self-checking is finished when the blue indicator light of flight controller stop blinking
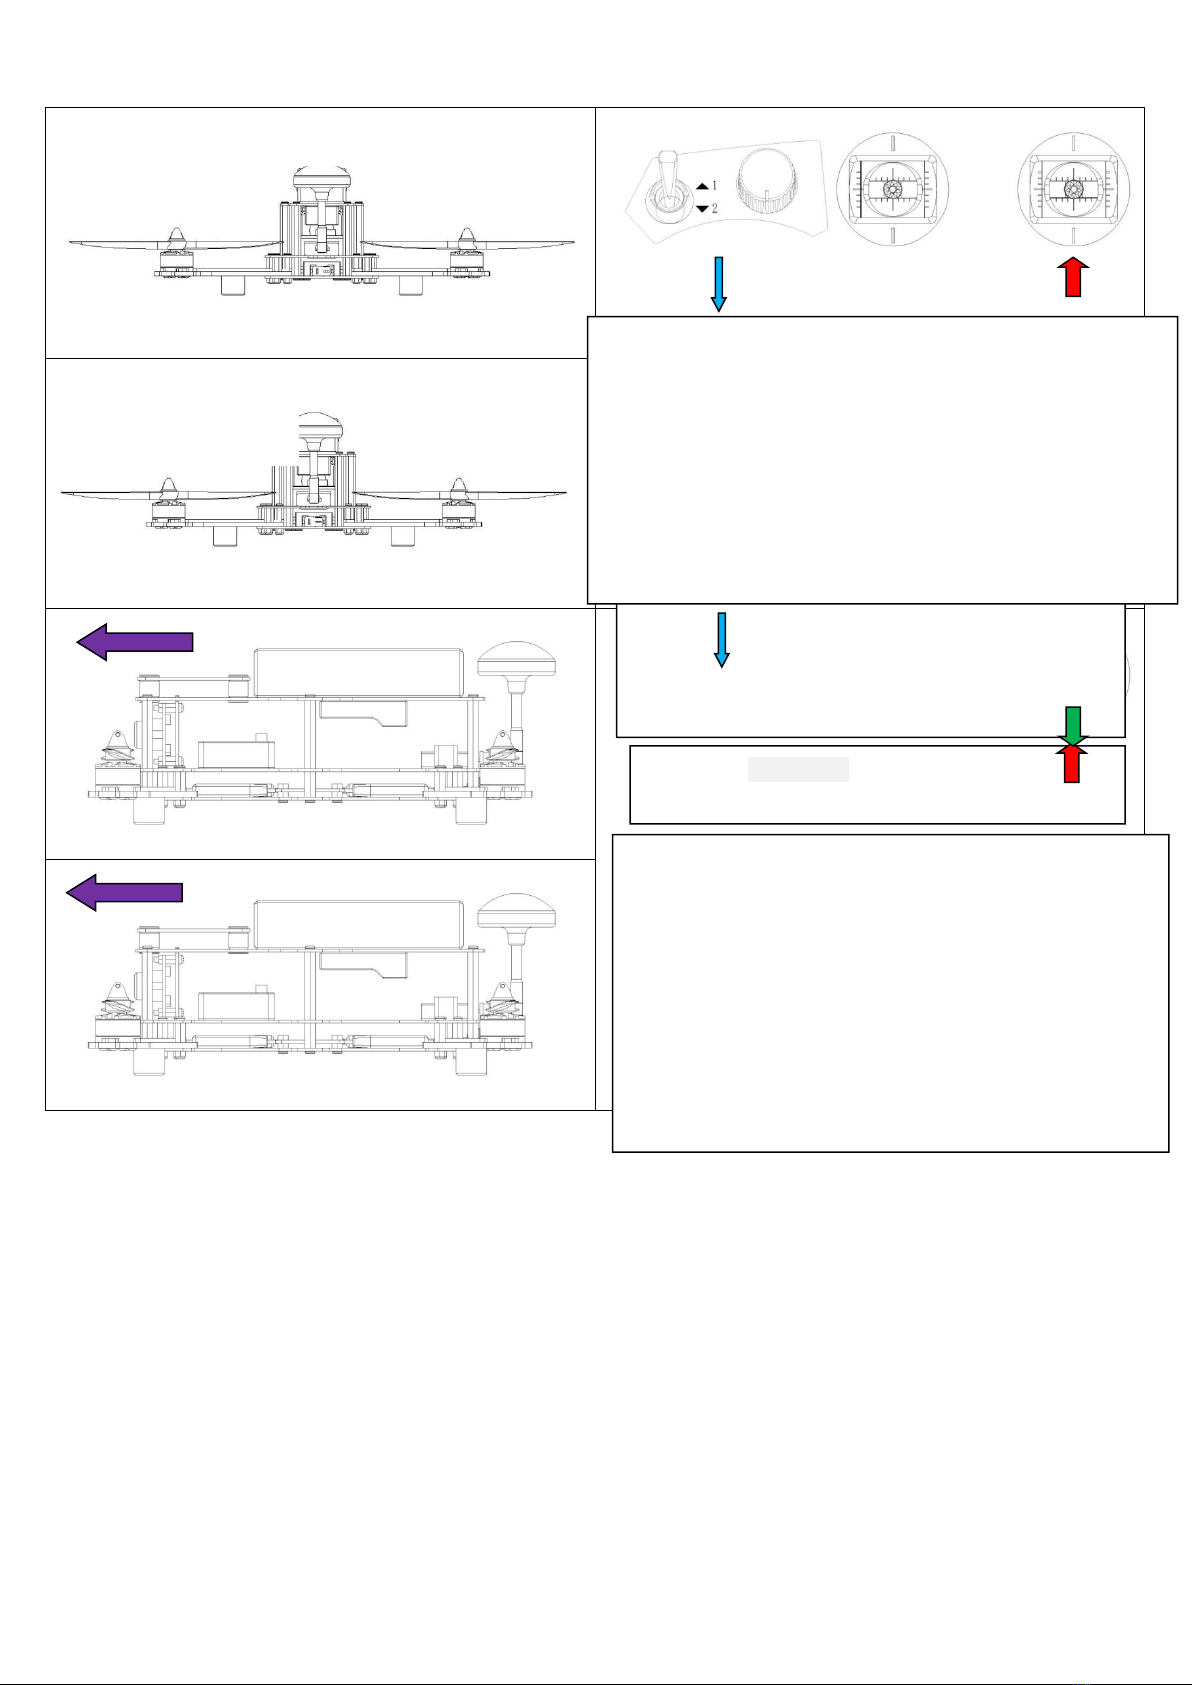
6. Lock and unlock the radio.
。
Please note: The default lock setting is Roll Left。The automatic locking time is 10 seconds. It should be reset every time
when you recalibrate radio.
After the setting of unlock is finished, please unlock the radio as following step.
After unlock the motors, please move it as following step.

7. Flight operation
Directional Control ( (Head direction)
Radio(Mode 2)
Up/Down
Forward/Back
Left/Right
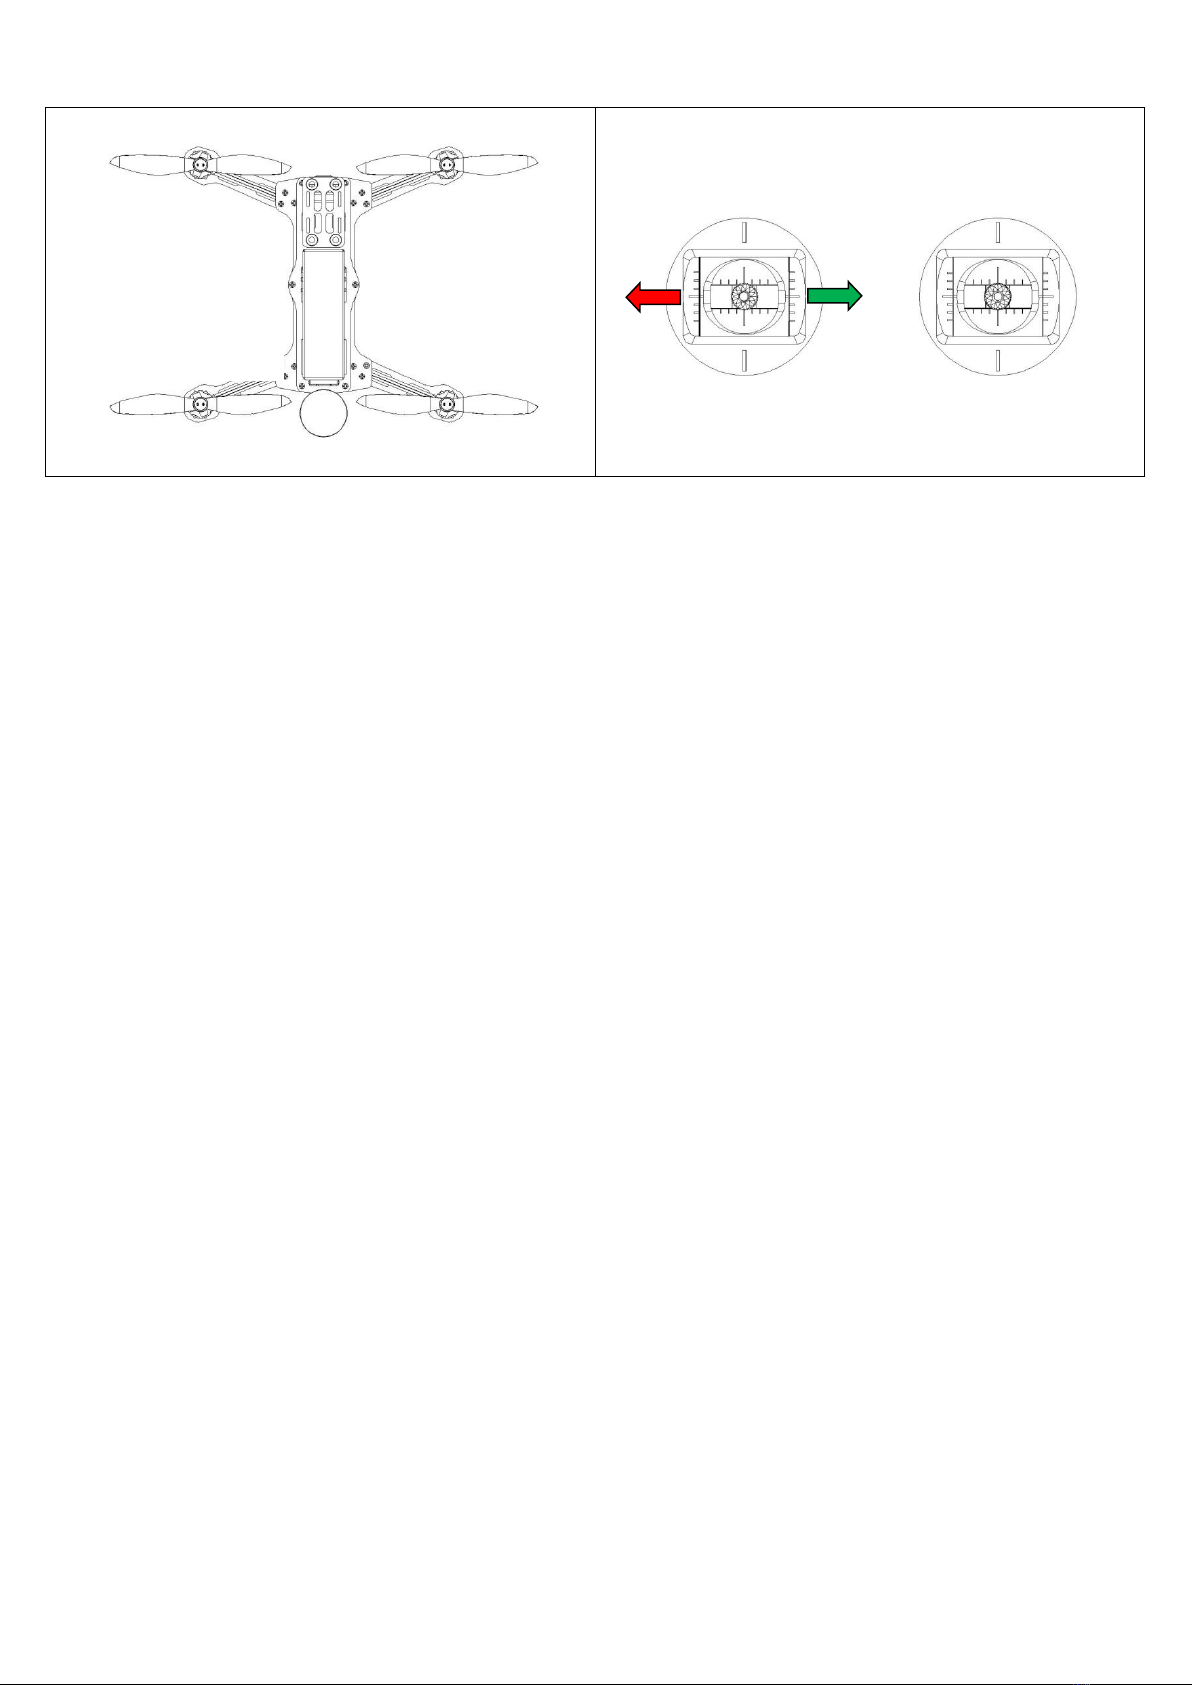
Rotation Direction
8. Flight practice.
Warning:
1. Meteor 280 is more suitable for the experienced pilot
2. During the flight, please keep aircraft within 30 meters of sight range or 300 meters of video receive range(the actual range
depends on the weather condition).
3. During flight, please keep away from the dangerous obstacles, such as crowd, animal, highline and so on.
9. Finish the flight
1、Manual landing
2、Please turn off the aircraft firstly and then switch off the radio .
Tail of aircraft towards to the pilot
Tail of aircraft towards to
the pilot
“1”position: Regular Mode
”2”position:3D mode
注意事项:
1、 需选择一个空地较大,地面柔软的飞行。
2、3D 模式适合有一定飞行经验的遥控操作员。
3、 在 3D 动作过程中需配合油门摇杆进行练习,飞
行器下降请适当的升高油门,飞行器上升请适当
的降低油门。
4、 做 3D 模式前,电池电量尽量保持满电量姿态,
这样动作过程中不会由于供电不足造成的损失。
Caution:
1).Please chooses big vacancy area with softer ground for flight.
2).3D mode is suitable for the pilot, who has gained enough experience.
3).In 3D flight, please practice the flight with the throttle joy sticker. Increasing the
throttle when the aircraft goes down and reducing the throttle when the aircraft goes
up.
4).Please ensure that there is full voltage in your battery when you are going to switch
to 3D mode. Then any loss or damage, which may caused by lower power supply, can
be avoid.
“1”position: Regular Mode
”2”position:3D mode
Caution:
1).Please chooses big vacancy area with softer ground for flight.
2).3D mode is suitable for the pilot, who has gained enough experience.
3).In 3D flight, please practice the flight with the throttle joy sticker. Increasing
the throttle when the aircraft goes down and reducing the throttle when the
aircraft goes up.
4).Please ensure that there is full voltage in your battery when you are going to
switch to 3D mode. Then any loss or damage, which may caused by lower power
supply, can be avoid.

OPENPILOT GCS INSTRUCTION
Please note: Aircraft and radio is set as factory data before leaving factory, you can change it to regular mode and 3D mode.
Please follow the steps per instruction when you change the mode. Meanwhile, please make sure that propeller is disassemble
to avoid any accident.
CC3D website
http://www.openpilot.org/
Firmware
http://wiki.openpilot.org/display/Doc/CopterControl+Hardware+Man
ual
GCS
http://wiki.openpilot.org/display/Doc/Installing+the+Ground+Control
+Station
Instruction of Flight Controller
http://wiki.openpilot.org/pages/viewpage.action?pageId=20250682
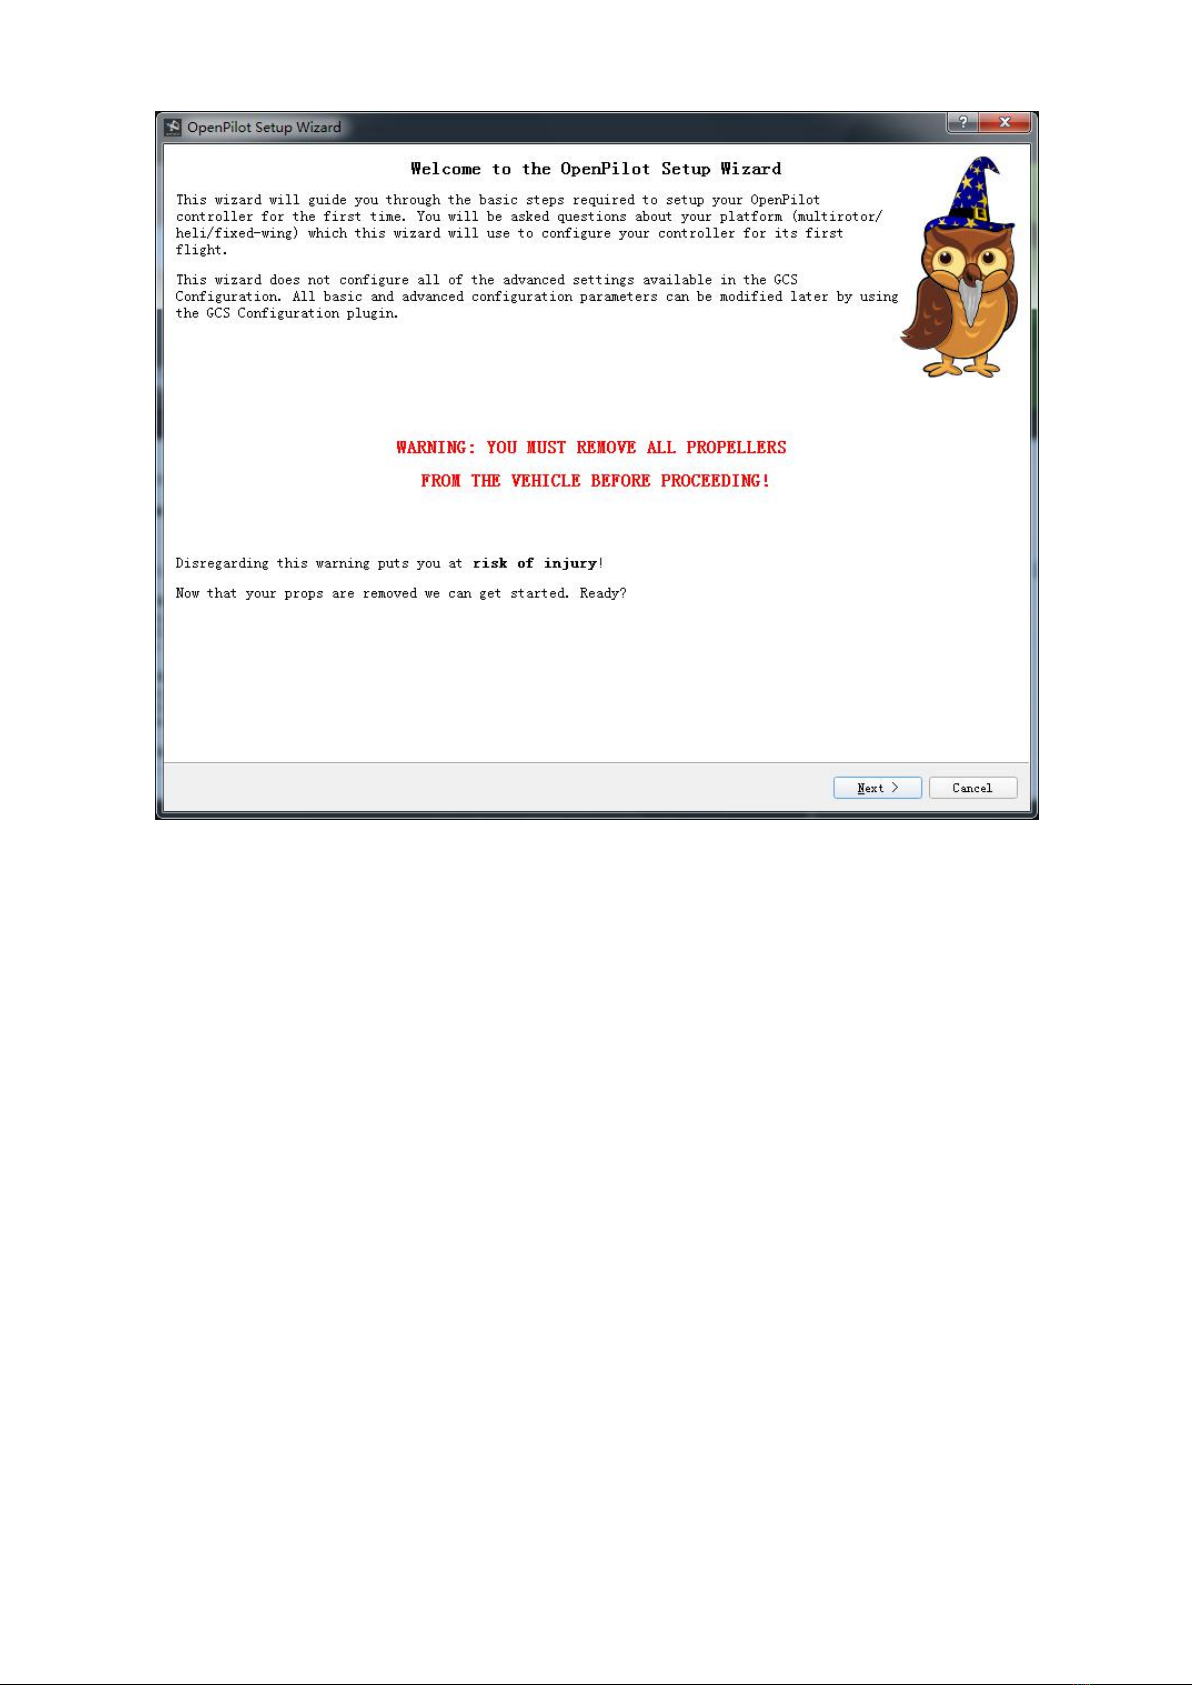
The Vehicle Setup Wizard allows users to step through and setup all the initial settings including the TX. When the GCS is
started, the Vehicle Setup Wizard can be accessed by clicking on the "green" Vehicle Setup Wizard button.
Ensure board is connected through USB port before starting Wizard.
Depending on the flight controller board, some screens may or may not be displayed as you progress through the wizard.

Vehicle Setup Wizard - Step by step
1 - Vehicle Setup Wizard welcome page
WARNING: YOU MUST REMOVE ALL PROPELLERS FROM THE VEHICLE BEFORE PROCEEDING
2 -It will allow you to upgrade to the latest Firmware that matches the GCS.

3 - Board Identification page.

4 - Allows selection of your RX (receiver) type.
Reboot
Selecting any input signal configuration other than PWM will initiate a necessary automated reboot.
Table of contents


