Flying Neurons NeuroTrack V1.1 User manual


User’s Guide NeuroTrack V1.1
FLNO_007 Installing NeuroTrack Page 2 of 43
Document Status
Document
FLNO_007
Date
23/12/2022
Author
Flying Neurons
Status
Public☒
Internal☐
NDA☐
Draft☐
Amendments
Version
Date
Description
1.0
23/12/2022
First Edition NeuroTrack V1.0
2.0
14/06/2023
First Edition NeuroTrack V1.1
Contents
This document details the installation, configuration and use of the NeuroTrack application
for tracking .

User’s Guide NeuroTrack V1.1
FLNO_007 Installing NeuroTrack Page 3 of 43
Contents
1Installing NeuroTrack...............................................................................................................................................5
2First start.........................................................................................................................................................................5
3The main screen..........................................................................................................................................................6
3.1 The top banner: The main information.................................................................................................7
3.2 The bottom banner: the system status.................................................................................................8
3.3 The menu and dialogs................................................................................................................................10
3.4 The map.............................................................................................................................................................11
3.4.1 Content of the card:...........................................................................................................................11
3.4.2 Map Movements: ................................................................................................................................14
3.4.3 Tracking ” button :..............................................................................................................................15
4Course of a session................................................................................................................................................16
5Tracking.......................................................................................................................................................................18
5.1 Start tracking...................................................................................................................................................18
5.1.1 The Surveillance Zone:......................................................................................................................18
5.1.2 Start tracking :.......................................................................................................................................18
5.2 Tracking information...................................................................................................................................19
6Neurone Pairing.......................................................................................................................................................21
7My Neurone...............................................................................................................................................................24
7.1 Neurone Settings..........................................................................................................................................24
7.1.1 Start/Stop controlled by the charging......................................................................................26
7.1.2 Options.....................................................................................................................................................26
7.1.3 Button action.........................................................................................................................................26
7.1.4 Radio commands.................................................................................................................................27
7.1.5 NeuroEthernet......................................................................................................................................27
7.1.6 My Neurone...........................................................................................................................................28
7.2 Advanced Features.......................................................................................................................................28
7.2.1 Compass Calibration and Orientation Setup........................................................................28
7.2.2 Resetting the Neurone configuration.......................................................................................28
7.2.3 Firmware update..................................................................................................................................29
8My MiniNeurone.....................................................................................................................................................30
8.1 List of my MiniNeurones...........................................................................................................................30
8.2 Configuring the MiniNeurone................................................................................................................31

User’s Guide NeuroTrack V1.1
FLNO_007 Installing NeuroTrack Page 4 of 43
8.2.1 Aircraft type............................................................................................................................................31
8.2.2 Altimeter..................................................................................................................................................31
8.2.3 Commands reception........................................................................................................................32
8.2.4 Flash...........................................................................................................................................................32
8.2.5 End of flight............................................................................................................................................32
8.3 Altimeter............................................................................................................................................................32
8.3.1 Automatic flight log recording.....................................................................................................32
8.3.2 Continuous recording.......................................................................................................................33
8.3.3 Viewing Altitude Records................................................................................................................34
8.4 Advanced Features.......................................................................................................................................37
8.4.1 Resetting the MiniNeurone............................................................................................................37
8.4.2 MiniNeurone firmware update.....................................................................................................37
8.4.3 Error log...................................................................................................................................................37
9Account definition..................................................................................................................................................38
10 App Configuration.............................................................................................................................................40
10.1 Watch area:......................................................................................................................................................40
10.2 Display................................................................................................................................................................40
10.3 Units and Language.....................................................................................................................................42
10.4 Audio...................................................................................................................................................................42
10.5 Audio alerts......................................................................................................................................................42
11 Demo & Help.......................................................................................................................................................43

User’s Guide NeuroTrack V1.1
FLNO_007 Installing NeuroTrack Page 5 of 43
1Installing NeuroTrack
NeuroTrack is available for iOS ( Ipad and iPhone) via the AppStoreand for Android (Version
> 9.0) on Play Store.
2First start
See the quick start guide " QuickStart NeuroTrack ” available in our Help Center .

User’s Guide NeuroTrack V1.1
FLNO_007 The main screen Page 6 of 43
3The main screen
Top banner
Bottom banner
Access to menu
Map handling
« Tracking » button
Boussole

User’s Guide NeuroTrack V1.1
FLNO_007 The main screen Page 7 of 43
3.1 The top banner: The main information
This banner summarizes the main information for the user. The order of priority is that of the
presentation of the various information below, from least important to highest priority:
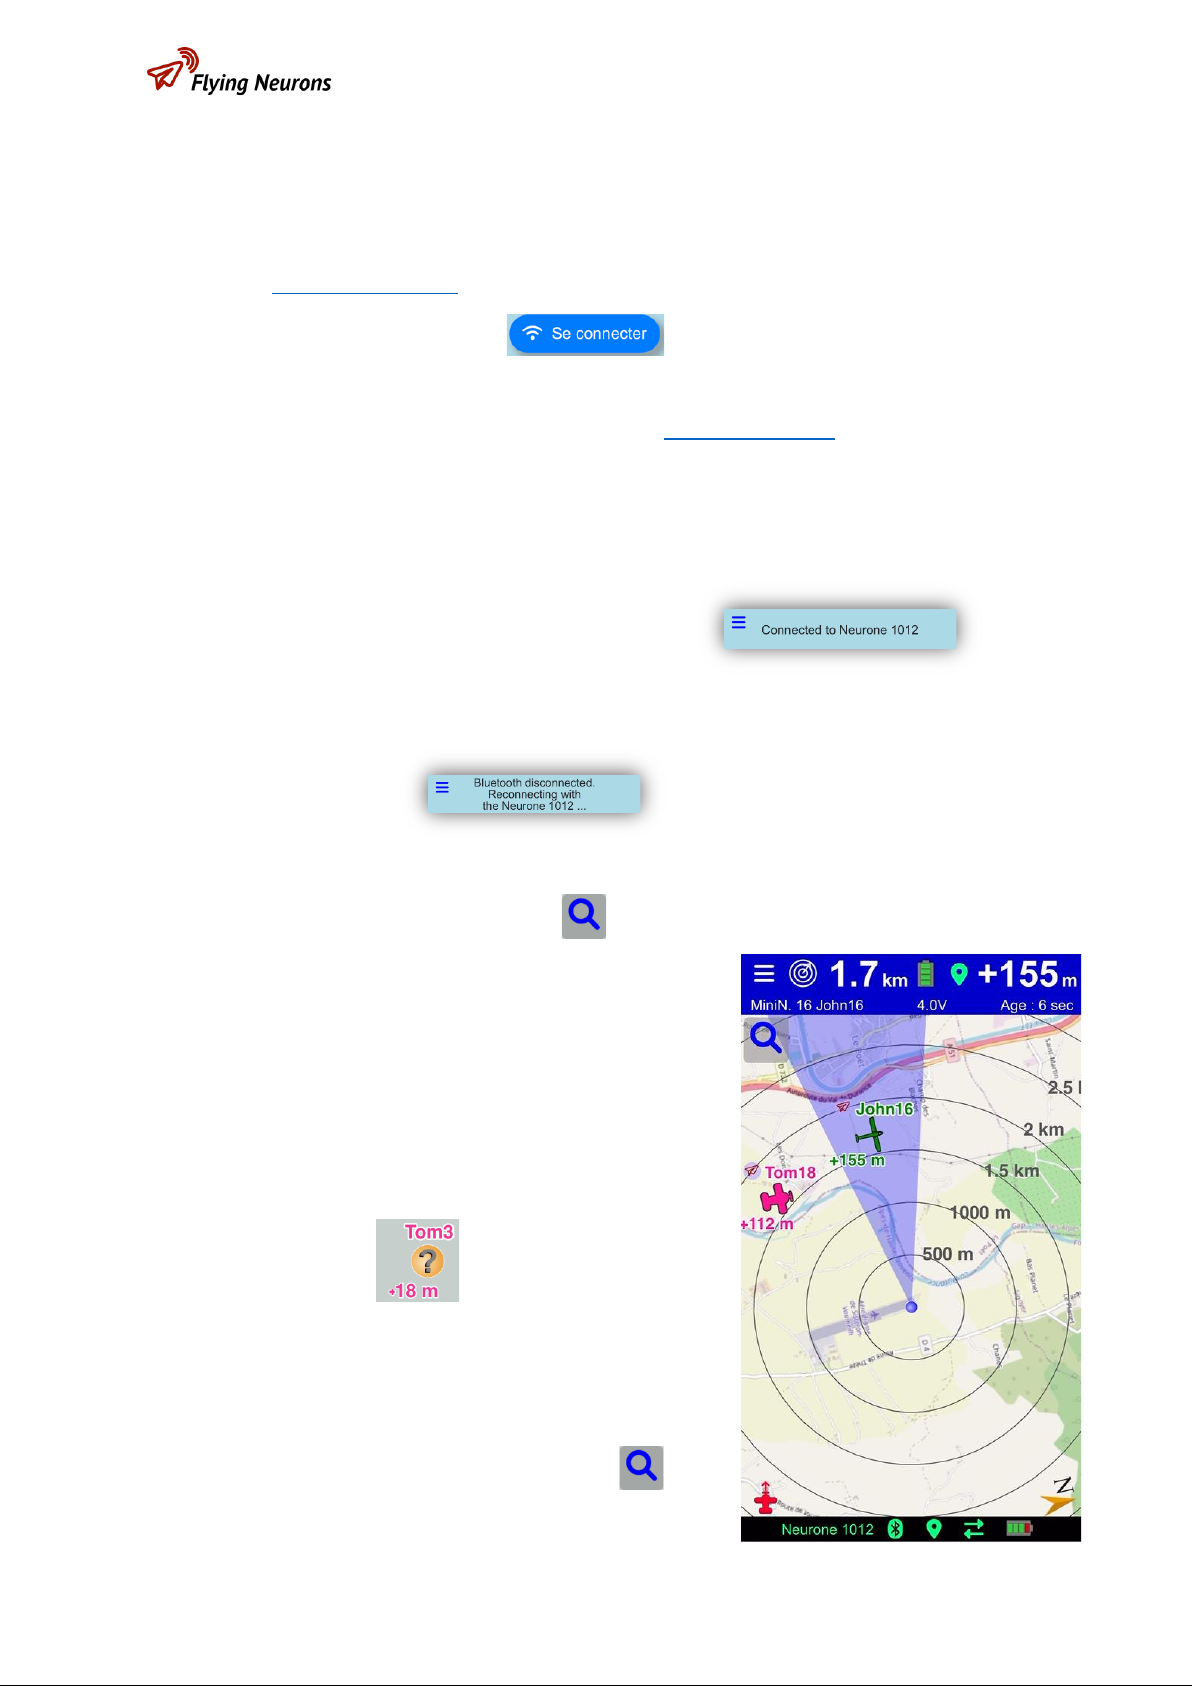
-Waiting for connection to a Neurone:
oIn blue background with flashing " Connect " button.
oThe connection to a Neurone as a mobile station receiving the positions of the
aircraft is a prerequisite for any tracking .
-Neurone connected, no failure, no tracking in progress:
oOn a sky blue background, the information of the connected Neurone number
is displayed : the surrounding aircraft are displayedon the map but no tracking
is in progress.
-Connection failure with the Neurone:
oOn a sky blue background, a message indicates the loss of connection and the
reconnection attempt in progress. In addition, a voice message and a red error
popup is displayed.

User’s Guide NeuroTrack V1.1
FLNO_007 The main screen Page 8 of 43
-Tracking in progress:
oDark blue background: tracking is in progress. The information concerning the
aircraft being tracked is displayed in the banner. See the chapter “ Tracking " for
more details.
3.2 The bottom banner: the system status
The bottom band displays the status of the main elements of the receiver system (Neurone
and NeuroTrack ):
oNumber of Neurones connected : if necessary, for your information the
number of Neurones connected is displayed.
oBluetooth pairing with a Neurone :
▪Grey: no Neurone connected, but no connection request in progress:
normal waiting situation.
▪Green: Neurone connected.
▪Orange: The Neurone is not found or the Bluetooth connection has
failed. Attempt to reconnect the Neurone in progress.
▪Red: Bluetooth error. The connection to the Neurone cannot be
established. Check app permissions for using Bluetooth.
oGPS position : this is the Neurone's GPS position. The Neurone on the outside
can take on the order of a minute to position itself when it is started.
▪Grey: no Neurone connected,the GPS of the Neurone is not retrieved:
normal waiting situation.
▪Red: the connected Neurone has no GPS position
▪Green: the Neurone has a precise GPS position.

User’s Guide NeuroTrack V1.1
FLNO_007 The main screen Page 9 of 43
oTelephone network connection : the exchange arrow indicates NeuroTrack's
connection to the GSM network and therefore to our servers.
▪Green: the connection with our server is established. You retrieve
the positions of the aircraft via the OGN network (FLARM, OGN trackers,
SafeSky or PilotAware ) and, during the flight, your position as well as
that of the Neurones/ MiniNeurones received is exchanged in real time.
▪Red: there is no connection with the server (no telephone network
or WIFI connection). You do not receive any positions from the OGN
network or exchange yours in real time on NeuroSky . Also note that the
basemap is not updated if the connection is lost
Note: The lack of a network in no way prevents NeuroTrack from working with the Neurone
(Neurone connection, detection, tracking ).
NeuroTrack constantly seeks to connect to the network and recovers it without action on your
part as soon as possible. The temporary loss is usually due to a "white" area of the GSM network.
oBattery : This is the Neurone's charge level. Lightning flash
indicates power on.

User’s Guide NeuroTrack V1.1
FLNO_007 The main screen Page 10 of 43
3.3 The menu and dialogs
oAccess to the menu is via the button at the top left of the screen.
oThe different dialogs accessible in this menu are described in the following
chapters of this manual. Use the top left icon to go back.

User’s Guide NeuroTrack V1.1
FLNO_007 The main screen Page 11 of 43
3.4 The map
The map allows you to view your position and that of the aircraft close to you, within your
surveillance zone (see the “ App configuration ” chapter ).
3.4.1 Content of the card:
The content of the card depends on your configuration choices.
•Your Neurone as a “mobile station”:
oWhen your Neurone has a GPS position, it is displayed with a blue ball inthe center
of the circles (radar style centered on you). Otherwise a "question mark" marker
symbolizes the GPS position of the smartphone.
•Distance circles:
oTheyare centered on the connected Neurone (or the smartphone if the Neurone has
no GPS position) and adapt to the zoom level. Their unit is defined in the " App
configuration ".
•Map orientation:
oThe direction of North is displayed at the bottom right of the map.
•Basemap:
oSeveral possibilities are available in “ App configuration ”.
▪Map: a plan is displayed
▪Satellite: a satellite view is displayed

User’s Guide NeuroTrack V1.1
FLNO_007 The main screen Page 12 of 43
▪Light: A light background is displayed, allowing better visibility in bright
light.
▪Dark: A dark background is displayed, allowing better visibility in high/low
light.
•Other aircraft:
othe display of any aircraft depends on your configuration (see
the “ App Configuration” chapter ).
▪The icon corresponds to the type of aircraft, for example:
▪The color is random (fixed by the identifier of the aircraft) in order
to easily differentiate the aircraft.
▪a label is written above, if not deactivated in the configuration (see the
chapter " App configuration" ). This label contains:
▪An icon describing the source of the position:
▪: MiniNeurone or Neurone received directly by your
Neurone.
▪: MiniNeurone or Neurone, ADSB, FLARM,
OGN tracker, SafeSky and PilotAware received via the
telephone network.
▪Aircraft identifier:
▪Aircraft name or registration if
provided by the user. Otherwise, its
Neurone or MiniNeurone number, or
even its ICAO number (preceded by h) or its address
(FLARM, SafeSky ).
▪The altitude of the aircraft or its altitude relative to the position of the
connected Neurone (positive if it is above you). The unit (meter or foot) is
defined in the " App configuration ".
▪If requested in configuration, the direction of movement of the aircraft is
indicated by an arrow.

User’s Guide NeuroTrack V1.1
FLNO_007 The main screen Page 13 of 43
▪A track representing the last minute of aircraft positions (in aircraft color)
is also optionally displayed.
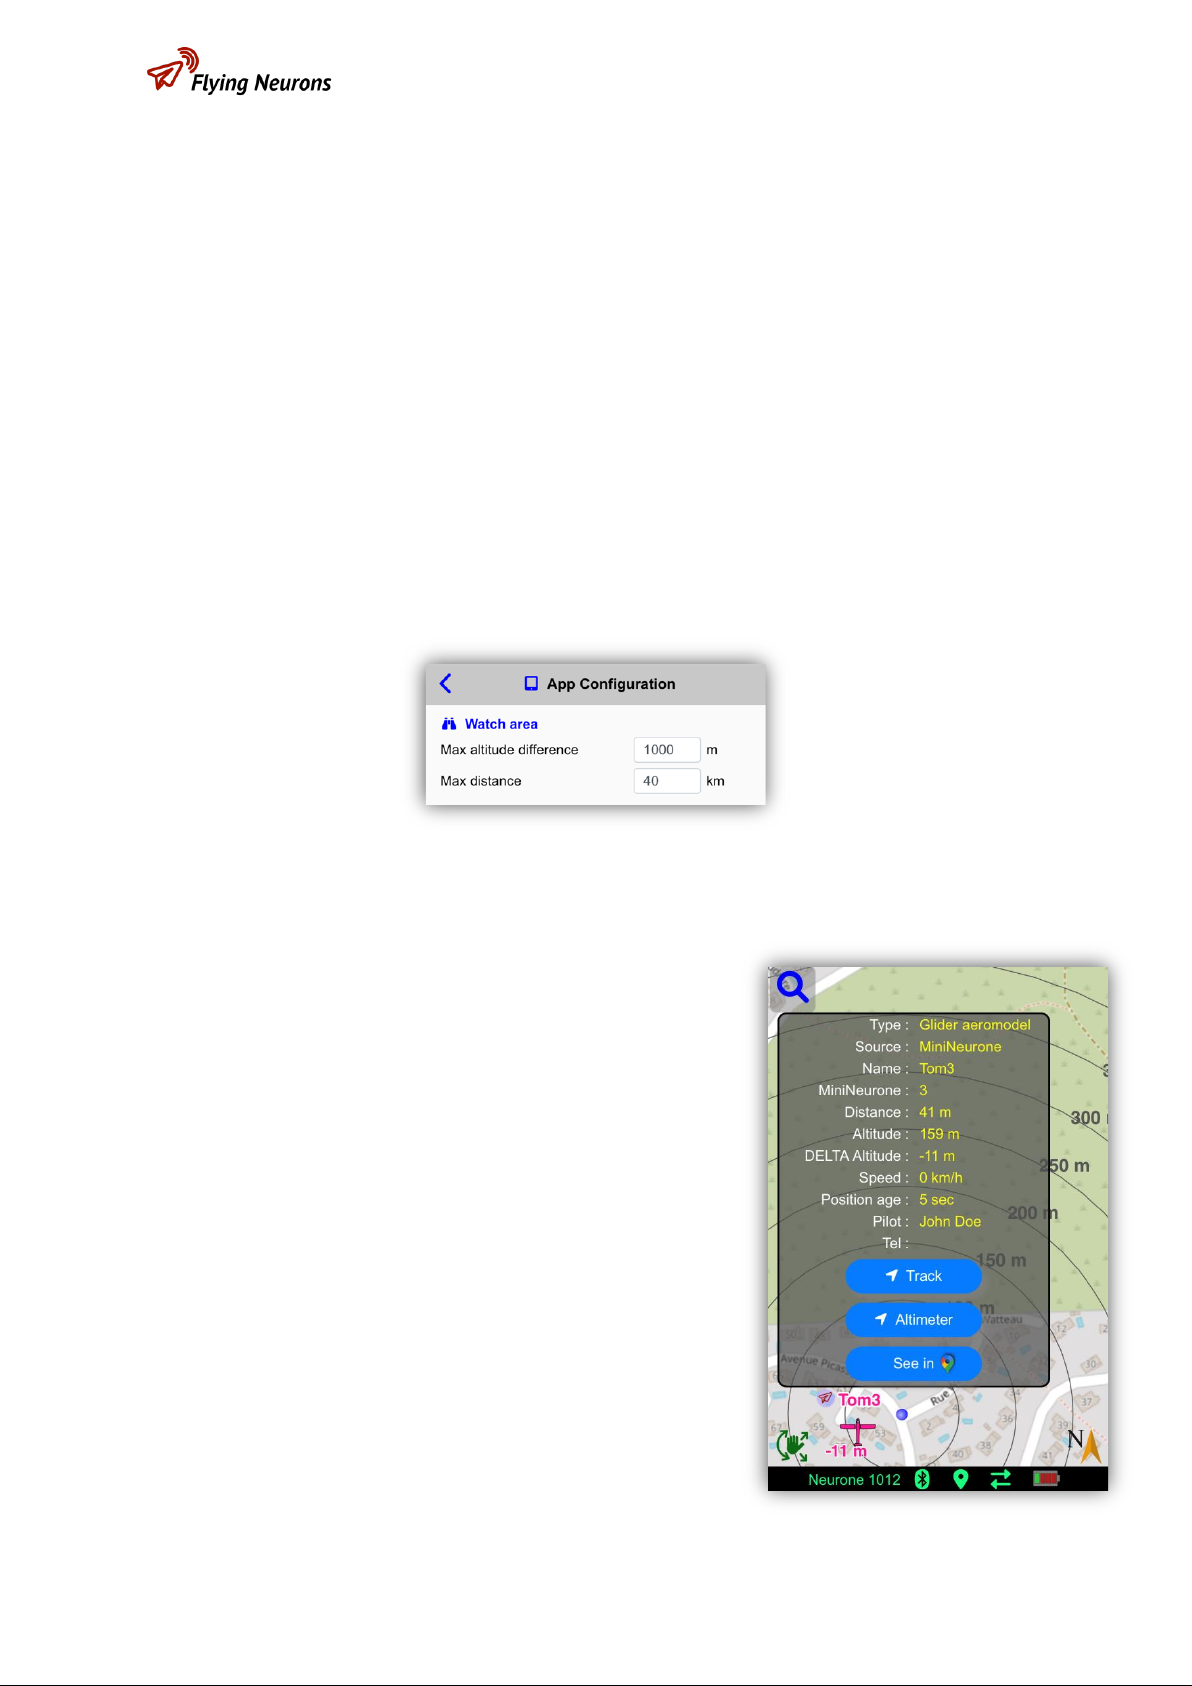
•Aircraft details:
oBy clicking on an aircraft, detailed
information is displayed. Click on the
information panel itself to make it
disappear.
This panel also allows direct access to very important features for the selected
aircraft via the 2 or 3 buttons at the bottom of the window:
▪“Track” : NeuroTrack switches directly to Tracking mode for this
aircraft.

User’s Guide NeuroTrack V1.1
FLNO_007 The main screen Page 14 of 43
▪“ Altimeter” : this button is displayed only if it is a MiniNeurone : if it
belongs to the list of your MiniNeurones , you can then directly see its
last altimeter curve. See the “ Altimeter ” chapter for more information.
▪"See in " : the GoogleMaps application is displayed with the position
of the aircraft as a landmark, allowing you to choose it as a destination
in the navigation application.
3.4.2 Map Movements:
Depending on the choice with the "Map movement" button, the interactive and automatic
movements of the map are different:
•Translation and Rotation:
oAuto mode:
▪If a Neurone is connected and has a GPS position, the map is centered
on the position of the Neurone. Otherwise the map is centered on the
position of the Smartphone.
▪The map is oriented in the direction of the smartphone.
o“North” mode:
▪As for the auto mode , the map is centered on the position of the
Neurone connected (or of the smartphone if no Neurone connected or
if it has no GPS position).
▪The orientation of the map is fixed on the other hand and the North is
at the top, whatever the orientation or the movement of the
Smartphone.
oManual mode ":
▪The map can be moved by dragging a finger or rotated by rotating 2
fingers on the map.
▪The map is by default oriented to the North when switching to manual
mode.
▪It is possible to put the map back with North at the top by clicking on
the "compass" at the bottom right of the screen.
•Zoom :
oAn automatic zoom mode exists (see the chapter " App configuration” ); it
adapts the zoom of the map according to the aircraft being tracked (to make it
clearly visible) or a default distance in the absence of tracking . It is only active
in “auto” or “north” mode.
oIn anycase, it is possible to zoom by pinching the map with 2fingers. If auto zoom
is on, it will take over after a few seconds.

User’s Guide NeuroTrack V1.1
FLNO_007 The main screen Page 15 of 43
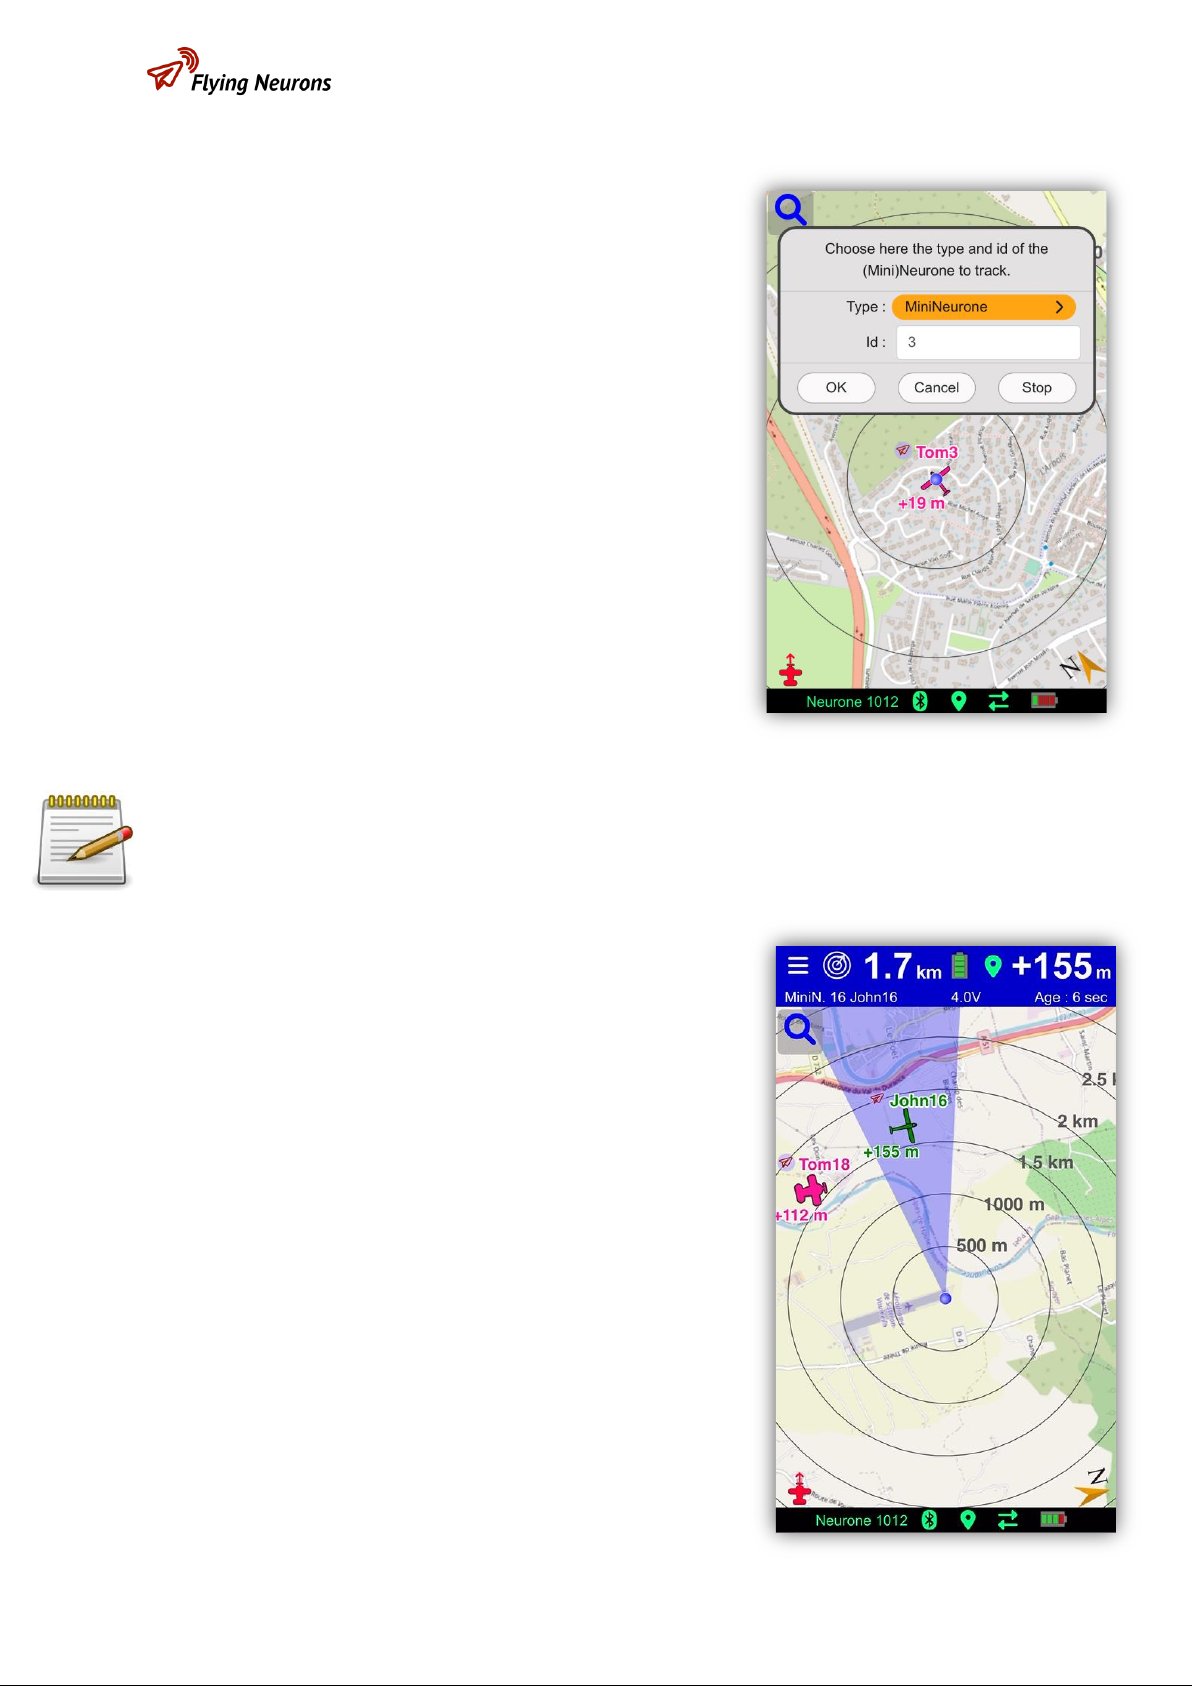
3.4.3 Tracking ” button :
The button is used to start or stop tracking a Neurone or MiniNeurone : by entering its
number in the dialog displayed and clicking on " OK" , tracking starts. By pressing " Stop ", the
tracking in progress is stopped.
As seen previously, it is possible to launch the tracking mode of an aircraft by clicking
on this aircraft and on the “Track” button displayed in the information window.
User’s Guide NeuroTrack V1.1
FLNO_007 Course of a session Page 16 of 43
4Course of a session
Configure the displayand sound announcements to your liking before starting the session (see
the chapter “App configuration”).
Start a session by pressing the button
It immediately tries pairing to the last Neurone used as station. In the case of a first use, you
are asked to choose the Neurone (see the chapter “ Neurone Pairing ”).
A voice announces the start of the connection: if no voice is heard, check the volume of your
phone, the connection to your headset or change your voice in the " App configuration ".
Once the Neurone is connected, if the operation is correct, the number of the connected
Neurone is displayed and NeuroTrack remains silent.
If a connection fault is detected with the Neurone (loss of Bluetooth connection with
NeuroTrack), an audible message informs you of the problem and the top banner also display
this information. Neurotrack tries to reconnect to the Neurone.
You can start tracking an aircraft visible on the map by clicking on it and then on the “ Track ”
button or by using the “ Tracking ” button .
Note that if during the lastsession,an aircraft wastracked,
NeuroTrack will automatically track this aircraft again.
The Neurone keeps track of the last position received and
–even if it is old –it will be displayed on the map until the
aircraft provides a new position. Check the age of the
position in the banner.
In case of not precise position with GPS
You can finish tracking an aircraft at any time or change
the aircraft to track with the " Tracking " button

User’s Guide NeuroTrack V1.1
FLNO_007 Course of a session Page 17 of 43
You can put the application in the background if you wish: it will continue to operate if you are
tracking and to warn you if necessary by an audible message.
To end a session and quit the Neurone, press the “ Disconnect ” button in the menu.
Do not log out of your account at the end of the session: simply close the application (it goes
into background) or stop it via your phone's system. Your account will be kept and will not be
requested the next time you use NeuroTrack . If you disconnect from your account (via the “
My account ” menu) your login (with password) will be requested again and an internet
connection may be required to reconnect.
User’s Guide NeuroTrack V1.1
FLNO_007 Tracking Page 18 of 43
5Tracking
NeuroTrack allows you to follow the evolutions of an aircraft around you equipped with a
Neurone or MiniNeurone . It gives you the means to recover a model aircraft or drone.
5.1 Start tracking
5.1.1 The Surveillance Zone:
In order not to pollute the display and to focus on interesting aircraft around you, you need to
define the surveillance area around you on which aircraft are located. This zone corresponds
to a horizontal range (by default 30 km) and a vertical range (by default -1000m to +1000m in
relation to you). It is defined in the “ App configuration ”.
5.1.2 Start tracking :
To track a Neurone or MiniNeurone , you must choose
this one.
Two methods are available to you:
-Method 1 : Directly in the map : if the Neuroneor
MiniNeurone is visible on the map, click on the
symbol. A window with information on this aircraft
or model aircraft is displayed on the screen and you
can then track it by clicking on the “ Track ” button.
User’s Guide NeuroTrack V1.1
FLNO_007 Tracking Page 19 of 43
-Method 2 : With the magnifying glass
(“Tracking” button) : click on the magnifying
glass. A window will allow you to enter the number
of the MiniNeurone or Neurone to follow.
If the Neurone has not acquired a GPS position (or has a connection or battery level
problem), no tracking results are displayed.
5.2 Tracking information
When tracking is activated, if the position of the Neurone
or MiniNeurone is known, it is displayed and a blue cone
shows you the direction of the aircraft.
Note that the last position received (even old or obtained
during a previous session) is used.
User’s Guide NeuroTrack V1.1
FLNO_007 Tracking Page 20 of 43
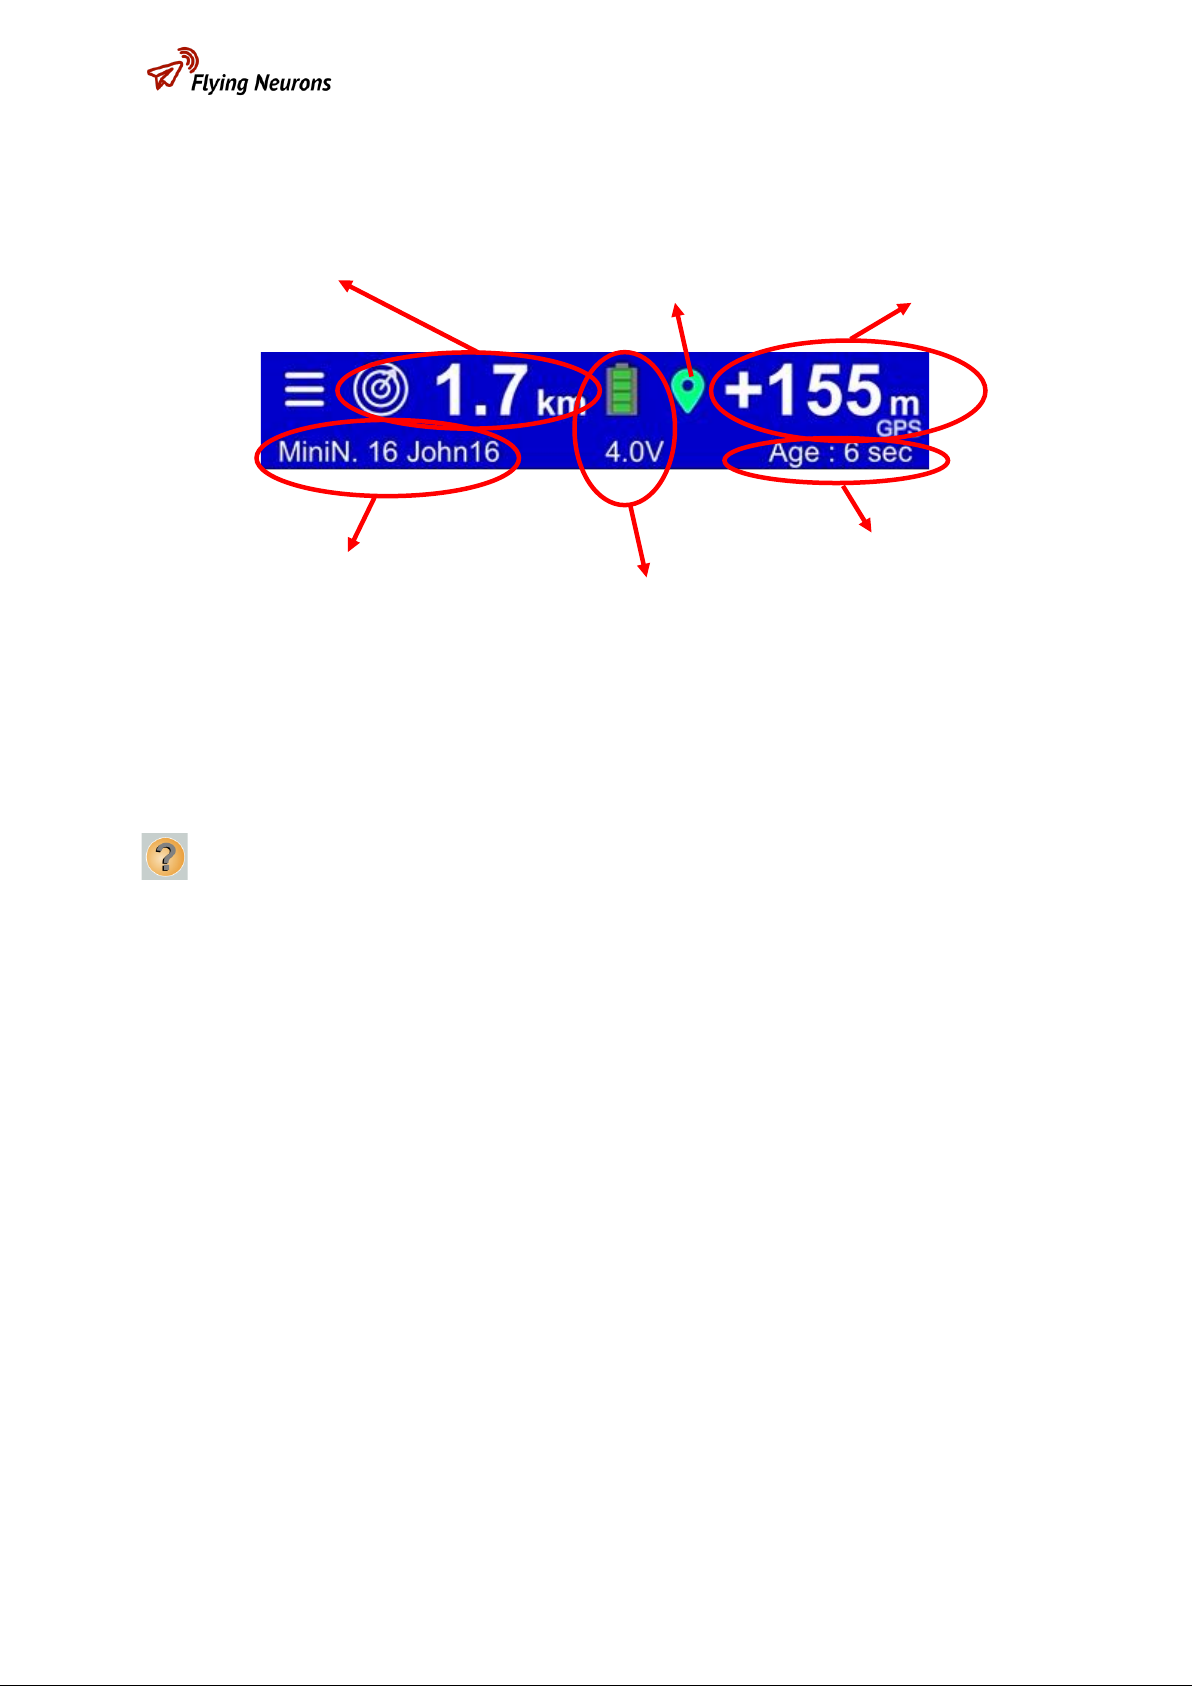
In addition, the top band, in dark blue, tells you the distance, the altitude difference of the
aircraft, the battery status of the MiniNeurone and the age of the last reception.
As soon as one of the parameters in the strip is abnormal, this parameter is displayed in red.
If the MiniNeurone or Neurone is out of range or has no GPS position or no longer works, the
last position received (even during a previous session) is displayed with the corresponding
reception age in red. In addition, the aircraft is symbolized on the map by a question mark
on its last known position.
The battery voltage displays in red if it is low.
The GPS position symbol is displayed in red if the MiniNeurone or Neurone being tracked is
unable to determine its position.
If the altimeter is activated on the MiniNeurone being tracked, the flight height of the
MiniNeurone from its starting position is displayed (barometric measurement more precise
than GPS) with the “Baro” symbol. Otherwise the GPS altitude difference between Neurone
(mobile station) and MiniNeurone is displayed (the "GPS" symbol is then displayed under the
value).
Audible announcements specify height and distance (eg "distance 400 meters, altitude 200
meters high,"). These announcements can be deactivated and configured in the “ App
configuration ” menu .
Remark :
-The sound announcement is triggered even if NeuroTrack is in the background.
Distance
GPS status
Altitude difference
or
Barometric height
Position age
Number and Name of
MiniNeurone (or Neurone)
Status and voltage of the
MiniNeurone battery
Table of contents


