FlyTech M276 User manual

Quick Start Guide
M276 & M278
2
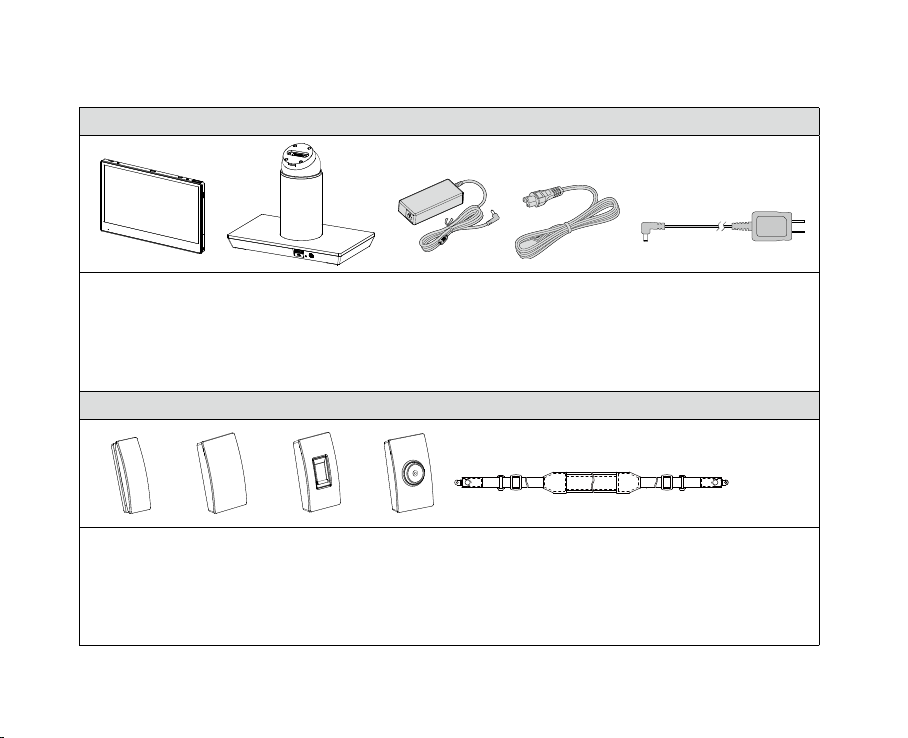
Packing
Standard
1. Tablet (11.6" or 13.3")
2. Premium docking station
3. 19V/120W power adapter (standard, for premium docking station)
4. Power cord
5. 12V/36W power adapter (optional, for tablet only)
Optional
1. MSR
2. RFID
3. Fingerprint
4. iButton
5. Shoulder strap
3
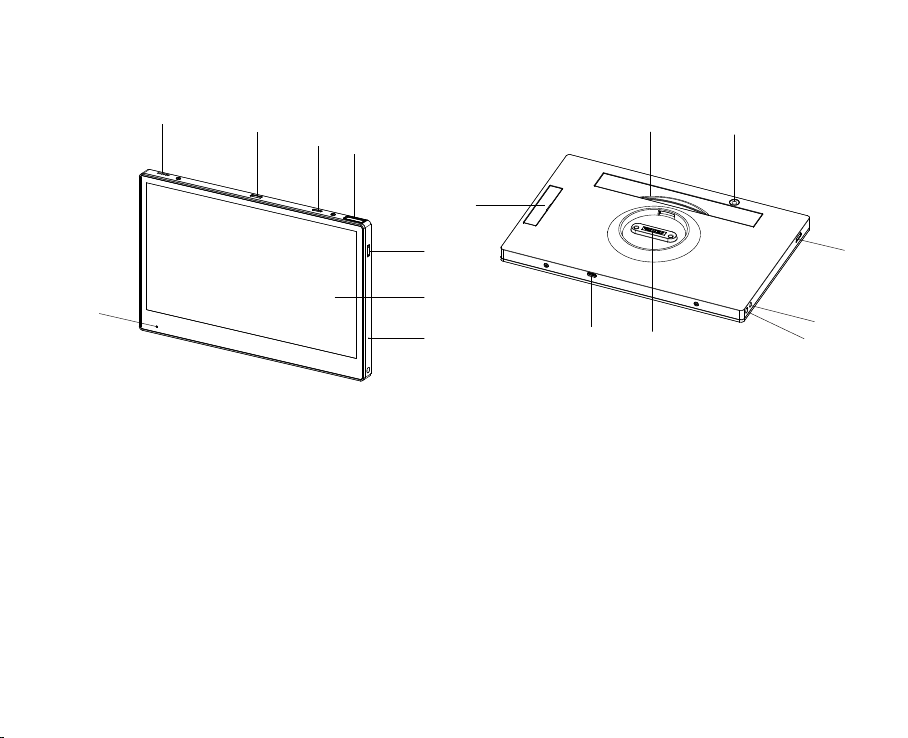
1. Speaker
2. Trigger key (middle)
3. Power On/Off
4. 2D scanner
5. Trigger key (right)
6. Full HD P-CAP multi-touch screen
7. Mic
8. Battery status indicator
Features
9. MSR/RFID/Fingerprint/iButton dummy
cover
10. Hand strap
11. 5MP AF camera
12. Trigger key (left)
13. DC-in
14. Should strap screw
15. Docking connector
16. USB type C
12
5
6
8
34
7
10 11
15
12
13
14
9
16

4
Getting Started
1. Power-on / Power-off
Press the power button for 2 seconds to turn
on the system and press it for 6 seconds to
turn off the system.
NOTE:For best touch performance, remove
the protective plastic overlay from the touch
screen by peeling it away from one of the
corners. Be sure to use a soft pointing
device or finger tip to avoid scratching the
screen during normal use.
2. Installing the Peripheral Kits
Remove the dummy cover first.
Remove the rubber pads (x2) and screws (x2)
to release the top cover of the MSR module.
NOTE: The variety of peripheral kits like RFID/Fingerprint
and iButton all follow the same installation method.
Connect the cable to the connector on the
system side. Then position the MSR module
over the system as shown and fasten with
the screws (x2). Finally place the top cover
of the MSR module back.

5
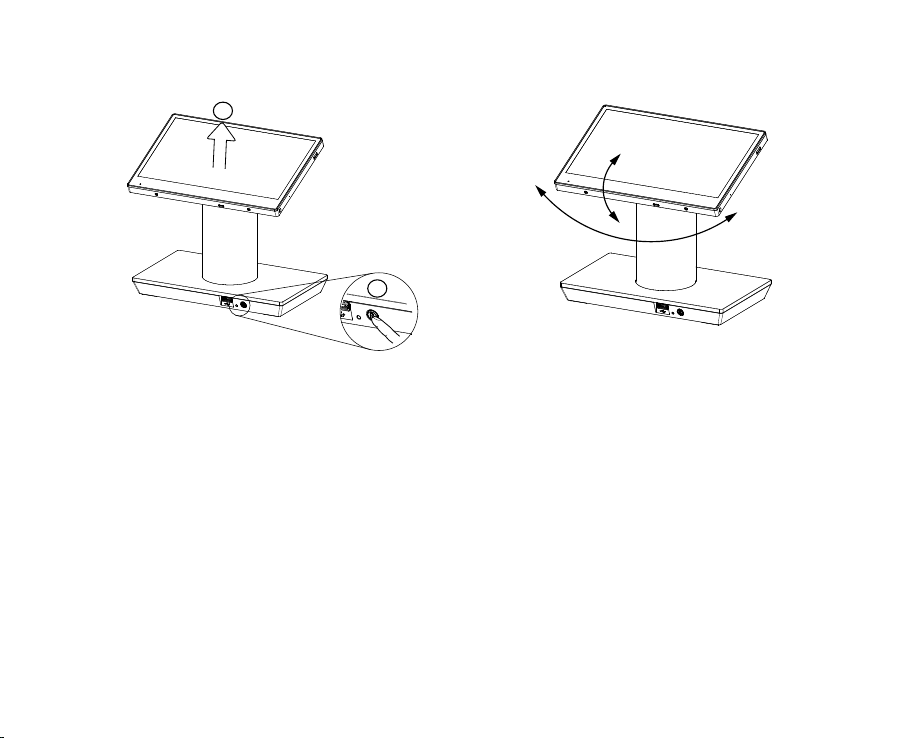
3. Using the Premium Docking Station
To power outlet
The premium docking station provides additional connectors and interfaces to support other
devices and is also designed to allow the tablet to charge its battery via the dock.
To use the premium docking station, firstly
connect the AC adapter to the DC-in input
and connect the other end to the power
outlet. Always plug in the AC adapter first
to enable the locking/unlocking function. • Attaching the tablet to the dock
After plugging in the AC adapter to the
power outlet, align the rear of the tablet
with the top of the docking station, and
place the tablet onto the dock. The tablet
automatically locks to the dock when
attached.
* You can also charge the battery via the
optional
36W power adapter. Plug in the AC adapter cable
directly into the connector located on the bottom
right of the tablet. Then plug the other end to
the AC outlet.
6
• Adjusting the tablet angle
The premium docking station offers
adjustment of viewing angle. You can tilt
and swivel the tablet to set it to angle you
preferred. The tilt angle can be set between
0° and 17° and the swivel angle can be set to
180° in either direction.
17°
180°
1
2
• Removing the tablet from the dock
Press the lock release button on the front of
the docking station, and then lift the tablet
off the dock.
The light on the dock’s lock release button
indicates the locking status:
Blue - The tablet is locked
Green - The tablet is unlocked and can be
removed.
NOTE:The tablet will be locked again if it is
not removed from the dock after pressing
the release button in 10 seconds.

7
Premium Docking Station
P-2DK10 P-2DK11
Front I/O
USB 1x USB2.0
Rear I/O
Serial port 2x DB9 (0V; 5V or 12V)
USB 2x USB3.0 2x USB2.0
Powered USB 1x 12V, 1x 24V
LAN 1x RJ45
(Giga LAN)
1x RJ45
(10/100 Mbps)
Power connector 1x DC jack
Type C 1
(USB 3.0 data only)
1
(USB 2.0 data only)
Cash drawer 1
USB over IP Yes No
I/O Specification
4. Attaching the Shoulder Strap
Align and attach the shoulder strap to the
tablet as shown and fasten the screws (x2) to
secure it.

8
Configuration
1. COM Port Power
Step 1: Double click P-2DK10_ConfigTool.exe to run the setup tool.
Step 2: By default, both left and right COM port power are 0V. To change the default
COM port power, select power and tap on Write COM Port Power to confirm.
* L/R COM port power can be set to different voltage individually, e.g., L:5V and R:12V.
❶
❷

9
2. Cash Drawer COM Port
Step 1: Click on New Port COM and enter 7 in the column.
Step 2: Tap on Set COM Port to confirm.
❶
❷

10
Step 3: Right-click the Windows icon/Start button. From the results, click on Device
Manager.
Step 4: Click on Ports (COM & LPT), you will see the current serial USB port is
changed from COM 4 to COM 7.

11
Step 5: You can check the current setup condition by tapping on Read.
* If the device is not connected or the setup process hasn’t been completed yet, the
Read / Write column will be highlighted.

12
3. USB over IP
• The Premium Docking Station P-2DK10 is designed with the feature of USB
over IP that offers a convenient way to extend and share a USB device over long
distance, and it also works with multiple tablet-dock pairs.
• When the tablet docks on the premium docking station P-2DK10, it is connected
via LAN and will be automatically switched to WLAN while releasing from the
docking station.
• Prior to installing the USB client software, ensure that the WLAN is on the same
network.
Step 1: In the VirtualHere folder, double click Install.bat to install the software.
Once it is completely installed, the program will launch automatically after
you log into the computer.
* To remove the software, double click Uninstall.bat

13
Step 2: Double click P-2DK10_ConfigTool.exe to run the setup tool.
Step 3: Specify the MAC address of the server in your VirtualHere by clicking on
Setp IP. The process may take up to 2~3 minutes showing the message Set
IP....If all was done correctly, a popup window should appear indicating Set
IP success!
❶
❷
❸

14
❶
❷
Step 4: The default setting of the system is Mode 1: POS Mode. To change the de-
fault mode, select Mode 2: All USB over IP and tap on Write USB over IP.
Step 5: Restart your computer to confirm changes.
*Always dock your tablet on the premium docking station before changing the Mode.
** USB over IP Mode is not recommended for the use of mass storage devices.

15
More Information on the M276/M278
See technical manual in the Driver Bank
Setting up and using the M276/M278
See technical manual in the Driver Bank
Support Information
LED Indicator
Power level is indicated by the battery status
indicator LED on the front of the tablet.
GREEN – Battery fully charged
(Tablet is plugged in or placed in dock)
ORANGE – Battery charging
(Tablet is plugged in or placed in dock)
RED/Flashing – Battery is low
RED – Battery nearly depleted
• The premium docking station features
with magnetic locking mechanism that
keeps the tablet securely mounted.
The locking/unlocking function only
works when the AC adapter is plugging
in. DO NOT directly place the tablet
onto the docking station when the AC
adapter is not well installed, the tablet
may drop and be damaged.
• DO NOT press down hard on the tablet
when docked, as this may damage the
Pogo Pin Connector or tablet mount
points.
• When removing the tablet from the
docking station, make sure the green
light is on.
• If locking/unlocking problems occur,
press the lock release button 5 seconds
to reset the system.
• Always plug in the AC adapter when
updating the BIOS.
CAUTIONS

16
P/N:3LMPM2700111 Version: 1.1
Safety Information
Battery Caution
Risk of explosion if battery is replaced by an incorrectly type. Dispose of used
battery according to the local disposal instructions.
Safety
Regulatory Information Caution: Only use approved and UL Listed accessories,
battery packs and battery chargers. Do NOT attempt to charge damp/wet mobile
computers or batteries. All components must be dry before connecting to an
external power source.
Warning for Use of Wireless Devices
Please observe all warning notices with regard to the usage of wireless devices.
Waste Electrical and Electronic Equipment (WEEE)
English: For EU Customers: All products at the end of their life must be returned to
the reseller for recycling.
This manual suits for next models
1
Table of contents
Popular Medical Equipment manuals by other brands


Joerns
Joerns ACX Series User & service manual

Atos Medical
Atos Medical Provox FreeHands FlexiVoice Instructions for use

Jolife
Jolife LUCAS Instructions for use

otometrics
otometrics ICS AirCal user guide

B. Braun
B. Braun Aesculap S4 Instructions for use/Technical description

NeuroTek
NeuroTek Elite Series quick start guide

Basic American
Basic American Liberty Service manual

Fresenius Medical Care
Fresenius Medical Care DIASAFE 2008 K Technical manual

swissflex
swissflex uni 14_75RF bridge operating instructions

Chattanooga
Chattanooga Intelect operating instructions

Gima
Gima SUPER VEGA BATTERY manual

Hitachi
Hitachi EUP-LV74 instruction manual