Fnirsi HS-01 User manual
智能电烙铁使用说明书
HS-01
Intelligent Electric Soldering Iron user Manual


目 录
用户须知 01
一、产品介绍 01
二、仪器说明 02
三、产品参数 02
四、电源选择 03
五、产品使用状态 04
六、操作说明 05
七、固件升级 07
八、维护保养 08
九、安全须知 08
十、保修条款 09
十一、生产信息 09

CATALOG
User Notice
10
1.Products Overview
10
2.Instrument Description
11
3.Parameter
11
4.Power selection
12
5.Product Usage
13
6.Operating Instructions
15
7.Firmware upgrade
17
8.Maintenance
18
9.Safety Instructions
18
10.Warranty terms
19
11.Contact US
19

СОДЕРЖАНИЕ
УВЕДОМЛЕНИЕ ПОЛЬЗОВАТЕЛЯ
20
1. ОБЗОР ПРОДУКТА
20
2. ОПИСАНИЕ ИНСТРУМЕНТА
21
3. ХАРАКТЕРИСТИКИ
21
4. ВЫБОР ПИТАНИЯ
22
5. ИСПОЛЬЗОВАНИЕ ПРОДУКТА
23
6. ИНСТРУКЦИЯ ПО ЭКСПЛУАТАЦИИ
25
7. ОБНОВЛЕНИЕ ПРОШИВКИ
28
8. ОБСЛУЖИВАНИЕ
29
9. ТЕХНИКА БЕЗОПАСНОСТИ
30
10. УСЛОВИЯ ГАРАНТИИ
30
11.СВЯЗАТЬСЯ С НАМИ
31

ÍNDICE
Aviso ao utilizador 32
1.Visão geral do produto 32
2.Descrição do produto 33
3.Parâmetros 33
4.Seleção de potência 34
5.Utilização do produto 36
6.Instruções de funcionamento 37
7.Atualização do firmware 41
8.Manutenção 42
9.Instruções de segurança 43
10.Termos da garantia 43
11.Contate-nos 44

●请详细读完本使用说明书以及操作指示,并且要确实遵守文中的规定。
●请妥善保存本使用手册。
●报废的仪器不可与生活垃圾一同处理,请按国家或者当地的相关法律规定处理。
●当仪器出现任何质量问题或者对使用仪器有疑问时,可联系“菲尼瑞斯-FNIRSI”在线客服或厂家,我们将在
第一时间为您解决。
●感谢您购买此产品,为了您能更加方便的使用本产品在使用时请按说明书操作。
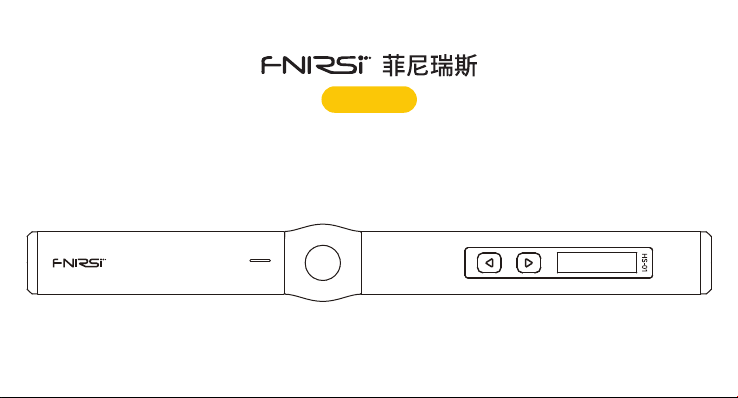
HS-01是本公司推出的一款便携式屏显智能电烙铁。该电烙铁具有以下特点:
用户须知
一、产品简介
●小巧便捷,携带方便
●控温精准
●回温快,升温迅速
●9-20V工作电压
●自带OLED屏显
●Type-c接口供电
●人体工学设计,握感舒适
1

三、产品参数
功率
供电
65W
USB Type-c接口
屏幕
温度范围
0.87寸OLED屏
80-420℃(180-780℉)
工作电压
快充协议
DC9-20V
PD触发
二、仪器说明
烙铁头 锁紧螺母 硅胶
笔盖 笔身
左键 右键 OLED屏幕 Type-c
供电接口
2

四、电源选择
使用PD快充协议的电源适配器,烙铁可以设置向适配器获取9V\12V\15\20V中任意一档的工作电压(默认设置20V)。不同的工作
电压下,工作电流、功率及化锡时间参考如下:
注意:
●智能烙铁默认获取工作电压为20V,如果您的适配器输出最高电压小于20V,则获取输出的最高电压。如您的适配器最高输出12V,则获取
12V。
●当使用不带PD快充协议的电源适配器时,智能烙铁工作电压则为输入的电压。注意:接入适配器,进入主界面后加热就重启,说明适配器
输出功率不足以正常工作,请更换其他适配器!
●如果您的适配器输出 20V,但输出电流小于 3.25A 时(即输出功率小于烙铁所需功率),进入主界面后加热,适配器可能会断电重启,导致屏
幕重启!(其他工 作电压也是一样)。
●出现加热就重启的情况,说明您的适配器当前电压的输出功率不足以正常工作,请根据适配器输出功率选择设置更低的工作电压。如您的
适配器输出:12V/2.5A, 15V/2A, 20/1.5A,输出总功率 30W。则选择设置工作电压为 12V。
工作电压
工作电流
功 率
化锡时间
20V
≥3.25A
65W
8秒
15V
≥2.5A
37.5w
12秒
12V
≥2A
24w
17秒
9V
1.5A
13.5w
30秒
※低于9V会屏幕会显示电压低。
3

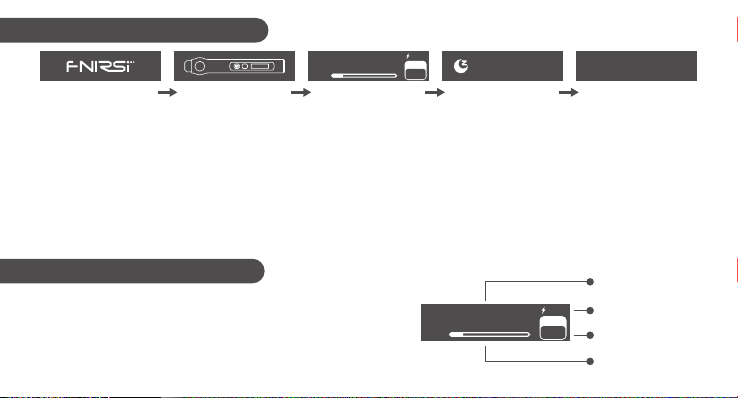
五、产品使用状态
HS-01智能烙铁工作流程如上图所示,上电后显示logo,短按一次对应闪烁的实体按键进行加热,当童锁模式
开启时短按三下对应的实体按键进行加热。进入主界面,烙铁处于正常工作状态,分为以下三种:
●工作状态:烙铁处于加热或已加热完成可以使用状态,切勿触碰高温部位。
①拆开螺母 ②插入烙铁头 ③锁紧螺母
※插入烙铁头时发现卡顿可以尝试旋转一下再插入。
1.安装说明
2.工作流程说明
开机LOGO 开机加热 主页面 休眠 关机
关机
280℃
10% 280
SET
20V 200℃
4

●休眠状态:烙铁已处于加热使用状态下,静止未使用超过设定休眠时间进入休眠,使用即解除。
●关机状态:断电即关机。
280
10% 280
●温度设置: 在加热的页面状态下按左右键可进入温度设置页面 ,进行温度设置,
短按右键加一个步进数值,短按左键减一个步进数值。长按快加或快减,步进为10℃或20℉。
SET
80 420
280℃
℃SET
20V
六、操作说明
主页面如右图所示,右下角显示的是用户设定的目标温度,
中间显示烙铁实时温度。底下显示的是加热功率,右上角显
示的是工作电压。
3.主界面说明 烙铁头温度
工作电压
加热功率条
设定温度
280℃
10% 280
SET
20V
●开 机:上电即开机,屏幕显示开机图标 随后显示提示插入烙铁头 ,烙铁头插好后显示
界面 。
●加 热: 中的图标按键会闪,这时短按对应的实体按键进入加热页面 ,烙铁加热。
280℃
10% 280
SET
20V
●一键待机: 在加热页面长按右键一键关闭加热,回到待机页面 。
280℃
10% 280
SET
20V
5
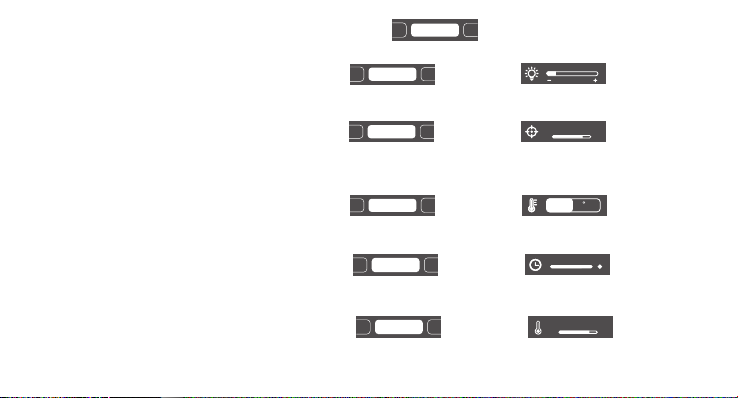
屏幕亮度 温度单位
温度校准
●温度校准:进入到设置模式下短按左右键切换到温度校准 ,长按右键进入 ,左右键调节,调
节完成长按任意键退出。在主页面下,设定目标温度为350℃,温度稳定后使用烙铁测温仪测量实际温度,记录目标
温度减去实际温度的差值(值可正可负),在进入菜单将差值填入此项。
-50 50
℃
30
●温度单位:进入到设置模式下短按左右键切换到温度单位 ,长按右键进入 ,左右键切换,切
换完成长按任意键退出。
温度校准 休眠时间
温度单位 F
℃
●休眠时间:进入到设置模式下短按左右键切换到休眠时间 ,长按右键进入 ,左右键调节,调
节完成长按任意键退出。休眠时间默认20分钟,设置范围为1-20分钟,设置到最大时再短按一下可以关闭休眠。
休眠单位
温度单位
休眠时间 120 关
80 200
℃
150
●休眠温度:进入到设置模式下短按左右键切换到休眠温度, 长按右键进入, 左右键调节,调
节完成长按任意键退出。当工作温度低于休眠温度时,休眠状态下保持工作温度,当工作温度高于休眠温度时,休眠
状态时温度会降到休眠温度。
童锁模式
休眠时间
休眠温度
●设置模式:在非设置温度的页面下,同时长按左右键进入设置模式 。
电压档位 温度校准
屏幕亮度
●屏幕亮度:进入到设置模式下短按左右键切换到屏幕亮度 ,长按右键进入 ,左右键调节,调
节完成长按任意键退出。
电压档位 温度校准
屏幕亮度
6
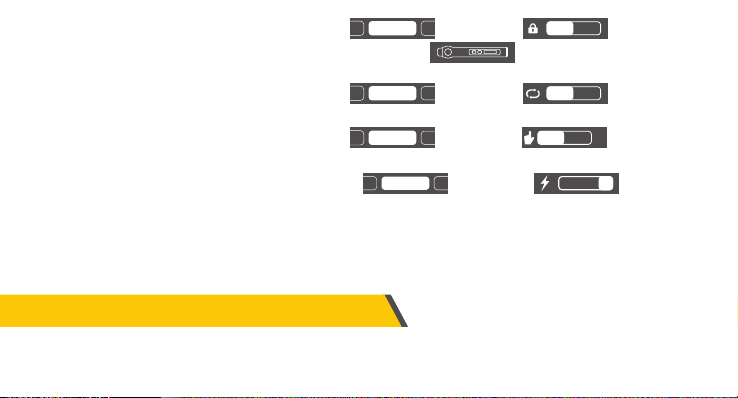
七、固件升级
●设备断电,按住左键,再使用USB Type-c数据线连接电脑给设备上电,进入Bootloader界面进行固件升级。
●选择相应的串口号,左边显示就绪时打开选择文件,点击烧录即可。
●产品在休眠的状态下无操作30分钟后会自动关机
●童锁模式:进入到设置模式下短按左右键切换到童锁模式 ,长按右键进入 ,左右切换,切换
完成长按任意键退出。开启童锁模式后再次上电使用时会显示 图标按键有个锁的图标,这时要连
续短按3下左键才能加热。
语言选择
休眠温度
童锁模式 关
开
●语言选择:进入到设置模式下短按左右键切换到语言选择 ,长按右键进入 ,左右切换,切换
完成长按任意键退出。
English
中文
语言选择
手幕亮度
童锁模式
●手持模式:进入到设置模式下短按左右键切换到手持模式 ,长按右键进入 ,左右切换,切换
完成长按任意键退出。产品默认右手,客户可凭自己的使用习惯和喜好设置。切换到左手后按键的操作逻辑相反。
左手 右手
手持模式
屏幕亮度
童锁模
择
●电压档位:进入到设置模式下短按左右按键切换到电压档位 ,长按右键进入 ,进入后左右切
换9V/12V/15V/20V四个电压档位,切换完成后长按任意按键退出,默认20V,客户可根据自己的充电器功率参数进行
设置,以避免出现功率不足导致充电器启动过流保护,设备强制关机黑屏现象。当出现此现象的时候,只需待充电器
恢复后,在不加热或者无烙铁头的时候进入设置页面重新选择合适的档位。
屏幕亮度
手持模式
电压挡位 912 15 20
7

九、安全须知
八、维护保养
●新的烙铁头第一次使用时需要先加热至250℃上锡,防止干烧氧化。
●新的烙铁第一次使用会存在温度乱跳的问题,反复使用几次后会稳定。
●烙铁使用完后请在烙铁头上涂上适量的焊锡,防止氧化。
●烙铁头的正常工作温度约为300-380℃,不宜长时间温度过高使用影响烙铁头寿命。
●焊接工作时避免暴力敲击烙铁头。
●使用湿海绵切勿有明水,半干状态最佳。
●不要使用含氯或酸过高的助焊剂,避免腐蚀表面。
●如果烙铁头表面氧化不沾锡,可用纱布或其他工具小心擦除表面层,然后上电加热至250℃,立即上锡黏住表面,以防再次氧化。
●烙铁头工作时温度可达80-420℃,切勿触碰烙铁头。
●请放置于儿童接触不到的地方。
●切勿弄湿本产品,或在潮湿环境中使用。
●长时间不使用时,请断开电源。
●正常工作时,手柄处会有一定的温度,属于正常现象,请放心使用!
8

十一、生产信息
十、保修条款
产品名称:HS-01智能电烙铁
品牌/型号:FNIRSI/HS-01
服务电话:0755-83242477
生产商:深圳市菲尼瑞斯科技有限公司
网址:www.fnirsi.cn
地址:广东省深圳市龙华区大浪街道伟达工业园C栋西边8楼
执行标准:GB/T 7157-2019
●服务期限
深圳市菲尼瑞斯科技有限公司承诺产品的良好品质,产品自售出之日起 7 天内正常使用 情况下机器出现故障,客户可以选择退
货或者保修(不影响二次销售才可以退货),正常使用一年内出现故障可以免费保修。
●购买日期以销售商开出的购机发票或收据日期为准,网购可以以交易截图为准。
●对于以下的情况,不提供免费保修服务
(1)一切人为损坏、私自改装、维修造成机器损坏的。
(2)烙铁头属于易耗品,不支持保修。
9

●Please read this user manual and operating instructions carefully, and be sure to abide by the stipulations in the text.
●Please keep this manual properly.
●Discarded instruments cannot be disposed of together with household waste,please dispose according to relevant
national or local laws and regulations.
●When there are any quality problems or questions about the use of the instrument,you can contact the online
customer service of "Fnirsi-FNIRSI" or the manufacturer,and we will solve them as soon as possible.
●Thank you for purchasing this product. In order to make it more convenient for you to use this product, please operate
follow this instructions.
HS-01 is a portable screen display intelligent electric soldering iron launched by our company.The electric soldering iron
has the following characteristics:
User Notice
1.Products Overview
● Precise temperature control
● Small and convenient,
easy to carry. ● Fast temperature recovery
and rapid temperature rise
● 9-20V operating voltage
● Built-in OLED screen display ● Ergonomic design,
comfortable grip.
● Type-c interface power supply
10

2.Instrument Description
soldering
iron tip locking
nut silica
gel
Pen cover pen body
Left Right OLED
screen Type-c interface
power supply
3.Parameter
Power
Power
supply Temperature
range Fast charging
protocol
USB Typr-c port 80-420℃(180-780℉) PD trigger
65W Screen 0.87 inch OLED screen operating voltage DC9-20V
11

4.Power selection
Using the power adapter of the PD fast charging protocol, the intelligent electric soldering iron can be set to obtain any
operating voltage of 9V\12V\15\20V from the adapter.(The defualt seting is 20V).Under different operating voltages, the
working current, power and tinning time are as follows:
Notice:
●The default operating voltage of the Intelligent soldering iron is 20V. If the maximum output voltage of your adapter is
less than 20V, the maximum output voltage will NOT be obtained. If your adapter outputs up to 12v, get 12V.
●When the power adapter without PD fast charging protocol is used, the operating voltage of the intelligent soldering
iron is the input voltage.It is noted that when the adapter is connected and the heating will restart after entering the
home page.This indicates that the output power of the adapter is not sufficient for adapter, please replace another
adapter.
Operating voltage
Operating current
Power
Tin melting time
20V
≥3.25A
65W
8s
15V
≥2.5A
37.5w
12s
12V
≥2A
24w
17s
9V
1.5A
13.5w
30s
※If the voltage is lower than 9V, the screen will display low voltage.
12

● If output voltage of your adapter is 20V, but the ouput current is less than 3.25A(That is to say, the output power is less
than the power required by the soldering iron),after entering the main interface and heating,the adapter may be powered
off and restarted, which will cause the screen to restart!(Other operating voltages are the same)
● If it restarts after heating, it means that the output power of the current voltage of your adapter is not enough to work
normally,Please select a lower working voltage according to the output power of the adapter.If your adapter output is
12V/2.5A, 15V/2A or 20/1.5A, the total output power is 30W,set the operating voltage to 12V.
5.Product Usage
①Remove the nut ②Insert the soldering iron tip ③Lock nut
※If it is found that the soldering iron is stuck when inserting, you can try to rotate it and insert it again.
Installation Instructions
13
The working process of HS-01 intelligent soldering iron is shown in the figure above.After power-on, the logo is displayed.
Short press the corresponding flashing physical button once to heat up.When the child lock mode is turned on, short
press the corresponding physical button three times to heat. Entering the main interface, you can choose between 3
main working states of the soldering iron:
●Working state:The soldering iron is in a heated or ready-to-use state, please do not touch the high temperature parts.
●Sleep state: The soldering iron is already in the state of heating and use, and it will enter into sleep state if it is not used
for more than the sleep time, and it will be released after use.
●Shutdown state: It will shut down when the power is disconnected.
Workflow Description
Boot Logo Turn on heating Home page Hibernate Shutdown
Shutdown
280℃
10% 280
SET
20V 200℃
The home page is shown on the right, the lower right corner shows
the target temperature set by the user,and the middle is the
real-time temperature of the soldering iron. The bottom shows the
heating power, and the upper right shows the operating voltage.
Home page description Soldering iron tip
temperature
operating voltage
Heating power bar
set temperature
280℃
10% 280
SET
20V
14
Table of contents
Languages:
Popular Power Tools manuals by other brands

Aeropro
Aeropro RP17411 Operating Instruction and Safety Manual

nvent
nvent PYROTENAX User instructions

Rowley
Rowley NS13LN Safety, operation & maintenance instructions

Bosch
Bosch GDS Professional 18 V-EC Original instructions

Cornwell Tools
Cornwell Tools bluePOWER CAT4580 operating manual

DUO-FAST
DUO-FAST CNP-65Y quick start guide


