Fobitec WS-3 User manual

0
User Instructions for Indicator WS-3
Tel. 0030 2310 795686
Fax. 0030 2310 795687
INDUSTRIAL AREA OF SINDOS THESSALONIKI 57022 P.O. BOX 1217 GREECE

1
CONTENTS
PROLOGUE..................................................................................................................................................2
USEFUL INFORMATION............................................................................................................................2
DESCRIPTION OF INDICATOR WS-3.....................................................................................................3
KEYBOARD FUNCTION.............................................................................................................................4
SYSTEM PARAMETERS........................................................................................................5
“Ad.FiLt” ADC Filter, Converter filter AD....................................................................5
“Ad.GAIn” ADC Gain.....................................................................................................5
“Ad.noiS.” ADC noise, Noise level at the load cell input........................................5
“Ad.driF.” ADC thermal drift correction.......................................................................6
“dec.Pnt.” (decimal point).............................................................................................6
“reSoL.” (resolution)......................................................................................................6
“d.FILt.”: Display Filter.................................................................................................6
“Comm.”: Communication Mode.................................................................................7
“Pr.dEL.”: Print Delay....................................................................................................7
“totAL”: Totalizing Weighing..........................................................................................8
"PASS": Password, User access to critical operations ...........................................8
“rESEt”: Reset, Restoring parameters in initial settings.........................................8
USER PARAMETERS.............................................................................................................9
“U.tArE”: User Tare,.......................................................................................................9
“P._____”: Maximum “empty scale” weight................................................................9
"P.-----": Maximum allowed scale weight......................................................................9
“CALIbr.”: Calibration......................................................................................................9
“FILtEr”: Filter..................................................................................................................9
“CLOCk”: Clock..............................................................................................................9
“HIStor.”: History..........................................................................................................10
“PrInt”: Print, Printing of all saved weighings..........................................................10
“CLEAr”: Clear, Clearing of the saved weighings...................................................10
TARE ZERO...........................................................................................................................10
Automatic Calculation of User tare ..................................................................................................10
FUNCTION OF TOTALIZING WEIGHING.............................................................................................10
ERROR CODES.........................................................................................................................................11
BASIC TECHNICAL CHARACTERISTICS ............................................................................................12
CONNECTIONS .........................................................................................................................................13

2
PROLOGUE
Thank you very much for choosing our electronic weighing scale. In order to use this scale
properly, we would like to ask you to read these instructions manual carefully.
USEFUL INFORMATION
-The indicator should be placed in a dry place in order to be protected from rain, from
getting wet, and it shouldn‟t be exposed to the sun for a long period of time.
-The indicator should be placed safely on its base or on a desk. Pay attention, as the
screen can get damaged from falling.
-The keyboard should be cleaned only with a dry cloth (DO NOT USE ANY CHEMICAL
SUBSTANCES)
-The keys are designed to be pressed by hands and you should never use them with any
other object.
-The scale that is connected with the indicator, should be placed in a stable and flat
surface, protected by air flow, current fluctuations, vibrations (and by water, if the scale‟s
load cell is not waterproof).
-You should never place weight on the scale higher than the MAXIMUM WEIGHT VALUE.
-You should never perform any welding, if you haven‟t removed earlier all the electronic
components (indicator - load cells - printer).
-To protect the indicator, it should always be off when it is not used and also use power
protection before its power supply.
-Turn on the scale 5‟ before use.
-For any additional information or issues of the scale you should contact the customer
service.

3
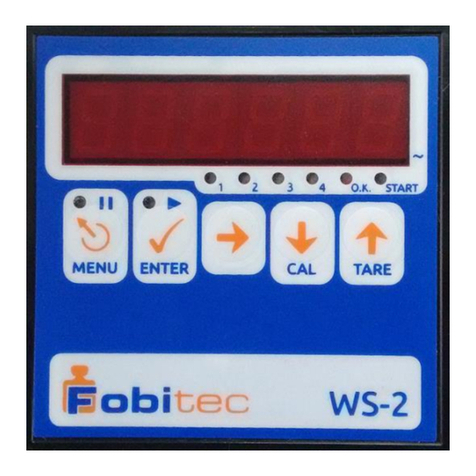
DESCRIPTION OF INDICATOR WS-3
1) 6 digit LED display
Display of weight: “-99999” .. “999999” with adjusted decimal point.
Display of parameters, messages, etc.
2) Display LED “0”, it lights when the weight measurement is placed in the minimum weight
range, which means that the scale is considered with no weight on.
3) Display LED “instability” of the weight. As long as it lights on, the weight measurement is
considered unstable.
4) Keys “MENU”, “ENTER”, “NEXT/PRINT”, “DOWN/TARE”, “UP/ZERO”

4
KEYBOARD FUNCTION
In the majority of operations, the keys have the following functions:
MENU:
Enters / Exits the parameters menu for adjustments, cancelation of numerical alteration, return a
level back to the menu structure, temporary pause/ cancelation of the weighing process.
Equipped with a LED, that lights up / flashes according to the user‟s operations.
ENTER:
Selection of function / parameter, validation of selection / number, passing to the next parameter.
It is used in the function “Totalizing Weightings” (“Total”), see below.
Equipped with LED, which lights up / flashes according to the user‟s operations.
NEXT / PRINT:
Change of the way of numbers‟ alterations, passing to the next digit during the number change
process. When the process begins, the displayed number can be altered using the keys UP /
DOWN.
DOWN / TARE:
Previous menu selection, reduction of digit / number during the process of number alteration.
Tare calculation (TARE) when the system is at rest and this is allowed (see system parameter
“PASS” ).
UP / ZERO :
Next menu selection, digit / number increase during the number alteration process. Tare serving
(ZERO) when the system is at weighing mode.

5
SYSTEM PARAMETERS
“SYS.Par.”: System parameters
System parameters are set on the menu “SYS.Par.”, on which we have access when we press
the keys “NEXT” and “MENU” simultaneously for 7 seconds while the system is in weighing
mode.
“Ad.FiLt” ADC Filter, Converter filter AD
The higher the value, the lower the weighing sample rate per second.
Value: 0 .. 3 Default: 1
adc filter : Hz
0 : 16.7
1 : 10
2 : 8,35
3 : 5
“Ad.GAIn” ADC Gain
It takes two values, 0 και 1. It must be 0 if the load cells connected have sensitivity higher or
equal to 20mV/V, while it must be 1 if the load cells connected have sensitivity lower or equal to
10mV/V.
Value: 0 .. 1 Default: 1
0 : gain X 1
1 : gain X 128
“Ad.noiS.” ADC noise, Noise level at the load cell input
It operates as a threshold for noise / microchanges rejection.
The higher the value the more “unconscious” becomes the system in microprojections,
which means it takes the measurement as „stable‟ easier, at the same time though the response
time increases in small weight changes.
It is influenced by the previous parameter System Parameter ADC Gain. Suggested values for
ADC Gain==0 are 2...15 while for ADC Gain==1 it is 30...100
Value: 1 .. 250 Default: 10

6
“Ad.driF.” ADC thermal drift correction - Thermal drift correction for the
converter AD
Displayed units per second.
Value: 0,0 .. 1,0 Default: 0,0
When it is higher than 0, it eliminates the very slow changes in the indication that usually
happens due to the thermal drift of the load cell and the AD converter. For example, if it is 0,2 it
eliminates the drift lower or equal to 0,2 units per second, which means 1 unit per 5 seconds,
while if it is 0,5 it eliminates 0,5 units per second, which means 1 unit per 2 seconds.
“dec.Pnt.” (decimal point)
Decimal Point position in weight display
Value: 0 .. 5 Default: 0
0 : “123456” …5 : “1.23456”
“reSoL.” (resolution)
Last digit Resolution in weight display
Value: 1, 2, 5 Default: 1
“d.FILt.”: Display Filter
Weight Display Filter. With 0 value it is completely rejected and the display response in
alterations becomes more direct. It filters more micro changes during higher values, however it
delays the response display of the indication.
Value: 0 .. 10 Default: 5

7
“Comm.”: Communication Mode
Communication port function (RS232)
Value: 0 .. 5 Default: 0
0 : without communication
1 : manual function, printing of the current weight indication and recording it to the
weighting history, by pressing the key “NEXT / PRINT” for a second.
2 : automatic function, printing and recording of the weighing history each time that the
scale is loaded and the weight remains stable for a certain time (see next parameter). If you want
to repeat the printing and registration, the scale should be unloaded (area „0‟) in between.
3 : manual function like „1‟, the tare functions are recorded as well (ZERO), the
calibration changes and the error reports also.
4 : automatic function like „2‟, the tare functions are recorded as well (ZERO), the
calibration changes and the error reports also.
5 : Continuous data transmission to the repeater or computer, “repeater mode”.
The device sends one string every 50msec in the following format:
[US/ST] ",GS," [+/-] [ weight] " kg" [LF]
where:
[US/ST] is 2 characters,
'US' when the measurement is unstable and
'ST' when it is stable
[+/-] is the sign of the weight measurement
[ weight] is the absolute weight value,
numerical characters „0‟ to ‟9‟ and the dot '.' as the decimal point
[LF] is the character LINE-FEED („\n'), end of line
Example: for stable weight 150,50 kg, the string will be
“ST,GS,+ 150.50 kg”
“Pr.dEL.”: Print Delay
Delay of the automatic printing, in seconds.
Value: 1 .. 10 Default: 3

8
“totAL”: Totalizing Weighing
Activates the function Totalizing Weighing.
Value: 0 .. 1 Default: 0
When this function is activated, the device shows (and saves to the indelible memory,
along with the user parameters) the number of the weighings totalized alongside the totalized
weight value.
For all of them to appear on the display, the user should press briefly (<0.4 secs.) the key
ENTER. The device will show on the screen “totAL “for 1 second, then “Id “followed by the
number of the weightings for 1 second and then it will display the total accumulated for 5
seconds or until another key is pressed. throughout all the above, the LED in the keys MENU +
ENTER are flashing to highlight the special situation.
To accumulate one of the displayed weights in the Total, the user needs to press ENTER
continuously ( >0.7 secs.). Then the message “tot.Add” appears and then the sequence of the
indications as described above in the display of the total.
To reset the total, the user needs to press briefly ENTER for the total to be displayed, and
then press continuously (>1 sec.) the ZERO (arrow up). Once zeroing is done, the message
“tot.Clr.” appears on the screen.
"PASS": Password, User access to critical operations
When it is "1" it allows the user to access critical functions / parameters.
Value: 0 .. 1 Default: 1
“rESEt”: Reset, Restoring parameters in initial settings
We choose number, in accordance to what we want to reset / restore.
Value: 0 .. 5 Default: 0
0 : return
1 : zeroing of weighting history
2 : zeroing of tare / calibration
3 : Restoration of user parameters
4 : Restoration of system parameters
5 : Total restore, execution of all the above from 1 to 4

9
USER PARAMETERS
“USr.PAr.”: User Parameters
In the menu “Usr.Par.”we have access when we briefly press the key "MENU".
“U.tArE”: User Tare,
With this selection the user can choose and set the tare weight, which will be deducted steadily
from the weighing and it will be reported in the printings of the weighing.
“P._____”: Maximum “empty scale” weight
It is not displayed when System Parameter Pass == 0.
When the weight on the scale is lower than this value, the scale is considered empty and it can
start / stop the weighing operation.
Value: 0 .. 199990 Default: 0 (decimal point depending on setting)
"P.-----": Maximum allowed scale weight
It is not displayed when System Parameter Pass == 0.
It must be set to the maximum permitted weight. When it is over that, the device displays
overload error.
Value: 0 .. 999999 Default: 999999 (decimal point depending on setting)
“CALIbr.”: Calibration
It is not displayed when System Parameter Pass == 0.
We place on the scale the known weight (if possible higher than the half of the maximum weight
value ). Then, we choose this function. We correct the indication to the desired weight, and we
press "ENTER" ("MENU" for cancellation). In case of inability to calibrate, an error message
appears (see below).
“FILtEr”: Filter
It is not displayed when System Parameter Pass == 0.
Integration filter for algorithm approximation of weight and vibration / noise rejection, the higher it
is, the slower the weight approximation.
Value: 0 .. 10 Default: 2
“CLOCk”: Clock
It is not displayed when printing is not On (System Parameter Print == 0 ).
The user checks / corrects the time and the date of the device, which is useful in printing.

10
“HIStor.”: History
It is not displayed when printing is not On (System Parameter Print == 0 ).
It leads to a sub-menu of 2 choices:
“PrInt”: Print, Printing of all saved weighings
“CLEAr”: Clear, Clearing of the saved weighings
When the printing mode (system parameters, print mode) is set on „3‟ or „4‟, additional events are
recorded that can be printed in the specific printing if both the keys „NEXT‟ and „ENTER‟ are
pressed simultaneously ( first „NEXT‟ and then „ENTER‟ ).
TARE ZERO
When the system is at weighing mode, we press the “ARROW UP / ZERO", the indication
“ZErO“ appears on the screen and then we press "ENTER" for validation or “MENU” for
cancellation. Alternatively, we press continuously "ARROW UP / ZERO" for 1 second.
Tare (Zero) lasts from 1..3 seconds and the display turns zero. In case of weight instability or
overweight tare (inability to zeroing) there will be an error message (see below).
Automatic Calculation of User tare
With this selection the user can define the tare, which will be deducted steadily from the weighing
and it is mentioned in the weighting printing.
When the system is at rest with the scale loaded with the tare, we press “ARROW DOWN /
TARE", the indication “tArE“ appears on the screen and then we press "ENTER" for validation
or “MENU” for cancellation. Alternatively, we press continuously “ARROW DOWN / TARE” for
1 second.
The new user tare is the total of the previous tare and the indication of the weight at the time of
this process. For the exact value to be checked, the user can select “User Parameters -> User
Tare”
FUNCTION OF TOTALIZING WEIGHING
While the function “Totalizing Weighing” (“Total”) is activated, a long press of “ENTER” for at
least 1 second, the message “tot.Add” (Total Add) appears for 0.7 seconds, the serial number of
weighings grows by 1 and the current weighing indication is added to the total.
The message “Id. XXX” appears on the screen where ΧΧΧ is the serial number, and then the
weighing after 0.7 seconds. The indication of the total remains on the screen for 3.5 seconds and
then it returns to the indication of the current weight. During this process the LED of the keys
“MENU” and “ENTER” are flashing.
If any key is pressed instantly, the process ends.
If the “UP/ZERO” is pressed during the process for at least 1 second, the message “tot.Clr”
(“Total Clear”) appears and the serial number and total weight are reset.
For simple indication without summation (total), the key “ENTER” should be pressed instantly, for
less than 0.4 of the second. Then the message “totAL” appears, while the remaining operation
says as described above.
The serial number and the total weigh are saved in the indelible memory alongside user
parameters.

11
ERROR CODES
If the device detects any malfunction, the message “Er. X” appears on the screen, where X is
the code of the error.
By pressing “MENU” the error turns to zero and the device resumes from where it stopped or it
performs a restart.
In many errors, some bad or incorrect connections(wiring) are responsible so we recommend
checking of the wiring / topology connections.
#
Description
1
System Parameters Error
Possible reasons:
High instability of the power supply line.
Excessive electrical interference in the installation, poor cable shielding ground.
Power switching off at a critical time (during the correction of parameters).
Solution: Correction of system parameters.
2
User Parameters Error
Possible reasons: Similar to error 1.
Solution: Reset / Corrections of user parameters.
( System Parameter Reset = 3 )
3
Weight Calibration Error
Possible reasons: Similar to error 1.
Solution: Reset / Corrections of weight parameters.
( System Parameter Reset = 1 )
4
ADC Converter Error
Possible reasons: Similar to error 1.
Solution: If the problem persists after restart, it is possible that the AD converter is
damaged.
5
Over-Weight Error
It appears when a formula has weight higher than the permitted one or in case that the
actual weight on the scale is over the limit.
Solution: Tare zeroing / calibration, see syspar→“rESEt” p2: Reset, Parameter
recovering to the initial settings.
6
Out of Range
During tare zeroing: Too much weight on the scale.
During calibration: Incorrect matching of the displaying parameters or gaining converter
AD.
7
Weight Not Stable
During tare zeroing.

12
8
Real Time Clock Error
Possible reasons: Similar to error 1.
Solution: Time / date adjustment.
9
Records Error
Possible reasons: Similar to error 1.
Solution: Resetting of records (User Menu - History - Clear ).
BASIC TECHNICAL CHARACTERISTICS
Power Supply:
10 ... 24Vac, 10 ... 32Vdc (+/- 10% )
Maximum consumption:
250mA @ 10Vac / 10Vdc, 100mA @ 32Vdc / 24Vac
Load Cell
Type of connection:
Power Supply:
Sensitivity:
6 or 4 cables
5Vdc ±5%, 120mA ( up to 8 load cells of 350Ω )
1,5mV/V ... 80mV/V

13
CONNECTIONS
Thread “SERIAL”: Connection of serial port RS-232.
Thread “LOAD CELL”: Connection of load cell with 6 cables (compensates the weighing
error due to the cable).
or Connection of the load cells of 4 cables. The connections S-,S+ should be bridged with the
I-, I+ equivalently ( with short cables on the thread ).
Thread “SUPPLY”: Power supply connection, either AC from transformer, or DC from DC
power supply (where l1 => (+) and G => (-) for DC power supply ).
Table of contents
Other Fobitec Measuring Instrument manuals
Popular Measuring Instrument manuals by other brands

Grundfos
Grundfos SI 010 CNV Installation and operating instructions
Trotec
Trotec IC085LV operating manual
RKC INSTRUMENT
RKC INSTRUMENT LE100 Communication instruction manual
Binsfeld
Binsfeld TorqueTrak TPM2 manual
PCB Piezotronics
PCB Piezotronics 339A30 Installation and operating manual
TOOLCRAFT
TOOLCRAFT 2303985 operating instructions
Gossen MetraWatt
Gossen MetraWatt METRAwin 10 operating instructions
Ametek
Ametek Thermox WDG-V UOP user manual
Hanna Instruments
Hanna Instruments HI 84429 instruction manual
PCE Instruments
PCE Instruments PCE-125 Series manual

Bosch
Bosch GLM 20 Operating/safety instructions

Koeng
Koeng KEG-500 Operation manual
