Foma 840 User manual
Wall high pressure cold water cleanerWall high pressure cold water cleaner
Wall high pressure cold water cleanerWall high pressure cold water cleaner
Wall high pressure cold water cleaner
ITA
F
BRUKSANVISNINGBRUKSANVISNING
BRUKSANVISNINGBRUKSANVISNING
BRUKSANVISNING
OPERATING INSTRUCTIONOPERATING INSTRUCTION
OPERATING INSTRUCTIONOPERATING INSTRUCTION
OPERATING INSTRUCTION
BRUKSANVISNINGBRUKSANVISNING
BRUKSANVISNINGBRUKSANVISNING
BRUKSANVISNING
N
GB
S
840
950

Fig. 1
Fig. 3
STANDARDUTSTYR
MAIN CONSTRUCTION COMPONENTS
MASKINENS HUVUDSAKLIGA KOMPONENTER
Fig. 2

Fig. 6
Fig.5
Fig. 8
Fig. 7
Fig. 9
Fig. 4

Fig. 10 Fig. 11
Fig. 12 Fig. 13
Fig. 14 Fig. 15

5
GB
11
11
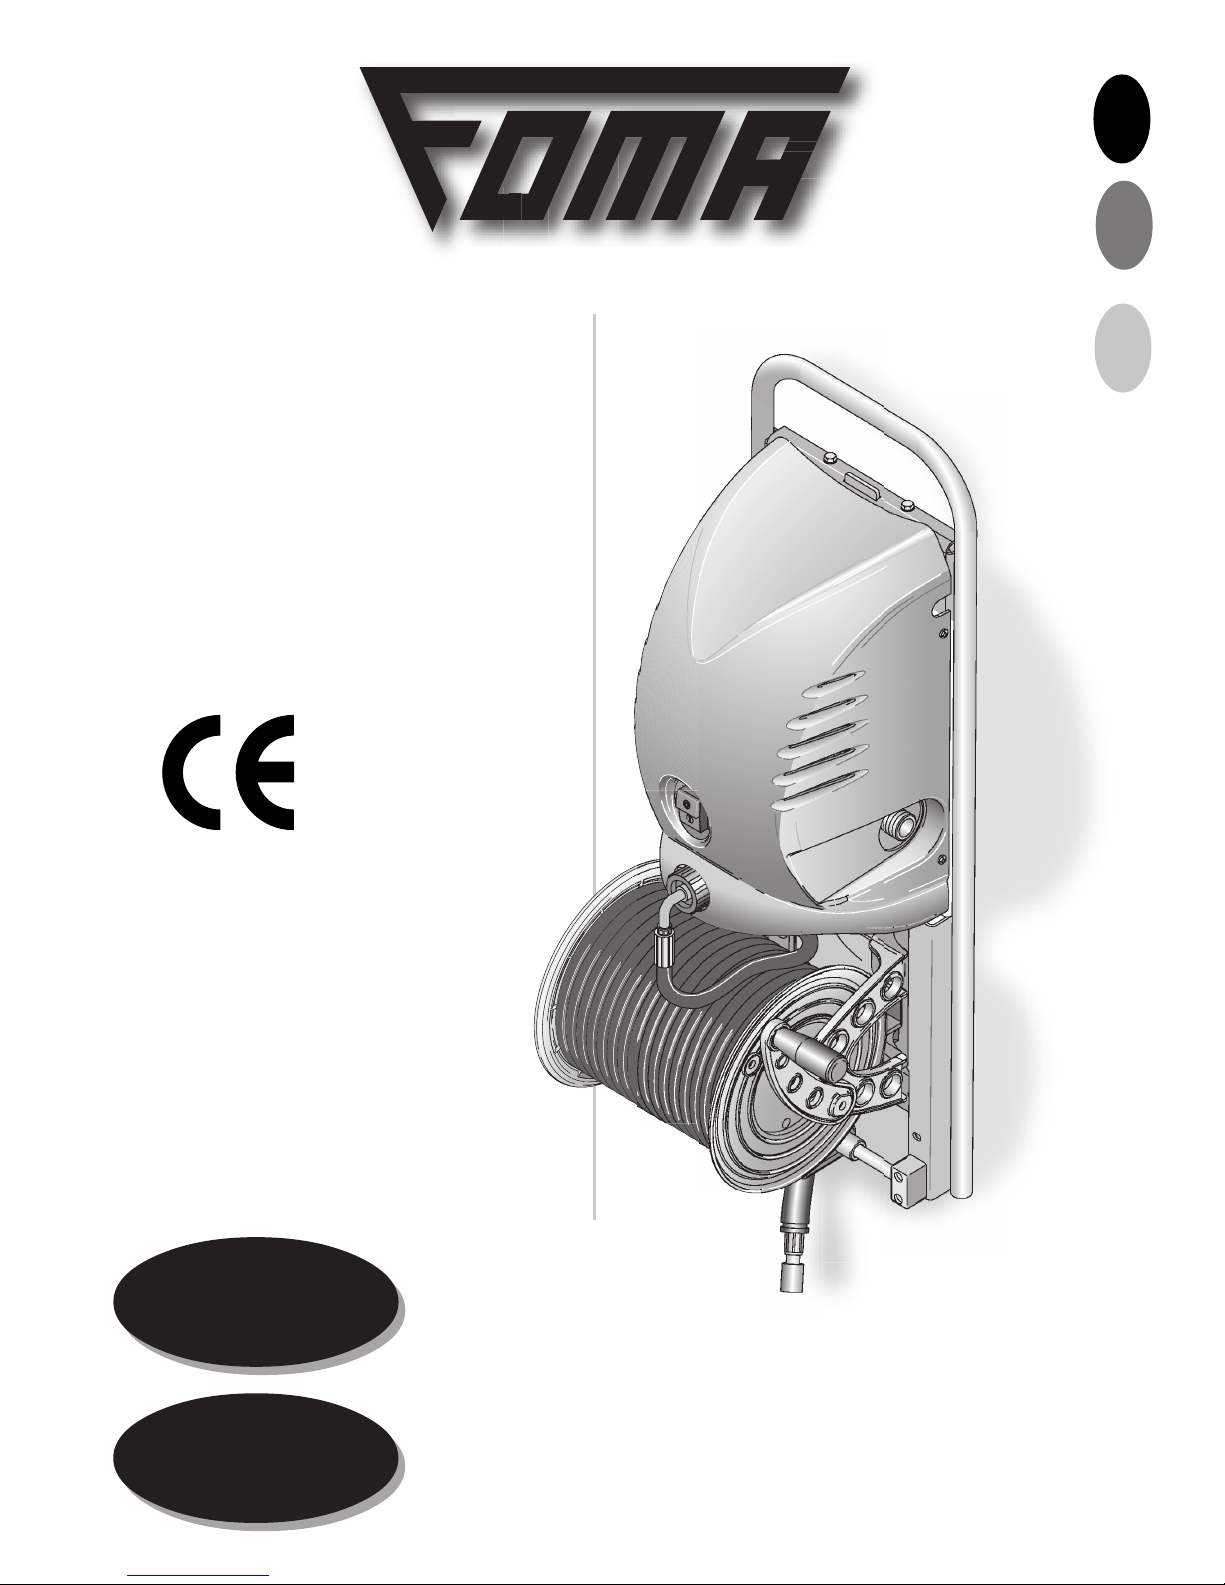
1MAIN COMPONENTS (Fig. 1)
We wish to thank you for choosing our machine. We are confident that the high quality of our machine will meet with your
satisfaction and appreciation and that your pressure washer will give you long-lasting service. Before starting to use your
machine, make sure to read with care this manual, which has been purposely drawn up to provide you with all the necessary
information for proper use of the machine, in compliance with basic safety requirements
22
22
2SAFETY PRECAUTIONS
The high pressure of the water
generated and connection to the
electricity supply constitute
particularly serious danger risks.
Carefully read the user
instructions before starting
the machine for the first time.
Follow the safety warnings.
The appliance must be used solely by personnel trained
in its use and specifically authorized to use it.
The user manual must be made available to all users.
Do not subject the machines to any modifications
which may jeopardize personal safety.
Using extensions, check the minimum section of the
individual cables (see paragraph entitled “Connection
to the mains appliances”).
Install the extensions in such a way as not to alter the
protection class of the appliance.
In the event of the use of extensions, the plug and
socket must be of waterproof type.
The use of unsuitable extension leads may constitute a
danger risk.
Your electrician can give you the necessary
information on the protection classification.
The electrical system to which the appliance is
connected must be realized in compliance with the
laws of the country of installation. The presence of a
differential magnetothermal switch is necessary with
a sensitivity of equivalent to 30 mA, above the power
socket or the system.
Only put the appliance into operation providing that
all components are free of defects.
Firstly check the mains attachment wire, the high
pressure pipe, the spraying device and the body.
Do not tread on the high pressure pipe; do not pull,
bend or twist it.
Do not shift the appliance by pulling it by the high
pressure pipe.
Never operate with a defective high pressure pipe,
but always replace with original spare.
The high pressure pipe must be homologated for the
permitted working overpressure of the appliance.
INDEX
1Main constructive components pag.9
2General safety advice pag.9
3Walll installation pag.10
4Connection of water supply pipe pag.11
5Assembly of the detergent spraying device pag.11
6Electrical connection of appliance pag.11
7Appliance switch on pag.11
8Appliance switch off pag.11
9Accessories pag.11
10 Maintenance and repairs pag.12
11 Trouble shooting guide pag.12
12 Technical data pag.17
Do not use the device in the
vicinity of persons, unless they
are wearing the necessary
protective garments.
High pressure jets may be
dangerous if used incorrectly, the
jet must never be directed on
persons, live electrical appliances,
including the appliance itself.
Never use the jet to clean your
own garments or footwear.
GB
1) Power plug
2) Main switch
3) Water supply rapid attachment
4) Foam nozzle
5) Nozzle with rotating head
6) Spray gun
7) Spray gun safety device
8) Water delivery attachment
9) High pressure hose
10) Hose reel kit
11) Supporting bracket
12) Holder bracket for accessoiries
13) Wall fixing screws
The functional overpressure and maximum tempera-
ture admitted, as well as the date of construction are
printed on the high pressure pipe covering.
Use only slightly alkaline detergents (Ph 9.1, 1%
solution), that are over 90% biodegradable.

6
CLOTHING AND EQUIPMENT
Always wear anti-slip sole
footwear.
Wear protective goggles or
visor and safety wear.
It is advisable to wear work overalls in order to redu-
ce the risk of injury in the event of accidental contact
with a high pressure jet.
FIELDS OF APPLICATION
The high pressure water cleaner has been developed for
washing vehicles, machines, containers, façades, stables
and for removing rust without generating dust or sparks.
During cleaning, ensure that no dangerous substances
of the object to be cleaned are dispersed into the
environment (such as asbestos, oil for example).
Carefully follow disposal instructions.
Do not treat concrete-asbestos surfaces with high
pressure jets. As it may cause the detachment of
dangerous asbestos fibres as well as dirt, detrimental
to the lungs.
The risk exists particularly after the drying of a surface
treated with a water jet or steam.
Do not clean delicate components made of rubber,
fabric or similar materials with a multi-directional jet.
When cleaning with a high pressure, flat jet, keep the
nozzle at a minimum distance of 15 cm.
STARTING UP, OPERATIONAL ADVICE
The trigger of the spray gun must
function smoothly and return to
initial position, after release.
Check the functional conditions of the appliance
before the start of each operation.
The mains cable and the plug, the high pressure pipe
with spraying device and the safety devices are
particularly important.
Keep children and animals clear when the appliance
is operating.
WARNING : with gun closed, on
machine not fitted with TOTAL
STOP system, avoid operating the
water cleaner for more than 30
minutes at a time to reduce the risk
of damage to the sealing system
of the water cleaner itself.
Before undertaking any
work on the appliance
always detachthe plug from
the power socket.
Do not ever wash the appliance or other
electrical appliances with a water jet.
Short circuit danger !
Check that there is sufficient air circulation in the
motor ventilation zone.
Do not cover the appliance, ensure
that there is sufficient motor
ventilation.
Position the high pressure cleaner as far away as
possible from the object to be sprayed.
Do not damage the mains attachment cable by
treading on it, squashing or pulling it, etc.Do not
detach the plug from the socket by pulling the
connection wire, but pull out the plug.
Make sure hands are dry before touching the plug
and the connection cable.
Hold the spraying device with both hands in order to
properly absorb the reaction force and the additional
torque in the case of spraying device with an inclined
spraying pipe. Always assume a safe and secure position.
33
33
3WALL INSTALLATION
As concerns water connection, refer to the regulations
of the individual countries.
The constructor will not accept liability for any damage
to people, animals or things as the result of improper,
incorrect or unreasonable use, or use which does not
comply with the above indications.
The water cleaner must not be used by children or
untrained persons.
Use only flexible hosing, accessories and fittings
recommended by the manufacturer. Do not use the
appliance in the event of any damage to the power
cable or other parts such as piping and fitting.
IMPORTANT :
Use only original Spare Parts
Fix the supporting bracket to the wall, by making
holes having a diameter of 12 mm at a height from
ground of approx. 180-190 cm (fig. 2). Make sure
that the wall and the fixing screws (included in the
supply) are suitable to support the weight of the
machine (Kg 40).
Release the gun from the high pressure pipe after
unlocking the safety device (fig. 7-B).
Connect the machine to the previously fixed bracket
and make sure that hook (1) is properly placed in the
eyelet on the upper part of the machine (fig 3). Then
fix the machine on the bracket by screwing the two
screws included in the supply.
Make two additional holes (Ø 12 mm) near the bracket
placed under the pipe winding device and fix the
machine to the wall using fixing screws included in
the supply (Fig. 4).

7
GB
55
55
5ASSEMBLY OF THE DETERGENT
SPRAYING DEVICE (Fig.10)
- Insert the sprayer pipe into the spray gun
- Rotate the pipe by 90°, and on extracting it, click it in.
44
44
4 CONNECTION OF THE WATER SUPPLY
PIPE
99
99
9 EQUIPMENT
The nozzle with rotating head can be rotated in a
continuous manner, by moving the terminal part.
ADDITION OF DETERGENT
The detergents must not be
allowed to dry on the object to
be cleaned.
- Push the sprayer pipe towards the gun, turning it
by 90° and then extract it (Fig. 14)
- Apply the detergent spray kit to the gun (Fig. 15).
- Fill the container of the spray kit with suitable
detergent (see paragraph “General safety
recommendations” in this booklet).
88
88
8 SWITCHING OFF THE MACHINE
- Press the button marked with an 00
00
0on the switch
(Fig. 11- OFFOFF
OFFOFF
OFF)
- Turn off water supply tap.
- Actuate spray gun until water drips from the
nozzle (machine is now de-pressurized).
- Release trigger.
- Press safety latch on spray gun. (Fig.13- pos.1).
The spray gun is locked and cannot be actuated
accidentally.
- Unplug machine from socket outlet.
- Disconnect water supply hose from machine and
water supply mains.
77
77
7 APPLIANCE ACTIVATION
- Press button I (Fig.11-ON) on the main switch
positioned at the rear of the device
-Position the spray gun on the object to
be cleaned - never on people !
- Press the safety device (Fig. 12 - pos. 1) - the gun
is released
- Direct the nozzle downwards
- Fully press down the trigger (Fig. 12 - pos. 2)
66
66
6 ELECTRICAL CONNECTION OF THE
APPLIANCE
The mains voltage must match the operating voltage.
(See identification plate)
- Insert the plug into a power socket installed in
compliance with regulations.
Check the minimum section of the individual cables
using extensions.
Position the extensions so as to maintain the protection
class of the equipment.
Voltage V Cable Cross-section
length mmm2
230 up to 2 1,5
230 20 to 5 2,5
Connect a clean water supply pipe (Fig. 9
– pos.3) to the water mains, checking to
ensure that the minimum pressure is of 1.5
bar and maximum is of 6 bar, with a
minimum flow rate of 6 l per min.
- Connect the water supply pipe (min. diam ½”) to
the water mains (fig.8)
- Fit the click-on attachment (Fig. 9- pos.1-3) onto
the fitting (2);
GB
It is advisable to point out the correspondence of the
holes: remove the machine from the bracket and
make the holes in such a way as to conveniently
work with the drill.
After definitely fixing the machine to the wall, intro-
duce the high pressure pipe into the loop under the
pipe winding device (Fig. 5); then fix the holder
bracket for accessoiries as shown in fig. 6.
Connect the high pressure pipe (previously released)
to the gun and make sure that the safety device is
locked (Fig. 7-A).

8
Before starting any work the machine, unplug the power cable, turn off the water supply and actuate the spray
gun until the pressure has been relieved completely.
1111
1111
11 TROUBLESHOOTING
Fault Cause Remedy
Pressure fluctuates or drops Lack of water Turn on water supply
Water filter clogged Clean the water filter on the
pump supply tube.
Motor hums when switched on,
but does not start Mains voltage too low Check electrical connection
Spray gun not actuted On switching on the machine,
engage the gun
Cross-section of extension lead
too small Use correctly dimensioned
extension lead, see "Connect
machine to power supply"
Motor will not start when
switched on Power supply not OK Check plug, cable and switch
Mains fuse tripped Resert mains fuse
Motor stops Motor protection switch tripped
due to motor overheating
Check that power supply
matches appliance voltage, wait
3 minutes, then switch machine
on again
The detergent fails to come out Clogged injector Clean the detergent spray nozzle
element
Jet is ineffective, ragged
unsteady Clean the nozzle of the foam
launch Clean the high pressure nozzle
with the tool provided in the
cleaning kit.
Selector sleeve for type of jet
wrongly set Adjust selector sleeve
1010
1010
10 MAINTENANCE , REPAIRS AND STORAGE
Before undertaking any work on the appliance always detachthe plug
from the power socket
Undertake only the maintenance operations described in the user instructions.
Contact the Technical Assistance service for all other interventions.
Use only original spares.
Should the power cable be damaged, it must be replaced by a cable or a set of special cables available from
the manufacturer or its assistance service.
The pins and joints of the connection cables of the electrical system must be protected against accidental water sprays.
STORAGE
Store the appliance in premises protected against freezing conditions.
If freeze protection is not guaranteed, suction a glycol based anti-freeze into the pump, as for cars
- Immerse the water pipe into the container of anti-freeze
- Immerse the gun without the sprayer nozzle into the same container
- Insert the appliance with open gun
- Activate the gun until an even jet is obtained.
Store the rest of the anti-freeze in a closed container.

9
1212
1212
12 Tekniske data
Technical data
Tekniska data
N
GB
S
ATADEKSINKET ATADLACINHCET ATADAKSINKET
AMOF 048 AMOF 059
kkyrt.skaMerusserpgnikroWkcyrtstebralamixaM rab__rab__
edgnemnnaV yreviledretawmumixaM lamixaM gninmörtsllitnettav emit/retil__ emit/retil__
gninnepSegatloVgninnäpS tloV__tloV__
snevkerF ycneuqerF snevkerF zH__ zH__
tkeffErewoPtkeffE Wk__Wk__
eslettykseB yrogetacnoitcetorP mrofsddykS 5XPI 5XPI
edbyDhtgneLdsgnäLmm523mm523
edderB htdiW dderB mm513 mm513
edyøHthgieHdjöHmm068mm068
tkeV thgieW tkiV gk72 gk03
pmetnnav.skaM
ylppusretaw.xaM erutarepmet retawhtiwnoitcnuf- erusserprednu
röfrutarepmet.xaM gnintam nettavdemnoitknuf- kcyrtrednu
°C__°C__
åvindyL dnuosdeetnarauG levelrewop åpåvindujIdaretnaraG otom )A(Bd__ )A(Bd__
lyker.skaM ehtfonoitcaermumixaMtej alamixamsnelårtS noitkaer N__N__
edgnel,egnalsskkyrtyøHm__ m__
epyt,egnalsskkyrtyøHtremrarebiFtremrarebiF
lemmortegnalS ieN ieN
reldimeksavvagnirøfåPesnalepåSesnalepåS
This manual suits for next models
1
Table of contents


