Fomei TR-X 32 User manual
´
TR-X 32
FOR CANON

Thank you for purchasing FOMEI’products.
Please read this user manual carefully before using this product.
Website: www.fomei.com
Safety warning:
1. Do not disassemble the product. In case of damage contact a service FOMEI or contractual
service with trained professionals.
2. Keep this product out of reach the rain or humidity to avoid damage or injury.
3. Do not use in the presence of flammable gas.
4. The product is not suitable for children.
5. Turn off the transceiver immediately in the event of malfunction.
6. Do not use the product in extreme temperatures.
7. Be careful with handling batteries.
8. Keep away from strong magnetic field.

A) Product overview
a) Transmitter
1. Battery compartment
2. Micro USB port and PC sync socket
3. Hot shoe speedlight connection
4. AF assist beam switch
5. Power switch
6. Trigger button (TEST)
7. Indicating light
8. LCD panel
9. Hot shoe camera connection
10. Channel setting button (CH/OK)
11. Group setting button (GR)
12. Select dial
13. Mode selection button (MODE)
1
2
3
4
5
6
7
8
9
10
11
12
13
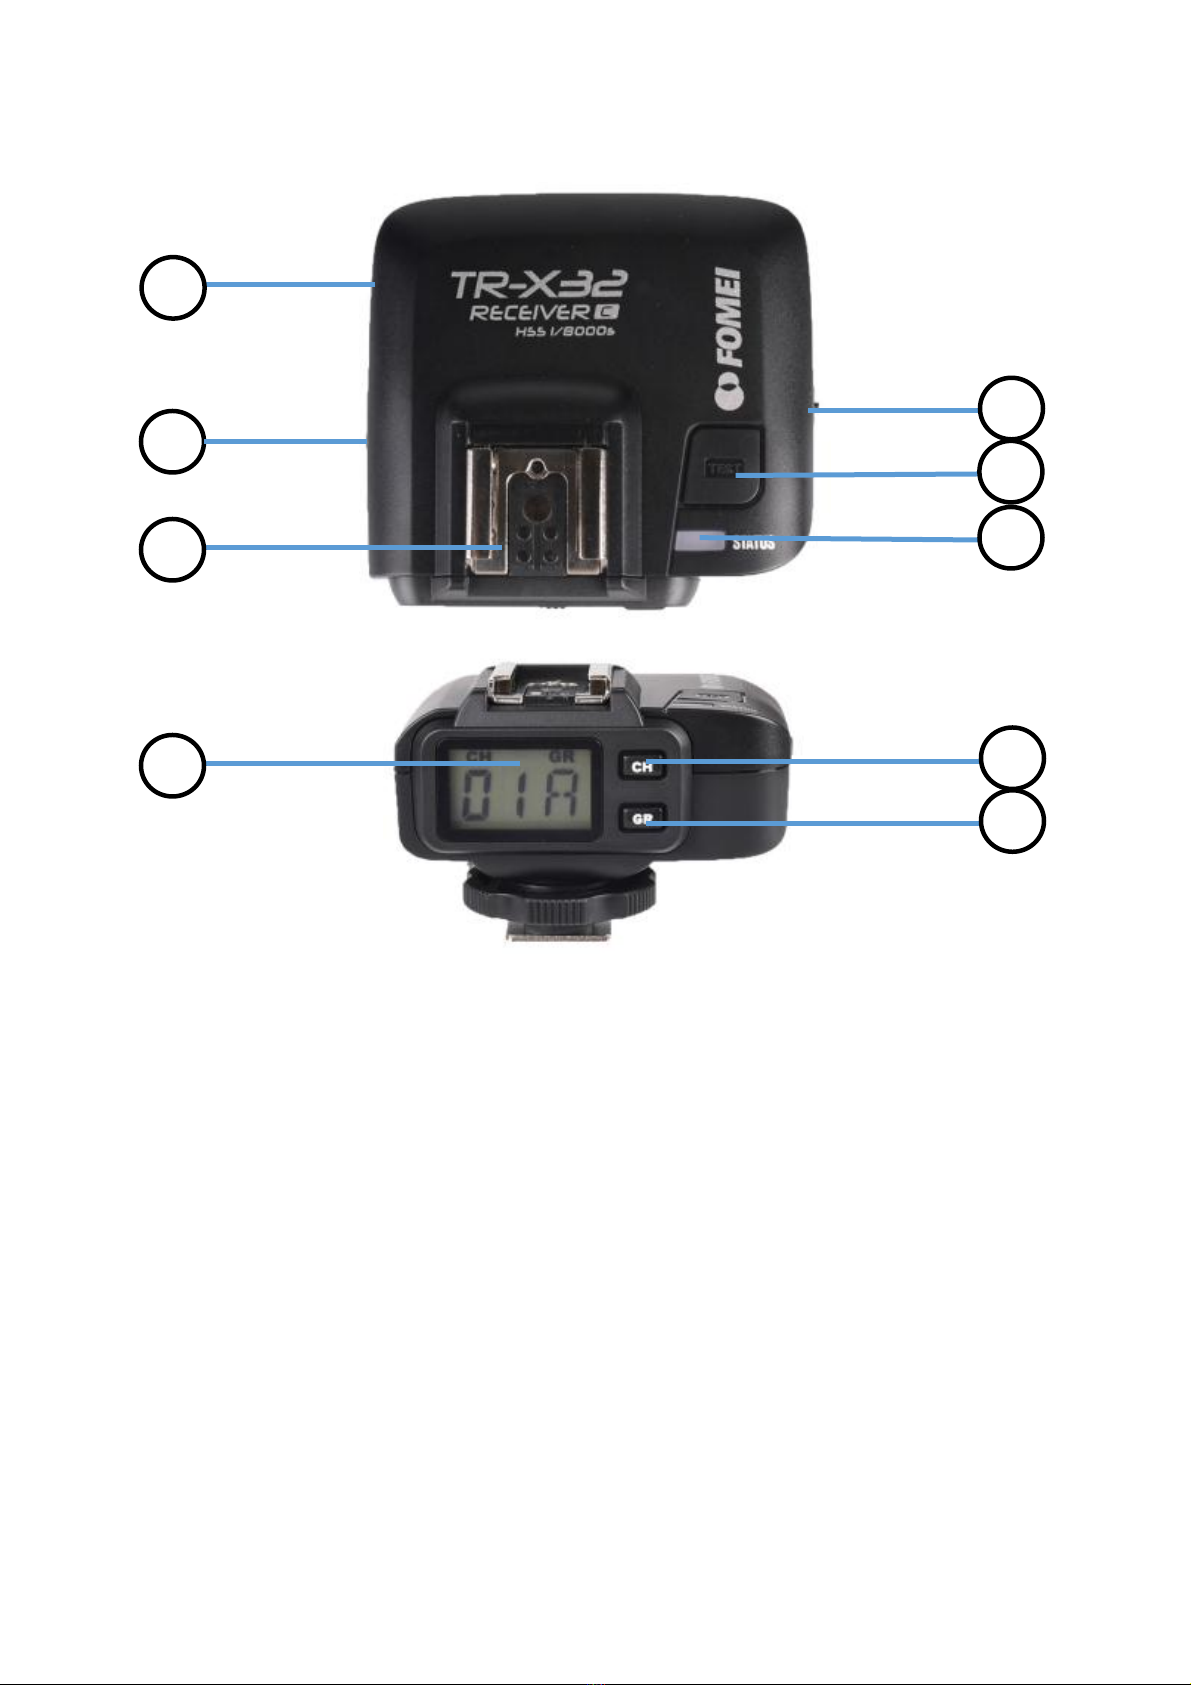
b) Receiver
1. Battery compartment
2. Micro USB port and 2,5mm shutter release port
3. Hot shoe speedlight connection
4. Power switch
5. Trigger button (TEST)
6. Indicating light
7. LCD panel
8. Channel setting button (CH)
9. Group setting button (GR)
1
2
3
4
5
6
7
8
9

Transmitter display
Receiver display

B) About product
TR-X 32 is wireless TTL flash trigger. This product can be used with a transmitter and one or more
receivers for studio flash, speedlight and camera shutter. Featuring multi-channel triggering, stable
signal transmission and sensitive reaction, if gives photographers unparalleled flexibility and control
over their setups. The TR-X 32 applies to hotshoe-mounted Canon EOS series cameras, as well as the
cameras which have PC sync sockets. With TTL wireless flash trigger, high speed synchronization is
available for most of camera flashes in the market which support E-TTL II. The max flash
synchronization speed is up to 1/8000s (1/8000s is achievable when the camera has a max camera
shutter speed of 1/8000s. 1/8000s is not achievable because some models of Canon EOS cameras have
a max camera shutter speed of only 1/4000s).
Battery:
There are two "AA" batteries in the transmitter and receiver. If the batteries are weak, the indicating
light blink quickly.
Using the flash trigger:
TR-X 32 features the following functions:
1) As a wireless studio flash trigger
a) Mount the transmitter on camera hotshoe and turn it on before turning on the camera.
b) Connect the receiver to studio flash by sync cable (one end in 2,5mm shutter release port of
the receiver, the other end in sync port of studio flash) before turning on the studio flash.
c) Set the transmitter and the receiver to the same channel.
d) Press the camera shutter button and the studio flash will be triggered simultaneously. The
indicating light of transmitter and receiver units turn red.
2) As a wireless speedlight trigger
a) Mount the transmitter on camera hotshoe and tur nit on before turning on the camera.
b) Mount the speedlight to hotshoe speedlight connection of receiver unit. Set the speedlight to
„M“ mode.
c) Set the transmitter and the receiver units to the same channel.
d) Press the camera shutter button and the speedlight will be triggered simultaneously. The
indicating light of transmitter and receiver units turn red.
3) As a wireless shutter release
a) Connect the receiver and the camera by remote cable (one end in receiver’s shutter release
port, the other end in camera’s shutter port) before turning on the camera.
b) Half press the „TEST“ to focus. When fully press the „TEST“ to shoot, the indicating light will
turn red until releasing the button.
4) As a wireless studio flash trigger or speedlight trigger with PC sync socket
a) The transmitter will control the flash on the receiver end to fire via using PC sync socket as
input by default.
b) Press the camera shutter and use the PC sync socket’s signal to control the flash.

c) PC sync socket can also be set as output. Long press the „CH/OK“ button of transmitter until
„Fn“ is displayed on the panel. Then set the value of C.Fn-03 to „ou“ and the PC sync socket is
under output mode.
Setting the transmitter:
•Power switch –slide the power switch to „ON“ and the device is on and the indicating light
will not blink.
•Power switch of AF assist beam –slide the power switch to „ON“ and the AF Lighting is allowed
to output.
•Channel setting
-1. Short press the „CH/OK“ button until the channel amount blinks.
-2. Turn the select dial to choose the appropriate channel. Press the „CH/OK“ button
again to confirm the setting.
-3. This flash trigger contains 32 channels which can be changed from 1 to 32. set the
transmitter and the receiver to the same channel before usage.
•Mode setting
-1. Short press the „MODE“ button and the mode of the current group will change.
-2. The current group’s mode will be changed by the order of TTL/M/-- modes („--„
means „OFF“ and the current group will not fire a flash in this mode)
•Current group setting
-1. Short press the „GR“ button to set the current group.
-2. The current group settings will blink and turn the select dial to change the settings.
-3. When the current group is in the „M“ mode, the power output value is changeable
from 1/1 (full power) to 1/128 (minimal power).
-4. Short press the „GR“ button again to confirm the settings.
•Multi flash group ON/OFF settings
-1. Open the multi flash in the C.Fn custom functions (set C.Fn-04 as „on“).
-2. Short press „MODE“ button to change the mode of selected group.
-3. The current group’s mode will be changed simultaneously by the order of on/-- (--
means „OFF“ which means that the current group will not fire flashes in this mode).
•Multi flash parameter setting
-1. Enter into multi flash mode before setting.
-2. Long press the „MODE“ button to enter multi flash parameter setting menu.
-3. Then, (output value), „T“ (flash times) and „H“ (flash frequency) will be displayed on
the LCD panel.
-4. Short press the „GR“ button to choose the settings. Turn the select dial to change
the blinking setting amount. Continue to press the „GR“ button until all the amounts
are set. Then short press the „MODE“ button to exit.
•Group settings
-1. Long press the „GR“ button to set all effective groups simultaneously.
-2. The settings of all effective groups will blink. Turn the select dial to change the
settings, until one of the group’s settings turns to the maximum or the minimum and
all settings of the effective groups will not change now.
-3. If the current group is in the „M“ mode, the power output value is changeable from
1/1 (full power) to 1/128 (minimal power) in 0,3 stop increments, until one of the
group’s setting turns to the maximum (1/1) or the minimum (1/128). If the current

group is in the „TTL“ mode, all the other groups which are in the „M“ mode will change
their FEC amount simultaneously. The FEC amount is changeable from -3 to 3 in 0,3
stop increments, until one of the group’s setting turns to the maximum (3) or the
minimum (-3). If the current group is in the „--„ mode (flash OFF) the amounts will not
change.
-4. If the groups in the „M“ mode or „TTL“ mode work together, the first FEC amount
which up to the maximum ort he minimum is considered as the limitation.
-5. Short press the „GR“ button again to confirm the setting.
•Test flash
-1. Press the „TEST“ to see the whether flash will fire normally or not.
-2. Fully press the „TEST“ and the indicating light turns red and the flash on the receive
end can be triggered.
-3. Use the transmitter to control camera to focus or shoot and the transmitter is
connecting to the camera (do not connect to the flash) now.
-4. In the standby mode, press the „TEST“ can wake up the receiver.
-5. The settings on the transmitter end will synchronize to the receiver end at the same
time.
•Modeling lamp control –double-click the „CH/OK“ button to power ON/OFF the modeling
lamp.
•Setting GR grouping mode
-1. Press the „MODE” button until „Gr” icon is displayed, which shows that GR grouping
mode has been set.
-2. To cancel GR grouping mode, press the „MODE” button again until the „Gr” icon
disappeared.
-GR mode can only be used normally when attaching to the CANON EOS cameras that
issued after 2012. In the GR mode, multi flash cannot be set.
•Automatically enter power saving mode
-1. The flash trigger will go into standby mode after the transmitter enter sleep mode
and the displays on the LCD panel will disappear.
-2. Press any of the button can wake up the flash trigger. If the transmitter is attached
to the Nikon DSLR camera, half press the shutter can also wake up the system.
-3. If the transmitter is set to single contact mode, the system will not enter power
saving mode.
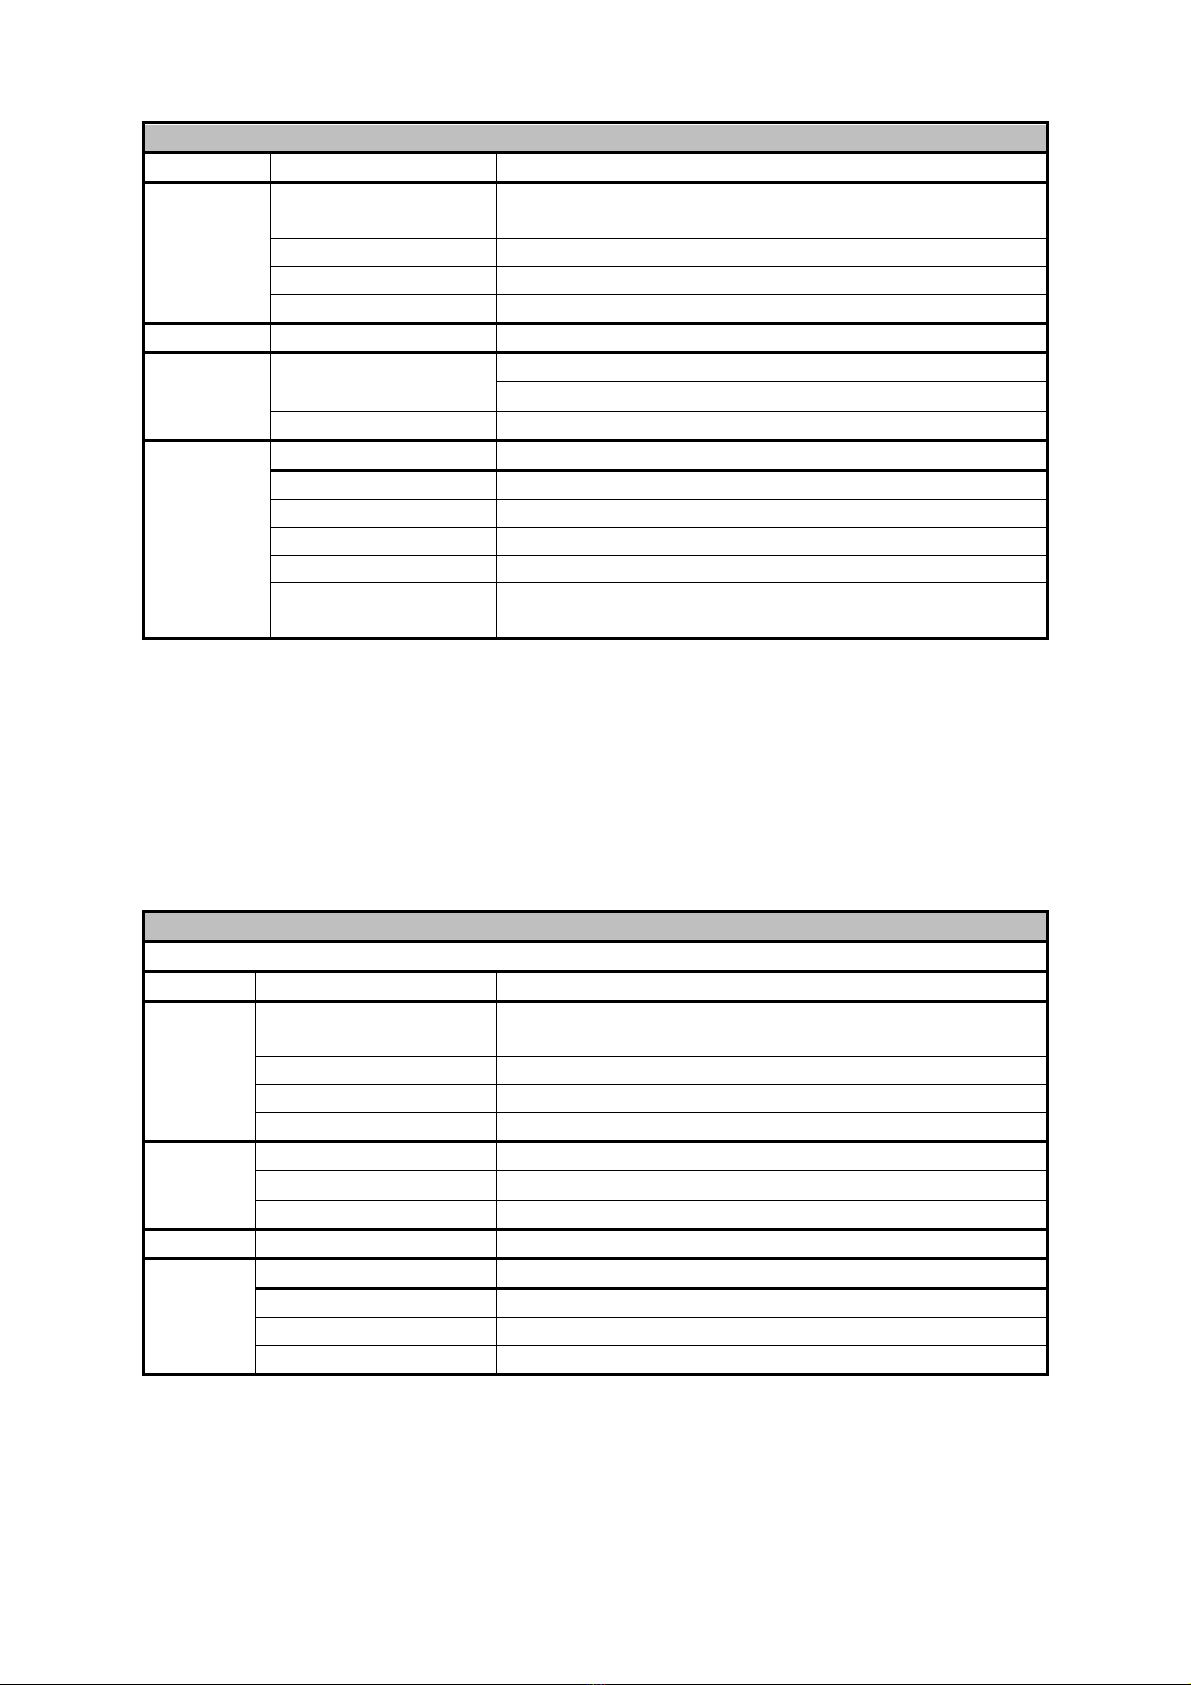
•C.Fn: setting custom functions –The following table lists the available and unavailable custom
functions of this flash.
Custom
functions
number
Functions
Setting signs
Settings and description
C.Fn-00
Synchronization
delay setting
0
No delay
1-100
Master flash synchronization delay
N*100
C.Fn-01
Single contact
mode
--
OFF
on
It is advisable to set the transmitter to
single contact mode when using it to
trigger the flash by PC cord or through
camera’s single contact.

C.Fn-02
Zoom setting
AU
Changing with camera’s zoom value,
flash’s auto zoom functions should be
turned on.
20, 24, 28, 35,
50, 70, 80, 105,
135, 200
Zoom (20, 24, 28, 35, 50, 70, 80, 105,
135, 200 mm)
C.Fn-03
PC sync socket
as an
input/output
In
PC sync socket connects with camera as
an input.
ou
PC sync socket connects with camera as
an output.
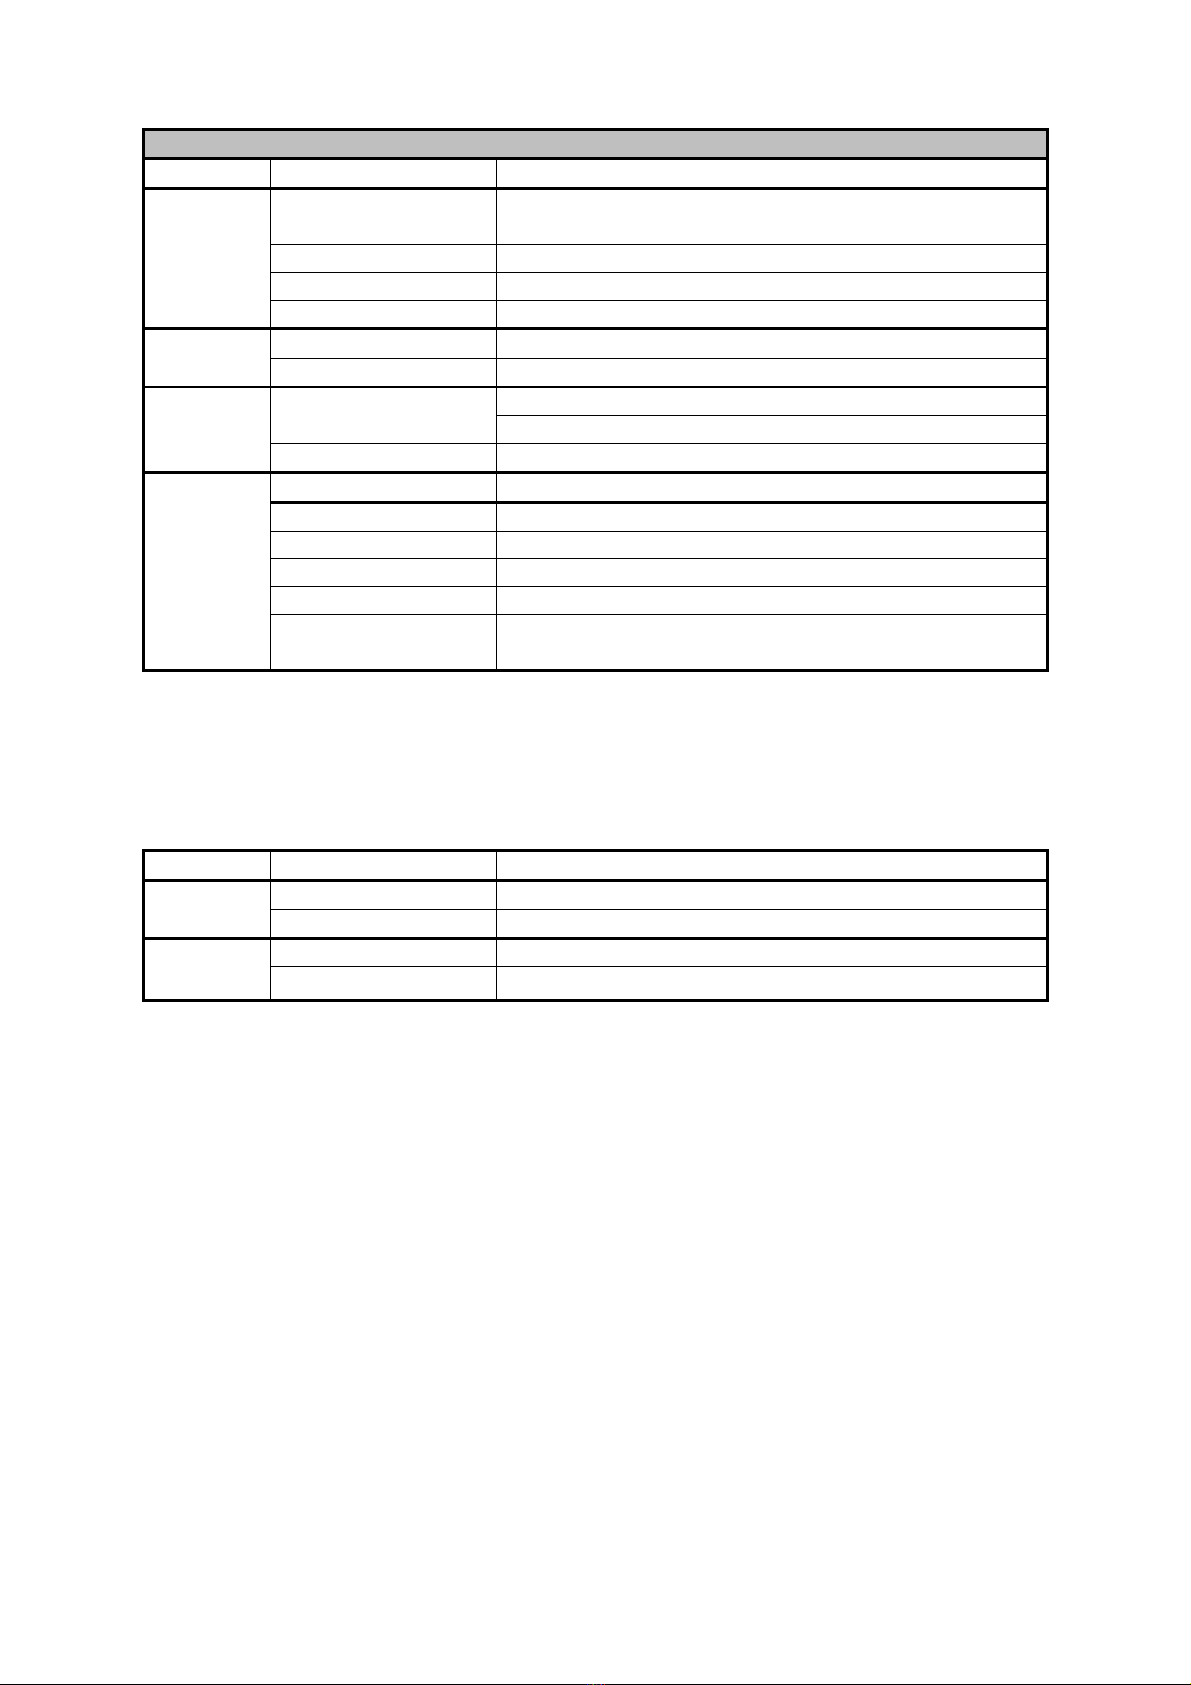
C.Fn-04
Second curtain
sync (*)
--
Second curtain sync off
on
Second curtain sync on
C.Fn-05
Minimum power
output value in
M/Multi mode
1/128
1/128
1/256
1/256
C.Fn-06
AF assist
--
OFF
on
ON
C.Fn-07
Displayed groups
03
3 groups displayed
05
5 groups displayed
C.Fn-08
Beeper ON/OFF
--
Turn off the beeper on the receive end
on
Turn on the beeper on the receive end
Double-click the „CH“ button to turn on/off the modeling lamp of the receive end.
Press the „TEST“ to turn on the flash trigger. When the indicating light blinks two times, it
means the effective remote distance is below 30m, thus the transmitter and receiver can
communicate normally no matter how near they are.
(*)Second curtain sync cannot be set through the camera’s external flash functions setting.
When using second curtain sync, the effective shutter speed range is from 1/30s to 30s. when
shutter speed is set as buLb or is quicker than 1/30s, the settings are invalid. After being turned
on, second curtain sync is effective even though HSS has been set and the shutter speed range
is from 30s to 1/30s. After second curtain sync is turned on, synchronization delay settings are
invalid.
1. Press the „CH/OK“ button for 2s or longer until „Fn“ is displayed.
2. Select the custom function number with the select dial.
3. Change the setting
-Press the „GR“ button until the custom function number blinks.
-Turn the select dial to set the desired number. Pressing „GR“ button
will confirm the settings.
-Press „MODE“ button to exit the „C.Fn“ settings.
•Wireless shutter release mode –half press the „TEST“ to focus. Fully press the „TEST“ and the
indicating light turns red. Now camera is ready to shoot. When releasing the button, the
indicating light turns off.
•Setting the camera –to achieve FP flash, set „e1: flash sync speed“ to „1/250s (Auto FP)“ in
the Nikon camera setting to get a stable transition from standard sync mode to high speed
sync mode. Do not use 1/320s (Auto FP).

Setting the receiver:
•Channel setting
-1. Short press the „CH“ button and the channel amount will increase a step each time.
-2. Long press the „CH“ button will enter quicker adjustment mode. The channel
amount will increase fast in this mode.
-3. Release the „CH“ button and the current channel amount is confirmed.
-4. The channel amount will increase from 1 to 32. when the current channel is 32,
press „CH“ button again and the channel 1 will be displayed on the panel.
•Group settings
-1. Short press the „GR“ button and the group amount will increase a step each time.
-2. Long press the „GR“ button will enter quicker adjustment mode. The group amount
will increase fast in this mode.
-3. Release the „GR“ button and the current group amount is confirmed.
-4. The group amount will increase from A to E. when the current group is E, press the
„GR“ button again and the group A will be displayed on the panel.
•Automatically enter power saving mode
-1. The system will go into standby mode after the transmitter goes into standby mode.
And the displays on the LCD panel disappear now.
-2. To wake up the system, press the „TEST“ or the „GR“ button. Fully press the „TEST“
of the transmitter can also wake up the receiver’s system. If the transmitter is attached
to the Nikon DSLR camera, half press the camera shutter can also wake up the system.
Selecting the operation method
Transmitter:
TR-X 32 –operation method 1 (by default)
TTL/M mode (In the GR mode or NON-GR mode)
Button
Operation
Function
CH/OK
Short press
Enter „CH“ settings (under normal status), confirm and back
to normal status (under settings)
Double-click
Control the ON/OFF of modeling flash
Long press for 2s
Enter C.Fn custom settings
Long press for 5s
Switch the operation methods (method 1/method 2)
GR
Short press
select power/FEC settings
Long press for 2s
Select all the group
MODE
Short press
Switch the group’s mode (TTL/M/--) (TTL/M/OFF in the GR
mode; TTL/M/Multi in the NON-GR mode)
Select dial
Status
Function
Normal
Set the group
Set the channel
Adjust the channel amount
Set the group
Adjust the group’s power/FEC amount
TR-X 32 –operation method 2
TTL/M mode
Button
Operation
Function
CH/OK
Short press
Enter „CH“ settings (under normal status), confirm and back
to normal status (under settings)
Double-click
Control the ON/OFF of modeling flash
Long press for 2s
Enter C.Fn custom settings
Long press for 5s
Switch the operation methods (method 1/method 2)
GR
Short press
Select the group downwardly
Double-click
Select the group upwardly
Long press for 2s
Select all the group
MODE
Short press
Switch the group’s flash mode (TTL/M/--)
Select dial
Status
Function
Normal
3/5 groups (*)
Set the channel
Adjust the channel amount
Set the group
Adjust the group’s power amount
Multi mode (In the NON-GR mode)
Button
Operation
Function
CH/OK
Short press
Enter „CH“ settings (under normal status), confirm and back
to normal status (under settings)
Double-click
Control the ON/OFF of modeling flash
Long press for 2s
Enter C.Fn custom settings
Long press for 5s
Switch the operation methods (method 1/method 2)
GR
Short press
Set times/frequency hz (under PTH status)
MODE
Short press
Switch the group mode
Back to normal status (under PTH status)
Long press for 2s
Enter PTH status (T-times, H-hz)
Select dial
Status
Function
Normal
3/5 groups (*)
Set the channel
Adjust the channel amount
Set the group
Adjust the group’s power amount
Set the flash times
Adjust the times amount
Set the flash
frequency
Adjust the frequency amount
Multi mode (In the NON-GR mode)
Button
Operation
Function
CH/OK
Short press
Enter „CH“ settings (under normal status), confirm and back
to normal status (under settings)
Double-click
Control the ON/OFF of modeling flash
Long press for 2s
Enter C.Fn custom settings
Long press for 5s
Switch the operation methods (method 1/method 2)
GR
Short press
Select the group downwardly
Double-click
Select the group upwardly
MODE
Short press
Switch the group’s mode (TTL/M/Multi)
Back to normal status (under PTH status)
Long press for 2s
Enter PTH status
Select dial
Status
Function
Normal
3/5 groups (*)
Set the channel
Adjust the channel amount
Set the group
Adjust the group’s power amount
Set the flash times
Adjust the times amount
Set the flash
frequency
Adjust the frequency amount
(*) There are 5 groups only in the GR mode while 3 groups in other modes. Choose 3 or 5 groups by
setting C.Fn-06 to 03 or 05.
Receiver:
Button
Operation
Function
CH
Short press
Select the channel downwardly
Double-click
Select the channel upwardly
GR
Short press
Select the group downwardly
Double-click
Select the group upwardly
Attentions:
1. Make sure that batteries are installed correctly and power switch is turned on. Check if the
transmitter and the receiver are set to the same channel. If the hotshoe mount or connection
cable is well connected, or if the flash triggers are set to the correct mode.
2. Check if the focus mode of the camera or lens is set to MF. If so, set it to AF.

C) Specifications:
Model
TR-X 32
Type
Canon
Compatible cameras
Canon EOS cameras (E-TTL II autoflash)
Support for the cameras that have PC sync socket
System
2.4G wireless transmission
Modulation mode
MSK
Power supply
2x AA batteries
Exposure control
Manual flash
Yes
TTL autoflash
E-TTL II
TTL
High-speed sync
Yes
Flash exposure compensation
Yes, ±3 stops in 1/3 stop increments
Flash exposure lock
Yes
Focus assist
Manual open
Multi flash
Yes
Second curtain sync
Yes
Modeling flash
Yes, fired with camera’s depth-of-field preview button
Wireless flash
Wireless function
In TTL mode, ratio OFF
In M mode, flash ratio (A:B C)
Support for GR group flash, A to E group can set their flash
mode separately
Controllable slave group
In the GR grouping mode, 5 (A, B, C, D, E)
In the ratio grouping mode, 3 (A, B, C)
Transmission range
>100m
channel
32
Others
Synchronization delay set
Yes (0-100ms)
Wireless shutter release
Receiver can control camera shooting through 2,5mm sync
port
Zoom setting
Adjust the flash’s focal length through the transmitter
LCD panel
Wide LCD panel, backlight ON/OFF
Output interface
Transmitter: use a PC cord to input and output
Receiver: use a 2,5mm sync cord to output
Firmware upgrade
Use the micro USB port to upgrade
Memory function
Settings will be stored 2s after last operation and recover
after a restart
Dimension and weight for
transmitter
72x75x52mm/100g
Dimension and weight for
receiver
70x65x47mm/70g

Table of contents
Popular Transmitter manuals by other brands

Emerson
Emerson Rosemount MultiVariable 3051SMV Reference manual

Emerson
Emerson wirelessHART Rosemount Series quick start guide

Jäger Direkt
Jäger Direkt OPUS RADIO PLUS operating instructions

Suntex
Suntex PC-3110-P Operation manual

Michell Instruments
Michell Instruments SF82 Series user manual

SMAR
SMAR TT303 Operation, maintenance & instruction manual


