FoodShare Bicycle Blender User manual
THE BICYCLE BLENDER
STEP BY STEP BUILDING GUIDE
Field To Table Schools

FoodShare Toronto
FoodShare Toronto is a non-prot community organization whose vision is Good Healthy Food for
All.Founded in 1985 to address hunger in Toronto communities, FoodShare takes a unique
multifaceted and long-term approach to hunger and food issues.
We work to empower individuals, families and communities through food-based initiatives, while
advocating for the broader public policies needed to ensure that everyone hasadequate access to
sustainably produced, good healthy food.
Working "from eld to table," we focus on the entire system that puts food on our tables: from the
growing, processing and distribution of food to its purchasing, cooking and consumption.
FoodShare would like to acknowledge the support of the Ontario Trillium Foundation, Patagonia
and Whole Foods Market in the production of this toolkit.
Published By:
FoodShare Toronto
90 Croatia Street
Toronto, ON
Canada
M6H 1K9
Phone: (416) 363-6441
Website: www.foodshare.net
WWW.FOODSHARE.NETTHE BICYCLE BLENDER 2 OF 12
Here’s to enjoying
the fruits of your labour
from the fruits of your labour
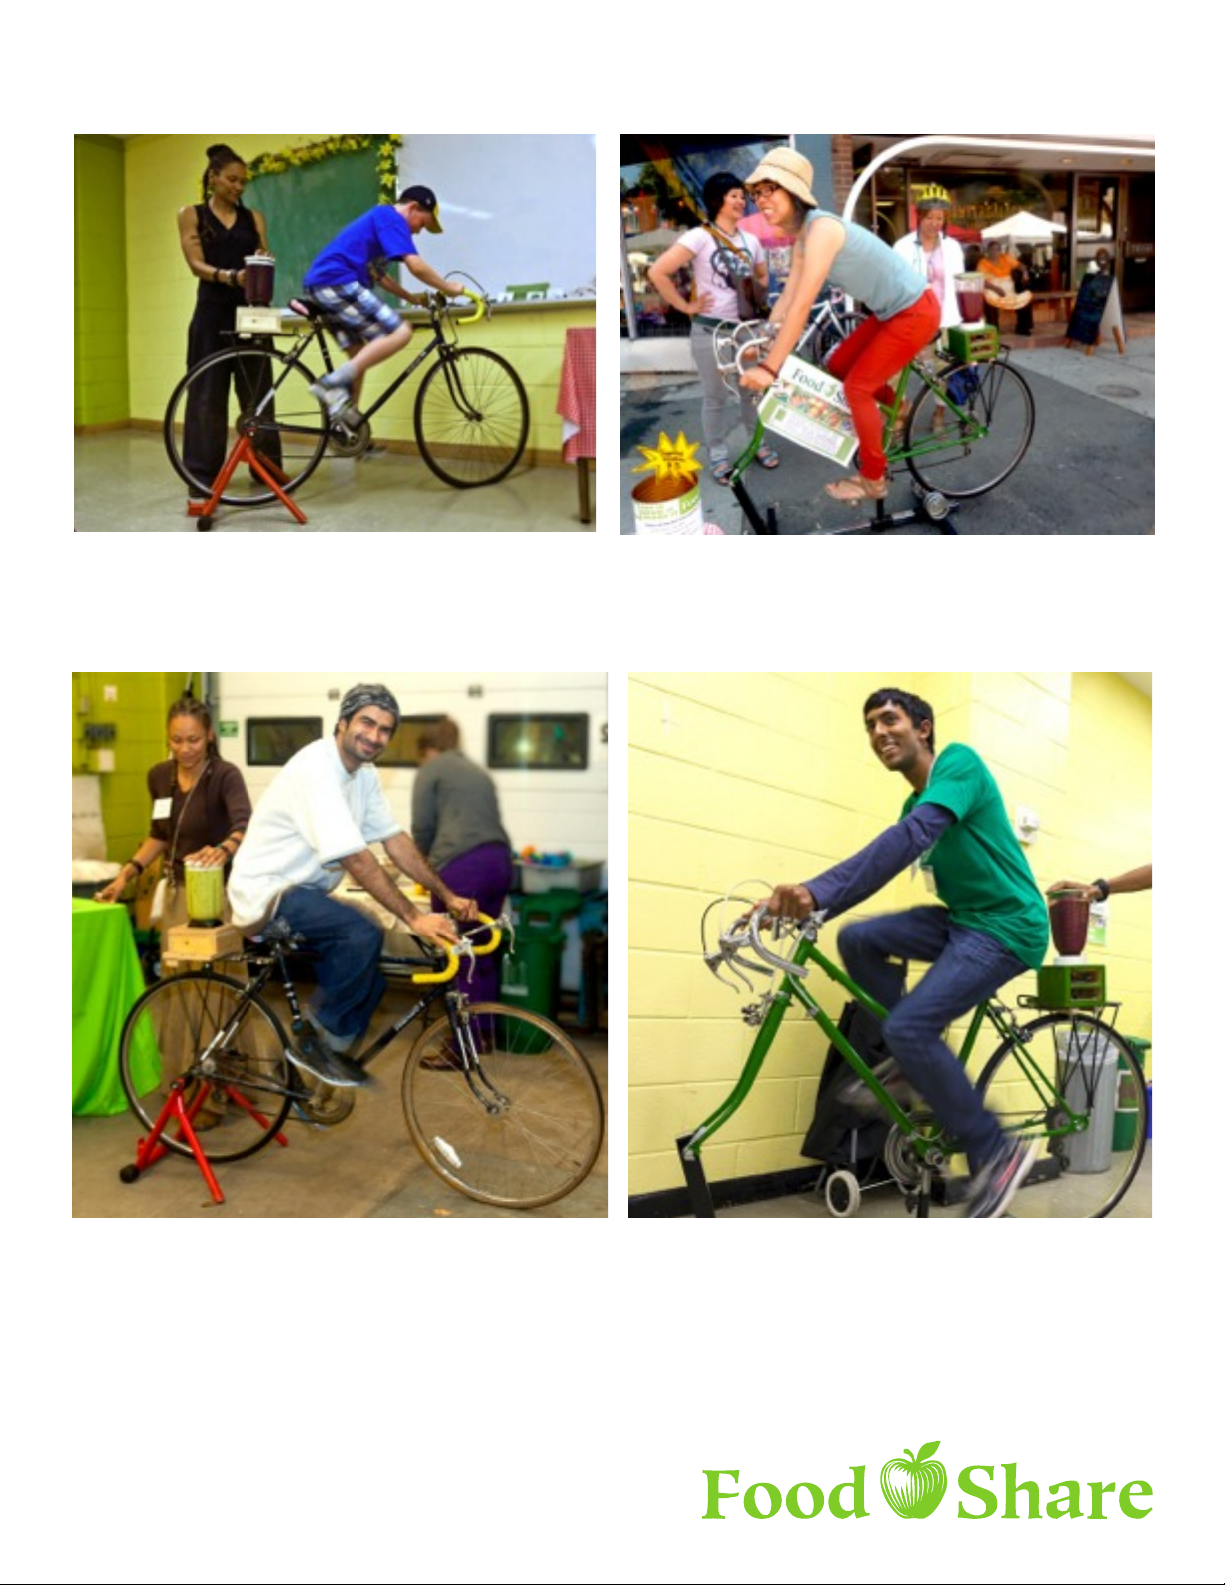
Welcome to the wonderful world of bike-powered blending! This guide will help you convert
an old blender (even one that no longer works) into a pedal-powered smoothie machine.
Here at FoodShare we use our bike blenders to get students of all ages excited about healthy
eating. Even the most unadventurous students will usually at least try a smoothie if they’ve
been involved in the process by taking a turn pedaling.
Although we have tried to make the steps for building a bike blender as straight-forward as
possible, it’s definitely not a project for everyone. If you’re never picked up a power tool
before, you’ll probably want to get some help from a handy friend.
Good luck and happy pedaling!
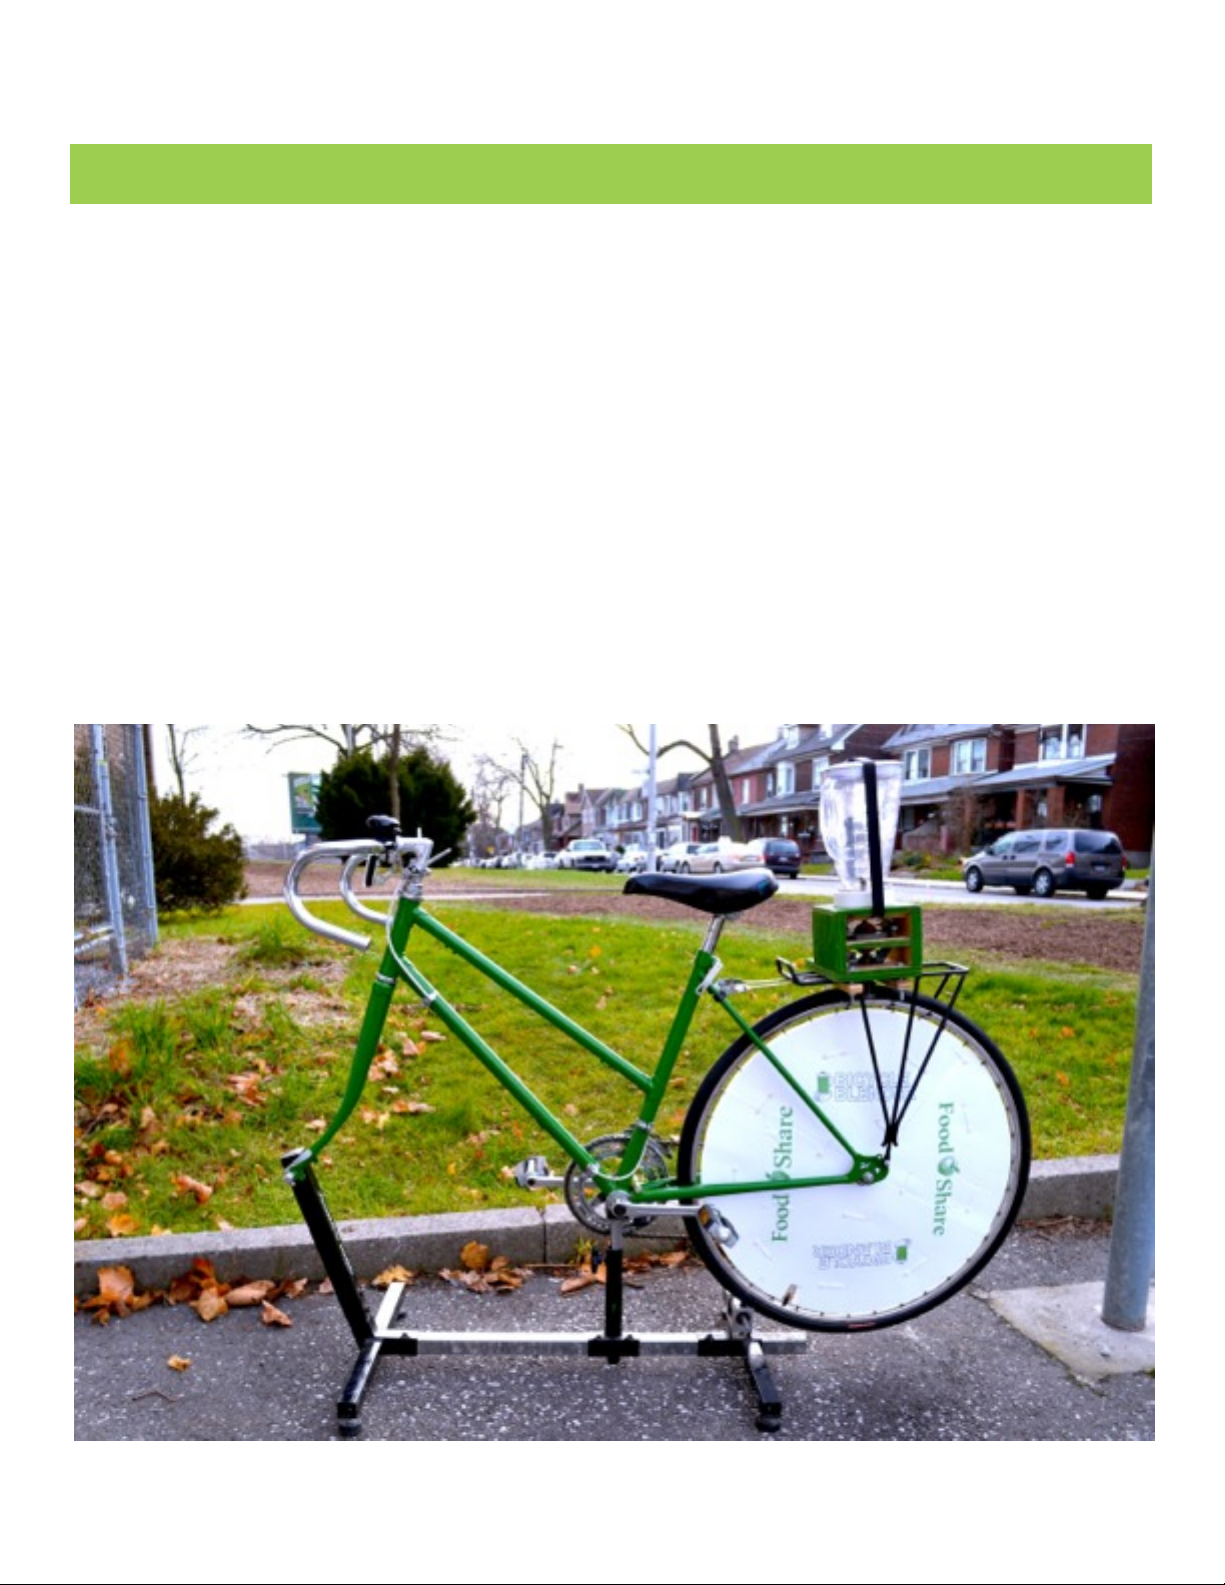
THE BICYCLE BLENDER
WWW.FOODSHARE.NETTHE BICYCLE BLENDER 3 OF12

clear polycarbonate sheet, 6” x 12” (full
sheets of this are quick expensive, so
look for offcuts)
¾” webbing, approximately 3 ½’ (MEC
product number 0407-056†)
plastic buckle (MEC product number
5000-701†)
Oster brand blender (old style with a
detachable plastic ring that holds the jug)
rear bike rack (MEC product number
1805-092†)
3/8” drill chuck and chuck key
5/8” plywood, about 12” x 16”
Weldbond glue
twelve 1 ½” wood screws (#8)
six ½” pan head screws (#8)
four 2” x ¼” bolts
eight ¼” washers
four ¼” nuts
road bike (a step-through frame is nice)
stationary trainer stand
table saw and jig saw
drill with #2 Robertson bit;
#8 countersink bit; and 5/32”, 1/4” and
3/8” drill bits
pliers
adjustable wrench
ratchet set
pencil and pen/marker
tape measure
BLENDER
BIKE RACK
DRILL CHUCK
AND KEY BOLTS, NUTS, WASHERS
TRAINER STAND
BUCKLE AND WEBBING
ATTENTION: Power tools can be very dangerous!
If you’re not familiar with using them, make sure
you get help from someone who is.
TIPS: Garage sales and second-hand stores are a good
place to find an older model of blender like this. Check
out Craigslist and Kijiji as well! Make sure that the bike
rack is similar to the one shown here, with lots of open
space between the horizontal bars.
TIPS: Trainer stands come in a variety of models and
usually include a resistance mechanism, which you can
remove before using.
TIPS: You can try removing the chuck from a broken drill or
just buy a replacement chuck from your local hardware store.
open space
detachable ring
†Visit www.mec.ca for more details about
these products
WWW.FOODSHARE.NET
MATERIALS
TOOLS
OPTIONAL
THE BICYCLE BLENDER 4 OF 12

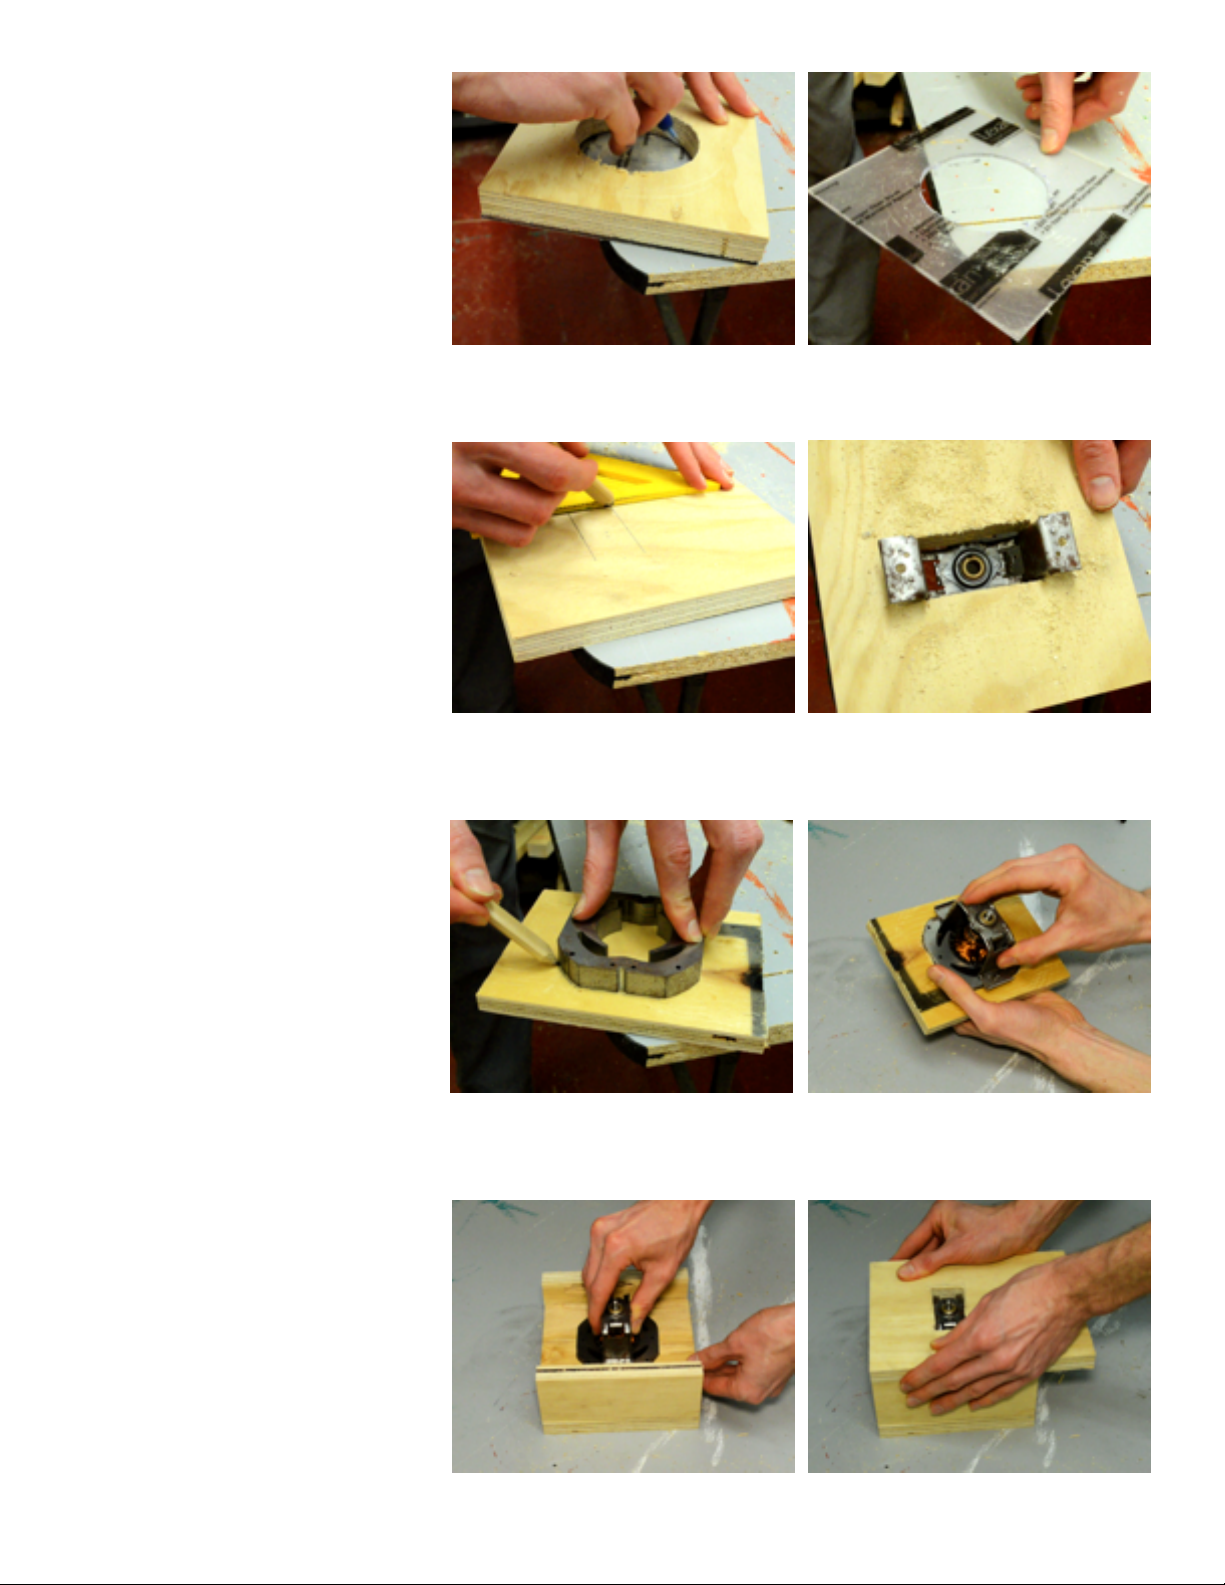
Disassemble the blender base by undoing the three screws that attach the bottom cover and
removing it. Disconnect the power cord, unscrew the top of the metal drive shaft (the part
that interfaces with the blender jug) and remove the fan from the bottom of the drive shaft.
Disconnect the coloured wires, undo the screws that hold the chassis in place and remove it.
Remove the two screws that attach the plastic rim to the top of the blender base and set it aside.
Undo the two screws that hold the chassis together and take it apart. Cut the wires and
remove the copper windings from the middle section of the chassis. Set aside the three parts
of the chassis, the two screws that held it together, the drive shaft and the top interface.
DISCONNECT WIRES REMOVE SCREWS
TAKE CHASSIS APART MIDDLE OF CHASSIS
REMOVE TOP OF DRIVE
SHAFT
REMOVE COPPER WINDINGS
Drive Shaft
TOP INTERFACE
PLASTIC RING
DISASSEMBLING THE BLENDER
PARTS TO SAVE
a
bce
d
a
b
c
d
e
e
e
DRIVE SHAFT
SCREWS
CHASSIS
WWW.FOODSHARE.NETTHE BICYCLE BLENDER 5 OF 12
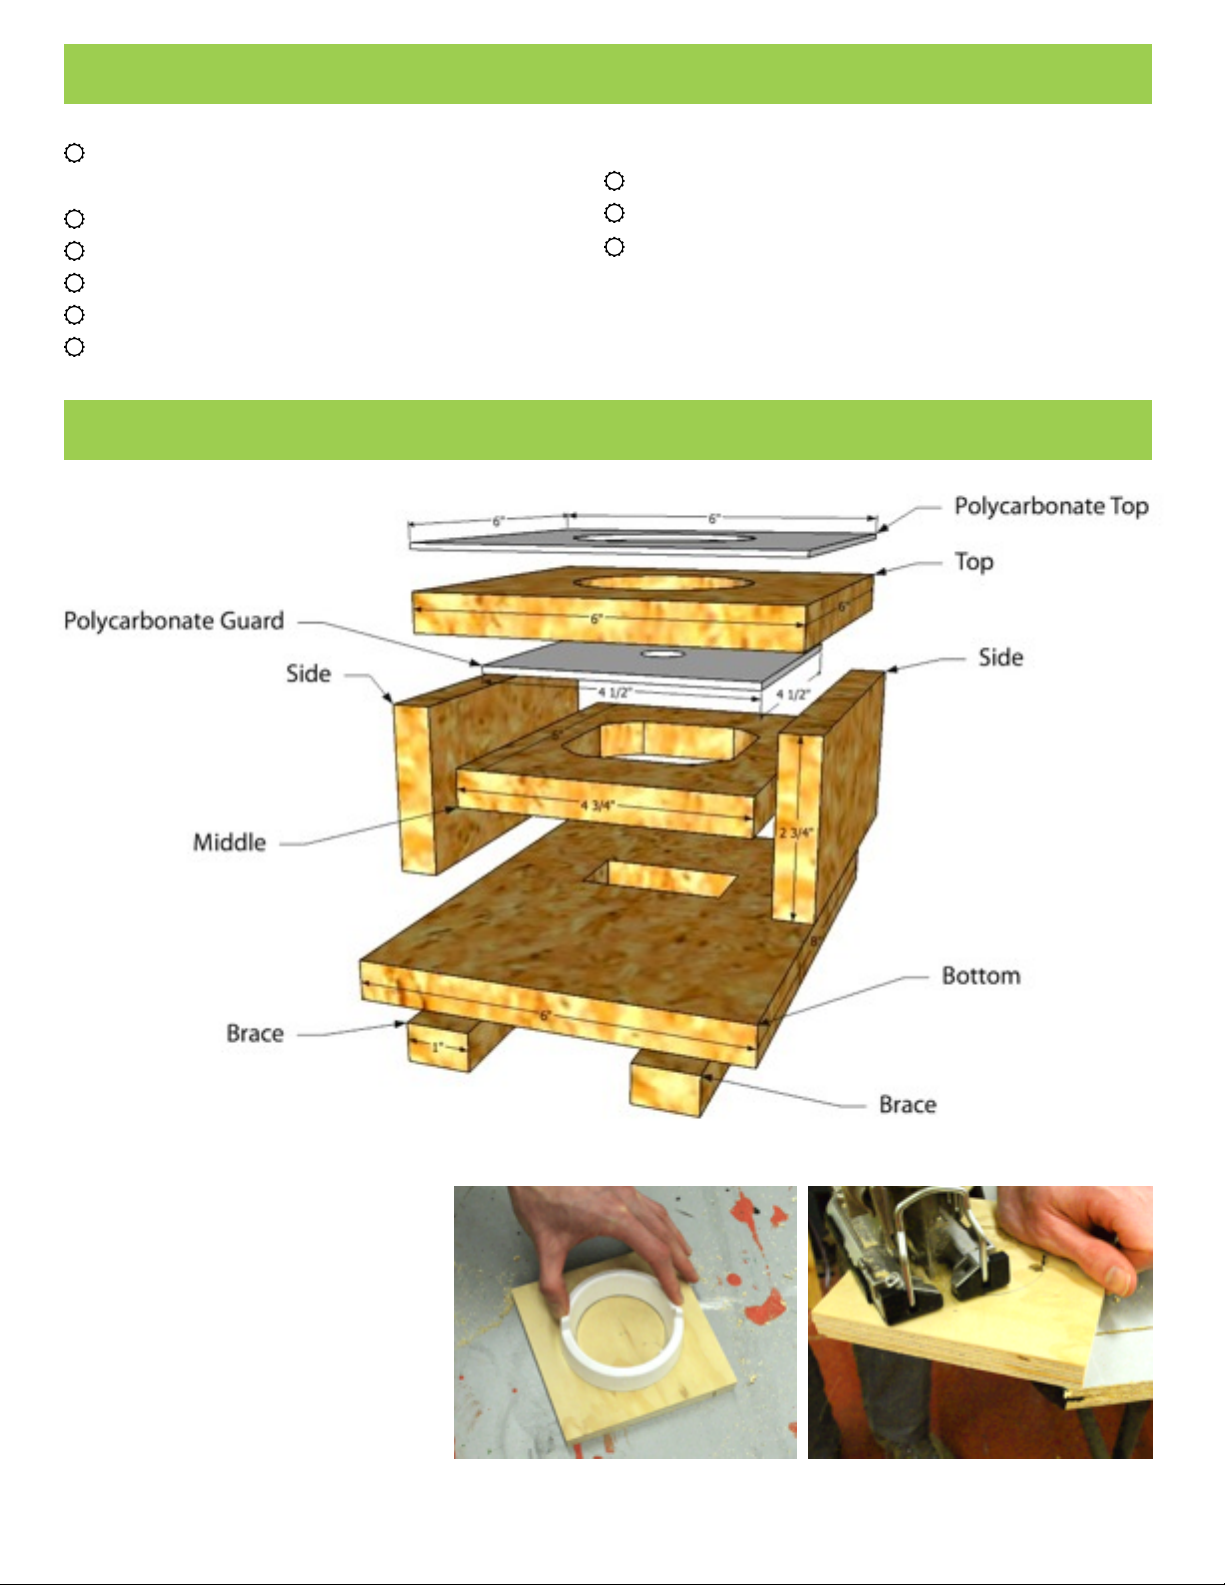
In the centre of the top piece,
trace a circle the size of the
inside of the ring that holds the
base of the blender jug. Cut this
hole out by drilling a hole with a
large drill bit and then using a
jigsaw.
Cut pieces for new base from 5/8”
plywood:
Top - 1 piece at 6” x 6”
Sides - 2 pieces at 2 ¾” x 6”
Bottom - 1 piece at 8” x 6”
Middle - 1 piece at 4 ¾” x 6”
Braces - 2 pieces at 1” x 8”
Cut the polycarbonate to the following sizes:
Top - 6” x 6”
Guard - 4 ½“ x 4 ½”
TRACE CIRCLE CUT OUT CIRCLE
BUILDING A NEW BASE
TIPS: These components are optional but useful additions.
The polycarbonate top makes it much easier to wipe the
base clean after use and the guard prevents smoothie from
dripping inside the blender box.
OPTIONAL
DIMENSIONS & ARRANGEMENT
STEP 1
WWW.FOODSHARE.NETTHE BICYCLE BLENDER 6 OF 12
Trace the middle section of the
chassis centred on the middle
plywood piece and cut it out.
Insert the middle section of the
chassis into the hole you just
cut and then reassemble the
chassis around the plywood.
Attach the plywood sides to the
plywood top with 1 ½” screws.
Place the middle plywood with
the chassis in position and then
attach the plywood bottom to
the sides with 1 ½” screws.
REASSEMBLE CHASSISTRACE CHASSIS MIDDLE
PUT CHASSIS IN POSITION ATTACH BOTTOM
Take the bottom piece and cut
out a 1-5/16” x 2-3/8” rectangle,
centred on a 6” x 6” section of
the plywood. Insert the bottom
piece of the chassis in this hole
to make sure that it fits.
MARK RECTANGLE FIT CHASSIS BOTTOM
OPTIONAL: Take the top piece
of polycarbonate (6” x 6”), trace
a hole the same size as the one
you just cut in the plywood, and
cut it out using the same
method you used to cut the
hole in the plywood. TRACE CIRCLE ON POLY CUT OUT CIRCLE
STEP 2
STEP 3
STEP 4
STEP 5
WWW.FOODSHARE.NETTHE BICYCLE BLENDER 7 OF12

Fasten the drill chuck to the
bottom of the drive shaft and
tighten it with the chuck key.
Reattach the top interface to
the top of the drive shaft by
screwing it back on.
Using two short pieces of 2”x4”
or other scrap wood as a stand
to accommodate the drill
chuck, place the plywood base
you have just assembled
upright. Place the plastic ring
and blender jug on top of the
base, with the drive shaft
inserted into the notch on the bottom of the blade assembly of the blender jug. Shift the jug
and chassis until the blade assembly rotates easily when you turn the drill chuck. Trace the
outside of the ring on the plywood top.
Use a pencil to make two
marks on the outside of the
plastic ring in line with where
the screw hole are on the
bottom. Transfer these marks
to the plywood and then make
marks the same distance in
from edge as the screw holes.
Unscrew the plywood top and
drill two 5/32” holes in the
plywood for the screws that will
attach the ring. Place the
polycarbonate on top of the
plywood and drill holes in the
polycarbonate where the six
screw holes are.
POSITION RING AND JUG
MARK RING TRANSFER MARKS
MARK SCREW HOLES DRILL HOLES IN POLY
STEP 6
STEP 7
STEP 8
WWW.FOODSHARE.NET
THE BICYCLE BLENDER 8 OF12
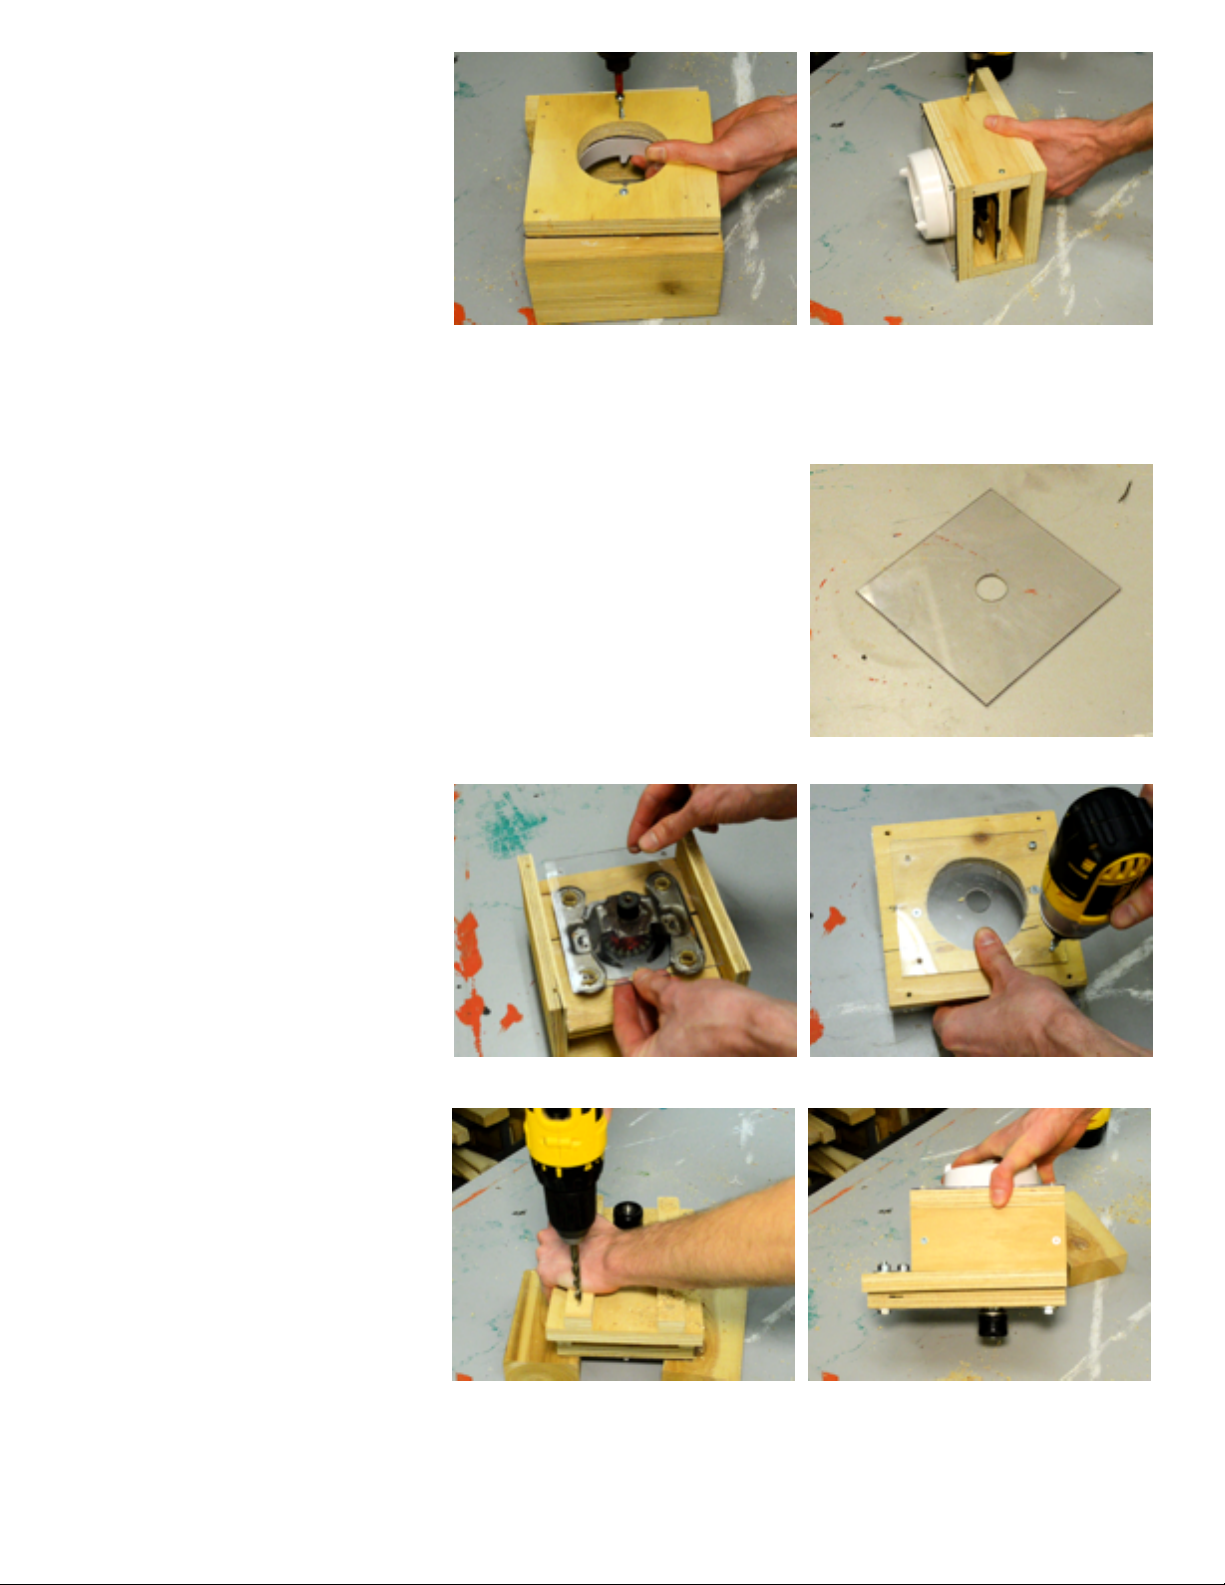
Remove the protective film from
the polycarbonate and then,
with it in place, screw in the ring
from below. Attach this whole
top assembly to the rest of the
plywood blender base.
Put the blender jug in place and lift the chassis up until the top interface fits into the slot in the
blade assembly. Adjust the position of the chassis until you find a spot where the blade
assembly spins freely when you turn the chuck and mark the
position of the centre piece of plywood. Attach this piece to
the sides with 1 ½” screws.
Put the new base back on the stand, replace the jug and test
to make sure that the blades still turn smoothly. You may
need to adjust the positioning slightly by undoing one or
more of the screws, moving the chassis, and then sinking the
screws back in.
OPTIONAL: Take the 4 ½“ x 4
½” polycarbonate guard and
drill a ¾” hole in the centre.
Remove the top assembly,
unscrew and remove the top of
the drive shaft and attach the
polycarbonate in position on
the underside of the top
assembly with ½” screws.
Reattach the top assembly.
FASTEN RING SCREW CHASSIS IN PLACE
Turn the box upside down and
place the two 1” x 8” braces
5/8” in from each side. Drill a
1/4” hole through the end of
each brace and the bottom of
the blender base (making sure not so drill too deeply and accidentally drilling through the
centre piece of plywood. Attach the braces temporarily using the bolts and nuts.
DRILL HOLES IN BRACES BRACES INSTALLED
GUARD WITH 3/4” HOLE
INSTALLING GUARDGUARD PLACEMENT
STEP 9
STEP 10
STEP 11
STEP 12
STEP 13
WWW.FOODSHARE.NETTHE BICYCLE BLENDER 9 OF 12

Loosen the drill chuck and
remove it. Apply glue to each
of the three “teeth” inside the
chuck and then carefully
mount it back onto the bottom
of the drive shaft. Tighten it
with the chuck key and spin it
with your fingers to make sure
it is centred properly, adjust as needed so that it spins without wobbling. When you find
the sweet spot, fasten it as tightly as possible.
Place the box on its side and apply glue to the small gap beside the jagged teeth on the
outside. Smooth this glue out with a small piece of scrap cardboard and let it dry for at
least 24 hours.
Mount the bicycle in the training stand and attach the rack to
the rear of the bicycle, using the provided instructions. When
the glue has cured, mount the blender base on the rack with
the drill chuck pressed up against the left sidewall of the tire.
Attach the box to the rack by fastening the braces with the
bolts and nuts, clamping the bike rack between the box and
the braces. Test the blender by cranking a pedal slowly and
watching to make sure that the chuck is spinning. If it comes
out of contact with the tire at any point in the rotation, loosen
the nuts, push the box so that the chuck presses up against
the tire more snugly, and tighten the nuts again.
GLUE CHUCK TO DRIVE SHAFT GLUE CHUCK CLOSED
MOUNT BLENDER ON RACK
INSTALL STRAP
TIPS: The safety strap is a great added feature for making sure that the blender jug doesn’t accidentally get
knocked of the bike and smashed when people are getting on and off of the bike. It also allows the blender to be
used by just one person if there isn’t an extra pair of hands to hold the jug in place while the bike is being pedaled.
OPTIONAL: Thread the webbing through the catch side of
the buckle, run it from the underside of the top piece of the
box to the top of the blender jug, and then cut it double that
length. Fasten both ends of to the top piece of the box with
a small screw. Thread the leftover webbing through the
hook side of the buckle. Fasten one end to the top piece of
the box, clip the buckle together at the top of the blender
jug and tighten it snugly.
STEP 14
STEP 15
MOUNTING THE BLENDER ON THE BIKE
WWW.FOODSHARE.NETTHE BICYCLE BLENDER 10 OF 12

Meredith Hayes Schools and Student Nutrition Senior Manager
meredith@foodshare.net, 416-363-6441 ext 248
As a founding FTTS programmer, Meredith is responsible for some of our most well-loved
activities and events. Bringing a passion for good food and environmental education, Meredith
is a major game-changer and one to watch as she collaborates like crazy to change the face of
school food through local, provincial and Canada-wide networks.
Contact For: FoodShare’s Recipe for Change Initiative, Ontario Edible Education Network,
Ontario Farm to School Challenge, Toronto Partners for Student Nutrition Programs
Brooke Ziebell Field to Table Schools Senior Coordinator
brooke@foodshare.net
Brooke applies a more formal nutrition science background (from her previous life in Australia)
with a love of get-your-hands-dirty education that encourages smell-touch-and-taste-it
investigations, out-of-this-world imaginations and wave-your-hands-in-the-air-like-you-just-
don’t-care celebrations.
Contact For: Student workshop information and bookings, curriculum development, educator
workshops and professional development opportunities, school events such as Eat-In Ontario
and The Great Big Crunch
Carolynne Crawley Field to Table Schools Educator
carolynne@foodshare.net
With over 20 years of working with children and youth, Carolynne “fountain-of-youth”
Crawley is a master at harbouring deep connections with nature and nutrition principals. A
keen forager and mentor, Carolynne talks the talk, walks the walk, and more often than not,
gardens the garden too. What ”Miss C” teaches, students remember.
Contact For: Volunteer opportunities, Harvest of the Month resources, Garden and Food
Curriculum Working Group, student engagement
Justin Nadeau School Food Innovations Senior Coordinator
justin@foodshare.net
Our resident “inventionator” combines an engineering background with intuitive design to
create innovative and super-fun ways to grow food up, down and all around school
classrooms, windows, hall ways, greenhouses, rooftops and gardens.
Contact For: School Grown Rooftop, food gardens and composting, indoor growing
innovations, aquaponics, Bendale Business and Technical Institute’s market garden
Katie German School Grown Coordinator
katieg@foodshare.net
Our very own accredited teacher with recent experience working on Canada’s largest (and
coolest) urban farm as well as coordinating FoodShare’s Focus on Food youth employment
program - can engage anyone to do just about anything.
Contact For: School Grown program, youth engagement, crop planning,
organic growing techniques
James Davis School Food Innovation Educator
james@foodshare.net
The “buildicationator” brings experience in permaculture, holistic design, green building and
carpentry. James has successfully tricked hundreds of unsuspecting students into drinking green
vegetable smoothies using his bicycle blender-building powers.
Contact For: bicycle blenders, school food garden furniture, File-A-Sprout, Brock Public School
terrace garden
Meet the Field to Table Schools Team
WWW.FOODSHARE.NETTHE BICYCLE BLENDER 11 OF 12

1 pear, cored and quartered
1 very ripe banana
1 cup water
1 cup of torn or ripped spinach leafs or other leafy vegetable
1 or 2 pitted dates (optional)
1 cup crushed ice (optional)
TIPS: Dark green, leafy vegetables will add more fibre, chlorophyll, vitamins and
minerals to your smoothie. Choose from a variety of greens: spinach, kale, collards,
chard, dandelion greens, parsley or even romaine lettuce.
Remember to remove and compost the thick, hard stems from your leafy, green
vegetables before adding leaves to the blender.
GREEN SMOOTHIE RECIPE
WWW.FOODSHARE.NETTHE BICYCLE BLENDER 12 OF 12
INGREDIENTS
DIRECTIONS
Place all of the ingredients in the blender and peddle until smooth.
Find more great recipes like this
one in our cookbook:
share: Delicious Dishes from
FoodShare and Friends
Table of contents
Other FoodShare Blender manuals


