Forever Redwood JEAN'S ULTIMATE SWING SETS User manual
ASSEMBLY INSTRUCTIONS FOR THE
JEAN’S ULTIMATE SWING SETS
866.332.2403 (TOLL FREE); 7am –7pm Pacific Time, Monday-Saturday
P| 1
Jean’s Ultimate Swing Sets
www.ForeverRedwood.com
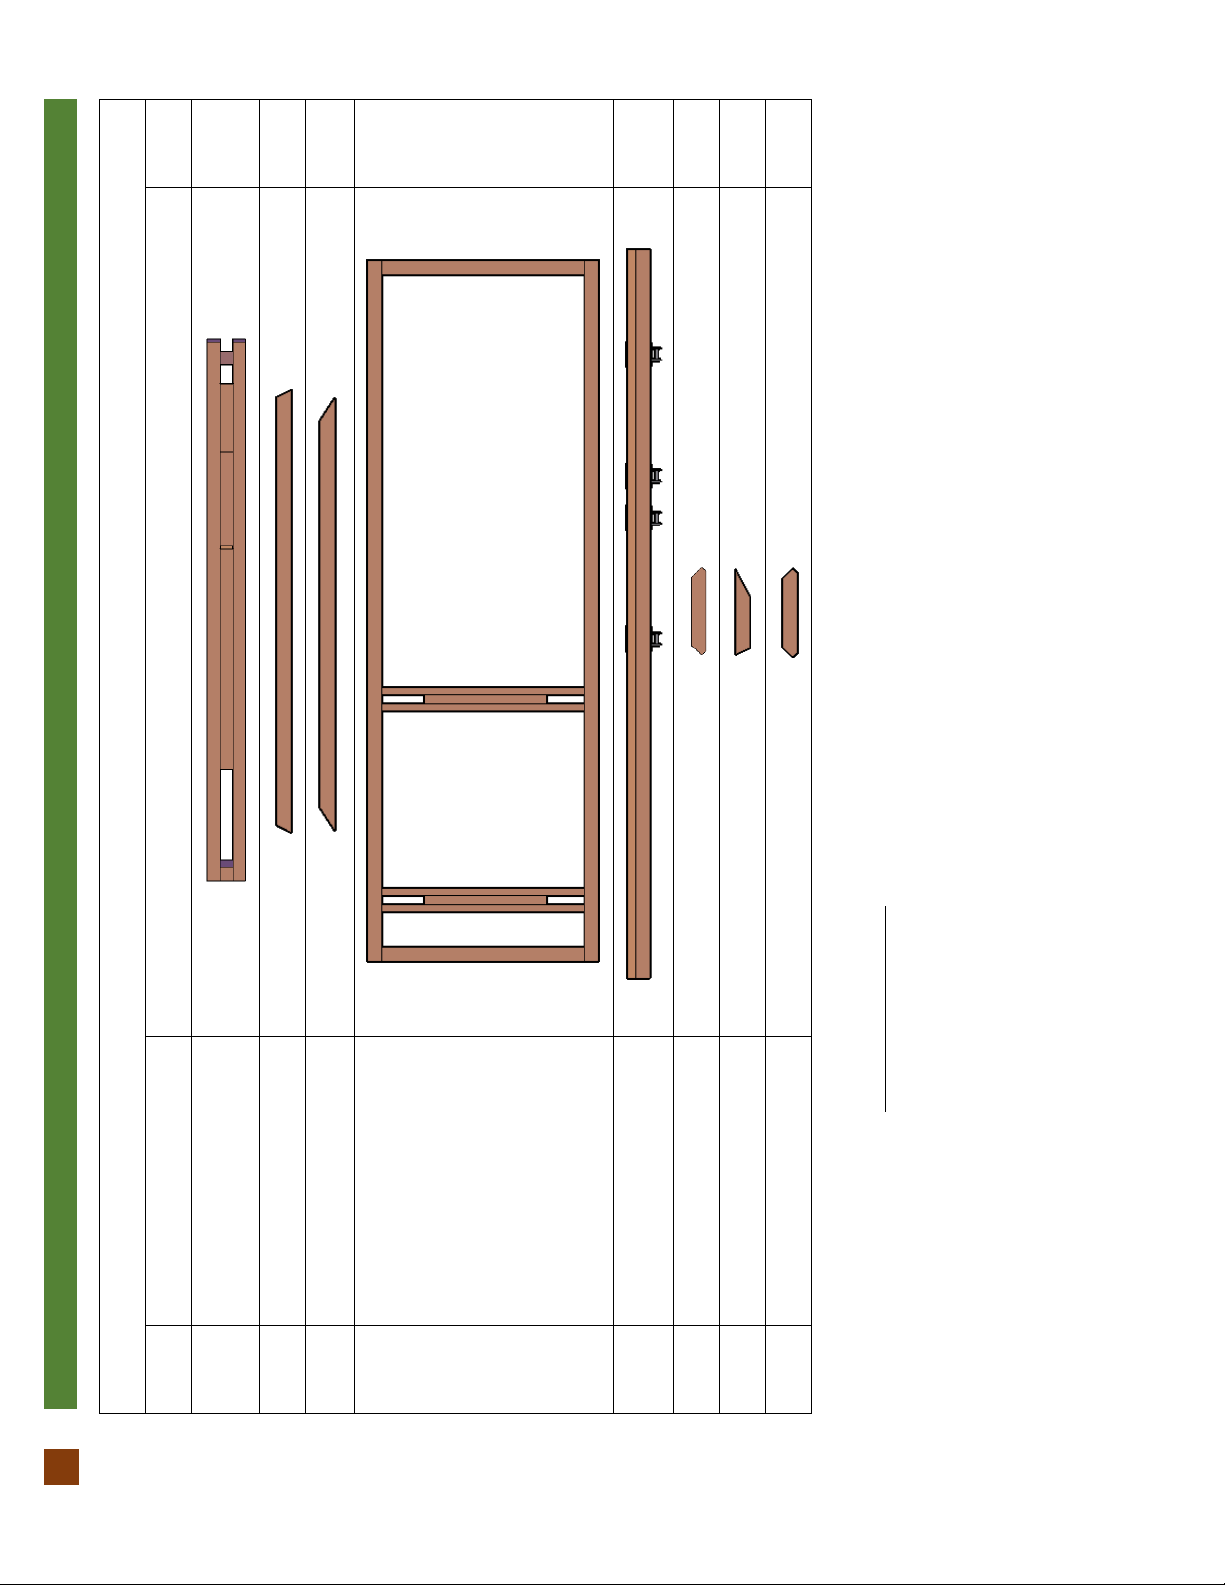
CONTENT OF BOXES
No.
1
2
3
4
5
6
7
8
Drawing
v
Description
Frame Legs
Lower Main Support
Top Main Support
Roof Frame
Main Structural Timber
Small Support
Connector Timbers
Knee Braces
Qty.
2
2
2
1
1
2
4
2
Note: Part numbers in the Content of Boxes Table are for reference only. These do not match to the numbers marked on the parts sent.

P| 2
Jean’s Ultimate Swing Sets
www.ForeverRedwood.com
CONTENT OF BOXES
No.
9
10
11
12
13
14
15
16
Drawing
Description
Straps
Kid´s Platform
If Ordered
Bench Seats
Long Bench Legs
Short Bench Legs
Bench Backrests
Bench Armrests
Swing Seats
Qty.
4
1
2
4
4
2
4
2
Note: Part numbers in the Content of Boxes Table are for reference only. These do not match to the numbers marked on the parts sent.
P| 3
Jean’s Ultimate Swing Sets
www.ForeverRedwood.com
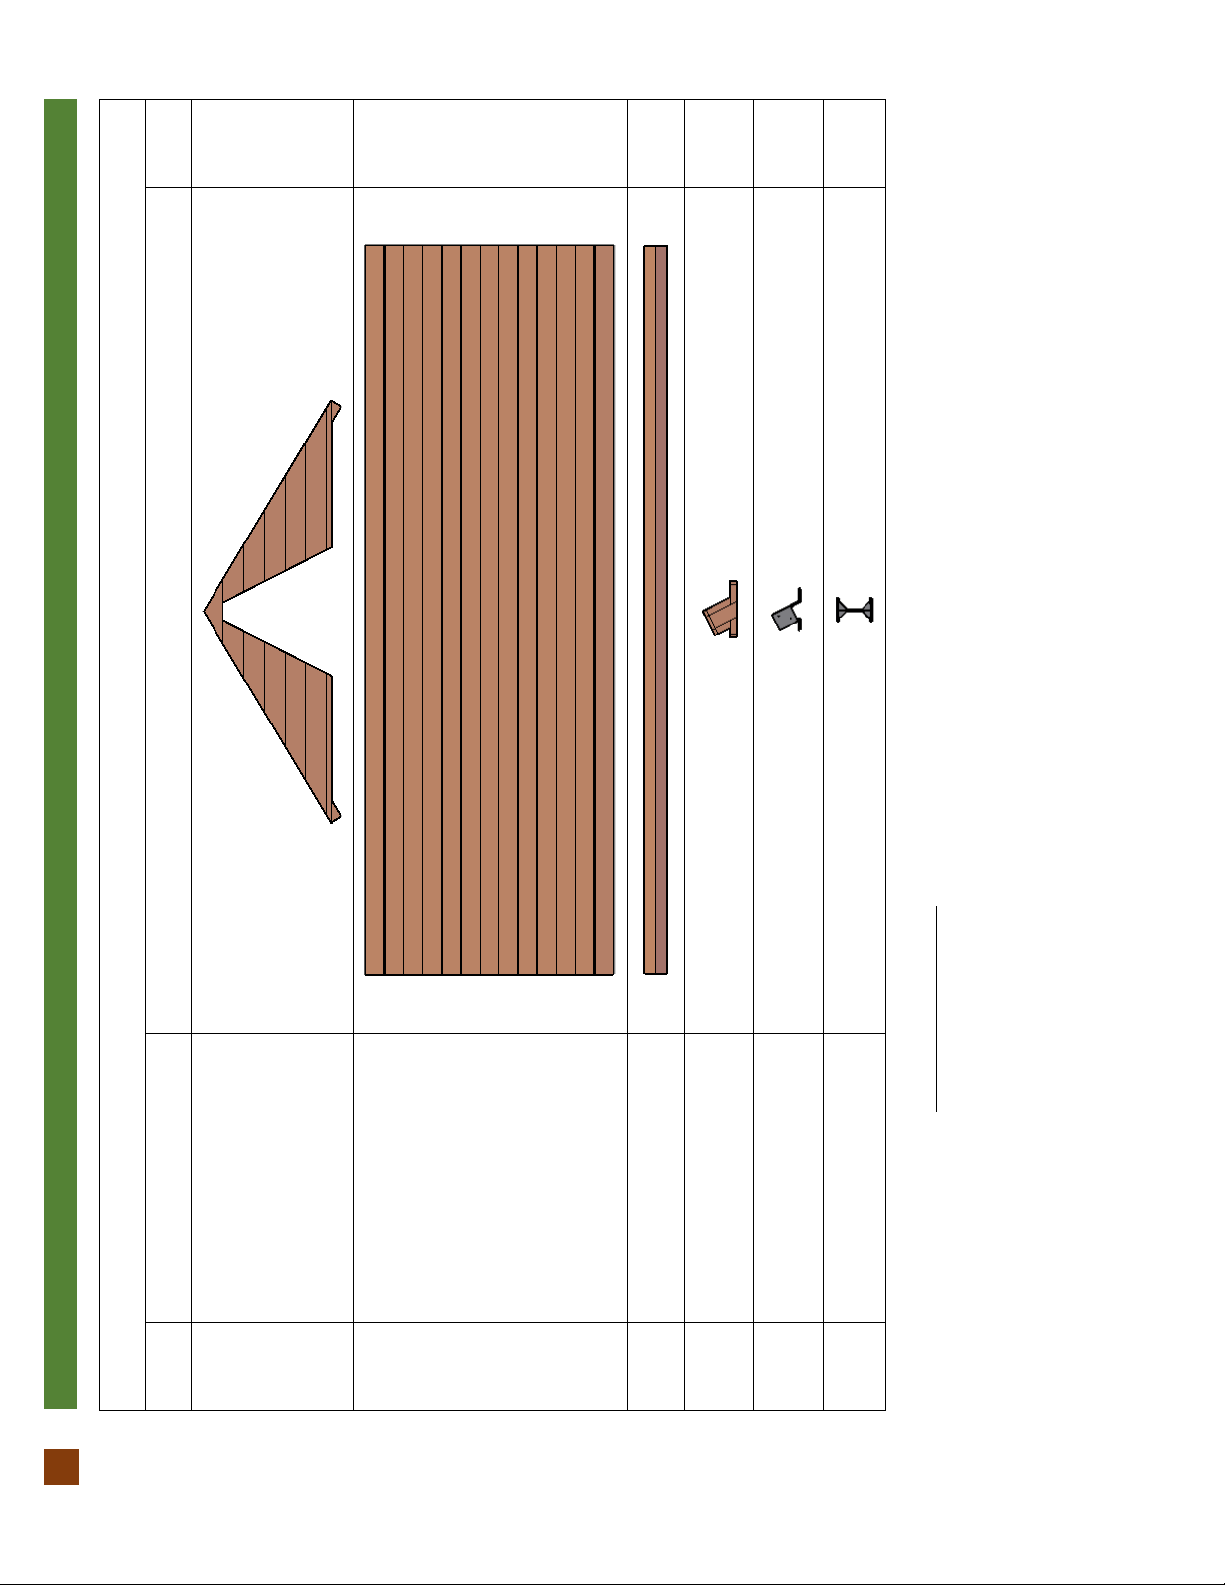
CONTENT OF BOXES
No.
17
18
19
20
21
22
Drawing
Description
Roof Covers
Roof Panels
Roof Board
Boots
If ordered
Anchor Bases
If ordered
Metal Base
Qty.
2
2
1
4
4
1
Note: Part numbers in the Content of Boxes Table are for reference only. These do not match to the numbers marked on the parts sent.
P| 4
Jean’s Ultimate Swing Sets
www.ForeverRedwood.com
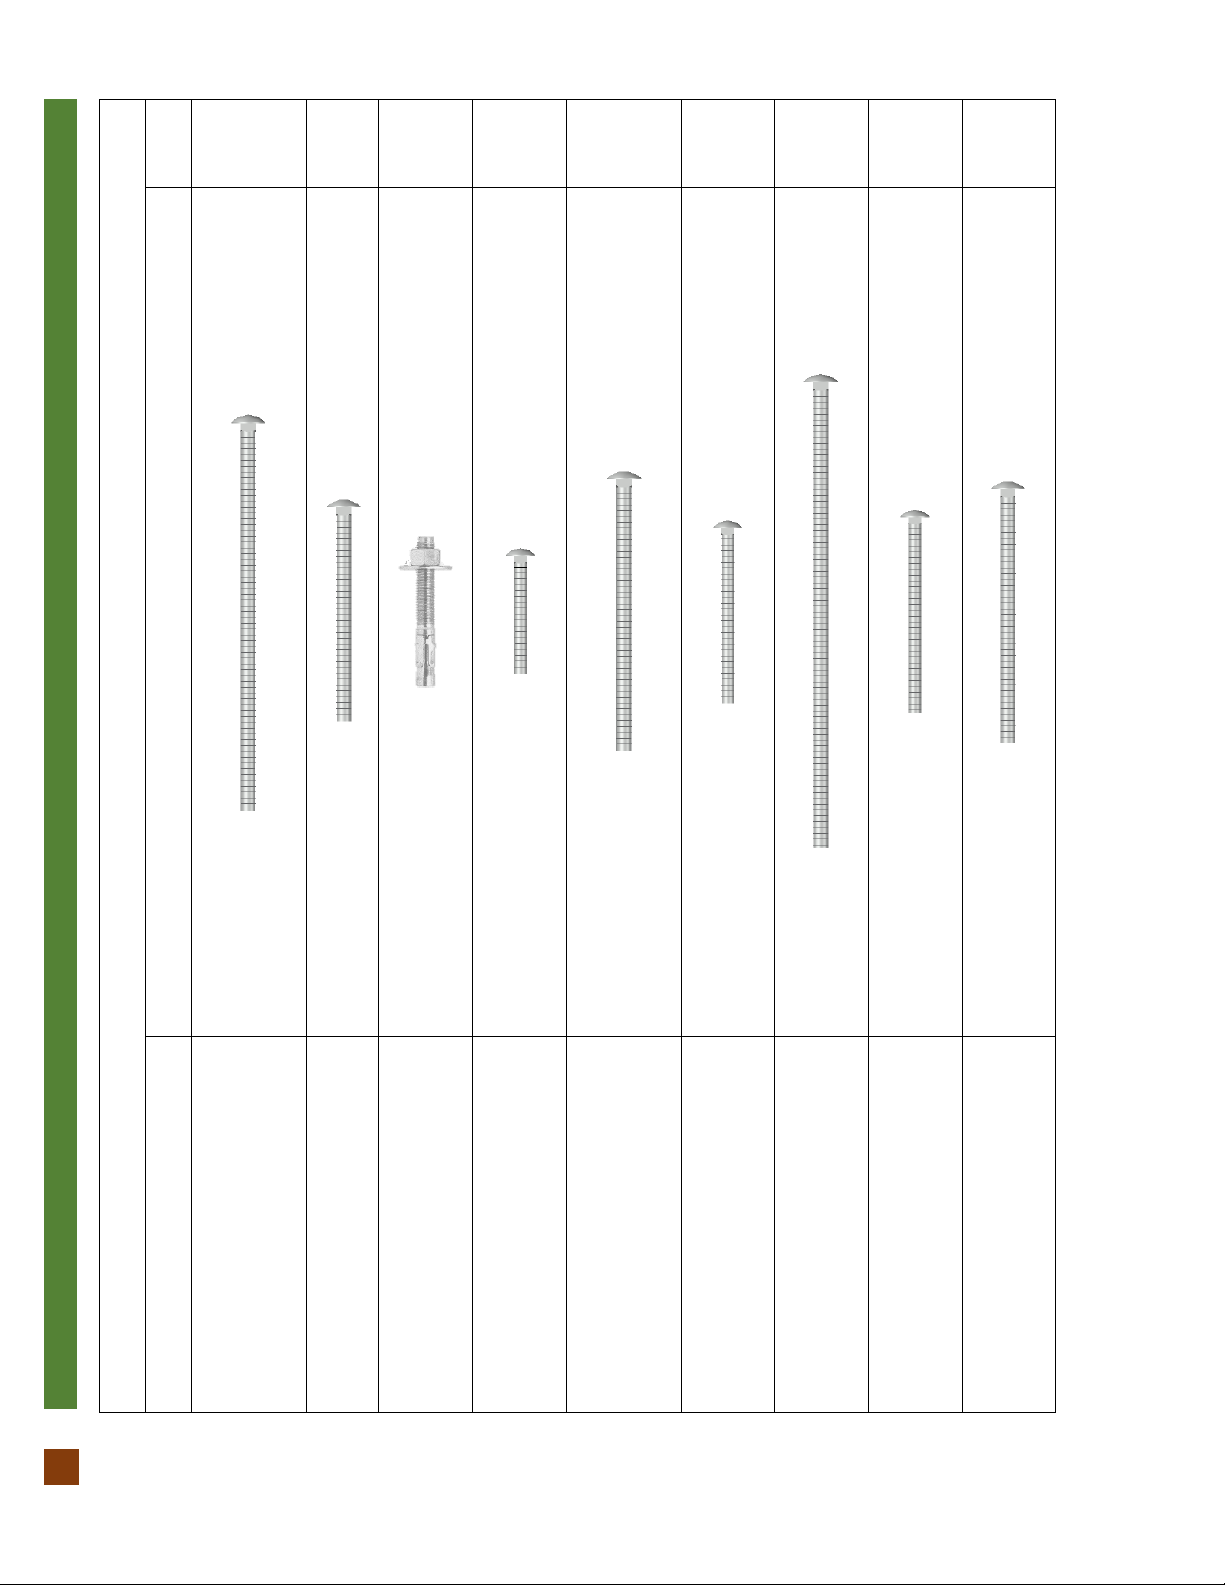
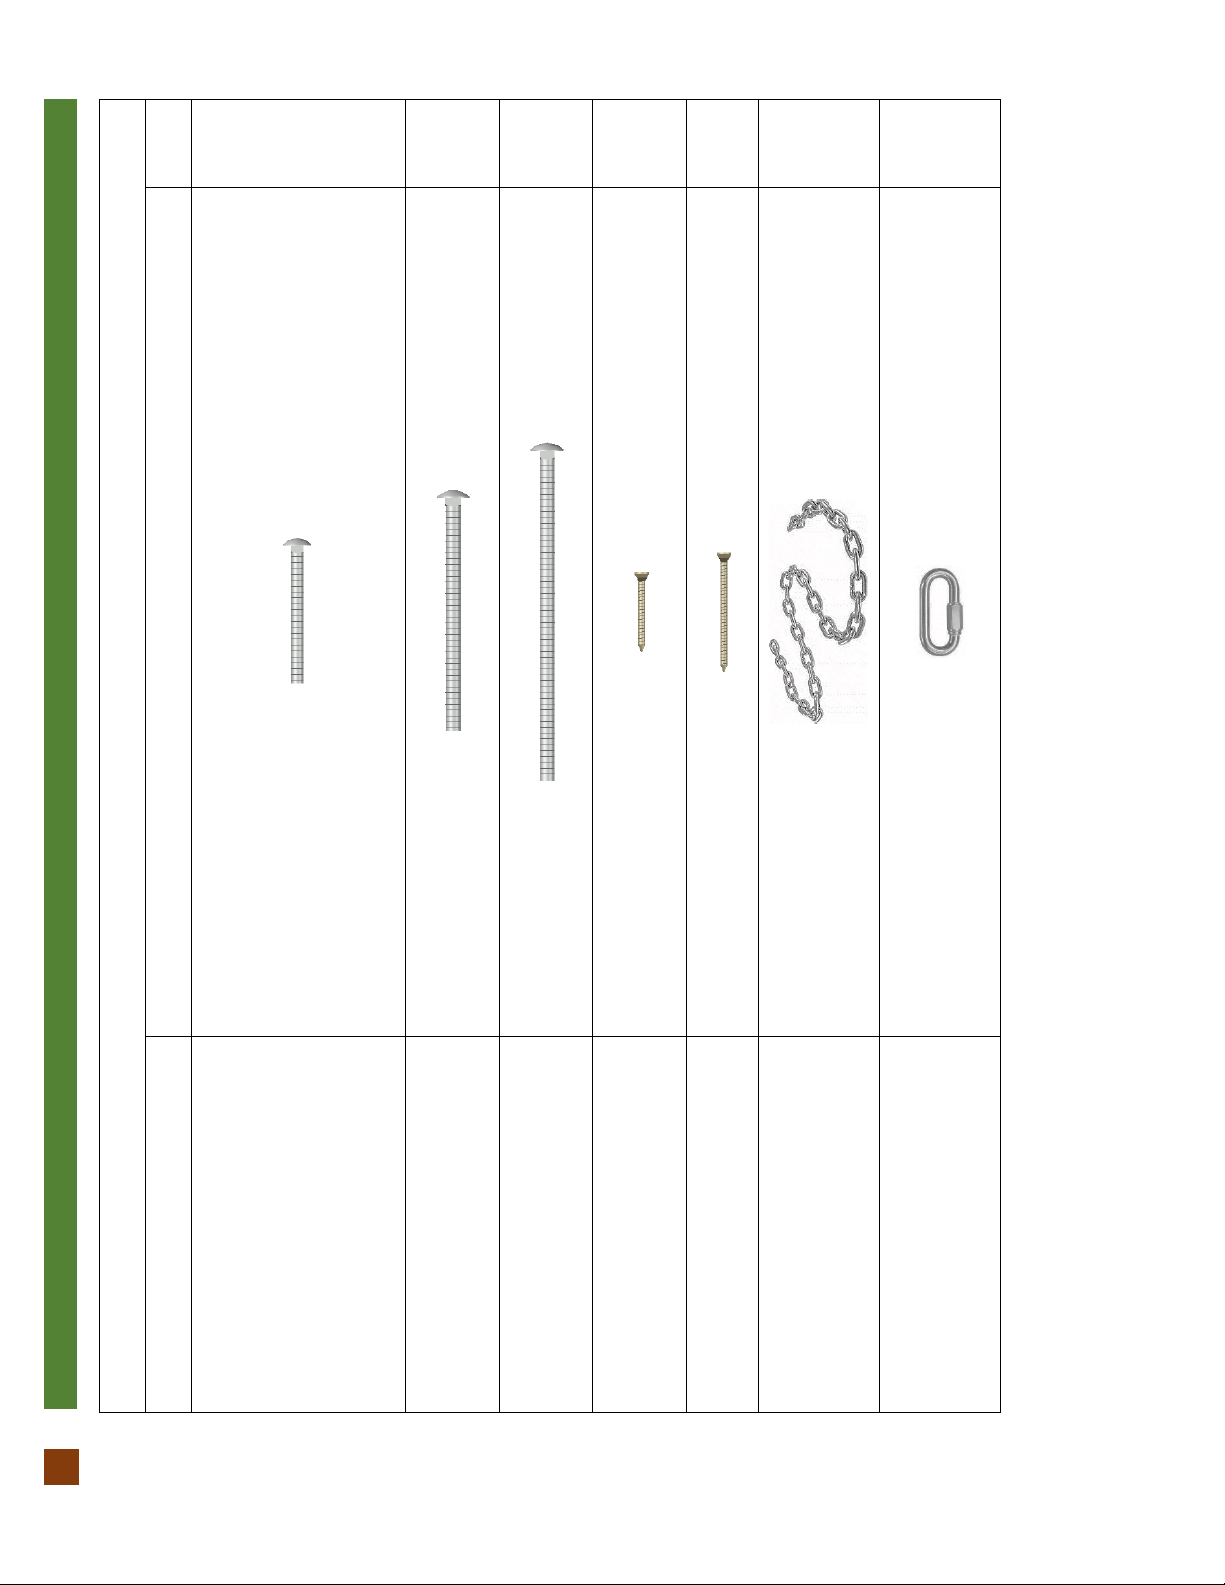
HARDWARE LIST
No.
A
B
C
D
E
F
G
H
I
Drawing
Description
3/8´´ x 10´´ Bolts
(To assemble the fame legs. / To attach the
supports to the frame legs. / To attach the
knee braces to the main structural timber).
3/8´´ x 5 ½´´ Bolts
(To assemble the frame legs).
½´´ x 3 ½´´ Anchor Bolts
(To attach the anchor bases to the anchor
bolts).
5/16´´ x 3´´ Bolts
(To attach the anchor bases to the frame
legs).
3/8´´ x 7´´ Bolts
(To attach the roof frame, the connector
timbers and the knee braces to the frame
legs).
5/16´´ x 4 ½´´ Bolts
(To attach the metal base to the main
structural timber).
3/8´´ x 12´´ Bolts
(To attach the main structural timber to the
frame legs).
5/16´´ x 5´´ Bolts
(To attach the metal base to the roof
frame).
3/8´´ x 6 ½´´ Bolts
(To attach the straps to the roof frames and
to the floor)
Note: Dimensions of your hardware will vary depending on size.
P| 5
Jean’s Ultimate Swing Sets
www.ForeverRedwood.com
HARDWARE LIST
No.
J
K
L
M
N
O
P
Drawing
Description
5/16´´ x 3 ½´´ Bolts
(To attach the long bench legs to the bench
seats. / To attach the bench seats to the
straps. / To attach the short bench legs to
the benches and to the straps. / To attach
the bench backrests to the long bench legs.
/ To attach the bench armrests to the straps
and to the long bench legs).
3/8´´ x 6´´ Bolts
(To attach the roof covers to the roof
frames).
3/8´´ x 8 ½´´ Bolts
(To attach the roof panels to the roof
covers).
2´´ Deck Screws
(To attach the roof board to the roof
panels).
3´´ Deck Screws
(To attach the boots to the frame legs).
Chains
Quick Links
Note: Dimensions of your hardware will vary depending on size.
P| 6
Jean’s Ultimate Swing Sets
www.ForeverRedwood.com
No
1
2
3
4
5
6
7
8
9
10
11
12
13
14
15
16
17
18
19
20
21
22
DESCRIPTION
Frame Legs
Lower Main Support
Top Main Support
Roof Frame
Main Structural Timber
Small Support
Connector Timbers
Knee Braces
Straps
Floor
Bench Seats
Long Bench Legs
Short Bench Legs
Bench Backrests
Bench Armrests
Swing Seats
Roof Covers
Roof Panels
Roof Board
Boots
Anchor Bases
Metal Base
Note: Part numbers in the Drawing are for reference only. These do not match to the numbers marked on the parts sent.

P| 7
Jean’s Ultimate Swing Sets
www.ForeverRedwood.com
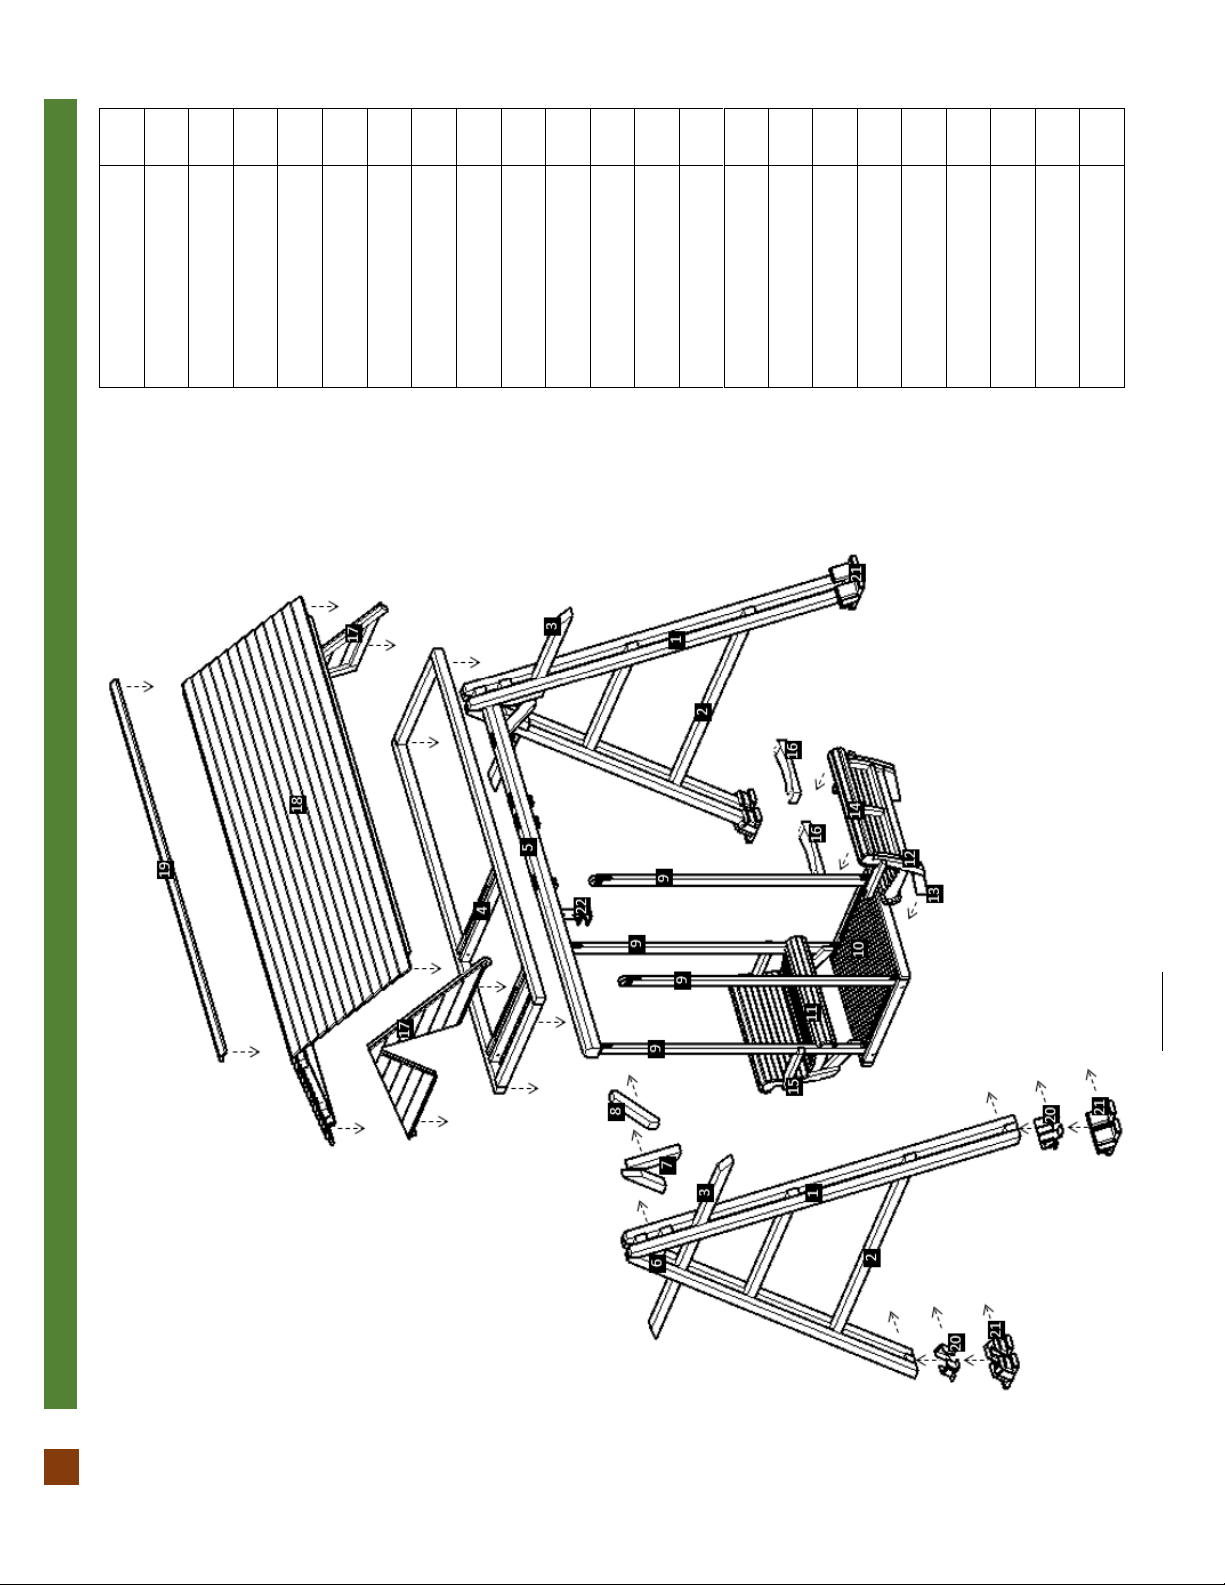
Note: The structure must be assembled on its side, as shown.
Step 1: Open the frame legs (1) as shown.
1
1
P| 8
Jean’s Ultimate Swing Sets
www.ForeverRedwood.com
Step 2: Pull out the cross supports and line up to match the predrilled hole. After that, use 3/8´´ X 10´´ Bolts (A) with washer and
nut to secure in place.
Step 3: Use 3/8´´ X 10´´ Bolts (A) with washer and nut to attach the lower main support (2) to the frame legs. Each part has a
series of numbers that indicate where to attach the part with the corresponding number.
3/8´´ X 10´´ Bolts
2
3/8´´ X 10´´ Bolts

P| 9
Jean’s Ultimate Swing Sets
www.ForeverRedwood.com
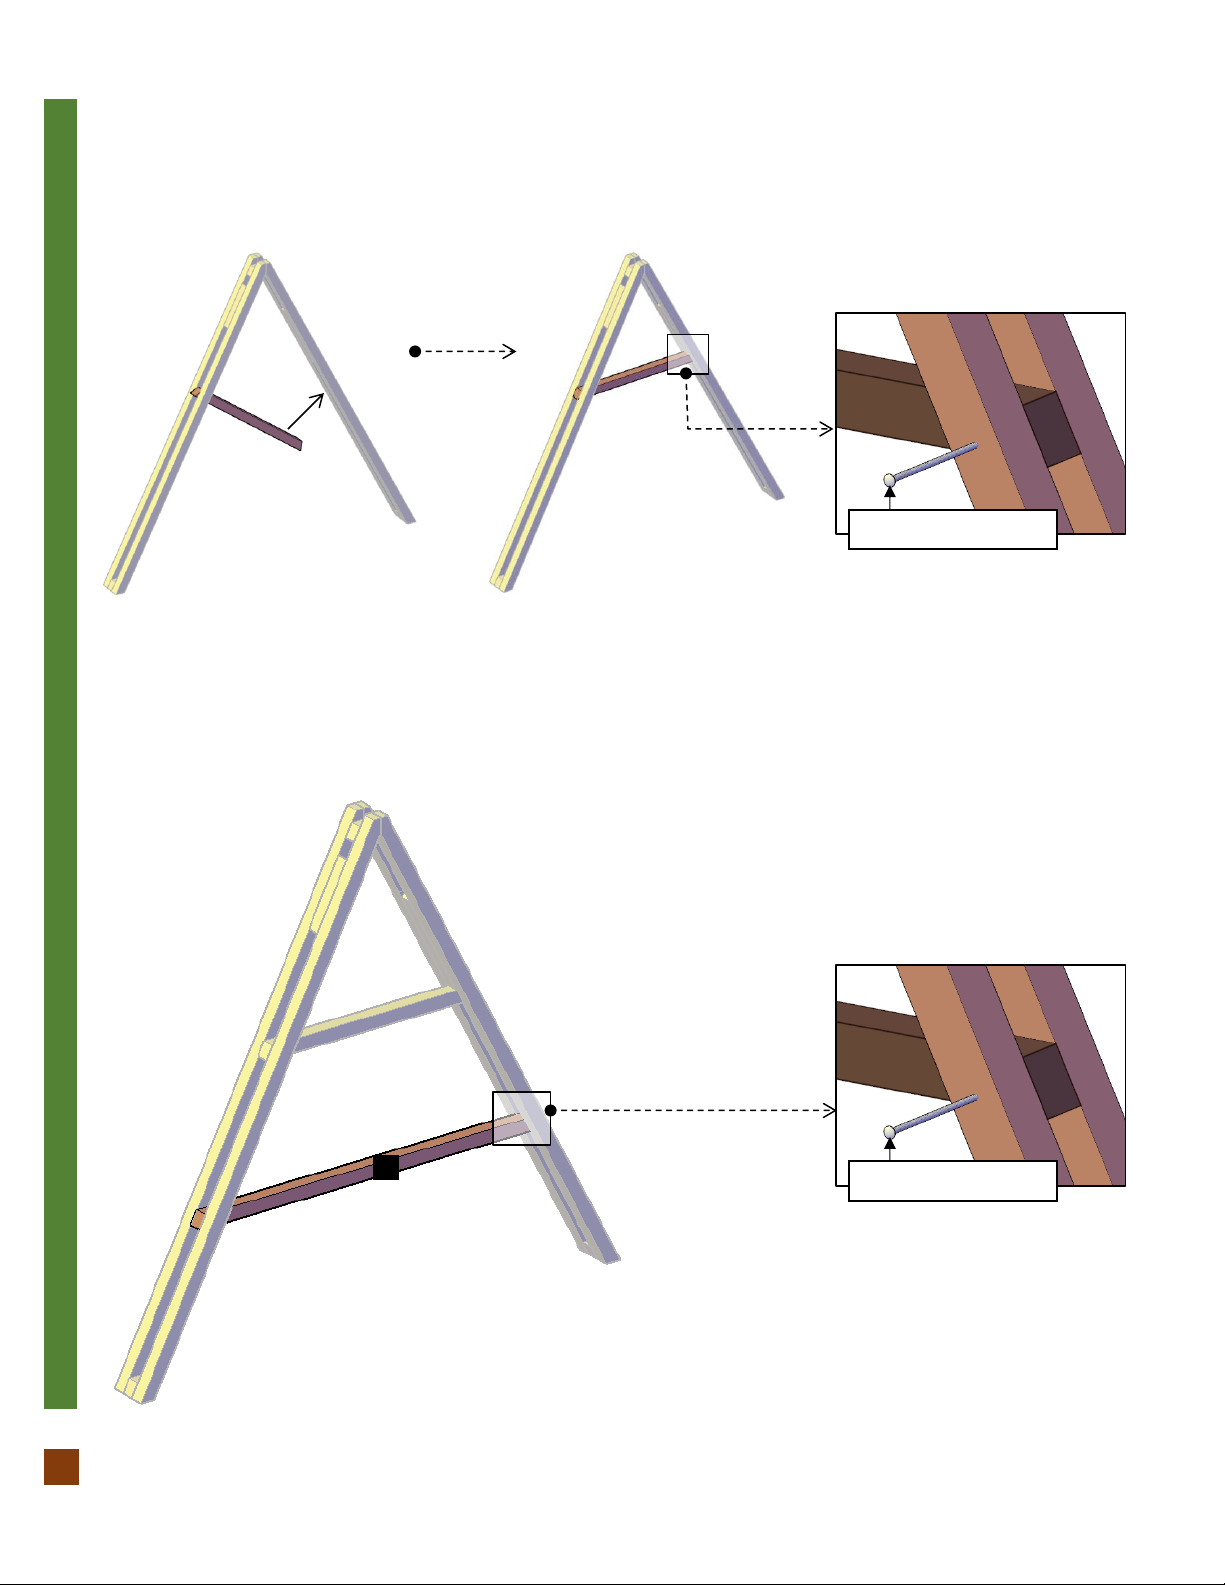
Step 4: Put the 3/8´´ x 5 ½´´ bolts (B) with washer and nut as shown.
Step 5: Pull out the top cross supports.
3/8´´ X 5 ½´´ Bolts

P| 10
Jean’s Ultimate Swing Sets
www.ForeverRedwood.com
Step 6: Use 3/8´´ X 10´´ Bolts (A) with washer and nut to attach the top main supports (3) to the frame legs. Each part has a
series of numbers that indicate where to attach the part with the corresponding number.
Step 7: Install the anchor bases (21)with ½´´ X 3 ½´´ anchor bolts (C). Please see the “How to anchor your pergola document”
for all details. Set your frame legs (1)in the saddle of the anchor bases. Drill a ø ¼´´ hole in the post prior to anchoring to facilitate
the ratcheting of the hardware. After that, use a 5/16´´ X 3´´ bolts (D) to attach each post to its respective anchor base.
5/16´´ X 3´´ Bolts
3/8´´ X 10´´ Bolts
3
21
P| 11
Jean’s Ultimate Swing Sets
www.ForeverRedwood.com
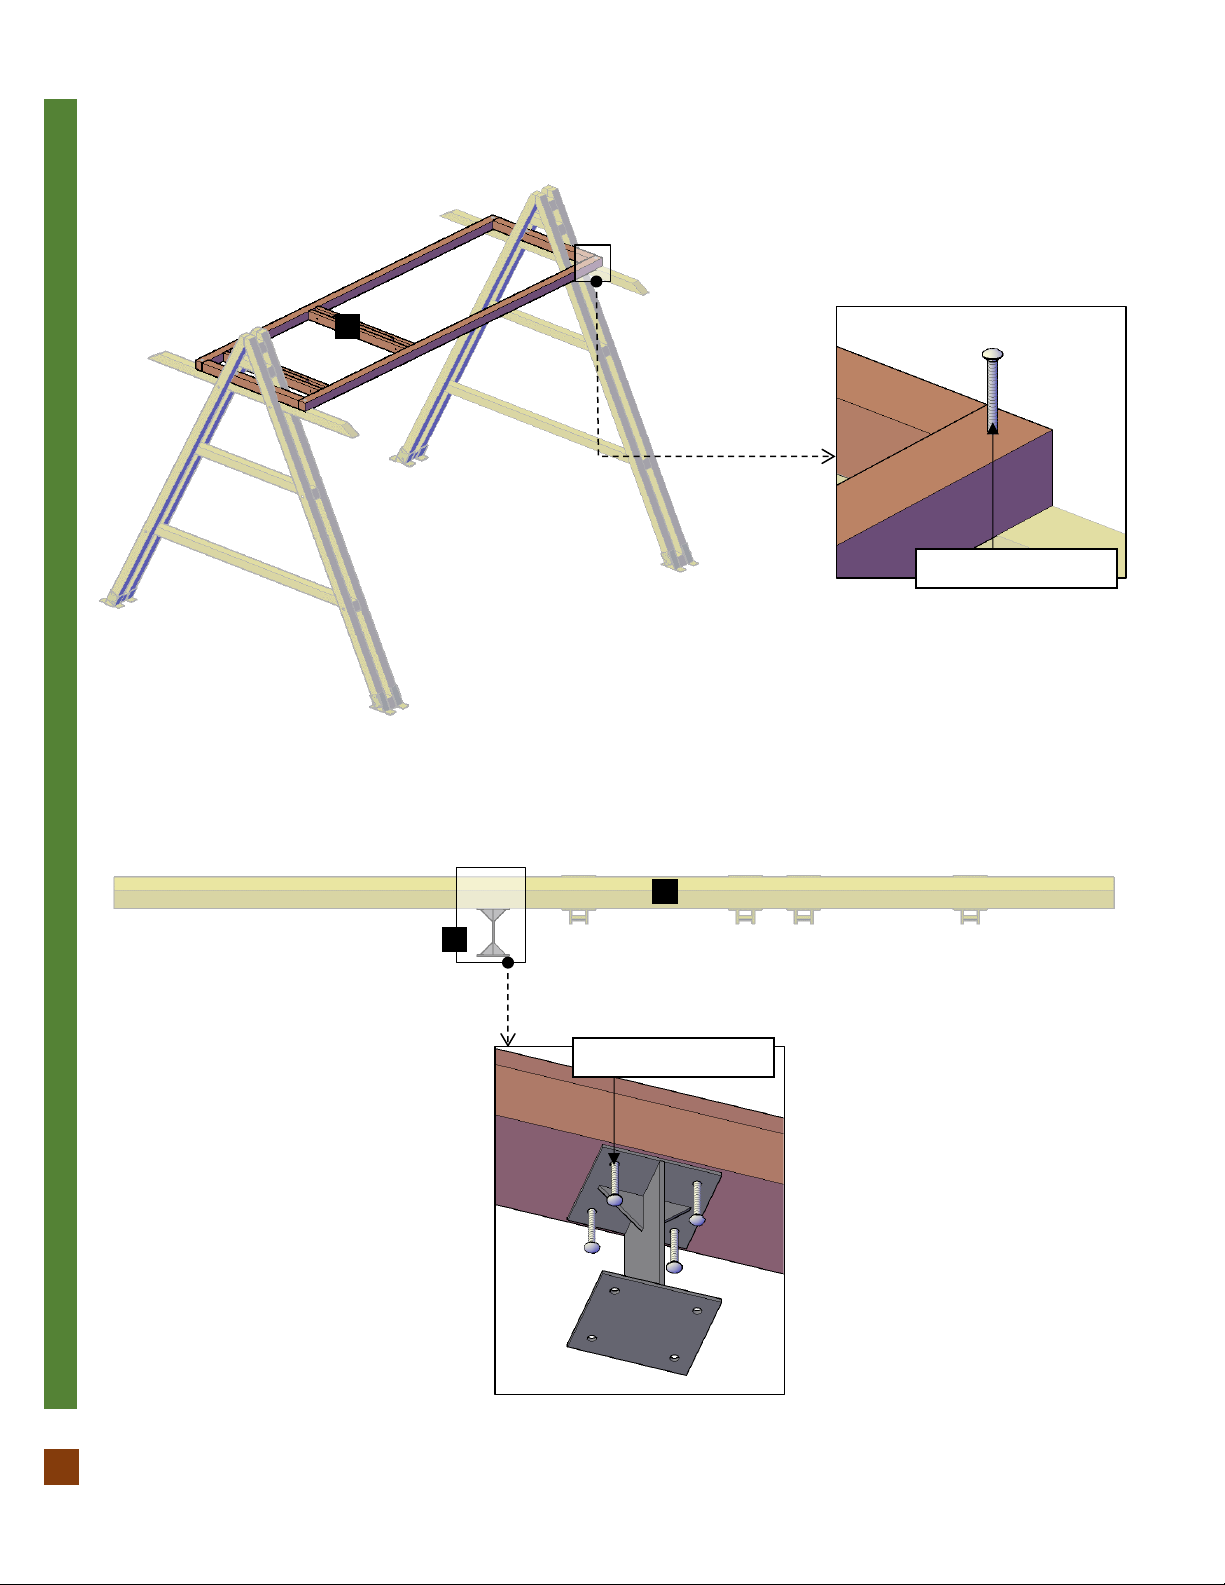
Step 8: Attach the roof frame (4) to the frame legs with 3/8’’ x 7’’ Bolts (E). Each part has a series of numbers that indicate
where to attach the part with the corresponding number.
Step 9: Use 5/16’’ x 4 ½’’ bolts (F) to attach the metal base (22) to the main structural timber (5). Each part has a series of
numbers that indicate where to attach the part with the corresponding number.
3/8´´ X 7´´ Bolts
5/16´´ X 4 ½´´ Bolts
4
5
22
P| 12
Jean’s Ultimate Swing Sets
www.ForeverRedwood.com
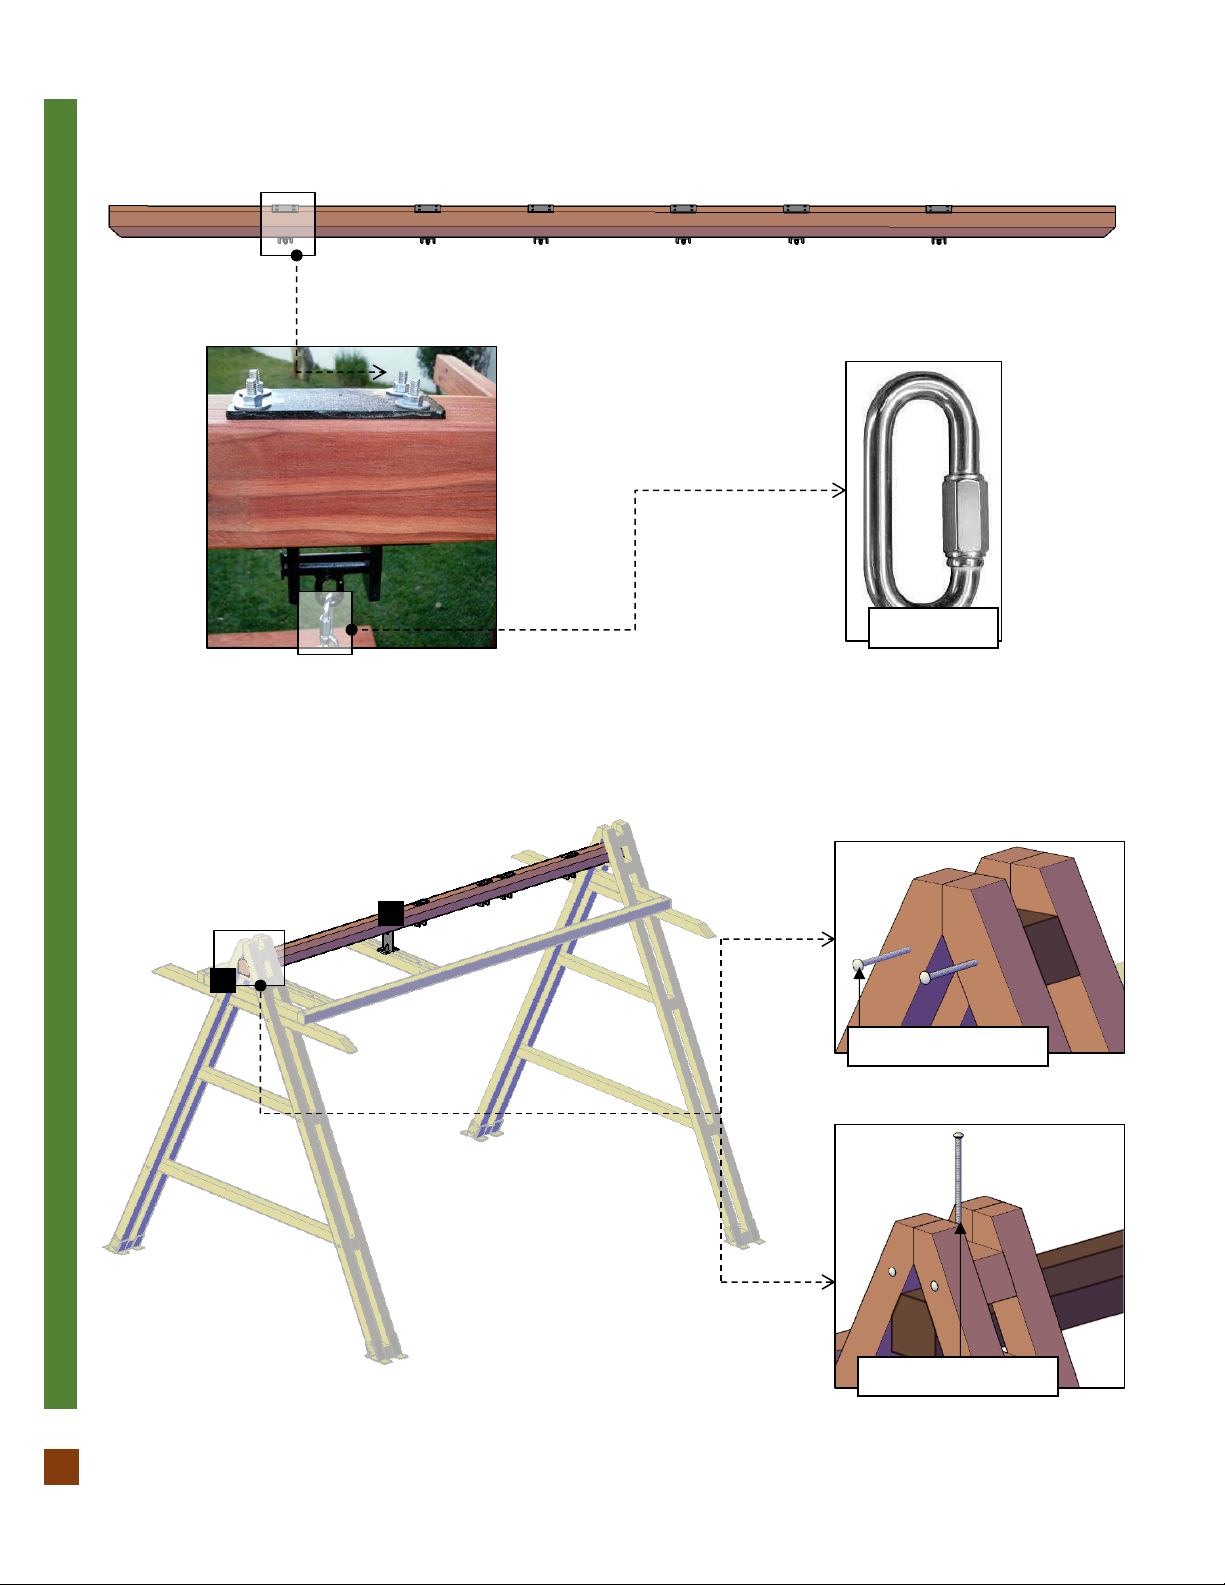
Step 10: Put the Quick Links (P) in the hangers. After that, put the chains (O). Take a few minutes to adjust the chain height to
your preference.
Step 11: Use 3/8’’ x 10 ‘’ bolts (A) to attach the small support (6) to the frame legs. After that, attach the main structural timber
(5) to the frames legs with 3/8´´ X 12´´ bolts (G) with washer and nut. Each part has a series of numbers that indicate where to
attach the part with the corresponding number.
5
3/8´´ X 12´´ Bolts
Quick Link
3/8´´ X 10´´ Bolts
6
P| 13
Jean’s Ultimate Swing Sets
www.ForeverRedwood.com
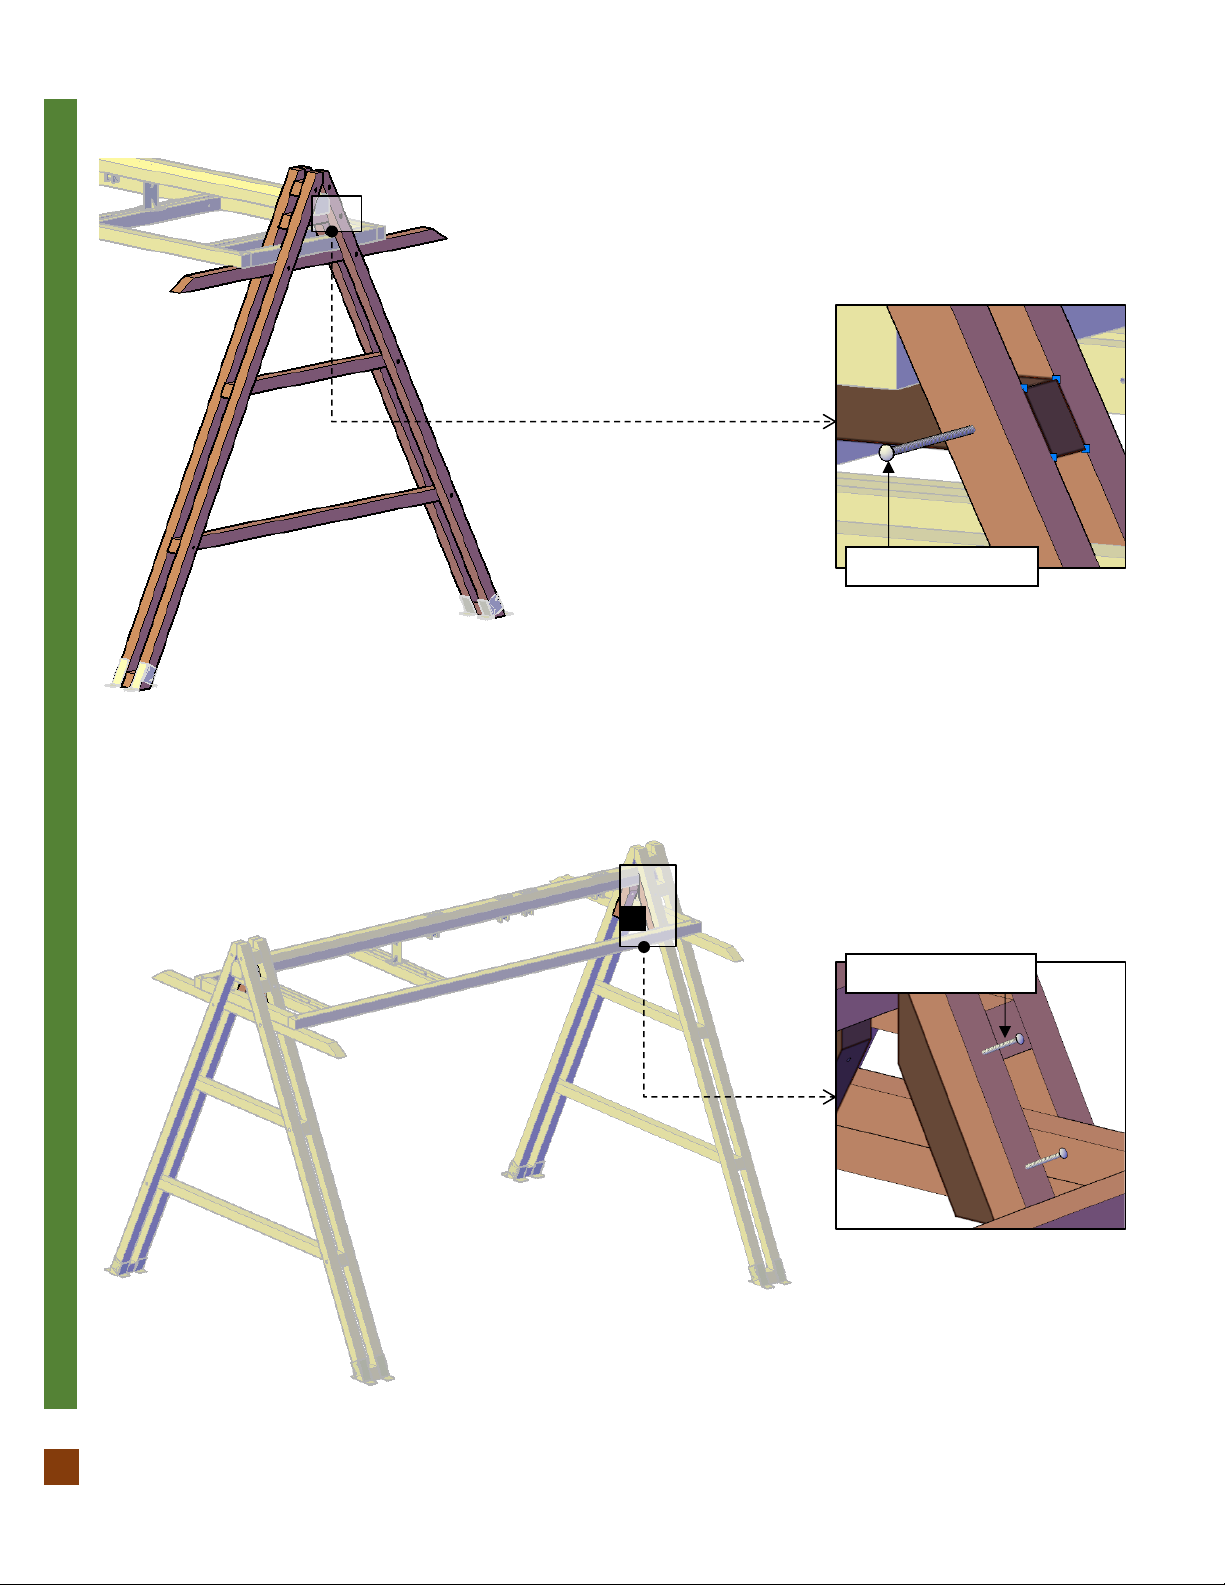
Step 12: Use 3/8´´ X 10´´ Bolts (A) with washer and nut to attach the cross supports to the frame legs.
Step 13: Attach the connector timbers (7) to reinforce the connection between the frame legs and the main structural timber. Use
3/8´´ x 7´´ bolts (E) with washer and nut to attach. Each part has a series of numbers that indicate where to attach the part with
the corresponding number.
3/8´´ X 10´´ Bolts
3/8´´ X 7´´ Bolts
7

P| 14
Jean’s Ultimate Swing Sets
www.ForeverRedwood.com
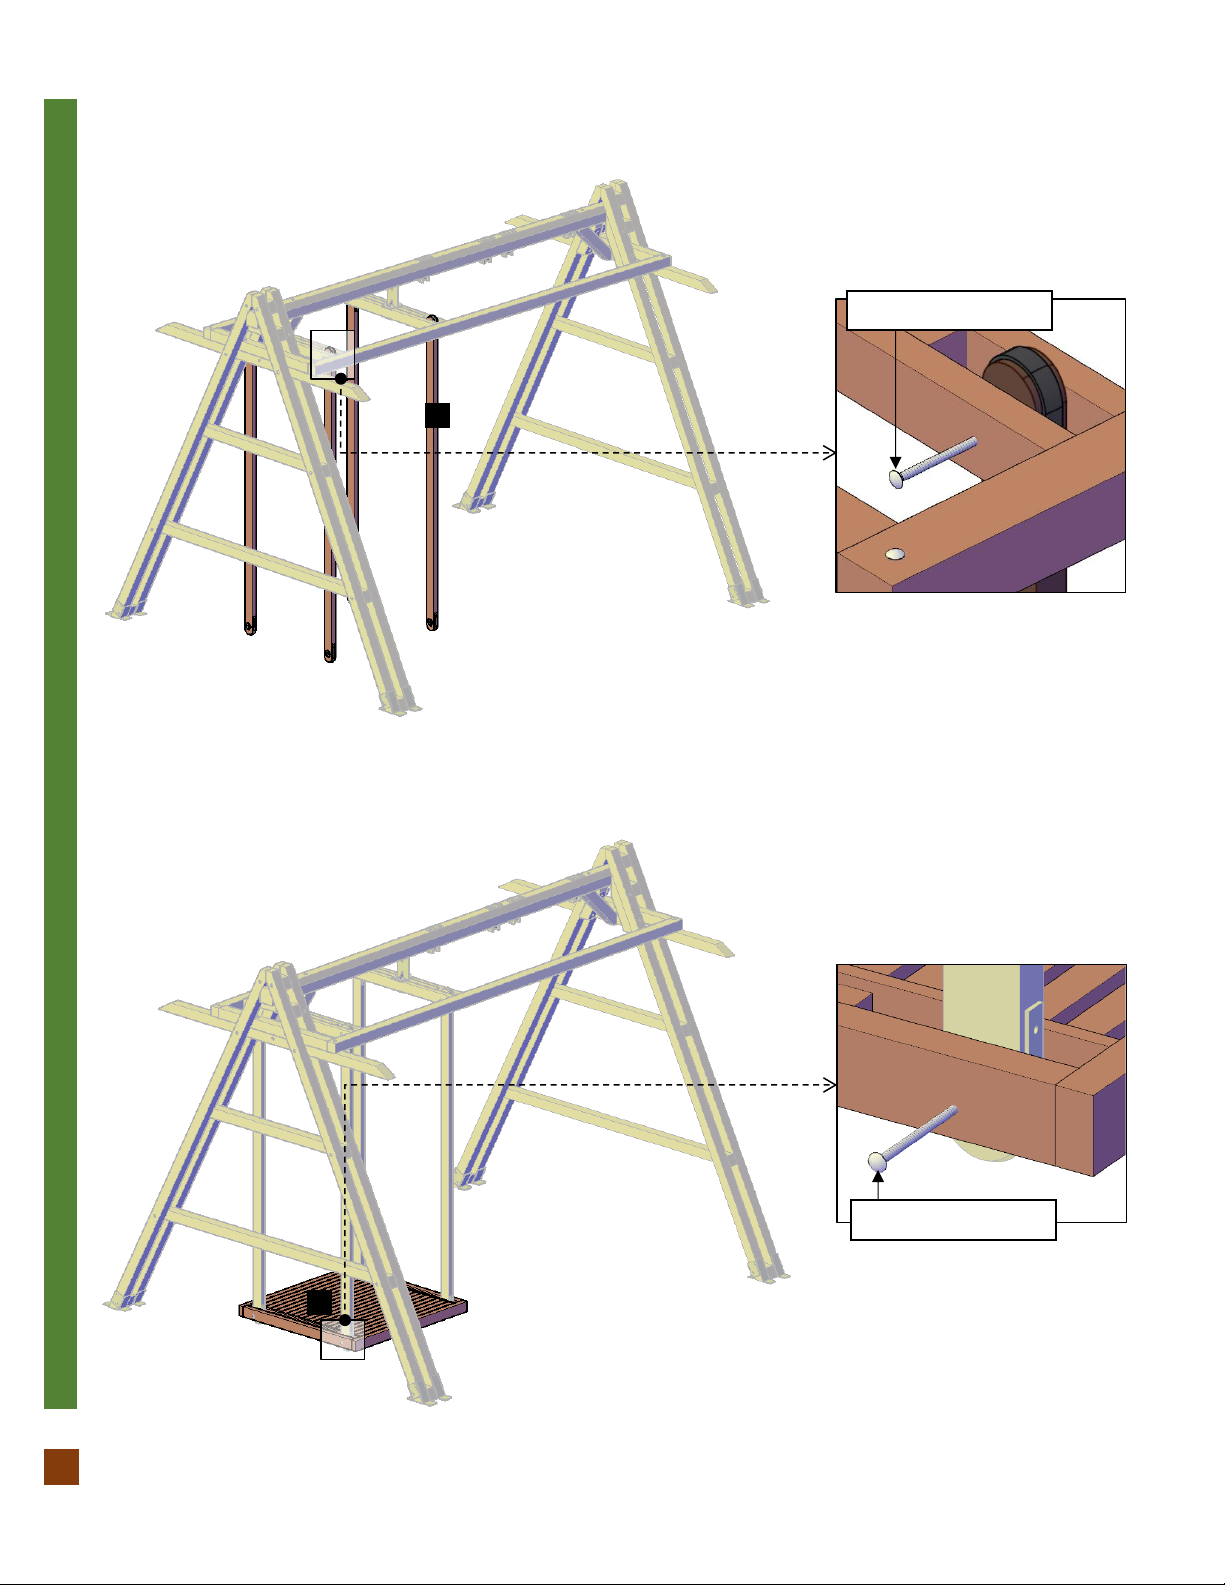
Step 14: Attach the knee braces (8) to the main structural timber with 3/8´´ x 10´´ bolts (A) and to the frame legs with 3/8’’ x 7’’
bolts (E). Each part has a series of numbers that indicate where to attach the part with the corresponding number.
Step 15: Use 5/16’’ x 5’’ bolts (H) to attach the metal base to the roof frame. Each part has a series of numbers that indicate
where to attach the part with the corresponding number.
3/8´´ X 10´´ Bolts
3/8´´ X 7´´ Bolts
8
5/16´´ X 5´´ Bolts
P| 15
Jean’s Ultimate Swing Sets
www.ForeverRedwood.com
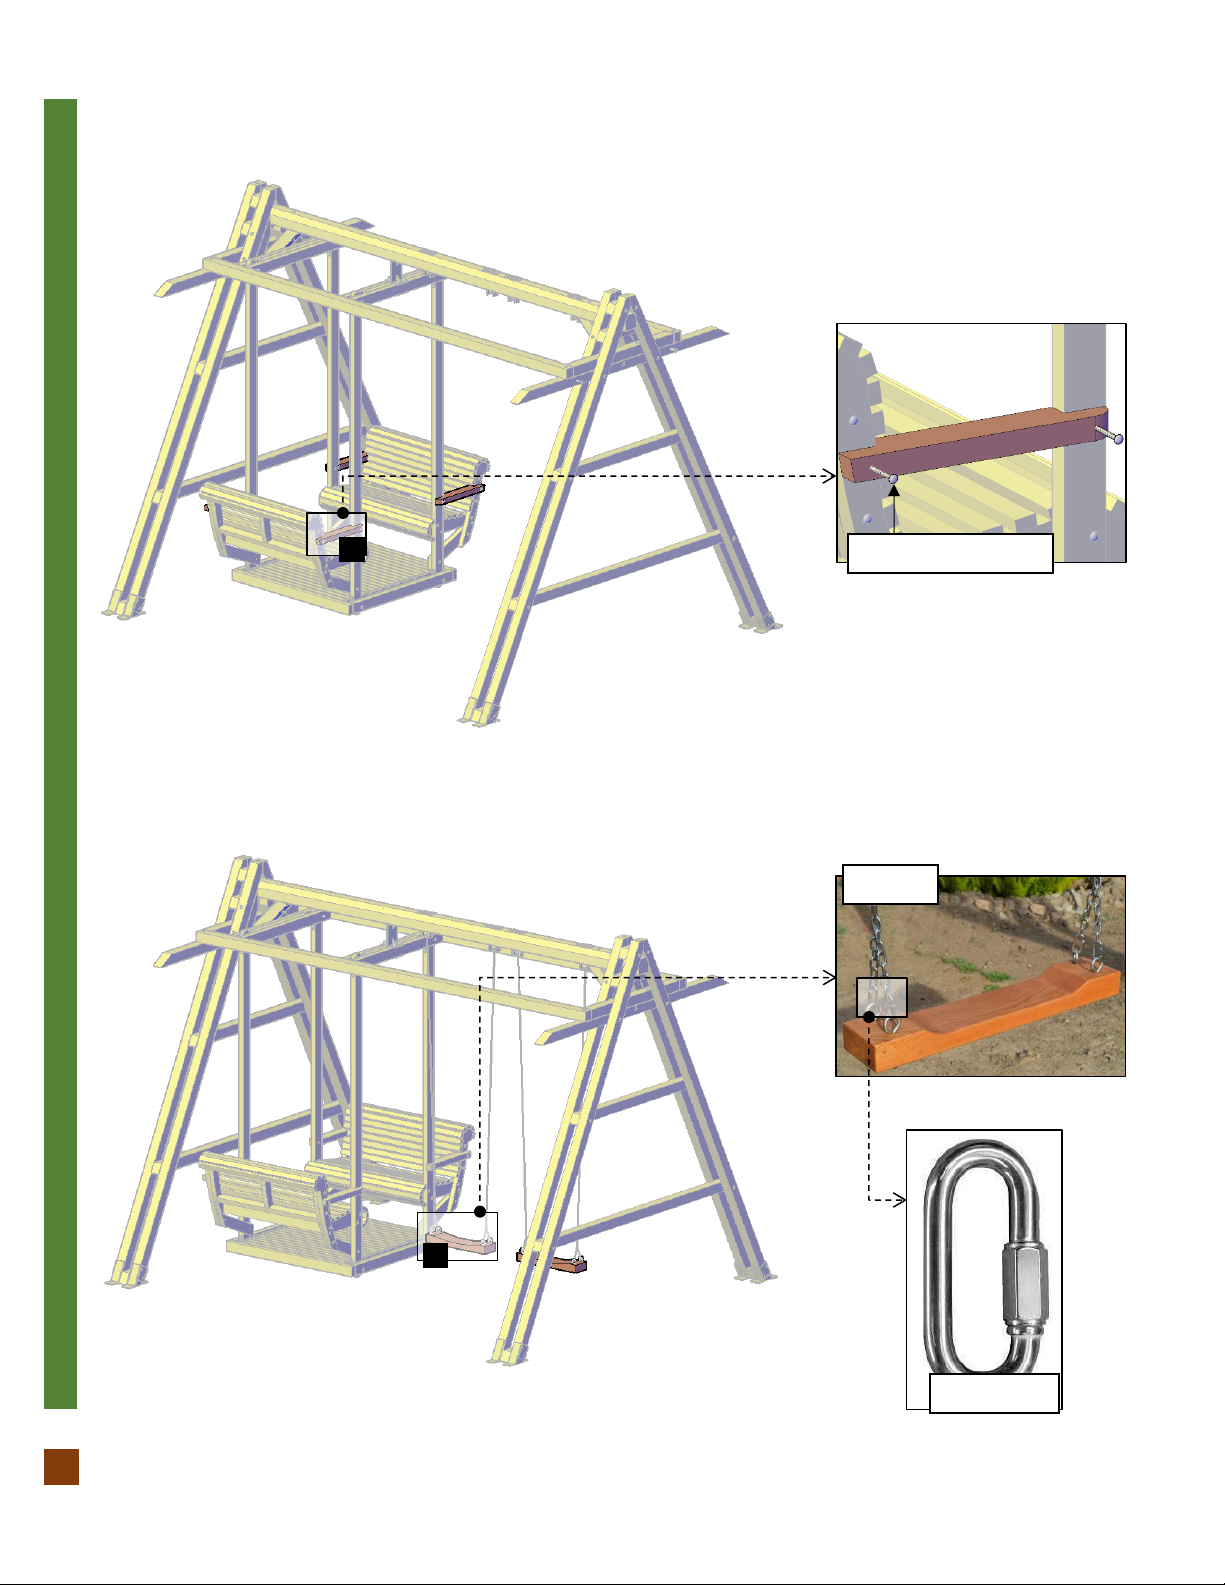
Step 16: Use 3/8’’ x 6 ½’’ bolts (I) to attach the straps (9) to the roof frame. Each part has a series of numbers that indicate where
to attach the part with the corresponding number.
Step 17: Use 3/8’’ x 6 ½’’ bolts (I) to attach the Kid´s Platform (10) to the straps. Each part has a series of numbers that indicate
where to attach the part with the corresponding number.
3/8´´ X 6 ½´´ Bolts
9
3/8´´ X 6 ½´´ Bolts
10

P| 16
Jean’s Ultimate Swing Sets
www.ForeverRedwood.com
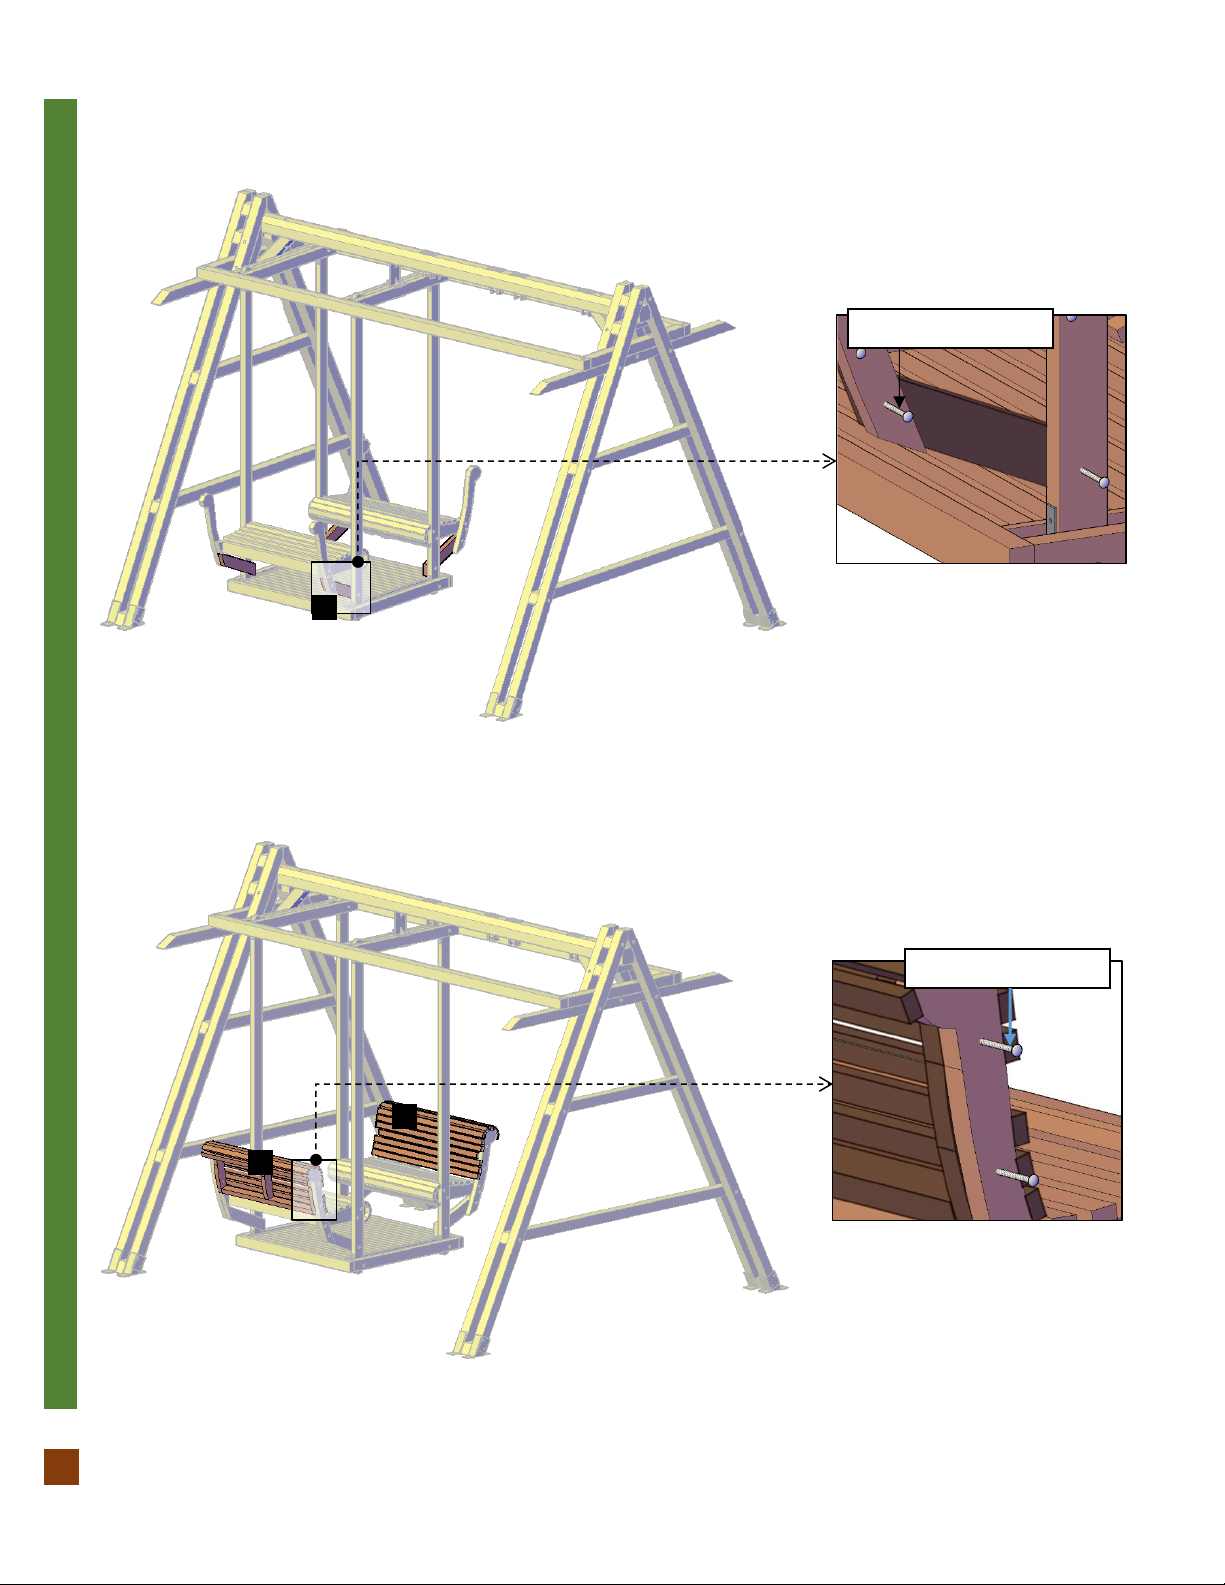
Step 18: Use 5/16’’ X 3 ½’’ bolts (J) to attach the long bench legs (12)to the bench seats (11). Each part has a series of numbers
that indicate where to attach the part with the corresponding number.
Step 19: Use 5/16’’ X 3 ½’’ bolts (J) to attach the benches to the straps. Each part has a series of numbers that indicate where to
attach the part with the corresponding number.
5/16´´ X 3 ½´´ Bolts
11
12
5/16´´ X 3 ½´´ Bolts
12
P| 17
Jean’s Ultimate Swing Sets
www.ForeverRedwood.com
Step 20: Attach the short bench legs (13) to the benches and to the straps with 5/16’’ x 3 ½’’ bolts (J). Each part has a series of
numbers that indicate where to attach the part with the corresponding number.
Step 21: Attach the bench backrests (14) to the benches with 5/16’’ x 3 ½’’ bolts (J). Each part has a series of numbers that
indicate where to attach the part with the corresponding number.
5/16´´ X 3 ½´´ Bolts
13
14
5/16´´ X 3 ½´´ Bolts
14
P| 18
Jean’s Ultimate Swing Sets
www.ForeverRedwood.com
Step 22: Use 5/16’’ x 3 ½’’ bolts (J) to attach the bench armrests (15) to the straps and to the benches. Each part has a series of
numbers that indicate where to attach the part with the corresponding number.
Step 23: Use quick links (P) to join the Swing seats (16) to the chains.
5/16´´ X 3 ½´´ Bolts
15
Seats
16
Quick Link

P| 19
Jean’s Ultimate Swing Sets
www.ForeverRedwood.com
Step 24: Use 3/8’’ x 6’’ bolts (K) to attach the roof covers (17) to the roof frames. Each part has a series of numbers that indicate
where to attach the part with the corresponding number.
Step 25: Attach the roof panels (18) to the roof covers with 3/8’’ x 8 ½’’ bolts (L). Each part has a series of numbers that indicate
where to attach the part with the corresponding number.
17
3/8’’ X 6’’ Bolts
3/8’’ X 8 ½’’ Bolts
18
Other Forever Redwood Baby Swing manuals


Popular Baby Swing manuals by other brands


Costway
Costway NP11162 quick start guide

Fisher-Price
Fisher-Price V1179 quick start

Belnick
Belnick TLH-007-BN-GG Assembly instructions

Kids II
Kids II ingenuity Power Adapt Portable Swing Landon Lion... manual

Fisher-Price
Fisher-Price V1179 instruction sheet

Garden Oasis
Garden Oasis EMERY D71 M20355 Use and care guide

Costway
Costway NP10768 Instruction booklet

Hudora
Hudora 72101 INSTRUCTIONS ON ASSEMBLY AND USE

die-schaukel.de
die-schaukel.de LMBG B 82.10:2002 Instructions For Proper Use, Care, And Assembly

Heavenly Hammocks
Heavenly Hammocks Beige Open Hangout Safety and assembly instructions

Trigano
Trigano ALLEGRO manual

Fisher-Price
Fisher-Price CHM84 manual