Fortin Electronic Systems FSA?211 User manual

SECURITY SYSTEM ONLY
REMOTE CAR STARTER ONLY
SECURITY SYSTEM AND REMOTE CAR STARTER
FSA‐211
DÉé.a.[UserGuide]

1
TABLE OF CONTENTS
usingtheremotecontrol..........................................................................................................2
OLED2‐WAYREMOTE.................................................................................................................2
FUNCTIONSETTING(OLEDREMOTE)...............................................................................................3
SETTINGS(OLEDREMOTE)...........................................................................................................4
BATTERYCAPACITY(OLEDREMOTE)................................................................................................4
1‐WAYREMOTE........................................................................................................................4
introduction..............................................................................................................................5
remote‐starting(withoptionavailable)....................................................................................5
REMOTE‐STARTINGTHEVEHICLE....................................................................................................5
ACCESSORYPRESET....................................................................................................................5
READYMODE(MANUALTRANSMISSIONONLY).................................................................................6
DRIVINGOFF............................................................................................................................7
remote‐starterfeature’s(withoptionavailable)......................................................................7
IDLEMODE(AUTOMATICTRANSMISSION)........................................................................................7
IDLEMODE(MANUALTRANSMISSION)............................................................................................7
TURBOMODE...........................................................................................................................8
VALETMODE(VIAREMOTE).........................................................................................................8
VALETMODE(VIASWITCH)/VALETCODING.....................................................................................9
COLDSTARTTIMERMODE..........................................................................................................10
AUXILIARYUSE........................................................................................................................10
remotestartingoptions(withoptionavailable).....................................................................10
REMOTEDOORLOCKS...............................................................................................................10
TRUNK/HATCHRELEASE(ZONE6)...............................................................................................11
RUNTIME...............................................................................................................................11
securitysystem(withoptionavailable)..................................................................................11
LOCKTHEDOORS(ARM)(OLEDREMOTE)......................................................................................11
UNLOCKTHEDOORS(DISARM)(OLEDREMOTE)..............................................................................11
REALTIMEREMOTEWARNINGFUNCTION(OLEDREMOTE).................................................................11
TRUNK(OLEDREMOTE).............................................................................................................11
OPENZONENOTIFICATION.........................................................................................................11
FALSEALARMDEACTIVATION......................................................................................................12
SHOCKSENSOR(ZONE4)...........................................................................................................12
VEHICLELOCATOR/PANICMODE..................................................................................................12
transmitterrange....................................................................................................................12
failedremote‐start..................................................................................................................12
remotestart/alarmdiagnostics.............................................................................................13
Rev.20120518
2
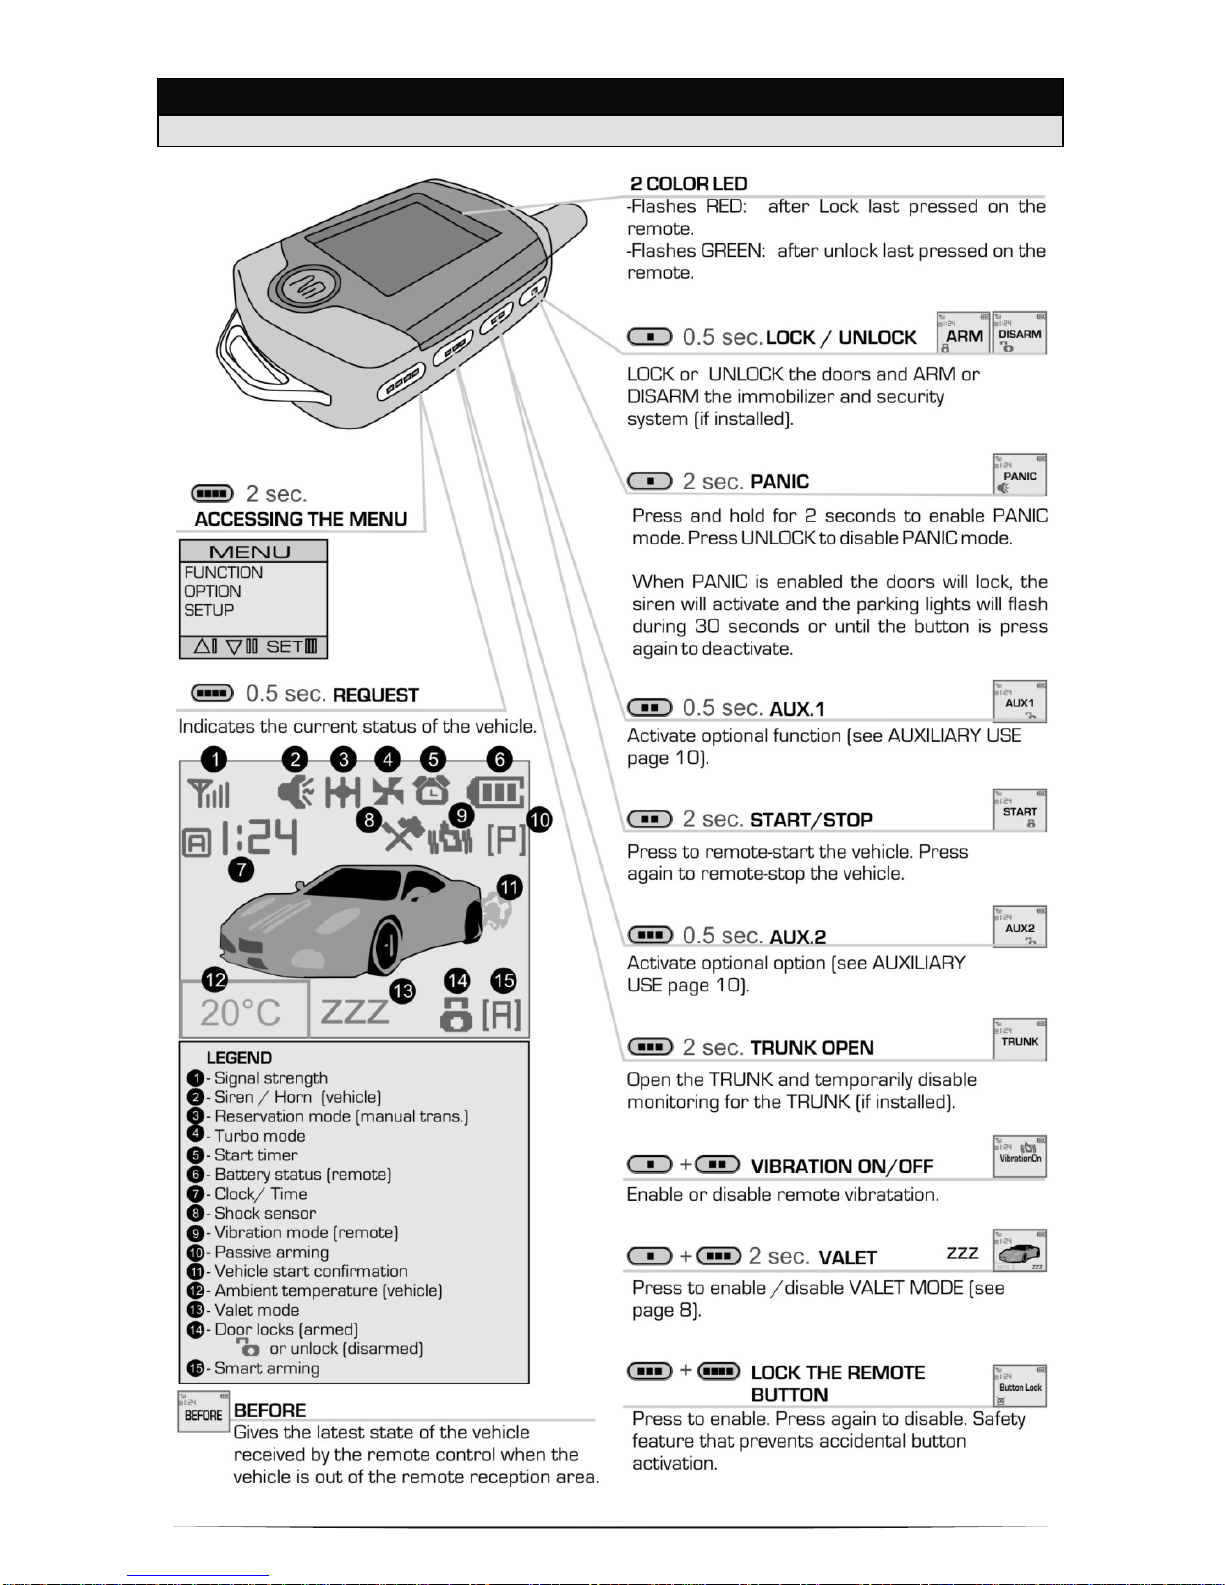
USING THE REMOTE CONTROL
OLED 2-WAY REMOTE

3
FUNCTION SETTING (OLED REMOTE)
LongpressthebuttontoentertheMENU,
Choose[FUNCTION],pushthebuttonfor0.5seconds[SET],
Choosethe[FUNCTION](seetablebelow)bypressingthebuttontogoupandbuttonto
godownonthemenu,
Pressthebuttonfor0.5seconds,
Theand iconswillflash.(enabled,disabled),
Longpressthebutton,
Theand iconswillstopflashing,
The[FUNCTION]isnowONorOFF.(Seetablebelow)
[MUTE]SILENTMODE
Whenenabledthesirenandhornisnotactivatedwhenarmingordisarming.
Thesirenwillstillactivateduringpanic,shockorwhenthehood,trunkoradooris
opened.
[VALET]VALET FUNCTION
Disablestheremotestarterandsecuritysystem(ifinstalled).ÆSeeVALETMODE
page8.
[PASSIVE]ACTIVE OR PASSIVE ARMING (with the security system installed)
Itispossibletoprogramtheimmobilizerinactivemode(noautomaticrearm)or
passive(withautomaticrearm).Yourremotestarterisconfiguredbydefaultto
passivemodein60seconds:theremotestarterwillautomaticallyarm60seconds
afterclosingthelastdoor.However,theremotestarterwillnotarmifadoorstays
open.
Note:Whentheimmobilizerisautomaticallyrearm,youcandisarmtheremote
starterbysimplypressingtheUNLOCKbutton.
[SMART]DOOR MONITORING
Ifthedoorsarenotopenedwithin30secondsafterdisarmingthesystem,thesystem
willautomaticallylockthedoorsandrearmthesystem(ifinstalled).Thedoorpins
mustbeconnectedtothesystemtousethisfeature.
[IGLOCK]IGNITION DOOR LOCK
Thisisanaddedsecurityfeature.Ifthesystemisinstalledwiththedoorlocks
connected,thedoorswillautomaticallylockwhentheignitionkeyisturnedtothe
ON/RUNpositionandthefoot‐brakeispressed.Thedoorswillautomaticallyunlock
whenthekeyisturnedOFF.
[SHOCK]SHOCK SENSOR
Anysensorthatisnotproperlyadjustedcantriggerafalsealarm.Disablingtheshock
sensorisusefulwhenparkingonbusyornoisystreetsthathavealotofvibration.
Thisfeaturecanbeusedtodisable/re‐enabletheshocksensor(zone4),auxiliary
input(zone7)andthetiltsensor(zone8).Abeepconfirmstheaction:1beep
indicatesanactivatedzoneand2beepsindicatesadeactivatedzone.
[TIMER]COLD START TIMER MODE
Thisfeaturewillremote‐startthevehicleevery1.5or3hoursanditwillrunfor3,5,
7or15minutes(6,14or30minuteswithadieselengine)dependingon
programming.ÆSeeCOLDSTARTTIMERMODEpage10.
[TURBO]TURBO MODE
ÆSee
TURBO
MODE
page 8.
[CARCALL]N/A (future use)
[2NDCAR]MULTI-VEHICULE MODE
Thisfeatureallows1remotetocontrol2vehicles.
NOTE:The2vehiclesmusthaveanremote‐starterand/orsecuritysysteminstalled.
NOTE:Theoptionmustbeprogrammedbyyourtechnicien.
4
SETTINGS (OLED REMOTE)
LongpressthebuttontoentertheMENU,
Choose[SETUP],
Pushthebuttonfor0.5seconds[SET],
[CLOCK]Time
setting
Press the button to increase the 'hour'.
Press the button to increase the 'minute'.
Press the button for 2 seconds to save the time.
Do not press any buttons for 20 seconds to cancel.
[TIMER]Future use
[TEMP]Togglethevehicle'sinteriorambienttemperature betweenCelsius
andFahrenheit.
BATTERY CAPACITY (OLED REMOTE)
Use1.5VAlkaline(AAA)batteriesforthemaximumlifetime.
morethan1.4V 1.3V~1.4V.REFERENCE
Whenthebatterycapacityislessthan1.3V,theOLEDwill
dimtosavepower.
1.2V~1.3V. <1.2V
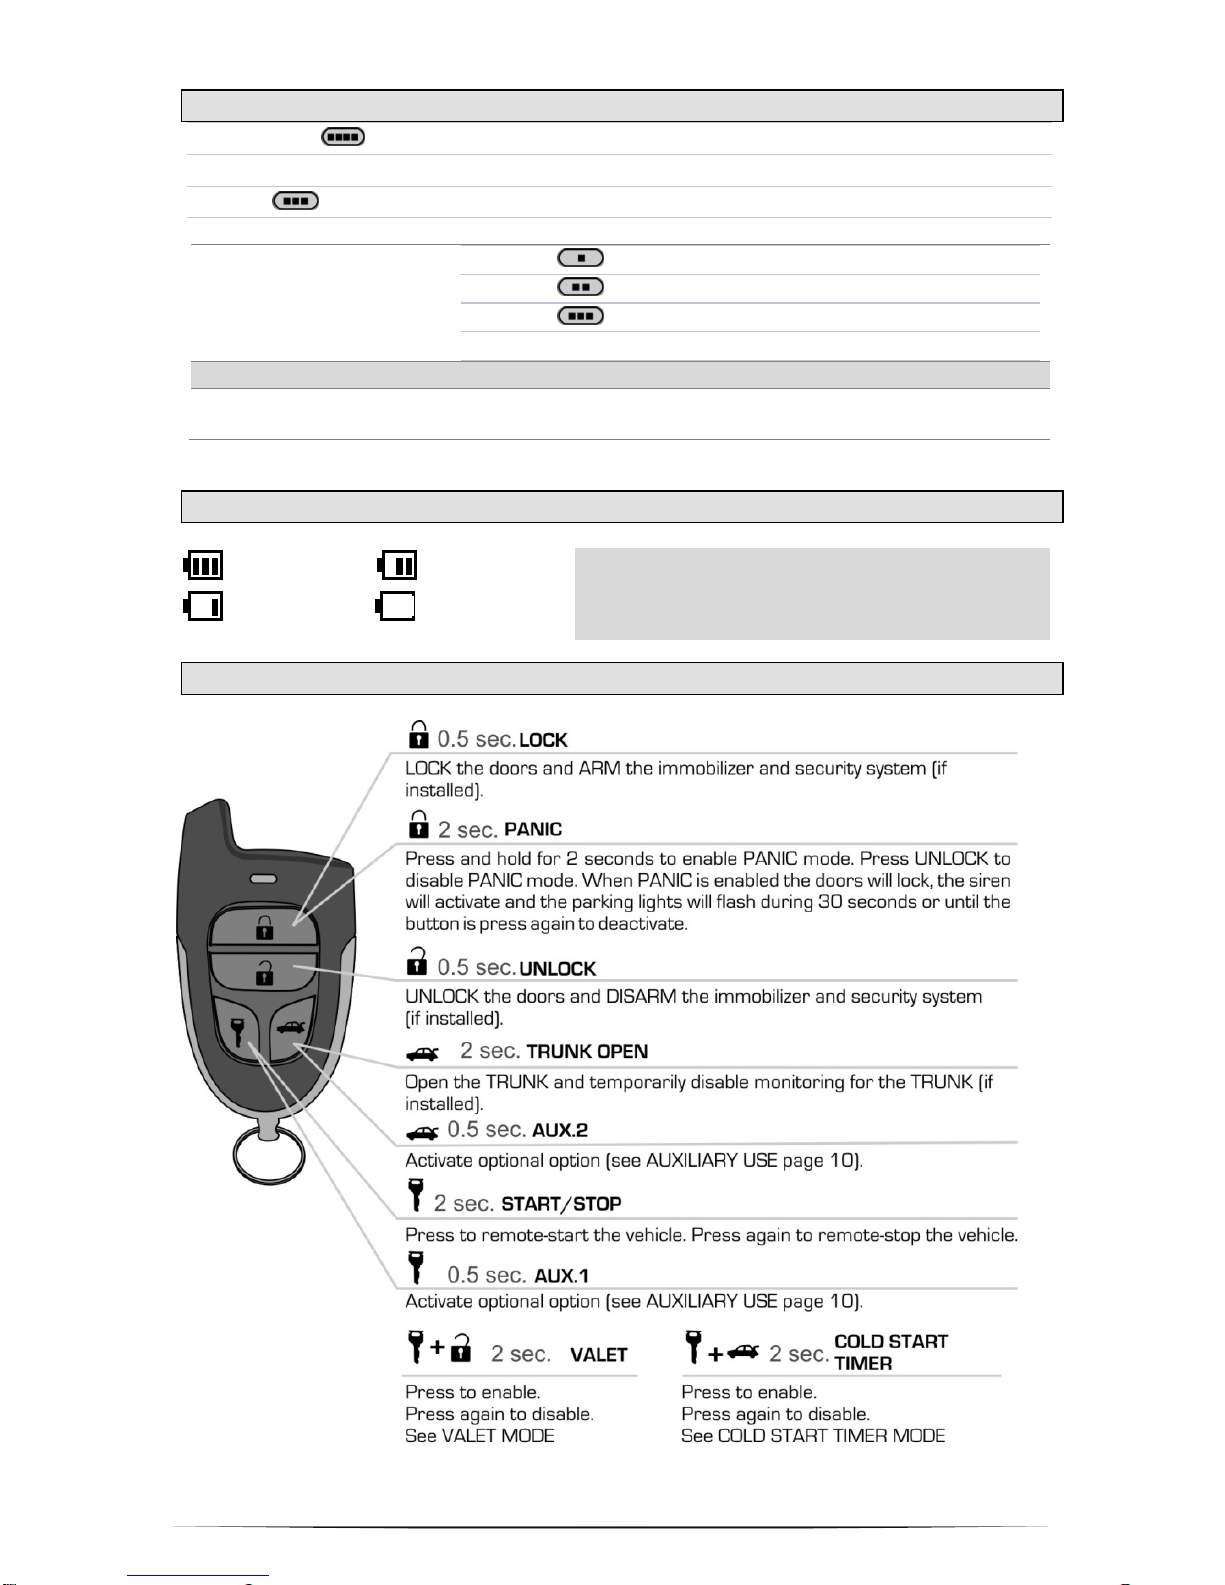
1-WAY REMOTE
5
INTRODUCTION
Thank you for purchasing this Remote-Starter/Security-System. This is a state of the art Remote-
Starter/Security-System including numerous new comfort and security features, and all of the
elementary features generally offered with most basic Remote-Starter systems. There are certain
features listed in this manual that may not be available for your system. There may also be features
listed in this manual that require additional installation or programming before they are active. In
order to truly enjoy the benefits of this system, we recommend that you
thoroughly review the following manual.
This system contains transmitter(s) and a receiver with 750m/2500ft range.
WARNING
•Do not start the vehicle indoors (garage, underground parking).
•Do not remote-start the vehicle with a passenger inside.
•When servicing the vehicle enable
VALET MODE
(ÆSee Page 8).
NOTE
• The system can be configured in three different ways: Remote Start only, alarm only or alarm and
remote starter.
• The options vary by vehicle, the components can be added to the system and the functions on the
vehicle.
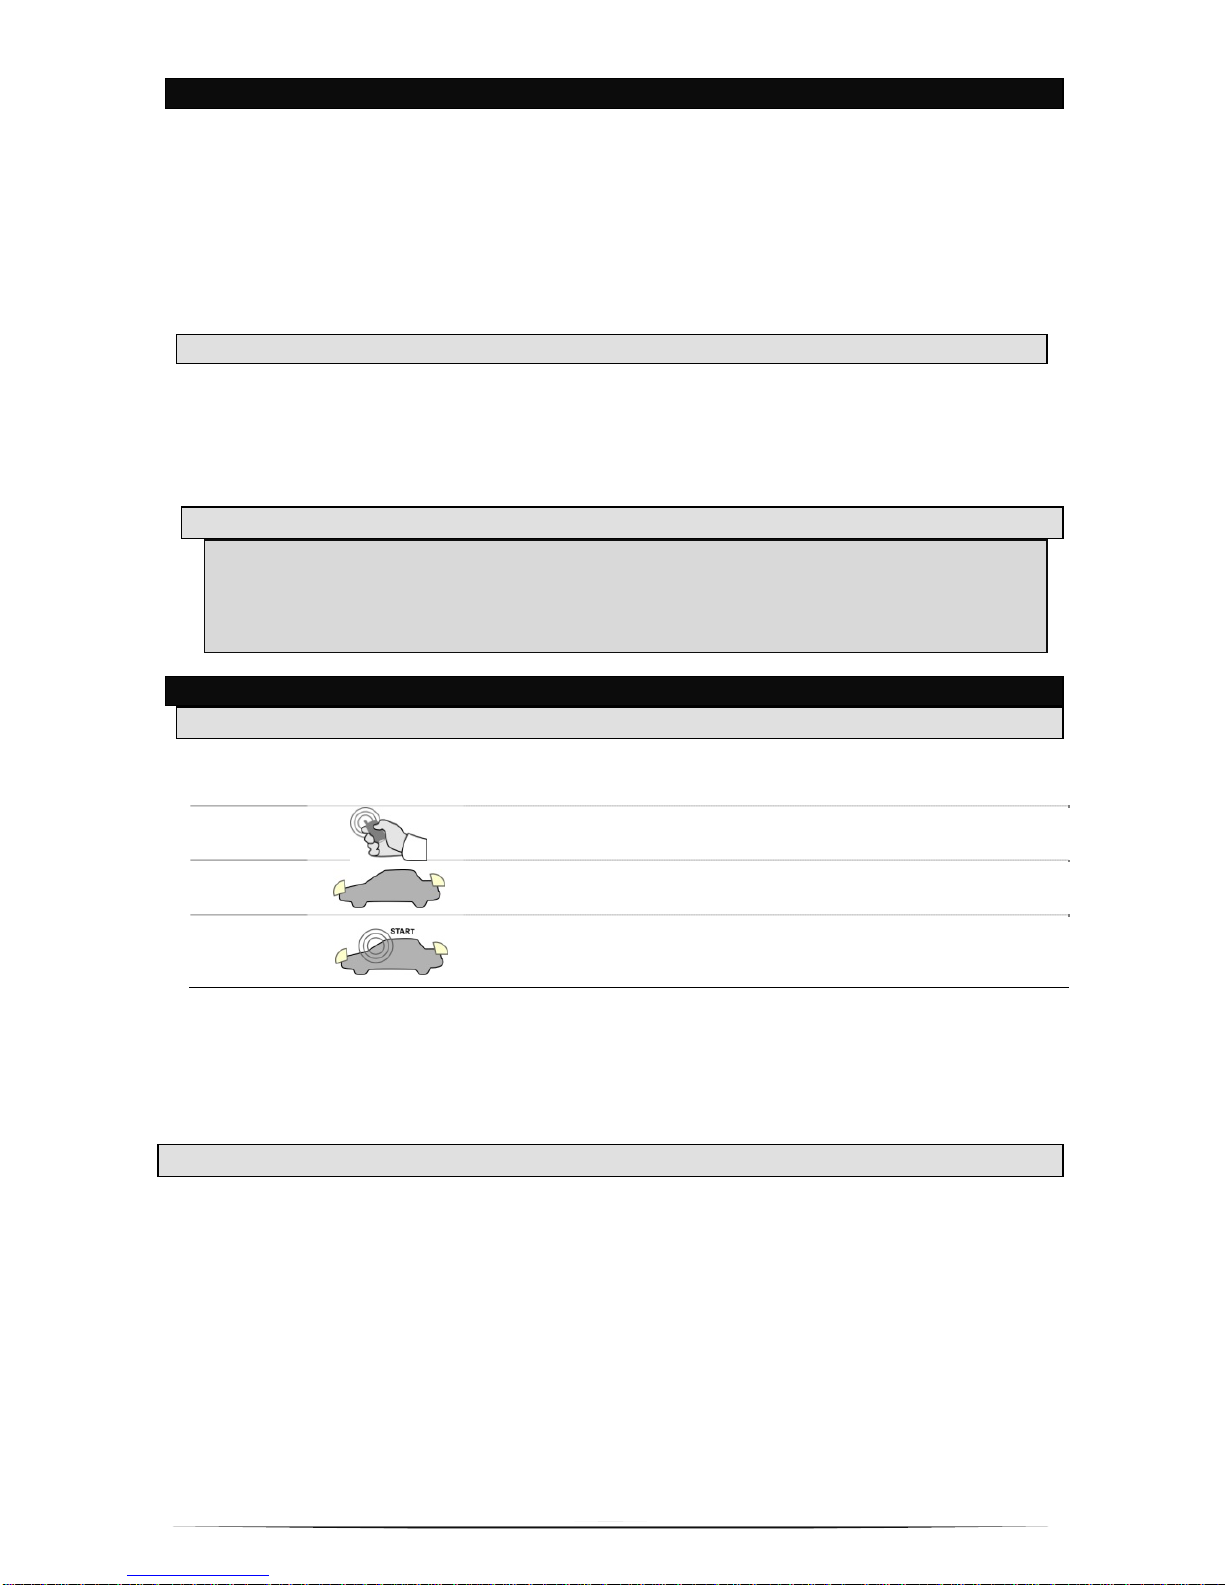
REMOTE-STARTING (WITH OPTION AVAILABLE)
REMOTE-STARTING THE VEHICLE
This Remote-Starter supports both manual and automatic transmission vehicles. For manual
transmission vehicles Æsee the Ready Mode section.
REMOTE-STARTING
ÉTAPE 1
To remote-start the vehicle press the START button for
approximately 1 second.
ÉTAPE 2
The parking lights will turn on to indicate a response to the Remote
-
Start signal.
ÉTAPE 3
Approximately 5 seconds later the engine will crank. Once the
vehicle starts the parking lights will turn on and remain on for the
entire duration of the Remote-Starter runtime, or until the Remote-
Starter is shut down.
If the vehicle fails to start on the first attempt, the Remote-Starter will wait 3 seconds before it will
attempt to start the vehicle again. The Remote-Starter will attempt to start the vehicle 2 times
(default) before giving up. (ÆSee
FAILED REMOTE START
p. 12)
ACCESSORY PRESET
Heater & Heated Seat(s): When leaving the vehicle it is recommended that the driver pre-set the climate
controls in preparation for a later Remote-Start. When the vehicle Remote-Starts, the current (or
last) setting for the climate controls, windshield wipers (and other accessories) will be used. When
setting the blower motor (fan speed) and heated seats (if equipped) should not be left on HIGH. It is
recommended to leave these settings on either a LOW or MEDIUM setting.
Windshield Wipers & Radio & Headlights: Some vehicles require the radio, windshield wiper, headlight circuits
to become energized while running under Remote-Start. When leaving the vehicle you must ensure
that the windshield wiper and headlight switches are turned off. Leaving the headlights on with some
vehicles could cause them to remain on even after the Remote-Starter has shut down, resulting in a
dead battery.
Rear Defrost: On most vehicles the Rear Defrost can only be activated after the vehicle has been started
and in most cases this feature is not included with a Remote-Starter installation. On some vehicles it
may be possible for the installer to hook this feature up so it either automatically enables after
Remote-Start or can be enabled by using an AUX output. (ÆSee Auxiliary Use p. 10)
Driver Presets: Some vehicles retain different seat, mirror and radio settings for each driver. Different
driver presets are not controlled by the Remote-Starter, however they may be controlled with the
Bypass/Interface Kit.
6
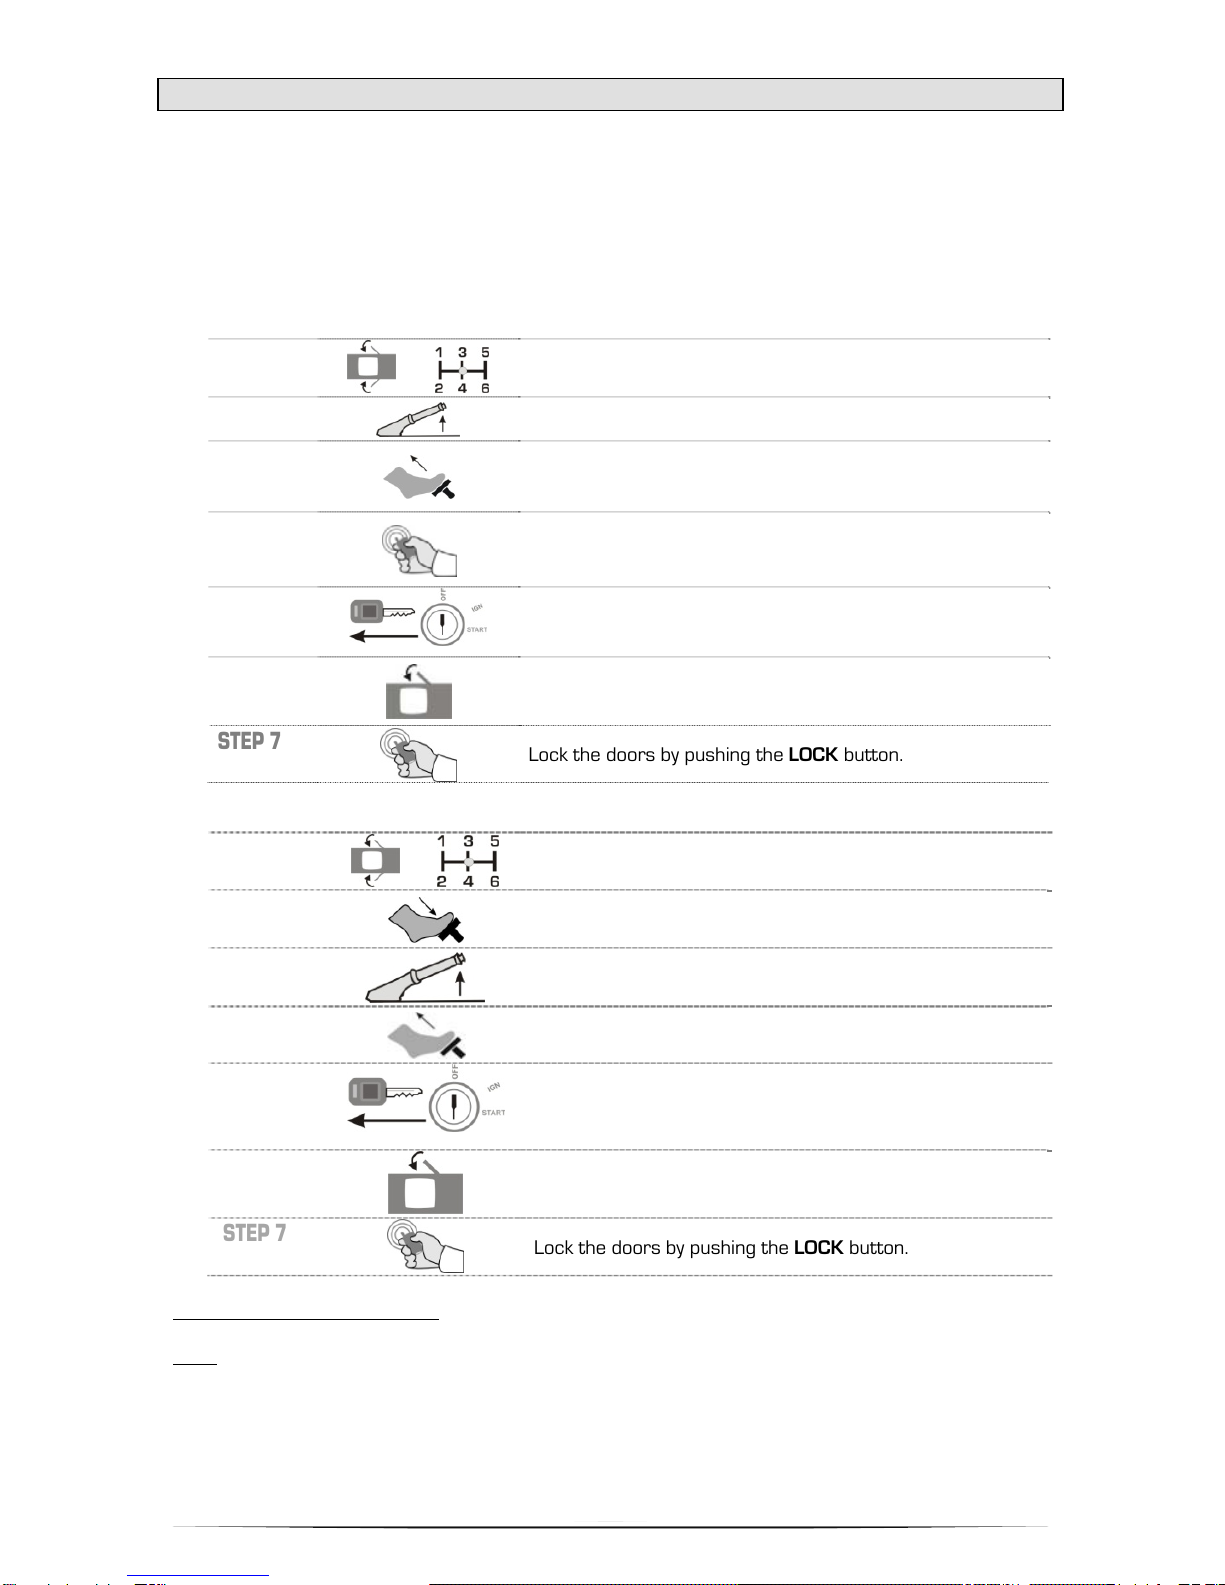
READY MODE (MANUAL TRANSMISSION ONLY)
Two activation methods are possible, please consult the salesman or installer to determine which of
these modes applies to your vehicle.
There are always safety concerns for a manual transmission vehicle to accidentally start while in gear,
Ready Mode alleviates these concerns. The driver must enable Ready Mode in order to Remote-Start
the vehicle at a later time. Once Ready Mode is setup the vehicle can be started/stopped at will, as
many times as needed. However once the parking brake is disengaged, the hood is opened, or any of
the doors are opened, Ready Mode will deactivate and the vehicle will not start until Ready Mode is
reactivated.
METHOD 1 ACTIVATION :
STEP 1
and
Make sure that all doors are closed and the transmission
is in the NEUTRAL position.
STEP 2 Engage the parking brake.
STEP 3
Release the brake pedal.
STEP 4
Within 20 seconds push the START button.
The parking lights will flash once and then remain on.
STEP 5
Remove the key from the ignition barrel.
The vehicle will remain running with the Remote-Starter.
STEP 6
Exit the vehicle and close all of the doors.
The Remote-Starter will stop running once all the doors are
closed.
STEP 7
Lock the doors by pushing the LOCK button.
METHOD 2 Thismethodmustbeenabledbytheinstallerduringinstallation.ACTIVATION :
STEP 1
AND
Make sure that all doors are closed and the transmission
is in the NEUTRAL position.
STEP 2
Press and hold the foot-brake.
STEP 3
Engage the hand- brake.
STEP 4
Release the foot-brake.
STEP 5
Remove the key from the ignition barrel. The engine will
shut down and the vehicle will be ready to start at any
time.
STEP 6
Exit the vehicle and close all doors.
The remote-starter will stop running as soon as all doors
are closed.
STEP 7
Lock the doors by pushing the LOCK button.
TO DEACTIVATE READY MODE:
• Open any door(s) • Open the hood • Disengage of the parking brake
Note : If the parking lights flash 3 times when Remote-Starting, Ready Mode is not enabled.

7
DRIVING OFF
When the vehicle is running with the Remote-Starter, enter the vehicle and proceed with the following
steps:
STEP 1
Insert the key and turn it to the ignition (ON/Run) position.
WARNING: Do not turn the key to the START position when the
engine is running. This may damage the ignition system on some
vehicles.
STEP 2
Step on the brake pedal to disable the Remote-Starter,
and put the vehicle in gear.
REMOTE-STARTER FEATURE’S (WITH OPTION AVAILABLE)
IDLE MODE (AUTOMATIC TRANSMISSION)
Idle Mode allows the vehicle to run without the key in the ignition barrel. For example, if you stop for a
quick errand or delivery, simply allow the vehicle to run while you are gone. The engine will run until the
Remote-Starter runtime expires. Press START any time the vehicle is running with the Remote-Starter
to reset this timer. To activate Idle Mode (automatic transmission) proceed with the following steps:
STEP 1
With the key in the barrel at the ignition (ON/RUN) position
and the engine running, press the START button, until the
parking lights turn on.
STEP 2
Turn the key to the OFF position and remove the key from
t
he ignition barrel. The vehicle will continue to run with the
t
he Remote-Starter.
STEP 3
Get out of the vehicle and press the LOCK button to lock
t
he doors. The engine will run until the Remote–Starter
runtime expires.
WARNING : Never leave children or animals in a Remote-Started vehicle unattended.
IDLE MODE (MANUAL TRANSMISSION)
Idle mode is activated in much the same way Ready Mode is activated, except for Step 1. To activate
Idle Mode (manual transmission) proceed with the following steps:
IDLE MODE ACTIVATION:
STEP 1
and
Open at least one door and ensure the transmission is in
t
he NEUTRAL position.
STEP 2
Engage the parking brake.
STEP 3
Release the brake pedal.
STEP 4
W
ithin 20 seconds push the START button.
T
he parking lights will flash once and then remain on.
STEP 5
Remove the key from the ignition barrel.
T
he vehicle will continue to run with the the Remote-Starter.
STEP 6
Exit the vehicle and close all of the doors.
T
he vehicle will continue to run after all the doors are closed.
STEP 7
Lock the doors by pushing the LOCK button.
The engine will continue to run until either the transmitter (STOP) button is pressed, the Remote-
Starter runtime expires, the parking brake is disengaged, the brake is pressed, or the hood is opened.
If the Remote-Starter is shut down by transmitter it will automatically go in to Ready Mode (if all the
doors are closed).
WARNING : Never leave children or animals in a Remote-Started vehicle unattended.

8
TURBO MODE
Turbo Mode (if installed) is similar to Idle Mode but is used to cool down the turbo-charger once the
driver leaves the vehicle. The Remote-Starter will continue run the vehicle for 2 minutes allowing the
turbo-charger to cool down.
TURBO MODE (AUTOMATIC TRANSMISSION)
To activate Turbo Mode (automatic transmission) proceed with the following steps:
STEP 1
With the engine already running, push the START button until
t
he parking lights come on.
STEP 2
Remove the key from the ignition barrel.
The vehicle will continue to run with the the Remote-Starter.
STEP 3
Exit the vehicle and close all of the doors.
The vehicle will continue to run after all the doors are closed.
STEP 4
Press the LOCK button to lock the doors.
The vehicle will continue to run for 60 seconds
TURBO MODE (MANUAL TRANSMISSION)
Turbo Mode (if installed) is similar to Idle Mode but is used to cool down the turbo-charger once
the driver leaves the vehicle. The Remote-Starter will continue run the vehicle for 2 minutes
allowing the turbo-charger to cool down. To activate Turbo Mode (manual transmission) proceed
with the following steps:
ÆSee
IDLE MODE (MANUAL TRANSMISSION)
page 7.
VALET MODE (VIA REMOTE)
Valet Mode disables the remote-starter and security system. IMPORTANT Whenever the vehicle
is being serviced or repaired, or the vehicle is parked indoors it is mandatory that Valet
Mode be enabled to prevent an accidental Remote-Start.
Note: The security system is deactivated (including Starter Kill) when the system is in Valet Mode.
However you are still able to lock & unlock the doors, use the auxiliary and release the rear
hatch/trunk. This method of enabling/disabling Valet Mode uses the remote transmitter instead of
the valet switch indicated in the preceding section.
To enter Valet Mode using the remote transmitter proceed with the following steps:
STEP 1
ÆSee 2-WAY OLED REMOTE (page 2) or 1-WAY REMOTE
(page 5).
The parking lights will flash once.
STEP 2
The LED will turn ON solid and remain ON. (if installed)
To exit Valet Mode using the remote transmitter proceed with the following steps:
STEP 1
ÆSee 2-WAY OLED REMOTE (page 2) or 1-WAY REMOTE
(page 5).
The parking lights will flash once.
STEP 2
The LED will turn OFF or will start to flash. (if installed)
9
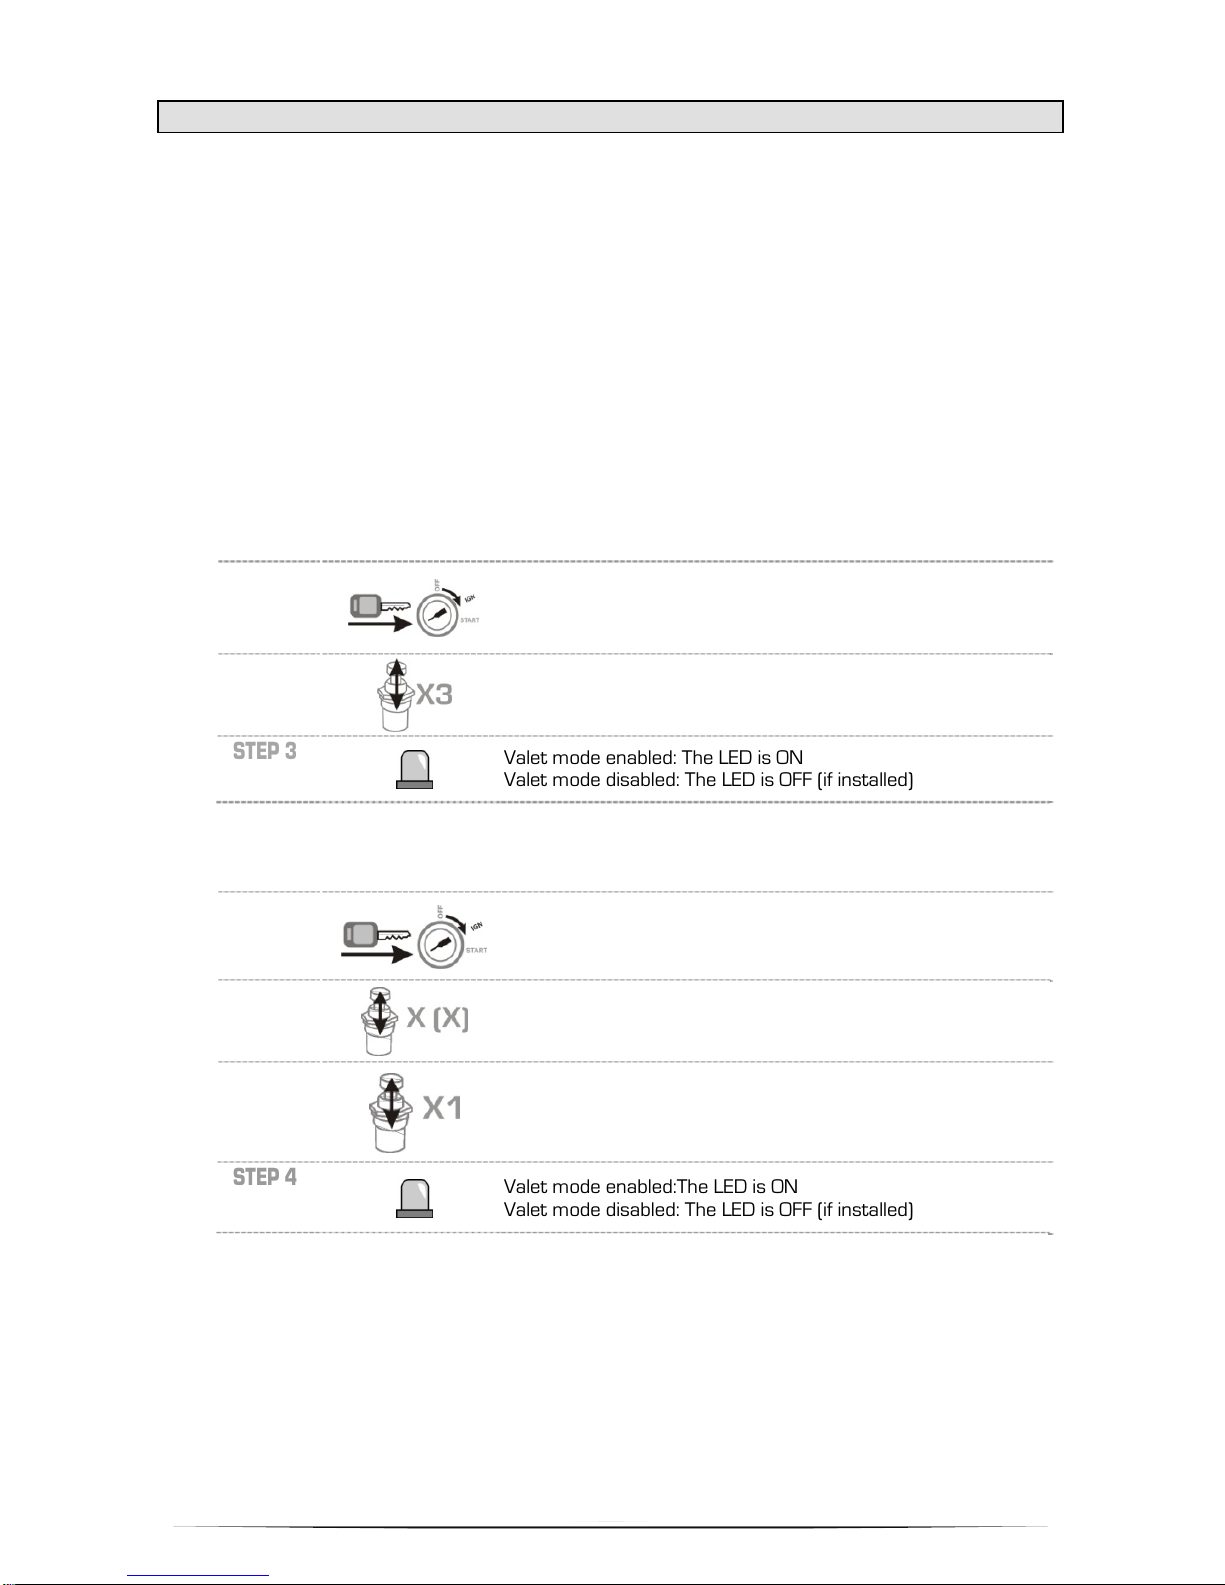
VALET MODE (VIA SWITCH) / VALET CODING
Valet Mode disables both the Remote-Starter and Security-System. Whenever the vehicle is being
serviced or repaired, or the vehicle is parked indoors it is mandatory that Valet Mode be enabled to
prevent an accidental Remote-Start.
Note: The security system is not active (including Starter Kill) when the system is in Valet Mode.
However you are still able to lock and unlock the doors, and release the rear hatch/trunk.
Note: When the Remote-Starter/Security-System is in Valet Mode, the LED will stay ON solid instead
of flashing after the doors are locked. The LED (if installed) will turn off only after Valet Mode is
disabled.
The valet mode can be programmed to use a coded entry in order to increase the security of your
system and to prevent accidents. By default, the valet button is pressed 3 times after turning the
ignition.
VALET CODING DISABLED (DEFAULT):
To activate and deactivate Valet Mode using the valet switch proceed with the following
steps:
STEP 1
Insert the key and turn it to the ignition (ON/RUN) position.
The vehicle does not need to be started.
STEP 2
Within 10 seconds press (1 second) and release the Valet
switch 3 times.
STEP 3
V
alet mode enabled: The LED is ON
V
alet mode disabled: The LED is OFF (if installed)
VALET CODING ENABLED (OPTIONAL):
To activate and deactivate Valet Mode using the valet switch proceed with the following steps:
STEP 1
Insert the key and turn it to the ignition (ON/RUN) position.
The vehicle does not need to be started.
STEP 2
Within 10 seconds press and release the valet button 3 to 7
t
imes (X = valet code) for 1 second. If your valet code is 7 then
press and release the valet button 7 times.
STEP 3
Press and hold the valet button once for 3 seconds to finish
t
he sequence.
STEP 4
V
alet mode enabled:The LED is ON
V
alet mode disabled: The LED is OFF (if installed)
Note: The coded valet option allows a selection of one of the five available codes. Once the
installer chooses one of the codes, note the value here so you do not forget
it_____________________.
10
COLD START TIMER MODE
Cold Start Timer Mode will remote-start the vehicle every 1.5 or 3 hours and run for 3, 5, 7 or 15
minutes (6, 14 or 30 for diesel engines), depending on programming. The remote-starter will repeat
this sequence for up to a maximum of 24 hours. For manual transmission vehicle’s READY MODE
must be enabled, and if at any time READY MODE is disabled this sequence will cancel.
WARNING Do not start the vehicle indoors (garage, underground parking).
To enable Cold Start Timer Mode
ÆSee 2-WAY OLED REMOTE (page 2) or 1-WAY REMOTE (page 5).
To disable Cold Start Timer Mode do any of the following:
• ÆSee 2-WAY OLED REMOTE (page 2) or 1-WAY REMOTE (page 4).
• Put the Remote-Starter/Security-System into Valet Mode.
• Remote-Start the vehicle.
• Open the hood.
• Press the brake pedal.
• Turn the key to the ignition (ON / RUN) position.
• Disable Ready Mode (manual transmission).
Note: If the Alarm is triggered during Remote-Start (Cold Start), the vehicle will stop running, but Cold
Start will not cancel its schedule.
AUXILIARY USE
The function of the auxiliary outputs may vary depending on the vehicle and the installation. In most
cases these outputs are not used, and in some cases they may be used to control other features such
as the sliding door, power windows, sunroof, or heated seats. Check with the installer to find out what
AUX outputs have been installed, and what they control.
ÆSee 2-WAY OLED REMOTE (page 2) or 1-WAY REMOTE (page 5).
REMOTE STARTING OPTIONS (WITH OPTION AVAILABLE)
REMOTE DOOR LOCKS
If the Remote-Starter is installed with door locks, you will be able to lock and unlock the vehicle without
using the key or OEM key fob.
To UNLOCK the doors and DISARM the security:
Press the UNLOCK button for 1 second.
The parking lights will flash twice and the LED (if installed) will turn OFF to confirm the signal. The
Starter-Kill will also deactivate allowing the vehicle to be started with the key. If UNLOCK is pressed
again (consecutively) the horn will honk twice (if installed) to confirm.
Note: The system can be configured during installation so the horn confirms UNLOCK on the first
attempt.
To LOCK the doors and ARM the security:
Press the LOCK button for 1 second.
The parking light will flash once and the LED (if installed) will turn ON to confirm the signal.
11
The Starter-Kill will activate preventing the vehicle from being started with the key. If LOCK is pressed
again (consecutively) the horn will honk once (if installed) to confirm.
Note: The system can be configured during installation so the horn confirms LOCK on the first
attempt.
TRUNK/HATCH RELEASE (ZONE 6)
The vehicle's trunk or rear hatch (if installed) can be opened by pressing the TRUNK button. The
system will not disarm but it will ignore the trunk zone until it is closed.
RUNTIME
On gas engines the Remote-Starter can run the vehicle for either 3, 7 or 15 (default) minutes. On
diesel engines the Remote-Starter can run the vehicle for either 6, 15 or 30 (default) minutes.
SECURITY SYSTEM (WITH OPTION AVAILABLE)
LOCK THE DOORS (ARM) (OLED REMOTE)
To LOCK the doors and ARM the security system press the button for 0.5 seconds.
[ARM] is displayed on the remote when the system is ARMed,
The vehicle's siren will chirp and the park ng lights will flash once.
UNLOCK THE DOORS (DISARM) (OLED REMOTE)
To UNLOCK the doors and DISARM the security system press the button for 0.5 seconds.
[DISARM] is displayed on the remote when the system is DISARMed,
The siren will chirp and the parking lights will flash twice.
When the security system is disarmed:
• 2x chirps, 2x parking light flashes, [DISARM] displayed: Normal operation.
• 4x chirps, 4x parking light flashes, [MEMORY] displayed: The security system detected a shock,
open door, open hood or open trunk since the vehicle was armed.
REAL TIME REMOTE WARNING FUNCTION (OLED REMOTE)
This function reports shock sensor pre-warnings directly to the remote when armed. The remote will
beep continually when a full shock sensor impact is detected,
Pressthebuttonfor0.5secondstostopthewarning.
ALARM REPORT MODE
Whenever a door is opened when the system is armed the alarm will activate.
Pressthebuttonfor0.5secondstostopthewarning.
TRUNK (OLED REMOTE)
Pressthebuttonfor2secondstounlockdoorsandopenthetrunk.Theparkinglightsflashes.
OPEN ZONE NOTIFICATION
When the LOCK button is pressed to ARM the system (non Valet Mode) it will indicate if there are any
zones which are currently active. The siren will sound with several short chirps to indicate which zone
is active. A silent ARM or only 1 chirp indicates that no zones are currently active. ÆSee REMOTE-
STARTER/SECURITY DIAGNOSTICS (page 12)

12
FALSE ALARM DEACTIVATION
This option will disable any zone that triggers the system 3 consecutive times. The zone will
automatically re-enable once the LOCK button or the UNLOCK button is pressed.
SHOCK SENSOR (ZONE 4)
This system supports FSS2Z (2 stage - 3 wire) Shock Sensors. The Shock Sensor will cause the siren
to produce a short audible warning on a weak shock, and will trigger a full alarm on a strong shock.
Whenever the vehicle is running with the Remote-Starter the shock sensor is ignored until the
Remote-Starter shuts down. The system can be set to monitor the Shock Sensor if the vehicle is
armed AFTER remote-start.
VEHICLE LOCATOR/PANIC MODE
To locate your vehicle in a busy parking lot press the LOCK button for 3 seconds to sound the
horn/siren (If installed) and flash the parking lights. Press unlock to cancel this Mode.
Note: If a Alarm pre-triggered zone is in memory, this Mode will NOT clear this zone from memory.
TRANSMITTER RANGE
Several factors may affect the operating range of the remote transmitter:
●A weak transmitter battery.
●The operating environment such as in the city and airports due to radio interference, cell phone towers,
etc…
●Several types of metal such as the vehicle itself, other vehicles, the windshields tint lines and large
buildings.
●The vehicle’s shape. Vans generally have poorer range.
● The shape of the vehicle’s roof and the A-pillars cause considerable radio-frequency deflection. As a
result, the direction in which the vehicle is facing with relation to the remote transmitter can affect
range. Facing the front of the vehicle generally produces the greatest range; secondly facing the back.
Facing either side of the vehicle will usually give the poorest range.
●The range will be significantly poorer in crowded parking lots as opposed to empty parking lots.
● Hold the transmitter at shoulder height or hold it against your chin so your body acts as a larger
antenna.
FAILED REMOTE-START
There are several different installation factors and devices that must work together in order for your vehicle
to Remote-Start properly. In some cases a failed Remote Start is not the fault of the Remote-Starter itself.
Here are some things to consider when the Remote-Starter fails.
●Unmaintained Engine. If you have problems starting the vehicle with the key then the Remote-Starter will
have the same difficulty.
● Low Battery. A battery’s voltage can drop to less than 4 volts DC (1/3 of the original) during cold
weather starting. Ensure your battery is working properly and is able to provide the proper current
needed to start the vehicle in extreme temperatures.
●Low Fuel, or water in the fuel tank. Keep your fuel tank full as much as possible to prevent the build-up of
condensation in the tank..
● A corroded or broken Hood Pin switch. Visually inspect the hood pin switch frequently. Cover with a
dialectic grease to prevent corrosion.
●Trailer wiring. Corroded or improperly wired trailer wiring may cause the park light signal to bleed into
the brake signal. This will cause the Remote-Starter to shut down as soon as the park lights are turned
on.
●Problems with the Bypass Kit (if installed). If you are able to put the Remote-Starter into Ready Mode, Idle
Mode, or Turbo Mode, but you are unable to Remote-Start the vehicle then the Bypass Kit may be failing.
Several Remote-Start attempts with a failed Bypass Kit may lock your vehicle for several hours.
● Dash warning lights. The dash should display in exactly the same way when either starting the vehicle
with the key, or with the Remote-Starter. If the dash displays any warning lights (Check Engine, ABS, or
Theft) once Remote-Started then something is wrong. Stop using the Remote-Starter and have it looked
at immediately.

13
TIP: If your vehicle is experiencing any problems either starting or running with the key have it looked at by
the Remote-Starter's installer first. Having the vehicle worked on by another service centre may void any
warranty and/or guarantees on the Remote-Starter and its Installation. Additionally the original
installation centre may refuse all fees incurred by the latter service centre (if any).
REMOTE START / ALARM DIAGNOSTICS
REMOTESTARTERDIAGNOSTICS ALARMDIAGNOSTICS
Parking Light flashes
(before starting) :
Parking Light flashes (after
Shutdown) :
Parking Light flashes (after
disarm) :
3x Ready mode disabled
4x Valet mode activated
(The LED is on)
5x Hood open
1x Normal stop (Brake, Park
Brake)
3x Runtime expired or shut
down by transmitter
4x No tachometer signal
5x Hood open
6x Failure to start the vehicle
3xDooropen
–
zone3
4xShocksensor–zone4
5xHoodopen–zone5
6xTrunkopen–zone6
7xAuxilliaryIN–zone7
8xTiltsensor–zone8
9xIgnition–zone9

SYSTÈME DE SÉCURITÉ SEULEMENT
DÉMARREUR ÀDISTANCE SEULEMENT
SYSTÈME DE SÉCURITÉ ET DÉMARREUR ÀDISTANCE
FSA‐211
DÉé.a.[Guideutilisateur]

1
TABLE DES MATIÈRES
Utilisationdestélécommandes.................................................................................................2
TELECOMMANDEOLED2‐VOIES....................................................................................................2
REGLAGEDESFONCTIONS(TELECOMMANDEOLED2‐VOIES).................................................................3
REGLAGE(TELECOMMANDEOLED2‐VOIES).....................................................................................4
CAPACITEDELABATTERIE(TELECOMMANDEOLED2‐VOIES)................................................................4
TELECOMMANDE1‐VOIE.............................................................................................................4
introduction..............................................................................................................................5
MISEENGARDE.........................................................................................................................5
NOTE......................................................................................................................................5
démarrageàdistance...............................................................................................................5
POURDEMARRERVOTREVEHICULEADISTANCE.................................................................................5
REGLAGESDESACCESSOIRES.........................................................................................................5
ACTIVATIONMODEPRETADEMARRER(TRANSMISSIONMANUELLESEULEMENT).......................................6
POURPARTIR............................................................................................................................7
fonctionsdudémarreuràdistance(avecoptiondisponible)...................................................7
MODEVEHICULEENATTENTE(TRANSMISSIONAUTOMATIQUE).............................................................7
MODEVEHICULEENATTENTE(TRANSMISSIONMANUELLE)...................................................................7
MODETURBO...........................................................................................................................8
MISEENVALETADISTANCE..........................................................................................................8
MODEVALET/VALETCODE..........................................................................................................9
MODETEMPSFROID.................................................................................................................10
UTILISATIONDESAUXILIAIRES......................................................................................................10
optionsdudémarreuràdistance(avecoptiondisponible)....................................................10
VERROUILLAGEDESPORTIERESADISTANCE....................................................................................10
OUVERTUREDUCOFFREADISTANCE(ZONE6)................................................................................11
TEMPSDEMARCHEDUMOTEUR..................................................................................................11
systèmedesécurité/alarme(avecoptiondisponible)..........................................................11
VERROUILLAGEDESPORTES(ARMEMENT)(TELECOMMANDEOLED2‐VOIES)..........................................11
DEVERROUILLAGEDESPORTES(DESARMEMENT)(TELECOMMANDEOLED2‐VOIES)..................................11
FONCTIOND'AVERTISSEMENTADISTANCEENTEMPSREEL(TELECOMMANDEOLED2‐VOIES)......................11
VALISE(TELECOMMANDEOLED2‐VOIES).......................................................................................11
AVERTISSEMENTDEZONEOUVERTE..............................................................................................11
DESACTIVATIONAUTOMATIQUED’UNEZONEDEL’ALARME................................................................12
DETECTEURDECHOCS(ZONE4)ETSIGNAUXD’AVERTISSEMENT(OPTIONNEL)........................................12
LOCALISATEURDEVOITURE/MODEPANIC......................................................................................12
réglerunproblèmederayond’action....................................................................................12
ECHECAUDEMARRAGEADISTANCE..............................................................................................12
diagnosticdudémarreuràdistance/alarme.........................................................................13
Rev.20120518

2
UTILISATION DES TÉLÉCOMMANDES
TELECOMMANDE OLED 2-VOIES

3
REGLAGE DES FONCTIONS (TELECOMMANDE OLED 2-VOIES)
AppuyezlongtempssurleboutonpourentrerdansleMENU,
choisissez[FONCTION],appuyezsurlebouton 0.5secondepour[SET],
choisissezla[FONCTION],(voirtableauci‐dessous)enappuyantsurleboutonpourmonteret
pourdescendredanslemenu,
Appuyezsurlebouton0.5seconde,
Lesicônes et clignotent.(fonctionactivé, fonctiondésactivé),
Appuyezlongtempssurlebouton ,
Lesicônes et arrêtentdeclignoter,
la[FONCTION],(voirtableauci‐dessous)estmodifier.(ON/OFF)
[MUTE]MODE DE SIRENE SILENCIEUSE
Dans ce mode, la sirène et/ou le klaxon ne s'activent pas pendant l'armement et le
désarmement seulement.
La sirène fonctionne dans les autres modes (panique, Impact, vol).
[VALET]FONCTION VALET
Désactiveledémarreuràdistanceainsiquel'alarme(siinstallée.)jusqu'ala
réactivation.ÆVoirMODEVALETÀDISTANCEpage8.
[PASSIVE]ARMEMENT ACTIF OU PASSIF (avec système de sécurité installé)
Il est possible de programmer le dispositif antidémarrage en mode actif (pas de
réarmement automatique) ou passif (avec réarmement automatique). Votre démarreur à
distance est configuré par défaut en mode passif à 60 secondes : le démarreur à
distance s’armera automatiquement 60 secondes après la fermeture de la dernière
portière. Cependant, le démarreur à distance ne s’armera pas si une portière demeure
ouverte.
Note: Lorsque le dispositif antidémarrage se réarme automatiquement, vous pouvez
désarmer le démarreur à distance en appuyant simplement sur la touche
DÉVERROUILLAGE.
[SMART]PORTE AUTOMATIQUE
Cette caractéristique permet de verrouiller les portières et d’armer l’alarme (si installé)
30 secondes après avoir reçu la commande déverrouillée. L’ouverture d’une porte
annule cette fonction.
Note : Les portières doivent être branchées sur le démarreur à distance pour activer
cette fonction.
[IGLOCK]VERROUILLAGE DES PORTIÈRES À L’ALLUMAGE
C’est une caractéristique additionnelle de sécurité. Si votre système est installé avec le
verrouillage des portières à l’allumage, les portières seront automatiquement verrouillées
dès que la clé de contact est tournée en position d’allumage (IGNITION ON / RUN) et que
vous actionnez la pédale de frein. Lorsque la clé revient en position « OFF », les portières
se déverrouillent automatiquement.
[SHOCK]DETECTION DE CHOC
Pour activer ou désactiver le capteur de choc utile lorsque vous stationnez dans les rues
encombrées ou les zones bruyantes.
Dans l’éventualité qu’un détecteur soit mal ajusté et qu’il déclenche de fausses alarmes, il
est possible de désactiver certaines zones de l’alarme. Les zones visées sont la zone 4 le
détecteur de choc, la zone 7 l’Auxiliaire IN et la zone 8 le détecteur d’inclinaison (Tilt
Sensor)). Un signal sonore se fait entendre pour confirmer l’action : 1 signal sonore
confirme l’activation des zones et 2 signaux sonores indiquent la désactivation des zones.
[TIMER]MODE DE DEMARRAGE PAR MINUTERIE
Lorsque le mode temps froid est activé, le moteur démarrera toutes les 1.5 ou 3 heures
et sera maintenu en marche pendant 3, 5, 7 ou 15 minutes (6, 14 ou 30 minutes avec
un moteur diesel) dépendant de la programmation. ÆVoir
MODE TEMPS FROID
page 10
[TURBO]MODE TURBO
ÆVoir
MODE TURBO
page Error! Bookmark not defined.
[CARCALL]Utilisation future.
[2NDCAR]MODE MULTI-VEHICULE
Cette caractéristique permet d’utiliser une télécommande sur deux véhicules différents
NOTE : les 2 véhicules doivent avoir un démarreur à distance et/ou système de sécurité
installé.
NOTE: l'option doit être programmée par votre technicien.

4
REGLAGE (TELECOMMANDE OLED 2-VOIES)
Appuyezlongtempssurlebouton pourentrerdansleMENU,
appuyezsurleboutonpourmonteretpourdescendredanslemenu,
choisissez[SETUP],appuyezsurlebouton0.5secondepour[SET],
[CLOCK]Réglagede
l'heure
Appuyez sur le bouton rapidement, ‘hour’ (heure) clignote et
augmente.
Appuyez sur le bouton rapidement, ‘minute’ clignote et
augmente.
Après avoir réglé l'heure actuelle, appuyez sur le bouton
pendant 2 secondes puis l'heure actuelle s'arrête de clignoter, le
temps est réglé.
La télécommande ne doit pas être manipulée pendant 20
secondes, car elle retournera aux réglages d'origine.
référence
Si la batterie est changée en moins de 20 secondes, l'heure sera
conservée.
[TIMER]Utilisation future
[TEMP]Pour afficher la température du véhicule en Celsius ou Fahrenheit.
CAPACITE DE LA BATTERIE (TELECOMMANDE OLED 2-VOIES)
1.5Valcaline(AAA)delabatteriedurepluslongtemps.
plusde1.4V 1.3V~1.4V.RÉFÉRENCE
Lorsquelacapacitédelabatterieestinférieureà1.3V,OLED
s'assombritpouréconomiserlabatterie.
1.2V~1.3V. 1,2
TÉLÉCOMMANDE 1-VOIE
5
INTRODUCTION
Merci d'avoir acheté ce système de démarreur à distance et alarme. Avec ses nombreuses fonctions
de pointe, ce produit saura satisfaire toutes vos attentes vis-à-vis des systèmes de confort et de
sécurité haut de gamme, sans négliger aucune des fonctionnalités élémentaires généralement
offertes sur les systèmes de démarrage à distance de base. Il se peut que les fonctions décrites dans
ce guide requière une installation ou une programmation additionnelle afin qu'elles puissent être
activées. Afin de bien bénéficier de tous les avantages nous recommandons de vous familiariser avec
ce guide.
Le démarreur à distance est distribué avec un récepteur à rayon d'action allant jusqu'à 750 m /
2500 pieds.
MISE EN GARDE
•Ne jamais démarrer un véhicule à l'intérieur d'un bâtiment non ventillé. (garage, stationnement
intérieur).
•Ne jamais démarrer à distance le véhicule avec un passager à l’intérieur du véhicule.
•En tous temps, lorsque des travaux sont effectués sur le véhicule, désactivez le système en
activant le
MODE VALET
(Ævoir Page 8).
NOTE
•Le système peut être livré de trois manière différente: Démarreur à distance
seulement, alarme seulement ou démarreur à distance et alarme.
•Les options varient selon le véhicule, les composantes qui peuvent être ajoutées
avec le système et les fonctions disponibles sur le véhicule.
DÉMARRAGE À DISTANCE
POUR DÉMARRER VOTRE VÉHICULE À DISTANCE
Le démarreur à distance est conçu pour les véhicules à transmission manuelle ou automatique. Pour
les véhicules à transmission manuelle, consultez la section : Activation Prêt à démarrer.
ÉTAPE 1
Pour démarrer votre véhicule à distance, appuyez sur la touche
DÉMARRER pendant environ 2 secondes
ÉTAPE 2
Les feux de stationnement s’allumeront pour vous indiquer que le
démarreur à distance a reçu votre signal.
ÉTAPE 3
Le moteur démarrera environ 5 secondes plus tard. Les feux de
stationnement demeureront allumés pendant la durée de marche
préprogrammée.
Si le véhicule ne démarre pas dès la première tentative, le démarreur à distance s’éteindra,
attendra quelques secondes et tentera à nouveau de démarrer le moteur.
Le démarreur à distance procédera à 2 tentatives de démarrage par défaut, mais peut être modifié
dans la programmation pour 1 ou 3 tentatives, avant d’abandonner en cas d’échecs répétés.
(ÆVoir
ÉCHEC AU DÉMARRAGE À DISTANCE
Page 12)
RÉGLAGES DES ACCESSOIRES
Chauffage et sièges chauffants : Il est conseillé de prérégler les commandes de l’habitacle avant de quitter
votre véhicule, en prévision du prochain démarrage. Le réglage du chauffage (ventilateur) avant et
arrière, de même que celui des sièges chauffants (si votre véhicule en est équipé) ne devrait pas être
laissé en position haute (HIGH). Nous recommandons de laisser ces réglages en position basse ou
moyenne (LOW ou MEDIUM).
Essuie-glaces, radio et phares : Sur certains véhicules, le circuit de la radio et/ou des essuie-glaces et/ou
des phares est obligatoirement mis sous tension suite à un démarrage à distance. Lorsque vous
quittez le véhicule, assurez-vous que les commandes des essuie-glaces et des phares sont en
position « OFF ». Si vous laissez l’interrupteur des phares en position ouverte « ON », vous risquez,
avec certains véhicules, que les phares s’allument après démarrage à distance, ce qui mettrait la
batterie à plat.
Dégivreur arrière : Puisque le dégivreur arrière peut seulement être activé après le démarrage du
véhicule, cette caractéristique n’est pas incluse dans l’installation du démarreur à distance. Pour
certains véhicules il est possible d’installer cette caractéristique de façon à ce qu’elle s’active
Table of contents
Languages:
Other Fortin Electronic Systems Car Alarm manuals

Popular Car Alarm manuals by other brands


OK-Computers
OK-Computers OBD-Saver VAG Mounting instruction

ETLOC
ETLOC ETLOC-50 SECURITY installation manual

Radio Shack
Radio Shack RS-500 owner's manual

MEGATRONIX
MEGATRONIX MEGALARM MEGA 462 Installation and operation manual

Magicar
Magicar M100AS user guide

Directed Electronics
Directed Electronics 1000 owner's guide


