Foryou General Electronics RM4Y65 User manual

RM4Y65
Operating Instructions

1
Safety Precautions
Never expose this unit, amplifier,
and speakers to moisture or water to
prevent electric sparks or re.
Please don't change the fuse on
the power cord without professional
guidance, using improper fuse may
cause damage to this unit or even cause
re.
Please contact your nearest dealer
if one of the following symptoms is
experienced:
(a). Water or other objects enters the
unit.
(b). There is smoke.
(c). Peculiar smell.
Only connect the unit to a 12-volt power
supply with negative grounding.
MUTE
OK
MUTE
OK
Never install this unit where the
operation & condition for safe driving is
impaired.
Never use the video display function
in the front when driving to prevent the
violation of laws & regulations and also
to reduce the risk of traffic accident
except for using rear view video
camera.
MUTE
OK
MUTE
OK
MUTE
OK
MUTE
OK
Thank you for purchasing this product.
Please read through these operating
instructions so you will know how to
operate your model properly. After
you’ve nished reading the instructions,
keep this manual in a safe place for
future reference.
To ensure safe driving, please adjust
the volume to a safe and comfortable
level in case of emergency situations.

2
Safety Precautions
1. Never disassemble or adjust the unit without any professional guidance.
For details, please consult any professional car shop / dealer for inquiry.
2. If the front panel or TFT monitor is dirty, please use a clean silicone cloth and neutral detergent
to wipe off the spot. Using a rough cloth and non-neutral detergent such as alcohol for cleaning
may result in scratching or decoloration to the monitor.
3. If any abnormal behavior of the unit is found, please refer to trouble shooting guide of this
manual. If no relevant information is found, please Press [ RESET ] with a ball-point pen or
similar tool to resume factory default.
4. If you have parked the car in hot or cold weather for a long time, please wait until the
temperature in the car becomes normal before operating the unit.
5. Do not impact the LCD monitor which could cause damage.
6. To prevent damage to the screen, avoid touching it with sharp objects.
7. To provide a clear demonstration and an alternative for easy understanding to the operation of
this unit, graphic illustrations are used.
However, some illustrations are different from the actual images displayed on the screen.
8. Operate the unit correctly according to this manual to prevent unnecessary problem. The
guarantee won't be valid if the problem is caused by inappropriate operation.

3
Contents
Safety Precautions ...................................1
Contents....................................................3
Before Using .............................................4
Front Panel .............................................4
Basic Operations......................................5
Parking Brake Inhibit...............................5
Mute ........................................................5
Power On / Off ........................................5
Playing Source Selection ........................5
Volume Adjustment.................................5
Equalizer .................................................6
Adjust EQ Parameters ............................6
Volume distribution (fader/balance) ........6
Set Date /Time ........................................6
Radio Mode ...............................................7
Radio Display..........................................7
Select One Radio Band ..........................7
Tune........................................................7
Preset Station .........................................8
RDS Basics.............................................8
Adjust RDS Settings ...............................8
CT (Clock Time)......................................8
PTY Function ..........................................8
Playback Mode..........................................9
Connect a USB Device ...........................9
Remove a USB Device ...........................9
Music Playback .......................................9
Play/Pause..............................................9
Previous/Next Track ...............................9
Select Music by Artist .............................9
Select Music by Album ...........................9
Search for a Folder .................................9
Playlists...................................................9
Video Playback .....................................10
Gallery Operations ................................10
Bluetooth Mode ......................................11
Making a Call .......................................11
Call from Phonebook ............................11
Audio playback via Bluetooth streaming12
Adjust Bluetooth Settings......................12
Apple CarPlay ........................................13
Apple CarPlay .......................................13
How to enter CarPlay mode..................13
How to use CarPlay ..............................13
Touch ....................................................13
Android Auto...........................................13
Prepare your phone ..............................13
Audroid Auto on your phone screen .....13
Audroid Auto on your car display (with a
USB cable)............................................13
Settings ...................................................14
Basic settings........................................14
General settings....................................14
Video settings .......................................14
Time settings ........................................14
System settings ....................................14
Other Modes............................................15
Listen to Other Devices ........................15
Reset ....................................................15
Replace a Fuse.....................................15
Steering Wheel Control Programming . . 15
Specications .........................................16
Wire Connections...................................17
4
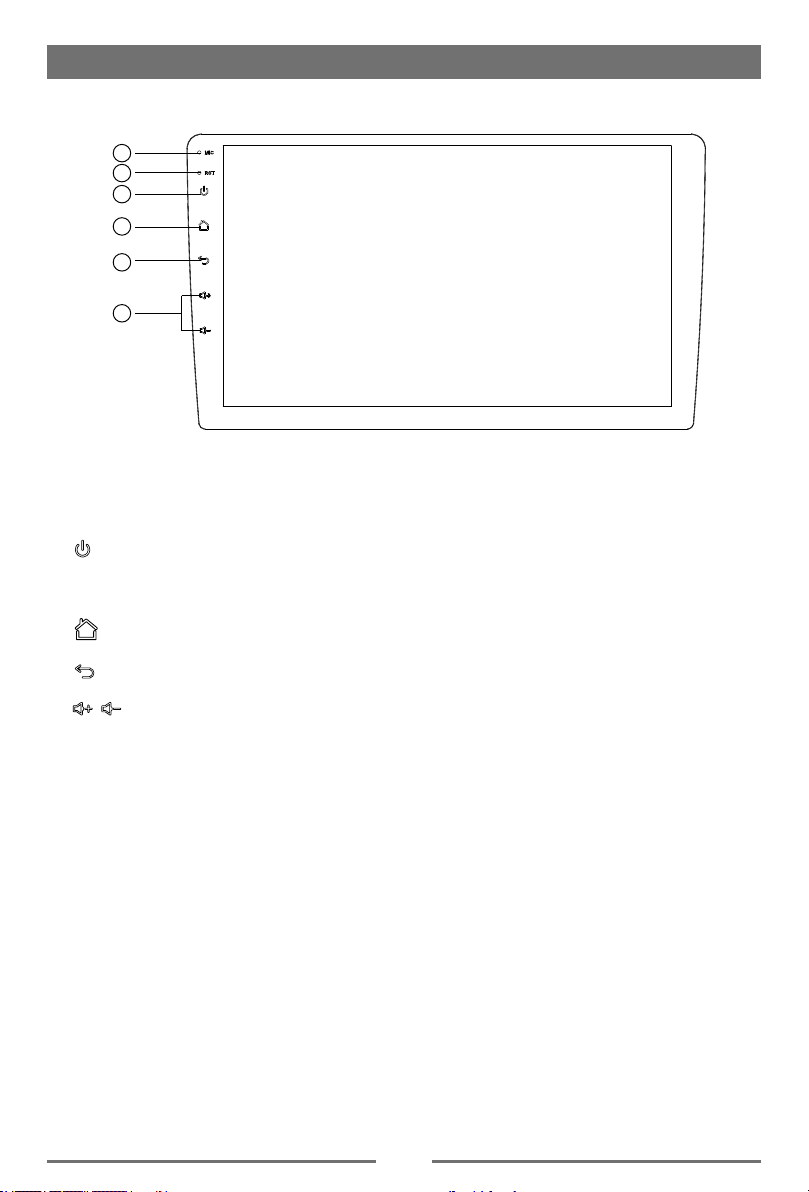
Front Panel
Before Using
1
2
3
4
5
6
1. Microphone
2. Reset Button
Reset the unit.
3. [ ] Rotary/pushbutton
Short press: Switch on device
In operation: Mute audio source
Long press: Switch off device
4. [ ] Button
Show main menu
5. [ ] Button
Returns to previous screen
6. [ / ] Button
Increase/Decrease the volume

5
Parking Brake Inhibit
• Whenthe“BRAKE” cableisconnectedto
thebrakeswitch, thedisplayontheTFT
monitorwilldisplay videoonlywhenthe
vehicleisapplied.
• Parkingbrakefunctionisoverriddenwhen
thevideosourceissettoREVERSE.
• Whentheparkingbrakeinhibitisactive,
thefrontmonitordisplays“Warning!!!It
isillegalto viewvideowhiledrivingor
operatingamotorvehicle.Setparking
braketoviewvideo.”,preventingthedriver
fromwatchingcontentwhiledriving.Rear
videoscreensarenotaffected.
Mute
Press [ ] button to mute the volume from
the unit. Press again to restore the volume.
Adjusting the volume or using any of the
audio setup features cancels the mute
function.
Power On / Off
Pressthe[ ]buttonontheunittoturnthe
uniton.Thebuttonsonthefrontoftheunit
lightupforamomentandthecurrentmode
statusappearsintheLCD.
Pressandholdthe[ ]buttontopoweroff
theunit.
Basic Operations
Playing Source Selection
Pressthe[ ]buttononthefrontpanelto
changebetweenavailableplayingsources.
Theplayingmodeisdisplayedonthescreen.
6
135
2
77
1. Enter radio mode.
2. Enter music menu.
3. Show main menu
4. Enter bluetooth mode.
5. Enter setting menu.
6. Function icons
7. Clock
Volume Adjustment
Toincreaseordecreasethe volumelevel,
pressthe[ / ]button onthefrontpanel.
Thevolumerangesfrom“0”to“39”.

6
Basic Operations
Equalizer
1. Enter the EQ setup mode
Touch the [ EQ ] icon in the user interface
and the EQ setup interface will display on
the screen.
2. Select EQ mode
Touch the desired EQ selection: [ User ] / [
Jazz ] / [ Pop ] / [ Classic ] / [ Rock ] / [ Flat
], and the EQ mode will change.
Adjust EQ Parameters
To adjust EQ parameters, touch and drag the
parameters adjustment bar.
[ User ]: Set the desired audio effect.
[ Flat ]: Select the original audio effect.
[ Reset ]: Cancel the equalizer function
settings.
[ Loudness: On/Off ]:When listening to music
at low volumes, this
featurewill selectively
boost certain bass and
treble frequencies.
Volume distribution (fader/
balance)
You can adjust the volume distribution in the
vehicle for all sources.
1. Press the [ ] button.The menu for fader
and balance is displayed.
2. Adjust fader and balance with [ ] / [ ]
or [ ] / [ ].
Set Date /Time
1. Touch [ ].
2. Touch [ Time ].
The date/time setup menu is displayed.
· Set Date
1. Touch [ Date ].
2. Touch the date information on the screen.
A submenu is displayed.
3. Touch [ ] or [ ] to set year, month and
day.
· Set Clock Mode
1. Touch [Clock mode].
2. Touch [12Hr] or [24Hr] to switch clock
mode.
· Set Time
1. Touch [ Time ].
2. Touch the time on the screen, a submenu
is displayed.
3. Touch [ ] or [ ] to set hour and
minute. Touch [ ] or [ ] to set AM/PM
(only for 12Hr).
Note:
When date/time is set, touch [ ] to conrm
or [ ] to exit.

7
Radio Mode
Select One Radio Band
Touch the [ ] icon on the user interface to
select one radio band among FM, AM.
Tune
Auto Tuning
Hold [ ] / [ ] icon on the user interface
more than 1 second to seek a higher / lower
station.
To stop searching, repeat the operation
above or press other buttons having radio
functions.
Note:
When a station is received, searching stops
and the station is played.
Manual Tuning
Method 1:
During manual tuning, the frequency will be
changed in steps.
Touch the [ ] / [ ] icon on the user
interface to tune in a higher / lower station.
Method 2:
1. Touch the numeric keypad icon [ ].
Numeric keyboard is displayed, touch
number to input frequency.
2. Touch [ ] to delete the input number
step by step.
3. Touch [ OK ] to enter.
Radio Display
1 4 53 6
7
8 9 11 12
10
13
14 15
1. Current radio band indicator
2. Current frequency
3. Current preset radio station
4. TA: Trafc Announcement indicator
5. AF: Alternative Frequency indicator
6. Clock
7. Enter Preset Station list
8. Band switch
9.Tune backward
Auto tune backward. (long press)
10. Search stations automatically
11. Tune forward
Auto tune forward. (long press)
12. Goto station by inputting frequency
13. Hide the second line of control buttons
14. Store the current station
15. RDS setting options
8
Radio Mode
Preset Station
Different memory bands and wavebands are
available Up to 18 FM and 12 AM stations
can be stored in each memory bank. hence
the unit can store 30 stations in total.
Search Stations Automatically
Touch [ ] to search station and
store strongest stations in current band
automatically.
Manual Store
1. Tune to a station.
2. Touch [ ] to display the 2nd menu.
3. Touch [ ].
Recalling a Station
1. Select a band .
3. Touch [ ] to select the corresponding
stored station.
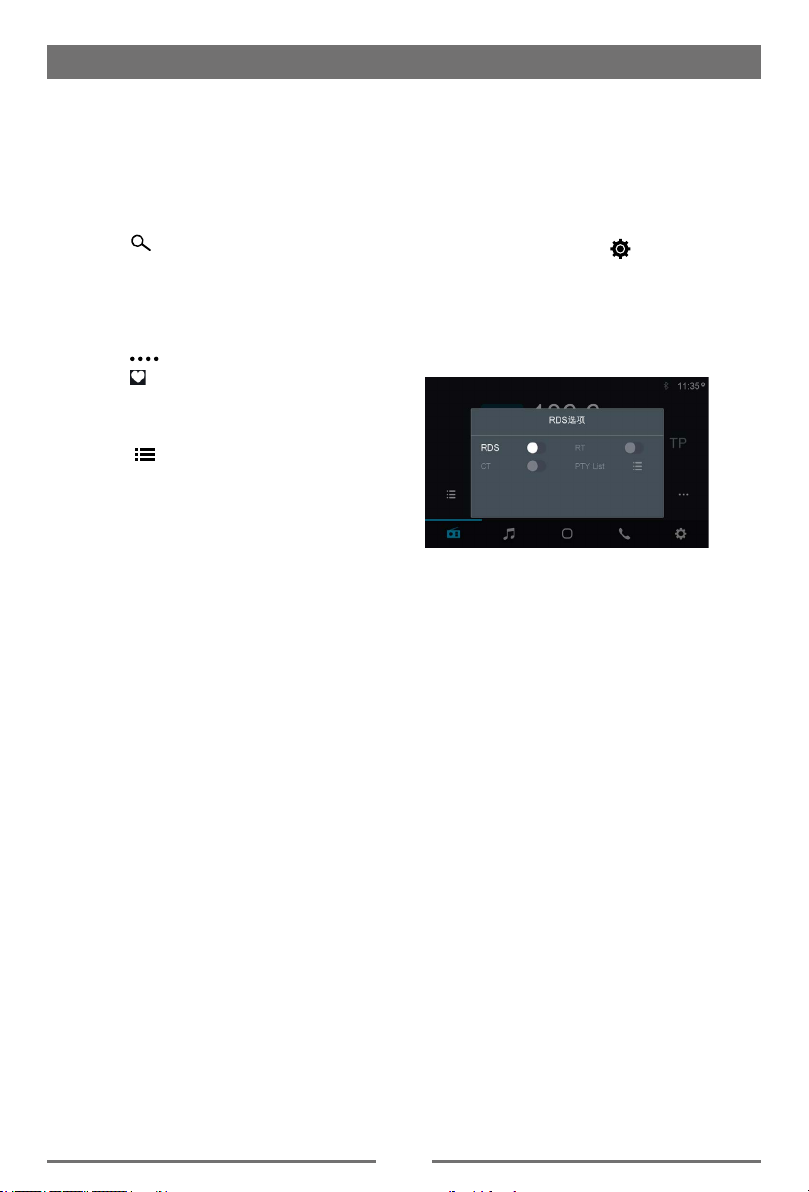
RDS Basics
Radio Data System (RDS) enables traffic
reports to be received and provides many
facilities, including enabling the radio station
name to be displayed on the radio display.
Adjust RDS Settings
1. In Radio menu, touch [ ].
The option menu is displayed.
2. Touch on the selected option to change
the setting.
∙ [CT]: To turn On or Off “Clock Time”.
∙ [RT]: To turn On or Off “RT”.
∙ [PTY List]: To show PTY list.
CT (Clock Time)
Some stations broadcast the time and date
within the encoded RDS signal. The clock
time is automatically adjusted when ‘CT’ is
set to ‘ON’.
PTY Function
PTY is the abbreviation for Program Type
which is a code dening the type of program
being broadcast (e.g. News or Rock).
PTY options will display on the screen. To
view more PTY options, touch the scroll bar
and arrows on the screen.
When one PTY option is touched (e.g.
News), auto search for next available PTY
by increasing tuning frequency until the PTY
of the next station matches the current. If no
matched PTY has been found, the unit will
return to the original radio frequency.

9
Playback Mode
15. Next track
16. Repeat play
17. Show more control buttons
18 19 20 22 23 24 25
21
18. Favorite
19. Stop
20. Not used
21. Not used
22. Display/Hide lyric
23. Spectrum
24. Preview current folder songs
25. Hide the second line of control buttons.
Play/Pause
When playing, press [ ] button to pause,
and the sound will be mute.
Press [ ] button to play.
Previous/Next Track
Press [ ] or [ ] button to go to previous or
next track.
Select Music by Artist
1. Touch [ ] on the left of the screen.
2. Touch an artist shown on the list.
3. Select a song to play.
Select Music by Album
1. Touch [ ] on the left of the screen.
2. Touch an album shown on the list.
3. Select a song to play.
Search for a Folder
When playback, touch [ ] icon to show
folder/le list.
Playlists
Add a song to favorite playlist
1. Press a song and select [ ].
2. Add it to an favorite playlist.
Connect a USB Device
Insert a USB device into the USB slot.
When connecting a USB device, the unit will
read the les automatically.
Remove a USB Device
1. Select other source on the main menu.
2. Remove the USB device.
Music Playback
Select [ ] of the screen, the unit will
playback all the music on the mobile
storages.
1
3
4
5
6
1. List the les by favorite
2. Return to playback menu
3. List the les by song name
Touch a song to start play.
4. List the les by artist
Drag up/down to scroll.
5. List the les by album
6. List window
Drag up/down to scroll.
Touch an item to select.
78
11
9 10
12 13 14 15 16 17
7. Select le source
8. Music playback menu
9. Video playback menu
10. Display all available picture les
11. Display the folder/le list.
12. Shufe Play.
13. Previous track
14. Play/Pause

10
Playback Mode
Delete a song from favorite playlist
1. Touch [ ] on the left of the screen.
2. Press [ ] on the favorite playlist, then
remove it from playlist.
Video Playback
Select [ ] on the screen, the unit will
playback all the video les on the storages.
During playback, touch the screen to show
control buttons.
1347
6
2
1. Show list menu
2. Fast backward
3. Previous movie
4. Play/Pause
5. Next movie
6. Fast forward
7. Show more control buttons
8 13
11 12
10
8. Stop
9. Subtitle language
10. Original sound and accompanying sound
11. Shufe Play.
12. Repeat play
13. Show previous page of control buttons
Gallery Operations
1. Select [ ] on the screen.
2. Select one gallery to show the picture list.
3. Touch to view it.
Drag left/right to scroll.
11
The Bluetooth allows you to utilize your car’s
built-in audio system for handsfree wireless
mobile phone or music communication. Some
Bluetooth mobile phones have the audio
features, and some portable audio players
support Bluetooth feature. This system can
play audio data stored in a Bluetooth audio
device. The car stereo with Bluetooth will be
able to retrieve phonebook contacts, received
calls, dialed calls, missed calls, incoming
calls, outgoing call and listen to music.
Notes:
• Thissystemwillnot operateormay
operateimproperlywithsomeBluetooth
audioplayers.
• Theunitcannotguaranteethecompatibility
ofallmobilephonestogetherwiththeunit.
• Audioplaybackwillbe settothesame
volumelevelas setduringtelephone
call.Thiscancauseproblems,ifextreme
volumelevelis setduringthetelephone
call.
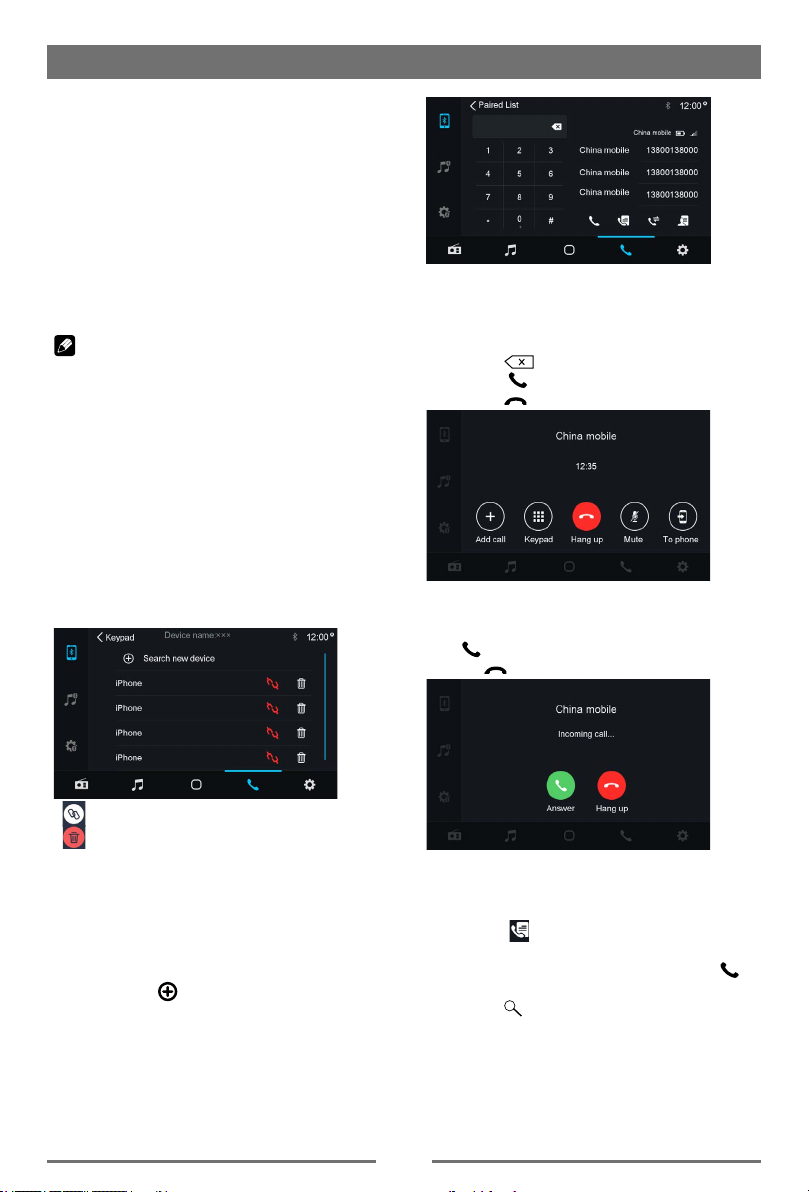
Touch [Phone] on the main menu to enter
Bluetooth Phone mode.
[ ]: Establish a connection.
[ ]: Delete the Bluetooth® device from the
list.
1. Turn on Bluetooth function of your mobile
phone.
2. Search for new Bluetooth devices on
your phone. Select Device name from the
pairing list on the mobile phone, and enter
password.
Or touch [ ] button on the screen to
search mobile Bluetooth devices.
After connect successfully, the unit show
following menu.
Bluetooth Mode
Making a Call
• DialNumber
1. Input numbers by digit-keys on the screen.
Touch [ ] to clear the digits.
2. Touch [ ] button to dial out.
3. Touch [ ] button to terminate call.
• Answeringacall
You can answer an incoming call by pressing
the [ ] button.
Touch [ ] button to reject an incoming call.
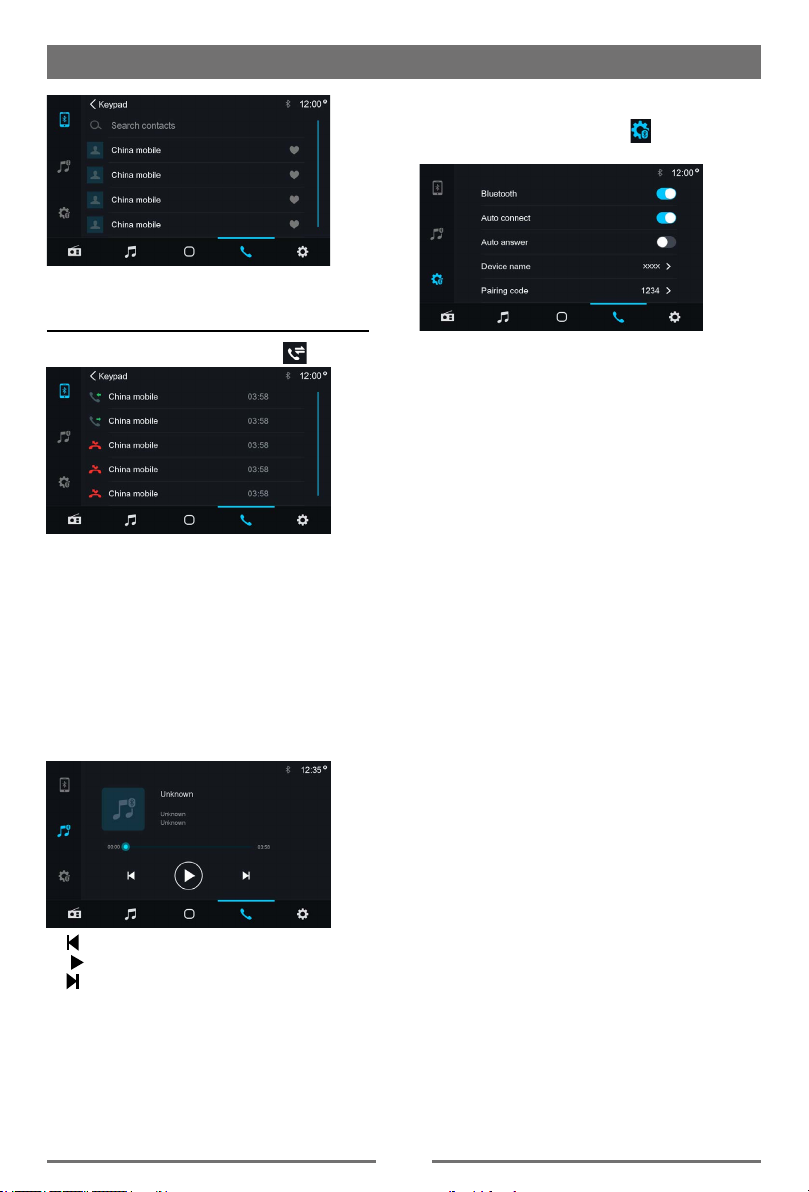
Call from Phonebook
1. Touch [ ] button to show your phone
book.
2. Select a number to select and touch [ ]
button to dial out.
3. Touch [ ] to search a contact name.
12
Bluetooth Mode
Adjust Bluetooth Settings
1. In Bluetooth menu, touch [ ].
The option menu is displayed.
2. Touch on the selected option to change
the setting.
∙ [Bluetooth]: To turn on or off “Bluetooth”
function.
∙ [Auto connect]: To turn on or off “Auto
connect” function.
∙ [Auto answer]: To turn on or off “Auto
answer” function.
∙ [Device name]:
∙ [Pairing code]: To set paring code.
∙ [Microphone]: External/Internal
Call History
Access Call History by touching [ ] button.
Then select a number from Dialled/Missed/
Received calls.
Audio playback via Bluetooth
streaming
If an audio streaming device is connected
with the car sound system via Bluetooth®,
you can play back the music via the car
sound system and control the playback.
Touch [ ] button to play music on your mobile
phone.
[ ] Previous track
[ ] Play/Pause
[ ] Next track

13
Apple CarPlay
Available on select cars, CarPlay is a
smarter, safer way to use your iPhone in the
car. CarPlay takes the things you want to do
with your iPhone while driving and puts them
right on your car's built-in display. You can
get directions, make calls, send and receive
messages, and listen to audiobooks and
music, all in a way that allows you to stay
focused on the road.
How to enter CarPlay mode
1. Connect your iPhone to the CarPlay
connector of the unit via the Apple Digital
Cable. The unit will enter CarPlay mode
automatically.
2. To exit CarPlay mode, touch [ ] button
on the front panel.
If you want to return to CarPlay mode,
touch [ Apple CarPlay] on the main menu.
How to use CarPlay
CarPlay features and Siri voice control is
specially designed for driving scenarios. It
also works with your car’s controls. And the
apps you want to use in the car have been
reimagined, so you can use them while your
eyes and hands stay where they belong.
Touch
you can use the touch screen of the unit to
control CarPlay.
Apple CarPlay Android Auto
Android Auto brings the most useful apps
to your phone screen or your compatible car
display, in a format that makes it easy for you
to keep your main focus on drving. You can
control things like navigation and maps, calls
and text messages, and music.
Prepare your phone
Make sure your phone is running Android 5.0
(Lollipop) and up. For best performance, we
recommend Android 6.0 (Marshmallow) and
up.
Download the Android Auto app from Google
Play.
Make sure your phone has a strong and fast
network connection. We recommend running
Audroid Auto for the first time within Wi-Fi
range for the fastest installation.
Audroid Auto on your phone
screen
1.
An Android phone running Android 5.0
(Lollipop) and up with a data plan. For best
performance, we recommend Android 6.0
(Marshmallow) and up.
2.
A car mount for your phone (optional but
recommended).
3.
A USB cable (optional for charging)
4.
The Android Auto app.
Audroid Auto on your car display
(with a USB cable)
1. An Android phone running Android 5.0
(Lollipop) and up with a data plan. For best
performance, we recommend Android 6.0
(Marshmallow) and up.
2. A car stereo that’s compatible with Android
Auto.
3. A high-quality USB cable.
4. The Android Auto app.

14
Basic settings
In the settings menu, you can adjust the
basic settings for the different functions of the
device to your requirements.
In the main menu, press the [ ] button.
The settings menu is displayed, the General
submenu is activated.
1
Thesettingsdisplay featuresthefollowing
functionsanddisplays:
①Menuitems
②Currentlyselectedmenuitem
③Clock
④Submenuitems
General settings
The following setting are possible:
Radio region - Select the reception region for
the radio reception.
Dimmer - Touch the [Dimmer],there 5 mode
to select: Auto/Night/Sunset/
Normal/Bright.
Beep - Switch conrmation beep on/off.
Language - Select on-screen display
language.
Start up logo -You can select start up logo.
SWC - The buttons of a connected steering
wheel control can be congured here.
Video settings
The following setting are possible:
Parking - If “Parking” is activated, video/
pictures will not be displayed during
driving. Please set according to
local laws.
Settings
Time settings
The following setting are possible:
Date - Set the date.
Cloct mode - Selection between 12Hr and
24Hr mode.
Time - Set the time.
System settings
The following setting are possible:
∙ To view software version information.
∙ Restore to default settings.

15
Listen to Other Devices
You can connect an external audio/video
device to the unit.
1. Connect the external device with the
supplied AV cable.
2. Touch the upper left corner to display the
main menu.
3. Touch [ AV-IN ] to access external device.
Reset
When the unit hangs up, you can reset it.
Press [ RESET ] with a ball-point pen or
similar tool.
Reset
Note:
When the unit has been reset, all the settings
will return to default settings.
Replace a Fuse
If there is no power, the fuse may be
damaged and need to be replaced.
1. Take out the unit from dashbpard.
2. Check all electrical connections.
3. Buy a fuse that matches the amperage of
the damaged fuse.
4. Replace the fuse while the units power is
disconnected.
Steering Wheel Control
Programming
1. Touch the [ ] button, the settings
menu is displayed.
2. Touch [ General setting ] in the settings
page.
3. Touch [ SWC ], the SWC menu will display.
4. Adjust each key with a individual function.
5. Touch [ Pair ] to program.
6. Press each individual steering wheel
control button for each corresponding
function.
Other Modes
7. Once the final steering wheel control
button is programmed, the functions are
saved and the programming will end.
8. Touch [ Reset ] to reset the programming.

16
Specications
General
Reference Supply Voltage .................................................................... 12V(DC)
Operating Voltage Range ........................................................10.5 - 15.8V(DC)
Max Operating Current .................................................................................15A
Maximum Output Power ....................................................................... 4 X 25W
Grounding System .................................................... Car Battery Negative Pole
Dimensions(WXHXD) ...................................................... 229.2*130.6*50.2 mm
Weight(main unit) .................................................................................... 1.09kg
FM
Signal Noise Ratio ................................................................................ ≥55dB
Residual Noise Sensitivity (S/N=30dB) ............................................... 18dBμV
Frequency Response (±3dB) ...................................................20Hz~12.5KHz
Station Seeking Level .................................................................... 20~28dBμV
Distortion .............................................................................................. ≤1.0%
Stereo Separation (1KHz) .................................................................... ≥25dB
Antenna Impedance ...................................................................................75Ω
AM
Residual Noise Sensitivity (S/N=20dB) ............................................... 30dBμV
Selectivity (±9KHz) ...............................................................................≥50dB
LCD
Screen size ................................................................................. 9 inchs (16:9)
Display resolution ...................................................................1024 X 600 dots
Contrast ratio ......................................................................................... 4000:1
Brightness.......................................................................................... 280cd/m2
AUX IN
Distortion .............................................................................................. ≤0.5%
Frequency Response (±3dB) ......................................................20Hz~20KHz
Audio Input Level .................................................................................0.5Vrms
Audio
Audio Output Impedance ..........................................................................100Ω
Audio Output Level ....................................................................... 2Vrms(Max)
Video
Normal Video Input Level (CVBS) ......................................................1.0±0.2V
Video Input Impedance...............................................................................75Ω
Video Output Impedance ............................................................................75Ω
Video Output Level .............................................................................1.0±0.2V
Environment
Operating Temperature .............................................................-30°C ~ +70°C
Storing Temperature..................................................................-40°C ~ +85°C
Operating Humidity ..................................................................... 30%~95%RH
Storing Humidity ......................................................................... 30%~95%RH
Notice:
When the unit is operated to extremes, such as with maximum power output for a long time,
or the temperature is over 70°C, it will enter heat protection mode, the volume will be reduced
automatically. This is normal.

17
Brown
BRAKE
CAM PWR GND
CAM 12V
BACK
BLACK
Black
YELLOW
Blue/White
Pink
CAMERA VIDEO IN
USB-0.5A
Yellow
White
Red
AUX-CVBS
RADIO ANT
RED
WHITE
ACC
AUX-R AUX-L USB
Black
MIC
Wire Connections

FCC Statement
1. This device complies with Part 15 of the FCC
Rules.
Operation is subject to the following two
conditions:
(1) This device may not cause harmful interference.
(2) This device must accept any interference
received, including interference that may cause
undesired operation.
2. Changes or modications not expressly
approved by the party responsible for compliance
could void the user's authority to operate the
equipment.
NOTE: This equipment has been tested and found
to comply with the limits for a Class B digital
device, pursuant to Part15 of the FCC Rules.
These limits are designed to provide reasonable
protection against harmful interference in a
residential installation.
This equipment generates uses and can radiate
radio frequency energy and, if not installed
and used in accordance with the instructions,
may cause harmful interference to radio
communications. However, there is no guarantee
that interference will not occur in a particular
installation. If this equipment does cause harmful
interference to radio or television reception, which
can be determined by turning the equipment o
and on, the user is encouraged to try to correct
the interference by one or more of the following
measures:
•Reorient or relocate the receiving antenna.
•Increase the separation between the equipment
and receiver.
•Connect the equipment into an outlet on a
circuit dierent from that to which the receiver
is connected.
•Consult the dealer or an experienced radio/TV
technician for help.
FCC Radiation Exposure Statement
This equipment complies with FCC radiation
exposure limits set forth for an uncontrolled
environment. This equipment should be installed
and operated with minimum distance of 20
centimeters between the radiator and your body.

PN.: 1270750014400
Table of contents


