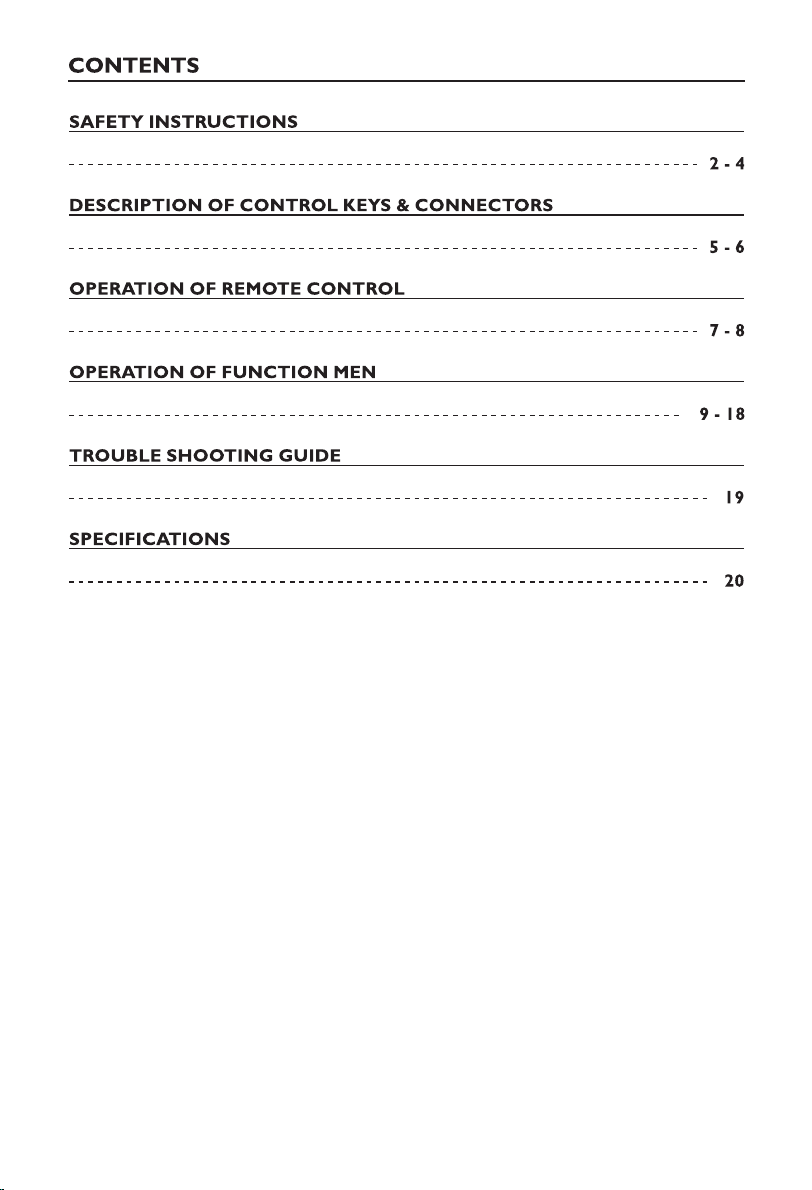
Fox 32DLE568 User manual

注:内页封面黑白印刷(100克双胶纸)
68
Model:32DLE568
42DLE668
A L

1

2

3

4

5

6

7

8

9
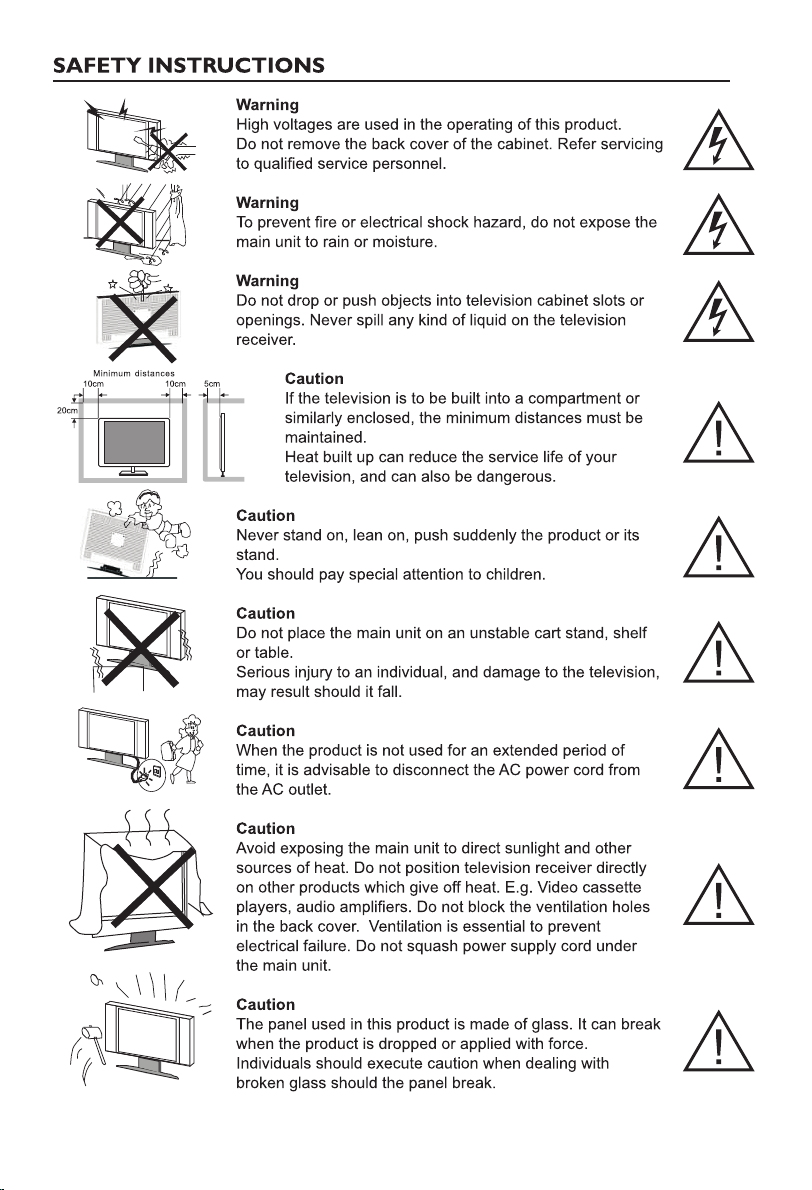
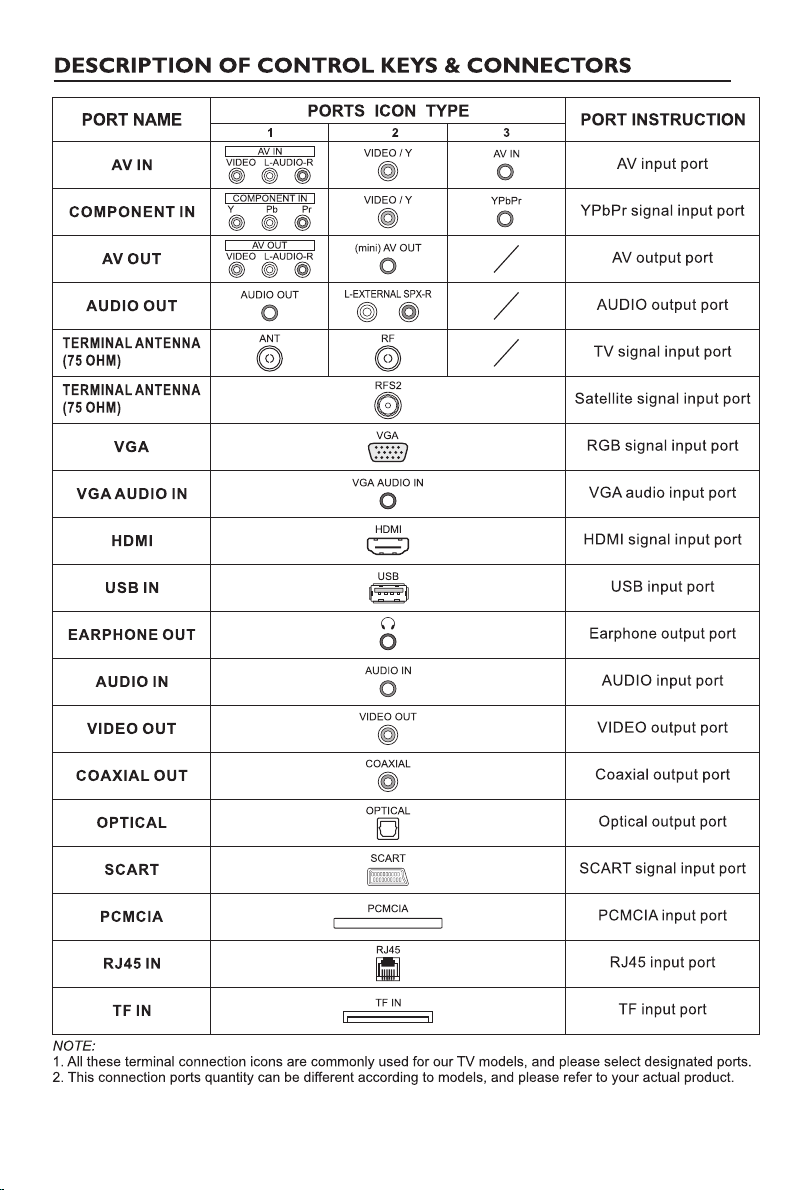
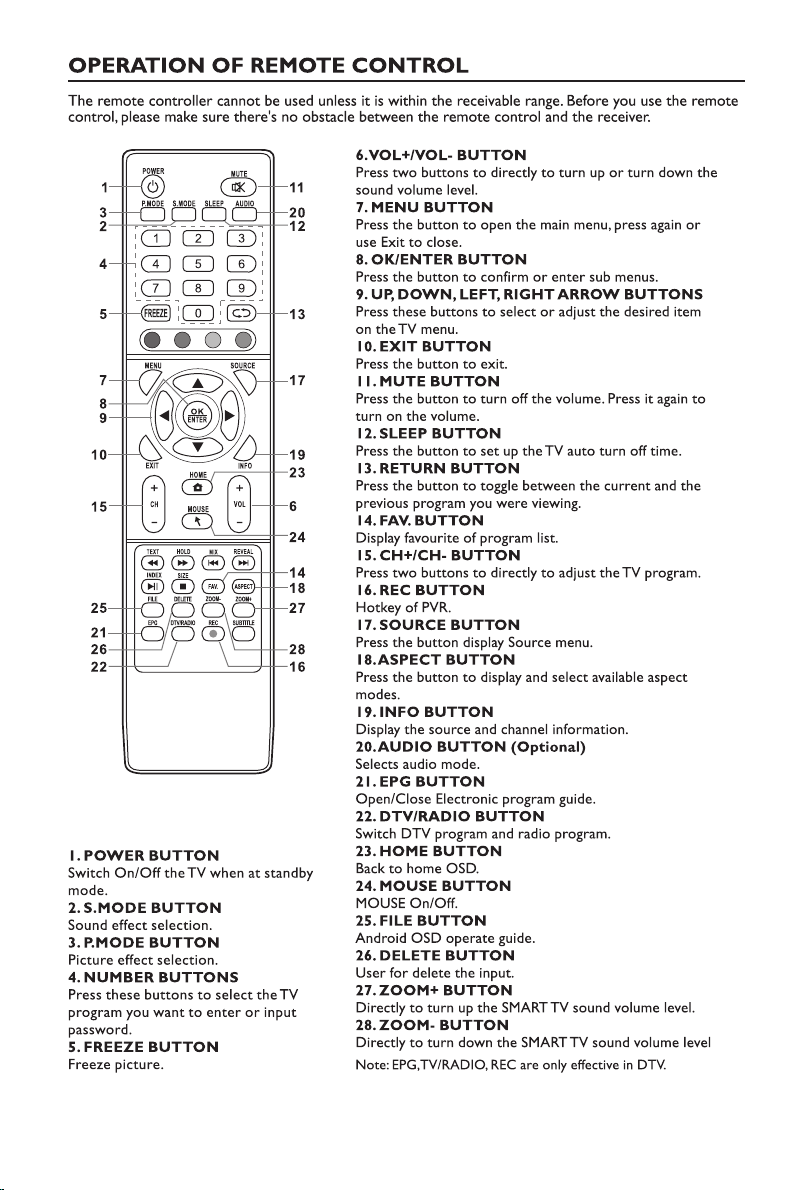
Note: The pictures on this manual are only examples and the actual products shall prevail.
Setup Wizard
Connect an RF cable from the Tv’s input called “RF-In” and to your TV Aerial socket
Press OK button to select the Start the setup.
Press button to select
the language. Press OK button to sure,
and press【►】button to select the
time zone.
【▼】/【▲】
Press button to select the
time zone. Press OK button to sure, and
press【►】button to connect the WIFI/
network.
【▼】/【▲】
Press OK button to connect the WIFI/
network. Press【►】button to select the
input source.
Note: This picture is for reference only.
Start the setup
Note: This picture is for reference only.

Tues . 04:46
Tues . 04:46
10
Press button to select the
input source.
【▼】/【▲】
Home Page
Press button to select Home
page in Setup Wizard or press【◄】/
【►】button to select Home in the menu
of TV input .
【▼】/【▲】
When the cursor is near the left border,
press【◄】button to call up the sidebar.
Press the【▼】/【▲】button to select
Apps / Network / Media / Settings.
You can choose the program you want
on the home page.
My Apps
Press
button to select My Apps, and press OK
button to enter the App List.
【▼】/【▲】/【◄】/【►】
Note: This picture is for reference only.
ATV No Signal
Browser
Miracast
Please choose the way you watch TV programs
or source,start to experience it!

11
Settings
Press button
to select the Settings, press OK button
to enter the System Setting.
Press【◄】/【►】button to select
Network / Time / Common / System Info.
【▼】/【▲】/【◄】/【►】
System Setting
Network Time Common System Info
Network
Press button to select
Network, press OK button to enter.
【◄】/【►】
Time
Press button to select
Time, press OK button to enter.
【◄】/【►】
Common
Press button to select
Common, press OK button to enter.
【◄】/【►】
System Info
Press button to select
System Info, press OK button to enter.
【◄】/【►】
Media
Press
button to select Multimedia on the
Home page, and press OK button to
enter the Media Center.
Press【▼】/【▲】button to select
All / Video / Audio / Image.
Press【▼】/【▲】/【◄】/【►】
button to select the file, press MENU
button to open the submenu.
【▼】/【▲】/【◄】/【►】
Note: This picture is for reference only.
Connection

12
Video
Press button to select
Video or All, and press【▼】/【▲】/
【◄】/【►】button to select Movies.
【▼】/【▲】
Audio
Press【▼】/【▲】button to select
Audio or All, and press【▼】/【▲】/
【◄】/【►】button to select Music.
Image
Press button to select
Image or All, and press【▼】/【▲】/
【◄】/【►】button to select Pictures.
【◄】/【►】
Input Source
TV Setting
Press SOURCE button to enter Input Source menu.
Press【▼】/【▲】button to select.
Press OK to select source.
Press MENU button to enter main menu.
Press【◄】/【►】button to highlight the desired menu icon, and press OK button to select.
(Optional: Home / Source / Picture / Sound / Channel / Common / Advance).
Picture & Sound
Start the setup
1/13
Information
Original
Advance
Lock

13
1.Picture
ress
【◄】/【►】
P MENU button to enter the main
menu. Press button to
select the Picture. Press OK button to
enter the sub-menu.
Press button to select Picture Mode / Contrast / Brightness / Color / Sharpness / Noise
Reduction / Aspect Ratio / Color Temp / More Settings. Press MENU or EXIT button to quit.
Picture Mode
Press【▼】/【▲】button to select Picture Mode, then press /button to select.
(Optional: Standard, Dynamic, Soft, Vivid, User).
Standard Produces a standard image.
Dynamic Enhance the contrast, color and clarity of the screen, so that the picture in the dynamic will
balance the color.
Soft Reduce the screen contrast , color and clarity to make the screen looks soft.
Vivid Image colors more beautiful, more vivid picture.
User User-defined picture settings.
Contrast / Brightness / Color / Sharpness (Optional in user mode only)
Press【▼】/【▲】button to select, and press【◄】/【►】button to adjust.
Contrast Adjust image contrast.
Brightness Adjust image brightness.
Color Adjust image color density.
Sharpness Adjust the image edge sharpness.
Noise Reduction
Set up options to eliminate the image noise intensity.
Press【▼】/【▲】button to select Noise Reduction.
Press【◄】/【►】button to select Off / Low / Middle / High / Auto.
Aspect Ratio
Press【▼】/【▲】button to select Aspect Ratio. Press【◄】/【►】button to adjust.
Color Temp
Adjust the overall color of the image.
Press【▼】/【▲】button to select Color Temp.
Press【◄】/【►】button to select Cool / Normal / Warm.
Cool Produces a gentle blue-hued image.
Normal Produces a vivid image.
Warm Produces a red-hued image.
More Settings
Press【▼】/【▲】button to select
More Settings. Press OK button to enter
the sub-menu.
DLC
Press【▼】/【▲】button to select DLC. Press【◄】/【►】button to select On / Off.
HDMI Mode (Show only under HDMI)
Press【▼】/【▲】button to select HDMI Mode.
Press【◄】/【►】button to select Video / Graphic / Auto.
【▼】/【▲】
【◄】 【►】

14
2.Sound
Press MENU button to enter the main
menu. Press【◄】 【►】button to
select the Sound. Press OK button to
enter the sub-menu.
Press【▼ ▲ button to select the item to be set .Press MENU or EXIT button to quit.
Sound Mode
Press【▼】/【▲】button to select Sound Mode.
Press【◄】/【►】button to select Standard / Music / Movie / News / User.
Standard Emit balanced sound under any circumstances.
Music Enhance the high pitch and reduce the bass.
Movie Enhances treble and bass for a rich sound experience.
News Enhance the voice.
User Select to customize sound settings.
【▼】/【▲】 【◄】/【►】
【▼】/【▲】 【◄】/【►】
AVC
Press【▼】/【▲】button to select AVC. Press【◄】/【►】button to select On / Off.
Note: After open the"AVC", once the volume is set up, it can keep the volume of the speaker steady no
matter what kind of difference among the TV sound of each channel.
(Show only under DTV)
【▼】/【▲】 【◄】/【►】
(Show only under DTV)
【▼】/【▲】 【◄】/【►】
【▼】/【▲】 【◄】/【►】
More Settings
Press【▼】/【▲】button to select
More Settings. Press OK button to enter
the sub-menu.
【▼】/【▲】
【◄】/【►】
/
】/【 】
Bass / Treble Optional in user mode only
Press button to select. Press button to adjust.
Bass Adjust the low frequency sounds.
Treble Adjust the high frequency sounds.
Balance
Balanced left and right channels.
Press button to select Balance. Press button to adjust.
Audio Description
Audio Description Press button to adjust.
Hearing Impaired
Hearing Impaired Press button to adjust.
Multi-Track Sound (Show only under ATV)
Press button to select. Press button to adjust.
Note: Audio Description / Hearing Impaired / Multi-Track Sound function requires signal support to be
effective.
Digital Audio Output
Press button to select Digital Audio Output.
Press button to select Off / PCM / RAW.
( )
Press button to select .

15
Press【▼】/【▲】button to select SPDIF Delay. Press【◄】/【►】button to adjust.
Surround
Press【▼】/【▲】button to select Surround. Press【◄】/【►】button to choose ON / OFF.
Audio Only
Press【▼】/【▲】button to select Audio Only. Press OK button will turn off the backlight.
3.Channel
Press MENU button to enter the main
menu. Press【◄】/【►】button to
select Channel. Press OK button to enter
the sub-menu.
Press【▼】/【▲】button to select . Press MENU or EXIT button to quit.
【▼】/【▲】
【◄】/【►】
【▼】/【▲】
【▼】/【▲】
Analog Manual Scan
Press【▼】/【▲】button to select
Analog Manual Scan.
Press OK button to enter the sub-menu.
Press EXIT or MENU button to quit.
Channel
Displays the channel number of the current search store.
Color System
Select the color system ( Auto / P AL / SECAM / NTSC).
SPDIF Delay
to select the item to be set
Automatic search can search for effective
program channel automatically.
Press
start auto search
If you want to stop searching, press EXIT
or MENU button to stop searching.
Antenna Type (Show only under DTV)
Press button to select Antenna Type.
Press button to select Air / Cable/ Statelite.
Note:'Satellite' is an optional feature, some models do not have this feature, the actual product shall prevail.
Scan (ATV)
Press button to select Scan.
Press OK button to enter the sub-menu.
Auto Scan (ATV)
button to select Auto
Scan, press OK button to .
(Show only under ATV)
BG

All
All
Blind
Select a Satellite Scan Mode
Channel Type
Service Type
Add a LNB
Start Auto Tuning All LNBs
Restore to Default
16
Sound System
Select the sound system (DK / BG / I / M).
Frequency
Set the frequency to search.
Start Down
After confirming by pressing the OK button, search down from the current frequency.
Start Up
After confirming by pressing the OK button, search upwards from the current frequency.
【▼】/【▲】
【▼】/【▲】
Press EXIT or MENU button to quit.
Press【▼】/【▲】button to select Digital Manual Scan. Press OK button to enter the sub-menu.
Press EXIT or MENU button to quit.
Scan Satellite
Press【▼】/【▲】button to select Scan.
Press OK button to enter the sub-menu.
Channel List
Press【▼】/【▲】button to select Channel List. Press OK button to enter the sub-menu.
Press MENU button edit the channel, press EXIT or MENU button to quit.
EPG
Press【▼】/【▲】button to select EPG.
Press OK button to enter the sub-menu.
Scan
Press button to select Scan.
Press OK button to enter the sub-menu.
Auto Scan (Ari/Cable)
button to select Auto Scan. Press OK button to enter the sub-menu
Digital Manual Scan (Show only under Ari/Cable)
( )
(Ari/Cable)
Press

17
4.Lock
Press MENU button to enter the main menu.
Press button to select Lock.【◄】/【►】
Press OK button to enter the sub-menu.
Initial password "0000"
Please input password
Cancel OK
Press button to select Change
Password / System Lock / Key Lock /
Parental Guidance.
【▼】/【▲】
Change Password
Press button to select Change Password.
Press OK button to enter the sub-menu.
【▼】/【▲】
System Lock
Press【▼】/【▲】button to select System Lock.
Press【◄】/【►】button to select Off / On.
When System Lock is set to On, press【▼】/【▲】button to select Key Lock / Parental Guidance.
Parental Guidance
Press【▼】/【▲】button to select Parental Guidance.Press【◄】/【►】button to adjust.
5.Common
Press MENU button to enter the main
menu. Press button to 【◄】/【►】
select Common. Press OK button to
enter the sub-menu.
Press button to select the item to be set. Press MENU or EXIT button to quit.【▼】/【▲】
PVR Setting (Show only under DTV)
Press button to select PVR Setting. Press OK button to enter the sub-menu.【▼】/【▲】
Note: This function requires a USB flash drive to be inserted.
OSD Timer
Press button to select OSD Timer. 【▼】/【▲】
Press to select. 【◄】/【►】(Optional: off, 5sec, 15sec, 30sec, 40sec)
Autostandby Timer
Press【▼】/【▲】button to select Autostandby Timer. Press【◄】/【►】to select.
(Optional: off, 3hour, 4hour, 5hour)
Sleep Timer
Press【▼】/【▲】button to select Sleep Timer. Press【◄】/【►】to select.
(Optional: off, 15min, 30min, 45min, 60min, 90min, 120min, 240min)
Lock
Change Password
System Lock
Key Lock
Parental Guidance Off
Set Password
old password
New password
Confirm password
Cancel OK

18
Blue Screen
Set the background color to blue when there is no input signal.
Press button to select Blue Screen.【▼】/【▲】
Press button to select On / Off.【◄】/【►】
Teletext (This function requires the support of signals transmitted by TV operators.)
Press Teletext【▼】/【▲】 【◄】/【►】button to select . Press to select.
(Optional: Arabic, East, West Euro, Farsi, Russian)
Audio Language 1st ( )Show only under DTV
Press Audio Language 1st【▼】/【▲】button to select . Press OK button to enter the sub-menu.
Audio Language 2nd ( )Show only under DTV
Press Audio Language 2nd【▼】/【▲】button to select . Press OK button to enter the sub-menu.
Subtitle Language 1st ( )Show only under DTV
Press Subtitle Language 1st. 【▼】/【▲】button to select Press OK button to enter the sub-menu.
Subtitle Language 2nd ( )Show only under DTV
Press【▼】/【▲】button to select Subtitle Language 2nd. Press OK button to enter the sub-menu.
HDMI CEC Setup
Press【▼】/【▲】button to select
HDMI CEC Setup.
Press OK button to enter the sub-menu.
Press to select CEC / Tv Auto Power On / Device Auto Power Off / ARC / Device List.【▼】/【▲】button
Note1: All the Options are HDMI CEC Switch Onavailable only when the select .
Note2: The Device List is HDMIavailable only when the source select .
CEC
Press【▼】/【▲】 【◄】/【►】button to select CEC, press button to select On / Off.
The following terms are available only when "On" is selected in CEC.
Tv Auto Power On
Press【▼】/【▲】 【◄】/【►】button to select Tv Auto Power On. Press button to select On / Off.
Device Auto Power Off
Press【▼】/【▲】 【◄】/【►】button to select Device Auto Power Off. Press to select On / Off.
ARC
Press【▼】/【▲】 【◄】/【►】button to select ARC. Press to select On / Off.
Device List
Press【▼】/【▲】 【►】button to select Device List. Press OK/ button to enter the sub-menu.
Menu Reset
Recall the default setting.
Press【▼】/【▲】button to select Menu Reset.
Press OK button to enter the sub-menu.
5.Advance
Press MENU button to enter the main
menu. Press button to 【◄】/【►】
select Advance. Press OK button to enter
the System Setting.

19
No picture or sound
SYMPTOM
Dotted lines or stripes appear on
screen
Snow on screen
Double images or 'ghosting'
METHODS OF CHECKING OR ADJUSTING
Check the AC plug is in the socket. Check house circuit breaker
is in the ON position.
Picture normal but no sound
Remote control not working
Cannot receive any TV signal
No program signals output from
external source
Contrast and brightness problems
Intermittent poor contrast and
colour fading on all channels
Check that the volume is not at its minimum setting or on MUTE.
Check that TV set power is ON.
Check batteries are operational and inserted correctly.
Make sure infrared receiving window on TV is not exposed to
strong lighting or blocked in any way.
Ensure SOURCE switch is set to TV.
Check aerial location and connection.
Re-check your tuning method.
Check SOURCE button to make sure it is in the correct position
for reception.
Make necessary adjustments to relevant settings.
Check aerial positioning
There may be Interference from another electrical product. Move
appliance if it persists.
Check aerial for broken circuit, loose connection or any visible
damage.
Check aerial location and direction - strong winds may cause it to
move. Also check whether mountains or tall buildings may be the
problem. Minor adjustment of the direction of your antenna
should keep the ghosting to a minimum.
Note: External rooftop/antenna adjustment should be left to a suitably qualified person.
Many apparent malfunctions are caused slight misadjustments of the regular controls of your unit or equally simple
causes. If any difficulty arises through normal use of your unit, check the list of common problems in the list below.
If the problem persists, unplug your unit and contact your dealer.
This manual suits for next models
1
Table of contents
Languages:
Other Fox LED TV manuals