Definition of the buttons on remote control:
1. STANDBY: Enter or quit the standby mode.
2. MUTE: Mute or restore sound.
3.NUMBER BUTTONS:
-/- -
Use to choose channels.
10.INPUT:
11.AUDIO:
Select signal source.
4.
5.
6.P.MODE:
:
:
Press to cycle through the available video
picture mode.
7.S.MODE: Press to cycle through the different sound settings.
8.MENU: Press to display/disappear the on screen
menus or to quit some operations.
9.SLEEP:
15.EXIT: Quit the current interface.
12.OK: Select or confirm menu item.
14.MENU:
13.▲/▼/
►
/►: Select direction.
16.VOL+/VOL-: Increase/Decrease audio volume.
17.CH+/CH-: Scroll to next/previous channel.
19.INFO:
18.ASPECT:
Set the sleep timer.
20.LIST :
22.FAV:
23.TEXT:
24.HOLD:
25.SUBTITLE:
26.INDEX:
27.REVEAL:
21.COLOR BUTTONS: Red/green/yellow/blue key
navigation link.
: Fast reverse (in MEDIA mode)
: Fast forward (in MEDIA mode)
: Previous (in MEDIA mode)
: Next (in MEDIA mode)
: Play / Pause (in MEDIA mode)
: Stop (in MEDIA mode)
NOTE:
All pictures in this manual are
examples, only for reference,
actual product may differ from the
pictures.
The buttons not mentioned
here are not used.
28.EPG: Call up the EPG(Electronic Program Guide),using in the DTV
mode
29.SUBPAGE:
30.SIZE:
31.REC:
Switch between NICAM DUAL /NICAM DUAL /NICAM DUAL
Audio language in DTV mode.
Reveal the hidden information of some teletext pages.
Enter subtitle mode
Go to index page/Enter the recorded list.(In PVR mode).
Change the size of Teletext screen in display mode.
To start recording(InPVR Mode).
+ /MONO and switch
Change the channel bits want to input
Return to last viewed program
Display the favorites program
Enter the Teletext, press again for MIX mode, press this
button again to exit
Hold the teletext page on display press again to release
Enter the subpage.
Adjust displayable aspect ratio.
Show channel program information.
Channel List Key.
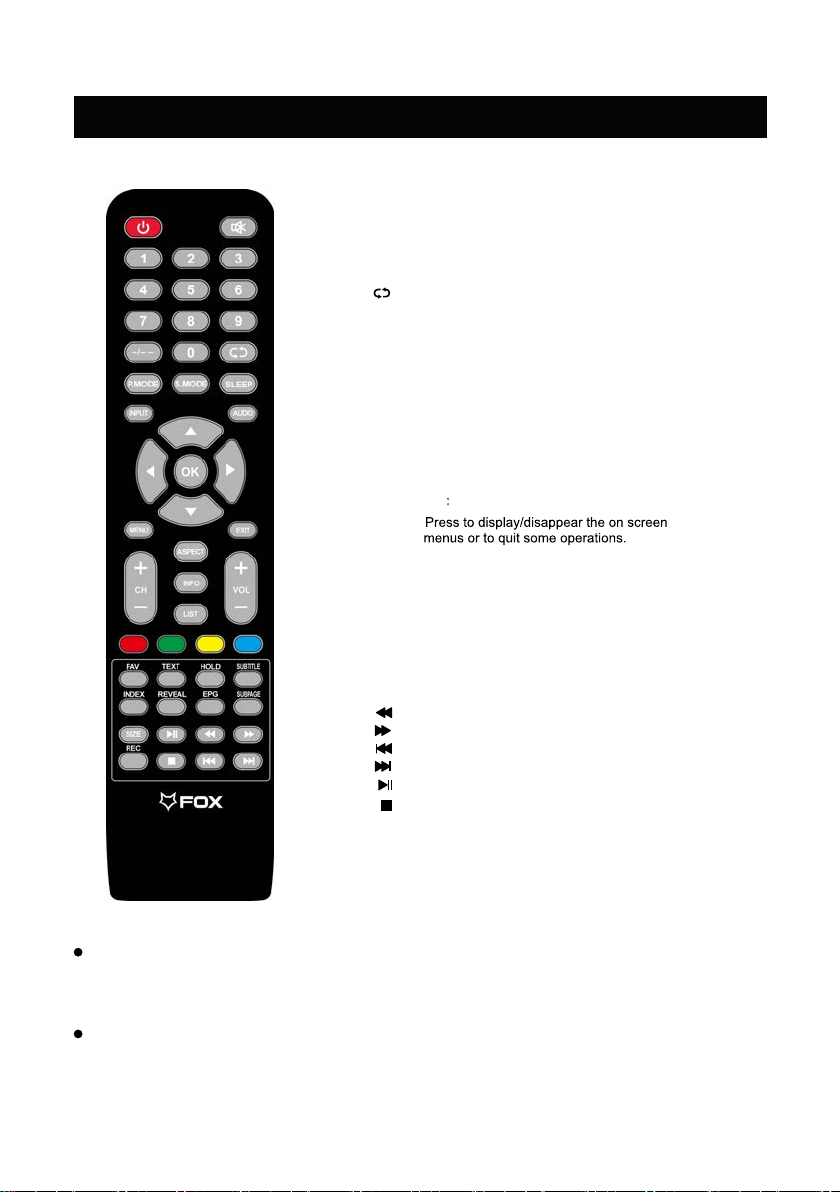
REMOTE CONTROL
The button of the original remote control are as following:
9