Foxydry WALL User manual

FOXYDRY WALL &
WALL PLUS
Lo stendibiancheria salvaspazio Made in Italy

ITA ISTRUZIONI DI MONTAGGIO
ENG ASSEMBLY INSTRUCTIONS
FR INSTRUCTIONS D’ASSEMBLAGE
ESP INSTRUCCIONES DE MONTAJE
DE MONTAGEANWEISUNGEN
FOXYDRY WALL & PLUS
INSTALLATION VIDEO

ATTREZZI NECESSARI
TOOLS NEEDED / OUTILS NÉCESSAIRES /
HERRAMIENTAS NECESARIAS / NOTWENDIGE WERKZEUGE
01
Metro
Measure tape
Mètre
Cinta métrica
Bandmass
Scala
Ladder
Échelle
Escalera
Leiter
Matita
Pencil
Crayon à papier
Lápiz
Bleistift
Trapano
Drill
Perceute
Taladro
Bohrmaschine
Chiave
Wrench
Clé
llave
Schraubenschlüssel
Cacciavite a stella
Star screwdriver
Tournevis étoile
Destornillador estrella
Sternschraubendreher

AVVERTENZE
WARNINGS / AVERTISSEMENTS / ADVERTENCIAS / HINWEISE
02
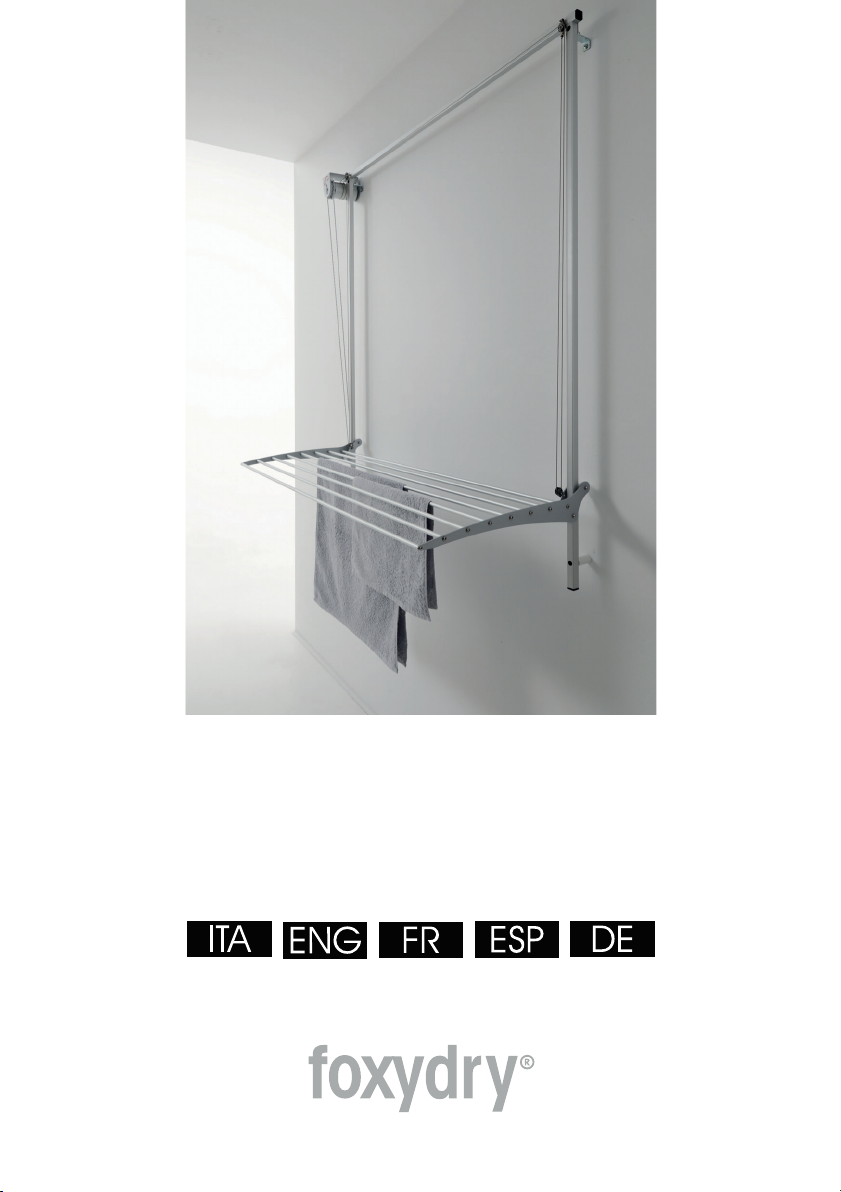
FOXYDRY è no stendibiancheria salvaspazio e non è n giocattolo. Non è adatto all’uso dei bambini.
Piccoli componenti di FOXYDRY potrebbero essere facilmente ingeriti. COMETA S.r.l. declina ogni responsabilità
per danni a cose o persone derivanti dall’uso improprio di FOXYDRY.
FOXYDRY is a space-saving clothes drying rack. It is not a toy. This product is not suitable for children. Small
parts of FOXYDRY can be easily swallowed. COMETA S.r.l. shall not be liable or responsible for any personal
injuries or damages to property caused by improper use of FOXYDRY.
FOXYDRY est n étendoir à linge escamotable, ce n’est pas n jo et. Il n’est pas conçu pour être utilisé par
des enfants ; les petits éléments de FOXYDRY pourraient facilement être ingérés. COMETA S.r.l. décline toute
responsabilité pour les dommages engendrés par une mauvaise utilisation de FOXYDRY.
FOXYDRY es n tendedero de pared para el aprovechamiento del espacio, no es n j g ete. El uso
de este producto no está recomendado para niños, las piezas de menor tamaño podrían ser ingeridas
fácilmente. COMETA S.r.l. no se hace responsable de los daños materiales o a personas ocasionados por el
uso indebido de FOXYDRY.
FOXYDRY ist ein platzsparender Wäscheständer nd kein Spielze g. Er ist nicht für den Gebrauch durch
Kinder geeignet. Kleine Teile von FOXYDRY können leicht verschluckt werden. COMETA S.r.l. haftet nicht für
Personen- und Sachschäden, die sich aus einem unsachgemäßen Gebrauch von FOXYDRY ergeben.
Il peso dello stendibiancheria è di 4,5 kg. FOXYDRY WALL può sopportare un carico massimo di 10 kg.
ATTENZIONE!! Non s perare mai q esto limite, potrebbe essere pericoloso e recare danni a cose o
persone.
FOXYDRY WALL weighs 4.5 kg and is designed to carry a maximum load of 10 kg.
ATTENTION!! Never exceed the stated load limit, as it co ld be dangero s and res lt in personal inj ries or
damages to property.
Le poids de l’étendoir est de 4,5 kg. FOXYDRY WALL peut supporter une charge maximale de 10 kg.
ATTENTION !! Ne jamais dépasser cette limite, cela po rrait s’avérer dangere x et ca ser des dégâts
matériels o blesser des personnes.
FOXYDRY WALL pesa 4.5 kg y ha sido diseñado para soportar una carga máxima de 10 kg.
¡ATENCIÓN! No exceda n nca el límite de carga, podría ser peligroso y ocasionar daños materiales o a
personas.
Das Gewicht des Wäscheständers beträgt 4,5 kg. FOXYDRY WALL trägt eine Höchstlast von 10 kg. ACHTUNG!!
Diesen Wert niemals überschreiten, dies kann gefährlich sein nd z Personen- nd Sachschäden führen.
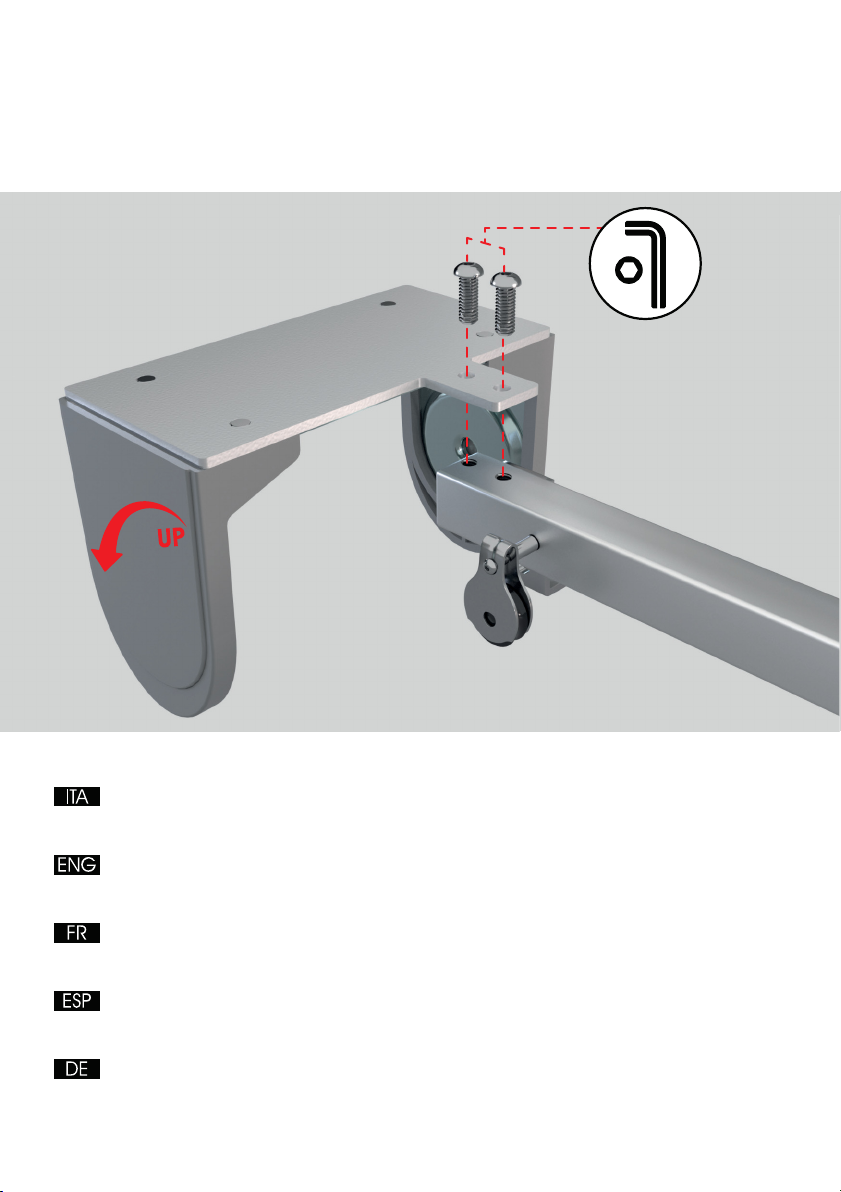
Per il fissaggio e montaggio di FOXYDRY, si raccomanda di rivolgersi a personale qualificato.
We recommend that FOXYDRY is assembled and installed by qualified and experienced personnel. Pour la
fixation et l’assemblage de FOXYDRY, il est recommandé de faire appel à un technicien qualifié. Se
recomienda que el montaje e instalación de FOXYDRY sea realizado por personal cualificado y
experimentado.
Die Befestigung und Montage von FOXYDRY sollte von qualifiziertem Fachpersonal vorgenommen werden.
10
Kg

AVVERTENZE
WARNINGS / AVERTISSEMENTS / ADVERTENCIAS / HINWEISE
03
IMPORTANTE!! Assicurarsi che i tasselli dati in dotazione siano idonei al tipo di materiale della parete. Se i tasselli
dati in dotazione non dovessero risultare idonei, procurarsi dei tasselli adeguati.
ATTENZIONE!! Si raccomanda di accertarsi che FOXYDRY sia fissato alla parete correttamente prima di
procedere con il completamento del montaggio.
Cometa S.r.l. declina ogni responsabilità per danni a cose o persone derivanti dall’installazione scorretta di
FOXYDRY.”
IMPORTANT!! Make sure that the plugs supplied with your clothes drying rack are suitable for the material of your
wall. If the plugs supplied with the product are not suitable for your wall, use suitable plugs instead.
ATTENTION!! Make s re that FOXYDRY has been mo nted correctly to the wall before completing assembly.
Cometa S.r.l. shall not be liable or responsible for personal injuries or damages to property caused by improper
installation of FOXYDRY. “
IMPORTANT !! S’assurer pour cela que les chevilles fournies sont adaptées au type de matériau du mur. Si les
chevilles fournies s’avéraient ne pas être appropriées, se procurer les chevilles adaptées.
ATTENTION !! Il est recommandé de s’ass rer q e FOXYDRY soit correctement fixé a m r avant de
po rs ivre la fin de l’installation.
COMETA S.r.l. décline toute responsabilité pour les dégâts matériels ou blessures engendrés par une mauvaise
installation de FOXYDRY.
¡IMPORTANTE! Asegúrese de que los tacos que se proporcionan con su tendedero son los adecuados para su
tipo de pared. Si los tacos proporcionados no f eran los adec ados, en s l gar se otros tacos q e lo sean.
¡ATENCIÓN! Asegúrese de q e FOXYDRY ha sido fijado correctamente a la pared antes de contin ar con el
montaje.
Cometa S.r.l. no se hace responsable de los daños materiales o a personas ocasionados por la instalación
incorrecta de FOXYDRY.
WICHTIG!! Stellen Sie hierzu sicher, dass die im Lieferumfang inbegriffenen Dübel für das Wandmaterial
geeignet sind. Wenn die im Lieferumfang inbegriffenen Dübel nicht geeignet sind, besorgen Sie sich geeignete
Dübel.
ACHTUNG!! Stellen Sie sicher, dass FOXYDRY korrekt an der Wand befestigt w rde, bevor Sie die Montage z
Ende führen.
Cometa S.r.l. haftet nicht für Personen- und Sachschäden, die sich aus einem falschem Einbau von FOXYDRY
ergeben.
ATTENZIONE!! Ricordati di fissare la catenella per la salita e discesa dello stendino con l’apposito fermaglio a
parete.
ATTENTION!! Do not forget to secure the drying-rack control chain to the wall using the chain retainer.
ATTENTION!! Ne pas oublier de bloquer la chaine pour la montée et la descente de l’étendoir avec le fermoir
mural prévu à cet effet.
¡ATENCIÓN! No olvide recoger la cadena de accionamiento del tendedero en la pared con el clip de
seguridad que se proporciona.
ACHTUNG!! Denken Sie daran, die Kette zum Heben und Senken des Ständers mit dem entsprechenden
Schließhaken an der Wand zu befestigen.

CONTENUTO DELLA SCATOLA
CONTENTS OF THE BOX / CONTENU DE LA BOÎTE /
CONTENIDO DE LA CAJA / INHALT DER VERPACKUNG
04
Tubo quadro superiore con staffe a parete Upper
square rail with wall brackets and pulleys
Barre de fixation supérieure et supports muraux et moufles de poulies.
Tubo cuadrado superior con soportes de pared y poleas.
Obere Rahmenstange mit Wandbeschlägen und Seilzügen
Portafrizione
Clutch holder
Plaque d’embrayage
Soporte para mecanismo enrollable.
Kupplungshalterung
Frizione
Clutch with chain and cords
Poulie avec chaine et cordons
Mecanismo enrollable
+ cadena y cordones
Kupplung mit Kette und Schnüren
A
B
C D
2 tubi quadri laterali
2 side square rails
2 barres de fixation latérales.
2 tubos cuadrados laterales.
2 seitliche Rahmenstangen

05
Sacchettino 3: 2 viti M5, 2 viti e dadi M6 + 2 cilindrati bloccacordini + 1 fermaglio x catenella
+
Chiavi a brugola + 1 gancio x chiusura stendino + gancio di chiusura griglia
Bag 3: 2 M5 screws + 2 M5 screws and nuts + 2 cord lock barrels + chain retainer + Allen
keys + 1 hook + rack closing hook
Petit sac 3 : 2 vis M5 + 2 vis et 2 écrous M6 + 2 cylindres coinceurs pour les cordons +
accroche pour la chaine + clés Allen + 1 crochet + crochet de fermeture de la grille
Bolsita 3 : 2 tornillos M5 + 2 tornillos y tuercas M6 + 2 cilindros para bloquear los cordones +
1 clip de seguridad + llaves Allen + 1 gancho + gancho de cierre parilla
Beutel 3: 2 Schrauben M5 + 2 Schrauben und Muttern M6 + 2 Zylinder zur Schnurbefestigung
+ 1 Schießhaken für Kette + Inbusschlüssel + 1 haken + wäschegestell-Schliesshaken
8 tubi per bucato
8 drying rails
8 tubes pour le linge
8 varillas de tendido
8 Stangen für die Wäsche
Sacchettino 1: 16 viti M5x16
Bag 1: 16 M5x16 screws
Petit sac 1: 16 vis M5x16 Bolsita
1 : 16 tornillos M5x16 Beutel 1: -
16 Schrauben M5x16
2 piastre laterali
2 side plates with pulleys
2 plaques latérales avec poulies
2 placas laterales con poleas
2 seitliche Platten
Sacchettino 2: 4 tasselli + 4 viti + 2 distanziali
Bag 2: 4 wall plugs + 4 screws + 2 spacers
Petit sac 2: 4 chevilles + 4 vis + 2 entretoises
Bolsita 2: 4 tacos + 4 tornillos + 2 separadores
Beutel 2: 4 Dübel + 4 Schrauben +
2 Abstandhalter
E
F
GH
I

06
A + B
WALL 150 152 cm (8+144) x 137 cm x 52 cm
WALL 120 128 cm (8+120) x 137 cm x 52 cm
WALL 100 108 cm (8+100) x 137 cm x 52 cm
WALL 80 88 cm (8+80) x 137 cm x 52 cm
INGOMBRO MASSIMO
MAXIMUM SPACE OCCUPIED / DIMENSIONS HORS-TOUT
MAXIMUM / DIMENSIONES MÁXIMAS / MAXIMALE
ABMESSUNGEN
BA
137 cm
52 cm
9 cm
4,5 cm
FRONTALE & LATERALE
FRONT & SIDE, AVANT & CÔTÉ,
FRENTE & LADO, FRONT & SEITE

WALL 150
WALL 100
WALL 120
WALL 80
07
C D
WALL 150 140 cm
125,2 cm
WALL 120 116 cm
125,2 cm
WALL 100 96,5 cm
125,2 cm
WALL 80 76,5 cm
125,2 cm
FORI A PARETE
WALL HOLES / TROUS MURAUX / AGUJEROS EN LA PARED /
BOHRLOECHER AN DER WAND
DD
CC
C
DD
C

08
Fissare il portafrizione al tubo quadro superiore con le apposite
viti. Lato sinistro o destro come da ordine.
Fix the clutch plate with tab washers to the upper square rail.
Fix the clutch on the left or on the right, depending on your
order.
Fixer la plaque de support de poulie à rebords sur la barre de fixation supérieure ducôté
gauche ou droit comme indiqué.
Fije el soporte para contera al tubo cuadrado superior.
A la derecha o a la izquierda del tubo dependiendo de su pedido.
Kupplungsplatte an der oberen Rahmenstange
befestigen. Linke oder rechte Seite je nach Bestellung.
FISSAGGIO PORTAFRIZIONE
ATTACHING THE CLUTCH HOLDER / FIXATION PLAQUE
EMBRAYAGE / FIJACIÓN MECANISMO ENROLLABLE /
BEFESTIGUNG DER KUPPLUNGSHALTERUNG

09
Segnare la posizione dei fori per fissare il tubo quadro superiore e forare.
Fissare il tubo quadro superiore con gli appositi tasselli (vite corta).
Mark on the wall the position of the holes to fit the upper rail, then drill the holes. Fix the
upper square rail to the wall using the appropriate plugs supplied (short screw).
Marquer sur le mur la position des trous pour fixer la barre de fixations supérieure et percer. Fixer
la barre de fixation supérieure au mur à l’aide des chevilles prévues à cet effet (vis courtes).
Marque en la pared la posición de los agujeros para fijar el tubo superior y abra los agujeros.
Fije el tubo cuadrado superior a la pared utilizando los tacos indicados que se proporcionan
(tornillo corto).
Position der Bohrlöcher an der Wand zur Befestigung der oberen Stange markieren und bohren.
Obere Rahmenstange mit den entsprechenden Dübeln (kurze Schraube) an derWand
befestigen.
FISS. TUBO QUADRO SUPERIORE A PARETE
ATTACHING THE UPPER SQUARE RAIL / FIXATION DE LA BARRE
SUPÉRIEURE / FIJACIÓN DE EL TUBO CUADRADO SUPERIOR /
BEFESTIGUNG DER OBERE RAHMENSTANGE

10
Fissare i 2 tubi quadri laterali alle staffe a parete in alto con le apposite viti e dadi.
Fix the side square rails to the wall brackets at the top with the appropriate screws and nuts.
Monter les barres de fixation latérales sur les supports muraux supérieurs à l’aide des vis et
écrous prévus à cet effet.
Fije los tubos laterales a los soportes de pared en la parte superior con los tornillos y tuercas
indicados.
Seitliche Rahmenstangen mit den entsprechenden Schrauben und Muttern an den oberen
Wandbeschlägen montieren.
FISSAGGIO TUBI QUADRI LATERALI
ATTACHING THE SIDE SQUARE RAILS / FIXATION DE LES
BARRES LATÉRALES / FIJACIÓN DE LOS TUBOS LATERALES /
BEFESTIGUNG DER SEITLICHEN RAHMENSTANGEN
M6

11
Segnare la posizione per fissare i tubi quadri laterali in basso, forare ed inserire il tassello.
Assic rarsi che i t bi siano in asse e paralleli tra di loro per garantire n corretto scorrimento
dello stendino.
Mark on the wall the position of the holes to fit the side square rails, then drill and insert the plugs.
Make s re that the rails are aligned and parallel to each other, th s ens ring that the drying
rack slides correctly and smoothly.
Marquer sur le mur la position des trous pour fixer les barres de fixations latérales, percer et insérer
la cheville. S’ass rer q e les barres soient bien dans l’axe et parallèles entre elles po r q e le
séchoir co lisse correctement.
Marque en la pared la posición de los agujeros para fijar los tubos laterales, taladre los agujeros
e introduzca los tacos. Asegúrese de q e los t bos laterales están alineados y paralelos entre
ellos, así q e el bastidor del tendedero se deslice correctamente y con s avidad.
Position der Bohrlöcher an der Wand zur Befestigung der seitlichen Rahmenstangen markieren,
bohren und Schließhaken einsetzen. Acht ng!!! Sicherstellen, dass die Stangen in einer Achse
nd parallel z einander stehen, m den richtigen Verfahrweg des Ständers z gewährleisten.

1
2
3
4
12
Assemblare la griglia per stendere il bucato come in foto. Infilare il gancio per la chiusura
griglia. Stringere le viti quanto basta con la chiave a brugola, senza eccedere (i tubi
potrebbero piegarsi inutilmente).
Assemble the drying grid as in the photo. Insert the hook for closing the rack. Use the Allen key
to tighten the srews firmly but not excessively (it may cause unneccessary bending in the
tubes).
Assembler la grille pour pendre le linge comme dans la photo. Insérez le crochet pour fermer
la grille. Serrer les vis juste ce qu’il faut avec la clé Allen, sans forcer (les tubes pourraient seplier
inutilement).
Monte la rejilla de tendido como se muestra en la imagen. Inserte el gancho para cerrar la
parilla. Apriete los tornillos todo lo necesario con la llave Allen, sin ejercer demasiada fuerza
(los tubos podrían doblarse en vano)
Das Gitter zum Aufhängen der Wäsche wie im Foto gezeigt zusammensetzen. Setzen Sie den
Haken für das Wäschegestell schliessen ein. Die Schrauben ausreichend mit dem
Inbusschlüssel festziehen, ohne zu übertreiben(die Stangen könnten sich unnötigerweise
biegen).
MONTAGGIO STENDINO
ASSEMBLING THE DRYING RACK / MONTAGE SÉCHOIR/
MONTAJE TENDEDERO / MONTAGE DES WÄSCHEGESTELLS
M5x16

13
Inserire i tubi quadri laterali tra le due pulegge bianche della griglia per stendere il bucato.
Fissare i tubi quadri laterali con le apposite viti e distanziali ai tasselli a muro.
Mount the drying rack by inserting the side square rails between the two nylon pulleys.
Fix the side square rails to the wall plugs using the screws and spacers provided.
Apposer la grille de séchage en insérant les barres de fixation latérales entre les deux poulies en
nylon. Fixer les barres de fixation latérales aux chevilles préalablement insérées dans le mur, à
l’aide des vis et entretoises prévues à cet.
Monte el bastidor en el tendedero pasando los tubos cuadrados laterales entre las poleas de
nylon. Fije los tubos laterales a la pared utilizando los separadores de pared con los tornillos y
tacos.
Ständer durch Einsetzen der seitlichen Rahmenstangen zwischen den beiden Riemenscheiben
aus Nylon anbringen. Seitliche Rahmenstangen mit den Schrauben und Abstandhaltern an den
Dübeln in der Wand befestigen.

1
14
Inserire la frizione nel portafrizione.
Insert the clutch with chain in the clutch holder.
Insérer la poulie et sa chaine dans leur emplacement.
Introduzca el mecanismo enrollable en el soporte correspondiente.
Die Kupplung in die Kupplungshalterung einfügen.
AGGANCIO FRIZIONE
CONNECTING THE CLUTCH / ACCROCHAGE EMBRAYAGE
/ ENGANCHE MECANISMO ENROLLABLE / EINRASTEN DER
KUPPLUNG

15
ATTENZIONE! Assicurarsi che la frizione si agganci correttamente al portafrizione primadi
completare il montaggio (vedi foto).
WARNING! Make sure that the clutch is securely fastened in the clutch holder before completing
assembly (see photo).
Attention! S’assurer que la poulie soit correctement insérée avant de poursuivre la finde
l’installation (voir photo).
¡ATENCIÓN! Asegúrese de que ha introducido la contera correctamente antes de continuar
con el montaje del tendedero (véase la imagen).
ACHTUNG! Sicherstellen, dass die Kupplung fest einrastet, bevor man die Montage fertigstellt
(siehe Foto).

1 1
2 2
33
0
16
Passare il circuito dei 2 cordini (vedi foto). Il cordino corto entra nella carrucola più vicina
Passare il cordino lungo tra la carrucola più vicina ed il tubo quadro. Infilarlo nella carrucola più
lontana Passare entrambi i cordini nelle carrucole in basso
Feed the 2-cord circuit through it (see picture). Feed the short cord into the nearest pulley Feed
the long cord between the nearest pulley and the square tube. Feed it in the farest pulley
(opposite side) Feed both cords in the lower pulleys at the drying rack
Passer le circuit des 2 cordons (voir photo). Passer le cordon court dans la moufle la plus prochePasser le
long cordon entre la poulie la plus proche et le tube carré supérieur. Passer le long cordon dans la
moufle la plus éloignée Passer les deux cordons dans les poulies en bas, à la grille de séchage
Pase el circuito de los 2 cordones (véase la imagen). Pase el cordón corto por la polea más próxima
y tire del cordón hacia abajo. Pase el cordón largo entre la polea más próxima y el tubo cuadrado
y a continuación por la polea a más distancia. Pase los cordones por las poleas inferiores.
Den Kreislauf der 2 Schnüre durchführen (siehe Foto). Kurze Schnur in den näher gelegenen Seilzug
einführen und nach unten ziehen. Die lange Schnur zwischen dem näheren Seilzug und der
Rahmenstange führen, in den weiter entfernten Seilzug einführen und nach unten ziehen.
Die Schnüre in die unteren Seilzüge einführen und wieder nach oben ziehen.
CIRCUITO CORDINI
CORD CIRCUIT / CIRCUIT CORDONS /
CIRCUITO CORDONES /
SCHNURKREISLAUF

1 2
3 0
17
Bloccare i capi dei cordini con gli appositi cilindretti passandoli attraverso il foro della carrucola
superiore Regolare la lunghezza dei cordini per mettere in bolla lo stendino, agendo sui
cilindretti.
Secure the ends of the cords with the round cord locks, passing them through the upper pulley
hole Adjust the length of the cords by means of the cord lock barrels so that the drying rack is
level.
Bloquer les extrémités des cordons à l’aide des petits cylindres bloques-cordons, passer le
cordon dans le trou central de la moufle supérieure Ajuster la longueur des cordons pour
mettre le sèche-linge à niveau.
Fije los extremos de los cordones con los cilindros pasando por el agujero central de las
poleas superior. Adjuste la largura de los cordones para nivelar el tendedero, por medio de los
prisioneros.
Die Schnurenden mit den entsprechenden Zylindern zur Schnurbefestigung und durch das
Loch in der Mitte der oberen Seilzüge blockieren. Die Länge der Schnüre (durch Einwirken auf
die Zylinder) so regulieren, das das Wäschegestell waagrecht hängt.

18
Tirare la parte esterna della catenella per far salire lo stendino (SALITA). Tirare la
parte interna della catenella per far scendere lo stendino (DISCESA).
Pull the outer chain, to lift the drying rack (UP).
Pull the outer chain, to lower the drying rack (DOWN).
Pour remonter la grille de séchage, tirer la partie externe de la chaine (SUR).
Pour faire baisser la grille de séchage, tirer la partie interne de la chaîne (JUIN).
Para subir el tendedero tire de la cadena exterior hacia abajo (SUBIDA).
Para bajar el tendedero tire de la cadena interior hacia abajo (BAJAR).
Zum Anheben des Wäscheständers an der äußeren Kette ziehen (HEBEN).
Zum Absenken des Wäscheständers an der inneren Kette ziehen (SENKEN).
ISTRUZIONI PER L’USO
INSTRUCTIONS FOR USE / INSTRUCTIONS POUR L’UTILISATION
/ INSTRUCCIONES DE USO / GEBRAUCHSANWEISUNG
This manual suits for next models
1
Table of contents
Popular Indoor Furnishing manuals by other brands

Accent
Accent BALANCE DESK Assembly guide

Better Homes and Gardens
Better Homes and Gardens Ashwood Road 2-pk Dining Chairs... Assembly instructions

Sunjoy
Sunjoy 1203060011-W Assembly instruction

Mocka
Mocka Zander Round Dining Table Assembly instructions

Next
Next 734052 Assembly instructions

COLAMY
COLAMY A334 instruction manual