FP ultimail User manual
Operator Manual
ultimail
Franking System

2The control panel – display and keyboard
Multi function keys
(soft keys)
Numeric keys:
– Enter digits
– Enter letters, punctuation
and special characters
Display
(illuminated)
C/CE key:
– Delete input
– Call default setting
In the home menu, press C/CE for 3 seconds:
Home menu is reset to standard
Arrow keys
Back to the home menuInfo key:
Display help
Go back to the higher
window / menu level
SET UP menu:
Change system
settings
Start/Stop key:
Start letter transport/
franking
Franking labels
Loading postage:
TELESET
Display
postage register
Multi function keys
(soft keys)
Enter key:
– Confirm the input
– Acknowledge error messages

Contents 3
About this Operator Manual _____________________________________7
1 Safety tips ____________________________________________________8
2 A short description of the ultimail _______________________________10
3 Switching the ultimail ON / OFF _________________________________13
4 ultimail operating basics _______________________________________15
4.1 Access control by MASTER / USER card ____________________15
4.2 The operating menu _____________________________________16
4.3 Trial run (zero test print) __________________________________19
5 Setting the franking imprint _____________________________________22
5.1 Postage value / Royal Mail product _________________________23
5.1.1 Setting the postage value / product using the memory __________23
5.1.2 Setting mailing data _____________________________________26
5.1.2.1 Selecting the mailing data for a new product __________________26
5.1.2.2 Editing a product _______________________________________29
5.1.3 Setting the weight ______________________________________30
5.1.3.1 Setting the weight of the mail piece manually _________________30
5.1.3.2 Using the integrated scales: weighing mail pieces (optional) _______31
5.1.4 Entering the postage value manually ________________________32
5.2 Date _________________________________________________34
5.3 Logo / advertising imprint _________________________________35
5.4 SMS text _____________________________________________37
6 Franking ____________________________________________________38
6.1 Preparations ___________________________________________38
6.1.1 Setting up catch tray ____________________________________38
6.1.2 On the sealer: adjust letter guide (ultimail with sealer only) __________38
6.1.3 On the feeder: adjust letter guide (ultimail with feeder only) __________40
6.1.4 Switch on / off seal function (ultimail with feeder / sealer only) _________41
6.2 Change account ________________________________________42
6.3 Positioning and franking a letter ____________________________43
6.3.1 ultimail with hand feed tray _______________________________43
6.3.2 ultimail with sealer (optional) _______________________________44
6.3.3 ultimail with feeder (optional) _______________________________46
6.3.3.1 Positioning letters in stack ________________________________46
6.3.3.2 Positioning single letters _________________________________48
6.4 Franking labels (optional) __________________________________49

ultimail Operator Manual
4
7 Special functions _____________________________________________ 50
7.1 Using the DX feature (optional) _____________________________ 50
7.1.1 Things worth knowing about the DX feature __________________ 50
7.1.2 Franking DX-mail _______________________________________ 51
7.2 Working with the batch counter ____________________________ 52
7.3 Using the ultimail as incoming mail stamp ___________________ 55
7.4 Seal only function (ultimail with feeder / sealer only) _________________ 56
7.5 Differential weighing (optional) ______________________________ 57
7.6 Using an external postage scale ___________________________ 60
7.6.1 Connecting an external postage scale ______________________ 60
7.6.2 Using ultimail with an external postage scale _________________ 61
8 Postage register ______________________________________________ 62
9 Loading postage – TELESET ___________________________________ 63
10 Account administration ________________________________________ 66
10.1 Set up a new account ___________________________________ 66
10.2 Change settings for existing accounts _______________________ 69
10.2.1 Change standard setting for the logo and the SMS text _________ 69
10.2.2 Release / block TELESET access __________________________ 72
10.2.3 Changing budgets and assigning credits ____________________ 73
10.2.4 Change name _________________________________________ 75
10.3 Generate / block USER card(s) for an account ________________ 76
10.4 Switch on / off “access card required?” ______________________ 78
10.5 Display and print account information _______________________ 79
10.6 Set account counter to zero ______________________________ 81
10.6.1 Set one account to zero _________________________________ 81
10.6.2 Set all accounts to zero __________________________________ 81
10.7 Delete accounts ________________________________________ 82
10.7.1 Delete one account _____________________________________ 82
10.7.2 Delete all accounts _____________________________________ 82
11 Memory administration ________________________________________ 83
11.1 Displaying and printing memory assignment __________________ 83
11.2 Saving settings ________________________________________ 84
11.3 Renaming memories ____________________________________ 85
11.4 Delete memories _______________________________________ 86

Contents 5
12 Print image data administration _________________________________87
12.1 Logo display and printing _________________________________87
12.2 Change the logo names __________________________________88
12.3 Enter / change / save SMS texts ___________________________89
12.4 Loading print image data from card _________________________93
12.5 Delete print image data __________________________________94
13 Advanced settings and system information _______________________95
13.1 Setting the operating mode _______________________________95
13.2 Display, print and send system information ___________________97
13.3 Display and reset item counter ____________________________98
13.4 Display and reset advert counter ___________________________99
13.5 Setting low postage warning – limit ________________________100
13.6 Tone signal __________________________________________101
13.7 Display contrast _______________________________________102
13.8 Time ________________________________________________103
13.8.1 Adjusting the current time _______________________________103
13.8.2 Summer / winter time ___________________________________104
13.8.3 Setting time zone ______________________________________106
13.9 Setting standby time ___________________________________107
13.10 Setting Memory 1 as standard after standby _________________108
13.11 Setting print head standby time ___________________________110
13.12 Setting letter transport run-on time ________________________111
13.13 Manage rate tables ____________________________________112
13.13.1 Loading rate table from card _____________________________112
13.13.2 Loading rate table from the data centre _____________________113
13.13.3 Delete all rate tables ___________________________________114
13.14 Integrated scales (optional) _______________________________115
13.14.1 Tare ________________________________________________115
13.14.2 Setting gravity ________________________________________116
13.14.3 Switching automatic endorsement selection on / off ___________117
13.14.4 Setting weighing mode __________________________________118
13.14.5 Switching differential weighing mode on / off (optional) __________119
13.15 Connection to data centre _______________________________120
13.15.1 Internal Modem _______________________________________120
13.15.2 External Modem (optional) ________________________________124
13.16 Changing phone numbers _______________________________126
13.17 Selecting the user interface language ______________________128
13.18 High-quality print ______________________________________129

ultimail Operator Manual
6
13.19 New PC Protocol ______________________________________ 130
13.20 TELESET & RSI ______________________________________ 131
13.21 Generate MASTER card ________________________________ 133
13.22 Enable / disable optional functions ________________________ 134
13.22.1 Memory administration extension (ultimail without integrated scales only) 134
13.22.2 Account administration extension _________________________ 135
13.22.3 Differential weighing feature _____________________________ 136
13.22.4 InfoPrint _____________________________________________ 137
14 Maintenance and care ________________________________________ 138
14.1 Cleaning the ultimail franking system ______________________ 138
14.2 Changing the ink cartridges ______________________________ 139
14.3 Adjust the ink cartridges ________________________________ 144
14.4 Cleaning the print system _______________________________ 145
14.4.1 Start automatic cleaning the print system ___________________ 145
14.4.2 Manually cleaning the print heads _________________________ 146
14.5 Replacing the ink pad insert _____________________________ 148
14.6 Filling the water tank (feeder / sealer ultimail) ____________________ 151
14.7 Adjust moistening level (feeder / sealer ultimail) __________________ 153
14.8 Cleaning / changing the moistening sponge (feeder / sealer ultimail) __ 154
14.9 Cleaning / changing the moistening brush (feeder / sealer ultimail) ___ 158
14.10 Changing the battery ___________________________________ 160
15 Troubleshooting _____________________________________________ 162
15.1 Problems and remedies ________________________________ 162
15.2 Removing letter jams ___________________________________ 170
15.3 How to prevent jamming and double-feeding during batch mailing 172
15.4 Attach adjustable letter guide to feeder / sealer ______________ 174
15.5 Error codes (sample) ___________________________________ 175
15.6 Display and print diagnostics list __________________________ 180
16 Withdrawal and disposal of the ultimail franking system ___________ 181
Appendix
Moving the ultimail to another location _____________________________ 183
Access rights ________________________________________________ 192
SET UP menu (overview) _______________________________________ 194
Glossary ____________________________________________________ 195
Technical Data _______________________________________________ 197
Declaration of Conformity _______________________________________ 202
Index _______________________________________________________ 203
Service _____________________________________________________ 213
About this Operator Manual 7
About this Operator Manual
Please read this Operator Manual before using the ultimail
franking system. Please keep the manual near the ultimail at all
times for reference.
This Operator Manual applies to all configurations and
equipment varieties of franking machines ultimail 60 and
ultimail 90. Functions which are only available with certain
configurations are recognisable by a suffix, e.g. (optional).
In this Operator Manual, ‘ultimail’ stands for the franking
systems ultimail 60 and ultimail 90.
Quick Reference Guide The Quick Reference Guide gives you an overview of the
operating menu and franking with the ultimail.
The following keywords and safety signs identify the safety tips
in this Operator Manual.
Warning! indicates a potential hazard which may result in
injury.
Warning! indicates a potential danger of injury caused by
rotating components. Danger areas of the ultimail are marked
with such a safety sign.
Caution! indicates a potential hazard that may result in
damage to the ultimail or impair the franking process.
The following symbols and text features are used in this
Operator Manual:
MEMORY Menu names and options from the operating menu are written
in capital letters.
“Please select …” Prompts and messages are highlighted by quotation marks.
A tip offers advice or additional suggestions for improving the
operation.
Display graphics show inputs and current settings. The multi
function key(s) to be pressed is / are marked in black.

ultimail Operator Manual
8
1 Safety tips
The ultimail is a digital franking system with an inkjet printer for franking letter mail.
The ultimail complies with the pertinent safety regulations for office information
equipment.
Please observe the following tips for your own safety:
• Installation and commissioning of the franking system ultimail are only done by
qualified personnel authorised by Francotyp-Postalia.
• Only operate the ultimail system on a grounded single-phase power socket. Make
sure your office power supply conforms to the power requirements shown on the
serial number plates.
• Use only cables provided or approved by Francotyp-Postalia. Make sure that
cables are not damaged.
• Make sure the socket for connecting the ultimail is close by and easily accessible
at all times.
• Do not reach into the danger areas marked with a safety sign.
Keep long hair, fingers, loose clothing pieces, shawls and jewellery away from
moving machine parts.
• Do not remove any part of the safety and protective equipment. Do not make them
inoperative. Do not remove any parts of the housing.
• Never cover the ventilation slots in the housing.
• Pull out the power plug in the event of danger! Call the after-sales service.
• Make sure that no liquids or foreign objects penetrate the interior of the ultimail.
If this happens, pull out the power plug immediately. Have the ultimail franking
system checked by Francotyp-Postalia service before starting it up again.
• The ‘Sealer ultimail’ is intended for use with the ultimail 60 franking machine.
It is not possible to operate the sealer without the ultimail franking machine.
• The ‘Feeder ultimail’ is intended for use with the ultimail 60 / ultimail 90 franking
machine. It is not possible to operate the feeder without the ultimail franking
machine.

Safety tips 9
• We recommend to use only approved FP equipment and FP original parts. The
manufacturer FP has established reliability, safety and applicability. The manufac-
turer cannot assess the reliability, safety and applicability for products not approved
by FP, and therefore not vouch for such products.
• Ingestion of the ink can be hazardous to your health. Avoid contact with the eyes.
Keep the ink cartridges away from children. Further instructions for use are
enclosed with the ink cartridges.
• Only use the batteries provided by Francotyp-Postalia. Observe the instructions
enclosed with the battery for correct use and disposal.
• Only have maintenance and repair work done by qualified personnel authorised by
Francotyp-Postalia. Otherwise your warranty will be voided. You will be liable for
any damages.
• Observe the specific notes for moving the ultimail franking system on page 183 if
you wish to install the ultimail at another location.

ultimail Operator Manual
10
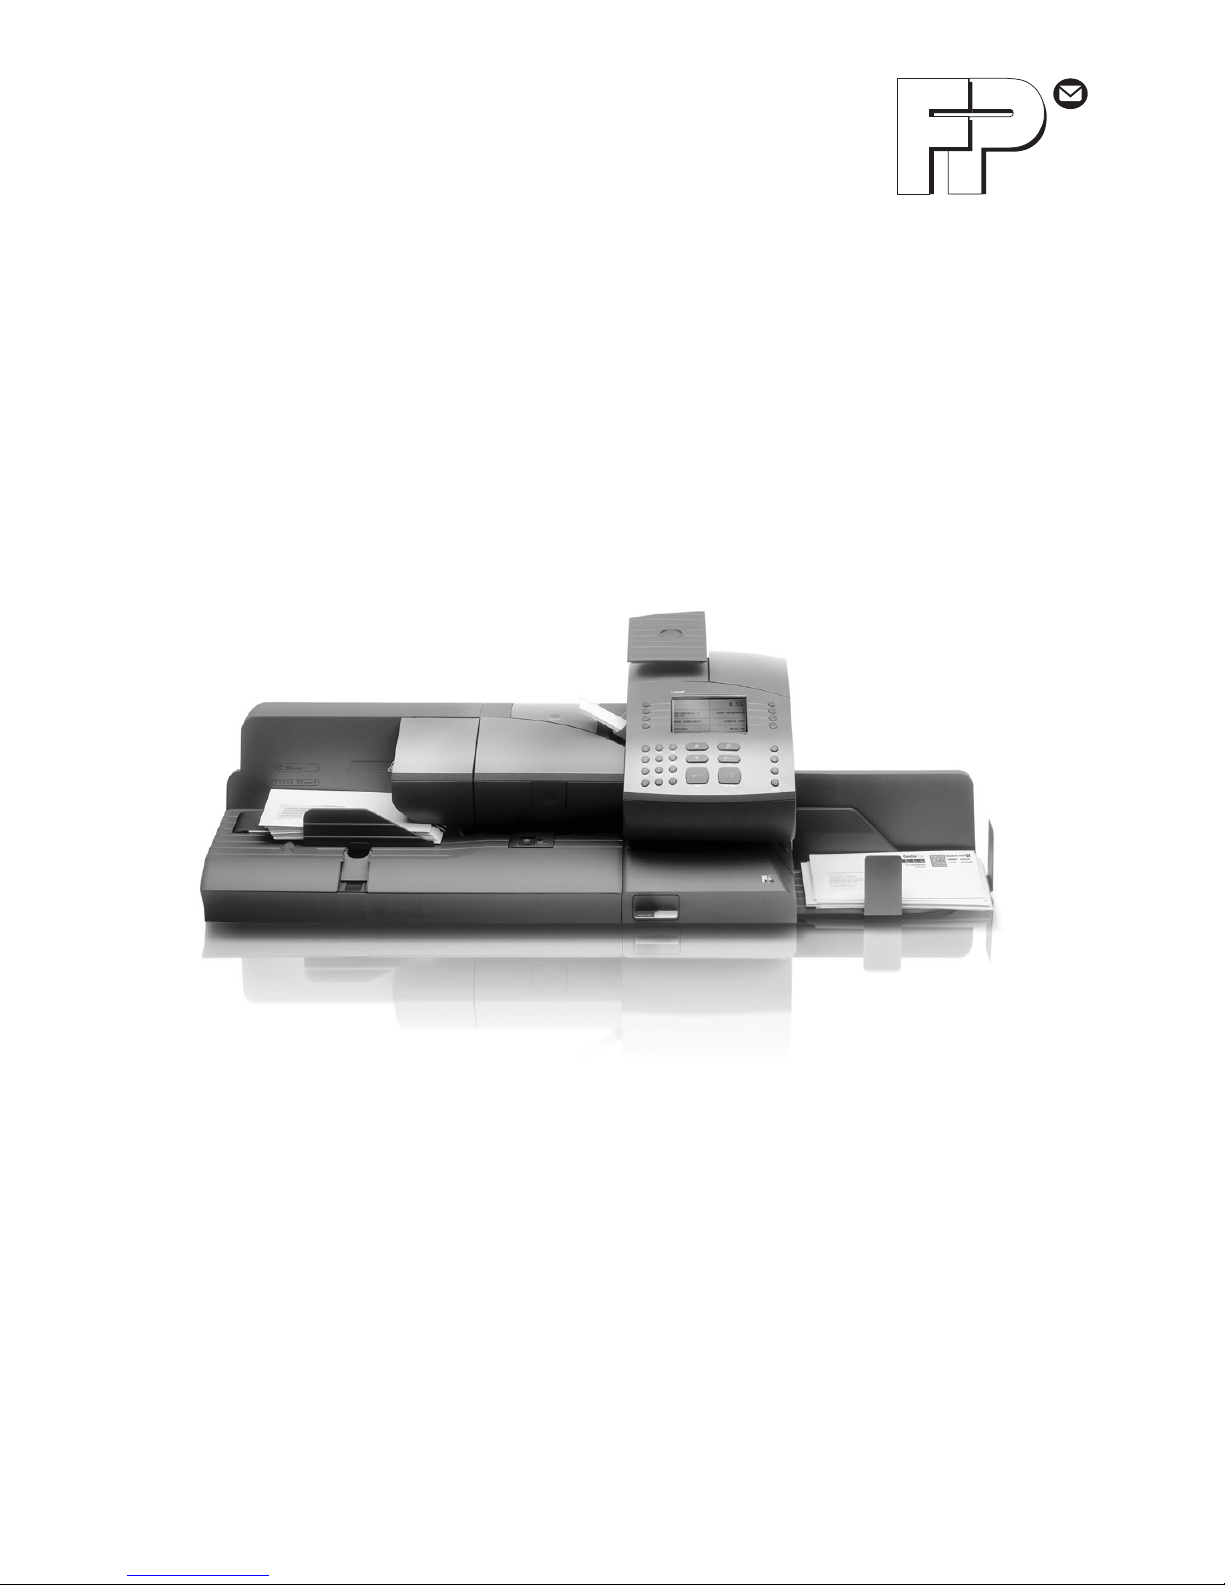
2 A short description of the ultimail
The ultimail is a digital franking machine with horizontal letter
transport and ink jet technology (ink jet print with two ink
cartridges arranged side by side).
Structure In its basic version, the franking system consists of the franking
machine, hand feed tray and catch tray.
The franking machine is available as model
–ultimail 60 with a processing speed up to 60 letters/minute
–ultimail 90 with a processing speed up to 90 letters/minute
Menu-supported
user interface
The back-lit display is clear and easy to read and understand.
Simply follow the instructions in the display, whether for setting
the franking imprint, modifying the system settings or service
functions, e.g. changing cartridges.
Help No illegal entries are allowed by the ultimail – you are informed
by an appropriate message. A help function offers additional
advice and support.
Franking At a glance, the home menu will show you the current settings
for the franking imprint. You simply position the letter – the
ultimail will take the letter, frank it and place it in the catch tray
ready for dispatch.
You can frank
– mail pieces up to a thickness of 6.35 mm (¼") of an ink
absorbent material
– self-adhesive labels.
Logo imprint and
text messages
ultimail can print a logo of your choice on every mail piece. Also,
the ultimail has the ability to print user editable text messages
(SMS texts).
TELESET Load new postage by the TELESET procedure – fast, com-
fortably and, if necessary, 24 hours a day.
Protection against
unauthorised use
The MASTER / USER card functionality protects the ultimail
against unauthorised use and facilitates the assignment of
individual access rights.
Flexible and up to date New logos, type of mail endorsements or rate changes of the
Royal Mail – you can easily load the latest data in your ultimail.

A short description of the ultimail 11
Additional functions The following functions will soon be among your favourites:
–Account function. Recording and accounting of postage
according to accounts.
–Memory function for frequently used Royal Mail products.
–Stamp of receipt. Imprint ‘Received on: …’ for stamping
incoming mail.
–Print lists for account data, postage register states, system
information.
– Warning in case of too low amount of postage available.
–Remote diagnostics. You can transfer important system
data to the Francotyp-Postalia service.
Options The following components and features are available for
functionality extension:
–Label dispenser to print self-adhesive labels for large / thick
mail pieces.
–Integrated scales. The space saving, integrated scales
quickly and reliably determines the weight of your mail. The
determined weight directly affects the product settings.
–Differential weighing. Weighing mode for convenient
franking of letter stacks. The ultimail determines the weight of
the complete letter stack and sets the postage for each letter
when feeding – according to the change in weight.
–Sealer ultimail. Automatic sealer to moisten and seal letters.
The letters are positioned manually.
–Feeder ultimail. Automatic feeder with sealer. The letters
are separated from the stack, optionally moistened and
sealed, and fed to the ultimail franking machine.
–Dynamic scales. Additional module for the ultimail 90 for
weighing and franking mixed mail and parcels. To retrofit
your ultimail with dynamic scales, please contact Francotyp-
Postalia.
– To run InfoPrint, a PC-based Francotyp-Postalia data
management and archiving software application, you can
enable the InfoPrint function of the ultimail with a machine-
specific release code.

ultimail Operator Manual
12
Options
(continued)
–GSM modem (external modem). As an alternative to the
internal modem, the GSM modem can be used for communi-
cation with the data centre.
– The mailcredit Kit allows you to connect the ultimail to a
computer and thereby via the internet to the data centre.
Furthermore, you can update the software of your ultimail
franking machine with mailcredit.
You will find an overview of the ultimail system components on
pages 210 to 212.

Switching the ultimail ON / OFF 13
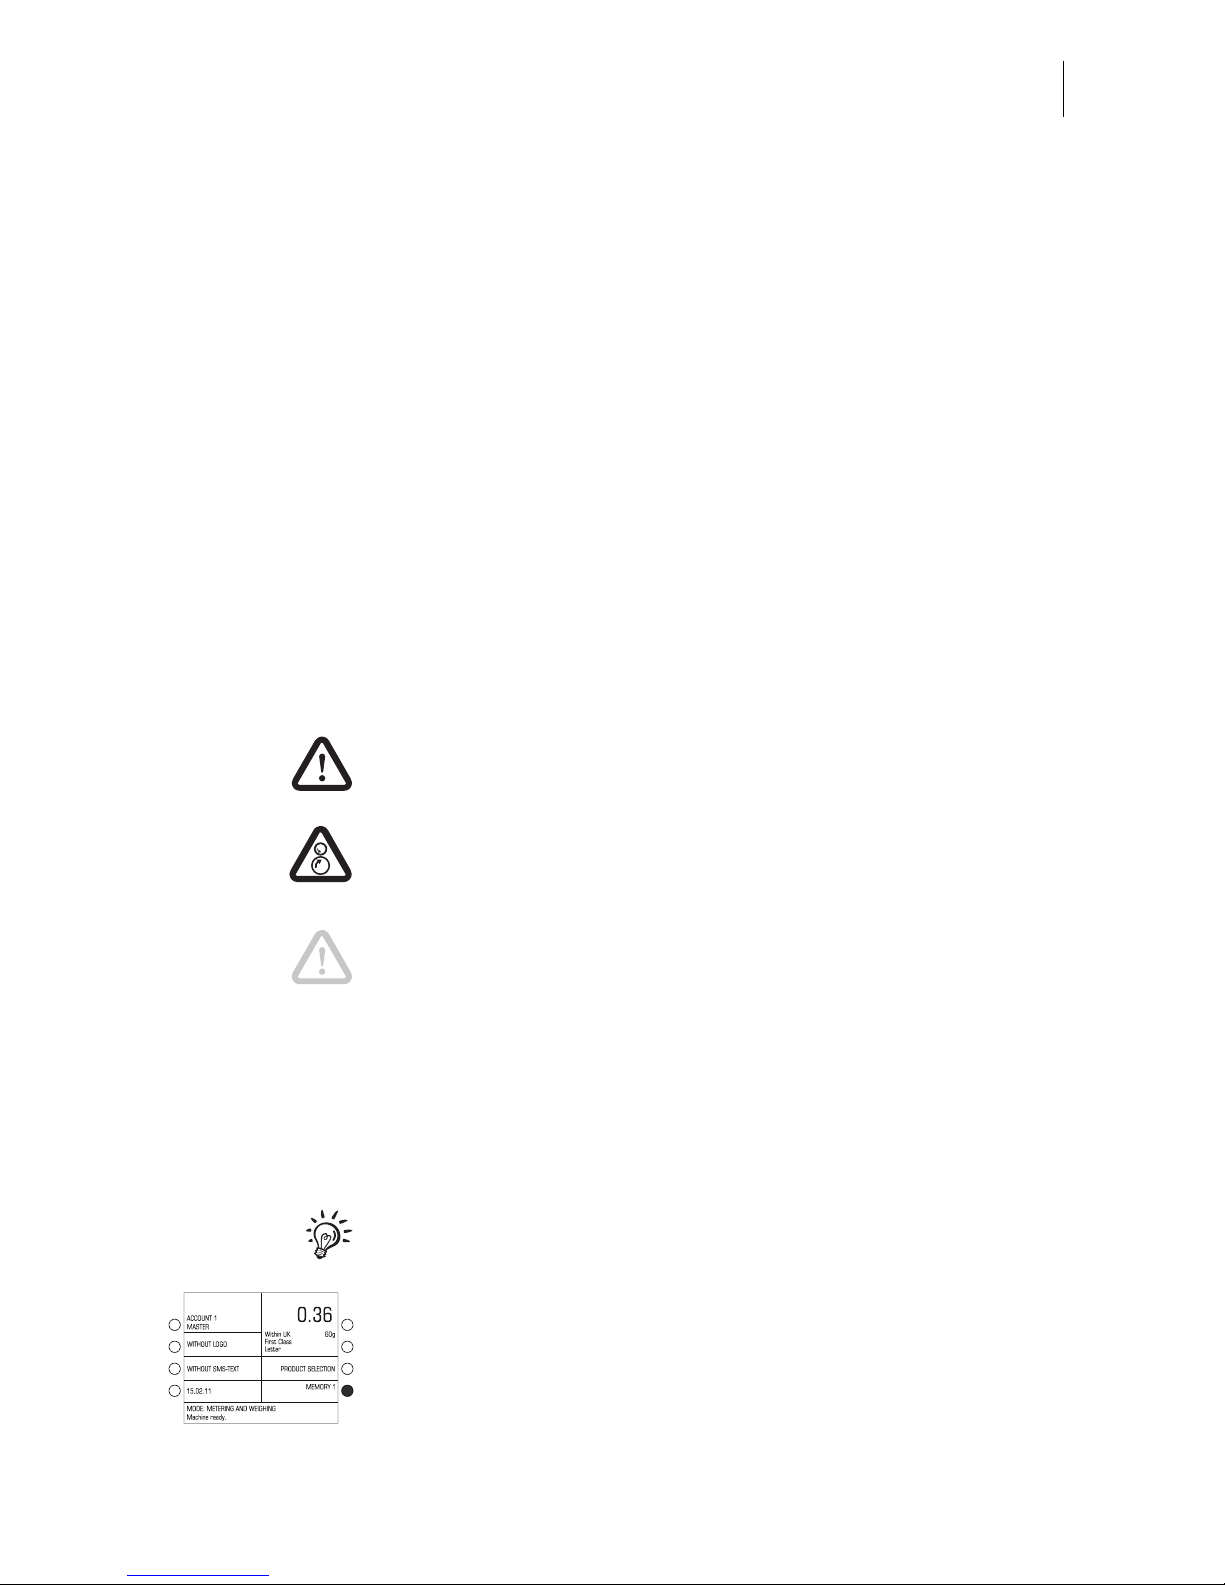
3 Switching the ultimail ON / OFF
Use the power switch on the back of the
franking machine to switch the ultimail
franking system ON / OFF.
Switching on
• Switch the power switch on the back of
the franking machine to the Iposition.
The display lights up and a start routine is
initiated. All system components are now
checked and activated by the ultimail.
The self-test is accompanied by signal-
ling beeps and information on display.
The home menu appears in the display.
The ultimail is ready for operation.
Notes:
The example shows the complete home
menu.
ACCOUNT only appears if an access
card (MASTER or USER) is plugged in or
if access control is switched off.
A postage value only appears if
– all required mailing data are selected,
– the displayed weight value exceeds 0 g
and
– an access card (MASTER or USER) is
plugged in or if access control is
switched off.
METERING stands for franking mode.
Power switch
(back of the
machine)
ON
Home menu (example)
ultimail Operator Manual
14
Switching off
Caution! Always switch the ultimail off
using the power switch. Never simply pull
the power cord or interrupt the power in
any other way before the printing system
has moved to sealed position. That way
you can prevent drying and maintain a
constant printing quality.
• We recommend going to home menu
before switching the ultimail off.
To do so, press the key.
• Switch the power switch to the
Oposition.
The ultimail finishes all operations which
are currently in process and moves the
printing system to sealed position. This
switch off routine may take some time.
ultimail switches off. The display illumina-
tion switches off as well.
OFF
Power switch
(back of the
machine)
ultimail operating basics 15
4 ultimail operating basics
In this chapter you will learn about the basic ultimail functions and how to use the
operating menu.
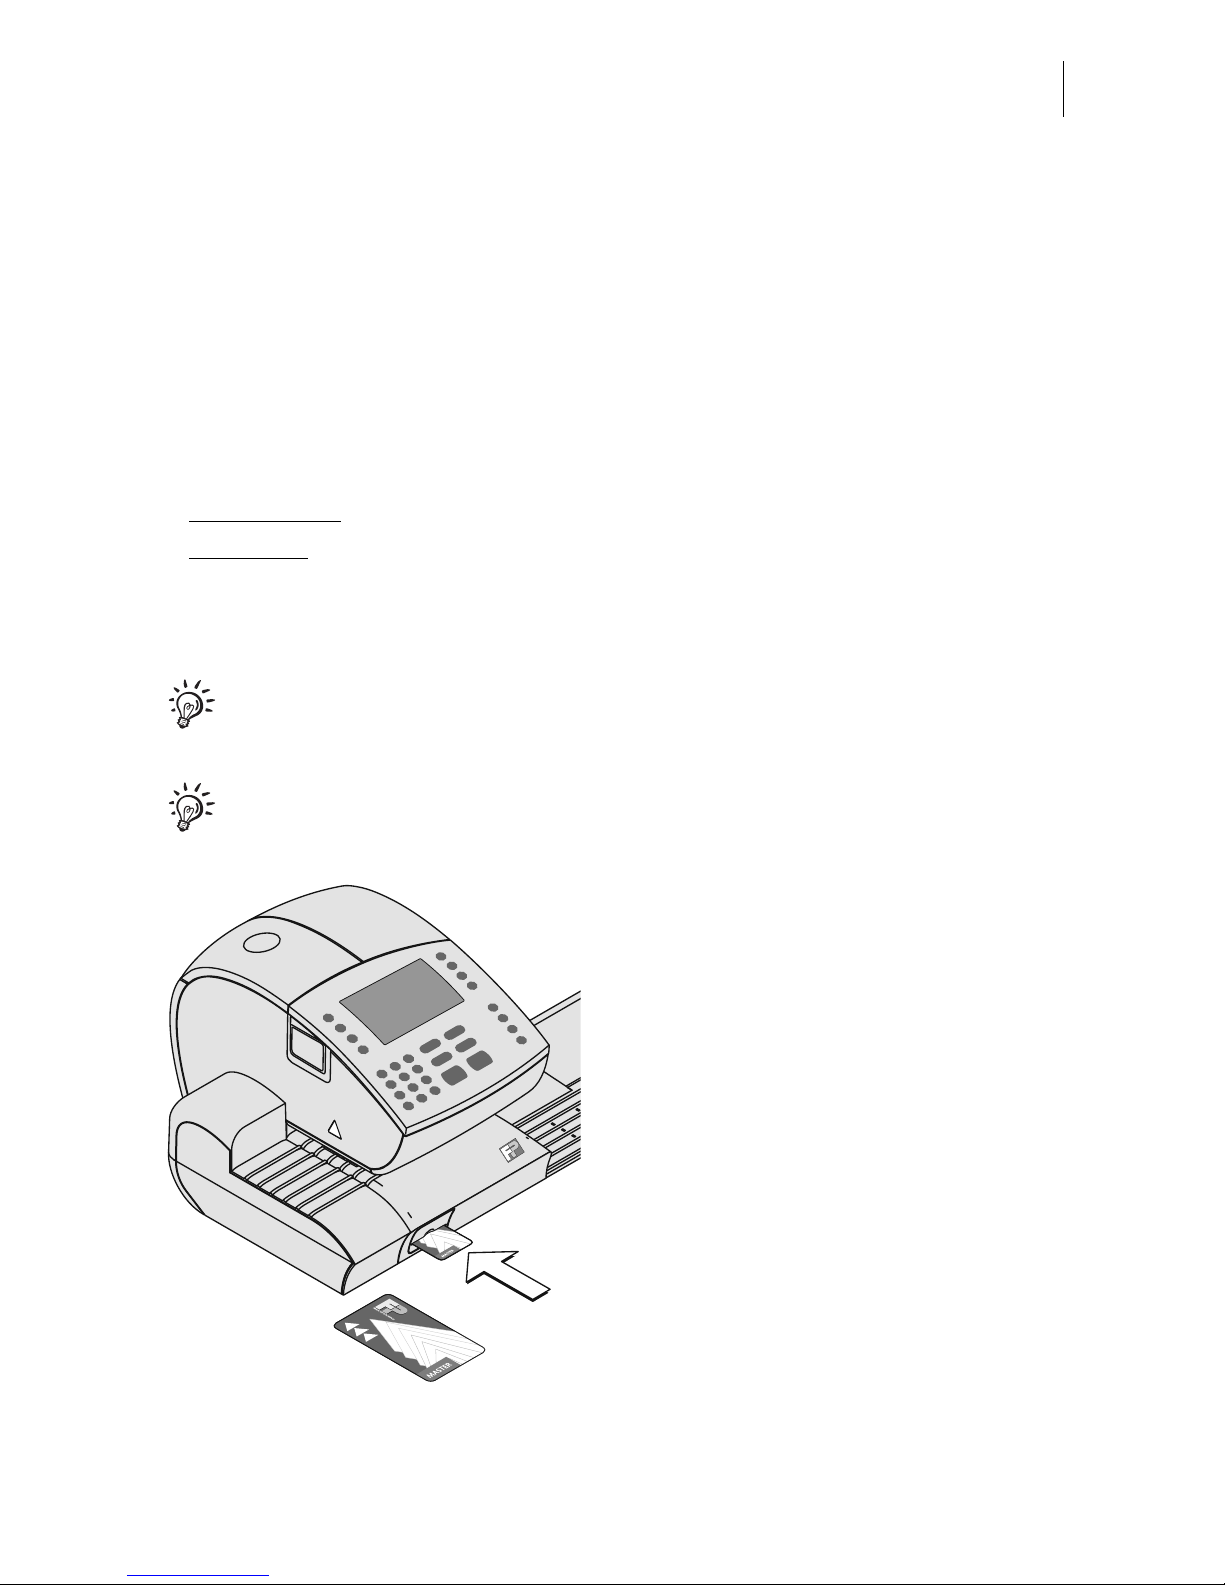
4.1 Access control by MASTER / USER card
MASTER card and USER card, both designated as access cards, control access
rights to the ultimail.
A MASTER card allows you to access all functions.
A USER card allows you to access selected functions only.
– Franking to the assigned account.
– Entering and changing of SMS texts.
– Assigning a logo and SMS text to the account.
The authorisation for franking can be set so that no access card is necessary.
Then franking will be possible without MASTER card or USER card to all
accounts (refer to chapter 10.4 on page 78).
You will find an overview of the access rights on page 192.
How to insert the access card into the
card reader
• Insert access card into the card reader
in the direction of the arrow. The chip
on the card should face downward.
• Push access card in as far as it goes.
You will feel the card snap in.
How to remove the access card
• Simply pull access card out of the card
reader.
ultimail Operator Manual
16
4.2 The operating menu
In this chapter you will get to know the home menu and product selection menu. All
other ultimail menus work in a similar way. You will soon get used to the other
windows (SET UP menu, input, prompt, error message, help).
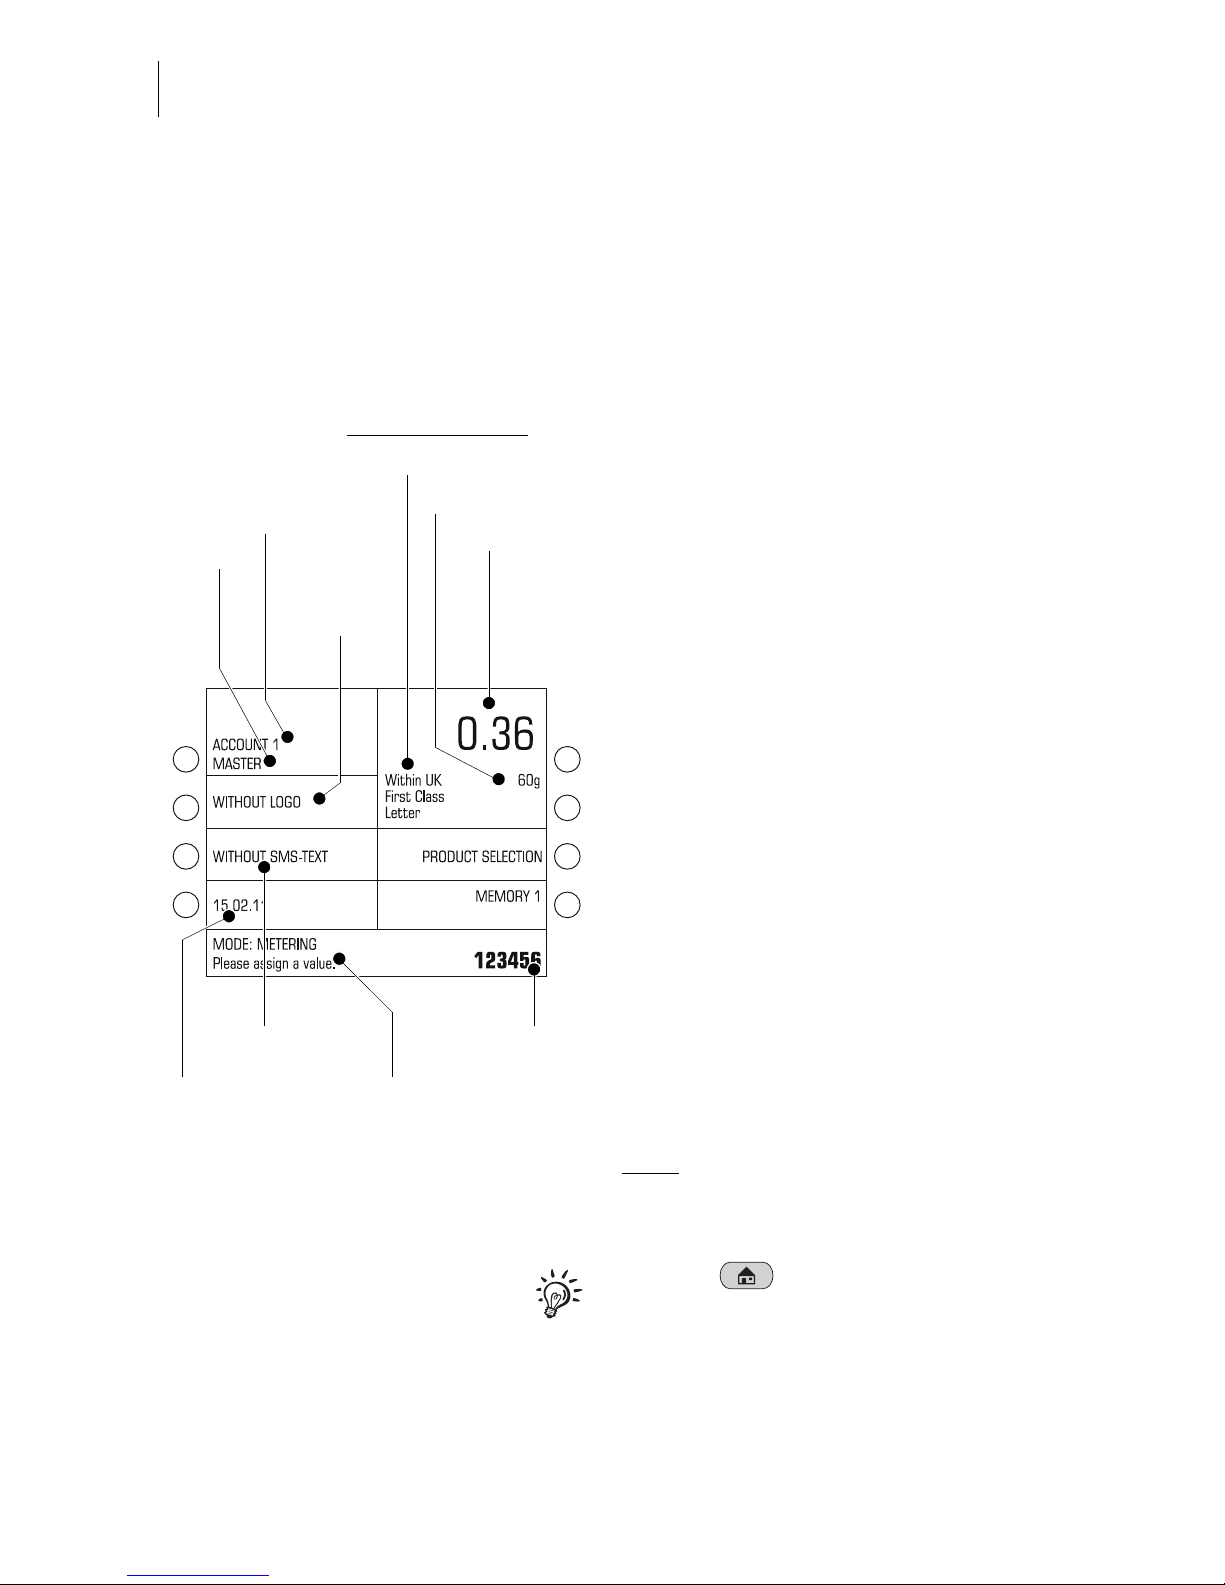
The home menu
The home menu appears after switching
on. At a glance, you will see all settings
for franking (product, date, advertising
imprint…).
A postage value only appears if
– all required mailing data are selected
– the displayed weight value exceeds 0 g
– an account is set / an access card
(MASTER or USER) is plugged in.
The keys to the left and right of the dis-
play are multi function keys (also called
soft keys). You can see the assigned
function immediately next to the key in the
display.
In the home menu, you can
– set logo, SMS text, date.
– call saved product settings (memory)
– go to product selection menu to set
mailing data
– change account (if access to this
function is permitted)
– weigh letters (ultimail with scales only)
–frank.
Note: In the ultimail user interface,
the franking mode is shown as
‘MODE: METERING …’.
With the key you go back to home
menu from other menus.´
Postage value
Status line
Current account:
Name
Mailing data
Input field
Weight
Logo
(advertising
imprint)
Product of Royal Mail:
Number
Date of
franking imprint
SMS text

ultimail operating basics 17
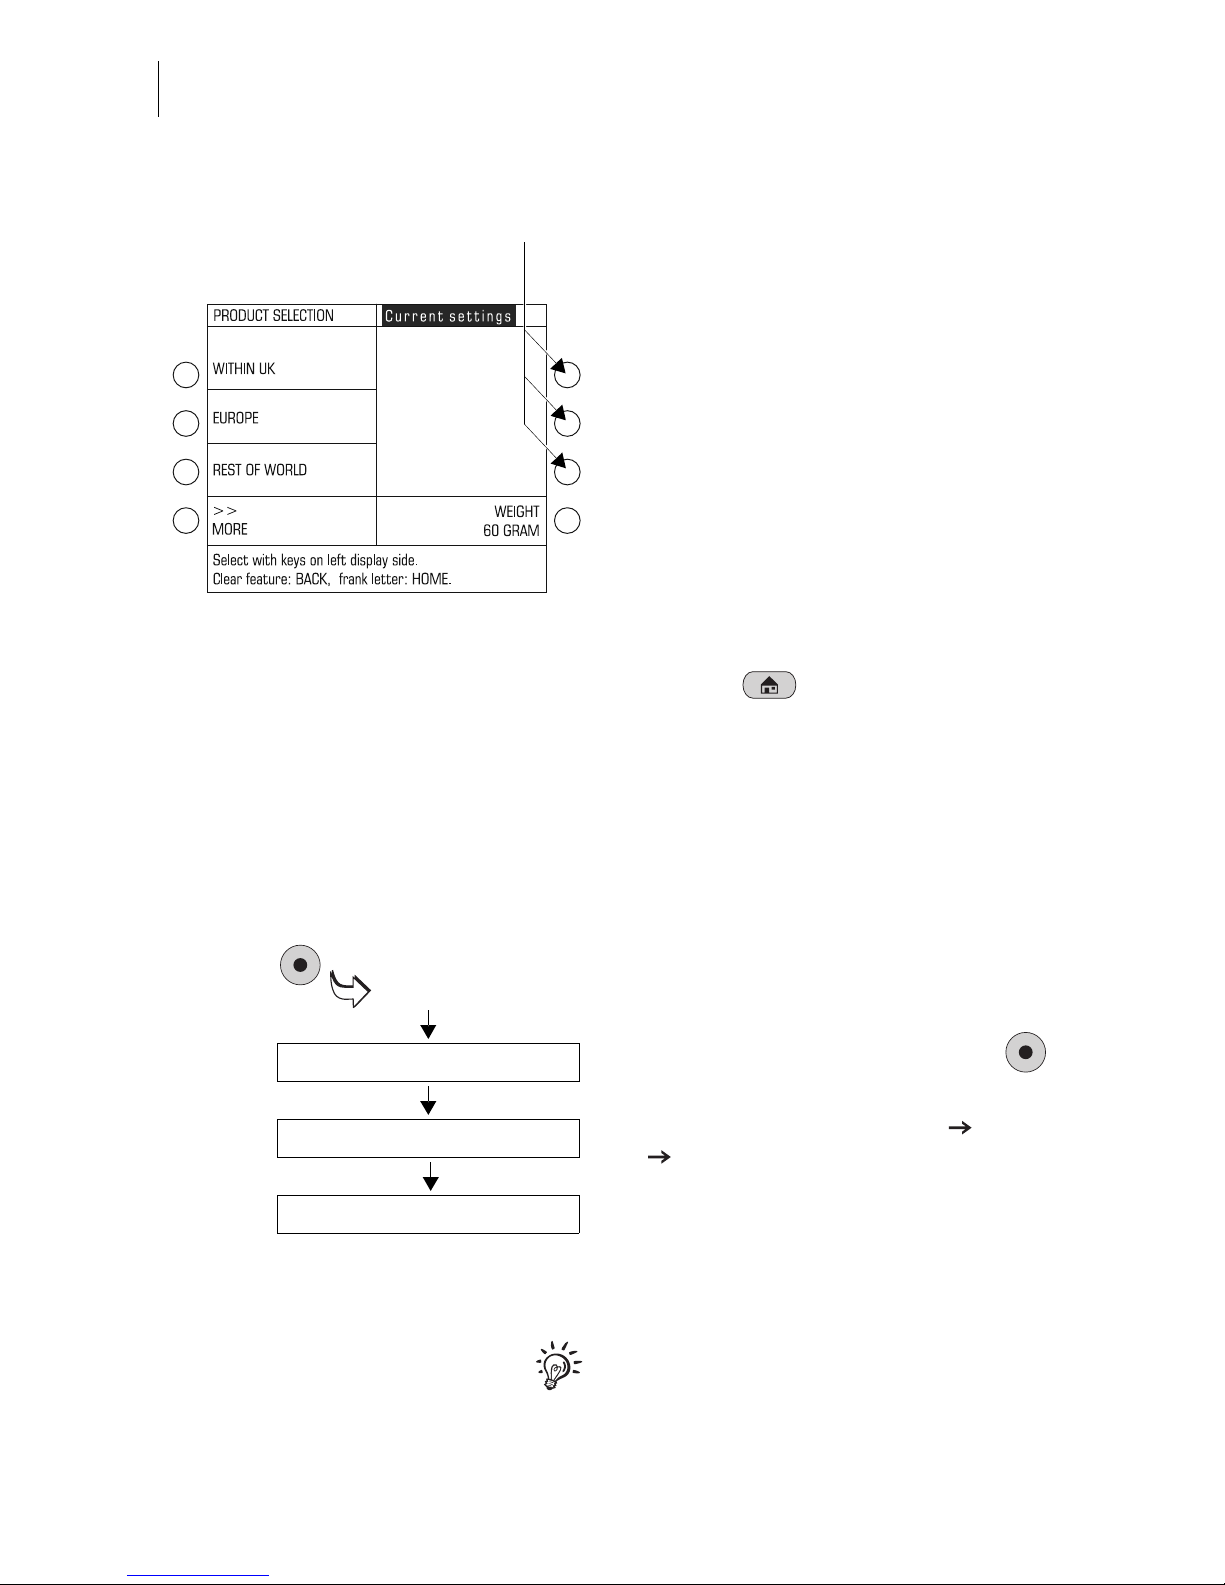
Displaying the product selection menu
Open the product selection menu where
you set mailing data and weight from the
home menu.
You can choose to
– set a new product or
– display / edit current product settings.
To set a new product press the multi
function key in the home menu to the right
of PRODUCT SELECTION. The ultimail
opens the product selection menu. The
field showing the current product settings
is empty.
To display / edit the product press one of
the two multi function keys to the right of
the product in the home menu. (These
are the two keys at the top right next to
the display.) The ultimail opens the
product selection menu displaying the
current product settings.
The product selection menu
The display field shows the current
product settings:
the postage value, all mailing data
selected, and the weight.
A postage value appears only if
– all necessary mailing data have been
selected,
– the weight displayed exceeds 0 grams,
and
– an account has been set / an access
card (MASTER or USER) has been
plugged.
The mailing data available for selection
are shown in the display left.
Displaying / editing
the set product
Setting a
new product
Mailing data available
for selection
Display field
for the current
product setting
Display field for
the set weight
ultimail Operator Manual
18
In the product selection menu you can
– select mailing data (using the multi
function keys to the left of the display).
When more than four items are avail-
able: scroll using MORE / PREVIOUS.
– manually specify the weight (using the
multi function key to the right of
WEIGHT).
– weigh letters (ultimail with scales only).
Some of the multi function keys are
without function in the product selection
menu (see the figure).
Return to home menu
• With the key you go back to the
home menu.
When you exit the product selection
menu, the ultimail saves the current
settings.
How menu sequences are visualised
The ‘path’ through the operating menu to
the different functions is represented in
this way:
• Go to the SET UP menu using the
key.
• Select SYSTEM SETTINGS MORE
TONE SIGNAL.
You will see menu names, options or
functions which you should select one
after the other by pressing the associated
multi function keys.
For fast orientation you will find an over-
view of the SET UP menu on page 194.
Multi function keys:
without function here
SET UP
SYSTEM SETTINGS
MORE
TONE SIGNAL

ultimail operating basics 19
4.3 Trial run (zero test print)
You can check the settings for franking
imprint and the print quality by doing a
trial run with postage value ‘0000’ (zero
test print).
Setting the zero test print
• In the home menu:
Press the multi function key next to
PRODUCT SELECTION.
The ultimail opens the product selection
menu.
• Scroll using MORE until the OTHER
option appears.

ultimail Operator Manual
20
• Select OTHER.
• Select ZERO TEST PRINT.
• Press the key to change to the
home menu.
The postage value for the zero test print
is set to £ 0.00.
You can feed an empty envelope for a
trial run.
Other manuals for ultimail
1
Table of contents
Popular Office Equipment manuals by other brands


Reiner
Reiner 880 operating instructions

Unisto
Unisto Translex S1 HANDLING, CARE & SAFETY INSTRUCTIONS

Anviz
Anviz FacePass Pro user manual

IAC INDUSTRIES
IAC INDUSTRIES SMS S1 SMART MOBILE STATION Assembly instructions

Royal Sovereign
Royal Sovereign EL-9DF Brochure & specs

Enwork
Enwork SKYLINE installation guide


