Fractal FM3 User manual

Manual Version 1 for FM3 Firmware 1.x

Inside Front Cover

i
Declaration of Conformity
Manufacturer’s Name: Fractal Audio Systems, LLC
Manufacturer’s Address: 4 Wilder Drive, Plaistow, NH 03865 USA
Declares that the product:
Product name: FM3 Product option: None
Conforms to the following Product Specications:
Safety: EN60065:2014
EMC: EN55013:2013
EN55020:2007+A11:2011
EN55024:2010
EN61000-3-2:2014
EN61000-3-3:2013
Supplementary Information:
The product herewith complies with the requirements of
the Low Voltage Directive 2006/95/EC
and the EMC Directive 2004/108/EC.
Clifford Chase
President / CEO
January 22, 2018
EMC/EMI
This equipment has been tested and found to comply with the limits for a Class B Digital device, pursuant
to part 15 of the FCC rules. These limits are designed to provide reasonable protection against harmful
interference in residential installations. This equipment generates, uses and can radiate radio frequency
energy and, if not installed and used in accordance with the instructions, may cause harmful interference to
radio communications. There is no guarantee that interference will not occur in a particular installation. If
this equipment does cause harmful interference to radio or television reception, which can be determined
by turning the equipment off and on, the user is encouraged to try to correct the interference by one or
more of the following measures:
Reorient or relocate the receiving antenna.
Increase the separation between the equipment and receiver.
Connect the equipment to an outlet on a circuit different from that to which the receiver is connected.
Consult the dealer or an experienced radio/TV technician for help.

ii
TABLE OF CONTENTS
1 INTRODUCTION .......................1
Welcome .............................1
Feature Summary ......................2
Quick Connect Guide ...................4
Setting Levels .........................5
Humbuster™ Cables ....................6
Mono vs. Stereo .......................6
The Home Page: Presets ................7
Layouts ..............................8
Footswitches..........................9
Expression Pedals.....................10
Global Expression Setup ................11
Global Volume Setup...................11
External Switches .....................12
USB Audio ...........................13
Fractal-Bot & FM3-Edit .................13
Intro to the Layout Grid .................14
Intro to Scenes and Channels ............15
Grid Editing: Quick Start ................16
Block Editing: Quick Start ...............16
The Fractal Audio Blocks Guide ..........17
The Footswitch Functions Guide..........18
2 HARDWARE OVERVIEW ................19
The Top Panel ........................19
The Rear Panel .......................21
3 USB ...............................23
Computer Integration ..................23
USB Audio ...........................24
Basic Playback .......................25
Basic Recording ......................25
USB Re-Amping .......................26
4 SETTING UP.........................27
General Principles .....................27
FRFR/Direct..........................28
Basic Recording Setup .................29
Third-Party Audio Interface..............29
Neutral (FRFR) Power Amp & Speakers.....30
Traditional Guitar Power Amp & Speakers ..31
Front-Of-House + Personal FRFR Monitor ... 32
Front-Of-House + Guitar Speaker Backline ..33
FX Processor Only (“Pre”) ...............34
FX Processor Only (“Post”) ..............35
Four-Cable Method (“4CM”) .............36
Inserting Outboard Gear ................37
Electric And Acoustic ..................38
5 PRESETS ...........................39
Overview ............................39
The Layout Grid ......................40
Working with Blocks ...................40
Connector Cables .....................42
Block Inventory .......................44
Example Preset Grids ..................45
Editing Effect Blocks...................46
Saving Changes.......................47
Preset CPU Limits .....................48
6 SCENES & CHANNELS .................49
How to Change A Block’s Channel ........50
Setting Up Channels ...................50
Selecting Scenes......................51
The Default Scene.....................51
Selecting Scenes & Channels Remotely ....52
Program Change Mapping...............53
Transmitting MIDI With Scenes...........53
Scene levels .........................53
Scenes, Channels & Modiers............54
Scene Revert .........................54
7 LEVELING PRESETS ...................55
A Method for Leveling..................56
Bypass and Level .....................57
TIP: Page numbers in this Manual are linked to the Table of Contents.

iii
8 BLOCKS ............................58
9 MODIFIERS .........................59
Creating a Modier ....................59
Modier Tutorial: Wah Pedal .............60
Modier Tips And Tricks ................60
Modier Sources Overview ..............61
Modier Parameters ...................62
Internal Controllers ....................65
Control Switches......................66
Metronome ..........................67
External Controllers....................67
Modiers List ........................67
Tutorial: Scene Controllers ..............68
10 LAYOUTS & SWITCHES................69
The Master Layout Menu. . . . . . . . . . . . . . . . 69
Tap & Hold Functions ..................70
Factory Default Layouts ................71
Easy (“EZ”) Edits ......................73
Layout Views.........................74
The Layouts List ......................75
Edit a Layout .........................76
Naming Layouts ......................77
Startup Layouts.......................77
Backing Up Layouts....................77
Edit a Switch .........................78
Per-Preset Switches ...................79
Stand-In Switches .....................80
Using the FM3 with an FC Controller.......81
FM3 Footswitch FAQ ...................82
11 TEMPO. . . . . . . . . . . . . . . . . . . . . . . . . . . .83
Synchronizing Sound Parameters .........84
12 TUNER ............................85
Advanced Tuner Functions ..............85
Mini Tuners ..........................86
13 SETUP MENU .......................87
FC Controllers/Onboard Switches Menu....87
The Global Settings Menu...............89
The I/O Menu ........................92
The MIDI/Remote Menu ................95
The Utilities Menu .....................99
14 ADDITIONAL TOPICS ................100
Fractal-Bot..........................100
Backing Up & Restoring................100
Firmware Updates ....................101
Recovery ...........................102
Getting Help ........................102
Foot Control Tutorial ..................103
Loading User Cabs ...................107
Axe-Change.........................108
Frequently Asked Questions ............109
Shortcuts...........................111
Spillover ...........................112
Sending and Receiving MIDI ............113
MIDI Reference Tables ................115
15 SPECIFICATIONS ...................118
MIDI Implementation..................120
WARRANTY .........................121
EULA ..............................122

iv
WARNING: To reduce the risk of re or electric shock, do not expose this appliance to rain or
moisture.
CAUTION: To reduce the risk of re or electric shock, do not remove screws. There are no user
serviceable parts inside. Refer servicing to qualied service personnel.
Legal Notices
Fractal Audio Systems FM3 Owner’s Manual. Contents Copyright © 2019. All Rights Reserved.
No part of this publication may be reproduced in any form without the express written permission of Fractal Audio Systems.
Fractal Audio, the Fractal Audio Systems logo, Axe-Fx, FM3, Humbuster, UltraRes, FASLINK are trademarks of Fractal Audio Systems. Manufacturer names
and product names mentioned herein are trademarks or registered trademarks of their respective owners, which are in no way associated with or afliated
with Fractal Audio Systems, LLC. The names are used only to illustrate sonic and performance characteristics.
Important Safety Instructions
1. Obey all warnings on the FM3 chassis and in this User Guide.
2. Keep away from sources of heat such as ducts, registers or appliances that produce heat.
Do not obstruct or cover over the side or bottom ventilation holes.
3. Connect only to a standard grounded AC outlet of 100–240V, 47–63 Hz.
4. Keep the power cord in good condition. Do not kink, bend, or pinch.
5. If the cord becomes damaged, discard and replace it.
6. If not using your FM3 for extended periods of time, disconnect from AC power.
7. Protect the unit from rain and excessive moisture.
8. Refer servicing to qualied personnel only.
9. Stop operation of the unit and obtain service if:
- Liquids or excessive moisture enter the unit.
- The unit operates incorrectly or performance is inconsistent or erratic.
- The unit has been dropped and/or the enclosure damaged.
10. Prolonged exposure to high volume levels can cause hearing damage and/or loss.
The use of hearing protection in high volume situations is recommended.
A Manual for Online and Print Use
This manual is intended for use in desktop, tablet, and smart phone readers. It includes clickable links and bookmarks to make navigation
and cross-reference easy. We recommend against printing, because rmware updates tend to make older manual versions fall out of date.
That said, considerations have been taken for those who prefer paper. You are granted permission to print this PDF for personal use only.
A copy center or online printer can print and bind a book for you from the PDF le. Hopefully those with screen readers can forgive the
changes made herein to accommodate the print version: all links also include a page or section numbers, page spreads have extra margins
towards the binding edge, and blank pages have been included to preserve page and chapter flow.

1
1 INTRODUCTION
Thank you for choosing the Fractal Audio Systems FM3, an all-in-one amp modeler, effects processor and foot
controller based on the award-winning Axe-Fx III and its companions, the FC-6 and FC-12. The new FM3 places
some of our best technologies into a highly portable, “grab-and-go” format. It is ruggedly built to withstand the
rigors of touring, while still delivering the nuance, accuracy, and sound quality that have earned Fractal Audio its
place in the world’s top studios and on stage with some of the biggest tours in the world. Never before have we
offered so much in a unit so compact as the FM3.
Sonically, the FM3 is the direct descendant of our flagship, with an ultra-high quality signal path and the latest
ARES amp models. FM3 also includes many of our most popular features like scenes, channels, modiers, flexible
routing, footswitch layouts, USB recording/re-amping/playback, and much more. It is expandable with a FASLINK™
II port supporting up to two FC controllers for up to 24 additional footswitches. It is also cross-compatible: FM3-
Edit not only delivers everything you’ve come to expect from our best-in-class software, but even converts Axe-Fx
III presets for the FM3 (and vice versa).
FM3 truly demonstrates that good things come in small packages. No other platform offers the same sonic
performance while being as flexible and fun. This unique combination has made Fractal Audio the tool of choice
for some of the world’s mightiest guitar heroes, yet we also hear again and again from “weekend warriors” who
tell us that our products make them “a better player,” on a permanent honeymoon, in love with their tone.
Whether you want the pure simplicity of a great guitar straight in to a classic amp, or choose to venture into totally
unexplored sonic territory, the FM3 delivers the legendary Fractal Audio experience — and ts it in a backpack.
We hope you enjoy using it as much as we have enjoyed creating it.
Fractal Audio Systems
January 2020
WELCOME
1 INTRODUCTION

2
1 INTRODUCTION
FEATURE SUMMARY
The FM3 is powered by a 3-Core “Grifn” DSP with one ARM
and two SHARC+ cores, plus a GPU. It is the only product
of its kind to feature Fractal Audio’s ARES amp modeling,
cab sims, and legendary stompbox and studio effects.
Durable steel chassis with protective endcaps
designed to withstand the rigors of touring.
FM3 features an ultra-high-quality signal path
for extremely low THD and noise floor.
FM3 features our “crown jewel”: ARES amp modeling
technology developed for the Axe-Fx III. ARES captures
the sound and feel of real tube amps, with hundreds of
models offering an impressive range of clean tones, elusive
“edge of breakup”, and everything from warm, touch-
sensitive overdrive to face-melting modern distortion.
The FM3 Cabinet Simulator block loads up to two
impulse responses for extremely accurate response
and dynamic remixing including visual phase alignment.
2,048 factory cabs include every option from the Axe-Fx
III plus all 189 “Legacy” Cabs from the Axe-Fx II/AX8.
1,024 User Cab memory locations allow you to load
Cab Packs and other 3rd party IRs. Compatible
formats include, .ir, .syx, and .wav; Sixteen Scratchpad
memories are provided for experimentation.
As a multi-effects unit, the FM3 includes a superb
selection of state-of-the-art “blocks” based on those from
Axe-Fx III, including 42+ drives, 50+ reverbs, 30+ delays,
compressors, EQs, lter, chorus, flanger, phaser, pitch
shift, rotary, tremolo, synth, wah and many more.
Input and Output blocks provide incredibly flexible
routing, with setup diagrams included for FRFR, direct
FOH plus “live” power amp and guitar cabs, creating an
“FX Loop” for pedals, simultaneous electric and acoustic/
piezo, the popular “four cable method”, and more.
512 Preset memories can each store an entire rig
with its own amp, cab, effects, and much more.
12×4 layout grid, with “Zoom Out” option to show the
entire grid on one page, including VU meters!
Eight nameable “Scenes” per preset eliminate “tap
dancing” and allow for quick sound changes – including
easy “spill-over” of effects like delay and reverb, plus
Scene MIDI messages for complete rig integration.
“Channels” give each block up to four different sound
settings. One drive block, for example, can provide four totally
different drive pedal sounds with no extra CPU “cost.”
Easy-to-read, precision full-screen tuner includes
a bar graph and virtual strobe display.
4×4 USB audio capabilities allow for recording,
playback, re-amping and more.
FM3 features our latest interface and navigation controls,
featuring the same custom color display as the flagship
Axe-Fx III, with ve knobs with on-screen labels providing
instant access to both turn and push functions.
Dedicated hardware navigation controls for NAV, VALUE and
PAGE provide great ergonomics and efciency, plus instant
familiarity to those coming from another Fractal Audio product.
Three onboard footswitches use our “FC” system for extreme
flexibility, with nine layouts containing 12 switch denitions
each. A new “Views” feature maximizes the utility of FC Layouts.
Each footswitch has its own mini LCD display to show
the function of the switch, plus a variable color LED ring
which shows the category and status of the switch.
Every switch can have its own fully-customizable tap and
hold functions. Change presets, banks, scenes, effects,
channels, operate the looper, tuner, tap tempo, and more.
Per-Preset Switches: any preset can cleanly and easily override
any footswitch in any layout, providing incredible flexibility.
Modular Control! Those who wish for more footswitches
can use FASLINK™ to connect one or two FC-6 or FC-12
controllers. These integrate seamlessly with onboard
switches and also offer additional switch/pedal jacks.
Two pedal jacks each allow connecting external switches
or expression pedals like the Fractal Audio EV-1 or EV-2.
Four top panel LED input meters plus two output “clip” LEDs
provide visibility of critical levels. Onscreen animations
show level for every block, input, output, and more.
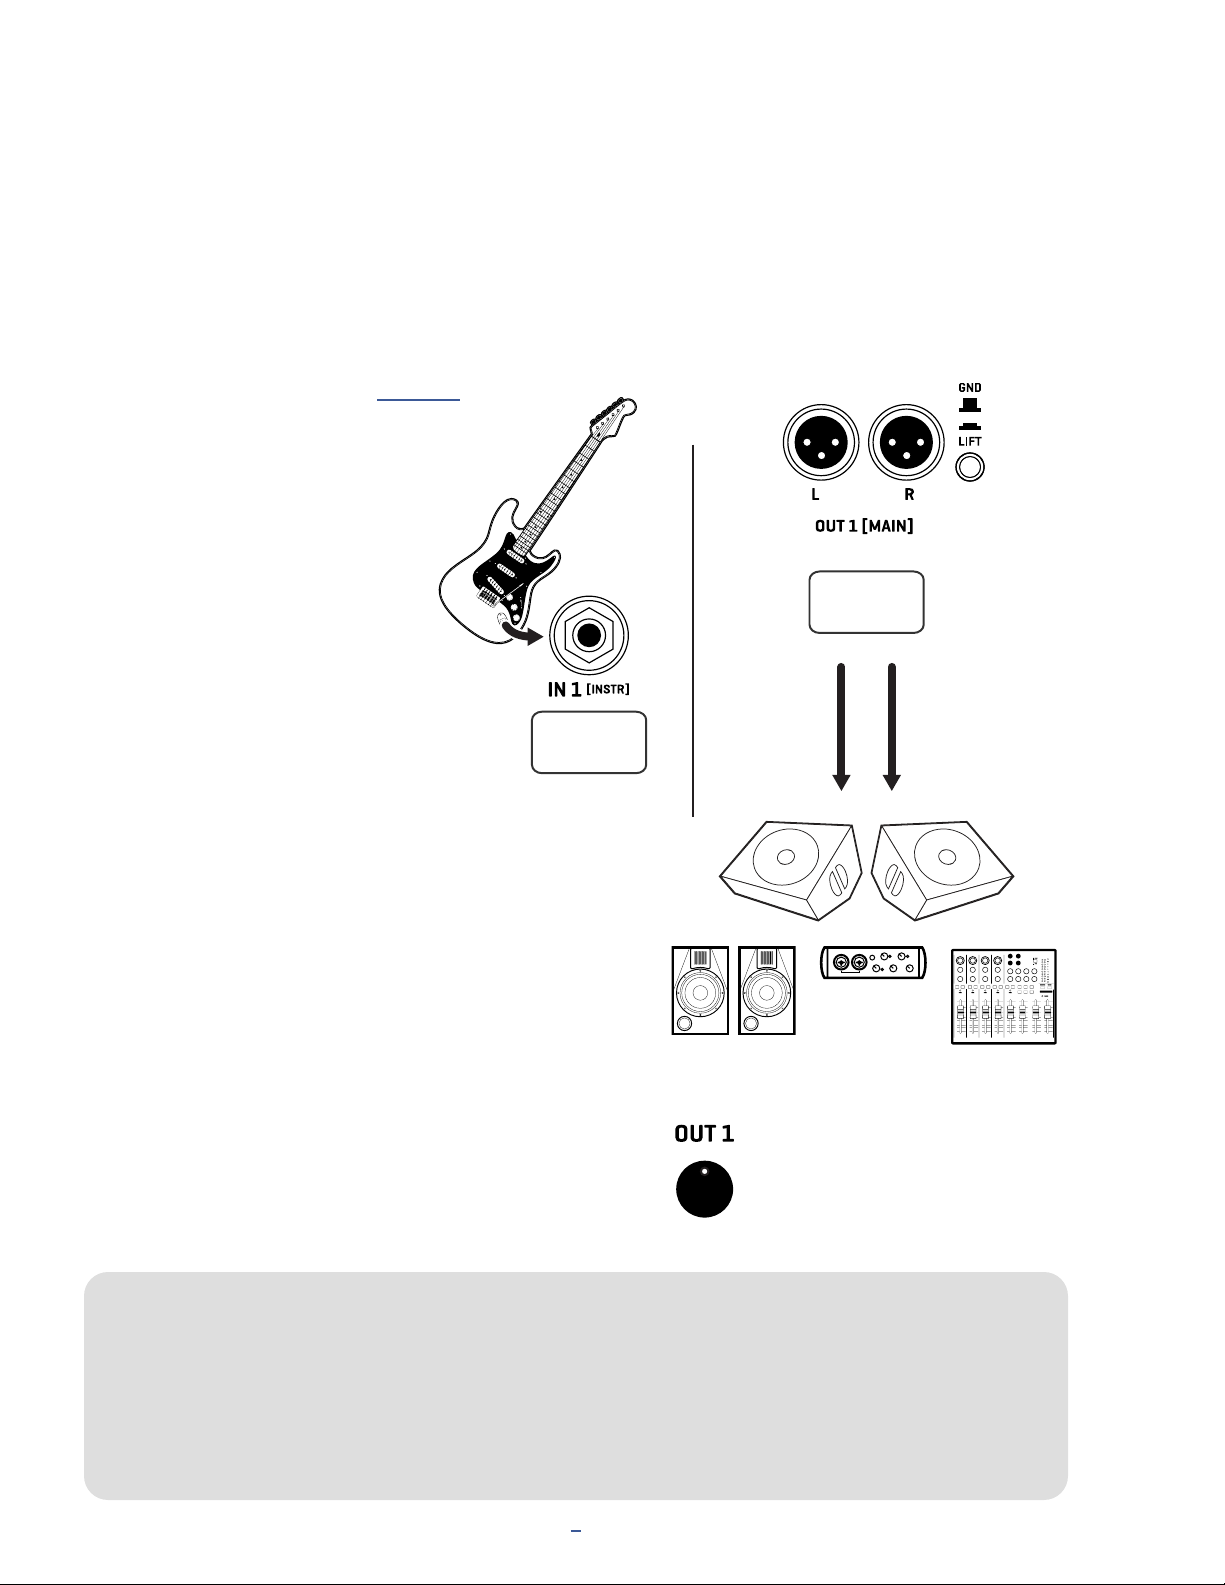
Input 1 is ultra-low noise, with a 1/4” mono Instrument
input featuring “Secret Sauce IV” for optimized signal
from your guitar or bass. Output 1 is Stereo, with
Balanced XLR jacks, plus a stereo headphone out.
Input 2 is Stereo, with balanced 1/4” inputs.
Output 2 is Stereo, with 1/4” designed for “unity gain”
with the knob “wide open”, and featuring Humbuster™
technology to help combat noise from ground loops.
An independent SPDIF output can transmit a choice of signals.
MIDI IN and combination OUT/THRU ports, backed
by a rich MIDI implementation with extensive MIDI
transmit and remote-control possibilities.
“Client-Server” architecture allows multiple FC series
foot controllers and FM3-Edit to control the FM3 and
update each other seamlessly and instantly.
A connected computer allows the use of FM3-Edit, our
world-class editor for Mac and PC, and Fractal-Bot,
for rmware updates plus backup and restore.
FM3-Edit allows FM3 to load Axe-Fx III presets, within
the limits of local block and CPU resources.
A built-in backup rmware ROM allows recovery
in the event of complications during an update
without the need for professional service.
The FM3 has upgradeable rmware allowing for
constant improvement and innovation.

3
1 INTRODUCTION
THE SETUP MENU
Throughout this manual, you will be directed to the SETUP menu of the FM3 for a range of options including
I/O, MIDI, global settings, and more. The SETUP menu includes the following areas:
The FC Controllers/Onboard Switches menu includes all settings for the onboard switches or a
connected FC controller.
The Global Settings menu includes options which govern the global behavior of the FM3.
The I/O menu contains settings for all inputs and outputs, including levels, audio options, and
switches or expression pedals connected directly to the FM3.
The MIDI/Remote menu contains MIDI settings, plus several pages of remote controller assignments
for the many remote-controlled functions of the FM3.
The Utilities menu contains readouts, utilities, and a control to adjust screen brightness.
To access and use the SETUP menu:
Press HOME.
Push the “E” soft knob for the SETUP main menu.
Use the NAV buttons to select a sub-menu and press ENTER to make a selection.
Use PAGE and NAV buttons to get around. Use VALUE and knobs A–E to make changes.
You never need to store changes to the SETUP menu. All changes take effect immediately.
Press HOME at any time to return home.
Use these links for instant access to the SETUP menu topics in this manual:
SETUP
FC Controllers/Onboard Switches p. 87
Global Settings p. 89
I/O p. 92
MIDI/Remote p. 95
Utilities p. 99

4
1 INTRODUCTION
QUICK CONNECT GUIDE
Perhaps the best and most flexible way to enjoy your FM3 is through a full-range system such as studio monitors,
a high-quality PA, or full-range cabinets designed specically for guitar. All of the factory presets are designed for
this type of setup.
The FM3 is incredibly flexible, however, and many other types of setups are supported, including those which
integrate with tube amps, USB recording, 3rd-party outboard equipment, and much more.
Find additional setup diagrams in Section 4.
The most basic setup instructions appear below:
FRFR = "Full Range, Flat Response"
FRFR stands for “Full-Range, Flat Response,” used to describe a system which aims to reproduce the entire
audio spectrum without compromise. In comparison, most traditional guitar speakers have limited range
-- they cannot reproduce extended lows and highs -- and are not at all “flat” -- meaning some frequencies
are markedly louder or quieter. Full-range flat response studio monitors, high-quality PA speakers, and FRFR
speakers designed specically for guitar should be able to reproduce anything you send to them. Of course,
even these may vary, depending on which brand and model you choose.
qBegin with all level knobs turned down.
Connect your guitar to FM3
Instrument input (Input 1).
The FM3 is also perfect for bass
and other instruments.
wConnect Output 1 to your mixer, studio
monitors, audio interface, PA system, full-
range speakers, power amp inputs, etc.
• For a mono rig, use Out 1 Left.
• For optional stereo, connect Out 1 Right.
• Use XLR-to-XLR cables or XLR-to-
TRS cables when connecting to
balanced inputs. Use XLR-to-1/4"
(TS) cables for unbalanced inputs.
eSlowly turn up the front panel OUT 1
knob and adjust the level on your monitors as desired.
Explore factory presets by turning the VALUE wheel.
Select Scenes within a preset by using NAV Up/Down.
IN 1
OUT 1
Use
Out 1 L
for
Mono
FRFR speakers, Studio Monitors
Audio Interface or Mixer
Add
Out 1 R
for
Stereo
The front Out 1 knob adjusts the
level of what you hear in this setup.

5
1 INTRODUCTION
SETTING LEVELS
Setting proper levels is critical, but easy, with abundant meters to inform you about levels on the FM3.
INPUT LEVELS
The FM3 comes ready-to-use for the typical guitar with passive pickups. To check levels,
connect a guitar to INPUT 1. Choose your loudest pickup setting and set all the guitar
controls to “wide open.” Play loud, open chords to push the levels as you watch the
IN1[INSTRUMENT] meter LEDs. It’s OK to tickle the red LED once in a while, but if actual
clipping occurs, you must pad the input as follows:
Open the SETUP: I/O: Audio menu page.
Navigate to the INPUT 1 PAD parameter. Turn the VALUE knob to increase this setting. The
possible values are 0dB, 6dB, 12dB, and 18dB. Be aware that as you increase this setting you also
increase the noise floor, so set it as close to 0 as possible for the best signal-to-noise ratio.
Input 2 can be adjusted with its own Input 2 Pad parameter on the same menu page.
You can also monitor all levels on the Meters page of the Home menu (shown below).
Input Pad adjustments do not affect gain levels or what you hear. As you pad the input of the A/D
converter, the output is boosted by the same amount. This eliminates clipping but ensures unity gain.
OUTPUT LEVELS
Output levels are easy to monitor by
paging to the Meters page of the Home
page. Should your output levels be too
high, the OUT 1 CLIP or OUT 2 CLIP
LEDs on the front panel will light. If you are clipping the
outputs, you will need to lower the level INSIDE your
presets. The top panel OUT 1 knob comes after the
converters and only affects the level of what you hear.
Output 1 is ready to be connected to consumer
line level inputs (-10 dbV). If you are connecting to
professional-grade equipment operating at +4dBu, set
the nominal output levels as follows:
Page SETUP: I/O: Audio
Adjust Output 1: Output Level to +4dBu.
Learn more about the I/O Menu on p. 92
Section 7: 7 Leveling Presets is dedicated to the
subject of adjusting preset levels.
Output 2 is designed so that turning the OUT 2 knob all
the way up produces a unity gain signal.
The Meters page of the Home menu shows all I/O levels.
The Layout also has a Meters view showing block levels.

6
1 INTRODUCTION
HUMBUSTER™ CABLES
For OUTPUT 1, use XLR-to-XLR or XLR-to-1/4" TRS cables when connecting to balanced inputs.
Use XLR-to-1/4" (TS) cables when connecting to unbalanced inputs.
For OUTPUT 2, standard 1/4" (guitar) cables may be used, but there is a better option. Humbuster™ cables can
signicantly reduce unwanted hum due to ground loops. A Humbuster cable has one TRS end (like a balanced
cable) and one TS end (like a guitar cable). The TRS end connects to the FM3. The TS end connects to your amp
or other device.
Humbuster cables are available from http:/www.fractalaudio.com/cables. You can make your own by following
the diagram below. Be sure to use high-quality connectors and shielded cable.
The FM3 comes pre-congured for stereo but you can connect it in mono with no issues. If you
are NOT running in stereo, you may nd that certain presets or settings produce unexpected
results. For example, a panner sounds like a tremolo when one channel is missing. A ping-pong
delay may ping but never pong. Stereo enhancers or certain types of modulation may not be
apparent at all. Tone may change completely if amps or cabs have been hard panned. Here is
an overview of several scenarios, with recommended settings for each.
MONO VS. STEREO
Stereo: No special settings required.
Half-Stereo: Leaving the FM3 in its default stereo conguration but connecting only
one (Left) output results in a “half-stereo” setup. This works ne, aside from the
exceptions mentioned above (ping-pong, panning, etc). No special settings required.
Dual Mono: If you want to force your rig to mono, dual mono is a good choice. Sonically, this
is identical to half-stereo, with the same limitations, except that mono signal is produced
at both the left and right jacks so you can connect to two monitors. To switch to dual
mono, open SETUP: I/O: Audio and set Mode for the desired output to “COPY L->R”.
Summed Mono: In this setup, left and right channels are added together resulting in an identical
mono signal at both left and right outputs. This has the advantage of not discarding half of
the sound, but summing has its own issues. For example, short delays or phase differences
between channels can result in strange artifacts or even cancellation. To switch to summed
mono, open SETUP: I/O: Audio and set Mode for the desired output to “SUM L+R”.
On the FM3, a flexible block-based I/O system makes it easy to use different outputs with different
settings. See the “The Fractal Audio Blocks Guide” for more on Input and Output Blocks.
All options of the I/O menu under SETUP are detailed in Section 13: Setup Menu.
TIP TIP
RING
SLEEVE SLEEVETR
S
T
S

7
1 INTRODUCTION
THE HOME PAGE: PRESETS
Once you have connected your FM3 you can begin to audition factory preset sounds. Remember that aside from
a few templates, the factory presets are designed for use with full-range speakers / monitors / headphones. (See
Section 4 for details on many other types of setups.)
The FM3 contains 512 preset memories, each like a fully independent rig with its own amps, cabs, effects,
settings, controllers, and more. When you consider everything that is possible with Scenes and Channels, a single
preset can cover an entire song, or even a whole show.
Here’s how to explore the factory presets:
Press HOME to show the Home page,
where you can switch presets.
To change presets, turn the VALUE
knob or use the NAV buttons.
Many factory presets contain extra Scenes.
You can switch between Scenes using the NAV buttons or by
turning knob A.
See p. 15 for an introduction to Scenes.
OTHER HOME MENU FUNCTIONS
The push functions of the ve knobs on the Home page of the Home menu provide access to other areas:
Tuner
Layout grid (p. 14 and p. 40)
Controllers (p. 65)
FC Per-Preset (“Per-Preset Switches” on p. 79; also “The Footswitch Functions Guide” on p. 18)
Setup (p. 3 and p. 87)
Turning knob Echanges between different foot control “Layouts” (p. 69).
A mini-Tuner appears at the top of the Home page itself in the form of two
green triangles. When both are shown, the note is in tune.
The Home menu also provides access to the Presets directory page,
listing all presets in a scrolling list sorted by number.
PAGE to the Presets page to show the directory.
To sort alphabetically by name, press the “Sort A–Z” button.
The ENTER key loads the selected preset and returns to the Home page.
The Meters page provides visual indication of all input and output levels, including USB.
Previous Scene
Previous
Preset
Next
Preset
Next Scene

8
1 INTRODUCTION
LAYOUTS
The FM3 is based on our popular FC controllers. The central concept behind all these products is the footswitch
Layout. A layout is a set of 12 footswitch denitions. You can change the layout to change what the footswitches
do. All layouts and switches can be completely customized. The FM3 provides eight layouts in total, plus one
special “Master” layout (covered below). Layouts have both numbers and names to make them easier to manage.
There are multiple ways to change the layout on the FM3. The easiest is probably to turn knob E from the Home
page of the Home Menu. You wouldn’t be able to do this easily while you are playing, however, so we created the
Master Layout Menu and Layout Switches so you can select layouts with your feet.
THE MASTER LAYOUT MENU
Let’s look at the Master Layout Menu or “MLM” and how to use it:
qPress and hold footswitch 2 in any normal layout
to enter the Master Layout Menu (“MLM”).
wTAP any footswitch on any MLM page to select a
new layout and exit the MLM.
eWhile you’re in the MLM, hold the left or right switches to step through
three different “views” -- each with its own menu choices shown below.
The layouts themselves are detailed on p. 71.
Learn more in Section 10: Layouts & Switches.
PRESS
AND
HOLD
PRESS
AND
HOLD
PRESS
AND
HOLD
PRESS
AND
HOLD
PRESS
AND
HOLD
PRESS
AND
HOLD
PRESS
AND
HOLD
LAYOUT 1:
PRESETS
LAYOUT 4:
CHANNELS LAYOUT 7:
PERFORM
LAYOUT 3:
EFFECTS LAYOUT 6:
PER-PRESET
MLM1 MLM2 MLM3
MLM1MLM3
--
LAYOUT 2:
SCENES LAYOUT 5:
LOOPER LAYOUT 8:
UTILITIES

9
1 INTRODUCTION
FOOTSWITCHES
The FM3 has three built-in footswitches, each with its own mini-display and vari-color LED ring. Footswitches
can be used to change presets, select scenes, toggle effects, and much more. This page introduces the basic
concepts, while Section 10: Layouts & Switches covers this subject in more detail.
SWITCHING PRESETS
Let’s begin with how to explore the factory presets using the footswitches.
When the FM3 starts up, it loads the PRESETS footswitch layout. In this layout, the three footswitches each select
a single preset. Preset names are shown in the mini-displays. The current preset will have a bright ring and the
others will be dim.
A “bank” is a group of three presets. To change to the next bank of three presets, press and hold the right
footswitch. To change to the previous bank, press and hold the left footswitch.
You can use the MANAGE PRESETS feature of FM3-Edit to drag and drop presets of the FM3 into any order
you wish. Put your favorites in groups of three so you’ll have what you need without a lot of bank changes!
Deluxe Verb Plexi 50W FAS Modern
The FM3 boots up to the Presets footswitch layout.
In this layout, three footswitches select three different presets.
Press and hold the right switch
to load the next bank of three presets.
Press and hold the left switch
to load the previous bank of three presets.
FOOTSWITCH FUNCTIONS
Every footswitch in every layout (see next page) can have its own independent functions for Tap and Hold
Function. Functions are arranged in Categories like “Presets”, “Scenes”, or “Effects”.
LED RING COLORS
Every footswitch Category has its own default LED ring color. You can change these default colors on the Ring
Colors page of the FC Controllers/Onboard Switches menu under SETUP. You can also change the color of any
individual switch. See “Edit a Switch” on p. 78.
MINI DISPLAYS
The Mini-Display for each switch shows a label for the Tap function. While the switch is depressed — even for a
normal “tap” — the label changes momentarily to show the Hold function.
See “The Footswitch Functions Guide” for more information.

10
1 INTRODUCTION
TO CONNECT & CALIBRATE AN EXPRESSION PEDAL...
Expression pedals should have a linear resistance taper and must have a maximum
resistance in the range of 10–100kΩ. Expression pedals must be used with Tip-Ring-
Sleeve (TRS) cables.
Connect your expression pedal to one of the FM3 Pedal jacks with a TRS cable, then
follow these instructions:
1. From the Home page, open SETUP: I/O: Pedal.
2. For pedal jack 1, set Pedal 1 Setup to “PEDAL 1 (EXP/SW TIP)”
(or use Pedal 2 Setup if that’s the jack you’re connecting to)
3. Navigate down to the Calibrate function for your pedal and press the ENTER.
4. Follow the on-screen instructions to perform calibration. Press HOME to nish.
Be sure to see the next page for instructions on assigning your new pedal.
If something doesn’t work, check a different pedal or cable!
FRACTAL AUDIO EV PEDALS
The Fractal Audio Systems EV series of
expression pedals are perfect for use with all
Fractal Audio Systems products. The EV-1 is
a full-sized expression pedal. The EV-2 is a
compact version. These pedals feature rugged
cast metal casings, a high quality 100kΩ
potentiometer, and built-in analog volume
pedal capability.
Learn more at https://www.fractalaudio.com
EXPRESSION PEDALS
WHAT IS TRS? “TRS” stands for TIP-RING-SLEEVE and describes the
conguration of a 1/4" end plug or jack with three connectors. Normal guitar cables
are “TS” (Tip-Sleeve) since they lack the ring required for a third contact. Expression
pedals require TRS cables because full control voltage is transmitted to them on
one contact (the tip), while less than full voltage is returned to on another (the ring)
so the host device is able to sense and utilize the pedal position. The third contact
(sleeve) is connected to ground.
This section is for pedals connected to the local “Pedal” jacks of the FM3.
For pedals connected to an FC Series controller, see your FC Owner’s Manual.
FM3
EXPRESION
PEDAL
TRS
PEDAL JACK
TRS
FM3
SINGLE SWITCH
(TIP)
TS TRS
PEDAL JACK
TS
Guitar Cable
Insert Cable
TRS Cable
TRS
TRS
TRS Cable
TS TS
FM3
PEDAL JACK PEDAL JACK
SWITCH
(TIP)
SWITCH
(RING)
“DUAL”
SWITCH
Some “Dual”
switches work
over a single
TRS cable.
Each of the two Pedal jacks of the FM3 support one expression pedal (or 1 to 2 switches).

11
1 INTRODUCTION
GLOBAL VOLUME SETUP
The FM3 allows global remote control of the volume at any input or output via a pedal or MIDI CC of your choice.
To set up a pedal for global volume, follow the instructions below. Be careful that you don’t accidentally assign
the same pedal to both Volume and an External Controller as described above!
First you’ll need to decide which global volume option you prefer:
Input volume affects gain/distortion and the behavior of level-dependent blocks like the compressor or gate.
Output volume does not affect gain or level-dependent blocks, but
scales everything you hear including effect tails.
To set Global Volume:
1. From the Home page, open SETUP: MIDI/Remote: Other.
2. NAV to the entry for whichever volume you want to control: Input 1 or 2, or Output 1 or 2.
3. Turn the Aor VALUE knob to assign a controller to your selected entry.
Select “PEDAL 1 (EXP/SW TIP)” for the onboard Pedal jack (or #2 if you are using that one)
4. Test and EXIT when nished.
Learn more about the MIDI/Remote menu options on p. 95.
GLOBAL EXPRESSION SETUP
FM3 Pedal Jack 1 can be assigned as the “External 1 Controller” for use with factory presets as a Wah.
Follow the instructions below.
1. From the Home page, open SETUP: MIDI/Remote: External.
2. NAV down to External Control 1.
3. Turn the Aor VALUE knob to select PEDAL 1 (EXP/SW TIP)
4. Press EXIT when nished.
You can test the pedal using Factory presets in the range 000–064.
External 1 can also easily be assigned as Volume, Whammy, or almost anything else on a per-preset basis.
Learn more about assigning pedals and switches to sound parameters in Section 9: Modiers.

12
1 INTRODUCTION
Each of the two Pedal jacks of the FM3 can support one or two switches instead of one expression pedal. This
requires a simple setting change. Any make-break switch type may be used with the FM3 in this way. Connect
switches in any of the ways illustrated below:
EXTERNAL SWITCHES
This section is for switches connected to the local “Pedal” jacks of the FM3.
For switches connected to an FC Series controller, see your FC Owner’s Manual.
FM3
EXPRESION
PEDAL
TRS
PEDAL JACK
TRS
FM3
SINGLE SWITCH
(TIP)
TS TRS
PEDAL JACK
TS
Guitar Cable
Insert Cable
TRS Cable
TRS
TRS
TRS Cable
TS TS
FM3
PEDAL JACK PEDAL JACK
SWITCH
(TIP)
SWITCH
(RING)
“DUAL”
SWITCH
Some “Dual”
switches work
over a single
TRS cable.
EXTERNAL SWITCH SETTINGS
External switches require a simple setup:
Page to the Pedal page of the I/O menu under SETUP.
Set Pedal 1 Setup to “ONE SWITCH” or “TWO SWITCHES”
depending on what you have connected
(or use Pedal 2 Setup if that’s the jack you’re connecting to).
Next, navigate down to the SWITCH SETTINGS section
and select the TYPE and POLARITY for each of your
switches. See p. 94 for more on this setting.
Press HOME to nish.
SWITCH ASSIGNMENT
Since each jack supports TWO
different switches, you’ll nd multiple
options for assignment in the modier
source menu and the various MIDI/
Remote menu pages.
Pedal 1 (EXP/SW TIP) is switch 1 tip.
Pedal 1 (SW RING) is switch 1 ring.
Pedal 2 (EXP/SW TIP) is switch 2 tip.
Pedal 2 (SW RING) is switch 2 ring.
Switch RING
function is
disabled in
this mode.
External Switches can be used with many per-preset and global options found in the MIDI/REMOTE MENU.
Even more powerful, however, is the STAND IN SWITCH feature, which allows them to perform the same
functions as the onboard switches.

13
1 INTRODUCTION
FRACTAL-BOT & FM3-EDIT
In addition to providing audio capabilities, USB allows you to use our
companion software applications Fractal-Bot and FM3-Edit.
Fractal-Bot is a small, simple program used to update the FM3 when new
rmware is released. It includes tools to backup or restore presets and other
custom settings and can be used to install downloaded presets or cabs.
FM3-Edit is a full-featured software editor/librarian for the FM3. If you are
comfortable with audio software or plug-ins, you will probably enjoy using
this program. FM3-Edit offers great ease of use and convenience, plus some “power-user” routines that aren’t
possible on the unit itself (e.g. Performance Page editor, Block Library, Scene Swap). It also provides great tools
for managing presets and banks, installing Cab Packs, and more.
You can download FM3-Edit for Mac or Windows at https://www.fractalaudio.com/fm3-edit
USB AUDIO
USB provides the FM3 with a host of great audio features. With 4×4 channels, you can play backing tracks, record
processed audio or DI signals, re-amp in real-time, and more.
See Section 3: USB for full details on the USB capabilities of the FM3.

14
1 INTRODUCTION
Behind every preset is the Grid, a matrix of rows and columns that is the key to unlocking the true potential of
the FM3. In the world of traditional gear, our options are restricted by budget, space, weight, and the limits of the
equipment itself. Building a rig means making hard choices. With the FM3 however, these limits are replaced by a
vast, ever-growing “inventory” of virtual amps, cabs, effects, and more. Every single preset gives you the flexibility
to design a unique rig composed of whichever components you choose.
To create a preset, virtual pieces of gear called blocks are selected from an inventory and placed into the slots
of the layout grid. Each block represents a different component like a wah pedal, amp, or reverb unit. Blocks are
connected together using virtual cables. You can split, merge, or create parallel paths as needed. Passive shunts,
like cables, carry signal through empty grid spaces. Special input and output blocks connect to the various jacks
and USB signals of the FM3. Here is an illustrated overview of the concept:
INTRO TO THE LAYOUT GRID
Let’s review what’s happening above. Signal flow begins at the Input 1 block on the left. It is connected by a cable
to the Wah block, which in turn connects to a shunt. The shunt has no effect on the sound and is shown only to
introduce the idea of how it can be used to carry signal from one block to another. The shunt is connected to
an Amp block (we might set its type to “Plexi 100W High”), which in turn feeds a Cab (one of the many “4×12”
options, perhaps). This is connected to a Reverb and then to an Output block. In this limited example, many grid
spaces are empty, and only some of the columns are shown. In reality, the size of a preset is limited only by the
grid structure, block inventory, and total processing power (“CPU”). The FM3 can create presets large enough to
cover a song, a set, or even an entire show.
The layout “ZOOM” feature shows the whole grid at once. Look for the ZOOM button on Layout menu pages.
CABLE
Table of contents
Other Fractal Recording Equipment manuals

Fractal
Fractal AXE-FX II User manual

Fractal
Fractal Axe-Fx User manual

Fractal
Fractal AXE-FX II User manual

Fractal
Fractal Axe-Fx II XL User manual

Fractal
Fractal MFC-101 Mark III Owner's manual

Fractal
Fractal Axe-Fx User manual

Fractal
Fractal MFC-101 Mark III Mounting instructions

Fractal
Fractal MFC-101 Mark III User manual

Fractal
Fractal MFC-101 MARK III Instruction Manual