Francis X3 User manual

Instruction manual
Manuale di istruzioni
Bedienungsanleitung
Manual de instrucciones
Manuel d’instructions
Manual de instruções
ESPRESSO MAKER WITH PUMP
DESIGN BY LUCA TRAZZI
Downloaded from CoffeeMachineManual.com Manuals

X3 is a FrancisFrancis!
production made in Italy
Design by
Luca Trazzi - Milan
It should be spoken with
affection, the way a mother
would scold her small child,
whose hands and face she
found stained with forbidden
chocolate. 'FrancisFrancis!'
She tries to be serious, with
her right index finger moving
back and forth like a
metronome, but she is unable
to hold back the
insuppressible smile that will
turn this little tragedy
into a kiss. This, is
FrancisFrancis!. It is the child
in all of us that we love
unconditionally, the child that
makes us smile, laugh, enjoy.
So, if you ask yourself why a
child is part of the
FrancisFrancis! logo.
It is simply because a child
represents the best part of all
of us. And FrancisFrancis! -
with all its products - wants to
share this affinity with the
child that has the genuine
ability to make us smile, even
when we thought we weren't
in the mood.
For more information:
www.francisfrancis.com
9
10
16
2
3
4
5
7
8
11
12
13
15
14
10
7
E.S.E. Serving
1On/Off switch (I/O)
2Coffee switch
3 Steam switch
4Steam valve
5Right temperature pilot light
6On/Off pilot light
7Filter-holder
8Filter- holder housing
9Steam outlet (Cappuccino)
10 Cold water tank
11 Drip plate
12 Steel cup warmer
13 Drip grill
14 Intake pipe
15 Plate
16 Air absorption hole
1Interrutore avviamento (I/O)
2Interrutore caffè
3Interrutore vapore
4Valvola vapore
5Spia luminosa temperatura
6Spia luminosa avviamento
7Portafiltro
8Alloggio porta-filtro
9Tubo uscita vapore (cappuccino)
10 Deposito acqua fredda
11 Vassoio sgocciolio
12 Scaldatazze in acciaio
13 Reticella sgocciolio
14 Tubo di aspirazione acqua
15 Placca
16 Foro di aspirazione aria
1Ein/Aus Schalter I/O
2Kaffeeschalter
3 Wasserdampfschalter
4Dampfventil
5Temperaturkontrollampe
6Betriebslampe
7Filterträger
8Br
ühkopf
9Dampfaustrittsrohr (Cappuccino)
10 Kaltwasserbehälter
11 Abtropfschale
12 Tassenwärmer aus Stahl
13 Abtropfgitter
14 Saugschlauch
15 Typenschild
16 Lufteinlass beim Dampfrohr
1Interruptor puesta en marcha I/O
2Interruptor café
3Interruptor vapor
4Válvula vapor
5Piloto temperatura ideal
6Piloto indicador puesta en marcha
7Porta-filtro
8Alojamiento porta-filtro
9Tubo salida vapor (cappuccino)
10 Depósito de agua fría
11 Bandeja de goteo
12 Calienta tazas de acero
13 Rejilla de goteo
14 Tubo de aspiración
15 Placa
16 Orificio de absorción de aire
1Interrupteur mise en marche I/O
2Interrupteur café
3Interrupteur vapeur
4Soupape vapeur
5Voyant température idéale
6Voyant indicateur mise en marche
7Porte-filtre
8Logement porte-filtre
9Tuyau sortie vapeur (Cappuccino)
10 Réservoir d’eau froide
11 Plateau d’égouttement
12 Chauffe-tasses en acier
13 Grille d’égouttement
14 Conduit d’aspiration
15 Plaque
16 Trou d’absorption d’air
1Interruptor funcionamento I/O
2Interruptor café
3Botão vapor
4Válvula vapor
5Piloto temperatura ideal
6Piloto indicador funcionamento
7Filtro
8Alojamento porta-filtro
9Tubo saída vapor (cappuccino)
10 Depósito de agua fría
11 Bandeja de gotejamento
12 Acquecedor de aço para chávenas
13 Grelha de gotejamento
14 Tubo de aspiração
15 Placa
16 Furo de absorção do ar
IEFP
D
USA
GB
16
Placing the filter holder To close: turn right
To open: turn left
Downloaded from CoffeeMachineManual.com Manuals

11. Non utilizzate
l'apparecchio per scopi
diversi da quello previsto.
12. CONSERVATE QUESTE
ISTRUZIONI.
WICHTIGE
SICHERHEITSHINWEISE
1. Lesen Sie alle
Bedienungshinweise.
2. Berühren Sie keine
heissen Flächen. Griffe und
Knöpfe benützen.
3. Um Feuer, elektrischen
Schlag und Verletzungen zu
vermeiden, nie das Kabel, die
Maschine oder den Stecker in
Wasser oder andere
Flüssigkeiten eintauchen.
4. Wenn die Maschine in der
Nähe von Kindern in
Gebrauch ist, muss die
Maschine überwacht werden.
5. Stecker aus der Steckdose
ausziehen, wenn die
Maschine länger nicht
benutzt wird oder bei
Reinigung.
6. Die Maschine nie mit
einem beschädigten Kabel,
oder Stecker benutzen, wenn
die Funktionsweise Fehler
aufweist, oder wenn die
Maschine beschädigt wurde.
Senden Sie die Maschine an
die nächste Service-Stelle zur
Überprüfung, Reparatur oder
Anpassung ein.
7. Der Gebrauch von
Zusatzgeräten, die nicht vom
Hersteller empfohlen sind,
können zu Feuer,
elektrischem Schlag oder
Verletzung von Personen
führen.
8. Nicht im Freien
verwenden.
9. Vergewissern Sie sich,
dass das Kabel nicht über die
Kante (von Küchenabdeckung
oder Tisch) hängt und lassen
Sie das Kabel keine heissen
Oberflächen berühren.
10. Maschine nicht auf oder
nahe an Gas- oder
Elektrobrenner stellen; nicht
in den heissen Ofen stellen.
11. Maschine nur für den in
der Bedienungsanleitung
beschriebenen Zweck
benutzen.
12. BEWAHREN SIE DIESE
BEDIENUNGSANLEITUNG
AUF.
IMPORTANTES
MEDIDAS DE
SEGURIDAD
Al usar todo aparato
eléctrico, hay que respetar
las siguientes medidas de
seguridad:
1. Lea atentamente las
instrucciones.
2. Nunca toque una
superficie caliente. Utilice las
empuñaduras o los botones.
3. Para protegerse contra el
fuego, contra las descargas
eléctricas y las lesiones, en
general, no sumerja el cable,
el enchufe, ni en el agua, ni
en ningún otro líquido.
4. Si los niños utilizan el
artefacto, o bien, si se usa
cerca de los mismos, vigile
con suma atención.
5. Desenchufe el aparato,
cuando deja de usarlo y
antes de proceder a limpiarlo.
Deje que se enfríe antes de
añadirle o quitarle los
accesorios y antes de
limpiarlo.
6. Nunca utilice un aparato,
cuyo cable o enchufe están
estropeados; si el mismo
funciona mal o si se ha
producido algún desperfecto.
Lleve el aparato al
concesionario autorizado de
su zona para que lo controle
o lo arregle.
7. El empleo de accesorios
IMPORTANT
SAFEGUARDS
When using electrical
appliances, basic safety
precautions should always be
followed, including the
following:
1. Read all instructions.
2. Do not touch hot surfaces.
Use handles or knobs.
3. To protect against fire,
electric shock and injury to
persons do not immerse
cord, plugs or machine in
water or other liquid.
4. Close supervision is
necessary when any
appliance is used by or near
children.
5. Unplug from power socket
when not in use and before
cleaning. Allow to cool before
putting on or taking off parts
and before cleaning the
appliance.
6. Do not operate any
appliance with a damaged
cord or plug or after the
appliance malfunctions, or
has been damaged in any
manner. Return appliance to
the nearest authorised
service facility for
examination, repair, or
adjustment.
7. The use of accessory
attachments not
recommended by the
appliance manufacturer may
result in fire, electric shock,
or injury to persons.
8. Do not use outdoors.
9. Do not let cord hang over
edge of table or counter, or
touch hot surfaces.
10. Do not place on or near a
hot gas or electric burner, or
in a heated oven.
11. Do not use appliance for
anything other than its
intended use.
12. SAVE THESE
INSTRUCTIONS.
IMPORTANTI MISURE
DI SICUREZZA
Nell'utilizzo di
apparecchiature elettriche
devono essere sempre
osservate le seguenti misure
di sicurezza:
1. Leggere attentamente le
istruzioni
2. Non toccare mai una
superficie calda. Usare
manici o pulsanti.
3. Per proteggersi dal fuoco,
scosse elettriche o lesioni
non immergere il cavo, la
spina o in acqua o altro
liquido.
4. Se l'apparecchio viene
utilizzato da bambini o vicino
a bambini, sorvegliare
attentamente.
5. Disinserire la spina
quando l'apparecchio non
viene utilizzato o quando se
ne esegue la pulizia. Lasciar
raffreddare prima di
aggiungere o levare parti
accessorie e prima della
pulizia.
6. Non utilizzare un
apparecchio se il cavo o la
spina sono danneggiati, o se
l'apparecchio mostra segni di
cattivo funzionamento oppure
se ha subìto qualche danno.
Riportare l'apparecchio al
concessionario autorizzato
piùvicino per controlli o
riparazioni.
7. L'utilizzo di accessori non
raccomandati dal produttore
puòprovocare incendi,
scosse elettriche o lesioni
alle persone.
8. Non utilizzare all'esterno.
9. Non lasciare penzolare il
cavo da tavoli o banconi,
impedite che esso venga a
contatto con superfici calde.
10. Non appoggiate
l'apparecchio su fornelli
elettrici o a gas, o dentro un
forno caldo.
GB
USA I
D
E
Downloaded from CoffeeMachineManual.com Manuals

crianças, vigiar com atenção.
5. Desligar a ficha quando o
aparelho não éusado ou
quando se procede àsua
limpeza. Deixar arrefecer
antes de montar ou
desmontar acessórios ou
antes da operação de
limpeza.
6. Não utilizar o aparelho no
caso em que o fio ou a ficha
estejam danificados, ou se o
aparelho demonstra sinais de
mau funcionamento ou se
sofreu danos. Contactar o
concessionário mais próximo
para controles ou
reparações.
7. O uso de acessórios não
recomendados pelo produtor
pode provocar incêndios,
choques eléctricos ou lesões
às pessoas.
8. Não usar ao ar livre.
9. Não deixar livre o cordão
fora da beira das mesas.
Impedir que o mesmo possa
entrar em contacto com
superfícies quentes.
10. Não apoiar o aparelho
sobre fornos eléctricos ou a
gás fogões ou dentro de um
forno quente.
11. Não usar o aparelho para
fins diversos daquele
previsto.
12. CONSERVAR ESTAS
INSTRUÇÕES. SAVE THESE
INSTRUCTIONS
CONSERVATE QUESTE
ISTRUZIONI
BEWAHREN SIE DIESE
BEDIENUNGSANLEITUNG
AUF
GUARDE LA PRESENTE
HOJA DE INSTRUCCIONES
GARDER SOIGNEUSEMENT
CETTE NOTICE
CONSERVAR ESTAS
INSTRUÇÕES
no aconsejados por el
fabricante puede provocar
incendios, descargas
eléctricas o lesiones físicas.
8. No use el artefacto al aire
libre.
9. No deje el cable colgando
del borde de la mesa o
mostrador. Impida que el
mismo entre en contacto con
superficies calientes.
10. No apoye el aparato
sobre fogones de gas, ni
calentadores eléctricos. No lo
introduzca en un horno
caliente.
11. No utilice el aparato para
funciones distintas de la
prevista.
12. GUARDE LA PRESENTE
HOJA DE INSTRUCCIONES.
PRECAUTIONS
IMPORTANTES
Quand on se sert d'appareils
électriques, il faut toujours
prendre les précautions
suivantes:
1. Lire attentivement la
notice d'emploi.
2. Ne jamais toucher une
surface chaude avec les
mains nues. Utiliser les
poignées ou les poussoirs.
3. Pour se protéger du feu,
des secousses électriques et
éviter de se blesser, ne
jamais plonger la machine, la
prise ou le fil dans l'eau ou
un autre liquide.
4. Si la machine est utilisée
par des enfants ou dans leur
voisinage immédiat, surveiller
attentivement les opérations.
5. Débrancher la machine
après usage et pendant le
nettoyage. La laisser refroidir
avant d'ajouter ou d'enlever
les parties accessoires et
avant de la nettoyer.
6. Ne pas se servir de la
machine si le fil ou la prise
sont endommagés, si elle-
même donne des signes de
mauvais fonctionnement ou
encore si elle a subi un
dommage quelconque. Dans
ce cas, la rapporter au
concessionnaire le plus
proche pour la faire contrôler
ou réparer.
7. L'emploi d'accessoires
non recommandés par le
fabricant risque de provoquer
des incendies, des
secousses électriques ou
des lésions aux personnes.
8. Ne pas utiliser la machine
àl'extérieur.
9. Ne pas laisser le fil pendre
du bord de la table ou du
comptoir et éviter qu'il soit en
contact avec des surfaces
chaudes.
10. Ne pas poser la machine
sur des réchauds électriques,
àgaz ou dans un four chaud.
11. Ne pas se servir de la
machine pour des usages
autres que ceux pour
lesquels elle a étéfabriquée.
12. GARDER
SOIGNEUSEMENT CETTE
NOTICE.
IMPORTANTES
MEDIDAS DE
SEGURANÇA
No uso de aparelhagens
eléctricas devem ser sempre
respeitadas as seguintes
medidas de segurança:
1. Ler com atenção as
instruções.
2. Nunca tocar uma
superfície quente. Usar
pegas ou botões.
3. Para protecção contra o
fogo, choques eléctricos ou
lesões, não introduzir o fio, a
ficha, em água ou qualquer
outro líquido.
4. Se o aparelho éutilizado
por crianças ou perto de
P!
F
Downloaded from CoffeeMachineManual.com Manuals

Die Espressomaschine
X3 arbeitet mit dem
System EASY SERVING
ESPRESSO (E.S.E.): Für ein
einwandfreies Funktionieren
ist es notwendig, die Portionen
E.S.E. zu verwenden. Die
Portionen erkennen Sie am
E.S.E. Markenzeichen auf der
Kaffeeverpackung. Dieses
Markenzeichen finden Sie
ebenfalls auf der Verpackung
der Espresso-Maschinen.
Das System E.S.E. garantiert
eine Reihe von Vorteilen: Die
Qualität des Espresso bleibt
immer konstant, unabhängig
von der Erfahrung der
zubereitenden Person. Die
Verwendung von Portionen ist
einfach und sehr schnell, die
Reinigung der Maschine
äusserst einfach.
Es ist sehr wichtig, dass die
E.S.E. Portionen in einem
geschlossenen Behälter
trocken und ohne
Fremdgerüche aufbewahrt
werden.
La máquina de café
exprés X3 se utiliza con
el sistema EASY SERVING
ESPRESSO (E.S.E.). Para que
la misma funcione
correctamente, es preciso
utilizar los servings E.S.E.
Los reconoceráfácilmente
mediante la marca impresa
en los envases, que es la
misma que se aprecia en las
máquinas de caféexprés.
El sistema E.S.E. garantiza
una serie de ventajas: la
calidad del caféexprés
permanece siempre constante,
independientemente de la
pericia del consumidor, a la
hora de prepararlo; es fácil
de usar y muy rápido; el
sistema es muy sencillo de
limpiar.
Es fundamental que
conserve los serving E.S.E.
en un recipiente cerrado, en
un ambiente seco y ventilado.
La cafetière pour
expresso X3 utilise le
système EASY SERVING
ESPRESSO (E.S.E.): pour
qu'elle fonctionne
correctement, il faut donc
employer les serving E.S.E.
que l'on reconnaîtra
aisément àla marque
imprimée sur les emballage
et qui figure sur la cafetière
elle-même.
Le système E.S.E. présente
toute une série d'avantages:
il garantit une qualitéde café
expresso constante,
indépendamment de
l'habiletédu consommateur à
le préparer, il est d'utilisation
rapide et facilite le nettoyage
de la machine.
IMPORTANT: les serving
E.S.E. doivent être conservés
dans un récipient ferméet
dans un lieu sec et bien aéré.
A máquina para café
expresso X3 utiliza o
sistema EASY SERVING
EXPRESSO (E.S.E.): para o
correcto funcionamento é
necessário utilizar o serving
E.S.E. que se reconhece
facilmente pela marca
gravada nas confecçes, o
mesmo que se encontra nas
máquinas para caféexpresso.
O sistema E.S.E. garante
uma série de vantagens: a
qualidade do caféexpresso
permanece sempre constante
independentemente da
prática do consumidor em
prepara-lo, o uso éfácil e
muito rápido, a limpeza do
sistema éextremamente
simples.
Éfundamental conservar o
serving E.S.E. fechado num
recipiente num ambiente
seco e ventilado.
E.S.E.
(Easy Serving Espresso)
The X3 espresso
machine uses the EASY
SERVING ESPRESSO (E.S.E)
system: for best results, we
recommend using the E.S.E.
servings, which are easily
recognisable by the E.S.E.
logo on the package.
The E.S.E. system
guarantees several benefits:
the quality of the espresso
coffee remains constant
regardless of the user's
experience.
The system is very easy to
use, quick, and extremely
easy to clean.
It is very important, however,
that you store E.S.E. servings
in a closed, airtight container
so that they remain fresh.
La macchina per
espresso X3 impiega il
sistema EASY SERVING
ESPRESSO (E.S.E.): per un
corretto funzionamento è
necessario utilizzare i serving
E.S.E., facilmente
riconoscibili dal marchio
impresso sulle confezioni, lo
stesso che si ritrova anche
sulle macchine per espresso.
Il sistema E.S.E. garantisce
una serie di vantaggi: la
qualitàdel caffèespresso
rimane sempre costante
indipendentemente
dall’esperienza del
consumatore nel prepararlo,
l’impiego èfacile e molto
veloce, la pulizia del sistema
èestremamente semplice.
E’fondamentale conservare i
serving E.S.E. in un
recipiente chiuso in ambiente
secco e ventilato.
GB D
I
EP
F
USA
Downloaded from CoffeeMachineManual.com Manuals

GB
USA
ounces) turn off the switch (2).
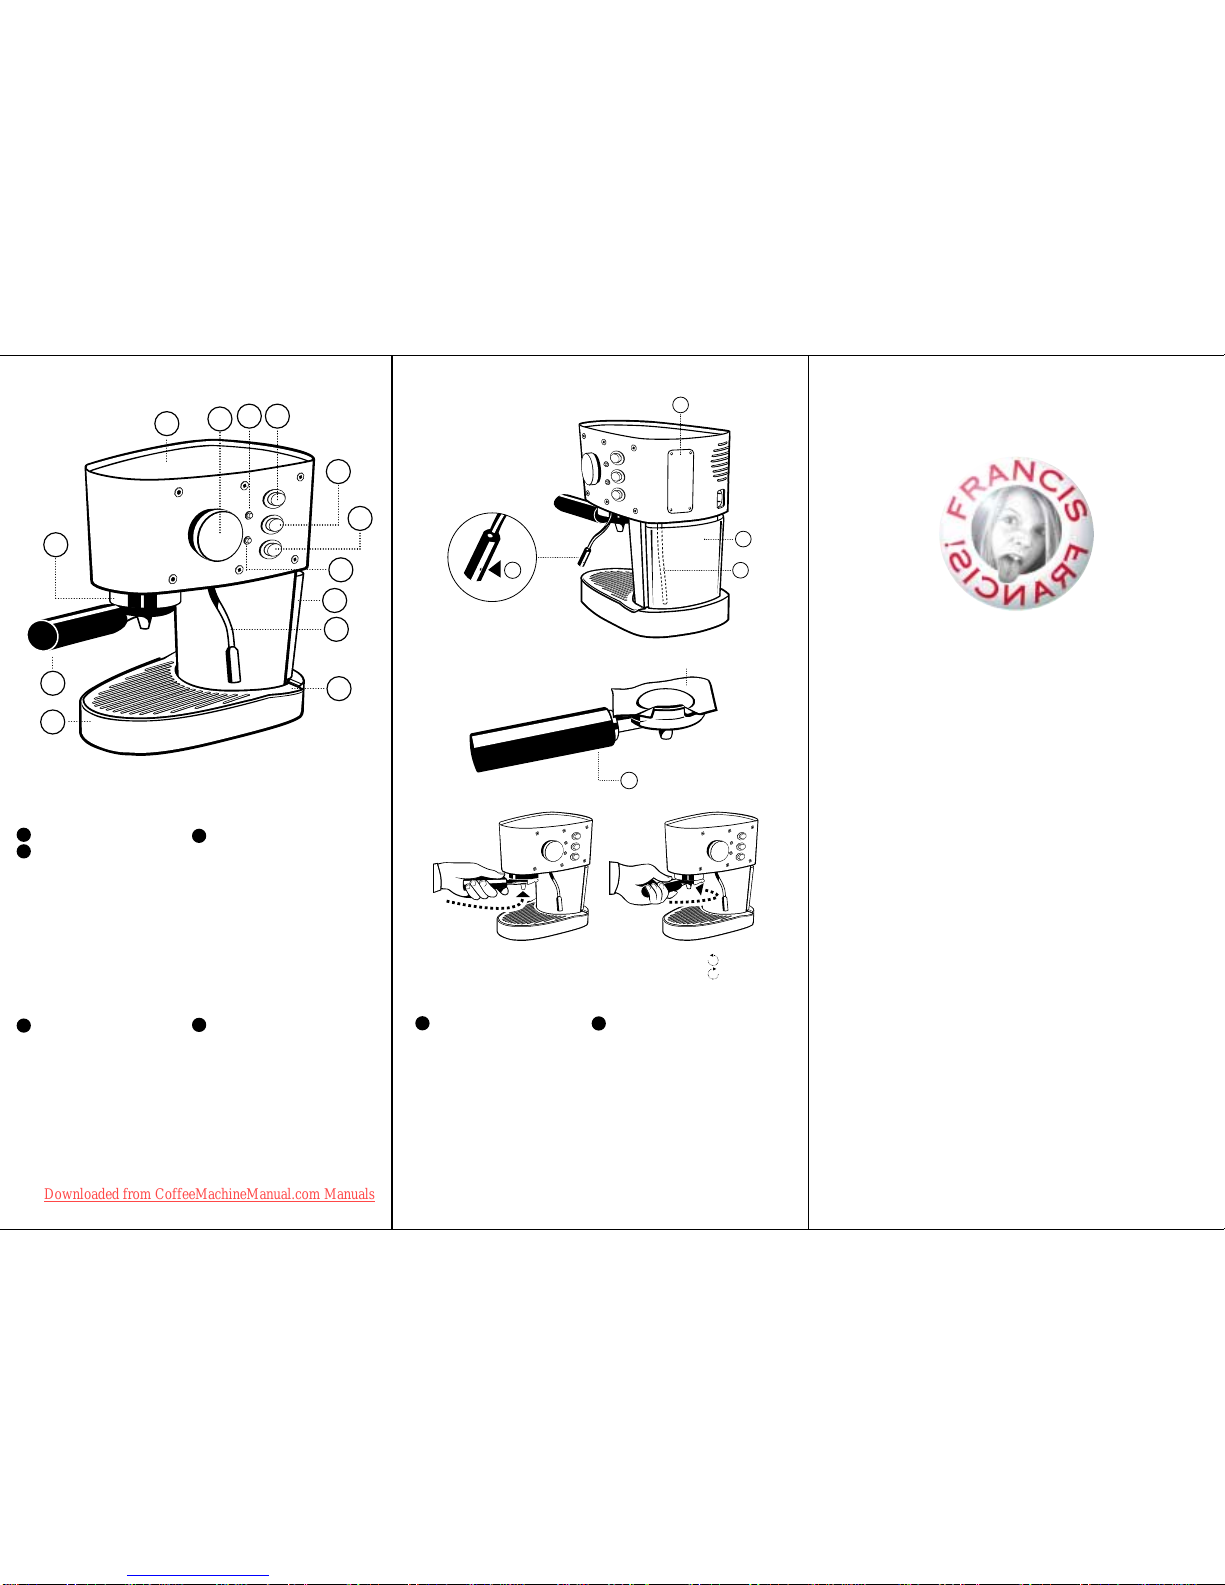
H) Remove the filter-holder (7) from
its housing (8) by repeating the
operation described in point F in
reverse. Dispose of the used E.S.E.
serving.
Preparation of additional cups of
espresso:
I) To make more cups of espresso,
repeat operations E through H.
Ground Coffee Kit (Using pre-
ground coffee to prepare
espresso)
A Ground Coffee Kit is available as
an option with your X3. You will need
this kit if you want to use pre-ground
coffee (not E.S.E. Servings) to make
espresso. The Ground Coffee Kit
contains a filter-holder, which
must be fitted with one of two filters
provided with the kit. The smaller
filter should be used to prepare one
cup of espresso, and the larger filter
for two cups of espresso. The kit
also includes a measuring spoon,
which will also be used to measure
the correct amount of coffee per
serving, and also to tamp or press
the coffee firmly into the filter-holder.
The Ground Coffee Kit is used as
followed:
J) Select the one or two cup filter,
depending on the number of
espressos that you would like to
prepare, and press it firmly into the
filter-holder.
K) Take the measuring spoon and
measure one spoonful (7 grams) of
coffee for the one cup filter and two
spoonfuls (14 grams) for the two cup
filter. For each cup that you want to
you will need to grind coffee or have
pre-ground coffee.
How to produce steam (making a
cappuccino)
In order to make steam for a
cappuccino, it is necessary to
increase the temperature of the
machine, as follows:
L) Make sure that there is no serving
in the filter-holder. With the steam
valve (4) in the closed position, turn
on the steam switch (3). If the
temperature pilot light (5) is not
already lit, this operation will
make it come on.
M) The pilot light (5) will go off when
the correct temperature has been
obtained. When the light goes off,
open the steam valve (4) slightly, by
turning it counter-clockwise, and
allow the residual water to flow from
the pipe (9) until the steam comes
out of the steam outlet. When
steam starts to come out, close the
valve (4).
N) Place a container of milk under
the steam outlet pipe (9) so that a
small part of the pipe is immersed.
Then open the steam valve (4) to
obtain steam. A special hole at the
side of the nozzle brings in air, which
mixes with the milk to make the
foam for cappuccino. If this does
not occur, change the position of the
container so that the air hole (16) is
not covered by the milk. It is
preferable to use very cold milk.
After you have steamed the milk,
turn off the steam switch (3).
After a few minutes, the machine will
return to the correct temperature for
making espresso.
Troubleshooting for cappuccino:
If you notice a reduction in the
supply of steam, close the steam
valve (4) and turn on the coffee
switch (2) until water comes out of
the filter-holder (7). Then repeat
steps K and L.
O) It is very important to avoid
making an espresso immediately
after using the steam function,
as the machine will be too hot.
To reduce the temperature of the
machine quickly in order to make a
perfect espresso, follow the
instruction below:
- Make sure that there is no coffee
serving in the filter-holder.
- Turn on the coffee switch (2) and
put a container under the
filter-holder (7). This will remove
some hot water from the boiler. Do
this until the temperature pilot light
(5) comes on.
- Turn off the coffee switch (2) to
stop the water flow and then wait
again for the temperature pilot light
(5) to go off: the machine is now
ready to make another espresso.
THE MANUFACTURER RESERVES
THE RIGHT TO MAKE
MODIFICATIONS OR IMPROVEMENTS
WITHOUT PRIOR NOTICE.
TECHNICAL CHARACTERISTICS:
VOLTAGE: 220/230 V
(110/120 V US - 110 V J)
POWER: 1.050 W
INSTRUCTION MANUAL
General Rules for Using the
Machine
It is important to keep the machine
clean by frequently washing the drip
plate (11), the filter holder (7), and
the water tank (10). The steam
outlet pipe (9) and the air absorption
hole (16) should also be kept clean.
VERY IMPORTANT: never immerse
the machine in water or put it in a
dishwasher.
The water contained in the tank (10)
must be changed regularly. After
changing the water, check that the
intake pipe (14) is positioned inside
the tank (10).
Depending on the hardness of the
water in your area, it is
recommended that you occasionally
use a special de-scaling product for
coffee machines (do not use vinegar)
to remove scaling inside the
machine.
De-scaling: Follow the directions on
the package for recommended
strength. Mix, as per package
instructions, enough de-scaling
solution to fill the water tank (10)
two-thirds full, and put tank in
machine.
Turn on the machine, but do not wait
for it to heat. Immediately, open the
steam valve (4) and let all but one
third of the solution run through the
steam outlet (9) into a container.
Close the steam valve (4). Then turn
on the coffee switch (2) and let the
remainder of the solution run
through the filter holder (7) into a
container. When the water tank is
empty, turn off the coffee on/off
switch immediately (1).
Rinsing: Wash the water tank (10)
with soap and rinse thoroughly. Refill
the water tank with fresh cold water
and replace in the machine. Open
the steam valve (4) and let the full
tank of water run through the steam
outlet (9) into a container. Close the
steam valve (4). Refill the water tank
with fresh cold water and replace it
in the machine. Turn on the coffee
switch (2) and let all of the water run
through the filter-holder (7) into a
container. When the water tank is
empty, the cleaning process is
complete. After refilling the tank, you
can begin to make coffee again. If
you use your machine frequently, and
live in a area with hard water, you
may want to repeat this process
once every two months. If your water
is not hard, or if you use the
machine less frequently, you can de-
scale every six months to one year.
(If you want proof that all of the
cleaning solution is out of the
machine, steam some milk as
explained in the section on making
cappuccino. The milk will curdle if
any solution is left in the machine.)
In order to enjoy a perfect piping hot
espresso, keep the cups warm by
storing them on the cup warmer
(12) on top of the machine.
Operating the Machine
Installation
It is only necessary to do the
following before using the
machine for the first time.
A) Check that the voltage plate of
the supply current of your machine is
correct by looking on the plate (15)
before plugging it into the electrical
socket.
B) Fill the tank half-full of cold water
(10), ensuring that the intake pipe
(14) is immersed in the water. Place
a container under the filter-holder (7).
Turn on the main on/off switch (1)
and activate the water flow through
the internal system by turning on
the coffee switch (2).
C) Fill the tank again (10), checking
that the intake pipe (14) is
immersed in the water.
How to make the first espresso
after installation (or after the
machine has been turned off).
To make sure the machine is in the
ideal condition to make a perfect
espresso, follow the instructions
below:
D) Turn on the main switch (1) and
make sure that the on/off pilot light
(6) will come on automatically,
indicating that the machine is
heating.
E) Take out an E.S.E. serving and
place it in the filter-holder (7) with the
printed side facing down.
F) Place the filter-holder (7) in its
housing (8), and rotate until it fits
firmly, making a good seal.
G) Make the coffee by turning on the
switch (2): once you have the
desired quantity of coffee (extra
strong-one ounce, or mild-two
Downloaded from CoffeeMachineManual.com Manuals

H) Togliere il porta-filtro (7) dal
suo alloggiamento (8)
ripetendo in maniera inversa
l’operazione descritta al punto
F). Eliminare il serving E.S.E.
utilizzato.
Preparazione successiva di
altri caffè
I) Per preparare altri caffè
ripetere le operazioni da E a H.
Come ottenere vapore
(Preparazione di un
cappuccino)
J) Assicurarsi che il porta-filtro
sia senza serving.
Con la valvola del vapore (4)
in posizione chiusa azionare
l’interruttore del vapore (3).
Se non era giàaccesa, questa
operazione faràaccendere la
spia della temperatura (5).
K) Dopo lo spegnimento della
spia della temperatura (5),
aprire un poco, in senso
antiorario, la valvola del
vapore (4) e far fuoriuscire
l’acqua residua dal tubo (9)
fino all’arrivo del vapore.
Quando inizia a uscire vapore
chiudere la valvola (4).
L) Collocate un recipiente con
il latte sotto il tubo di uscita
del vapore-cappuccino (9) in
modo da immergene una
parte. Aprire poi la valvola del
vapore (4) per ottenere il
vapore desiderato.
Un apposito foro a lato
dell’ugello rende possibile
l’assorbimento di una piccola
parte di aria che miscelandosi
con il latte lo trasforma in
crema per cappuccino.
Se ciònon avviene modificate
la posizione del recipiente
affinchéil foro di aspirazione
aria (16) non venga coperto
dal latte.
E’preferibile usare latte molto
freddo.
Chiudere l’interrutore del
vapore (3).
Se si nota una diminuzione
nell’erogazione del vapore
chiudere la valvola del vapore
(4) e azionare l’interruttore del
caffè(2) fino alla fuoriuscita di
acqua dalla porta-filtro (7).
Ripetere quindi i passaggi K e
L.
M) E’ molto importante
evitare di preparare un
espresso subito dopo
l’erogazione di vapore
poiché la macchina è
ancora troppo calda.
Per ridurre rapidamente la
temperatura della macchina e
ottenere un espresso
perfetto, seguire le seguenti
istruzioni:
- Assicurarsi che il porta-filtro
sia senza serving.
- Azionare l’interruttore del
caffè(2) e collocare un
recipiente sotto il porta-filtro
(7) consentendo la fuoriuscita
di acqua calda fino
all’accensione della spia della
temperatura (5).
- Spegnere l’interruttore del
caffè(2) interrompendo cosìil
flusso di acqua e attendere
che si spenga la spia della
temperatura: la macchina è
ora nuovamente pronta per
preparare un altro espresso.
IL PRODUTTORE SI RISERVA IL
DIRITTO DI APPORTARE MODIFICHE
O MIGLIORAMENTI SENZA
PREAVVISO.
CARATTERISTICHE TECNICHE:
VOLTAGGIO: VOLTAGE: 220/230 V
(110/120 V US - 110 V J)
POTENZA: 1.050 W
MANUALE DI
ISTRUZIONI
Regole generali per l’uso
della macchina
La macchina deve essere
mantenuta pulita sciacquando
frequentemente il vassoio
(11), il porta-filtro (7), il
serbatoio (10), il tubo uscita
vapore (9) e il foro di
aspirazione aria (16).
IMPORTANTISSIMO: mai
immergere la macchina in
acqua o introdurla in
lavastoviglie.
L’acqua contenuta nel
serbatoio (10) deve essere
regolarmente sostituita.
Dopo il cambio dell’acqua
verificare che il tubo di
aspirazione (14) sia collocato
all’interno del serbatoio (10).
Si consiglia di utilizzare, ogni
tre mesi, una miscela per la
rimozione del calcare
appositamente studiata per
macchine per espresso.
Per gustare un espresso
perfetto si consiglia di
mantenere calde le tazze
utilizzando lo scalda-tazze (12)
incorporato nella macchina.
Funzionamento della
macchina
Installazione
A) Verificare sulla placca (15)
che il voltaggio della corrente
di alimentazione sia corretto:
in caso affermativo, collegare
la macchina alla presa di
corrente.
B) Riempire con acqua fredda
metàdel serbatoio (10)
assicurandosi che il tubo di
aspirazione (14) sia immerso
nell’acqua. Collocare un
recipiente sotto il porta-filtro
(7). Azionare l’interrutore
generale (1) e far circolare
l’acqua nel circuito interno
azionando l’interruttore del
caffè(2).
C) Riempire nuovamente il
serbatoio (10) verificando che
il tubo di aspirazione (14) sia
immerso nell’acqua.
Come ottenere il primo
caffè dopo l’installazione
(o lo spegnimento) della
macchina
Per far sìche la macchina si
trovi nelle condizioni ideali per
preparare un espresso
perfetto, seguire le seguenti
istruzioni:
D) Azionare l’interruttore
generale (1) e accertarsi che
la spia di avviamento (6) sia
accesa: se la temperatura
della macchina non è
sufficiente, si accenderàla
spia della temperatura (5).
Inserire il porta-filtro (7) nel
suo alloggiamento. Attendere
che la spia della temperatura
(5) si spenga. Collocare una
tazza sotto il porta-filtro (7) e
azionare l’interruttore del
caffè(2). Lasciare uscire
l’acqua calda. Vuotare l’acqua
calda dalla tazza.
A questo punto la macchina e
la tazza sono pronte per un
espresso perfetto.
E) Estrarre un serving E.S.E. e
collocarlo nel porta-filtro (7) con
il marchio verso il basso.
F) Inserire il porta-filtro (7) nel
suo alloggiamento (8)
facendolo ruotare fino a trovare
resistenza.
G) Preparare il caffèazionando
l’interruttore (2): una volta
raggiunta la quantità
desiderata di caffè(ristretto o
lungo) spegnere l’interruttore
(2).
I
Downloaded from CoffeeMachineManual.com Manuals

wieder ausschalten.
H) Den Filterträger (7) aus
seinem Gehäuse drehen und
dabei nach links drehen.
Die gebrauchte Kaffeeportion
entfernen.
Zubereitung von weiteren
Kaffees
I) Für die Zubereitung von
weiteren Kaffees sind die
Punkte von E bis H zu
wiederholen.
Zubereitung von Dampf (für
einen Cappuccino)
J) Darauf achten, dass sich
keine Portion in der Maschine
befindet. Bei geschlossenem
Dampfventil (4) den
Dampfschalter (3) einschalten.
Wenn die
Temperaturkontrollampe (5)
nicht bereits aufleuchtet, wird
sie durch diesen Vorgang
eingeschaltet.
K) Nach dem Erlöschen der
Temperaturkontrollampe (5),
das Dampfventil (4) im
Gegenuhrzeigersinn ein wenig
aufdrehen, damit das
Restwasser aus dem Dampfrohr
(9) auslaufen kann und warten,
bis Dampf aus dem Rohr
austritt. Wenn der Dampf
auszuströmen beginnt, das
Ventil (4) schliessen.
L) Den Milchbehälter unter das
Auslaufrohr des Cappuccino-
Dampfes (9) stellen, welches
ein wenig in die Flüssigkeit
eingetaucht werden muss.
Dann das Dampfventil (4)
öffnen, um auf diese Weise den
gewünschten Dampf zu
erhalten. Eine kleine Bohrung
oberhalb der Düse nimmt einen
kleinen Teil der Luft auf und
schäumt die Milch für den
Cappuccino auf. Erfolgt dies
nicht, muss der Milchstand so
geändert werden, bis der
Lufteinlass (16) des Dampfrohres
über der Milch liegt. Es wird
empfohlen, dazu sehr kalte
Milch zu verwenden.
Nach dem Bezug
Dampfschalter (3)
ausschalten.
Geht der Dampf zurück, muss
das Dampfventil (4)
geschlossen und der
Kaffeeschalter (2) gedrückt
werden, bis Wasser aus dem
Brühkopf (7) herausströmt.
Anschliessend die Punkte K und
L wiederholen.
M) Nach erfolgter
Dampfabgabe sollte die
Zubereitung eines weiteren
Espressos unbedingt
vermieden werden, da das
Gerät noch zu heiss ist.
Für schnelle
Temperaturherabsenkung des
Gerätes und die unmittelbare
Zubereitung eines perfekten
Espressos, die folgenden
Anweisungen befolgen:
- Sicherstellen, dass der
Filterträger leer ist.
- Den Kaffeeschalter (2)
bedienen und einen Behälter
unter den Filterträger
(7) stellen, damit das heisse
Wasser bis zum Einschalten der
Temperaturkontrollampe (5)
auslaufen kann.
- Den Kaffeeschalter (2)
ausschalten, dadurch die
Pumpe unterbrechen und
warten, bis die
Temperaturkontrollampe
auslöscht. Nun steht das Gerät
für die Zubereitung eines
weiteren Espressos bereit.
DER HERSTELLER BEHÄLT SICH
VOR, ÄNDERUNGEN ODER
VERBESSERUNGEN OHNE
VORANZEIGE ANZUBRINGEN.
TECHNISCHE DATEN:
SPANNUNG: VOLTAGE: 220/230 V
(110/120 V US - 110 V J)
LEISTUNG: 1.050 W
BEDIENUNGSANLEITUNG
Allgemeine Hinweise zum
Gebrauch des Gerätes
Die Reinigung der Maschine
erfolgt durch häufiges
Ausspülen der Tropfschale (11),
des Filterträgers (7), des
Wassertankes (10), des
Dampfrohres (9) und des
Lufteinlasses beim Dampfrohr
(16).
WICHTIG: Das Gerät nie ins
Wasser tauchen. Stellen Sie
das Gerät nie in einen
Geschirrspüler.
Der Inhalt des Wassertankes
(10) sollte regelmässig
ausgewechselt werden.
Nach einem Wasserwechsel
sicherstellen, dass der
Saugschlauch (14) ins
Tankinnere (10) reicht. Es
empfiehlt sich, die Maschine
alle drei Monate mit einem
speziell für Espresso-Maschinen
entwickelten Kalklösungsmittel
zu entkalken (kein Essig
verwenden). Für einen perfekten
Espresso-Geschmack empfiehlt
es sich, die Tassen vorher auf
dem Tassenwärmer (12)
vorzuwärmen.
Betriebsbeschreibung
Installation
A) Kontrollieren Sie, ob Ihre
Netzspannung mit den Angaben
auf dem Typenschild des
Gerätes übereinstimmt.
Wenn ja, das Gerät einstecken.
B) Die Hälfte des Wassertankes
(10) mit kaltem Wasser
auffüllen und darauf achten,
dass der Saugschlauch (14) ins
Wasser eintaucht. Den
Kaffeeschalter (2) betätigen und
dadurch das Wasser im
Innenkreislauf zirkulieren
lassen. Einen Behälter unter
den Filterträger (7) stellen.
C) Den Wassertank (10) erneut
auffüllen und darauf achten,
dass der Saugschlauch (14) ins
Wasser eintaucht.
Der erste Kaffee nach
erfolgter Installation (oder
dem Ausschalten) der
Maschine
Durch das Befolgen der
folgenden Anweisungen
versetzen Sie Ihre Maschine in
die idealen
Betriebsbedingungen und
erhalten einen perfekten
Espresso:
D) Den Betriebsschalter (1)
einschalten und sicherstellen,
dass die Betriebslampe (6)
aufleuchtet; wenn die
Temperatur der Maschine
unzureichend ist, leuchtet die
Temperaturkontrollampe (5)
automatisch auf. Den
Filterträger (7) an der dafür
vorgesehenen Stelle einführen.
Warten bis die
Temperaturkontrollampe (5)
auslöscht. Eine Tasse unter den
Filterträger (7) stellen und den
Kaffeeschalter (2) betätigen.
Das heisse Wasser auslaufen
lassen. Das warme Wasser aus
der Tasse weggiessen.
An dieser Stelle stehen Ihnen
die Maschine und die Tasse für
einen perfekten Espresso
bereit.
E) Eine Kaffeeportion mit dem
Markenzeichen “illy down”
gegen unten in den
Filterträger (7) einlegen.
F) Den Filterträger (7) fest in
das Gehäuse nach rechts
eindrehen.
G) Den Kaffeeschalter (2)
einschalten, den Kaffee
zubereiten und nach Erhalt der
gewünschten Menge (wenig
oder viel / ristretto o lungo)
D
Downloaded from CoffeeMachineManual.com Manuals

de café(cafésúper corto o
largo), apague con el
interruptor (2).
H) Quite el portafiltro (7) de
su asiento (8), repitiendo
todas las instrucciones
indicadas en el punto F, de
atrás para adelante. Eche a la
basura el serving E.S.E.
usado.
Para preparar otros cafés
I) Para preparar otros cafés,
repita las operaciones
indicadas desde el punto E
hasta el punto H.
Cómo obtener vapor (para
preparar un capuchino a la
italiana)
J) Cerciórese de que no haya
un serving en el portafiltro.
Con la válvula del vapor (4) en
la posición “cerrado”, pulse el
interruptor del vapor (3).
Si el piloto de la temperatura
(5) estaba apagado, con esta
operación se encenderá.
K) Una vez que se haya
apagado el piloto de la
temperatura (5), abra un poco
la válvula del vapor (4),
haciéndola girar hacia la
izquierda. Deje que salga el
agua que quedaba en el tubo
(9), hasta que empiece a
subir el vapor. Cuando el
vapor empiece a salir, cierre
la válvula (4).
L) Coloque un recipiente con
leche bajo el tubo de salida
del vapor-capuchino (9), de
manera tal que una parte del
tubo quede sumergida en la
leche. Luego abra la válvula
del vapor (4) para que salga el
vapor deseado. Un orificio al
efecto, ubicado al costado de
la boquilla, absorbe una
pequeña cantidad de aire que,
al mezclarse con la leche, la
transforma en crema para el
capuchino a la italiana.
Si la crema no se forma,
cambie de posición el recipiente
con la leche, haciendo que
esta última no tape el foro de
absorción del aire (16).
Preferentemente utilice leche
muy fría.
Cierre el interruptor del
vapor (3). Si nota que sale
menos vapor, cierre la válvula
del vapor (4) y mantenga
apretado el interruptor del
café(2), hasta que empiece a
salir agua por el portafiltro (7).
Ahora repita las instrucciones
indicadas en los puntos K y L.
M) ¡Cuidado! No prepare
café exprés
inmediatamente después
de haber usado el vapor,
puesto que la máquina
está demasiado caliente.
Para lograr que la temperatura
de la máquina disminuya
rápidamente, lo cual le
permitirápreparar un café
exprés perfecto, siga las
siguientes instrucciones:
- Cerciórese de que en el
portafiltro no haya un serving.
- Pulse el interruptor del café
(2) y coloque un recipiente
bajo el portafiltro (7), para que
salga el agua caliente, hasta
que se encienda el piloto de
la temperatura (5).
- Apague el interruptor del
café(2), con lo cual dejaráde
salir agua. Aguarde hasta que
el piloto de la temperatura se
apague: ahora la máquina
estálista para preparar un
nuevo caféexprés.
EL FABRICANTE SE RESERVA EL
DERECHO DE MODIFICAR O
MEJORAR EL PRESENTE ARTÍCULO,
SIN AVISO PREVIO.
CARACTERÍSTICAS TÉCNICAS:
VOLTAJE: VOLTAGE: 220/230 V
(110/120 V US - 110 V J)
POTENCIA: 1.050 W
MANUAL DE
INSTRUCCIONES
Reglas generales para el
uso de la máquina
Debe mantener Usted la
máquina en perfectas
condiciones de limpieza: para
ello, lave a menudo el cajón
(11), el portafiltro (7) el
depósito (10), el tubo de
salida del vapor (9) y el orificio
de absorción de aire (16).
MUY IMPORTANTE: nunca
sumerja la máquina en el
agua, ni la introduzca en el
lavavajillas.
Cambie con frecuencia el
agua del depósito (10). Tras
cambiar el agua, verifique si el
tubo de aspiración (14) está
ubicado en el interior del
depósito (10). Es aconsejable
utilizar, cada tres meses, una
mezcla para desincrustar las
restos de cal, estudiada
especialmente para las
máquinas de caféexprés.
Para saborear un caféexprés
perfecto, es conveniente
mantener las tazas calientes
utilizando el calienta-tazas
(12) que viene incorporado en
la máquina.
Funcionamiento de la
máquina
Instalación
A) Verifique si el voltaje de la
corriente de alimentación de
la red corresponde al que
indica la placa (15) de la
máquina: si es así, enchufe la
máquina en la toma de corriente.
B) Llene el depósito (10)
hasta la mitad con agua fría,
controlando que el tubo de
aspiración (14) esté
sumergido en el agua.
Coloque un recipiente bajo el
portafiltro (7). Encienda la
máquina mediante el
interruptor general (1) y haga
que el agua circule por el
circuito interior, pulsando el
interruptor del café(2).
C) Llene una vez más el
depósito (10), verificando que
el tubo de aspiración (14)
estésumergido en el agua.
Cómo preparar el primer
café, después de la
instalación de la máquina
(o después de apagarla).
Para poner a la máquina en
las condiciones ideales para
preparar un caféexprés
perfecto, siga las siguientes
instrucciones:
D) Encienda la máquina
mediante el interruptor
general (1) y verifique si el
piloto de puesta en marcha
(6) estáencendido. Si la
temperatura de la máquina
aún no ha llegado al nivel
indicado, se encenderáel
piloto de la temperatura (5).
Inserte el portafiltro (7) en su
asiento. Aguarde hasta que el
piloto de la temperatura (5) se
apague. Ubique una taza bajo
el portafiltro (7) y pulse el
interruptor del café(2). Deje
que salga el agua caliente.
Vacíe el agua caliente de las
tazas.
Ahora la máquina y las tazas
están listas para un perfecto
café exprés.
E) Coja un serving E.S.E. y
ubíquelo en el portafiltro (7)
con la marca mirando hacia
abajo.
F) Inserte el portafiltro (7) en
su asiento y hágalo girar
hasta el tope (8).
G) Prepare el café, pulsando
el interruptor (2): cuando haya
llegado a la cantidad deseada
E
Downloaded from CoffeeMachineManual.com Manuals

toujours au moyen de
l'interrupteur (2).
H) Retirer le porte-filtre (7) de
son logement (8) en répétant
àrebours l'opération décrite
au point F). Jeter le serving
E.S.E. utilisé.
Préparation des cafés
suivants
I) Pour préparer d'autres
cafés, répéter les opérations
de E àH.
Comment obtenir de la
vapeur (Préparation d'un
cappuccino)
J) S'assurer qu'il n'y a pas de
serving dans le porte-filtre.
La soupape de la vapeur (4)
étant en position fermée,
actionner l'interrupteur de la
vapeur (3).
Cette opération fera s'allumer,
s'il était éteint, le voyant de la
température (5).
K) Après que le voyant de la
température (5) s’est éteint,
ouvrir légèrement, en la
tournant dans le sens
contraire des aiguilles d’une
montre, la soupape de la
vapeur (4) et faire sortir l’eau
restée dans le conduit (9)
jusqu’à ce que la vapeur
n’apparisse. Lorsque la
vapeur commence à
apparaître, fermer la soupape
(4).
L) Placer un récipient
contenant le lait sous le
conduit de sortie de la vapeur-
cappuccino (9) et y plonger ce
dernier. Ensuite, ouvrir la
soupape de la vapeur (4) pour
obtenir la vapeur désirée.
Un trou situéàcôtéde la
buse permet l’absorption
d’une petite quantitéd’air qui,
en se mélangeant au lait, le
transforme en crème pour
cappuccino. Si cela ne se
produit pas, modifier la
position du récipient afin que
le trou d’absortion d’air (16)
ne soit pas couvert par le lait.
Il est préférable d'utiliser du
lait très froid.
Fermer l'interrupteur de la
vapeur (3). Si l'on remarque
une diminution du débit de la
vapeur, fermer la soupape de
la vapeur (4) et actionner
l'interrupteur du café(2)
jusqu'àce que de l'eau sorte
du porte-filtre (7). Répéter
ensuite les opérations
décrites aux points K et L.
M) Il est expressément
recommandé de ne pas
préparer de café
immédiatement après la
sortie de vapeur, la
cafetière étant encore trop
chaude. Pour en diminuer la
température et obtenir un
expresso parfait, se tenir aux
instructions suivantes:
- s'assurer qu'il n'y a pas de
serving dans le porte-filtre;
- actionner l'interrupteur du
café(2) et placer un récipient
sous le porte-filtre (7) en
faisant couler de l'eau chaude
jusqu'àce que s'allume le
voyant de la température (5);
- fermer l'interrupteur du café
(2) ce qui aura pour effet
d'arrêter l'eau et attendre que
le voyant de la température
s'éteigne; la machine est de
nouveau prête àfaire un autre
expresso.
LE FABRICANT SE RESERVE LE
DROIT D'APPORTER SANS PREAVIS
DES MODIFICATIONS OU DES
AMELIORATIONS A CET ARTICLE.
CARACTERISTIQUES TECHNIQUES:
VOLTAGE: VOLTAGE: 220/230 V
(110/120 V US - 110 V J)
PUISSANCE: 1050 W
NOTICE D'EMPLOI
Règles générales pour
l’emploi de la machine
Veiller àmaintenir la cafetière
toujours bien propre en
rinçant fréquemment le tiroir
(11), le porte-filtre (7) le
réservoir (10), le conduit de
sortie de la vapeur (9) et le
trou d’absorption d’air (16).
TRES IMPORTANT: ne jamais
plonger la machine dans l'eau
ni la mettre dans le lave-
vaisselle.
L'eau du réservoir (10) doit
être changée régulièrement.
Après l'avoir fait, s'assurer
que le conduit d'aspiration
(14) est bien àl'intérieur du
réservoir (10). Il est
recommandéd'éliminer le
calcaire tous les trois mois en
utilisant un mélange conçu
spécialement pour ce type de
cafetières (pas de vinaigre).
Pour obtenir un délicieux
expresso àl'italienne, il est
conseilléde chauffer les
tasses au moyen du dispositif
(12) incorporédans la
machine.
Fonctionnement de la
cafetière
Mise en place
A) Vérifier sur la plaque (15)
que le voltage du courant
d'alimentation est correct,
puis brancher la cafetière.
B) Remplir d'eau froide la
moitiédu réservoir (10) après
s'être assuréque le conduit
d'aspiration (14) est bien
plongédans l'eau. Placer un
récipient sous le porte-filtre
(7). Actionner l'interrupteur
général (1) et faire circuler
l'eau dans le circuit intérieur
en actionnant l'interrupteur du
café(2).
C) Remplir de nouveau le
réservoir (10) en s'assurant
que le conduit d'aspiration
(14) est plongédans l'eau.
Comment obtenir le
premier café après la mise
en place (ou l'extinction)
de la cafetière
Pour que la cafetière se
trouve dans les conditions
idéales pour préparer un
expresso parfait, se
conformer aux instructions
suivantes:
D) Actionner l'interrupteur
général (1) et s'assurer que le
voyant lumineux de mise en
marche (6) est allumé: si la
machine n'est pas assez
chaude, le voyant de la
température (5) s'allumera.
Introduire le porte-filtre (7)
dans son logement.
Attendre que le voyant de la
température (5) s'éteigne.
Placer une tasse sous le
porte-filtre (7) et actionner
l'interrupteur du café(2).
Laisser sortir l'eau chaude.
Vider l'eau chaude de la
tasse.
A ce point, la cafetière et la
tasse sont prêtes pour faire
un excellent expresso.
E) Extraire un serving E.S.E.
et le placer dans le porte-filtre
(7), la marque tournée vers le
bas.
F) Introduire le porte-filtre (7)
dans son logement (8) en le
faisant tourner jusqu'àce
qu'on rencontre une certaine
résistance.
G) Préparer l'expresso en
actionnant l'interrupteur (2):
une fois obtenue la quantité
voulue de café(serréou
allongé), arrêter le débit,
F
Downloaded from CoffeeMachineManual.com Manuals

desejada de café(bica
"italiana" ou cafénormal)
desligar o interruptor (2).
H) Retire o porta-filtro (7) do
seu alojamento (8), repetindo
inversamente a operação
descrita no ponto F). Elimine
o serving E.S.E. utilizado.
Preparação sucessiva de
outros cafés
I) Para preparar outros cafés
repetir as operações descritas
nos ponto E a H.
Como obter vapor
(Preparação de um
"cappuccino)
J) Verifique que o porta-filtro
esteja sem serving.
Com a válvula do vapor (4)
situada na posição fechada
accione o interruptor do vapor
(3). No caso em que não
esteja acesa, esta operação
faz acender o sinal luminoso
da temperatura (5).
K) Depois de se ter apagado
o sinal luminoso da
temperatura (5), abrir um
pouco, no sentido anti-horário,
a válvula do vapor (4) e deixar
sair a água que se encontra
no tubo (9) atéquando
começar a sair vapor. Quando
começar a sair vapor feche a
válvula (4).
L) Coloque um recipiente
contendo o leite debaixo do
tubo de saída do vapor-
cappuccino (9) de modo que
uma parte fique introduzida
A seguir abra a válvula do
vapor (4) para obter o vapor
desejado. Um furo específico
situado no lado do bico torna
possível a absorção de uma
pequena quantidade de ar
que misturando se com o leite
o transforma em espuma para
o cappuccino.
No caso em que tal não
aconteça, modifique a
posição do recipiente atéque
o furo de absorção do ar (16)
fique coberto pelo leite.
Épreferível usar leite muito
frio.
Fechar o interrupto do
vapor (3). No caso em que
notar uma pequena
diminuição na saída do vapor,
feche a válvula do vapor (4) e
accione o interruptor do café
(2), atéque saia água fria do
porta-filtro (7).
A seguir repita as operações
descritas nos ponto K e L.
M) É muito importante
evitar de preparar um café
expresso logo a seguir à
saída do vapor porque a
máquina ainda está muito
quente. Para reduzir
rapidamente a temperatura da
máquina e obter um café
expresso perfeito, siga as
seguintes instruções:
- Verifique que o porta-filtro
não contenha um serving.
- Accione o interruptor do café
(2) e coloque um recipiente
debaixo do porta-filtro (7)
consentindo a saída da água
quente atéque se acenda o
sinal luminoso da temperatura
(5).
- Desligue o interruptor do
café(2) interrompendo deste
modo o fluxo de água e
aguarde que o sinal luminoso
da temperatura (5): agora a
máquina estánovamente
pronta para preparar um outro
caféexpresso.
O PRODUTOR RESERVA SE O
DIREITO DE EFECTUAR
MODIFICAÇÕES OU MELHORIAS
SEM AVISO PRÉVIO.
CARACTERÍSTICAS TÉCNICAS:
VOLTAGEM: VOLTAGE: 220/230 V
(110/120 V US - 110 V J)
POTÊNCIA: 1.050 W.
MANUAL DE
INSTRUÇÕES
Regras gerais para o uso
da máquina
A máquina deve ser mantida
limpa, enxaguando
frequentemente a gaveta (11),
o porta-filtro (7) e o depósito
(10), o tubo de saída do vapor
(9) e o furo de absorção do ar
(16).
MUITO IMPORTANTE: nunca
introduza a máquina na água
ou na máquina de lavar louça.
A água contida no depósito
(10) deve ser periodicamente
substituída.
Depois de ter mudado a água
verifique que o tubo de
aspiração (14) esteja
colocado no interior do
depósito (10). Aconselha-se
utilizar, cada três meses, um
produto específico para
eliminar o calcário nas
máquinas de caféexpresso.
Para saborear um café
expresso perfeito
aconselhamos que mantenha
as chávenas quentes usando
o escalda-chávenas (12)
incorporado na máquina.
Funcionamento da máquina
Instalação
A) Verifique na placa
contendo os dados técnicos
(15) que a voltagem da
corrente de alimentação seja
correcta: no caso afirmativo,
ligue a máquina àtomada de
corrente.
B) Encha o depósito de água
(10) atémetade com água fria
verificando que o tubo de
aspiração (14) esteja
introduzido na água. Coloque
um recipiente debaixo do
porta-filtro (7). Accione o
interruptor geral (1) e deixe
circular a água no circuito
interno accionando o
interruptor do café(2).
C) Encha novamente o
depósito e verifique que o
tubo de aspiração (14) esteja
introduzido na água (10).
Como fazer o primeiro café
depois da instalação ou
quando a máquina foi
ligada hà pouco tempo
Para fazer com que a máquina
se encontre nas condições
ideais para fazer um perfeito
caféexpresso siga as
seguintes instruções:
D) Accione o interruptor geral
(1) e verifique que o sinal
luminoso de funcionamento
(6) esteja aceso: se a
temperatura da máquina não
ésuficiente, acende-se o sinal
luminoso da temperatura (5).
Introduza o porta-filtro (7) no
respectivo alojamento.
Aguarde atéque o sinal
luminoso da temperatura (5)
se apague. Coloque uma
chávena debaixo do porta-
filtro (7) e accione o
interruptor do café(2).
Deixe sair a água quente.
Deite fora a água quente da
chávena.
A este ponto a máquina e a
chávena estão prontas para
um café expresso perfeito
E) Extraia um serving E.S.E.
colocando-o no porta-filtro (7),
com a marca voltada para
baixo.
F) Introduza o porta-filtro (7)
no seu alojamento (8) fazendo
o rodar atéencontrar
resistência.
G) Prepare o caféaccionando
o interruptor (2): quando se
tiver atingido a quantidade
P
Downloaded from CoffeeMachineManual.com Manuals
Table of contents
Other Francis Coffee Maker manuals
Popular Coffee Maker manuals by other brands

Nespresso
Nespresso VERTUO NEXT manual

Rancilio
Rancilio Classe 8 S Use and maintenance manual

BETTY CROCKER
BETTY CROCKER BC-2806 manual

Nespresso
Nespresso Prodigio TURMIX instruction manual

Rommelsbacher
Rommelsbacher EKS 1510 instruction manual

cecotec
cecotec Cumbia POWER MATIC-CCINO Vaporissima instruction manual