Franke HCWF-28 User manual

HCWF-28 High Capacity Wall Freezer
INSTALLATION AND
OPERATION MANUAL

Important CAUTIONS & WARNINGS Page 2
Equipment Diagram: Key Components Page 4
1 Installation Page 5
2 Operating Controls Page 9
3 Loading the Freezer Page 11
4 Store-Closing Procedure Page 12
5 Periodic Maintenance Page 12
6Basic Troubleshooting Page 15
7Unit Specications Page 16
8 Product Warranty Page 17
9 Service Commitment & Contact Information Page 18
Table of Contents
ofPage 181

Important CAUTIONS & WARNINGS
General:
1. This Installation & Operating Manual contains important instructions and safety information on the High Capacity
Wall Freezer (HCWF). Read and understand the contents of this manual before attempting to: Uncrate, Install,
Operate, and Clean or perform Routine Maintenance.
2. The HCWF is designed for the temporary frozen storage and easy access to frozen sh patties and other frozen
product at commercial restaurants only. Franke authorizes no other use.
3. The HCWF may NOT be used for long term storage, only temporary storage of frozen product between the walk-in
freezer and fryer or grill station production.
4. The HCWF is designed for installation and operation indoors, in a restaurant kitchen area protected from weather,
excessive heat, excessive humidity and corrosive salt air.
5. Only persons over 15 years old may operate this equipment, following all safety and operating instructions.
Plesae read and understand all of the WARNINGS, CAUTIONS and NOTES listed below.
During Installation
This equipment must be installed by qualied personnel, in compliance with all manufacturers’ instructions and local
building, food safety and electric codes.
CAUTION! The shipping carton and pallet have banding under tension, nails or staples and possibly wood splinters.
When uncrating, wear gloves and eye protection to reduce the risk of injury.
CAUTION! The HCWF-28 model weighs 200 lbs. or 91 kg. Do not attempt to remove this unit from the shipping
carton or pallet without the help of others.
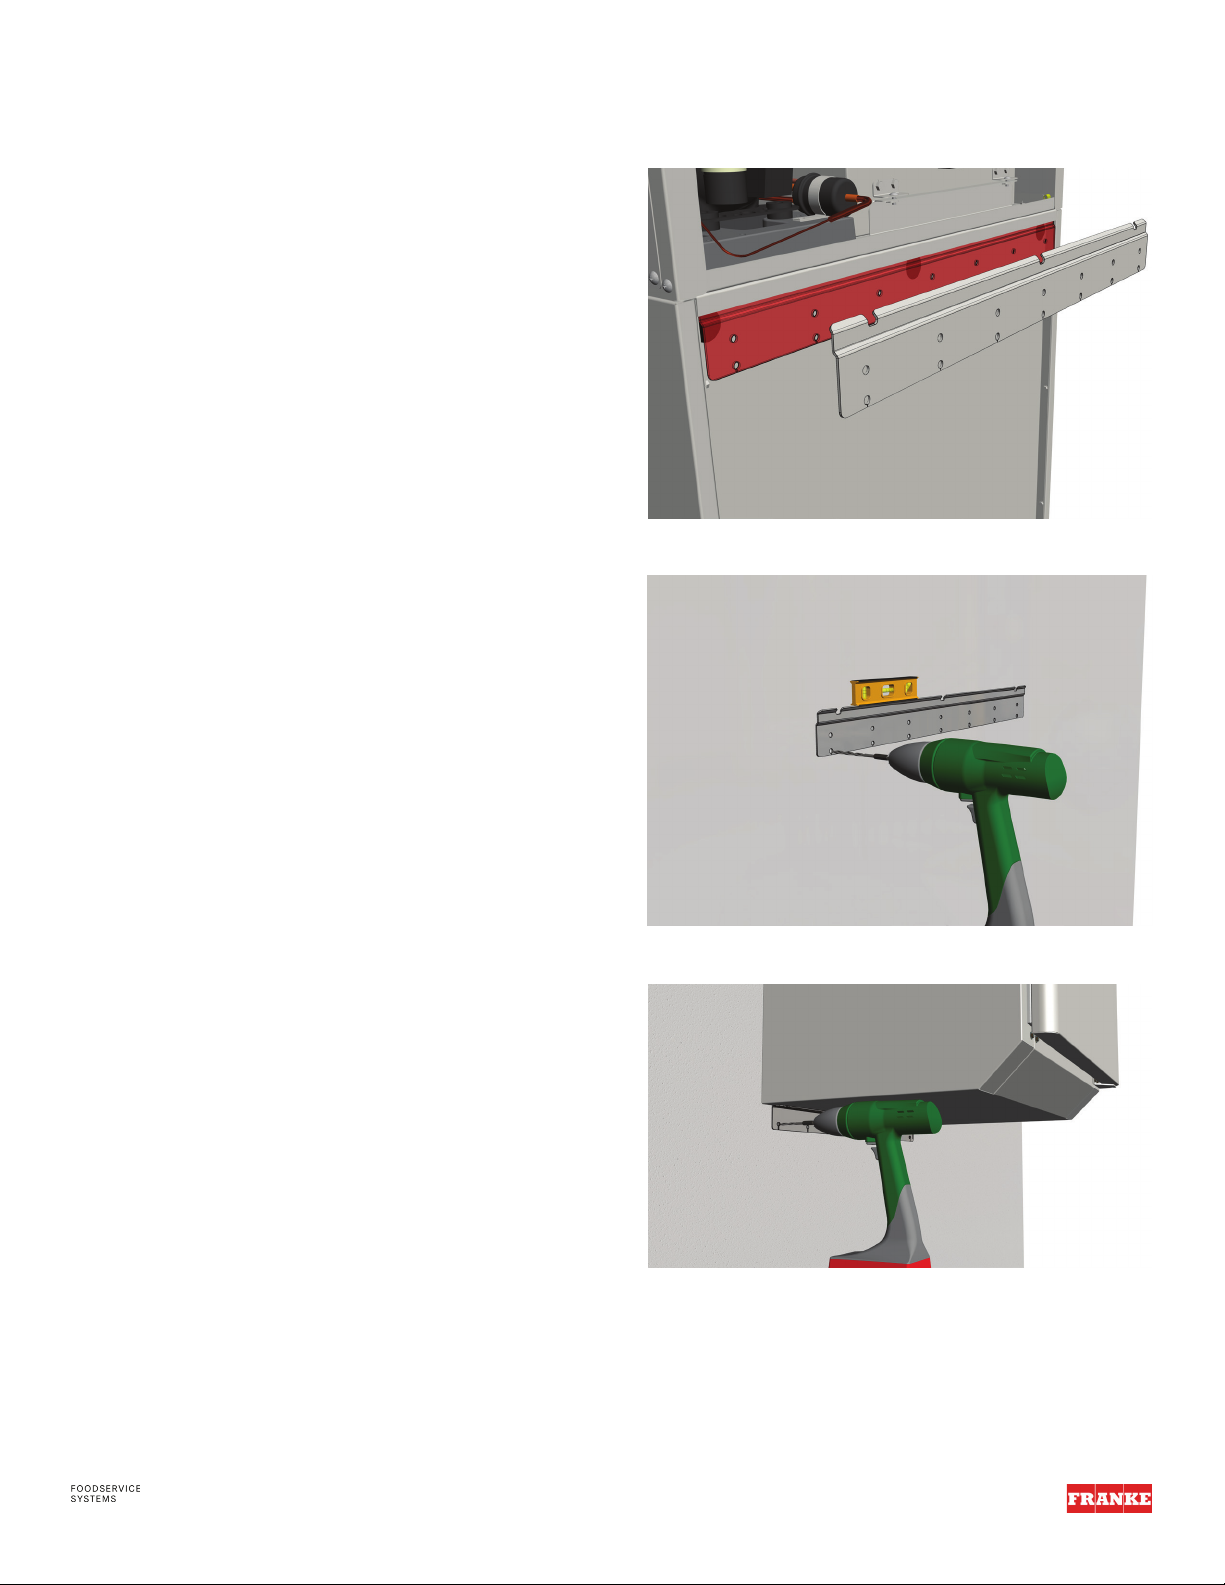
CAUTION! The HCWF-28 is designed for wall mounting and provided with special mounting strips to secure the
unit to a wall. Installer must be qualied to evaluate (mounting) wall construction, supply suitable wall anchors and
securely mount the freezer per the instructions provided. Improper mounting could result in personal injury, freezer
damage and damage to equipment located below the freezer.
When Loading Product
Always use disposable gloves when removing frozen product from the freezer, to avoid potential cross
contamination.
Important Product Loading Tips:
1. DO NOT over-ll the High Capacity Wall Freezer. This freezer requires good air circulation to maintain uniform
frozen temperatures.
2. DO NOT let box aps or inner plastic bags block or obstruct the openings or vents in the top of the storage
compartment. Blocking those openings may raise freezer compartment temperature and require the compressor to
work harder
NOTE: Recommended maximum HOLD time for all products is 24 hours.
CAUTION! Do not allow freezer door to remain open for any longer than the time required to remove the frozen
product required. Keeping the door open will raise freezer compartment temperature, require the compressor to
work harder and potentially result in a FOOD SAFETY problem.
ofPage 182

During Store Closing Procedure
1. Before closing, all remaining frozen product must be returned to long-term freezer storage.
2. This equipment must not be cleaned with a high-pressure water jet or steam cleaner.
3. Use only Cleaning and Sanitizing Agents approved by McDonald’s and specied for this application in their
restaurants.
NOTE: Never defrost the freezer by scraping the inside walls, regardless of how much frost is present. The HCWF-
28 is programmed to defrost every three hour of compressor run time. That defrost time interval will vary with
product load and how often the door is opened.
During Periodic Maintenance
WARNING! Verify the freezer is disconnected from the power source before attempting any preventive
maintenance. Failure to disconnect the electric power could result in electric shock, burns, other injuries or death.
CAUTION! The ns on a condenser coil are very sharp, and some refrigeration lines can be very hot, resulting in
possible cuts and/or burns. Avoid physical contact with the ns on the condenser coil or any related refrigeration
lines. Gloves are recommended when cleaning the condenser coil.
Basic Troubleshooting:
1. Store Personnel authorized “troubleshooting” on the HCWF is limited to the steps and procedures outlined in
Section 6 of this manual.
2. For any other service or performance problem not covered or corrected by Basic Troubleshooting procedures, call:
Franke Technical Support at 1-800-537-2653 opition 2 in North America.
3. All service or repair work must be done by a licensed professional trained and authorized to perform service on
Franke products.
4. Only factory authorized repair parts may be used when servicing this unit.
ofPage 183

Franke HCWF Key Components
Model HCWF-28 (18006422 shown)
Power ON/OFF Switch
Temperature Display
& Controller
Front Vented Condenser
Coil Access Panel
Three Position Shelf Supports
Adjustable Upper
& Middle Shelves
ofPage 184
Freezer Compartment Door
(Hinged Right)

1 Installation
1. Remove Freezer from Shipping Carton
This unit will arrive in a skid-mounted carton.
CAUTION! The shipping container may have staples and will have banding under tension, which can cause
injuries. Wear gloves and eye protection to reduce the risk of injury when removing the carton.
– Cut the plastic banding using heavy scissors or tin snips.
– Use caution to avoid contact with banding, when cut.
– Lift cardboard carton straight up and off unit.
2. Leave Unit on Skid Until Ready to Wall-Mount
CAUTION! The unit weighs 200 lbs (91 kg). Do not attempt to remove it from the shipping skid without assistance.
– Peel the protective white plastic lm from all stainless steel surfaces (front, sides, bottom and
compartment interior).
3. Remove Packing & Loose Components
The High Capacity Wall Freezer has one compartment door and three interior wire shelves that have been
secured so they won’t open or shift during shipping. Remove any tape securing the door. Remove any foam
blocking and tape used to secure the product storage shelves. The shelves can be removed to lighten the unit
during wall mounting.
4. Determine Freezer Wall Mounting Location
Identify the wall-mounting location, per the store equipment plan.
The High Capacity Wall Freezer is typically mounted immediately right or left of the Fry Station.
5. Electrical Preparation
Before you wall mount this unit, locate the appropriate 120-volt power outlet, typically the closest wall outlet. A
ten-foot power cord with grounded plug is provided with the Freezer. This cord will be shipped coiled inside the
open-top compressor compartment.
6. Wall Structure & Surface Preparation
The mounting wall must be capable of supporting 100 lbs. per linear foot. If drywall construction is evident, the
wall may need reinforcing with 1/2-inch thick plywood. Cut plywood to size and securely anchor it to the wall
structure (studs). A minimum of two wall studs are required for proper anchoring.
ofPage 185

7. Wall Mounting the Fillet Freezer
– A steel offset mounting strip has been
provided for wall mounting this unit. This
mounting strip will engage the full width of the
freezer case top-rear frame/ange (Fig 1).
– Locate center point of desired case-mounting
position on the wall surface. Measure up 80”
from the nished oor.
– Place the bottom of the mounting strip at
that measured height, against the wall and
on-center with your mark. Level the mounting
strip with a small spirit or laser level. Mark
location of the ve screw holes in the
mounting strip.
– The mounting strip must be anchored to a
minimum of two wall studs for proper support.
For new store installation, verify if mounting
wall has plywood backing.
– Drill ve pilot holes in the anchor wall.
– Secure mounting strip to wall using No.12 x
2” long [minimum] wood screws. Make sure
top edge of strip protrudes from wall, so
ange on freezer can slip behind that strip.
Recheck level of mounting strip (Fig 2).
– Get help and lift unit from sides. Lift it up to
a height that will clear the mounting strip
with top/rear frame ange on cabinet, then
slowly lower case ush with wall, to securely
engage mounting strip along its full length.
IMPORTANT: Ensure unit frame ange slips
behind the mounting strip, while you continue
to supporting weight of cabinet.
– A stainless steel ‘L’ nish bracket is provided
to provide additional case support and a
clean nished look below the freezer. Hold
nish bracket against the wall, abutting the
case bottom. Secure strip with pre-drilled
holes to wall using the stainless steel
mounting screws provided (Fig. 3).
Fig 1. Offset Mounting Strip
Fig 2. Securing Offset Mounting Strip
Fig 3. Securing “L” Finish Bracket
ofPage 186

– Install four or ve screws to the refrigeration
compartment top brace. Drill pilot holes as
needed. Use No.12 x 2” long [minimum]
wood screws to secure top frame to wall
(Fig. 4).
– Span the unistrut across two ceiling trusses
above the drop ceiling (Fig. 5).
– Screw the all thread into the nut sert
attached at the top of the freezer and behind
the evaporator area (Fig 6)
– Secure the all thread to the unistrut with
supplied hardware (Fig 7).
– Cover the exposed all thread between the
HCWF and the drop ceiling with the split
plastic tube.
– Remove and uncoil the power cord from
refrigeration compartment. Plug it into the
120-volt/60-Hz outlet identied earlier. Any
excess power cord can be coiled inside the
refrigeration compartment, but away from
fan and hot coils. Use plastic wire ties, as
needed.
Fig 4. Securing Top Brace
Fig 5. Unistrut Installation
Fig 6. All Thread Installation to HCWF
Fig 7. All Thread Installation to Unistrut
ofPage 187
7. Wall Mounting the Fillet Freezer (Continued)
Fig 8. Complete Assembly Shown for Reference

8. Initial Cleaning & Shelf Mounting
Clean all interior and exterior surfaces of the
freezer using approved McDonald’s cleaning
chemicals, according to instructions.
The High Capacity Wall Freezer comes with
three wire form shelves that slide onto right and
left shelf supports. The shelf supports have six
adjustable shelf positions. Slide the bottom shelf
into the nonadjustable bottom position. The
middle and upper shelves can be positioned to
accommodate different frozen food boxes or
packaging, as needed (Fig 9).
IMPORTANT: The shelf support system helps
maintain an air gap and good cold air circulation
around the freezer compartment. Always use the
wire shelves and position them properly in their
shelf supports.
Fig 9. Interior Cleaning
ofPage 188

2 Operating Controls
1. Power-ON/OFF Switch
The HCWF is provided with a main Power-
ON/OFF switch mounted above the freezer
compartment, just left of the temperature
display/controller. The switch will light up when
the power is ON (Fig 10).
IMPORTANT: Never turn OFF the Power Switch
when the freezer is in use.
2. Temperature Display, Set Point & Manual Defrost
The digital temperature display shows the
actual unit operating temperature at all times. If
adjustment becomes necessary, the four buttons
on the digital temperature display are used to
change the target set temperature (Fig 11).
The HCWF internal thermostat maintains
the recommended frozen product storage
temperature range of 0° (zero) to –10° F [-18
to -23° C]. This thermostat is calibrated, set
and tested at the factory, prior to shipment from
Franke.
Bring Freezer Down to Holding Temperature:
As soon as the unit is plugged in, the compressor will start and the unit will begin to chill. Keep the freezer door
closed. Do not load any product until the freezer temperature display reaches 0 (zero) to –10° F [-18 to -23° C].
This initial cool-down may take 30-45 minutes.
NOTE: Once the freezer is down to operating temperature, the compressor will shut off. While the compressor is
off, the fan will cycle on and off to save energy, when the freezer isn’t being used.
In addition to the Power ON/OFF switch, the only operating control on the HCWF is the digital temperature display
and its four small buttons used to change the target set temperature (set point) of the freezer. Adjusting target
temperature may be necessary to compensate for higher or lower temperature or humidity in the kitchen, or the
close proximity of heat producing equipment. NOTE: The “set point” is the mid-point in the compressor-on…
compressor-off operating cycle, which is factory set at plus or minus (+/-) 2° F.
Fig 10. ON/OFF Power Switch and Display
Fig 11. Digital Temperature Display
ofPage 189

To Change Temperature Set Point:
1. Push ‘SET’ button to display: SEt (Fig 12)
then press it again to display the set point
temperature, which is factory set at - 5° to -7° F.
2. Push the up-arrow button (upper-left) to raise
target temperature, the down-arrow button
(lower-left) to lower set point.
3. The current compartment temperature will
automatically reappear.
(If the target temperature was reduced, the
compressor should come on to lower the
compartment temperature.)
To Initiate Manual Evaporator Coil Defrost (ONLY If Directed*):
NOTE: The HCWF is provided with a heater and controls for automatic evaporator coil defrosting. Under
normal operating conditions, NO MANUAL DEFROSTING is required by the operator.
*However, if the compartment temperature remains above set point and ice is visible on the evaporator coil,
Franke Technical Services may advise starting a manual defrost cycle.
1-800-5FRANKE (1-800-537-2653) select option 2
To Initiate Manual Defrost:
1. Push and hold the down arrow button on the
display for 5 seconds (Fig 13), until digital
display reads: dEF
2. The compressor will shut off and the
evaporator heater coil will come on to melt
any excess ice buildup. At the end of the
manual defrost cycle, the heater will shut
off, the compressor will start and the display
will return to the actual freezer compartment
temperature.
Fig 12. Change Temperature Set Point
Fig 13. Manual Defrost
ofPage 1810

3 Loading the Freezer
The High Capacity Wall Freezer is designed to
provide more cubic feet of compartment storage
space, with two shelves for boxed product,
including:
– Upper and middle wire shelfs that are
adjustable for different box or case heights
– A raised wire-form bottom shelf designed
to ensure good air circulation in the freezer
compartment (Fig 14).
Important Product Loading Tips:
– DO NOT over-load the High Capacity
Wall Freezer. Like all freezers, it
requires good air circulation to maintain
uniform frozen product temperatures.
– DO NOT let inner plastic bags
block or obstruct the Evaporator air
intake openings inside the freezer
compartment.
– DO make sure all cartons are pushed
back fully into the compartment and that
the front door closes and seals (Fig. 15).
NOTE: The recommended maximum
HOLD time for all products is 24 hours.
Fig 14. Shelf Placement
Fig 15. Product Loading
ofPage 1811

4 Daily Store-Closing Procedures
The outside of the HCWF must be cleaned every
day. Wipe off and clean the HCWF exterior,
using approved McDonald’s cleaning chemicals,
according to instructions provided (Fig 16).
Be sure to clean the unit’s: front/door, both sides
and bottom of the freezer.
IMPORTANT: Do not spray cleaners directly on
or expose the small control panel to excessive
moisture during cleaning.
5 Periodic Maintenance
WARNING! Verify the freezer is disconnected from the power source before attempting any preventive
maintenance. Failure to disconnect the electric power could result in electric shock, burns, injuries or death.
CAUTION! The ns on a condenser coil are very sharp, and some refrigeration lines can be very hot, resulting in
possible cuts and/or burns. Avoid physical contact with the ns on the condenser coil or any related refrigeration
lines. Gloves are recommended when accessing the internal components of any refrigerated equipment.
Weekly – Inspect & Clean Freezer Interior
(Also See PMM Page: RF 6A W1)
1. Remove Unused Product
Remove any unused product from the HCWF and return it to bulk frozen storage or dispose of per store
procedures.
2. Turn OFF & Unplug HCWF To Begin Cleaning Procedures
– Turn OFF power switch.
– Unplug HCWF from electric power outlet.
– Open freezer door to allow the freezer interior to defrost and warm.
3. Remove Shelves for Cleaning
While freezer compartment is defrosting, remove the three wire shelves. They can be washed and sanitized in the
main pot sink.
Fig 16. Cleaning Exterior of HCWF
ofPage 1812

4. Freezer Compartment Cleaning
Allow freezer to completely defrost and warm up to
a surface temperature above freezing (32°F/0°C),
before cleaning the freezer interior (Fig 17).
– Wipe out any accumulated water, paper or
food waste on the freezer bottom.
– Wipe down all interior surfaces with
approved McDonald’s cleaner and
sanitizer.
– Leave the freezer door open to allow the
compartment to dry, before plugging it in.
5. Returning High Capacity Freezer to Service
– Return and position the bottom, middle and upper shelves. Close the compartment door.
– Plug the power cord into the grounded 120-volt/60 Hz electric outlet and turn on power ON/OFF switch.
– The unit compressor will start and begin chilling the freezer compartment to target frozen product storage
temperature. Do not load any product until the freezer temperature display reaches 0 (zero) to -10° F [-18
to -23° C]. This cool-down may take 30-45 minutes.
Fig 17. Cleaning Freezer Compartment
ofPage 1813

Quarterly/Every Three Months - Clean
Condenser Coil & Inspect Door Gasket
(Also See PMM Page: RF 6A Q1)
– Remove the upper-right vented front
access panel to inspect and access the
condenser coil. Just pull up and lift it out.
Check back of panel for any debris or
blockage (Fig 18) .
– Use a soft-bristle cleaning brush to
gently remove dust and debris in and
around the coil.
IMPORTANT: Carefully brush with-the-
ns, up-and-down. They are fragile
and easily bent (Fig 19).
– Replace the vented front access panel.
Insert top, then allow bottom to drop into
channel.
– Inspect the entire perimeter of the
magnetic door gasket for tears, cracks
or other damage (Fig 20). If damage is
found it will need to be replaced.
Contact Franke at:
1-800-537-2653 opition 2 for
Technical Services.
Fig 18. Accessing Coil
Fig 19. Cleaning Coil
Fig 20. Inspecting Door Gasket
ofPage 1814

6 Basic Troubleshooting: HCWF Freezer
PROBLEM POSSIBLE CAUSE WHAT TO DO
Freezer won’t run when unit is
plugged into a grounded electric
outlet.
Unit not plugged in Verify unit is plugged into outlet.
Wall outlet isn’t working Plug freezer into another nearby outlet.
If individual outlet is not working,
use alternate and contact licensed
electrician to repair or replace outlet,
as needed.
Circuit breaker has been tripped Check circuit breaker to see if it has
tripped. Reset if necessary. If these
steps do not x problem, call Franke at
1-800-537-2653 opition 2 for Technical
Services.
Freezer is running but it won’t
reach target operating tempera-
ture of 0° (zero) to -10° F (-18° to
-23° C).
Ice buildup on internal
Evaporator Coils
Verify freezer is has been recently
defrosted following Preventive
Maintenance Procedures in Section
5. If ice buildup is present, remove all
product, defrost, reassemble, plug in
and allow sufcient time to reach target
operating temperature.
Condenser Coil is dirty
or clogged with debris
Use a soft bristle brush to clean coils,
per Preventive Maintenance
instructions in Section 5. If these steps
do not x problem, call Franke at
1-800-537-2653 option 2 for Technical
Services.
Door gasket is damaged Inspect door gasket for cracks or
damage. Gasket should provide tight
seal on all sides of door. If damage is
found, call Franke at 1-800-537-2653
opition 2 for Technical Services.
ofPage 1815

Key Performance Specications
Product Model: HCWF-28
Part Number: 18006422 (115V) 18006646 (230V)
Capacity: 7.3 cubic feet .2 cubic m
System Type: Forced air cooling system
Refrigerant Type Used: R-404A
Agency Listings: CULUS & NSF
Key Dimensions & Weights
Unit Width: 28.25” 718 mm
Unit Depth [front-to-back]: 24.37” 619 mm
Unit Height: 44.68” 1135 mm
Minimum Door Swing: +27” (add to depth) +686 mm (add to depth)
Shipping Weight: 280 lbs. 127 kg
Unit Operating Weight: 200 lbs. 91 kg
Electric Power Requirements
Voltage: 115 VAC 230 VAC
Phase: 1-phase
Cycles: 60 Hz 50 HZ
Amperage: 6.2 AMPs
Watts: 713
Power Cord Provided: Yes: 10’ Yes: 3.1 m
Plug Provided:? 90° straight blade
Installation Requirements
Max. Room Temp.: 82°F 82°F
Max. Room Humidity: 60% 60%
Min. Side Clearance: 0”
(2” recommended)
0 mm (51 mm
recommended)
Min. Top Clearance: 12” recommended 305 mm recommended
7 Unit Specications
Model HCWF Series – High Capacity Wall Freezer
The HCWF is a compact, custom freezer designed for short-term storage of frozen product, providing quick and
easy access near point-of-use. Designed to be wall mounted near the Fryer Station to save space, the HCWF is
currently available in a 28” wide model with a single door with a magnetic door gasket. The freezer compartment
is provide with two wire-form shelves that slide into right and left shelf supports that provide six shelf (height)
positions. The HCWF has the following specications, utility and installation requirements:
ofPage 1816

8 Franke Wall Freezer Limited Warranty
Franke Foodservice Systems (“Franke”) warrants new equipment manufactured in Franke’s own facilities and
installed in the United States and Canada to be free of defects due to poor materials or workmanship for the
period of time listed below (following the date of original installation):
Franke-Manufactured Equipment
– Stainless Steel Surfaces – Life of the equipment
– Compressor -- 5 Year Extended Warranty, as detailed below
– All Other Components – 2 Years Parts and Labor
– Replacement (Authorized Service) parts – 90 Days Parts and Labor
5-Year Extended Compressor Warranty
– Two Years from Date of Installation – Parts & Labor
– 3rd through 5th Year from Date of Installation – Parts only
In accordance with the compressor manufacturer’s policy, the serial number plate afxed to the compressor
must be returned with the service invoice before reimbursement will be made.
Exclusions: Certain Franke parts that are expendable by nature and that need to be replaced frequently may
not be covered. Franke is not liable under these warranties for repairs or damages due to improper operation,
attempted repairs or installation by unauthorized persons, alterations, poor water quality, abuse, re, ood or acts
of God.
Additionally, this warranty may be voided in the case of:
– Failure to follow Franke instructions for use, care or maintenance
– Removal, alteration or defacing of the Franke-afxed serial number
– Service by a non-authorized service company
This warranty is conditioned upon Franke receiving notice of any defect subject to this warranty within thirty (30)
days of its original discovery by the Buyer.
Other Equipment (Not Manufactured by Franke)
Equipment not manufactured by Franke (commonly known as “buyouts” or purchased goods) and manufactured
by other entities is covered by the warranties, if any, of those third-party manufacturers. Where such third party
manufacturers provide warranties on any or all portions of said “buyouts,” Franke agrees to transfer all such
warranties to the Buyer.
ofPage 1817

9 Franke Service Commitment
Franke Foodservice Systems’ Technical Support Department and its third-party Service Network are committed
to meeting the unique service needs of restaurant operators worldwide. Accordingly, we strive to provide the
following response times to service requests for Franke- manufactured equipment:
1. Provide contact with the customer:
– Within 30 minutes of request for service during normal business hours
– Within 90 minutes after normal business hours (including weekends)
2. Perform service visit:
– The same day for emergency service*
– Within 24 hours for standard service
3. Target a 90% “rst call” x rate
4. Provide 90-day warranty on the service performed
*An “emergency” is dened as an equipment operating condition that poses an immediate risk to the safety of
restaurant workers or customers.
This response time breakdown applies throughout the week and weekend. Due to varying customer locations,
and varying service agent locations and schedules, response rates may occasionally be extended. In these
situations, Franke Technical Support will work directly with the customer to nd mutually acceptable options.
Franke reserves the right to use service agents outside of the stated Service Network.
Service Network - United States & Canada
Franke provides 24-hour, 7-day (24/7) response to customer service requests, through its own Call Center.
Whenever possible, Franke selects service agents who belong to the Commercial Food Equipment Service
Association (CFESA). This trade association currently has more than 450 members in the United States, Canada,
Mexico and Puerto Rico.
When Franke cannot select a CFESA member, it nonetheless adheres to the CFESA standards for qualied
service agents in North America. Among them are:
– Provide 24 Hour emergency service
– Factory authorized for warranty service
– Employs factory trained and certied technicians
– Stocks & uses OEM parts
– Has system for communication with eld technicians
Performance of service agents, including their parts stocking abilities, call response time, service rates and
customer satisfaction are monitored by the Franke Field Service Department via online, written and phone
surveys. This Service Network list is updated annually by Franke Technical Support.
U.S. & Canada Contact Information:
Franke Technical Services
1-800-5FRANKE (1-800-537-2653); select option 2
Email: [email protected]
ofPage 1818

© 2013 Franke Foodservice Systems, Inc, - This media is the condential and proprietary property of Franke Foodservice Systems, Inc and shall not be reproduced in any
form of media without the expressed written permission of a Franke representative. Due to continuous product development, Franke Foodservice Systems, Inc reserves the
right to make changes in design and specications without prior notice. Under license Franke Technology and Trademark Ltd., Switzerland
(Rev A, August, 2013)
If you need assistance please call
Franke Technical Service
Tel +1-800-5-Franke option 2
(1-800-537-2653) option 2
Franke Foodservice Systems Inc.
800 Aviation Parkway
Smyrna, TN 37167
USA
Phone: +1.615.462.4000
Toll Free: +1.888.4 FRANKE
www.frankefs.com
Table of contents
Other Franke Freezer manuals

Franke
Franke GSFP 450 R290 User manual

Franke
Franke 2DCF-30 User manual

Franke
Franke FSDF 300 NF XS E User manual

Franke
Franke HCWF-P User manual

Franke
Franke SU03 User manual

Franke
Franke 2DCV-30 User manual

Franke
Franke HCMF-30P User manual

Franke
Franke 2DCV-30 User manual

Franke
Franke FSDF 330 NF NE F Operating manual

Franke
Franke HCMF-18 User manual