Freedom Freedom FR-3neo User manual

User Guide
Freedom FR-3neo
Warranty statement.
Sound Projections Six Year Limited Warranty.
The Freedom FR-3neo is warranted to be free of defects in materials and work-
manship for a period of 6 years from the date of original purchase, subject to the
following conditions:
• This warranty excludes defects caused by normal wear, abuse, shipping
damage or failure to use product in accordance with instructions. All
warranty service must be performed or authorized by Sound Projections.
Any service or modifications performed without authorization from Sound
Projections may void this warranty.
• The lead acid rechargeable battery in the FR-3neo model is warranted for
a period of 2 years.
• Wireless microphone and CD/MP3 player options are warranted for a
period of two years.
• Prior to returning your system for repair and/or warranty service, please
contact our customer service department at the address below for a
Return Authorization (RA) number.
Sound Projections
22130 South Vermont Avenue, unit E
Torrance, California 90502
(310) 618-9619
www.soundprojections.com 560-23 Rev A, FR-3neo, 07/07

15
This page left intentionally blank.
2
Welcome
Congratulations on purchasing a portable sound system from Sound Projections.
Our products combine superior design with quality components and rugged
construction. We’re proud of the products we manufacture, and appreciate the
confidence you’ve shown by choosing us.
Please take a few of minutes to read this user guide. Our products incorporate
many unique features, and your knowledge of them will enhance the performance
of your system.
John Munroe, President
and the entire staff at Sound Projections
Unpacking
System inspection and inventory.
Check the unit carefully for damage which may have occurred during transit, and
contact the freight carrier immediately should you find damage.
Save the shipping carton and packing materials.
The shipping box was designed to ship your unit safely.
Contents
Safeguards. . . . . . . . . . . . . . . . . . . . . . . . . . . . . . . . . . . . . . . . . . . . . . . . . . . . . . . . . . . . . 3
Getting started . . . . . . . . . . . . . . . . . . . . . . . . . . . . . . . . . . . . . . . . . . . . . . . . . . . . . . . . . . 4
Charging the battery . . . . . . . . . . . . . . . . . . . . . . . . . . . . . . . . . . . . . . . . . . . . . . . . . . . . . 5
Choosing an input . . . . . . . . . . . . . . . . . . . . . . . . . . . . . . . . . . . . . . . . . . . . . . . . . . . . . . . 6
Wireless system operation. . . . . . . . . . . . . . . . . . . . . . . . . . . . . . . . . . . . . . . . . . . . . . . . . 8
Changing wireless channels . . . . . . . . . . . . . . . . . . . . . . . . . . . . . . . . . . . . . . . . . . . . . . 10
Using talkover . . . . . . . . . . . . . . . . . . . . . . . . . . . . . . . . . . . . . . . . . . . . . . . . . . . . . . . . . 12
Setting the tone controls . . . . . . . . . . . . . . . . . . . . . . . . . . . . . . . . . . . . . . . . . . . . . . . . . 12
CD operation (see separate instructions)
Changing the fuse . . . . . . . . . . . . . . . . . . . . . . . . . . . . . . . . . . . . . . . . . . . . . . . . . . . . . . 13
Specifications. . . . . . . . . . . . . . . . . . . . . . . . . . . . . . . . . . . . . . . . . . . . . . . . . . . . . . . . . . 14
Warranty Statement . . . . . . . . . . . . . . . . . . . . . . . . . . . . . . . . . . . . . . . . . . . . . . . . . . . . . 16

14
Specifications for FR-3neo.
Rated power output.................................................100 watts
Max SPL .................................................................123 dB ‘loud’ mode
................................................................................115 dB ‘normal’ mode
Frequency response ...............................................70 Hz - 15 kHz
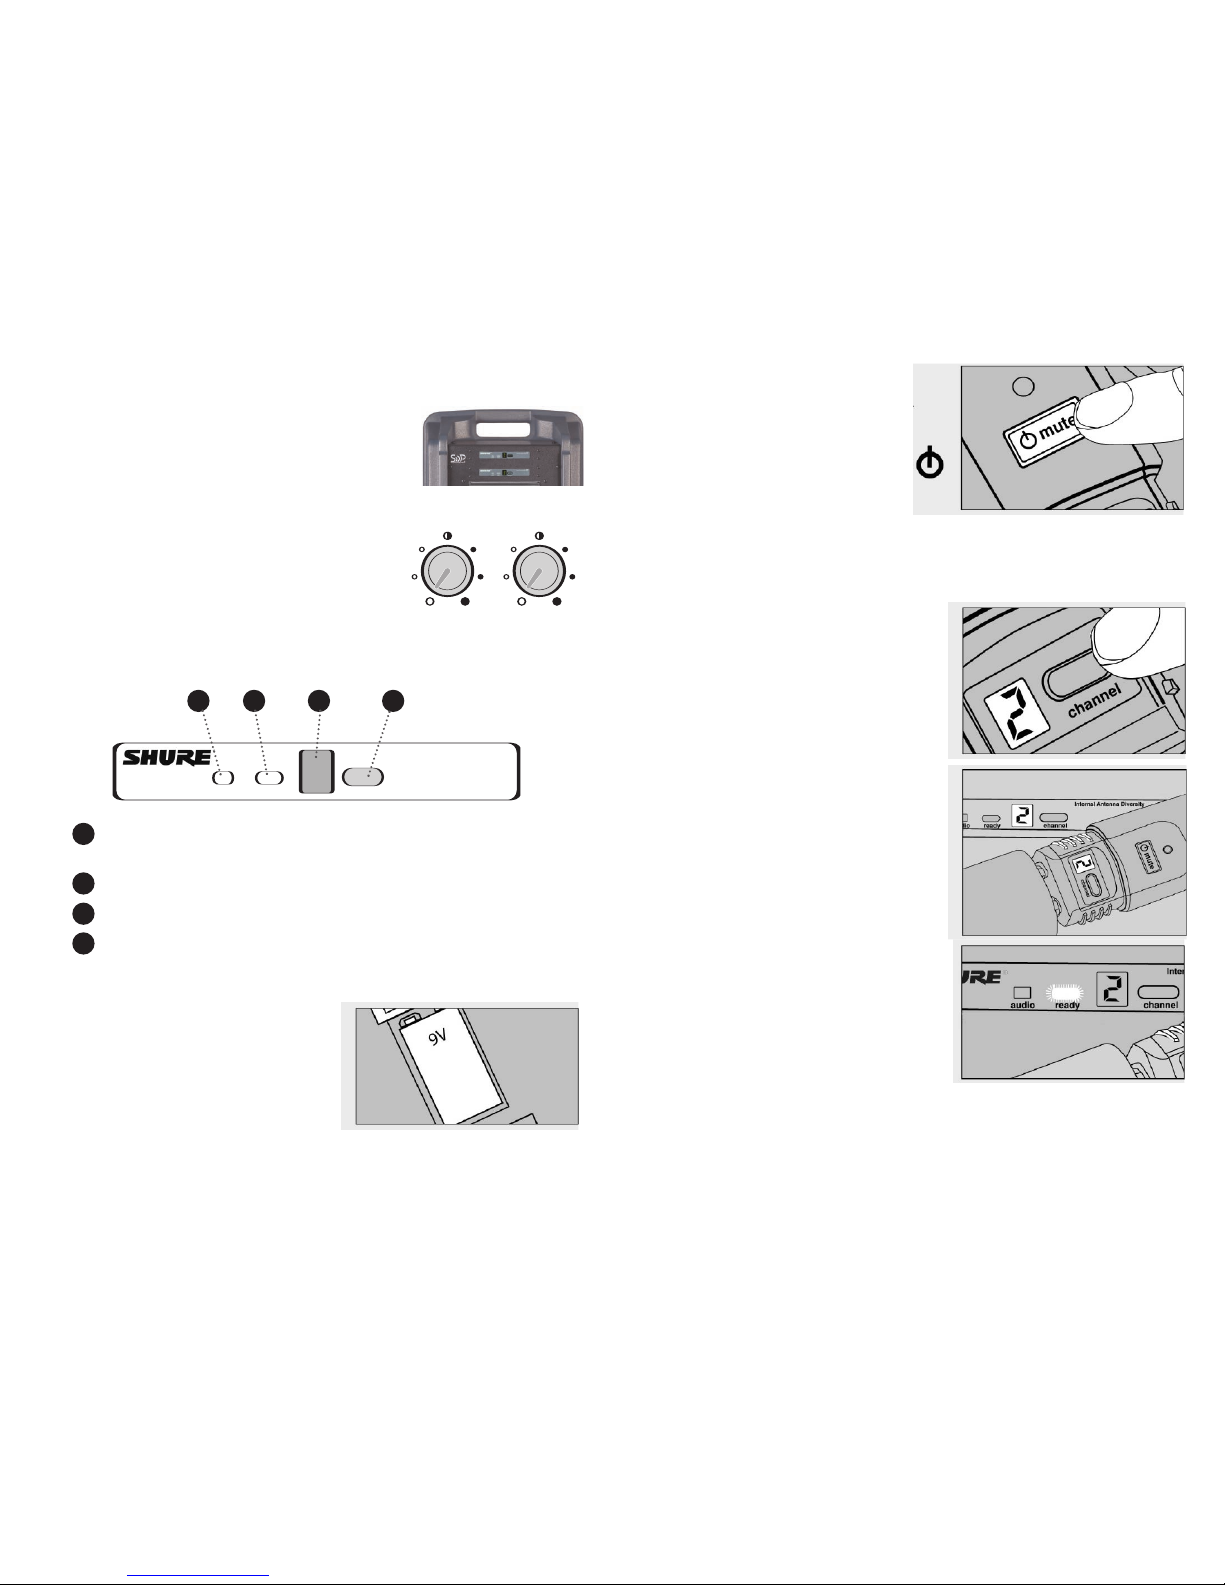
Wireless system (optional)......................................Shure 10 channel UHF
Battery life ...............................................................4-8 hours typical
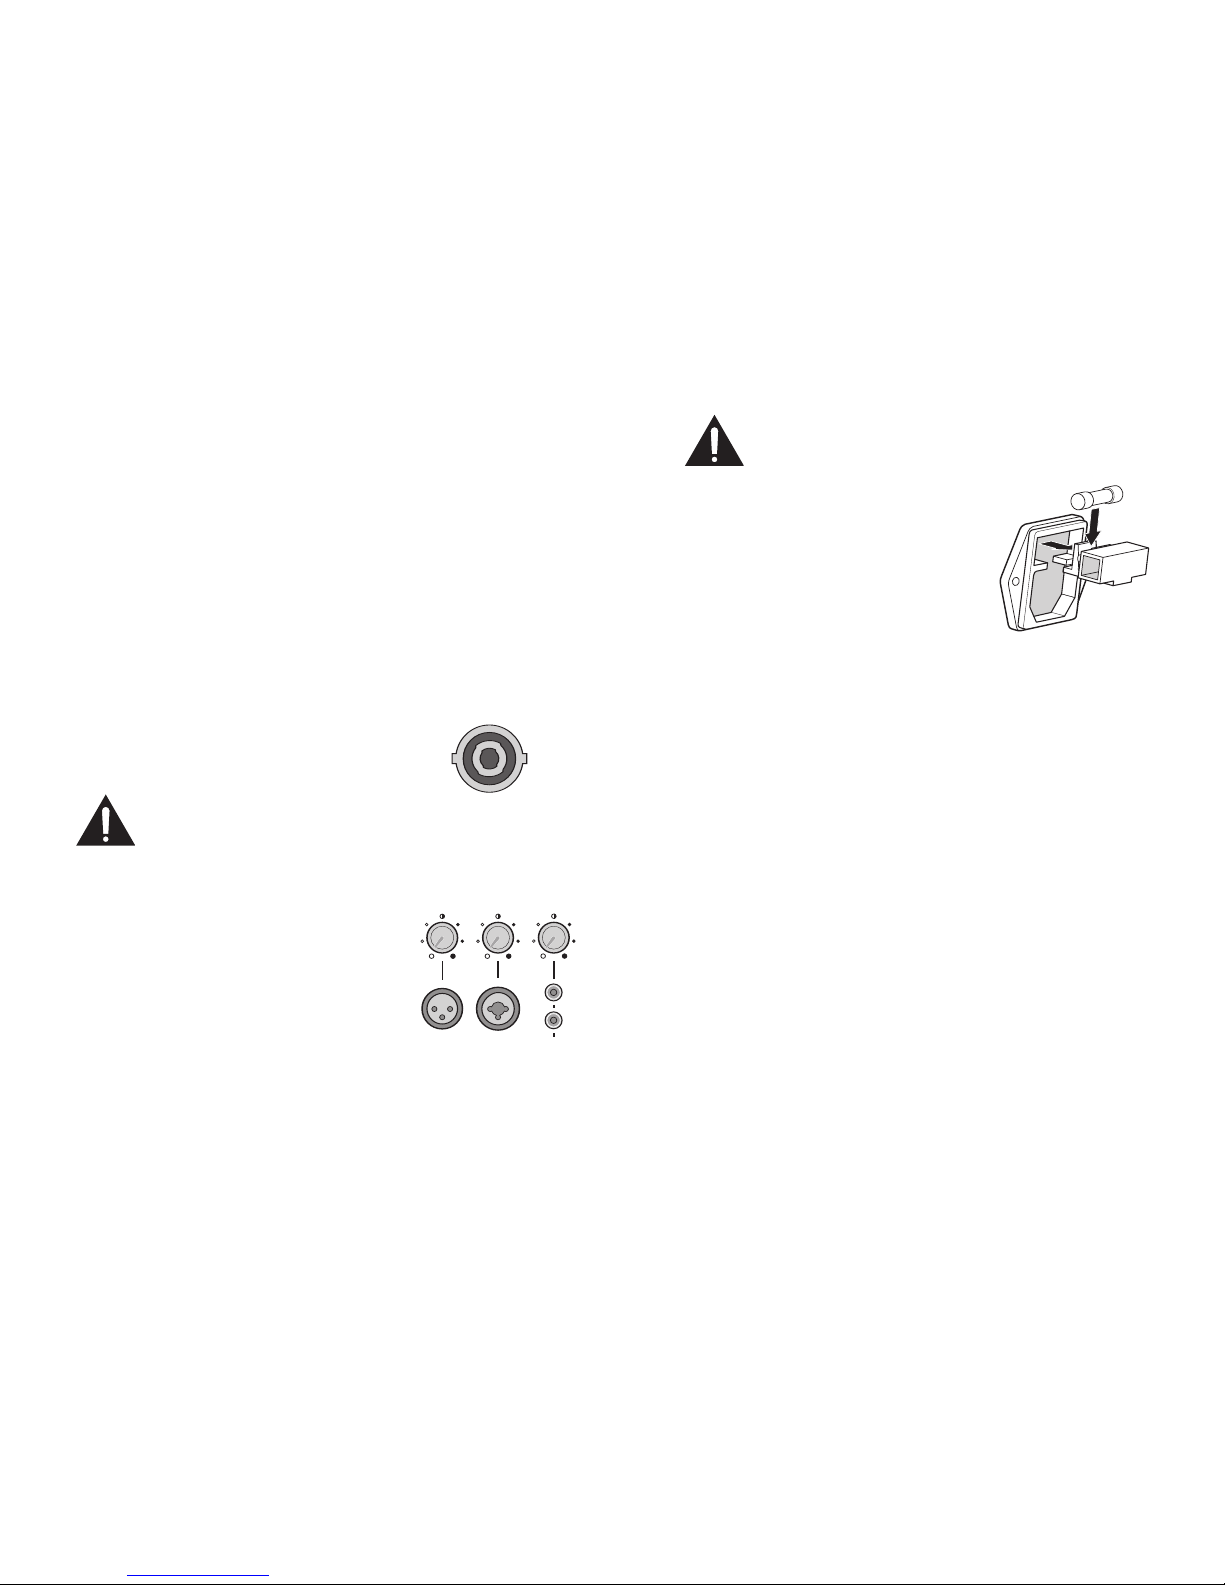
Power requirements................................................110/240 VAC - 50/60 Hz, 120 watts max
Dimensions (HWD) .................................................23 x 15 x 13”
Weight.....................................................................35 pounds (37lbs with OPT-HB1)
Inputs ......................................................................(2) mic level, balanced, XLR
................................................................................(1) line level, 1/4" phone
................................................................................(1) tape/CD level, dual RCA
Outputs....................................................................(1) line level, 1/4" phone
................................................................................(1) tape/CD level, dual RCA
................................................................................(1) speaker output
Specifications and models subject to change without notice
3
Important safeguards
CAUTION: To reduce the risk of electric shock, do not remove the cover. No user-
serviceable parts inside. Refer servicing to qualified personnel.
ATTENTION: Pour eviter les risques de choc électrique, ne pas enlever le
couvercle. Aucun entretien de pièces intérieures par l'usager. Confier l'entretien
au personnel qualifié.
WARNING: To prevent fire or electric shock, do not expose this equipment to rain
or moisture.
AVIS: Pour eviter les risques d'incendie ou d’électrocution, n'exposez pas cet
article à la pluie ou a l'humidité.
Explanation of graphical symbols.
The lightning flash with arrowhead symbol, within an equilateral triangle,
is intended to alert the user to the presence of uninsulated “dangerous
voltage” within the product’s enclosure that may be of sufficient magni-
tude to constitute a risk of electric shock to humans.
The exclamation point, within an equilateral triangle, is intended to alert
the user to the presence of important operating and maintenance (servicing)
instructions in the literature accompanying the appliance.
Explication des symboles graphiques.
Le symbole éclair avec point de flèche à l'intérieur d'un triangle
équilatéral est utilisé pour alerter l'utilisateur de la presence à l'intérieur
du coffret de “voltage dangereux” non isolé d'ampleur suffisante pour
constituer un risque d'elétrocution.
Le point d'exclamation à l'intérieur d'un triangle équilatéral est employé
pour alerter les utilisateurs de la présence d'instructions importantes
pour la fonctionnement et l'entretien (service) dans le livret d'instruction
accompagnant l'appareil.
RISK OF ELECTRIC SHOCK
DO NOT OPEN
RISQUE DE CHOC ELECTRIQUE
NE PAS OUVRIR
CAUTION
AVIS

13
Replacing the fuse.
Warning! Replace fuse with same type and
rating as indicated on panel.
1. Remove power cord plug from panel
mounted AC receptacle
2. Pry fuse carrier away from receptacle
with small screwdriver
3. Remove fuse to be replaced.
4. Install new fuse
5. Insert fuse carrier with new fuse back into receptacle
6. Plug power cord back into AC receptacle
4
Getting started.
Whether you’re a first-time user or an experienced presentation professional, the
Freedom FR-3neo was designed with you in mind. Easy to use and loaded with features,
you’ll need only a few minutes to set up and begin operation. This user guide is full of
valuable information — please read it!
!! Charge the battery!
The FR-3neo is shipped with the battery fully charged. If stored for more than
two weeks before use, plug it in to top off the battery. See “Charging the battery”
on page 5.
1. Set up the sound system in front of your audience.
Proper set-up is important. For best sound distribution, put the unit on a
speaker stand or table so the sound projects over the audience.
Connecting an FR-3C Companion Speaker.
For expanded crowd coverage, connect unpowered
companion speaker FR-3C to the speaker out jack on
the panel of the Freedom.
Note: The speaker output is designed
specifically for use with the Freedom FR-3C
companion speaker and SC55-4W or SC100-4W cable —
DO NOT use other type external speakers or damage may result!
2. Plug a microphone or audio source into an input jack.
Connect a microphone, tape player or other
source to the matching input jack; turn down the
corresponding volume knob before turning on the
FR-3neo. (See “Choosing an Input” on pages 6-7
for more information on input selection.)
If using the optional wireless microphone system,
use the corresponding knob to control the volume.
Note: See separate instructions for operation of the CD/MP3 player.
speaker out
use FR-3C
bi-wired
companion
speaker
input
L
R
tape/cd
mic 1 mic 2 / line
install
fuse

5
3. Turn the power switch ON
(plug in power cord for AC operation).
Observe LED indicators to confirm
battery level and power.
Battery Power: The green light indicates the battery
is at or near full charge and ready to use. The yellow light means 30-60%
usage remains, and red means less than 30% remains and that the battery
should be charged before use (see “Charging the battery.” )
AC Power: When plugged into an AC power outlet, the green LED will stay on
constantly as the system is being powered from the AC line (not the battery).
Occasionally, when playing loudly, the LED’s may flicker between green and
yellow - this is normal.
4. Adjust the volume level and sound quality.
Increase the volume of the input being used to desired level (be sure the
microphone or input source is turned on!) Adjust base and treble controls and
set voice switch as necessary (see page 12 for more details).
Charging the battery.
!! For maximum operating time, charge the battery after
EVERY use.
The performance of the built-in battery will be greatly improved if the system is
charged completely after each use — storing the unit in a partially-discharged
condition will reduce the service life of the battery. (The Freedom may be left
plugged into an AC outlet during storage for optimum results.)
Charging the battery.
Turn the power switch “off”, then plug the cord into a standard
AC outlet to charge the Freedom battery. The unit automatically
begins charging, indicated by the yellow “charging” LED.
When the green “full” LED lights steady, the battery is 90%
charged and may be used immediately or left plugged in another
1-2 hours to top-off the battery before use or storage.
power
on
off
charging
full
12
Using talkover.
Press the red button to use the “talkover” feature, which automatically lowers the vol-
ume of all other inputs (including optional CD) when speaking on the microphone.
When to use talkover.
Use talkover when making voice announcements over music or
other program material being played through the sound system
(without having to manually adjust the other volume controls).
When you stop speaking into the microphone, the volume on
other inputs smoothly returns to normal in 3 seconds.
Note: The talkover feature is assigned to optional wireless mic
1 if installed; otherwise, it is assigned to the mic 1 XLR input.)
Setting the tone controls.
Use the treble and bass controls to adjust for best sound quality and clarity. The
top-center mark indicates a ‘flat’ response.
For outdoor / voice applications:
Set the voice switch to “loud” for outdoor
and other applications where powerful voice
projection is needed.
Turn the bass control to the 9 o’clock posi-
tion for maximum voice clarity (reducing the
bass level will also increase battery life).
For indoor / music playback:
Set the tone controls to the flat (12 o’clock)
position, then adjust for desired sound quality (be sure the voice switch is in
the “normal” position).
Set the voice switch to the “normal” position when playing music and for most
indoor applications.
CD/MP3 player operation.
See separate instructions for operation and features of the CD/MP3 player.
voice
loud
norm
bass
treble
talkover

116
Testing the audio.
• Speak into the microphone. The
audio LED on the wireless receiv-
er should flicker green or amber.
!! If the audio LED flickers red,
adjust the gain (see below).
Accessing and setting the gain switch.
Multiple gain settings are available on the
body-pack transmitter.
•mic: Use for most (low sensitivity)
headband or lapel microphones.
•0dB: Use for (high sensitivity) headband
microphones and instruments.
•-10dB: Use for high-output instruments and line-level signals.
Locking and unlocking transmitter controls.
The transmitter (handheld and body-pack) has a locking feature which prevents
accidental muting during performance.
• To lock controls: Turn transmitter off. Remove Battery Cover. Press and
hold Channel Button. Press and release Power/Mute button.
Power/Mute LED will flash red and green.
• To unlock controls: Press and hold Power/Mute button down until
Power/Mute LED flashes red and green.
Choosing an input.
input output
L
R
L
R
tape/cd tape
mic 1 line outmic 2 / line
Plug a microphone with an
XLR connector into mic input
one or two. The knob above
the jack controls the volume
level.
The mic inputs are balanced and low
impedance, and supply phantom
power (10 volts) for condenser type
microphones.
When using long mic cables, use a
balanced microphone to help prevent
hum and interference.
Plug any line-level source
with a 1/4" phone plug (tape
player, music instrument,
etc) into the line input. The
knob above the jack controls
the volume level.
The line input is an unbalanced line
level input.
Use shielded cable to avoid hum or
interference.
To daisy-chain two sound systems
together for greater crowd coverage,
connect the line output from one sys-
tem into the line input of the other.

710
Changing wireless channels.
Setting the receiver channel.
1. Turn off the transmitter.
2. Press and hold the channel
button on the receiver until the
display starts flashing.
3. While the display is flashing,
press the channel button to
select channels 0-9.
When the number stops flashing,
the channel is active.
!! (The center segment also acts as an interference indicator. When interfer-
ence is detected, the center segment will appear different from the other
segments while cycling through channels. A flashing center segment for
channels 0, 1, and 7 and a solid center segment for all other channels will
appear when interference is detected by the receiver.)
Setting the transmitter channel.
1. Open battery compartment of
wireless transmitter and locate the
channel button.
2. Press and hold the channel button
on the transmitter until the display
starts flashing.
3. While the display is flashing, press
again to select channels 0-9.
When the number stops flashing,
the channel is active.
Receiver and transmitter channels
should match.
!! Note: On systems with two wire-
less receivers, each must operate
on a different channel!
input output
L
R
L
R
tape/cd tape
mic 1 line outmic 2 / line
Plug the outputs from a
tape player or external
CD player with RCA
jacks into the tape/cd
input. The knob above
the jacks controls the
volume level.
The tape/cd input is a line
level input.
This is a summing input,
meaning the left and right
channels will combine for a
mono input signal.
Connect the RCA
outputs to a tape
player’s input to
record the sound
system.
The tape output is a
line-level, summed and
composite signal of the
sound system inputs.
Connect line output
to the line input of
another Freedom to
daisy-chain systems
together.
The line output is an
unbalanced, line-level and
composite signal of the
sound system inputs.
center segment

9
2. On/Mute/Off Button:
The wireless transmitter
(microphone or beltpack)
uses a single button for
“on”, “mute” and “off”.
Press the button for 1 second
for “on” (LED green), push
again for “mute” (LED orange),
push again to return to “on.”
Press and hold button for 2
seconds to turn off (LED off).
3. Transmitter Channel Display:
When transmitter is "on", momen-
tarily pressing the channel button
will illuminate the channel display.
(see page 10 for channel setting
procedure).
Confirm that the transmitter
and the receiver display the
same channel.
The ready LED on the receiver
should be illuminated.
4. Replace battery cover.
8
Wireless system operation.
The Freedom FR-3neo is available with single or dual
built-in Shure wireless receivers. The instructions on the
following pages describe how to set-up and operate the
receiver units and wireless transmitters.
Operating the optional wireless mic system.
The built-in wireless receiver(s) turn on automatically
when the Freedom is turned “on.” Note the location of
the wireless mic volume controls on the Freedom’s rear
panel. (There are no exterior antennas; they are built-in
to the receiver.)
Features and controls of the built-in wireless receiver.
audio LED: Indicates strength of incoming audio signal:
green for normal, amber for strong, red for peak.
ready LED: Green light indicates wireless system is receiving signal.
Channel number readout: See “Setting the receiver channel” on page 10.
channel button: See “Setting the receiver channel” on page 10.
Setting-up the wireless transmitter and receiver.
1. Install battery: If you haven’t
installed the battery, do it now and
leave the cover off.
Expected life for a 9 volt alkaline
battery is approximately 8 hours.
When the Power/Mute LED on the
transmitter glows red, the battery
should be replaced immediately.
channelreadyaudio
1 2 3 4
1
2
3
4
wireless 1 wireless 2
This manual suits for next models
1
Table of contents