FreeVision VILTA-M Pro User manual

Web : www.fvshare.com
Tel : +86 4009970100
Facebook Youtube Instagram
Quick Start Guide
V2.00
Freevision Intelligent Technology Co.,Ltd.
VILTA-M Pro
Stabilizer for Smartphone

01English
CONTENTS
05
German
09
Dutch
13
Spanish
17
French
21
Japanese
25Certification

01 English
Product Overview
02English
Smartphone Installation
Place the phone in the phone holder while pulling the sides of the holder outwards, then release
the sides of the holder. It is recommended that you position the phone close to the tilt motor.
Turn the phone over facing downwards, adjust the position of the phone in the holder to balance
the tilt motor(refer to the picture below) and then tight up the adjustment knob.
Loose the knob, and rotate the phone holder. Tighten the knob again.
( Follow this step when using vertically )
1
3
2
Connect to FV Share
Power on VILTA-M Pro.
Open FV Share, tap Connect to Gimbal and choose your gimbal to connect. After successfully
connecting, the blue connection indicator LED stops flashing and turns solid blue.
Power On/Off
Long press power button for 3 seconds
to power on/off.
1
2
3
Turn on bluetooth.
( For Android users, please turn on GPS )
After the phone is installed on the gimbal, please check whether the phone is flushed with the
holder.If not, please manually adjust it to the middle position.
Always keep your phone mounted and well balanced prior to power on.
Portrait and
Landscape Knob
1/4 Inch threaded screw
Type-C Charging Port
Smartphone
Mounting Holder
Connection Indicator LED
Balance
adjustment Knob
Roll axis Buckle
Joystick
Focus/Zoom Wheel
Focus/Zoom Button
Camera Parameter
Adjustment Wheel
Mark A Button
Mark B Button
Scene Mode Switch
Menu/Back Button
Shutter
EV Button Shutter Button
Record Button
Custom Mode Button
ISO Button
Album Mode Button
OK/DISP Button
Power Button
Tilt axis
Wireless Charging
Roll axis Adjustable Arm
USB-A
Charging Port
Pan axis
Status Indicator LED
Handle Grip
Functions of VILTA-M Pro are introduced in this section. Please read carefully before use, or read
the full user manual with all its features on the official website: www.fvshare.com. Product
technology continues to develop, which is subject to change without prior notice.
For iOS users, please search FV Share in Apple Store. ( iOS 9.0 or above)
Download FV Share
For Android users, please search FV Share in Google Play or Huawei store. (Android 5.0 or above)
App Installation Power ButtonConnection
Indicator LED

03 English 04English
Buckle
Buckle
Choose two different depth of fields of the shooting subject.
Use Focus/Zoom Wheel to choose the other subject. Long press the Mark B button to confirm.
Use Focus/Zoom Wheel to choose one of your subjects. Long press the Mark A button to confirm.
Shooting Subject Switch1
Operating instructions
When recording, single tap the Mark A and B button to switch the focus of the subject.
2Quick Zoom / Focus
Single tap zoom/focus switching button.
Adjust the focus or zoom with the focus/zoom wheel.
Quick Camera Parameter Adjustment
3
4Mode Indicator LED And Mode Switch
Status
Indicator LED
Single tap
Follow Mode
Button
Double taps
Three taps
Four taps
Long press
Long press and move
the joystick
Green
Yellow light
flashes
Red
Yellow
Gimbal Mode
To adjust the roll motor angle
POV mode
For quick positioning of the direction
Semi follow mode
Full follow mode
To lock the current camera shooting angle
5Scene Mode Switch
Single tap to switch between walk mode, sports mode, custom mode.
6Menu/Return Button
In the primary level of the App interface, single tap the menu key to switch to menu bar options.
In the secondary level of the App interface, single tap the back button to return to the previous
menu and long press to exit the menu.
7Record Button
Single tap to start/exit recording.
8Shutter Button
Light press shutter button to focus. Deep press shutter button to take a photo.
9Custom Mode Button
Default hand following mode, customized flash, white balance and wireless charging power switch.
(Hand following mode: the motor responds at high speed, and follows quickly the handle rotation to meet the fast
transition effect)
10 Album Mode Button
Single tap the album mode button to view the album.
12
If any buckle is locked, the gimbal will automatically sleep.
If unlock all buckles, the gimbal will resume its operation.
The gimbal will automatically power off if it sleeps for more
than 15 minutes.
Gimbal Sleep mode
Single tap the power button to activate the
sleep/wake up mode.
11 OK/DISP Button
When adjusting the camera parameters, single tap OK to confirm the parameters.
When the App is on primary interface display, single tap the DISP button to display the current
camera parameters.
When viewing photos, single tap the DISP button to display photo information.
When viewing the album, single tap OK to confirm the playback.
Gimbal Dimensions (folded)
Gimbal weight
Gimbal weight capacity
Supported phone width
Type of battery
Gimbal duration time
332*122*62mm
635g
275g
55~85mm
Lithium Battery
Greater than 15H
Charging voltage
Operating temperature
Charging current
Mechanical Rotation Range
-10~40℃
5±0.1V
Max 2A
Pan360°; Roll 325°; Tilt 330°
Technical Parameters
Status
Indicator LED
Use camera parameter adjustment wheel to adjust accutately these three parameters.
Single tap EV button, shutter button, ISO button to turn on quickly the manual camera parameter adjustment.
Double tap to switch front and rear facing camera.
Single tap the back button to return to the previous menu.

German05 German 06
Produktbeschreibung
Hoch- und
Querformatknopf
1/4 gewindete Schnittstelle
Typ-C Ladeanschluss
Handyclip
Verbindungsindikator-LED
Knopf zur Anpassung
der Balance
Rollschnalle
Joystick
Fokus-/Zoomrad
Fokus-/Zoombutton
Kameraanpassungsrad
Punkt A markieren
Punkt B markieren
Szenenmodus umschalten
Menü/Zurückbutton
Shutter
EV Button Auslöser
Aufnahmeknopf
Benutzerdefinierte Funktion
ISO Taste
Galerie
Bestätigungs-/DISP-Taste
Ein-/Ausschalter
Neigungsachse
Wireless Charging
Rollenachse
Arm zur Anpassung
der Balance
USB-A Ladeanschluss
Kursachse
Systemstatus-LED
Griff
Montageanleitung und Balancierung
Platzieren Sie Ihr Handy auf den Handyhalter während an den Seiten des Halters
auseinandergezogen werden und lassen dann los. Es ist empfohlen, das Handy in der Nähe der
Neigungsachse zu platzieren.
Stellen Sie die Position des Handys so ein, dass es wie in der folgenden Abbildung aussieht und
stabil ist. Dann ziehen Sie den Einstellknopf fest.
Drehen Sie den Handyhalter, um zwischen Quer- und Längsformat zu wechseln.
( Befolgen Sie diesen Schritt, wenn Sie vertikal arbeiten )
1
3
2
Mit FV Share verbinden
VILTA-M Pro einschalten.
FV Share öffnen, mit dem Tragrahmen verbinden wählen und den entsprechenden Tragrahmen
wählen. Nach der erfolgreichen Verbindung hört das blaue Verbindungsindikator-LED auf zu
blinken und leuchtet blau.
Ein-/Ausschalten
Zum Ein-/Ausschalten, halten Sie den
An-/Ausschalter für 3 Sekunden gedrückt.
1
2
3
Bluetooth einschalten.
( Androidnutzer schalten bitte GPS ein )
Ein-/Ausschalter
Nachdem das Telefon auf dem Gimbal installiert ist, überprüfen Sie bitte, ob das Telefon mit dem
Gimbal in Linie gebracht ist. Falls micht, bitte bringen Sie das Gerät manuell in die Mitteposition.
Bitte lassen Sie das Handy befestigt, bevor es eingeschaltet wird.
AppInstallation
Die Funktionen von VILTA-M Pro werden in diesem Abschnitt vorgestellt. Bitte lesen Sie ihn sorgfältig
durch, oder lesen Sie das ganze Handbuch auf der offiziellen Website: e: www.fvshare.com.
Für iOs-Nutzer: Bitte suchen Sie im App Store nach der "FV Share App" (iOS 9.0 oder höher).
Herunterladen der FV Share App
Für Android-Nutzer: Bitte suchen Sie im Google Play Store nach "FV Share App" oder scannen
Sie den QR-Code, um die App zu installieren (Android 5.0 oder höher).
Verbindungsindikator-LED

Schnalle
Schnalle
Wählen Sie zwei unterschiedliche Schärfentiefen des Motivs aus.
Verwenden Sie das Fokus- / Zoomrad, um das andere Motiv auszuwählen.
Drücken Sie zur Bestätigung die Mark B-Taste.
Verwenden Sie das Fokus- / Zoom-Rad, um eines Ihrer Motive auszuwählen. Drücken Sie zur
Bestätigung die Markierung A-Taste.
Motivwechsel der Aufnahme1
Bedienungsvorschriften
Tippen Sie während der Aufnahme einmal auf die Schaltfläche Mark A und B, um den Fokus des Motivs zu ändern.
2Schneller Zoom / Fokus
Schneller Zoom / Fokus.
Stellen Sie den Fokus oder Zoom mit dem Fokus / Zoom-Rad ein.
Schnelle Kameraparameteranpassung
3
4Statusanzeige und Moduswechsel
Statusindikator
-LED
Klick
Follow-Modus
-Taste
Doppelklick
3 mal klicken
4 mal klicken
Lang gedrückt
halten
Lang drücken und den
Joystick bewegen
Grün
Gelbe LED
blinkt
Rot
Gelb
Gimbal modus
So passen Sie den Winkel der Rollachse an
POV Modus
Zum schnellen Positionieren der Richtung
Semi-Folgemodus
Voller Folgemodus
Sperren Sie den aktuellen Kamerawinkel
5Szenenmodus wechseln
Mit einem einzigen Tastendruck wechseln Sie zwischen Laufmodus, Sportmodus und
benutzerdefiniertem Modus.
6Menü/Zurückbutton
Tippen Sie in der primären Ebene der App-Oberfläche einfach auf die Menütaste, um zu den
Optionen der Menüleiste zu wechseln.
Tippen Sie in der sekundären Ebene der APP-Oberfläche einmal auf die Schaltfläche Zurück,
um zum vorherigen Menü zurückzukehren, und drücken Sie lange, um das Menü zu verlassen.
7Aufnahmebutton
Klicken, um die Aufnahme zu starten/beenden.
8Auslöser
Drücken Sie den Auslöser leicht, um scharfzustellen. Drücken Sie den Auslöser tief,
um ein Foto aufzunehmen.
9Benutzerdefinierte Modus-Schaltfläche
Standard-Handfolgemodus, benutzerdefinierter Blitz, Weißabgleich und kabelloser Ladeschalter.
( Handfolgemodus: Der Motor reagiert mit hoher Geschwindigkeit und folgt schnell der Griffdrehung, um den schnellen
Übergangseffekt zu erzielen)
10 Album-Modus-Taste
Tippen Sie einmal auf die Albummodus-Schaltfläche, um das Album anzuzeigen.
12
Wenn eine Schnalle verriegelt ist, schläft der Gimbal
automatisch. Wenn alle Schnallen entriegelt werden,
nimmt der Gimbal seinen Betrieb wieder auf. Der Gimbal
schaltet sich automatisch aus, wenn er länger als
15 Minuten schläft.
Gimbal-Schlafmodus
Tippen Sie einmal auf die Ein / Aus-Taste,
um den Schlaf- / Weckmodus zu aktivieren.
11 OK / DISP-Taste
Tippen Sie beim Anpassen der Kameraparameter einmal auf OK, um die Parameter zu bestätigen.
Wenn sich die APP auf der primären Anzeige der Schnittstelle befindet, tippen Sie einfach auf die
DISP-Taste, um die aktuellen Kameraparameter anzuzeigen.
Tippen Sie beim Anzeigen von Fotos einfach auf die DISP-Taste, um Fotoinformationen anzuzeigen.
Tippen Sie beim Anzeigen des Albums einmal auf OK, um die Wiedergabe zu bestätigen.
Gimbal Maße (gefaltet)
Gimbal gewicht
Gimbal Gewichtskapazität
Supported phone width
Art der Batterie
gimbal dauer zeit
332*122*62mm
635g
275g
55~85mm
Lithium Batterie
Größer als 15H
Ladespannung
Betriebstemperatur
Ladestrom
Mechanischer Drehbereich
-10~40℃
5±0.1V
Max 2A
Pan360°; Um 325° rotieren; Um 330° neigen
Technische Parameter
Modusindikator-LED
Verwenden Sie das Einstellrad für die Kameraparameter, um diese drei Parameter genau einzustellen.
Einfaches Antippen der EV-Taste, des Auslösers und der ISO-Taste, um die manuelle Einstellung der
Kameraparameter schnell einzuschalten.
Doppelklick, um zwischen Front- und Rückkamera zu wechseln.
Tippen Sie einmal auf die Schaltfläche Zurück, um zum vorherigen Menü zurückzukehren.
German07 German 08

DutchDutch
09 10
Productoverzicht
Staande en
staande knop
1/4 Inch schroefdraad
Type-C oplaadpoort
Smartphone
-montageho uder
Verbindingsindicator-LED
Balansregeling Knop
Rol as gesp
Joystick
Focus/Zoom wiel
Focus/Zoom knop
Camera parameter
aanpassingswiel
Markeer A knop
Markeer B knop
Scènemodus schakelaar
Menu/terug knop
Sluiter
EV knop Sluiterknop
Opneemknop
Aangepaste modus knop
ISO knop
Album modus knop
OK/DISP knop
Aanknop
Kantelas
Draadloos opladen
Rol as Aanpasbare arm
USB-A oplaadpoort
Pan-as
Systeemstatus-LED
Handvat
Smartphone Installatie en Balans
Plaats de mobiele telefoon in de houder terwijl u de zijkanten van de houder naar buiten trekt.
Laat vervolgens de zijkanten los. Het wordt aangeraden dat u de mobiele telefoon dicht bij de
kantelas positioneert.
Draai de mobiele telefoon naar beneden gericht, pas de positie van de telefoon aan in de houder
om de kantelmotor te balanceren (zie de afbeelding hieronder) en draai dan de balansinstelknop vast.
Roteer de telefoonhouder manueel om tussen de horizontale en verticale schermen te schakelen.
( Volg deze stap bij verticaal gebruik )
1
3
2
Verbinden met FV Share
Schakel de VILTA-M Pro in.
Open FV Share, tik op Verbinden met Gimbal en kies je gimbal om te verbinden. Nadat u succesvol
verbinden bent, stopt de blauwe indicator LED met knipperen en wordt deze continu blauw.
Inschakelen/uitschakelen
Houdt de aan/uit knop ingedrukt voor 3
seconden om aan of uit te schakelen.
1
2
3
Schakel bluetooth in.
( voor Android gebruikers, schakel GPS in )
AanknopVerbindings
indicator LED
Kijk na of de telefoon gelijk staat met de houder nadat u deze heeft geïnstalleerd op de gimbal.
Zo niet, past u de positie van de telefoon manueel aan zodat deze in de middenste positie staat.
Hou steeds de telefoon bevestigd en goed gebalanceerd voor u het apparaat inschakeld.
Voor IOS gebruikers: zoek aub de FV Share App in de App Store(IOS 9.0 of hoger)
Download de FV Share App
Voor Android gebruikers: zoek aub de FV Share App in Google Play, of scan de QR code om te
installeren. (Android 5.0 of hoger)
In deze sectie worden functies van de VILTA-M Pro geïntroduceerd. Lees dit aub aandachtig voor
gebruik, of lees de volledige gebruiksaanwijzing op de officiële website te www.fvshare.com. De.
De ontwikkeling van producten loopt verder, en kan veranderen zonder eerdere verwittiging.
App installatie

11 12
DutchDutch
Gesp
Gesp
Kies twee verschillende scherptedieptes van het onderwerp van de opname.
Gebruik Focus / Zoom Wheel om het andere onderwerp te kiezen. Druk lang op de Mark B-knop om
te bevestigen.
Gebruik Focus / Zoom Wheel om een van je onderwerpen te kiezen.Laat lang op de Mark A drukken
knop om te bevestigen.
Opname van onderwerp schakelen1
Gebruiksinstructies
Druk tijdens het opnemen eenmaal op de markeer A en B knop om de focus van het onderwerp te wisselen.
2Snel zoomen/focussen
Druk eenmaal om te zoomen/focussen op de wisselknop.
Pas het focussen of zoomen aan met het Focus/Zoom wiel.
Snelle Camera Parameter Aanpassing
3
4Modusindicator LED en Modus Wisseling
Status
Indicator LED
Enkele tik
Volgmodus
knop
Dubbele tik
Driedubbele
tik
Vierdubbele
tik
Lang
indrukken
Druk lang en beweeg
de joystick
Groen
Gele
knipperende LED
Rood
Geel
Gimbal modus
Om de rolas-hoek aan te passen
POV Modus
Voor snelle positionering van de volgrichting
Half volg modus
Volledig volgmodus
Vergrendel de huidige camera-opnamehoek
5Scene Modus Wisseling
Druk eenmaal om te wisselen tussen wandelmodus, sportmodus en gewijzigde modus.
6Menu/Terug knop
Tik in het primaire niveau van de app-interface op de menutoets om naar het bar opties menu te gaan.
Tik in het secundaire niveau van de app-interface op de terugknop om terug te keren naar het
vorige menu en druk lang om het menu te verlaten.
7Opneemknop
Druk eenmaal om de opname te starten/stoppen.
8Sluiterknop
Druk licht op de sluiterknop om scherp te stellen. Druk diep op de sluiterknop om een foto te maken.
9Aangepaste modusknop
Standaard handvolgmodus, aangepaste flitser, witbalans en draadloos laadstroomschakelaar.
( Handvolgmodus: de motor reageert met hoge snelheid en volgt snel de draai van de hendel om aan het snelle
overgangseffect te voldoen)
10 Albummodus knop
Druk eenmaal op de albummodus knop om het album te bekijken.
12
Als een gesp vergrendeld is, zal de gimbal
automatisch slapen.Als alle gespen worden
ontgrendeld, hervat de gimbal zijn werking.De gimbal
wordt automatisch uitgeschakeld als hij meer dan 15
minuten slaapt.
Gimbal Slaap modus
Druk eenmaal op de aan/uit knop om de
slaapmodus in of uit te schakelen.
11 OK/DISP Knop
Druk eenmaal op OK om te bevestigen bij het aanpassen van de cameraparameters.
Wanneer de APP zich op het primaire interfacescherm bevindt, tikt u één keer op de knop DISP
om de huidige cameraparameters te tonen.
Druk eenmaal op de DISP knop om de foto-informatie te bekijken tijdens het bekijken van fotos.
Druk eenmaal op OK om het afspelen te bevestigen bij het bekijken van het album.
Gimbal Dimensies (folded)
Gimbal gewicht
Gimbal draagvermogen
Ondersteunde telefoonbreedte
Type batterij
gimbal duur tijd
332*122*62mm
635g
275g
55~85mm
Lithium batterij
Groter dan 15 uur
Laadspanning
Bedrijfstemperatuur
Laadstroom
Mechanisch Rotatie Bereik
-10~40℃
5±0.1V
Max 2A
Pan 360°; Rol 325°; Kantel 330°
Technische parameters
Modus indicator LED
Gebruik het wiel voor aanpassing van de cameraparameters om deze drie parameters nauwkeurig in te stellen.
Druk eenmaal op de EV knop, sluiterknop of ISO knop om de manuele camera parameter
aanpassing in te schakelen.
Druk tweemaal om te wisselen tussen voor- en achtercamera.
Druk eenmaal op de terugknop om terug te keren naar het vorige menu.

Spanish13 Spanish 14
Descripción del producto
Botón de retrato y paisaje
tornillo de 1/4
Puerto de carga tipo C
Soporte para
el celular
Luz indicadora de estado
Perilla de ajuste
de balance
Seguro de rodillo
Joystick
Rueda de ajuste de foco
Botón de ajuste
de Zoom/foco
Rueda de ajuste
Marcar punto A
Marcar punto B
Cambio de escenario
Menú/Retorno
OBTURADOR
(Botón de velocidad
del obturador)
EV(Botón de ajuste
de exposición )
Botón de obturación
Botón de grabación
Botón de funciones
personalizadas
ISO (Botón de ajuste de ISO)
Galería
Botón Aceptar/Disp
Botón de encendido
Eje de inclinación
Cargador inalámbrico
Rodillo Brazo de ajuste
de balance
Puerto de carga
USB-A para celular
Eje de rumbo
Luz indicadora de modo
Mango
Instalación y balance para smartphone.
Abra halando hacia arriba y debajo el soporte par ael celular de manera tal que las dos partes
estén equidistantes al centro, monte su dispositivo movil, y asegurelo haciendo uso del seguro
posicionado al lado izquierdo del celular.
Ajuste ligeramente la posición a izquierda y derecha, como se muestra en la imagen de abajo,
luego ajuste las perillas de ajuste y nivel.
Gire manualmente el soporte del celular, para cambiar directamente la pantalla a posición horizontal.
( Siga este paso cuando use verticalmente )
1
3
2
Conectarse a FV Share
Power on VILTA-M Pro.
Abra la aplicación ¨FV Share¨, seleccione el dispositivo VILTA-M, y acepte la solicitud de conexión
cuando se solicite. Depués de que la conexión es exitosa, el indicador de conexión dejará de
parpadear, y brillará constantemente de color azul.
Encendido/Apagado
Presione el botón de encendido/modo
por 3 segundo, para encender/apagar
el dispositvo.
1
2
3
Botón de encendidoIndicador de luz de
estado de conexión
Después que el teléfono móvil es instalado en el gimbal, por favor revise si este se encuentra
nivelado con la base. Si no, por favor ajustelo manualmente en una posición central.
No encienda el dispositvo sin antes instalar el telefono móvil.
Las funicones de VILTA-M Pro se presentan en esta sección. Por favoe lea cuidadosamente antes de
usar el dispositivo, o lea en su totalidad el manual del usuario que presenta todos los detalles en la
página oficial: l: www.fvshare.com. La. La tecnología del producto aún se encuentra en desarrollo,
por lo cual éste se encuentra sujeto a cambios sin previo aviso.
Para usuarios de iOS, busque la aplicación FV Share en la App Store. (iOS 9.0 o posterior)
Descargar la aplicación FV Share
Para usuarios de Android, encuentre la aplicación FV Share en Google Play o escanee el código
QR para instalarla. (Android 5.0 o posterior)
Instalación de la aplicación
Encienda el bluetooth del dispositivo movil.
( Para dispositivos móviles Android asegúrese de encender y dar permiso de las funciones del GPS a la Gimbal )

Spanish15 Spanish 16
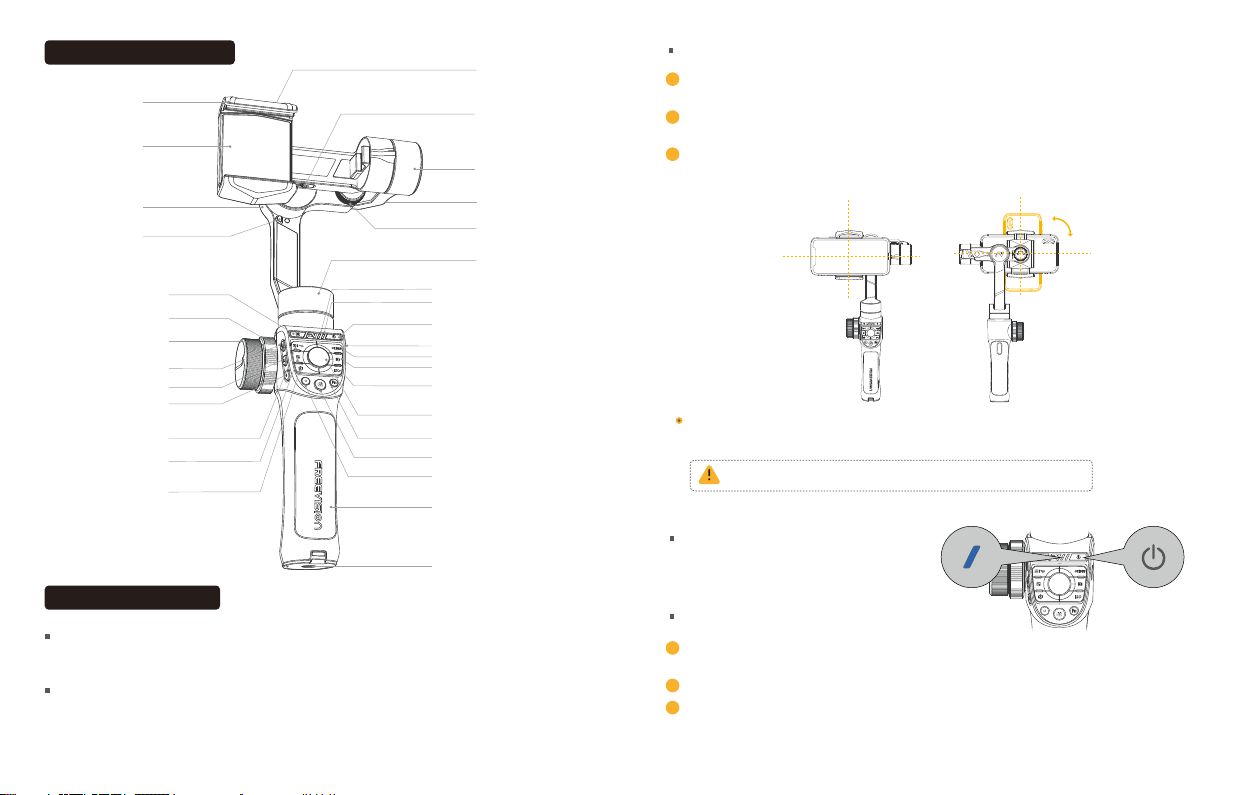
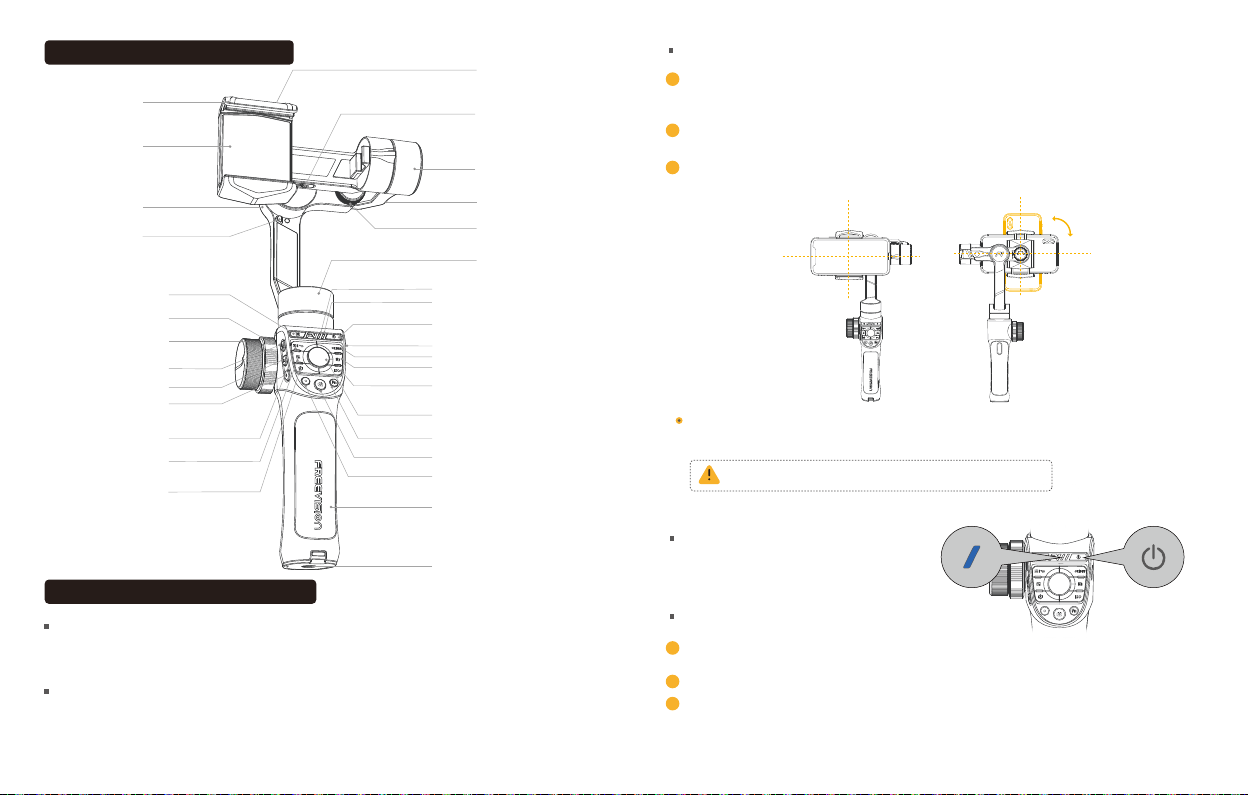
Seguro
Seguro
Seleccione dos objetivos en escena con profundidad diferente.
Enfoque deseado para el objetivo A ajustando la perilla de ajuste de enfoque, luego presione durante
unos instantes el botón Mark A para fijar el objetivo, a través de la perilla de ajuste de enfoque escoja
el enfoque deseado para el objetivo B y fíjelo precionando el botón Mark B por unos segundos.
Cambio de objetivos en escena1
Instrucciones de uso
Al momento de grabar, presione una sola vez Mark A o Mark B para cambiar el obajetivo de enfoque principal.
2Zoom/foco rápido
Zoom/foco rápido.
Presione una sola vez el botón de cambio de foco/Zoom.
Ajuste rápido de parámetros
3
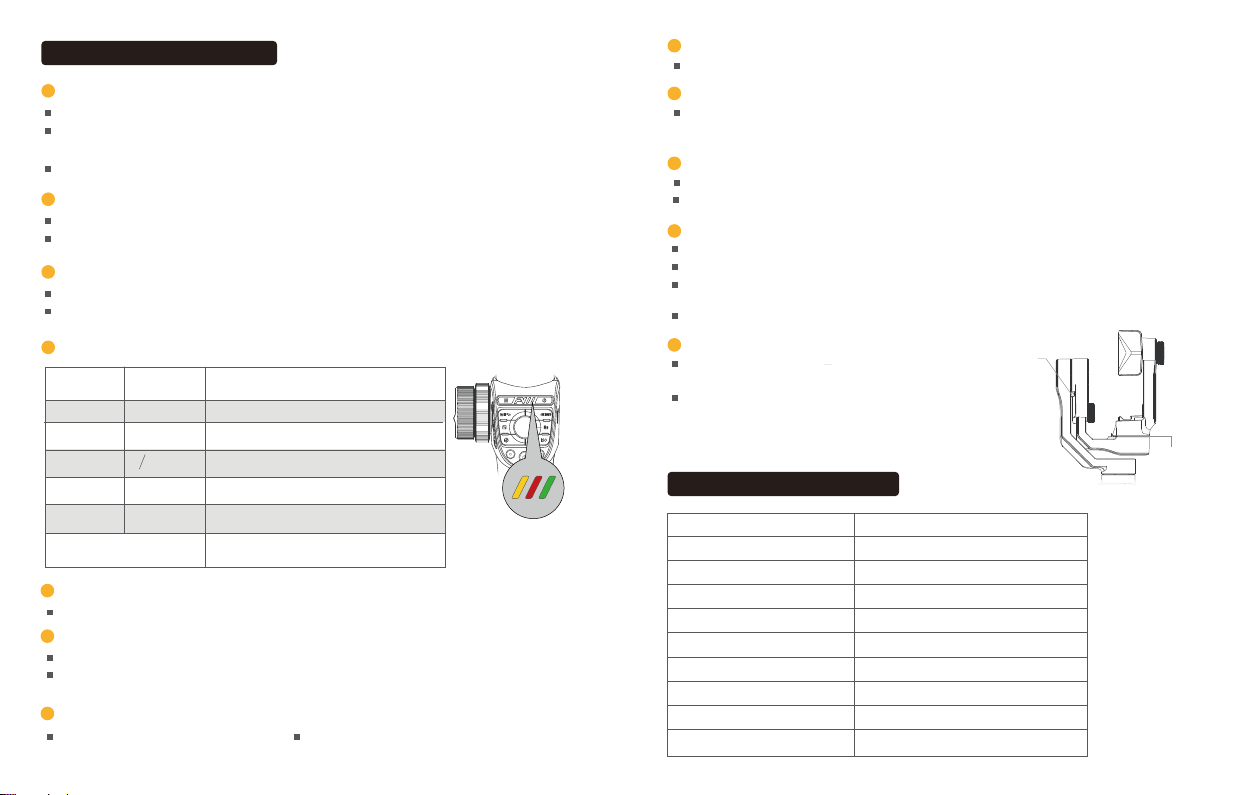
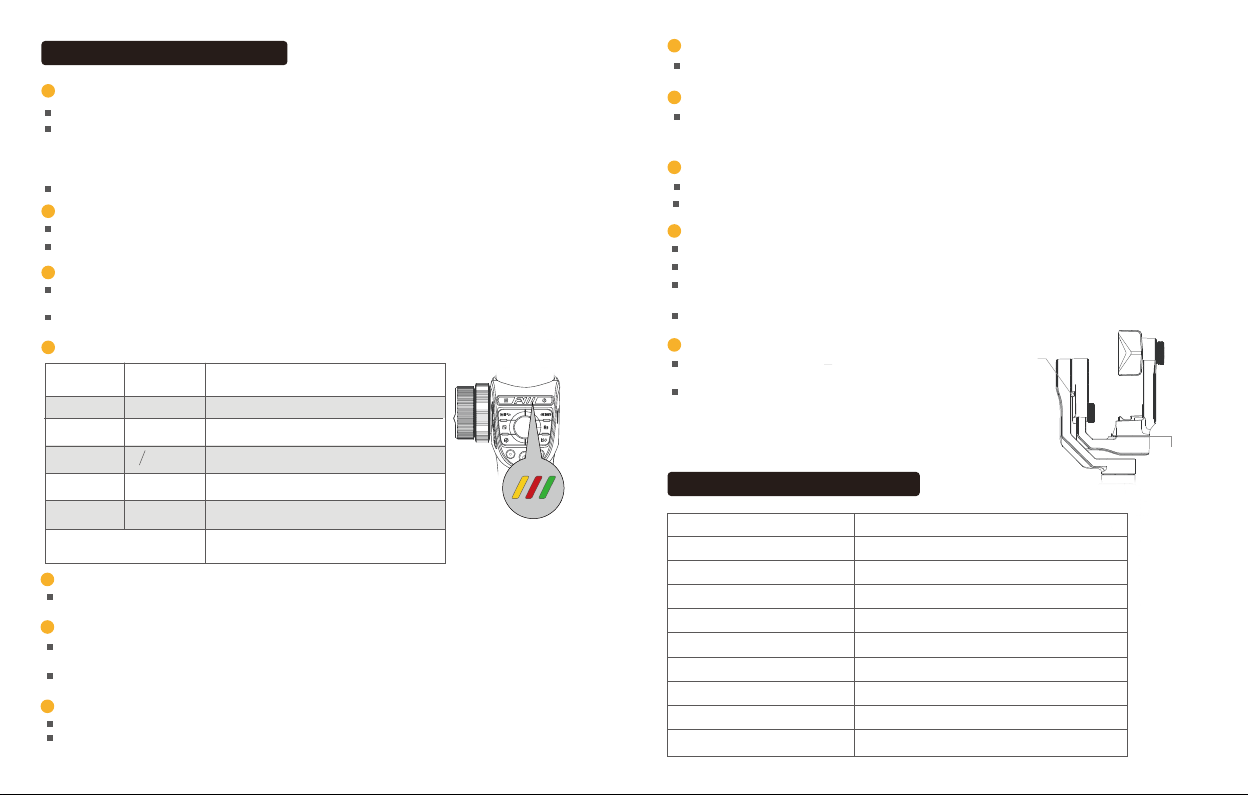
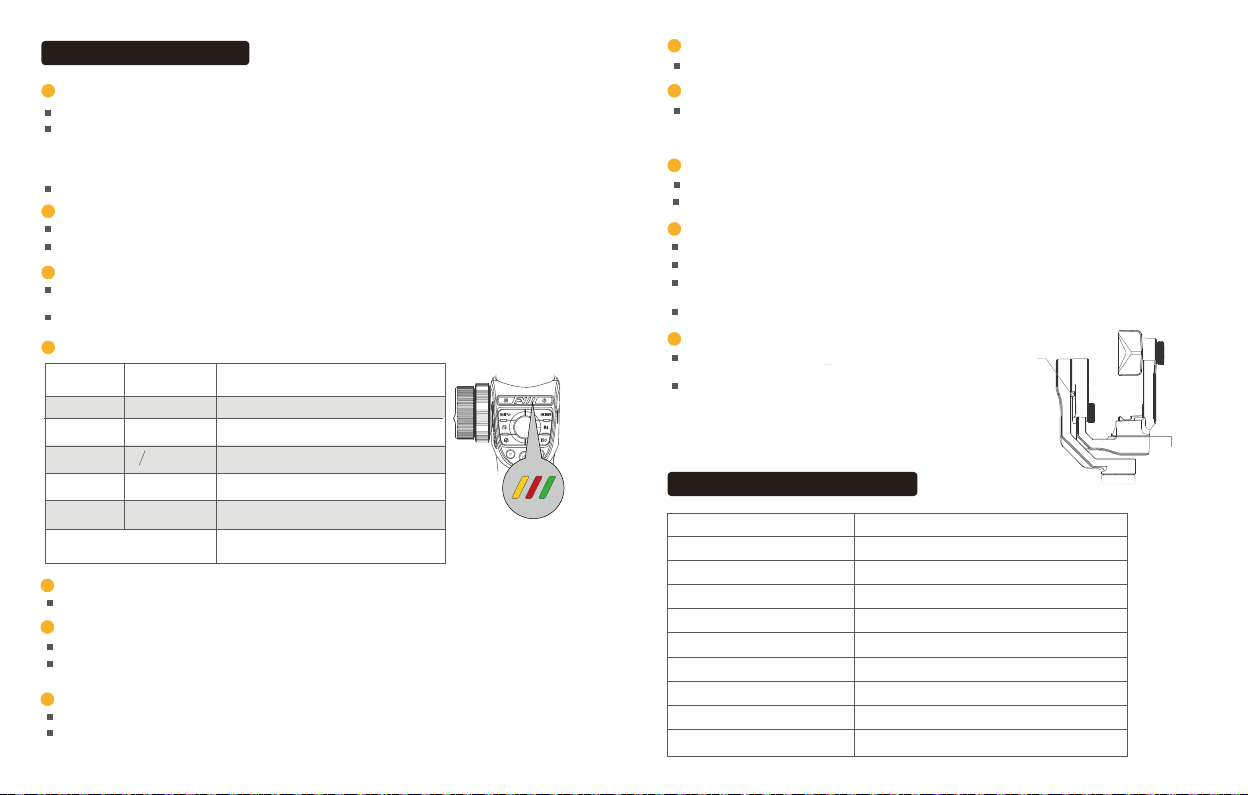
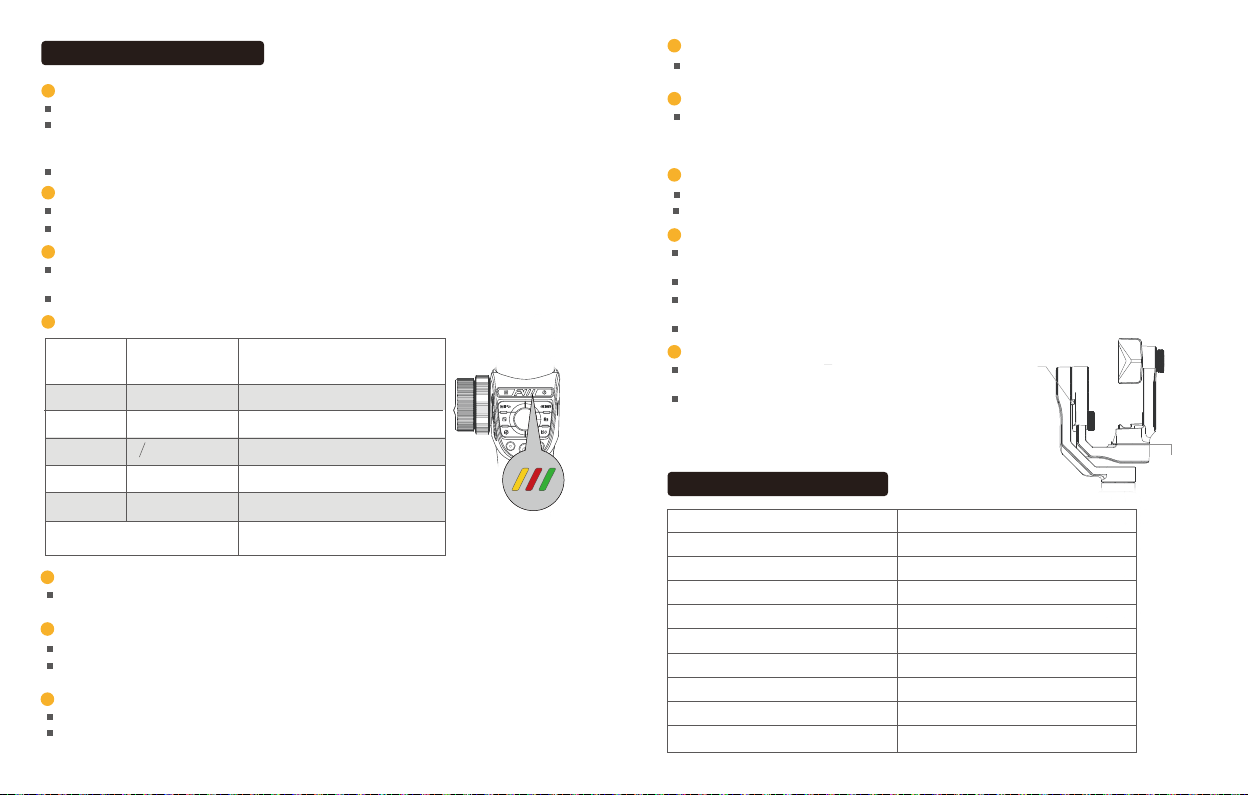
4Luz indicadora de modo y cambio de modo
Luz indicadora
de estado
Pulsación
sencilla
Botón de modo
seguimiento
completo
Pulsación
doble
Pulsación
triple
Pulsación
cuatruple
Pulsación de
larga duración
Pulsación de larga duración +
mover el mango a izquierda o derecha
Verde
Luz amarilla
intermitente
Rojo
Amarillo
Modo gimbal
Ajuste del ángulo de rotación
Modo POV
Orientación rápida de ubicación
Botón de medo seguimiento parcial
Modo de seguimiento completo
5Cambio del modo de la escena
Pulse una sola vez el botón de cambio de modo de escena para seleccionar entre el modo caminata,
deporte, o personalizado.
6Botón Menú/Retorno
En la interfaz principal del menú, presione una vez el botón de menú para cambiar entre las opciones.
En la interfaces secundarias del menú, presione una sola vez el botón atrás para regresar al menú
inmediatamente anterior, o presione por algunos segundos para regresar a la interfaz principal.
7Botón de grabación
Presione una sola vez para empezar/finalizar con la grabación.
8Botón de opturación
Presione suavemente el botón de obturacón para enfocar. Para tomar fotos preisone totalmente el
botón de obturación.
9Botón de funciones personalizadas
Modos por defecto que pueden ser cambiados con gestos manuales: las configuraciones del flash,
balance de blancos, y carga inalambrica.
( Para el modo de seguimiento de manos: los motores responden a movimientos rápidos, y siguen con eficacia las
rotaciones del dispositivo para cumplir con los efectos de transición deseados)
10 Botón Galería
Presione una sola vez el botón de galería para ver la galería.
12
Si alguna tarjeta está bloqueada, y la plataforma hiberna
automáticamente; si la tarjeta está desbloqueada, la
plataforma se activará automáticamente; si la plataforma
se encuentra en modo hibernanción por más de 15
minutos, el dispositivo se apagará automáticamente.
Modo hibernación del Gimbal
Presione una sola vez el botón de encendido para
entrar/salir del modo hibernación.
11 Botón Aceptar/Disp
Al momento de terminar con los ajustes de los parámetros de la cámara, presione el botón Aceptar
para confirmar los cambios.
En la interfaz principal del menú, presione una vez el botón DISP para mostrar la información de los
parámetros actuales de la cámara.
Al momento de visualizar las fotos, presione una sola vez el botón DISP para ver la información de la imagen.
Al momento de estar explorando la galería, presione una sola vez el botón Aceptar para confirmar lareproducción.
Dimensiones del gimbal (plegado)
Peso del gimbal
Gimbal capacidad de peso
Ancho de teléfono soportado
Tipo de bateria
Tiempo de duración del gimbal
332*122*62mm
635g
275g
55~85mm
Batería de Litio
Más de 15H
Voltaje de carga
Temperatura de funcionamiento
Corriente de carga
Intervalo de rotación mecánica
-10~40℃
5±0.1V
Max 2A
Pan360°; Rotación 325°; Inclinación 330°
Parámetros técnicos
Luz indicadora de modo
Presione una sola vez el botón de EV/obturación rápida/ISO, para activar rápidamente la función de
ajuste manual de parámetros.
Presione dos veces para cambiar entre la cámara frontal y tracera.
Presione una sola vez el botón de regreso para devolverse al menú anterior.
Fijar el ángulo de obturación actual
del teléfono móvil
Use la rueda de ajuste de parámetros de la cámara para ajustar con precisión estos tres parámetros.

French French17 18
Vue d'ensemble du produit
Bouton de Portrait
et Paysage
Vis filetée 1/4 pouce
Port de charge de type C
Support de fixation
pour smartphone
Lumière du connexion
de l'indicateur
Bouton d'ajustement
de la balance
Boucle d'axe de roll
Joystick
Molette de mise
au point / zoom
Bouton de mise
au point / Zoom
Molette de réglage des
paramètres de la caméra
Bouton Mark A
Bouton Mark B
Commande du
mode de scène
Bouton Menu / Retour
OBTURATEUR
Bouton EV Bouton de l'obturateur
Bouton d'enregistrement
Bouton de mode personnalisé
Bouton ISO
Bouton du mode album
Bouton OK / DISP
Bouton marche
Axe d'inclinaison
Rechargement sans fil
Axe de roll Bras réglable
Port de charge
USB-A
Axe de pan
Lumière de l'état du système
Poignée
Installation et balance pour smartphone
Placez le téléphone dans son support tout en tirant les côtés du support vers l'extérieur, puis
relâchez les côtés du support. Il est recommandé de placer le téléphone près de l'axe d'inclinaison.
Retournez le téléphone vers le bas, ajustez la position du téléphone dans son support pour équilibrer
le moteur d'inclinaison (voir l'image ci-dessous), puis serrez le bouton de réglage de la balance.
Faites pivoter manuellement le support du téléphone pour changer entre les écrans horizontal
et vertical.
( Suivez cette étape lorsque vous utilisez verticalement )
1
3
2
Se connecter au FV share
Allumer le VILTA-M Pro.
Ouvrez FV Share, appuyez connecter au Gimbal et choisissez votre gimbal à connecter.
Une fois la connexion établie, la lumière de l'indicateur bleu du connexion cesse de clignoter
et devient bleu fixe.
Marche / arrêt
Appuyez longuement sur le bouton
de Marche pendant 3 secondes pour
allumer / éteindre.
1
2
3
Activer le bluetooth.
( pour les utilisateurs d'Android, veuillez activer le GPS )
Bouton marcheLumière du connexion
de l'indicateur
Une fois le téléphone installé sur le gimbal, vérifiez si le téléphone est bien inséré dans le support.
Sinon, réglez-le manuellement au centre.
Gardez toujours votre téléphone monté et bien équilibré avant d'allumer.
Installation de l'application
Les fonctions de VILTA-M Pro sont présentées dans cette section. Veuillez lire attentivement avant utilisation,
ou lire le manuel d'utilisation complet avec toutes ses fonctionnalités sur le site officiel:www.fvshare.com.
La technologie des produits continue de se développer, ce qui peut être modifié sans préavis.
Pour les utilisateurs iOS, veuillez rechercher l'application FV Share sur l'App Store
(iOS 9.0 ou version ultérieure).
Télécharger FV Share App
Pour les utilisateurs d'Android, recherchez l'application FV Share sur Google Play ou scannez le code
QR pour installer. (Android 5.0 ou version ultérieure)

French French19 20
Boucle
Boucle
Choisissez deux profondeurs de champs différentes de prise de vue du sujet.
Utilisez la molette de mise au point / zoom pour choisir l’un de vos sujets. Appuyez longuement sur
le bouton Mark A pour confirmer.
Utilisez la molette de mise au point / zoom pour choisir l’autre sujet. Appuyez longuement sur le
bouton Mark B pour confirmer.
Changer le sujet de prise de vue
1
Mode d'emploi
Lorsque vous enregistrez, appuyez une fois sur les boutons Mark A et B pour changer la mise au point du sujet.
2Zoom rapide / mise au point
Appuyez une fois pour zoomer / changer la mise au point.
Ajustez la mise au point ou zoomez avec la molette Focus / Zoom.
Réglage rapide des paramètres de la caméra
3
4Lumière du mode de l'indicateur et Changer de mode
Lumière
d'indication d'état
Un seul appui
Bouton mode suivi
Double appuis
Triple appuis
Quatre appuis
Appuyez
longuement
Appuyez longuement et
déplacez le joystick
Verte
Lumière jaune
clignotante
Rouge
Jaune
Mode gimbal
Pour ajuster l'angle d'axe de roll
Mode POV
Pour un positionnement rapide de
la direction
Mode semi-suivi
Mode de suivi complet
5Commande de mode scène
Appuyez une fois pour changer entre le mode marche, le mode sport et le mode personnalisé.
6Bouton Menu / Retour
Au niveau principal de l'interface de l'application, appuyez une fois sur la touche Menu pour passer
aux options de la barre de menus.
Au niveau secondaire de l'interface de l'application, appuyez une fois sur le bouton Précédent pour
revenir au menu précédent et appui long pour sortir du menu.
7Bouton d'enregistrement
Appuyez une fois pour démarrer / quitter l'enregistrement.
8Bouton de l'obturateur
Appuyez légèrement sur le Bouton de l'obturateur pour faire la mise au point. Appuyez profondément
sur le Bouton de l'obturateur pour une photo.
9Bouton de mode personnalisé
Mode de suivi des mains par défaut, flash personnalisé, balance des blancs et Commande de
recharge sans fil.
( Mode suivi à la main: le moteur répond à grande vitesse et suit rapidement la rotation de la poignée pour répondre
à l'effet de transition rapide)
10 Bouton mode d'album
Appuyez une fois sur le bouton du mode d'album pour afficher l'album.
12
Si une boucle est verrouillée, le gimbal sera automatiquement
mise en mode sommeil. Si toutes les boucles sont
déverrouillées, le gimbal reprend son fonctionnement. Le gimbal
va automatiquement s'éteindre s'il dort plus de 15 minutes.
Mode de sommeil du gimbal
Appuyez une fois sur le bouton Marche pour
activer le mode sommeil / réveil.
11 Bouton OK / DISP
Lors du réglage des paramètres de la caméra, appuyez simplement sur OK pour confirmer les paramètres.
Lorsque l’APP est sur l’affichage principal de l’interface, appuyez simplement sur le bouton DISP
pour afficher les paramètres actuels de la caméra.
Lorsque vous visionnez des photos, appuyez une fois sur le bouton DISP pour afficher les
informations relatives à la photo.
Lors de la visualisation de l'album, appuyez une fois sur OK pour confirmer la lecture.
Dimensions du gimbal (plié)
Poids du gimbal
Capacité de poids du gimbal
Largeur de téléphone prise en charge
Type de batterie
Durée du gimbal
332*122*62mm
635g
275g
55~85mm
Batterie de lithium
Plus de 15h
Voltage de recharge
Température de fonctionnement
Courant de recharge
Intervalle de rotation mécanique
-10~40℃
5±0.1V
Max 2A
Pan 360°; Roll 325°; Inclinaison330°
Paramètres techniques
Lumière du mode
de l'indicateur
Utilisez la molette de réglage des paramètres de la caméra pour régler précisément ces trois paramètres.
Appuyez une fois le bouton EV, le bouton de l'obturateur, le bouton ISO pour activer rapidement le
réglage manuel des paramètres de la caméra.
Appuyez deux fois pour changer le caméra de l'avant et l'arrière.
Appuyez une fois sur le bouton Retour pour revenir au menu précédent.
Verrouiller l'angle de prise de
vue actuel de la caméra

21 22
JapaneseJapanese
商品梗概 スマホの設置と調整
上下等間隔で携帯のチャックを開けて、スマホに入れて、携帯の左側に携帯のサポートを貼り付けます。
スマホが安定して下図の状態になるまで、右側の微調整軸アームを均等に締めます。
手動で携帯のチャックを回転させて、直接に横画面の撮影を切り替えることができます。
( 縦画面を使用する場合は、この手順に示す操作を行ってください。 )
1
3
2
*リンクFVShare
VILTA-M Proオープン。
FV Shareを開いて、VILT-M Proを選択し、ポイント選択デバイスは提示された通りに接続されます。
接続が成功すると、青い接続状態のランプが息を止めて点滅し、青いランプが常に点灯します。
オン/オフ
電源/モードボタンを3秒押し続けて、
電源を入れます。
1
2
3
スマホのブルートゥース機能を開きます。
( AndroidユーザはGPS測位機能のオンを許可してください )
携帯電話を読み込む前に、電源を入れないでください。
横画面と縦画面
の切り替え
1/4ネジ接口
Type-C充電接口
スマホの固定夾
接続状態ランプ
バランス調整つまみ
横ロール尾錠
レバー
ピント
ズーム/対角切替キー
調参輪
マーク点A
マーク点B
情景モード切り替え
メニュー/戻るキー
SHUTTER
(シャッタースピードボタン)
EV(露出補正ボタン)シャッターボタン
録画ボタン
ソフトキー
ISO(ISO感度キー)
アルバムキー
エンターキー/Dispキー
電源ボタン
ピッチ軸
ワイヤレス充電
ロール軸 バランス調整軸アーム
USB-Aスマホの
充電口
針路軸
パターンランプ
ハンドル
電源ボタン接続状態ランプ
アプリケーションのインストール
このセクションではVILTA-SEの機能を紹介します。使用前に注意深く読むか、または公式ウェブ
サイト上でそのすべての機能を備えた完全なユーザマニュアルを閲覧できます:www.fvshare.com。
弊社はは開発を続けており、予告なしに変更されることがあります。
IOSではApp Store(iOS 9.0以上)から「FV Share」を検索してダウンロードしてください。
FV Shareアプリ ダウンロード
「AndroidではGooglePlayで「FVShare」を検索できます」
または携帯電話でQRコードをスキャンして、インストールしてください。(Android5.0以上)"
携帯電話をジンバルに取り付けた後、携帯電話がホルダーでフラッシュしているかどうかを
確認してください。そうでない場合は、手動で中央の位置に調整してください。

23 24
JapaneseJapanese
バックル
バックル
2つの異なる奥行きの撮影主体を選択します。
焦点調整輪で撮影主体Aの焦点を調整し、Mark A点を長く押して固定し、焦点調整輪で撮影主体
Bの焦点を調整し、Mark B点を長く押して固定する。
撮影主体の切り替え
1
使用方法
録画の場合は、Mark A点とMark B点をクリックして本体の焦点を切り替える。
2高速ズーム/フォーカス
ズーム/フォーカス切替ボタンをクリックします。
焦点調整ホイールで交点を調整したり、拡大縮小したりします。
快速調整パラメータ
3
4モードランプとモード切替
状態ランプ
クリック
従うモー
ドキー
ダブルクリ
ック
3回クリック
4回クリック
長押し
長押し+左右レバー
緑
黄色のラ
ンプが点滅
赤い
黄色
雲台モード
ロール軸の角度を調整する
POVモード
迅速に位置決め位置決め
半従うモードキー
完全フォローモード
ロック当面携帯撮影アングル
5情景モード切り替え
モード切り替えボタンをクリックして、走行モード、運動モード、カスタムモードを切り替えます。
6メニュー/戻るキー
アプリ1級画面の場合は、メニューキーをクリックして、左メニューバーのオプションを繰り返し切り替えます。
アプリ2級画面の場合は、戻るキーをクリックして、前のレベルのメニューに戻り、長押しでメニューを
終了します。
7録画ボタン
録画の開始/終了をクリックします。
8シャッターボタン
軽く押すとピントが合いますが、深く押すと写真を撮ります。
9カスタムキー
フラッシュ、ホワイトバランス、ワイヤレス充電スイッチをカスタマイズします。
(フォローモード:モータの高速応答、ハンドルに従って素早く回転し、高速回転効果の応用を満足します)
10 アルバムキー
アルバムキーをクリックしてアルバムを表示します。
12
どのバックルをロックされて、雲台は自動的にスリープ
します。ロック解除カードのボタンは、雲台が仕事を再
開します。雲台が休眠して15分を超えたら、自動的にシ
ャットダウンします。
雲台休眠
電源キーをクリックしてスリープ/スリープします。
11 OK/DISPキー
カメラのパラメータを調整する場合は、OKボタンをクリックしてパラメータを確認します。
アプリ1級画面の場合、DISPキーをクリックして現在のカメラパラメータを表示します。
写真を見る場合は、DISPキーをクリックして写真情報を表示します。
アルバムを見るときは、OKボタンをクリックして再生を確認します。
雲台尺寸(収納状態)
雲台重量
雲台最大荷重
携帯電話対応幅
バッテリータイプ
雲台航続時間
332*122*62mm
635g
275g
55~85mm
スマートリチウム電池
大きい 15H
充電電圧
使用環境温度
充電電気
制御可能回転範囲
-10~40℃
5±0.1V
Max 2A
水平360°無限ビット:横転325°:仰向け330°
技術パラメータ
パターンランプ
チューニングホイールを通じてカメラのパラメータをきちんと調整します。
露出補正キー/シャッタースピードキー/ISOボタンをクリックして、手動調整機能をすばやくオンにします。
ダブルクリックして前後カメラを切り替えます。
戻るキーをクリックして、前のレベルのメニューに戻ります。

25 English 26English
FCC Warning
This device complies with part 15 and part 18 of the FCC Rules. Operation is subject to the following
two conditions:
(1) This device may not cause harmful interference, and (2) this device must accept any interference
received, including interference that may cause undesired operation.
Note 1: This equipment has been tested and found to comply with the limits for a Class B digital device,
pursuant to part 15 of the FCC Rules. These limits are designed to provide reasonable protection against
harmful interference in a residential installation. This equipment generates uses and can radiate radio
frequency energy and, if not installed and used in accordance with the instructions, may cause harmful
interference to radio communications. However, there is no guarantee that interference will not occur in a
particular installation. If this equipment does cause harmful interference to radio or television reception,
which can be determined by turning the equipment off and on, the user is encouraged to try to correct the
interference by one or more of the following measures:
-Reorient or relocate the receiving antenna.
-Increase the separation between the equipment and receiver.
-Connect the equipment into an outlet on a circuit different from that to which the receiver is connected.
-Consult the dealer or an experienced radio/TV technician for help.
NOTE 2: Any changes or modifications to this unit not expressly approved by the party responsible for
compliance could void the user's authority to operate the equipment.
Caution:
Use the Product in the environment with the temperature Between -10℃and 40℃; Otherwise, it may
damage your product. Products can only be used below 2000m altitude.
For the following equipment:
Product Name: VILTA-M Pro
Model: VT30
Brand Name: FREEVISION
Hangzhou Freevision Intelligent Technology Co., Ltd.
Hereby declares that this [Name: VILTA-M Pro, Model: VT30] is in compliance with the essential
requirements and other relevant provisions of Directive 2014/53/EU.
The full text of the EU declaration of conformity is available at the internet address: www.fvshare.com.
This product is intended for sale and application in a business environment.
RED Article 10 2
-This product can be used across EU member states
RED Article 10 10
-The product is class 1 product, No restrictions
Bluetooth Version: V4.2 (Only BLE)
Frequency Range: 2402-2480MHz
Max. RF Output Power: -2.01dBm (EIRP)
WPT Frequency Range: 110~205kHz (Only Power transmission)
Antenna Type: Coil Antenna
CE Warning
CAUTION
RISK OF EXPLOSION IF BATTERY IS REPLACED
BY AN INCORRECT TYPE.
DISPOSE OF USED BATTERIES ACCORDING
TO THE INSTRUCTIONS

Other manuals for VILTA-M Pro
1
Table of contents
Languages:
Other FreeVision Cell Phone Accessories manuals
Popular Cell Phone Accessories manuals by other brands

Wonky Monkey
Wonky Monkey WM PAC-BT085 User instructions

USKEYVISION
USKEYVISION Flex-K3 user manual

Hama
Hama Fun 70 BT operating instructions

Infinite Peripherals
Infinite Peripherals Infinea X IX-I2DBTR-PH5-WH quick start guide

TaoTronics
TaoTronics TT-ST001 Online guide

Panasonic
Panasonic QE-PL202 owner's manual