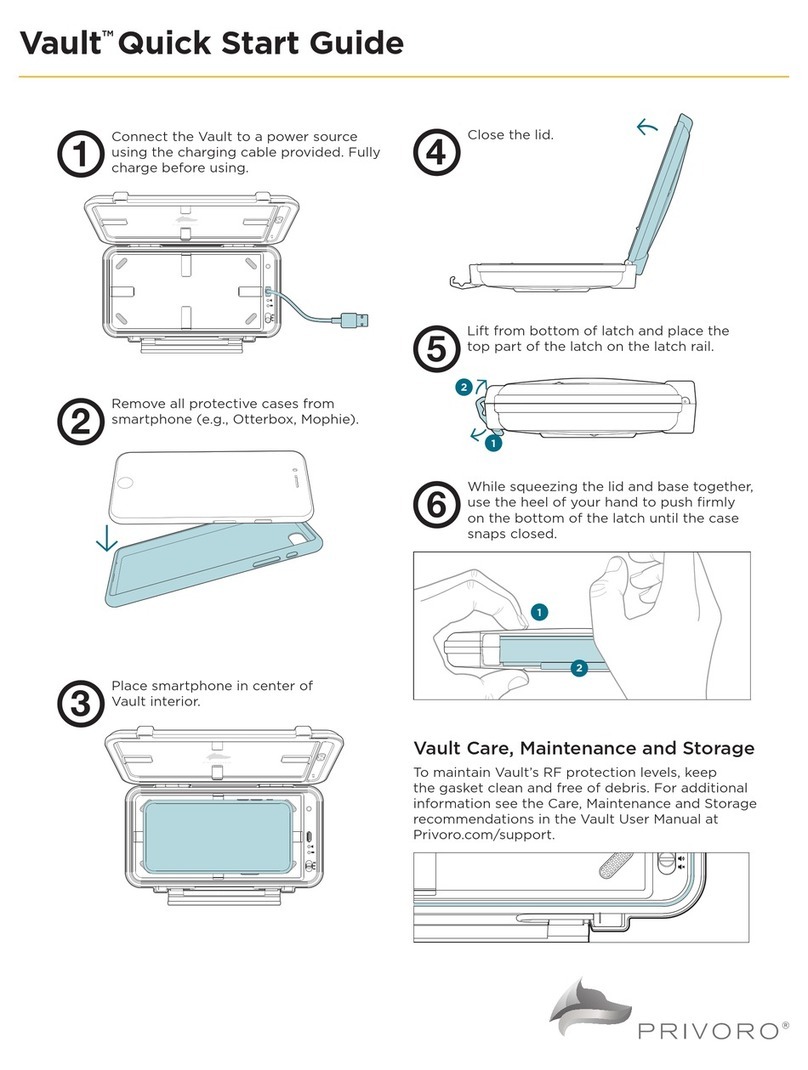
Privoro Vault User manual

Vault™
User Manual
Updated February 22, 2021

Vault User Manual
Section 1: About Vault 3
Vault components 3
Section 2: Getting started with Vault 4
Powering on Vault 4
Removing smartphone accessories 4
Section 3: Inserting a smartphone into Vault 4
Opening Vault 5
Section 4: Managing audio masking 6
Section 5: Charging 7
Battery Life 7
Checking battery status 7
Section 6: Covering the LEDs 7
Section 7: Testing Vault functionality 8
Testing RF shielding 8
Testing audio masking 8
Section 8: Vault Care, Maintenance and Storage 9
Appendix A: Technical specifications 10
Appendix B: Safety and handling 11
Appendix C: Recycling 11
Appendix D: Regulatory information 11
Table of Contents Section 1: About Vault
Vault is the first-of-its-kind integrated, two-in-one
portable Faraday enclosure and audio masking
chamber for smartphones. Vault eliminates smartphone
signals more eectively than fabric-based Faraday
products, delivering a minimum of 100 dB of radio
frequency (RF) attenuation/10 billion times signal
reduction. When placed in the Vault case, a smartphone
can no longer be reached via cellular, WiFi, Bluetooth,
near-field communication (NFC) or radio-frequency
identification (RFID). User-controlled audio masking
prevents extraction of intelligible speech up to voice
levels of 90 dBA through independent noise signals.
The associated smartphone’s cameras are also unusable
when sealed in the enclosure to prevent spying.

3
Latch rail
Holds the top of the latch in place.
Lid
The top portion of the Vault,
hinged to the base.
Pads
Cushion the smartphone and lift
it to facilitate audio masking.
Base
The bottom portion of the Vault, where
your smartphone is placed.
Latch
Joins the lid and base together
to create an RF seal.
USB-C charging port
For charging Vault via charging cable.
Audio masking LED
Indicates audio masking level.
Battery status LED
Indicates battery charge level.
Audio masking switch
Controls audio masking setting.
Gasket
Creates the seal that provides high-level
RF shielding. NOTE: The gasket must be
free of dirt and debris to maintain the
highest level of shielding. See Section
8 of this manual for Care, Maintenance
and Storage recommendations.
LED cover switch
Covers up the interior LEDs.
LED status window
Creates visibility to the interior LEDs.
Mounting socket
Enables placement of Vault on
a standard tripod mount.
VAULT COMPONENTS
At a basic level, Vault includes a lid, a base and a latch that joins the two together to create a radio frequency
(RF) seal. Vault also ships with a three-foot, USB-A to USB-C charging cable.
The components of Vault (and their main functions) are displayed in Figure 1.
Figure 1: Vault components
Audio masking switch
Gasket
Base
Latch
Lid
Latch rail
Pads
USB-C charging port
Audio masking LED
Battery status LED
Inside
LED cover switch LED status window Mounting socket
Top Bottom

4
Insert your smartphone into Vault using the following steps:
1. Open the lid (Figure 4). It may help to place the
base on a flat surface.
Before using Vault for the first time, it’s important to complete the following steps:
POWERING ON VAULT
Vault is in shipping mode when it arrives. To power it
on for the first time, connect Vault to a power source
(charge-capable USB port or wall charger) using the
charging cable provided. The USB-C side connects
to Vault and the USB-A side connects to the power
source (Figure 2). Once powered on, the battery
status LED will illuminate.
REMOVING SMARTPHONE ACCESSORIES
Before inserting your smartphone into Vault, remove
any protective cases and any other accessories from
your smartphone (Figure 3). Protective cases may
prevent your smartphone from fitting into the device
and may disrupt both RF shielding and audio masking.
Section 2: Getting started with Vault
Figure 3: Remove protective case, if applicable
Section 3: Inserting a smartphone into Vault
Figure 4: Open the lid
Figure 2: Connect Vault to a power source

5
2. Place your smartphone in the center of the interior
(Figure 5). Your smartphone should rest evenly on
the four pads.
With your smartphone in place, you can now turn on
audio masking (see: Managing audio masking).
3. Close the lid (Figure 6).
4. Lift from the bottom of the latch and place the
top of the latch onto the latch rail (Figure 7).
5. Firmly push the bottom of the latch inward to snap
into place (Figure 8).
With Vault securely latched, a tight seal is created
around the device to shield out any RF signals.
OPENING VAULT
When you would like to remove your smartphone from
Vault, adjust audio masking or charge the device, you
will first need to open Vault.
Open Vault using the following steps:
1. Pull the bottom of the latch outward (Figure 9).
2. Move the top of the latch o the latch rail
(Figure 10).
Figure 6: Close the lid
Figure 10: Move the latch
Figure 7: Place the latch
1
2
Figure 8: Shut the latch
Figure 9: Open the latch
Figure 5: Place your smartphone

6
Vault provides two levels of audio masking – Maximum (for high noise levels) and Standard (for low-to-moderate
noise levels) – as well a Standby setting for when masking is not required (Figure 11).
To change the audio masking setting, with the lid open toggle the audio masking switch to the desired setting
(Figure 12). The audio masking LED reflects the current masking setting.
Section 4: Managing audio masking
Figure 12: Toggle the audio masking switch
Figure 11: Audio masking settings
Audio masking setting When to use
Audio masking
LED behavior Notes
Maximum masking For use in the presence of
high noise levels. Examples:
noisy restaurant, city street
Pulses blue every
10 seconds (when
latched closed)
Masks speech intelligibility at a constant
level of 90 dBA
Standard masking For use in the presence of low-to-
moderate noise levels. Examples:
quiet oce, residential area
Pulses white every
10 seconds (when
latched closed)
Adaptively masks speech intelligibility
up to voice levels of 90 dBA and speech
presence up to voice levels of 80 dBA
Standby In instances when audio masking
is not required or when needing to
conserve battery
O With masking o, RF shielding is
maintained when Vault is latched closed
Maximum masking
For use with
high noise levels
Standard masking
For use with
low-to-moderate
noise levels
Standby
For times when
masking is not required
or when needing to
conserve battery
Audio masking LED
Blue = Maximum
White = Standard
O = O

7
To charge Vault with the lid open, insert the USB-C
side of the charging cable into the USB-C port and
then insert the USB-A side into a power source
(charge-capable USB port or wall charger) (Figure 13).
Section 5: Charging
Figure 13: Connect Vault to a power source
BATTERY LIFE
2+ days in Standard masking mode (in quiet
environments), ~6 hours in Maximum masking mode
• Standard audio masking mode: Utilizes adaptive
masking to automatically adjust masking signal
power levels based on ambient sound level. Quieter
environments consume less power while noisier
environments consume more. This mode maximizes
product battery life and minimizes masking signal
obtrusiveness.
• Maximum audio masking mode: Masking signals play
continuously at peak power. This mode enables users
to choose maximum protection, at a cost of shorter
battery life. Note, masking signals will be more
noticeable in this mode.
• Standby mode: No masking signal; battery status LED
pulses to indicate remaining battery life.
CHECKING BATTERY STATUS
Battery level will be indicated by the battery status LED,
with the color of the LED corresponding to the charge
level (Figure 14).
Battery status LED
Green = 60-100%
Amber = 20-60%
Red = 0-20%
Figure 14: Charge levels associated with battery status LED
Both the audio masking LED and the battery status
LED are visible through the LED status window when
Vault is latched closed. However, you can block these
LEDs if you’re trying to be covert or want to
eliminate light fatigue.
To cover the LEDs, toggle the LED cover switch so
that the LED status window is closed (Figure 15).
Section 6: Covering the LEDs
Figure 15: Toggle the LED cover switch

8
TESTING RF SHIELDING
With your smartphone inside Vault, you can try pinging your phone in a number of dierent ways (Figure 16).
Signal to test Smartphone settings Action Expected result
Cellular Cellular is turned on, WiFi is turned
o and the ringer is set to maximum. Call the smartphone. Your smartphone
will not ring.
GPS Location services are turned on and
WiFi and Bluetooth are turned o.
Use a locator service (Like iPhone’s
Find My or Android’s Find My Device)
to locate the smartphone.
Your smartphone’s
location will be
unavailable.
WiFi WiFi is turned on, cellular is turned
o and the ringer is set to maximum. Call the smartphone. Your smartphone
will not ring.
Bluetooth Bluetooth and Bluetooth sharing
are turned on.
From a compatible device, use the
Bluetooth sharing feature (like iPhone’s
AirDrop or Android’s Nearby Share)
to send the smartphone a photo.
Your smartphone will
not be discoverable.
While both the RF shielding and audio masking capabilities of Vault have been rigorously tested to ensure the
highest levels of protection, you may decide to perform informal tests to verify a baseline level of protection.
Figure 16: Sample RF shielding tests
Section 7: Testing Vault functionality
TESTING AUDIO MASKING
You can test audio masking using the following sequence:
Audio captured when Vault is latched closed should be masked by randomized noise.
1. Place your smartphone inside Vault.
2. Set the masking level to Standard or Maximum.
3. On your smartphone, start recording audio or video.
4. Latch Vault closed.
5. Introduce noise into your environment
corresponding to the masking level. For Standard
masking, you can speak at a conversational
volume; for Maximum masking, you can play
music at a loud volume.
6. Open Vault.
7. On your smartphone, stop the recording and then
play back the recorded audio.
9
• Cleaning: We recommend cleaning the gasket as
required, but no less than every 500 open/close
cycles (or every three months). To do so, apply
gentle pressure while wiping the surface of the
gasket with an alcohol wipe or a cotton ball/swab
dampened with isopropyl alcohol (Figure 17).
• Storage: We recommend turning masking to
Standby, and closing and latching the lid before
storing Vault. This helps keep dust/dirt from building
up on the gasket.
Section 8: Vault Care, Maintenance and Storage
Figure 17: Clean gasket
Gasket
To maintain the highest level of RF shielding, Vault’s gasket must be free of dirt and debris. To ensure that the
gasket remains clean, it’s important to follow the following recommendations:

10
Appendix A: Technical specifications
SIZE AND WEIGHT
• Total dimensions: 189.91 mm (7.47 inches) x
30.58 mm (1.20 inches) x 109.95 mm (4.32 inches)
• Interior dimensions: 162.32 mm (6.39 inches) x
10.54 mm (0.41 inches) x 82.14 mm (3.23 inches)
• Maximum dimensions of enclosed device:
158.5 mm (6.24 inches) x 8.5 mm (.33 inches) x
78.5 mm (3.09 inches)
• Weight: 0.47 kg (1.05 lbs)
RADIO FREQUENCY (RF) ATTENUATION
• A minimum of 100 dB of RF attenuation from
500 MHz to 6 GHz
AUDIO MASKING
• Digital signal processor for optimum audio quality
and secure voice masking
• Masks speech intelligibility up to voice level of 90
dBA (tested one meter from audio source)
• Masks speech presence up to voice level of 80 dBA
(tested one meter from audio source)
BATTERY AND BATTERY LIFE
• Standard mode: 2+ days
• Maximum mode: ~6 hours
• Charge time: ~3 hours with a 2A charger
ELECTRICAL RATINGS
• 3.8V, 4000mAh lithium-ion polymer (LiPo) battery
• Maximum input current: 2.0A
• Rated voltage: 5VDC
ENVIRONMENTAL REQUIREMENTS
• Operating temperature: -4° and 122° F
(-20° and 50° C)
• Relative humidity: Up to 95%
• Operating altitude: Up to 30,000 feet (9,144 m)
CERTIFICATIONS AND MANUFACTURING
• IP54 certification for water and dust ingress
• Drop certified up to 6 feet onto plywood over
concrete
• Manufactured in a U.S.-based ITAR facility
• Vault surpasses the U.S. military’s MIL-STD-188-125
standard for compliance

11
Appendix B: Safety and handling
Appendix C: Recycling
Appendix D: Regulatory information
©2021 Privoro LLC or its aliates. All rights reserved. Proprietary and Confidential. PVOSUPJ180V02
HANDLING
Handle Vault with care. Vault contains a lithium-ion
polymer (LiPo) battery, metal, plastic and electronic
components. To avoid damage to Vault and the battery,
take care not to puncture, drop, burn or crush Vault.
Vault is not water-resistant or waterproof. Avoid
exposing Vault to excessive moisture or liquid. Should
Vault become damaged, discontinue use.
REPAIR
Do not attempt to open or repair Vault. Opening
Vault will invalidate any and all warranties.
BATTERY
Do not attempt to change the Vault battery.
Improper replacement of the battery could result in
fire, overheating and injury. Attempting to replace
the battery will invalidate any and all warranties.
The lithium-ion polymer (LiPo) battery in your
device should be serviced or recycled by Privoro
or an authorized service provider and must be
recycled or disposed of separately from household/
municipal waste.
CHARGING
Vault comes with a USB-A 3.0 to USB-C high-
speed charging cable. For optimal charging it is
recommended you use a Privoro Vault charging
cable. Vault has a maximum input current of 2.0A.
Using damaged cables or charging when moisture is
present can cause fire, electric shock, injury or damage
to Vault or other property.
OPERATING TEMPERATURE
Vault is designed to work in ambient temperatures
between -4° and 122° F (-20° and 50° C). Vault may
be damaged and battery life shortened if stored or
operated outside of these temperature ranges. Vault
may be used in tropical climate regions.
Vault battery charging may be limited if the interior
temperature of Vault exceeds normal operating
temperatures (for example, in a hot car or in direct
sunlight for extended periods of time).
Privoro has partnered with Call2Recycle for your device and battery recycling needs (within the United States and
Canada). To find a recycling location near you, go to call2recycle.org/locator and enter your zip code.
COMPLIANCE STATEMENT
This equipment has been tested and found to comply
with the limits for a Class B digital device, pursuant to
Part 15 of the FCC Rules. These limits are designed to
provide reasonable protection against harmful inter-
ference in a residential installation. This equipment
generates, uses and can radiate radio frequency energy
and, if not installed and used in accordance with the
instructions, may cause harmful interference to radio
communications. However, there is no guarantee that
interference will not occur in a particular installation. If
this equipment does cause harmful interference to ra-
dio or television reception, which can be determined by
turning the equipment o and on, the user is encour-
aged to try to correct the interference by one of the
following measures:
• Reorient or relocate the receiving antenna.
• Increase the separation between the equipment
and receiver.
• Connect the equipment into an outlet on a
circuit dierent from that to which the receiver is
connected.
• Consult the dealer or an experienced radio/TV
technician for help.
Changes or modifications not expressly approved by
the party responsible for compliance could void the
user’s authority to operate the equipment.
This Class B digital apparatus complies with Canadian
ICES-003.
WARNING: Follow these safety instructions to avoid fire, electric shock, injury, damage to Vault or other property.
Other manuals for Vault
1
Table of contents
Other Privoro Cell Phone Accessories manuals

Privoro
Privoro SafeCase iPhone 12 User manual

Privoro
Privoro Vault User manual

Privoro
Privoro SafeCase Galaxy S21 User manual

Privoro
Privoro SafeCase Galaxy S22 User manual

Privoro
Privoro SafeCase iPhone 12 User manual

Privoro
Privoro PRIVACY GUARD User manual

Privoro
Privoro Safecase User manual

Privoro
Privoro Safecase User manual

Privoro
Privoro SafeCase Galaxy S21 User manual

Privoro
Privoro Safecase User manual