Fricosmos 061428 User manual

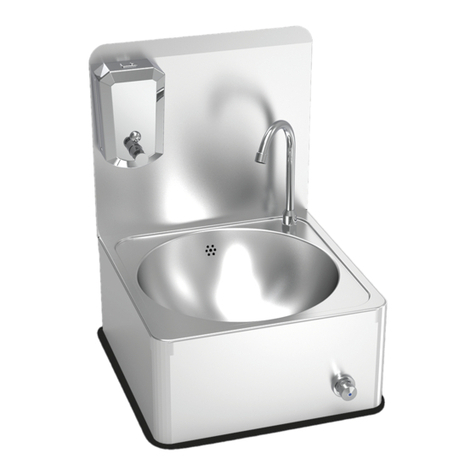
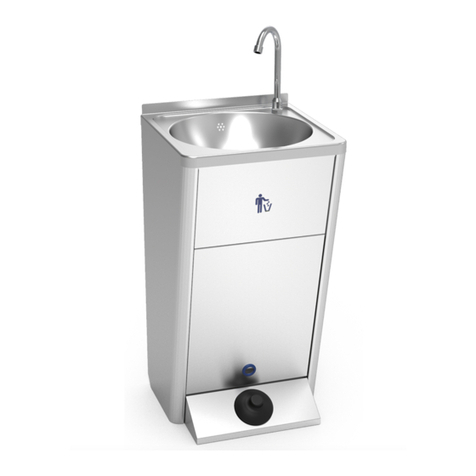
Lavamanos portátil autónomo de gran caudal
Mobileandautonomoushandwashbasinhighflow
Lave-mains portable autonome à grand débit
MobilesHandwaschbeckenmithöhererDurchflussmenge
Lavamãosportátilautónomodealtofluxo
Ref: 061428
Reg. San. 39.2737/M

REF: 061430
1X 1X 060410 1X 080418
1X 460236 1X 461008 1X 454260
1X 4614301X 454202
4X 421002
6X 421004
2X 409822
4X 421050
6X 421052 2X 421038
12
3 4
1X 461428
5

Lea las instrucciones antes de conectar el equipo y consérvelas en un lugar
seguro para su consulta.
NO BEBER AGUA DEL LAVAMANOS. ESTE LAVAMANOS ESTÁ CONCE-
BIDO EXCLUSIVAMENTE PARA LAVARSE LAS MANOS.
Verifiqueelcontenido.Esaconsejableemplearguantesanticorteparalasoperacionesdemontaje.
Extraiga la puerta frontal y quite los plásticos de puerta y lavamanos.
Inserte el peto deslizándolo por las guías y fíjelo con los tornillos y tuercas a la parte trasera del
lavamanos.
Extraiga el frontal del dispensador de jabón con la llave suministrada.
Fije el dispensador de jabón al peto con los tornillos y tuercas.
Introduzca 4 pilas AA en su compartimento · Fig. 1
Llene el depósito de jabón y coloque de nuevo el frontal del dispensador de jabón.
Fije el dispensador de tissues con los tornillos y tuercas.
Introduzcaelcañoporelorificiosuperiordelmuebleyfíjeloconlatuercaqueseacompaña·Fig.2
Monte la válvula de desagüe · Fig. 3
Conecte al caño el latiguillo de su mismo lado.
Introduzca el bidón con la etiqueta de agua no potable bajo el caño.
Conecteeldesagüeflexiblealaválvulahaciendoformadecodo/sifóneintroduzcaelotroextremo
en el bidón de agua sucia · Fig. 4
Quiteeltapónpequeñodelbidóndeagualimpiaeintroduzcaellatiguilloquefaltaporesteorificio,
haciéndolo pasar por el interior del asa. Fig 5
MONTAJE
Envolvente para lavamanos portátil autónomo. (repuesto no disponible)
060610 - Peto postizo para acoplar a lavamanos portátil.
080418 - Dispensador de 1 caja de guantes, tissues o toallas.
460236 - Jabonera electrónica (funcionamiento a pilas).
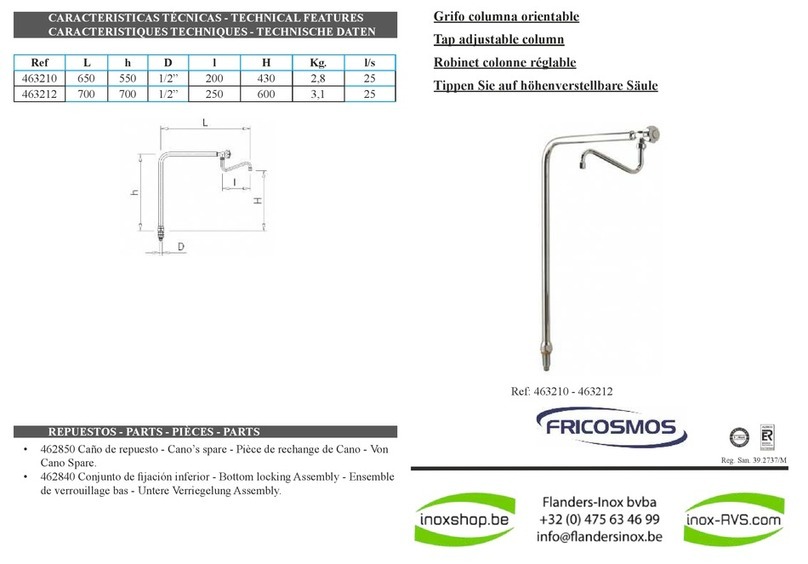
461008 - Caño giratorio 140x200x1/2” (rosca de 50mm).
454260Desagüeflexibleparalavamanosautónomo.
461430 - Bidón para agua sucia 10 lts para lavamanos autónomo.
461428 - Bidón para agua limpia 10 lts para lavamanos autónomo.
454202 - Válvula 2 ½” con rebosadero para fregadero de 500mm.
421002 - Tornillo cabeza hexagonal rosca métrica M4x16 mm.
421050 - Tuerca hexagonal rosca métrica M4 mm.
421004 - Tornillo cabeza hexagonal rosca métrica M5x8 mm.
421052 - Tuerca hexagonal rosca métrica M5 mm.
409822 - Taco de plástico nylon Fisher 6x30mm.
421038 - Tornillo rosca chapa 22x4,8 mm. DIN 7981 A2.
CONTENIDO Y REPUESTOS DISPONIBLES
Otros repuestos:
460412 Pulsador hidráulico de gran caudal
485020 - Rueda de plástico ø50x18 mm. para lavamanos autónomo.
461432 - Adhesivo vinilo “Agua no potable” para bidón.
Este lavamanos no podrá sustituir a ningún otro artículo que requiera agua corriente caliente y fría según la
legislación vigente aplicable
No beber agua del lavamanos. Este lavamanos está concebido exclusivamente para lavarse las
manos.
Este lavamanos no podrá sustituir a ningún otro artículo que requiera agua corriente caliente y fría
según la legislación vigente aplicable.
LIMPIEZA Y ESTERILIZACIÓN
• Lave ambos bidones con abundante agua potable.
• Esterilícelos antes del primer uso de cada jornada añadiendo un producto esterilizante homologa-
do para agua potable siguiendo las instrucciones del fabricante. Haga pasar por el circuito toda el
agua con esterilizante del bidón para agua limpia pisando el pulsador hasta el completo vaciado del
bidón para esterilizar el circuito.
• A continuación llene el bidón para agua limpia con agua potable.
• Ya está listo para su uso.
• Realice este procedimiento antes del inicio de cada jornada.
SEGURIDAD,
• Vacíe el bidón de agua usada al menos una vez cada hora o cuando se llene.
• Vacíe el bidón de agua limpia al menos una vez cada 6 horas.
• Cuando no use el equipo por un largo periodo de tiempo vacíe los bidones de agua, lávelos y guár-
delos totalmente secos. Almacene los bidones limpios y secos en un lugar oscuro, seco y saludable.
• Sustituir los bidones cada seis meses.
• Para evitar la contaminación cruzada, no hacer uso de la papelera.
SEGURIDAD, LIMPIEZA Y ESTERILIZACIÓN
En su primera utilización pise repetida y fuertemente el pulsador a fondo hasta que salga el agua.
Para suministrar agua, pise fuerte y repetidamente el pulsador.
MANEJO
• Use sólo agua y jabón neutro en la limpieza.
• Frote con un paño suave.
• Enjuague con abundante agua potable.
• Seque con un paño suave.
• No emplee ácidos o detergentes agresivos, ni raspe con estropajos, espátulas, cuchillas
u objetos cortantes o punzantes.
MANTENIMIENTO DELACERO INOXIDABLE
El equipo tiene garantía de dos años. El mal uso del equipo elimina la garantía del mismo.
GARANTÍA

Check the contents.
When assembling, it is advisable to use special gloves in order to avoid any bad cut on hands.
Pull out front door and remove the plastics from doors and washbasin.
Insert the backsplash sliding it along the rails and secure it to the back of the basin using the nuts
and screws.
Remove the front part of the soap dispenser using the key provided.
Attach the soap dispenser to the backsplash using the nuts and screws.
Introduce four AA batteries into the battery compartment · Fig. 1
Fill the soap container and replace the front part of the soap dispenser.
Secure the tissue dispenser using nuts and screws.
Insertthespoutintheupperorificeandfixitwiththeprovidedbolts·Fig.2
Assemble the drain valve · Fig. 3
Connect to the spout the closest hose.
Insert the tank with the label of non-drinking water under the spout.
ConnecttheflexibledrainpipetothevalvemakingaUbendandattachtheotherendtothedirty
water tank · Fig. 4
Remove the small plug from the clean water tank and insert the remaining hose through this hole.
Make sure that it runs under the handle Fig 5
ASSEMBLY
Casing for portable, self-contained basin. (spare not available)
060610 - Detachable transom for attachment to portable basin.
080418 - 1 box dispenser of gloves, tissue or towels.
460236 - Electronic soap dispenser (uses batteries).
461008 - Turning tap 140x200x1/2” (50mm nut).
454260 - Flexible drainage pipe for self-contained basin.
461430 - Stackable translucent 10 l tank for dirty water
461428 - Translucent 10 l tank for clean water
454202 - 2 ½” Valve with trough for 500mm sink.
421002 - M4x16-mm metric thread hex head screw.
421050 - Hexagon nut metric thread M4.
421004 - M5x8-mm metric thread hex head screw.
421052 - M5 metric thread hex nut.
409822 - Plastic nylon Fisher 6X30mm peg.
421038 - Plate thread bolt 22x4,8mm. DIN 7981 A2.
CONTENTS & AVAILABLE SPARES
Other spares:
460412Hydraulicpedalhighflow
485020 - 50x18-mm.ø plastic wheel for self-contained basin.
461432 - “Not drinking water” vinyl adhesive for tank.
Read the instructions before connecting the device and store them in a safe place for
reference.
DO NOT DRINK WATER FROM THE HAND WASHBASIN. THIS DEVICE
IS NOT DESIGNED FOR DRINKING WATER.
DO NOT DRINK WATER FROM THE HAND WASHBASIN. THIS DEVICE IS NOT DESIGNED
FOR DRINKING WATER.
This hand washbasin cannot replace any items that require hot and cold running water at the facili-
ties in accordance with the applicable laws.
CLEANING AND STERILIZATION
• Wash both tanks with plenty of drinking water.
•Sterilizebeforethefirstuseofeachday,byaddingasterilizingproductapprovedfordrinking
water according to the instructions of the manufacturer. Feed all the circuit with the water and the
sterilizing product stepping on the button until the tank is empty.
•Thenfillthetankwithdrinkingwater.Itisnowreadyforuse.
• Perform this procedure before the start of each day.
SAFETY
• Empty the tank of used water at least once an hour or when is full.
• Empty the tank of drinking water at least once every 6 hours.
• When the device is not being used for a long period of time, empty the tanks, wash them and store
them completely dry.
• Store the containers clean and dry in a dark, dry and healthy area.
• Replace the tanks every six months
• In order to avoid cross-contamination, do not use the bin.
SAFETY, CLEANING AND STERILIZATION
Whenusingitforthefirsttime,stepdownandreleasethebuttonallthewayrepeatedlyuntilthe
water comes out.
Then step down and release repeatedly.
USE
• Use only water and neutral soap when cleaning.
• Wipe with a soft cloth.
• Rinse with plenty of drinking water.
• Dry with a soft cloth.
• Do not use acids or strong detergents and do not rub with a scourer or spatula.
MAINTENANCE OF STAINLESS STEEL
This device has two years of warranty. An improper use void the warranty of the unit.
WARRANTY
This hand washbasin cannot replace any items that require hot and cold
running water at the facilities in accordance with the applicable laws

Vérifiezlecontenu.
Il est conseillé d’employer des gants anticoupure pour les opérations de montage.
Enlevez la porte frontale et retirez les plastiques de la porte et du lave-mains.
Insérezledosseretenlefaisantglisserparlesguidesetfixezleàl’aidedesvisetécrousàlapartie
arrière du lave-mains.
Détachez la partie frontale du distributeur de savon à l’aide de la clé fournie.
Fixez le distributeur de savon à la protection à l’aide des vis et écrous.
Introduisez 4 piles AA dans leur compartiment · Fig. 1
Remplissez le réservoir à savon et mettez de nouveau la partie frontale du distributeur de savon.
Fixez le distributeur de papiers à l’aide des vis et écrous.
Introduisezlecoldecygneparl’orificesupérieurdumeubleetfixezleaveclesécrousquiaccom
pagnent · Fig. 2
Montez la bonde de vidange · Fig. 3
Connectezletuyauflexibleleplusprocheàlabaseducoldecygne.
Insérez le reservoir avec l’étiquette de l’eau non potable sous le col de cygne.
Connectezl’évacuationd’eauflexibleàlavalveenfaisantlaformedecoude/siphonetintroduisez
l’autre bout dans le bidon d’eau sale · Fig. 4
Enlevezlecouverclepetitdubidond’eaupropreetintroduisezleflexiblequiresteparcetorifice.
Veuillez le faire passer par l’intérieur de la poignée du bidon Fig 5
INSTALLATION
Enveloppe pour lave-mains portable autonome. (détachée non disponible)
060610 - Faux dosseret à accoupler au lave-mains portable.
080418 - Distributeur de 1 boîte de gants, tissus ou serviettes.
460236 - Porte-savon électronique (fonctionnement à piles).
461008Coldecygned’eaugiratoire140x200x1/2”(filetde50mm).
454260Sortied’eauflexiblepourlavemainsautonome.
461430 - Bidon empilable translucide 10 l pour eau salle
461428 - Bidon translucide 10 l pour eau propre
454202 - Valve 2 ½” avec déversoir pour évier de 500 mm.
421002VisàtêtehexagonalefiletmétriqueM4x16mm.
421050ÉcrouhexagonalfiletmétriqueM4.
421004VisàtêtehexagonalefiletmétriqueM5x8mm.
421052ÉcrouhexagonalfiletmétriqueM5mm.
409822 - Taquet en plastique nylon Fisher 6x30 mm.
421038Visfilettôle22x4,8mm.DIN7981A2.
CONTENU ET PIÈCES DE RECHANGE DISPONIBLES
Autres pièces de rechange:
460412 - Pédale hydraulique d´grand débit
485020 - Roue en plastique ø50x18 mm. Pour lave-mains autonome
461432 - Adhésif vinyle “Eau non potable” pour bidon.
Ne buvez pas l’eau de ce lave-mains.
CE LAVE-MAINS N’EST CONÇU QUE POUR SE LAVER LES MAINS.
Ce lave-mains ne peut pas remplacer tout article qui nécessite de l’eau courante chaude et froide
selon les lois en vigueur.
NETTOYAGE ET STÉRILISATION
• Lavez les deux reservoirs avec de l’eau potable.
• Stérilisez avant la première utilisation de chaque journée, en ajoutant un produit stérilisant
agréé pour l’eau potable conformément aux instructions du fabricant.
• Faire passer par le circuit toute l’eau avec stérilisateur du reservoir d’eau propre, en pompant le
poussoir jusqu’au ce que le bidon d’eau propre soit vide.
• Puis remplissez le bidon d’eau propre avec de l’eau potable. Le lave-mains est prêt à l’emploi.
• Effectuez cette procédure avant le début de chaque journée.
SECURITÉ
• Videz le reservoir d’eau utilisée au moins une fois toutes les heures, ou lorsqu’il est plein.
• Videz le réservoir d’eau propre au moins une fois toutes les 6 heures.
• Quand vous n’utilisez pas l’appareil pendant une longue période de temps videz les reservoirs
d’eau, lavez-les et stockez-les complètement sec.
• Stocker les bidons propres et secs dans un endroit sombre, sec et sain.
• Remplacez les bidons tous les six mois.
• Pour éviter la contamination croisée, n’utilisez pas la corbeille à papier.
SECURITÉ, NETTOYAGE ET STÉRILISATION
Lors de la première utilisation appuyez fortement sur le bouton-poussoir jusqu’au bout et repetez
cette opération plusieurs fois jusqu’au ce que l’eau commence à couler.
Pour fournir l’eau, appuyez fortement et de manière répétée sur le bouton-poussoir.
UTILISATION
• Utilisez uniquement de l’eau potable et du savon neutre pour le nettoyage.
• Frottez à l’aide d’un chiff on doux.
• Rincez avec de l’eau potable abondante.
• Séchez à l’aide d’un chiffon sec.
• N’employez pas d’acides ou de détergent agressifs, ne grattez pas avec des tampons
métalliques, des spatules, des lames ou des objets coupants ou pointus.
ENTRETIEN DE L’INOX
L’appareil a deux années de garantie. Une mauvaise utilisation du lave-mains annulera la garan-
tie de l’appareil
GARANTIE
Lisez ces instructions avant de brancher ce produit et conservez-les dans un endroit
sûr pour sa consultation.
NE BUVEZ PAS D’EAU DE CE LAVE-MAINS. CE LAVE-MAINS N’EST CONÇU QUE
POUR SE LAVER LES MAINS.
Ce lave-mains ne peut pas remplacer tout article qui nécessite de l’eau cou-
rante chaude et froide selon les lois en vigueur.

Überprüfen Sie den Inhalt auf Vollständigkeit.
Zur Montage empfehlen wir Ihnen die Benutzung von Schnittschutzhandschuhen.
Entpacken Sie die Vordertür und entfernen Sie den Plastikschutz von der Tür und dem Waschbecken.
Führen Sie die Aufkantung in die vorgegebene Öffnung ein und befestigen Sie diese mit den mitge-
lieferten Schrauben und Muttern am Hinterteil.
Entfernen Sie die Vorderseite des Seifenspenders mit dem mitgelieferten Schlüssel.
Befestigen Sie den Spender an der Aufkantung mit den Schrauben und Muttern.
Legen Sie 4 AA-Batterien in das entsprechende Batteriefach ein · Fig. 1
Füllen Sie den Spender mit Flüssigseife oder Desinfektionsmittel und befestigen Sie diesen wieder
an der Vorderseite.
Befestigen Sie den Handtuchspender mit Schrauben und Muttern.
Führen Sie den Schwanenhalshahn in das obere Loch des Waschbeckens ein · Fig. 2
Montieren Sie das Abwasserventil · Fig. 3
Schließen Sie den Schwanenhalshahn an den Verbindungsschlauch an.
Stellen Sie den Wassertank mit dem Aufkleber “kein Trinkwasser” unter den Wasserhahn.
VerbindenSiedieflexibleAbflussleitungandasVentildesWasserhahnesundführenSiedieseinden
Behälter mit dem Abwasser Fig. 4
Entfernen Sie den kleinen Deckel des Frischwassertanks und führen Sie den Verbindugsschlauch in
die Öffnung durch den Griff des Tanks ein Fig 5
MONTAGE
Verpackungsmaterial für das mobile Handwaschbecken. (nicht als Ersatzteil verfügbar)
060610 - Aufkantung zum Anschrauben an das mobile Handwaschbecken.
080418 - Spender für 1 Paket Handschuhe, Taschentücher oder Handtücher.
460236 - Elektrischer Seifen- oder Desinfektionsspender (funktioniert mit Batterien).
461008 - Schwanenhalshan 140x200x1/2” (Gewinde 50mm).
454260FlexibleAbflussleitungfürmobileHandwaschbecken.
461430 -Stabelbarer lichtdurchlässiger Tank 10 Liter für Abwasser
461428- Lichtdurchlässiger Tank 10 Liter für Frischwasser
454202 - Ventil 2 ½” mit Überlauf für Becken 500 mm.
421002 - Sechskantschraube mit Gewinde M4x16 mm.
421050 - Sechskantmutter mit Gewinde M4 mm.
421004 - Sechskantschraubenkopf mit Gewinde M5x8 mm.
421052 - Sechskantmutter mit Gewinde M5 mm.
409822 - Nylon Fisher Plastikdübel 6x30mm.
421038 - Schraube mit Gewinde 22x4,8 mm. DIN 7981 A2.
INHALT UND ERSATZTEILE ZUR VERFÜGUNG
Weitere Ersatzteile:
460412HydraulischesPumpfußpedalfürhöhereDurchflussmenge.
485020 - Plastikrad für mobile Handwaschbecken ø50x18 mm.
461432 - Aufkleber “kein Trinkwasser” für Wassertank.
Lesen Sie die Anweisungen, bevor Sie das Gerät und halten Sie sie an einem sicheren
Ort als Referenz.
TRINKEN SIE KEIN WASSER AUS DEM HANDWASCHBECKEN. DAS MOBILE
HANDWASCHBECKEN IST ZUM WASCHEN DER HÄNDE VORGESEHEN.
DiesesmobileHandwaschbeckenersetztkeinfließendeskaltesoderwarmes
Leitungswasser, wenn dies vom Gesetzgeber vorgeschrieben ist
Trinken Sie kein Wasser aus dem Handwaschbecken. Das mobile Handwaschbecken ist zum Was-
chen der Hände vorgesehen.
DiesesmobileHandwaschbeckenersetztkeinfließendeskaltesoderwarmesLeitungswasser,wenn
dies vom Gesetzgeber vorgeschrieben ist
DESINFEKTIONS- UND REINIGUNGSPLAN
• Waschen Sie beide Wassertanks mit reichlich sauberem Trinkwasser.
• Sterilisieren Sie vor der ersten täglichen Benutzung den Frischwassertank, indem Sie ein Ste-
rilisationsmittel verwenden was für Trinkwasser genehmigt und geeignet ist. Befolgen Sie die
Sterilisationsanweisungen des Herstellers.
• Pumpen Sie das sterilisierte Wasser des Frischwassertanks durch den Wasserkreislauf, indem Sie
den Fußknopf betätigen bis des Wasser aus dem Behälter geleert ist.
• Füllen Sie den Frischwassertank mit Trinkwasser auf. Danach ist das mobile Handwaschbecken
zur Benutzung bereit.
• Führen Sie diesen Prozess täglich vor der Benutzung durch.
SICHERHEIT
• Entleeren Sie den Abwassertank stündlich oder wenn er vorher voll ist eher.
• Entleeren Sie den Frischwassertank mindestens aller 6 Stunden.
• Wird das mobile Handwaschbecken innerhalb längerer Zeit nicht benutzt, waschen Sie die Was-
sertanks mit sauberem Trinkwasser und bewahren Sie diese trocken auf, an einem Ort der dunkel
und trocken ist.
• Ersetzen Sie die Wasserbehälter aller 6 Monate.
• Zur Vermeidung möglicher Verunreinigungen, benutzen Sie den Papierkorb nicht.
SICHERHEIT, DESINFEKTIONS- UND REINIGUNGSPLAN
Am Anfang beim ersten Gebrauch muss durch mehrfaches Drücken des Fußknopfes die Luft aus
der Leitung herausgepresst werden, bis das Wasser herauskommt.
Damit das Wasser herausläuft muss der Fußknopf mehrmals stark betätigt werden.
BEDIENUNG
• Benutzen Sie zur Reinigung nur Wasser und neutrale Seifen.
• Reinigen Sie sanft mit einem angefeuchteten (nicht nassen) Reinigungstuch.
• Spülen Sie die Seife mit genügend Trinkwasser ab.
• Trocknen Sie das Produkt mit einem Reinigungstuch.
• Die Reinigung darf nicht mit Schwämmen, Spachteln, Messern oder anderen spitzen und schnei-
denden Mitteln vorgenommen werden.
REINIGUNG DES EDELSTAHLS
Das Produkt hat eine Garantie von 2 Jahren. Bei nicht sachgemäßer Benutzung oder bei Verände-
rungen des Produktes erlischt die Garantie.
GARANTIE

LEIA AS INSTRUÇÕES ANTES DE LIGAR O EQUIPAMENTO E CONSERVE-AS
NUM LUGAR SEGURO PARA FUTURA CONSULTA.
NÃO BEBER ÁGUA DO LAVA-MÃOS. ESTE LAVA-MÃOS FOI CONCEBIDO
EXCLUSIVAMENTE PARA LAVAGEM DE MÃOS
Verifiqueoconteúdo.
É recomendável usar luvas anticorte para as operações de montagem.
Extraia a porta frontal e tire os plásticos da porta e do lavatório.
Insiraaprotecçãodeslizandoapelasguiasefixeacomosparafusoseasporcasna
parte traseira do lavatório.
Remova a parte frontal do distribuidor de sabonete com a chave fornecida.
Fixe o distribuidor de sabonete à protecção com os parafusos e as porcas.
Introduza 4 pilhas tipo AA no compartimento · Fig. 1
Encha o depósito de sabão e coloque de novo a parte frontal do distribuidor de sabonete.
Fixe o distribuidor de papéis com os parafusos e as porcas.
Introduzaocanopeloorifíciosuperiordomóvelefixeocomasporcasqueoacompanham·Fig.2
Monte a válvula de escoamento· Fig. 3
Ligue o cano com a mangueira do mesmo lado.
Digite o canister marcado água contaminada sob o bico.
Ligueoescoadouroflexívelàválvulafazendoumacurva/sifãoeintroduzaaoutraextremidade
no bidão de água não potável· Fig. 4
Retirar o recipiente pequeno tampão de água limpa e inserir o tubo de falta através deste furo, pas-
sando através do interior do punho. Fig 5
MONTAGEM
Envolvente para lava-mãos portátil autónomo. (peça não disponível)
060610 - Protecção para acoplar ao lavatório integral.
080418 - Dispensador de 1 caixa de luvas, lenços de papel ou toalhas.
460236 - Saboneteira electrónica (funcionamento a pilhas).
461008 - Cano giratório 140x200x1/2” (rosca de 50mm).
454260Escoadouroflexívelparalavatórioautónomo.
461430 - Bidão de 10 l para água suja para lavatório autónomo.
461428 - Bidão de 10 l para água potável para lavatório autónomo.
454202 - Válvula 2 ½” com saída para pia de 500mm.
421002 - Parafuso de cabeça hexagonal rosca métrica M4x16 mm.
421050 - Porca hexagonal rosca métrica M4.
421004 - Parafuso de cabeça hexagonal rosca métrica M5x8 mm.
421052 - Porca hexagonal rosca métrica M5 mm.
409822 - Bucha de plástico nylon Fisher 6x30mm.
421038 - Parafuso de rosca chapa 22x4,8 mm. DIN 7981 A2.
CONTEÚDO E PEÇAS SOBRESSALENTES DISPONÍVEIS
Outras peças sobressalentes:
460412Botãohidráulicodealtofluxo
485020 - Roda de plástico ø50x18 mm para lavatório autónomo.
461432 - Adesivo de vinil “Água não potável” para bidão.
Este lava-mãos não poderá substituir nenhum outro artigo que requeira água corrente quente e fria conforme a
legislação em vigor aplicável.
Não beber água do lava-mãos. Este lava-mãos foi concebido exclusivamente para lavagem de mãos.
Este lava-mãos não poderá substituir nenhum outro artigo que requeira água corrente quente e fria conforme a
legislação em vigor aplicável.
LIMPEZA E ESTERILIZAÇÃO
• Lave ambos os bidões com abundante água potável.
• Esterilize-os antes do primeiro uso de cada dia acrescentando um produto esterilizante homolo-
gado para água potável de acordo com as instruções do fabricante. Faça passar toda a água com
esterilizante pelo circuito do bidão para água limpa pisando o comando até esvaziar por completo o
bidãoafimdeesterilizarocircuito.
• Em seguida, encha o bidão para água limpa com água potável. Já está pronto para ser usado.
• Realize este procedimento antes do início de cada dia.
SEGURANÇA
• Esvazie o bidão de água usada pelo menos uma vez por hora ou quando estiver cheio.
• Esvazie o bidão de água limpa pelo menos uma vez de seis em seis horas.
• Quando não usar o equipamento por um longo período de tempo, esvazie os bidões de água,
lave-os e guarde-os totalmente secos. Armazene os bidões limpos e secos num lugar escuro, seco e
saudável.
• Substitua os bidões de seis em seis meses.
• Para evitar a contaminação cruzada, não usar o papel.
SEGURANÇA, LIMPEZA E ESTERILIZAÇÃO
Na primeira utilização, pise repetida e fortemente o comando até ao fundo até que a água saia.
Para fornecer água, pise com força e pulse repetidamente.
UTILIZAÇÃO
• Use somente água e sabão neutro na limpeza.
• Esfregue com um pano macio.
• Enxagúe com água abundante.
• Seque com um pano macio.
• Não utilize ácidos ou detergentes agressivos, nem raspe com esfregões, espátulas,
lâminasouobjectoscortantesouafiados.
MANUTENÇÃO DO AÇO INOXIDÁVEL
Oequipamentotemumagarantiadedoisanos.Ousodeficientedoequipamentoeliminaagarantia
do mesmo
GARANTIA
Table of contents
Languages:
Other Fricosmos Plumbing Product manuals
Popular Plumbing Product manuals by other brands

aquabrass
aquabrass Folia 18018 installation guide

DXV
DXV Equility D35109500 installation instructions

Fortis
Fortis SAN MARCO 8920500 quick guide

KEUCO
KEUCO Axess 35090 000137 Instructions for use

OBI
OBI 411 722 manual

Hans Grohe
Hans Grohe Croma E 100 VarioJet 04331 0 Series Installation/User Instructions/Warranty