Fridja f1800 User manual

f1800 Whole Fruit
Slow Juicer
www.fridja.com
INSTRUCTION MANUAL
ENGLISH 02 | FRANÇAIS 34 | DEUTSCH 66
ESPAÑOL 98 | iTALIANO 160

2 3
f1800 FRIDJA WHOLE FRUIT SLOW JUICERENGLISH
INTRODUCTION
Thank you for purchasing this Fridja f1800 slow juicer!
This product has been designed and manufactured to give you years of
trouble free service.
Please take time to read these instructions prior to use - they have been
written to ensure you get the very best from your purchase.
As with any new electrical product please allow several hours of use before
all components have acclimatised themselves with your surroundings and
settled into optimum operation.
• This appliance is for household use only. Please follow the instructions
in the manual carefully.
(The appliance cannot be covered under the manufacturer warranty if
the product is abnormally or commercially used.)
• Save the instruction manual for future reference.
• If the appliance is given as a gift, please include the manual with the
product.
TECHNICAL SPECIFICATIONS
Brand: Fridja
Model Number: f1800 Whole Fruit Slow Juicer
Input Voltage: 220-240V 50/60 Hz
Power Consumption: 240W
Maximum Use: Less than 30 min
Instruction Booklet: 1.1

4 5
f1800 FRIDJA WHOLE FRUIT SLOW JUICERENGLISH
CONTENTS
INTRODUCTION ......................................................3
SPECIFICATIONS .....................................................3
IMPORTANT SAFEGUARDS .............................................5
SAFETY WARNING ....................................................6
PARTS ...............................................................7
HOW TO ASSEMBLE ..................................................9
TIPS ON OPERATION ................................................. 12
HOW TO OPERATE................................................... 13
TIPS ON INGREDIENTS................................................ 16
INGREDIENTS PREPARATION ...........................................17
HOW TO DISASSEMBLE AND CLEAN....................................21
HOW TO USE THE ICE CREAM STRAINER...............................23
HOW TO USE THE SMOOTHIE STRAINER ...............................25
HOW TO CLEAN THE SILICONE WIPERS................................26
TROUBLESHOOTING Q&A ............................................27
PLUG SAFETY........................................................ 31
NONREWIREABLE MAINS PLUG.......................................32
CORRECT DISPOSAL OF THIS PRODUCT ...............................32
GUARANTEE.........................................................33
IMPORTANT SAFEGUARDS
When using electrical appliances, basic safety precautions should always be
followed including the following:
1. Read all instructions.
2. To protect against risk of electrical shock do not put motor or base of
unit in water or other liquid.
3. Close supervision is necessary when using any appliance near children.
4. Unplug the juicer from outlet when not in use, before putting on or
taking off parts, and before cleaning.
5. Avoid contacting moving parts.
6. Do not operate any appliance with a damaged cord or plug or
after the appliance malfunctions, or is dropped or damaged in any
manner. Return appliance to the nearest authorised service facility for
examination, repair or electrical or mechanical adjustmenl.
7. The use of attachments not recommended or sold by the manufacturer
may cause fire, electric shock or injury.
8. Do not use outdoors.
9. Do not let cord hang over the edge of table or counter.
10. Always make sure juicer cover is clamped securely in place before
motor is turned on. Do not unfasten clamps while juicer is in operation.
11. Be sure to turn switch to OFF position after each use of your juicer.
Make sure the motor stops completely before disassembling.
12. Do not put your fingers or other objects into the juicer opening while it
is in operation. If food becomes lodged in opening, use food pusher or
another piece of fruit or vegetable to push it down. When this method
is not possible turn the motor off and disassemble juicer to remove the
remaining food.
13. Do not use the appliance if the rotating sieve is damaged.
14. Do not operate without the pulp container in place.
15. Please do not alter the appliance in anyway.
16. Do not use the appliance for anything other than its intended purpose
as described in the manual.
17. The appliance should be used for limited period of time (no longer
than 30 minutes continuously).

6 7
f1800 FRIDJA WHOLE FRUIT SLOW JUICERENGLISH
SAFETY WARNING
Unplug the power cord when not in use. Use a dry towel to clean the power cord.
Do not keep or operate the appliance near
infants or toddlers.
*It may injure them.
Do not repair, disassemble the base,
or customize the appliance.
* The appliance may not operate properly causing
fire, electric shock, or injury.
Do not put the juicer parts in the dishwasher
or extremely hot water.
*The parts may wear faster.
Do not use any hazardous chemicals to
clean the appliance.
* It may change the colour of the appliance
or could result in a fire.
Do not spray water or flammable sprays
near the appliance.
* It may cause an explosion or electrical shock.
Do not use the appliance on an uneven
surface.
* It may cause a malfunction
if the appliance tips over.
PARTS
1. Feeding Tube
2. Drum Lid
3. Juicing Bowl
4. Pulp Jug
5. Anti Drip Cap
6. Base
7. Juice Jug
8. Rotation Wiper
9. Strainer
10. Auger
11. Pusher
12. Cleaning Brush
11
8 9 10
12
4
6
2
7
3
5
1
Detachable

8 9
f1800 FRIDJA WHOLE FRUIT SLOW JUICERENGLISH
STEP 1
Top-set Assembly
Align the red dots on each part
and assemble in the order shown.
Once assembled, turn the drum lid
clockwise to close.
STEP 2
Top-set and base assembly
Place the bowl on the base so that
its grey arrow lines up with the black
arrow on the base
Align the dots
Pusher
Align
HOW TO ASSEMBLE
STEP 1
Top-set Assembly
1. Firmly insert the silicone lip into the slot below the pulp spout.
2. Place the juicing screw/auger into the strainer. Turn and press down on
it until it clicks into place.
3. Assemble the strainer into the rotation wiper then place this assembly
into the juicing bowl ensuring the red dot on the strainer is aligned
with the red dot on the juicing bowl.
yWash the parts before first use.
yEnsure that the silicone lip and silicone ring are assembled
properly.
Check
Before
Operating
TIP The Juicer may leak
if not assembled properly.
TIP The juicing screw needs to
be locked in place
in order to close the
drum lid.

10 11
f1800 FRIDJA WHOLE FRUIT SLOW JUICERENGLISH
STEP 2
Top-set and Base Assembly
For easy assembly hold the drum lid by grabbing the feeding tube and turn
clockwise as show in the illustration.
5. Place the bowl on the base so that its grey arrow lines up with the black
arrow on the base
4. Place the drum lid on to the juicing bowl aligning the red dot on the
drum lid with the red dot on the juicing bowl. Turn clockwise to close,
aligning the red dot on the drum lid with the closemark.
6. Open/Close mark on the top-set.
7. Place the pulp jug under the pulp spout and place the juice jug under
the juice spout as shown in the illustration.
TIP Juicer will not operate if parts are not assembled properly.
Detachable

12 13
f1800 FRIDJA WHOLE FRUIT SLOW JUICERENGLISH
STEP 2
Press the FORWARD button to operate.
TIPS ON OPERATION
STEP 1
After preparing the ingredients, plug the power cord into a wall outlet.
yDo not touch the power cord with wet hands. It may cause
electrical shock, short-circuit, or fire.
yCheck the safety of the wall outlet.
yForward: Pulls down and slowly masticates the ingredients.
yReverse: Pushes the ingredients back up to dislodge them.
yREVERSE: Pushes the ingredients backup to dislodge them.
The REVERSE button only works while holding down the switch.
ySwitch OFF ensuring that the juicer comes to a complete stop. Then press REVERSE. Hold the
REVERSE button for 2-3 seconds and release. Repeat as needed. Let the juicer stop completely
before using the REVERSE button to prevent malfunction.
yIf the juicer does not work after these steps, disassemble and clean the parts before
operating the juicer again.
Note
Note
Note
If the ingredients become jammed in the auger and the drum lid does not open, press the
OFF button. Then press and hold the REVERSE button until the ingredients become dislodged.
Repeat REVERSE - OFF - FORWARD as often as needed to achieve the desired result.
If the juicer stops during operation:
FORWARD: Pulls down the food
OFF: Stops the operation REVERSE:
Pushes the food back up
OFF OFFREVERSE
FOWARD
Switch the button to OFF position then press and
hold the REVERSE button until the ingredients
become dislodged.
Repeat REVERSE - OFF - FORWARD as needed.
HOW TO OPERATE
STEP 3
Insert the prepared ingredients one piece at a time.
yFibrous leafy vegetables (celery, kale, etc.):
ySeparate each stem. Cut the outer stems that are thick and tough
to 4 inches long or less.
yBundle up the leafy vegetables as inserting into the juicer. Alternate
between leafy parts and stems.
yBefore extracting, remove hard seeds or pits in ingredients.
yWhen juicing frozen fruits with small seeds, ensure that even the
seeds are completely thawed.
yInsert the ingredients one piece at a time.
yLeave the anti drip tap open when juicing ingredients that create
excessive foam during extraction, (e.g. apples, celery).
yPay close attention when operating with the anti drip tap closed.
Juice may overflow if the juice collected in the juicing bowl
exceeds its capacity marked on the bowl.
yAfter inserting ingredients, use the pusher when it is necessary. Too much use
of the pusher may affect the juice quality.
yIntermittently use the pusher for soft ingredients like tomatoes
and apples. Constant use of pusher for soft ingredients may
affect the juice quality.
yJuicing with the smart cap closed creates various mixed juice creations
when different fruits and vegetables, milk, banana, beans, etc. are
selected.
yAfter juicing, close the anti drip tap to stop the juice from
dripping, especially when disassembling the juicing bowl off
the base.
yWhen making different juices quickly rinse away any leftover
flavors by running a glass of water in the juicer with the smart cap
closed.
Note
Note
TIP
TIP
STEP 4
Use the anti drip tap to make mixed juices, stop juice from dripping, or rinse
between different juices.

14 15
f1800 FRIDJA WHOLE FRUIT SLOW JUICERENGLISH
STEP 5
After juice and pulp are completely extracted, switch the unit OFF.
yIf the remaining ingredients in the juicing bowl have not been
extracted completely, the drum lid may not open easily. After
each extraction, run the juicer for an additional 30 seconds to
let the juicer extract the remaining pulp.
yWhen the drum lid is stuck, press the REVERSE - OFF
-FORWARD button in this order; switching back and forth 2 or
3 times to dislodge the ingredients. Then place hands on top
of the drum lid and firmly press down while simultaneously
turning the drum lid counterclockwise to open.
yDepending on the ingredients, pour water down the
feeding tube to rinse out the interior of the juicing bowl
and then attempt to remove the drum lid.
Note
1. Operating the juicer without ingredients can cause damage to the
screw.
2. Do not continuously operate the juicer for more than 30 minutes.
• This can damage the motor from overheating.
• After continuous use, let the juicer rest for 30 minutes to cool down
before starting another session.
3. Do not put fingers or other objects into the feeding tube. Always use
provided pusher when needed.
• If other objects are inserted into the feeding tube during operation,
such materials can get stuck and damage the juicer parts and/or
cause injury.
4. Do not put dried or hard ingredients like whole grains, fruits with hard
seeds or ice into the juicer.
These may damage the juicer parts (e.g. auger, juicing screw, and
strainer).
• Beans or grains can be used if soaked overnight or boiled.
• Fruits with pits and hard seeds (e.g. nectarines, peaches, mangoes,
and cherries) must be pitted before juicing.
• When using frozen fruits with small seeds such as grapes,
completely thaw before inserting them into the juicer.
5. Do not use ingredients containing excessive amounts of vegetable oil or
animal fat.
Do not use the juicer to extract vegetable oil from ingredients.
• If vegetable/animal oil gets on the auger, it may reduce
performance and even damage the juicer.
6. Do not reinsert the extracted pulp into the juicer. This can cause the
juicer to stop or cause the drum lid not to open.
7. After juicing ingredients with seeds like grapes, thoroughly clean all the
crevices on the bottom of the juicing screw.
TIPS ON OPERATION

16 17
f1800 FRIDJA WHOLE FRUIT SLOW JUICERENGLISH
TIPS ON INGREDIENTS
Juicer damage due to owner negligence or from not following the instructions in
the owner’s manual will void the warranty service.
Hard
seeds
Peach, nectarines, apricot, plum, mango, etc.
Remove hard seeds from the ingredients before
juicing.
Pineapple, melon, mango, orange, etc.
Peel the skins from the ingredients before
juicing.
Frozen strawberry, blueberry, raspberry, etc.
Completely thaw frozen fruits before juicing.
Do not use ice.
Sesame seed, butter, margarine, etc.
Do not extract ingredients containing vegetable
or animal oil. This can reduce performance and
even damage the juicer.
Coconut, sugarcane, whole grains, etc.
Do not extract ingredients with no water
content.
Experience the best quality juice by understanding each ingredient’s
characteristics and knowing the optimal way of handling the ingredients.
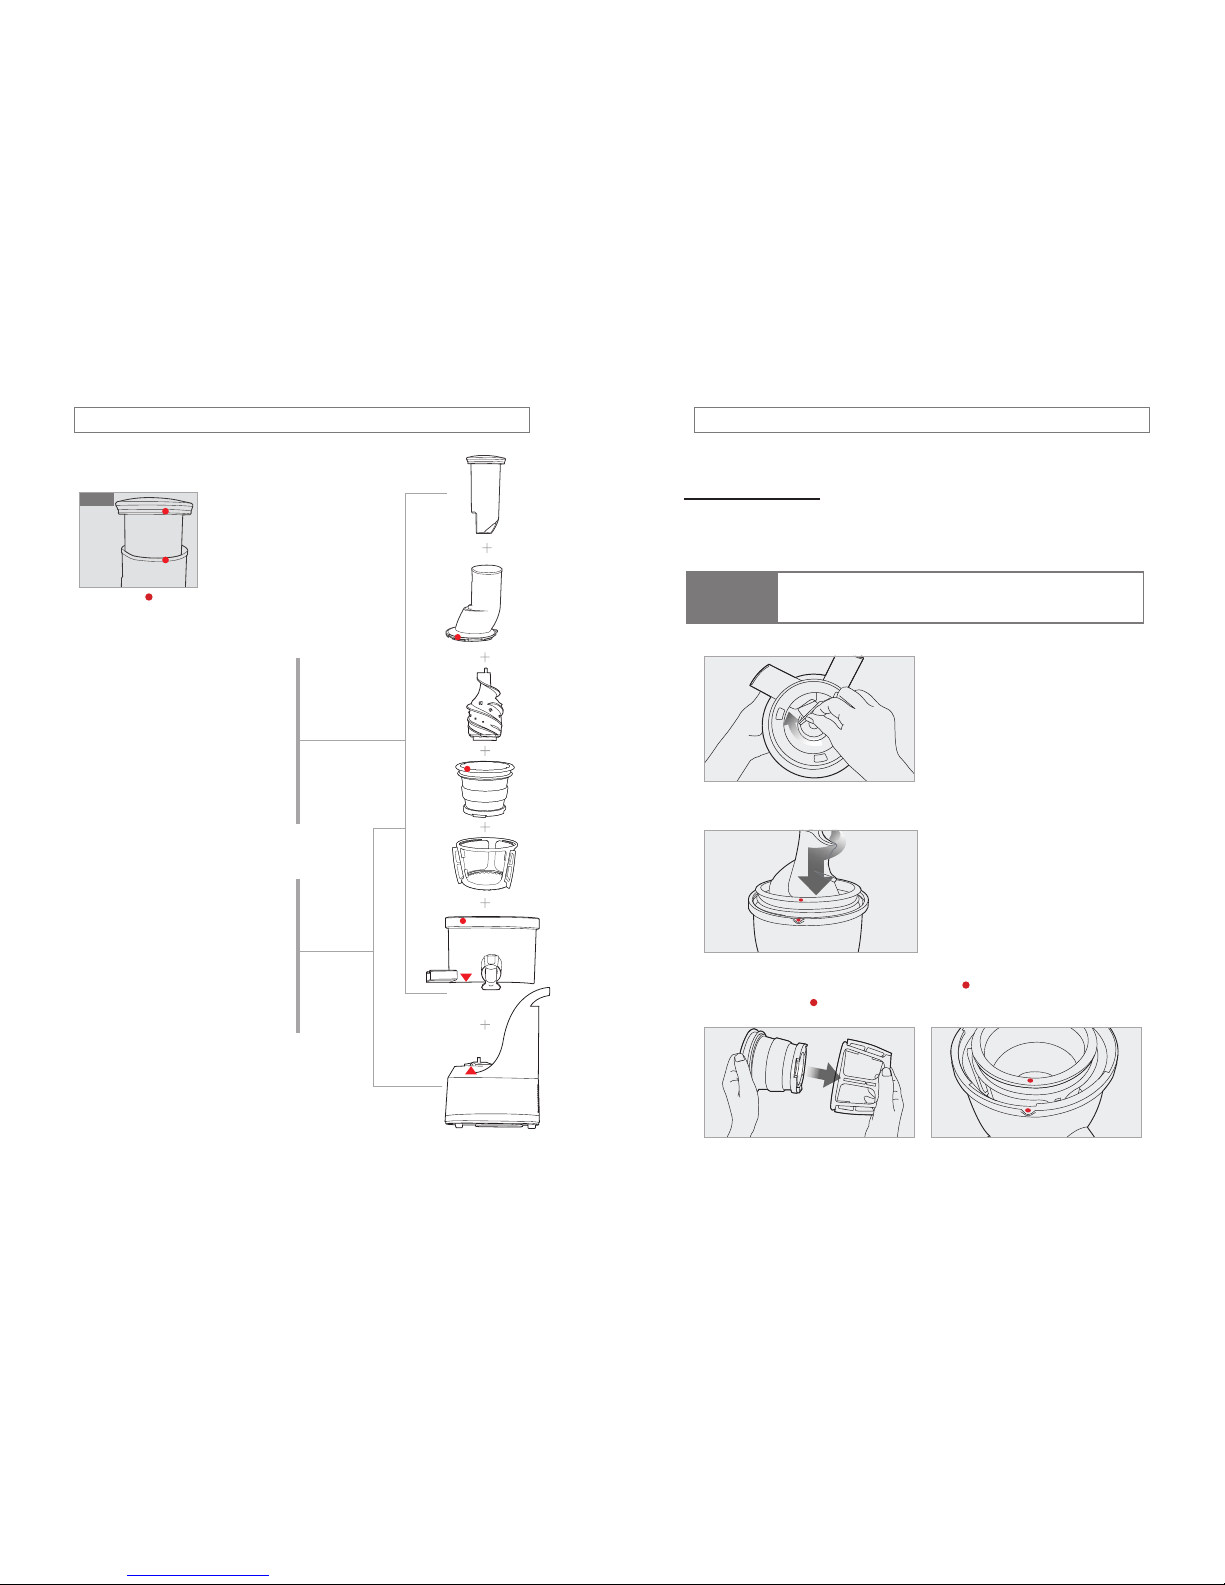
The Slow Juicer is an innovative product that uses a patented
slow-speed masticating technology to efficiently extract the
juice from ingredients. The juicer is designed to obtain the
best result from ingredients with firm composition and with
high water content. For best result, each ingredient should be
prepared and extracted depending on its characteristics and
properties.
Vegetable/
animal oil
Others
Hard or
inedible
skins
Frozen fruits
or ice
DO NOT put the following ingredients into the juicer:
INGREDIENTS PREPARATION
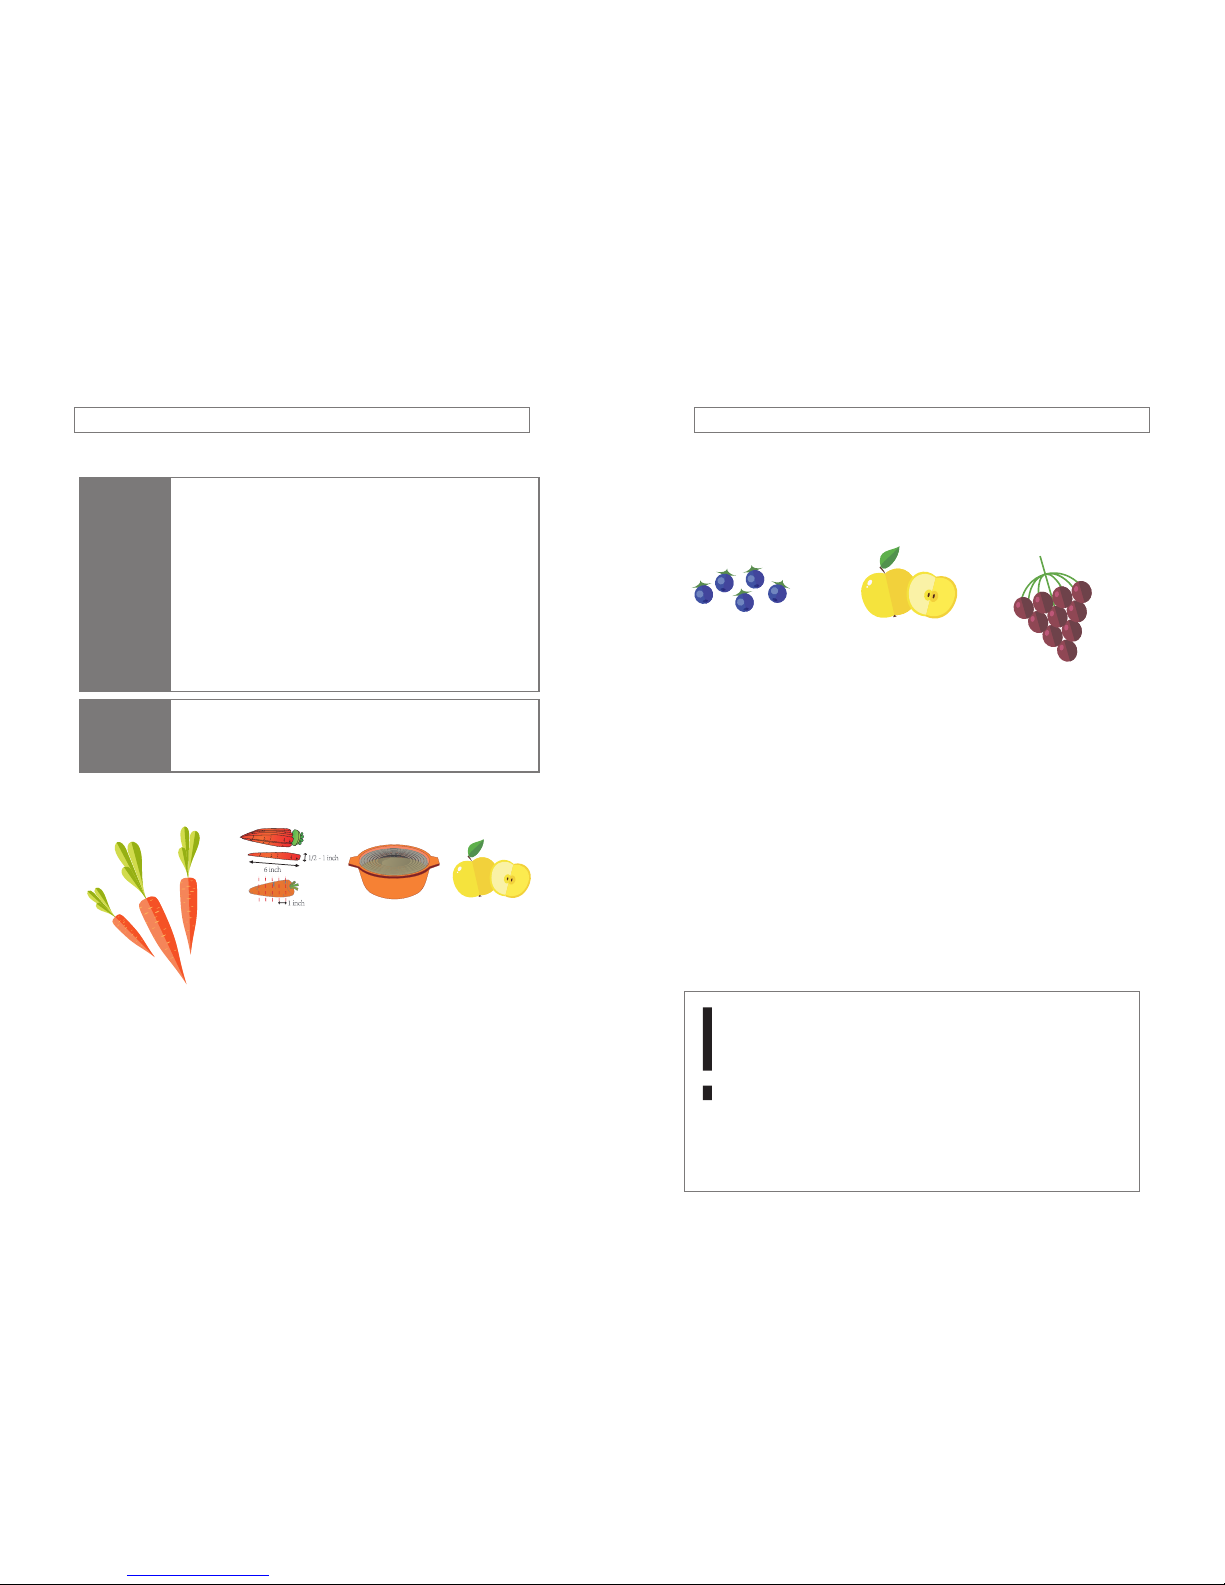
Soft fruits and vegetables (e.g. oranges, tomatoes):
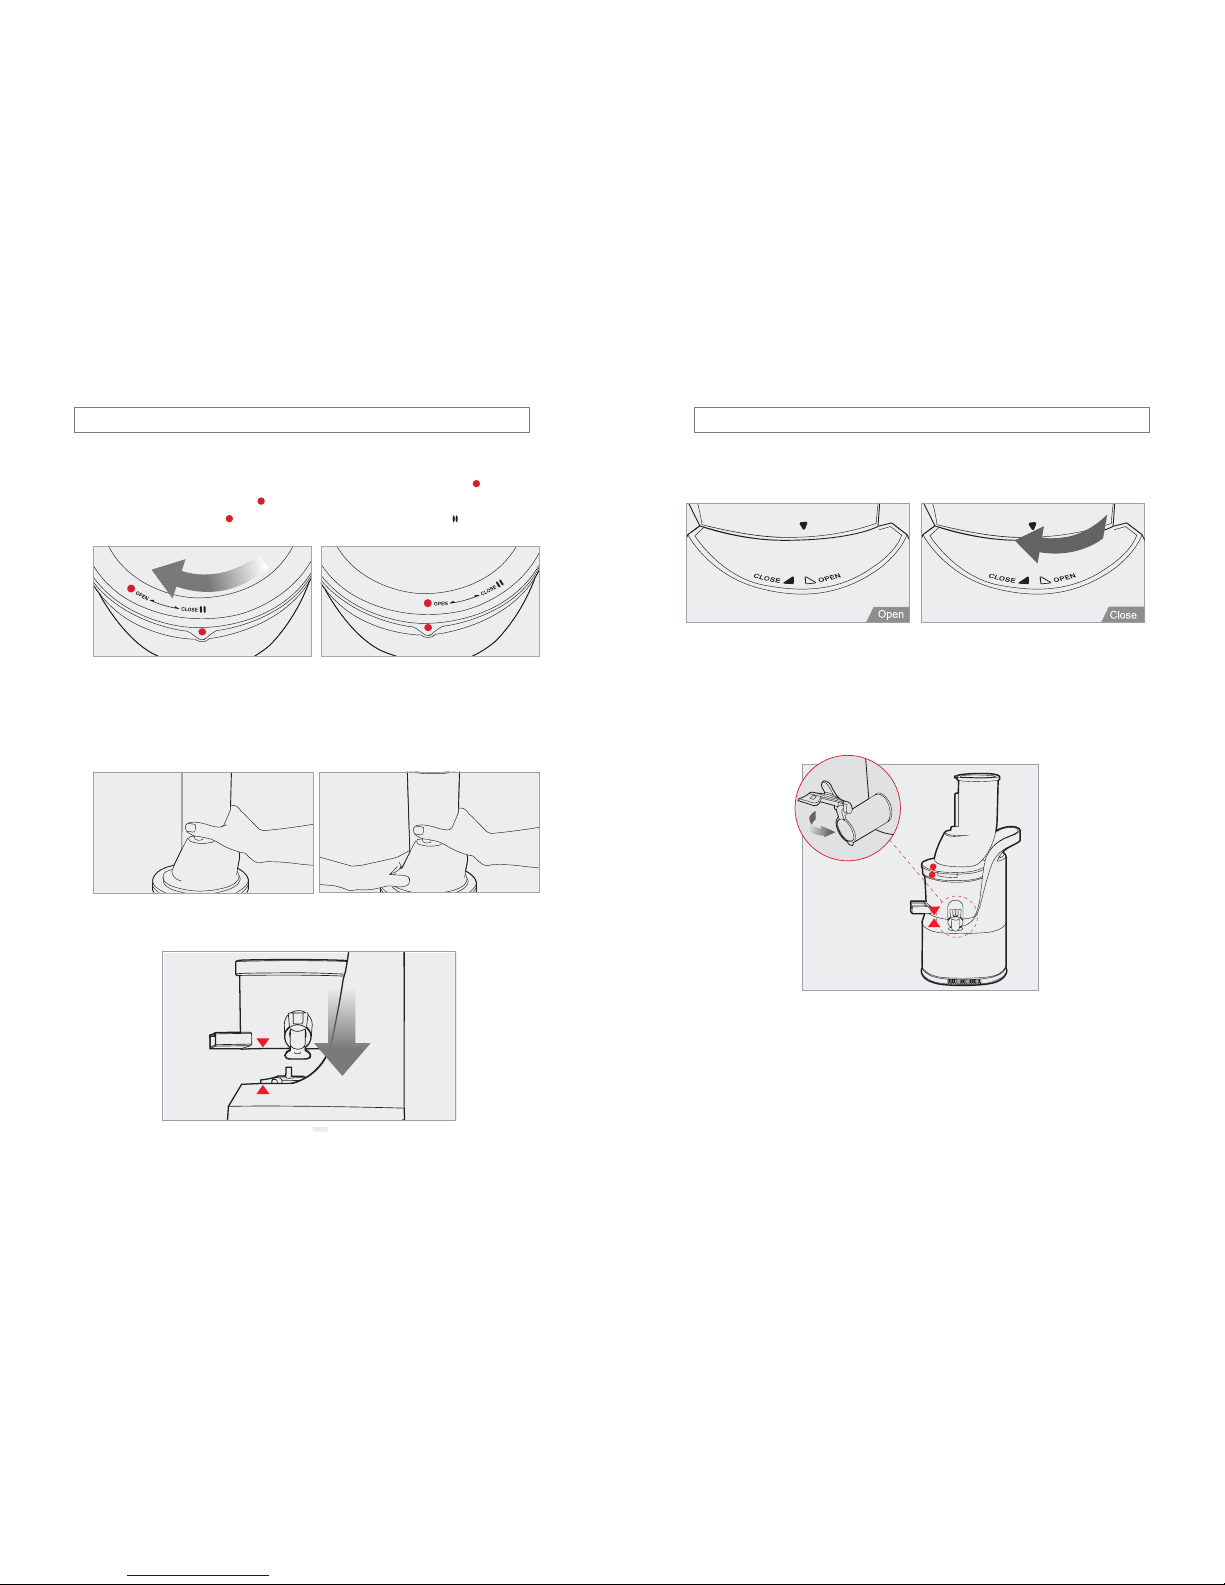
yBefore operating: If the juicer is jammed or if the drum lid does
not open, press the REVERSE button and hold until it becomes
dislodged.
Repeat REVERSE-OFF-FORWARD as needed.
yContinue operating the juicer until all the ingredients in the juicing
bowl are extracted. The drum lid may not open easily if there is a
lot of pulp remaining in the juicer.
yEvery ingredient yields different amounts of juice.
yFor the optimal extraction and maximum juice yield, cut the
ingredients following the guidelines given in this section.
yInsert ingredients slowly monitoring how the ingredients are
extracted. The juice yield may vary depending on the juicing
speed.
Before
Operating
Juice Yield
PREPARATION TIPS:
• Cut 1-4 wedges.
EXTRACTION TIPS:
• Slowly insert the ingredients one piece at a time.
• Use the pusher to push the ingredients down the feeding tube. (The pusher also helps
prevent juice from spraying out of the feeding tube when extracting ingredients with
high water content)
• Leave the anti drip tap open when juicing ingredients that create excessive foam
during extraction. (Foam can accumulate if operated with the anti drip tap closed.)
• It is recommended that the extracted juice be consumed within 48 hours after
extracting. Depending on the density of the ingredients the extracted juice can
gradually show layers overtime.
• If there is an excessive amount of foam, use a mesh strainer to separate it from the
juice.
• When an ingredient is being masticated by the juicing screw, the squeezed ingredient
may splash juice through the feeding tube. Use the pusher to block out the juice
splash when juicing.
1-4 wedges
• Peel the skin off oranges. Remove the stem
from tomatoes and apples.
• If the ingredients are larger than the feeding
tube, cut the ingredients into pieces that will
fit into the feeding tube.
• Fruits with seeds must be pitted before
extraction. Cut to 1-4 wedges then slowly
insert the ingredients down the feeding tube.

18 19
f1800 FRIDJA WHOLE FRUIT SLOW JUICERENGLISH
Hard fruits and vegetables (e.g. carrots, potato, beets, & spinach):
• Juicing with the anti drip tap closed allows mixed juice creations
with different fruits, vegetables and liquids.
• After juicing, close the smart cap to block excess juice from
dripping, especially when disassembling the juicing bowl off the
base.
• When making juices quickly rinse away any leftover flavours by
running a glass of water through the juicer with the anti drip tap
closed.
• Leave the anti drip tap open when juicing ingredients that create
excessive foam during extraction (e.g. apples, celery).
• Pay close attention when operating the juicer with the smart cap
closed. Juice may overflow if the juice collected in the juicing
bowl exceeds its capacity marked on the juicing bowl.
• Depending on the ingredient, you may get extra pulp in the
juice when juicing continuously.
• To reduce the amount of pulp, disassemble the top-set and
wash frequently.
How to Use
the Smart
Cap:
Adjusting
the amount
of pulp in the
juice:
Hard fruits and
vegetables
may put excess
strain onto the
motor and
cause it to stall.
Soak in cold
water prior to
juicing and cut
to appropriate
sizes.
To increase
the juice yield,
juice fruits and
vegetables
with high water
content.
PREPARATION TIPS:
• Slice the ingredients 1 inch thick or cut 1 inch wide and 2-6 inches long.
• Soak hard ingredient like carrots and ginger in cold water prior to juicing.
EXTRACTION TIPS:
• Slowly insert the ingredients one at a time.
• Pace the juicing speed to ensure each ingredient is thoroughly extracted.
• To maximize the juice yield, use ingredients with high water content.
Ingredients with small seeds (e.g. raspberry, pomegranate, grape):
Slowly insert Ingredients with small seeds to prevent the seeds from
clogging the strainer.
PREPARATION TIPS:
• When juicing frozen ingredients (e.g. raspberry, strawberry) make sure
they are completely thawed.
• Thoroughly rinse ingredients like grapes. Take the grapes off and discard
the stem.
• For pomegranate, discard the skin and juice only the inner part.
EXTRACTION TIPS
• Depending on the size of the grape, insert 3-5 grapes at a time while
monitoring the extraction result.
• Thaw frozen ingredients like pomegranate and raspberry then insert
about 1 tablespoon (5g) at a time.
• Frozen ingredients usually lose significant amount of fluid from thawing.
When juicing, mix milk or yogurt to balance the fluid lost.
CAUTION:
If the lid does not open due to excessive amount of small
seeds left in the juicing bowl, continuously run the juicer for
30 second to extract any leftover seeds. If the lid is still stuck,
repeat REVERSE - OFF- FORWARD until the ingredients become
dislodged. Then twist the lid to open while pushing downwards
on the lid with palms (depending on the ingredient, pour
some water down the feeding tube for quick rinsing to help
dislodging).
Insert ingredients
slowly to minimize
the amount of
leftover seeds in the
strainer.
For best result, juice
with ingredients with
higher amount of
fluid (e.g. apple, pear)

20 21
f1800 FRIDJA WHOLE FRUIT SLOW JUICERENGLISH
Fibrous and/or tough leafy ingredients (e.g. celery, kale, pineapple):
Fibrous ingredients like celery and kale should be cut into small lengths before
juicing. When the pulp outlet is blocked by the fibrous ingredients, press the
REVERSE-OFF-FORWARD button in this order, switching back and for the 2-3 times.
PREPARATION TIPS:
• Soak fibrous ingredients in cold water for about 30 minutes before cutting them.
• Separate each stem. Cut the outer stems that are thick and tough to 4 inches Iong
or less.
EXTRACTION TIPS:
• One at a time, slowly insert the prepared ingredients.
• Insert more ingredients after the previously inserted ingredients have been
completely extracted.
1. Roll leaves into spirals as inserting into the juicer.
2. Insert the leafy part of the ingredients first then alternate between leafy parts and
stems.
3. For ingredients like wheatgrass, grab a handful and insert in a bundle.
CAUTION:
• The fibers from tough ingredients like celery can wrap around the
juicing screw and affect juicer’s performance. Cut the stems that are
thick and tough to 4 inches long or less.
• Foam can build up from juicing fibrous ingredients. Use strainer to
remove the foam before serving.
• For ingredients like pineapple, slice off the rind of the pineapple
and cut around the fibrous core. Cut the flesh of the pineapple to
smaller pieces.
• Recommended amount of juicing per session is 500g. When juicing
more than 500g, wash the top-set before continue juicing.
When juicing leafy ingredients
like celery and kale, do not
collect more than 500 g
per session. For best result,
disassemble and wash the top-
set before juicing again.
If leafy ingredients wrap around
the juicing screw, open the lid
and remove the fibers before
continue juicing.
It’s best to juice with
ingredients with higher
amount of fluid, like carrots,
apples: fibrous ingredients = 9:1
[recommended ratio]
HOW TO DISASSEMBLE AND CLEAN
1. Switch OFF and unplug the power cord from the wall outlet. ausstecken.
Note
Note
• Extract all the remaining pulp in the juicing bowl before
stopping the juicer.
• For easier clean up, operate the juicer for an additional 30
seconds after the juice is extracted.
• When the drum lid is stuck, press the REVERSE - OFF -
FORWARD button in this order, switching back and forth 2 to
3 times to dislodge. Then place hands on top of the drum
lid and firmly press down simultaneously turning the drum
lid counter clockwise to open.
2. Turn the drum lid counter clockwise to open.
3. Lift the bowl on the base so that its grey arrow lines up with the black
arrow on the base.
• When moving the
appliance, do not
lift by grabbing the
feeding tube. Always
lift the appliance by
grabbing the base or
handle.

22 23
f1800 FRIDJA WHOLE FRUIT SLOW JUICERENGLISH
4. Remove the juicing screw/auger, strainer, and rotation wiper unit from
the juicing bowl. Clean with provided brush.
Note
TIP
• Immediately clean the juicer after each use. If remaining
residue in the juicer dries up, it can make disassembling
and clean-up difficult. The excess build up can cause poor
performance in future uses.
• For easier disassembly, place the top-set in the sink and run
the water through from the top of the top-set.
• Thoroughly dry the bottom of the juicing screw where it
connects to the metal cylinder shaft on the base.
5. Place the juicing bowl under running water and unplug the compression
silicone to clean the pulp spout.
• Soak the juicing bowl in a solution of warm water with
baking soda or a little bit of bleach to clean the excess
build-up.
HOW TO USE THE ICE CREAM STRAINER
1. To assemble the top set, place the juicing screw
and the blank strainer in the juicing bowl
and close the lid.
1. Insert the blank strainer into the juicing
bowl while aligning the red dots of
the blank strainer and the juicing bowl.
2. Insert the juicing screw/auger into the
blank strainer with a twisting motion.
3. Place the lid onto the juicing bowl by
aligning the red dots of the lid and
the juicing bowl. Then, rotate the lid
clockwise until the lid is secured.
* When using the blank strainer,
always leave the anti drip tap open.
2. Place the assembled top-set onto the base.
Lid
Before use, make sure the
silicone cover is correctly in
place
Juicing Screw
/ Auger
*use the same
juicing screw from
the Slow Juicer
Blanker Filter
Juicing Bowl
Top Set
Base
(CLOSE) (OPEN)
Align the arrow from the lid with
the OPEN sign from the base and
rotate the topset clockwise until
the arrow from the lid is in
CLOSE position.

24 25
f1800 FRIDJA WHOLE FRUIT SLOW JUICERENGLISH
• Do not use ice or process ingredients containing vegetable or
animal oil. It may cause a malfunction.
• Remove hard seeds from the ingredients and peel the skins
from the ingredients before juicing.
CAUTION:
The smoothie strainer is
used only with frozen
ingredients. Depending on
the different ingredients,
allow the frozen items to thaw
for 5 to 20 minutes before
use. Slowly process a smaller
amount per batch.
HOW TO USE THE SMOOTHIE STRAINER
1. To assemble the top-set, place the
juicing screw and the smoothie strainer
in the juicing bowl and close the lid.
1. Insert the rotation wiper and the
smoothie strainer into the juicing bowl
while aligning the red dots of the
smoothie strainer and the juicing bowl.
2. Insert the juicing screw into the
smoothie strainer with a twisting
motion.
3. Place the lid onto the juicing bowl by
aligning the red dots of the lid and the
juicing bowl. Then rotate the lid clockwise
until the lid is secured.
* When using the smoothie strainer, make
sure the anti drip tap is closed to make a
better smoothie.
4. Place the assembled top-set onto the
base.
Lid
Juicing
Screw / Auger
* use the same
juicing screw from
the Slow Juicer
Rotation Wiper
Smoothie Strainer
Juicing Bowl
Top Set
Base
(CLOSE) (OPEN)
Align the arrow from the lid with
the OPEN sign from the base and
rotate the topset clockwise until
the arrow from the lid is in
CLOSE position.

26 27
f1800 FRIDJA WHOLE FRUIT SLOW JUICERENGLISH
CAUTION:
When using frozen ingredients, make sure to thaw your frozen
ingredients for about 5 to 20 minutes before use.
(The required period to thaw the ingredients will depend
on how long the ingredients were in the freezer and the
temperature it was kept in.)
When making smoothies, add milk or other types of liquid
between ingredients.
Check the consistency of the smoothie by looking through the
juicing bowl, and add more liquid as needed.
• Please do not insert ingredients like ice, meat, oil, or fat based
ingredients. These ingredients may damage the components.
• Please remove hard or thick seeds, pits, or peel before use.
HOW TO CLEAN THE SILICONE WIPERS
The silicone wipers are removable for cleaning. After cleaning, place the
silicone wipers back onto the frame as shown in the picture.
TIP Insert into
the slot
with the tail
pointing
down.
TROUBLESHOOTING Q&A
When there is no power to the juicer:
• Check if the power cord is properly plugged in.
• Check if the drum lid and the juicing bowl are properly assembled.
• Check if the top-set and the base are properly assembled.
• Juicer will not operate if parts are not assembled properly.
Low juice yield:
• Different ingredients hold different amounts of fluid that will yield
different amounts of juice.
• If the ingredients are not fresh, they may contain reduced amounts of
fluid, which will yield less juice.
• Check if the silicone lip is firmly inserted (page 10).
• If the ingredients have low water content, it may help to soak them in
water before juicing.
• If juicing ingredients with small seeds, after a few servings, it may reduce
the juice yield. For best result, disassemble and wash the top-set in
between juicing.
• If there is seed residue on the bottom of the strainer, this can affect
juicer performance and the overall juice yield.
There is too much pulp in the juice:
• When continuously juicing, depending on the ingredients, the juice may
contain a lot of fine pulp.
• To reduce the fine pulp, clean the top-set frequently and the pulp.
• Use a mesh strainer and put the juice through it to collect the unwanted
pulp.
• If the strainer and the auger are damaged and affecting the juicer’s
performance, it is recommended the parts be replaced.
• The lifetime of each part may vary depending on length and method of
use and ingredients extracted.
• If too many ingredients are inserted at the same time, it may cause the
juicer to stop frequently. This can lead to excessive pulp in the juice.
Insert the ingredients slowly and few at a time.

28 29
f1800 FRIDJA WHOLE FRUIT SLOW JUICERENGLISH
The drum lid will not close:
• Make sure the juicing screw is pushed all the way in to the strainer in
order for the drum lid to close properly.
• If the juicing screw is not properly in position, the drum lid may not
close.
Odd noise from the juicer:
• Check if the parts are assembled correctly. Try reassembling the parts
and listen for the odd noise.
• Do not start the juicer unless there are ingredients and/or liquid in it.
• Operating the juicer without ingredients can cause damage to the unit.
• If the juicer is operated without ingredients or liquid, the noise level can
increase and also can lead to damage.
• Noise from the juicing auger and the strainer will is occur when
ingredients are inserted into the juicer.
• If excessive noise occurs when ingredients are inserted into the juicer,
check the size of the ingredients. Do not insert anything over 1 inch in
thickness.
• Depending on the type of ingredients, the dimensions should be
smaller.
• Noise can occur if the juicer is operated on an uneven or slanted
surface. Place the juicer on a horizontally flat surface when operating.
The extracted pulp is very moist:
• During the very beginning of extraction, the pulp can be more moist.
• Depending on the ingredient’s condition, the extracted pulp can be
affected; especially when the ingredient is not fresh, the juice can be
extracted with the pulp.
During operation, the juicing bowl shakes.
• The juicing screw and the strainer are set up to crush and squeeze the
ingredients. It is normal for the juicing screw and the strainer to vibrate.
• If the ingredient contains strong fiber, the vibration from the top-set may
be stronger.
During juicing, the juicer stopped:
• Check the power cord and make sure it is plugged in correctly.
• Check that all the parts are correctly assembled.
• If too many ingredients are inserted at one time, this can cause the juicer
to stop.
• When the juicer stops because there are too many ingredients inserted
in it, press the REVERSE-OFF-FORWARD button in this order, switching
back and forth 2 to 3 times.
• The reverse setting will push the ingredients up, and the forward setting
will pull the ingredients down.
• If the juicer stops due to the overload protection, let the juicer cool for
30 minutes to 2 hours before juicing again.
• If there are hard seeds within the ingredients, remove them before
juicing. Hard seeds will damage the juicer.
Layers of separation in the juice:
• Depending on the density of the ingredients, the extracted juice may
show layers of different juices. It is different from separation due to
oxidation caused by juicing with a high-speed juicer.
The drum lid is stuck:
• After juicing, let the juicer operate for another 30 seconds to extract the
remaining pulp.
• If there is too much pulp in the top-set, this can cause the drum lid to not
open. In this situation, press the REVERSE-OFF-FORWARD button in this
order, switching back and forth 2 to 3 times.
• Pour water down the feeding tube to rinse out the insides and then try
opening the drum lid.
Juice dripping down the body of the base:
• If the silicone lip on the bottom of the juicing bowl is not plugged
in correctly, the juice may seep out on to the juicer base. Before
assembling the parts, check and make sure the compression silicone is
plugged in correctly (page 10).

30 31
f1800 FRIDJA WHOLE FRUIT SLOW JUICERENGLISH
Is it possible to juice ingredients with tough fiber?
• Ingredients like celery or ginger contain long fibers that may wrap
around the juicing screw and affect the juicer’s performance. When
juicing fibrous ingredients, do not collect more than 3000 mm. of juice.
After collecting this quantity or less, clean the top-set completely before
juicing again.
Discolouration of the plastic parts:
• After juicing, if the juicer is not cleaned right away, the remaining pulp
inside the top-set can dry up which can make disassembling and
cleaning hard. This can also affect the juicer’s performance and colour.
• Ingredients that are rich in carotenoids such as carrots and spinach
may dye plastic parts. When the parts are dyed with carotenoids, rub
vegetable oil into the dyed areas and use mild detergent to clean.
• Vegetable oil should only be used during clean-up for parts that are
discoloured.
Do not use vegetable oil on the juicing screw or the strainer. If vegetable
oil or oil from animal fat gets on the juicing screw or the strainer, this can
affect the juicer’s performance and may result in damaged parts.
• The silicone pieces on the top-set can be detached to be thoroughly
cleaned.
Using for purposes other than juicing:
• This juicer is designed to juice ingredients like fruits and vegetables.
• Do not use the juicer for extracting vegetable oil.
• Do not juice ingredients with high contents of vegetable/animal oil.
• If vegetable/animal oil gets on the juicing screw or the strainer, this can
affect the performance of the juicer and could result in damaged parts.
PLUG SAFETY
The appliance is fitted with a 13 amp plug. In the event of having to change the
fuse in the plug supplied, a 13 amp ASTA approved (BS 1363) fuse must be used.
Should the plug need to be replaced for any reason, proceed as described
below. The wires in the mains lead are coloured in accordance with the
following code:
• The wire coloured green and yellow must be connected to the terminal
marked with the letter “E” or by the Earth symbol or coloured green and
yellow. Under no circumstances should either the Neutral or Live be
connected to the Earth terminal
• The wire coloured blue or black must be connected to the terminal “N”.
Under no circumstances should either the Earth or Live be connected to
the Neutral terminal.
• The wire coloured brown or red must be connected to the terminal
marked “L”. Under no circumstances should either the Earth or Neutral
be connected to the Live terminal.
• Upon completion there must be no cut or stray strands of wire present
and the cord clamp must be secure over the outer sheath.
If in doubt please contact a qualified electrician for advice.
Green & Yellow
Brown
Blue
Cord Clamp

32 33
f1800 FRIDJA WHOLE FRUIT SLOW JUICERENGLISH
NONREWIREABLE MAINS PLUG
If your appliance is supplied with a non-rewireable plug fitted to the mains
lead and should the fuse need replacing, you must use an ATSTA approved
one (conforming to BS1362) of the same rating. If in doubt, consult a qualified
electrician.
If you need to remove the plug – DISCONNECT IT FROM THE MAINS and
then cut off the mains lead and immediately dispose of it safely. Never
attempt to re-use the plug or insert it into a socket outlet as there is a danger
of an electric shock.
CORRECT DISPOSAL OF THIS PRODUCT
WASTE ELECTRICAL & ELECTRONIC EQUIPMENT
This marking on the product, accessories, or literature indicates that the
product and its electronic accessories should not be disposed of with other
household waste at the end of their working life. To prevent possible harm to
the environment or human health from uncontrolled waste disposal, please
separate these items from other types of waste and recycle them responsibly
to promote the sustainable reuse of material resources. Household users should
contact either the retailer where they purchased this product or their local
government office for details of where and how they can take these items for
environmentally safe recycling. Business users should contact their supplier and
check the terms and conditions of the purchase contract. This product and its
electronic accessories should not be mixed with other commercial wastes for
disposal.
GUARANTEE
This guarantee is applicable for goods bought directly from Fridja. If you
purchased your juicer from another vendor, please contact them.
If by chance you are unhappy with your purchase, please contact us within
seven days of delivery for a refund. Returned items must be in unused condition
with all supplied Fridja accessories and packaging. You are responsible for the
condition of your goods until they reach us, so pack your items carefully to
prevent damage in transit. Worn, damaged, or incomplete returns will not be
eligible for a refund and will be returned to you.
All our goods are supplied with a 12 month warranty from the date of purchase,
covering defects in materials and workmanship under conditions of normal use
and maintenance. If your goods develop a fault within this period, we will repair
or replace the item. If we cannot do this we will refund your actual purchase
price.
If goods become defective within three months of delivery, we will pay for
collection of the items and delivery of the replacement. After this time, we will
not pay to collect items.
In the unlikely event that your goods arrive damaged, please inform us within 24
hours of delivery, including photos of the damage. The claim will be assessed,
and if approved we will arrange for the goods to be collected, and we will
replace or refund as necessary.
It is your responsibility to securely package items for their safe return to us using
a trackable service. Not doing so will void your warranty.
This guarantee is subject to the following provisions:
• The product must be correctly installed and operated in accordance with
the instructions contained in these operating instructions.
• This guarantee does not cover accidental damage or misuse.
• This guarantee will be rendered invalid if the product is resold or has been
damaged by inexpert repairs. The manufacturers disclaim any liability for
incidental or consequential damages.
This guarantee is in addition to, and does not diminish, your statutory or legal
rights.

FRUIT ENTIER LENT JUICERFRANÇAIS
34 35
INTRODUCTION
Merci d’avoir acheté ce Fridja F1800 Slow Juicer!
Ce produit a été conçu et fabriqué pour vous donner des années de
Difficulté service gratuit.
Veuillez prendre le temps de lire ces instructions avant utilisation-elles ont
été écrites pour vous assurer d’obtenir le meilleur de votre achat.
Comme avec tout nouveau produit électrique s’il vous plaît permettre
plusieurs heures d’utilisation avant tout les composants se sont acclimatés
avec votre environnement et se sont installés en fonctionnement optimal.
• Cet appareil est destiné à un usage domestique seulement. Veuillez
suivre les instructions de la Manuel soigneusement.
(l’appareil ne peut pas être couvert par la garantie du fabricant si le
produit est utilisé anormalement ou commercialement.)
• Enregistrez le manuel d’instructions pour référence ultérieure.
• Si l’appareil est offert en cadeau, veuillez inclure le manuel avec le
produit.
SPÉCIFICATIONS
Marque Fridja
Modèle F1800 fruit entier Slow Juicer
Tension 220-240V 50/60 Hz
Consommation d’énergie 240W
Utilisation maximale inférieure à 30 min
Livret d’instructions: 1,1

FRUIT ENTIER LENT JUICERFRANÇAIS
36 37
CONTENU
INTRODUCTION ....................................................35
SPECIFICATIONS ....................................................35
DES MESURES DE PROTECTION IMPORTANTES .........................37
AVERTISSEMENT DE SECURITE ........................................38
PIECES DE ..........................................................39
COMMENT MONTER................................................. 41
CONSEILS SUR L’EXPLOITATION .......................................44
COMMENT OPERER .................................................45
DES CONSEILS SUR LES INGREDIENTS .................................47
INGREDIENTS DE PREPARATION .......................................49
COMMENT FAIRE POUR DEMONTER ET NETTOYER .....................53
COMMENT UTILISER LA PASSOIRE DE CREME GLACEE ..................55
COMMENT FAIRE POUR UTILISER LE TAMIS SMOOTHIE .................57
EN OPTION COMMENT UTILISER LA PASSOIRE SMOOTHIE . . . . . . . . . . . . . . 57
COMMENT NETTOYER LES ESSUIEGLACES DE SILICONE ................58
DEPANNAGE Q & A ..................................................59
LA SECURITE DE LA PRISE .............................................63
PRISE DE COURANT NON RECABLEE ..................................64
L’ELIMINATION CORRECTE DE CE PRODUIT ............................64
GARANTIE, ..........................................................65
PROTECTIONS IMPORTANTES
Lors de l’utilisation d’appareils électriques, des précautions de sécurité de base
doivent toujours être suivi, y compris les éléments suivants:
1. Lisez toutes les instructions.
2. pour protéger contre les risques de chocs électriques, ne pas mettre le
moteur ou la base de l’unité dans l’eau ou autre liquide.
3. une surveillance étroite est nécessaire lors de l’utilisation d’un appareil près
des enfants.
4. Débranchez le presse-agrumes de la prise lorsqu’il n’est pas utilisé, avant de
mettre ou de décoller des pièces, et avant le nettoyage.
5. Évitez de contacter les pièces mobiles.
6. n’utilisez pas d’appareil avec un cordon ou une fiche endommagés ou
après que l’appareil défectueux, ou est tombé ou endommagé de quelque
manière que ce soit. Retournez l’appareil à la facilité de service autorisée
la plus proche pour l’examen, la réparation ou l’électricité ou mécanique
adjustment.
7. l’utilisation de pièces jointes non recommandées ou vendues par le
fabricant peut causer incendie, choc électrique ou blessure.
8. ne pas utiliser l’extérieur.
9. ne pas laisser le cordon pendre sur le bord de la table ou du comptoir.
10. Assurez-vous toujours que le couvercle du presse-agrumes est bien fixé
avant de mettre le moteur en marche. Ne pas détacher les pinces pendant
le fonctionnement du presse-agrumes.
11. Assurez-vous de mettre l’interrupteur en position OFF après chaque
utilisation de votre centrifugeuse. Assurez-vous que le moteur s’arrête
complètement avant le démontage.
12. ne mettez pas vos doigts ou d’autres objets dans l’ouverture du presse-
agrumes pendant qu’il est en marche. Si la nourriture est logée dans
l’ouverture, utiliser le poussoir de nourriture ou un autre morceau de fruit
ou légume pour le pousser vers le bas. Lorsque cette méthode n’est pas
possible, éteignez le moteur et démonter le presse-agrumes pour enlever
les aliments restants.
13. n’utilisez pas l’appareil si le tamis rotatif est endommagé.
14. ne pas fonctionner sans le récipient à pulpe en place.
15. s’il vous plaît ne pas modifier l’appareil en tout cas.
16. ne pas utiliser l’appareil pour autre chose que son but visé, tel que décrit
dans le manuel.
17. l’appareil doit être utilisé pendant une durée limitée (pas plus de 30
minutes) continuellement.

FRUIT ENTIER LENT JUICERFRANÇAIS
38 39
AVERTISSEMENT DE SÉCURITÉ
Débranchez le cordon d’alimentation
lorsqu’il n’est pas utilisé.
Utilisez une serviette sèche pour nettoyer
le cordon d’alimentation.
Ne pas garder ou faire fonctionner l’appareil
à proximité nourrissons ou tout-petits.
* Il peut les blesser.
Ne pas réparer, démonter la base,
ou personnaliser l’appliance.
* L’appareil peut ne pas fonctionner correctement
causant
incendie, choc électrique ou blessure.
Ne mettez pas les parties de jus dans le
lave-vaisselle ou eau extrêmement chaude.
* les pièces peuvent porter plus vite
N’utilisez pas de produits chimiques
dangereux pour Nettoyez l’appareil.
* Il peut changer la couleur de l’appareil
ou pourrait entraîner un incendie.
Ne pas vaporiser d’eau ou de sprays
inflammablesprès de l’appareil.
* Il peut provoquer une explosion ou un choc
électrique
Ne pas utiliser l’appareil sur un
surface.
* Il peut causer un dysfonctionnement
Si l’appareil bascule
PARTIES
1. Tube d’alimentation
2. Couvercle de tambour
3. Bol à jus
4. Cruche de pulpe
5. Capuchon anti-gouttes
6. Base
7. Pichet à jus
8. Essuie-glace de rotation
9. Crépine
10. Tarière
11. Poussoir
12. Brosse de nettoyage
11
8 9 10
12
4
6
2
7
3
5
1
Detachable
Other manuals for f1800
1
Table of contents
Languages:
Other Fridja Juicer manuals