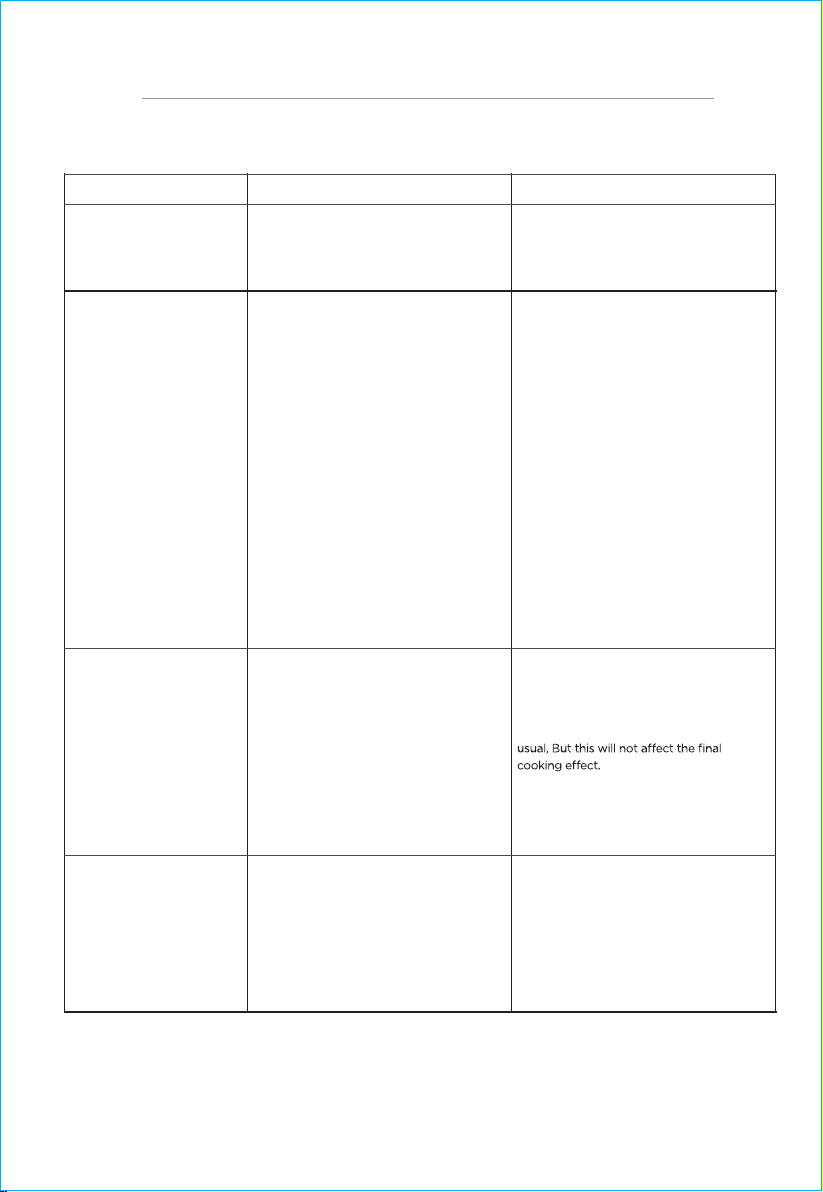
Frigidaire EAF383 Owner's manual

Introduction
Important Safeguards(cont.)
Parts Description
Getting Started
Operation Instructions(cont)
Cleaning And Maintenance
Trouble Shooting
Year Warranty
2
3
5
6
7
8
9
10
EAF383
3.2 QT DIGITAL AIR FRYER
USA/CANADA 1-800-968-9853 www.curtisint.com/frigidaire


Introduction 2
Thank you for bringing Frigidaire into your
home! We see your purchase as the beginning
of along relationship together.
This manual is your resource for the use and
care of your product. Please read it before
using your appliance. Keep it handy for quick
reference. If something doesn't seem right,
the troubleshooting section will help you with
common issues.
FAQs, helpful tips and videos,cleaning
products, and kitchen and home accessories
are available at www.frigidaire.com.
House power turned on
Air fryer plugged in
Make sure the crisping tray is inthe
frying basket
Make sure the frying basket is in
theair fryer
Shipping material removed

3IMPORTANT SAFEGUARDS(CONT.)

4
IMPORTANT SAFEGUARDS(CONT.)
1. This appliance is intended to beused in household and similar applications such as
farm houses
by clients in hotels,motels and other residential type environments
bed and breakfast type environments.
2. Becareful of hot steam and air when you remove the panfrom the appliance.
3. If you seedark smoke coming out of the appliance, immediately unplug the
Appliance, wait for thesmoke emission to stop before you remove thepan
from the appliance.
4. Ensure the appliance in placed on a horizontal, even and stablesurface.
5. The use of accessories is not recommended by theappliance manufacturer as
it may causeinjuries.
6. Always unplug theappliance while not using.
7. The appliance needs approximately 30minutes to cool before handling or cleaning.
8. If the supply cord is damaged, it must be replaced by the manufacturer, its service
agent or a similarly qualified person in order to avoid a hazard.
9. Young children should besupervised to ensure that they do not play withthe
appliance.
10. This appliance is not intended for use by persons (including children) with reduced
physical,sensory ormental capabilities,or lack of experience and knowledge,
unless they have been given supervision or instruction concerning use of the
appliance by a person responsible for their safety.

LCD Display
5PARTS DESCRIPTION
1.Display
2.Air inlet
3.Grill
4.Pot
5.Handle
6.Air outlet
7.Power cord

6
1. Place appliance ona flat, level and sturdy surface.
2. Ensure the frying basket is fully inserted into the cooking cavity.
GETTING STARTED
Before First Use
OPERATION INSTRUCTIONS
1. Remove any adhesive marketing stickers and packaging before use.
2. Clean the frying basket and thefrying-pan thoroughly with water, detergent and non abrasive
sponge.
3. Wipe the exterior surface witha mild and damp cloth.
4. The airfryer uses the hot air heating.Never pouroil or fat into the fryer.
5. Note, the appliance may emit a very small amount of smoke or odourduring initial use. This is
normal and is a caused by lubricants used during manufacturer which can comeinto contact
withthe heating element. This should clearafter thefirst use.
WARNING: Never pour oil or other liquid into thefryer. Never put things on top of the product,
Fat-Free Frying
Note: Do not touch the pan while in operation or after using to avoid scalding.
Only hold the pan by the handle.
1. Pull out the frying basket / pot carefully from thefryer body.
2. Place the food ingredients into thefrying basket / pot.
3. Inselt thefrying basket / pot back into the fryer.
4. Do not try to operate the air fryer before insertion of the frying basket/ pot.
5. Connect the appliance plug to the mains electrical supply and switch on, an audiblebeeping
sound will be heard and the "ON/OFF" indicator light will be remain illuminated. The appliance is
now the stand-by mode.
6. Press the ON/OFF button once, select your desired function (function selection).Press the
temperature control button to increase “+” or decrease "-" the temperature required.
7. You can adjust the cooking time from minimum (of 1 minute)
to amaximum (60 minutes) by pressing the timer control button.
8. Withthe temperature and timer selected, press the "ON/OFF" button once to start the cooking
process. (You must press the"ON/OFF" button to confirm what you selected; otherwise the
appliance will gointo stand-by mode only).
9. For best results,some foods need to beshaken or turned over during theairfryer cooking time.
Refer to the "Temperature setting guide" as a general guide. To overturn the food ingredients,
hold the handleand pull out the frying basket / pot from theappliance.

7OPERATON INSTRUCTIONS (CONT.)
11.There will be "beep" sounds heard when the cooking process is completed; then the
appliance will go into stand -by mode.
12. Cautionmust be exercised when pouring thehot food into the bowl oronto plates.
Helpful Hints:
1. Cooking times will vary depending on type and quantity of food used.
2. During the process of cooking, overturning small items canassist the cooking
process and can help with even distribution of cooking.
3. By adding small amount of oil to fresh foods, the food can bemade crisper.
After adding the oil,the food ingredients should be left for several minutes before
placing them in thefryer.
TEMPERATURE SETTING GUIDE

8
CLEANING AND MAINTENANCE
The frying-basket / frying pot has a non-stick coating applied.In order to avoid
damage, Do not use metalkitchen utensil or abrasive cleaning pads. You must
wait for the appliance to cool down completely before cleaning it.
1. Remove theplug from thepower socket,let the appliance cool down.
Note: Removal of the frying basket / pot will allow the unit to cooldown more
quickly.
2. Usedamp cloth to wipetheoutside part of theproduct.
3. Clean the frying-pot with hot water, detergent and non-abrasive sponge. Add hot
water into thefrying pot together with some detergent. Soak the frying pot and the grill
for 10 minutes.
4. Clean any spills on theinsideof theappliance using adamp
non-abrasive sponge.
TECHNICAL SPECIFICATIONS
Type
Rated Voltage
Rated Frequency
Rated Power
Product Dimentions:
EAF383
120V
60HZ
1000W
245X336X312mm

9TROUBLE SHOOTING
The appliance does
not work
Food ingredients inadequately
cooked.
Food ingredients not baked
evenly inthe frying-pan
White smoke
coming out of the
product
1.The plug of the product is not inserted
into thepower socket and switched on.
2.The timer / on process has not been
correctly followed
1.Insert theplug into the grounded
power socket and switch on.
2.Refer operating instructions earlier inthis
manual.
1.Too much food ingredients in the frying
basket.
2.The heating temperature selected is too low
3.The cooking timeis too short.
Some food ingredients should be overturned
during the process of cooking.
1. You are cooking food
ingredients with a high
content of oil.
2.0il or grease from last use
is still remained inside
the frying-basket.
1.Put the food ingredients into the
frying basket in smaller batches. The
frying can cook more evenly.
2.Adjust the temperature setting in
accordance with theOperating Instructions
earlier in this manual.
3.Adjust the timer setting in accordance with
theOperating Instructions earlier inthis
manual.
If some food ingredients lay on the top, or join
together with other food ingredients(e g. fried
chips), then they must be overturned inthe
process of cooking, please refer to the
"Setting" part inthe chapter of "Operating this
Product")
1.When you are cooking food
ingredients with comparatively high
oil content inthe fat-free fryer, large
amount of oil fume will infiltrate into
the frying-pan might be hotter than
2.The white smoke produced by
heating the oil and fat inside the
frying-pan. Make sure to clean the
frying-pan each time after the using.
Freshchips are not
fried evenly inside
the frying-basket
Correct preparation / cooking procedure has
not been followed
1. Usefresh potatoes, and make sure
that they will not split intheprocess
2. Make sure to drain the potato
3. By cutting the potato chips into smallersize,
they can be made more light and crisp.
4. The potato chips can bemademore light
and crisp by adding small amount of oil to
them.
Problem PossibleCauses Solving Method

Year Warranty 10
1 Year Warranty
To make a warranty claim, please email support@curtiscs.com or
call 1-800-968-9853.
This product is warranted to be free from defects in material and workmanship for a
period of one (1) year from the date of original purchase. During this period, your
exclusive remedy is repair or replacement of this product or component found to be
defective, at our option; however, you are responsible for all costs associated with
returning the product to us. If theproduct or component is no longer available, we will
replace with a similar one of equal or greater value. Prior to a replacement being sent,
the product must be rendered inoperable or returned to us.
This warranty does not cover glass, filters, wear from normal use, usenot in conformity
with the printed directions., or damage to theproduct resulting from accident, alteration,
abuse, or misuse. This warranty extends only to the original consumer purchaser or gift
recipient. Keep the original sales receipt, as proof of purchase is required to make a
warranty claim. This warranty is void if the product is used for otherthan single-family
household use or subjected to any voltage and waveform otherthan as onthe specified
rating onthe label (e.g., 120V~60Hz).
We exclude all claims for special,incidental, and consequential damages caused by
breach of express or implied warranty. All liability is limited to the amount of the
purchase price. Every implied warranty, including any statutory warranty or
condition of merchantabilityorfitness for a particular purpose, is disclaimed
except to the extent prohibited by law, in which case such warranty or condition is
limited to the duration of this written warranty. This warranty gives you specificlegal
rights. You may have other legal rights that vary depending on where you live. Some
states or provinces do not allow limitations on implied warranties or special, incidental,
or consequential damages, so the foregoing limitations may not apply to you.
For faster service, locate the model, type, and serial numbers on your appliance.
ATTACH YOUR PROOF OF PURCHASE HERE, PROOF OF PURCHASE IS REQUIRED TO
OBTAIN WARRANTY SERVICE.
Please have the following information available when you contact the Support Team:
· Name, address and telephone number.
· Model number and serial number.
· A clear, detailed description of the problem.
· Proof of purchase including dealer or retailer name, address and date of purchase.

welcome
owner support
service
FRIGIDAIRE is a pending or registered trademark
of Electrolux Home Products Inc.
and used under a license from Electrolux Home
Products, Inc.
1-800-968-9853
Our home is your home. Visit us if you
need help with any of these things:

FRITEUSEÀAIR NUMÉRIQUE 3.2QT
USA/CANADA 1-800-968-9853 www.curtisint.com/frigidaire
EAF383


Félicitations pour votre achat et bienvenuedans la familleFrigidaire!
La nouvelle friteuse àair vous permet de préparer vos ingrédients et grignotines
préférés de maniére plus saine.
La friteuse à air utilise del'air chaud en combinaison avec unecirculation d'airàhaute
vitesse (Rapid Air) et unegrillesupérieure pour préparer une variété deplats
côtés àlaIbis et sont conçus pour réduire I'utilisation d'huiles dans laplupart des plats,
ce qui permet de cuire les gâteaux,les quiches et les aliments délicats d'unemanière
plus simple et plus pratique.
Introduction
Composants duproduit
1. Affichage
2. Entrée d'air
3. Grillé
4. Pot
5. Manipuler
6. Sortie d'air
7. Cordon d'alimentation
1
2
3
4
5
6
7

Comment utiliserle panneaude configuration
A)BOUTON D'ALIMENTATION:
Appuyez surle bouton 'Alimentation' pour allumer / éteindre la friteuseà air.
B) BOUTON REFROIDISSEMENT RAPIDE:
Appuyez sur ce bouton pour accélérer le processus de refroidissement des aliments
chauds pour une consommationimmédiate après refroidissement.
C) BOUTON DE DÉMARRAGE / ARRÊT:
Appuyez sur ce bouton pour démarrer ou arrêter la cuisson.L'heure etla température
D) BOUTON DEMENU:
E) BOUTON D'AUGMENTATIONDEMINUTERIE:
Appuyez surle bouton «Augmenter la minuterie» pouraugmenter le temps decuisson
avec une minute. Vous pouvez ajouter un maximum de 60 minutes (maintenez le
bouton enfbncé pour une augmentation rapide).
F) BOUTON DE DIMINUTIONDELA MENUTERIE:
Appuyez surle bouton «Minuterie» pourdiminuer le temps decuisson d'uneminute
(maintenez le bouton enfoncé pourune diminution rapide).
G) BOUTON D'AUGMENTATIONDE TEMPERATURE:
Appuyez sur cette touche pour augmenter le réglagede la température parincréments
de 5 degrés jusqu'à un maximum de 400T(maintenez le bouton enfoncé pourune
augmentation rapidedela température de cuisson).
H) BOUTON DE DIMINUTION DE LA TEMPERATURE:
Appuyez pour diminuer le réglage de la température parincréments de 5 degrés
jusqu'à unminimum deMOT (maintenez enfbncé lebouton pourdiminuer rapidement
la température de cuisson).

Comment sélectionner une fonction de menu rapide
Tableau de menu rapide
Avant d'utiliser ce produit, veuillez lire attentivement les instructions et gardez-les
pour référence ultérieure.
Notice
Danger
Ne plongez jamais l'appareil contenant des composants électriques et les éléments
Pour éviter le risquede choc électrique, ne laissez aucune eau ou autre liquide
pénétrer dans l'appareil.

Ne touchez jamais l'intérieur del'appareil lorsqu'il est en marche.
Toujours mettez les ingrédients à frire dans le panier, en évitant le contact avec
les éléments chauflfants.
Ne couvrez pas l'entrée d'air et l'extérieur de l'air pendant le fonctionnement de
l'appareil.
Ne remplissez pas la casserole avec del'huilecar cela pourrait provoquer un
incendie.
Avertissement
Vérifiez si la tension indiquée sur l'appareil correspond à la tension secteurlocale
avant de brancher l'appareil.
N'utilisez pas l'appareil si la fiche, le cordon d'alimentation ou l'appareil
lui-même est endommagé.
Si le cordon d'alimentation est endommagé, vous devez le remplacer. Vous
pouvez également leporter à un centre de service agréé ou àun technicien
qualifié pour éviter tout danger.
Cet appareil nepeut pas être utilisépar des enfants de8 ans ou moins et par des
personnes à capacité physique réduite.
Les enfants doivent être surveillés pours'assurer qu'ils nejouent pas avec ou ne
font pas fonctionner l'appareil demanière dangereuse.
Gardez l'appareil et son cordon d'alimentation hors dela portée des enfants de
moins de 8 ans lorsqu'il est allumé ou en train de refroidir.
Gardez le cordon d'alimentation à l’écart des surfaces chaudes.
Ne branchez pas l'appareil et n'utilisez pas leparmeau de commande avec des
mains mouillées.
Ne branchez l'appareil quesur une prise murale miseàla terre. Assurez-vous
toujours quelafiche est correctement insérée dans laprise murale.
Ne connectez jamais cet appareil à un minuteur exteme pour éviter toute situation
dangereuse.
Ne placez pas l'appareil surouàproximité dematériaux combustibles /
inflammables tels quedes nappes ou des rideaux.
Ne placez pas l'appareil contre unmur ou contre d'autres appareils,laissez au
moins 10 cm d'espace libre à l'arrière et surles côtés et 10cm au-dessus de
l'appareil.Nemettez riensur l'appareil.
N'utilisez pas l'appareil à d'autres fins que celles décrites dans ce manuel..
Ne laissez pas l'appareil fonctionner sans surveillance.

Les surfaces accessibles peuvent devenir chaudes pendant l'utilisation(Fig.1).
Lors delafriture àl'air chaud,de la vapeur chaude est libérée par les orifices de
sortied'air, gardez vos mains et votre visageà une distance desécurité de la
vapeur et des orifices de sortied'air. Faites également attention à la vapeur et à
l'air chaud lorsque vous retirez la casserole del'appareil.
Débranchez immédiatement l'appareil si vous voyez de la fiimée noire en soitir.
Attendez que les émissions de fumée cessent avant de retirer lacasseroledel'appareil.
Mise en garde
Pour de meilleurs résultats, assurez-vous que les assiettes préparées dans cet
appareil sortent d'un jaunedoré aulieu d'un brun foncé. Enlevez tous les restes
brûtlés
Placez l'appareil sur une surface horizontale, plane, plane et stable.
Cet appareil est destiné à un usage domestique normal uniquement.Il n'est pas
destiné àêtre utilisedans des environnements tels que les cuisines depersonnel
de magasins, bureaux, fermes ou autres environnements de travail, ni aux clients
d'hôtels,motels,gîtes touristiques et aulres environnements résidentiels.
Si l'appareil est utilisédemanière mappropriée,à des fins professionnelles ou
semi-professioimelles ou s'il n'est pas utilisé conformément aux instructions du
manuel d'utilisation,la garantiedevient caduque et toute responsabilité pourles
dommages causés sera refusée.
Toujours renvoyer l'appareil à un centre de service agréé pour examen ou
réparation.
Débranchez toujours l'appareil après utilisation.
Laissez l'appareil refroidir pendant env. 30 minutes avant la manipulation oule
nettoyage.

Cet appareil est confbrme à toutes les normes concemant les champs
électromagnétiques (EMF).L'appareil est sûrà utilisers'il est utilisé correctement et
conformément aux instructions de ce mode d'emploi.
EMF
Avant la premiére utilisation
1. Retirez tous les matériaux d'emballage.
2. Retirez tous les autocollants ou étiquettes del'appareil.
3. Nettoyez soigneusement le panier et la casserole avec deI'eau chaude, du savon
doux et une éponge non abrasive. (Remarque: ces pièces sont lavables au
lave-vaisselle.)
5. Il s'agit d'unefriteuse à airqui fonctionnesurlacirculation del'airchaud.Ne
remplissez pas d'huileoudegraisse defriture.
Préparer pour l'Futilisation
1. Placez l'appareil surunesurface horizontale, plane, plane et stable. (Neplacez
pas l'appareil sur des surfaces non résistantes à la chaleur.)
2. Placez correctement le panier dans la poêle (Fig.2).
performances de friture à Pair chaud.
Utiliser l'appareil
Friture à l'air chaud
La friteuse à air peut préparer une grande variété d'aliments.La recette fournie vous
aidera à mieux connaître l'appareil.
1. Branchez le cordon d'alimentation suruneprise murale miseàla terre.
2. Retirez dé1icatement la casserole dela friteuseàair(Fig,3)
3. Mettez les aliments surle panier. (Fig.4)
4. Mettez la casserole dans la friteuseaair. (Fig.5)
Lafriteuse à air ne peut pas fbnctionner sans panier.
This manual suits for next models
1
Table of contents
Languages:
Other Frigidaire Fryer manuals
Popular Fryer manuals by other brands

Continental Refrigerator
Continental Refrigerator CE-DF309 user manual

Optimum
Optimum FT-2507 operating instructions

Waring
Waring DF55 owner's manual

Henny Penny
Henny Penny KFC Velocity PXE-100 Operation manual

Frymaster
Frymaster YSCF14G Series Installation & operation manual

Chefman
Chefman TurboFry Touch RJ38-SQSS-8T-UK user guide