manuals.online logo
Brands
  1. Home
  2. •
  3. Brands
  4. •
  5. Frigidaire
  6. •
  7. Refrigerator
  8. •
  9. Frigidaire FRS3R3EW1 User manual

Frigidaire FRS3R3EW1 User manual

This manual suits for next models

14

Other Frigidaire Refrigerator manuals

Frigidaire GLRT215RB User manual

Frigidaire

Frigidaire GLRT215RB User manual

Frigidaire FRS6R3J Instruction Manual

Frigidaire

Frigidaire FRS6R3J Instruction Manual

Frigidaire FRS26H5AS User manual

Frigidaire

Frigidaire FRS26H5AS User manual

Frigidaire FPE-20TJB User manual

Frigidaire

Frigidaire FPE-20TJB User manual

Frigidaire FGHG2366PF Installation and operation manual

Frigidaire

Frigidaire FGHG2366PF Installation and operation manual

Frigidaire FRT17HB3C User manual

Frigidaire

Frigidaire FRT17HB3C User manual

Frigidaire FRT21P5A User manual

Frigidaire

Frigidaire FRT21P5A User manual

Frigidaire GLHS68EGW3 User guide

Frigidaire

Frigidaire GLHS68EGW3 User guide

Frigidaire FFWC38F6LS User manual

Frigidaire

Frigidaire FFWC38F6LS User manual

Frigidaire FRS26TS7DW2 User manual

Frigidaire

Frigidaire FRS26TS7DW2 User manual

Frigidaire FRS26ZTHW5 Assembly instructions

Frigidaire

Frigidaire FRS26ZTHW5 Assembly instructions

Frigidaire FRT18G5A User manual

Frigidaire

Frigidaire FRT18G5A User manual

Frigidaire PLRS267ZA User manual

Frigidaire

Frigidaire PLRS267ZA User manual

Frigidaire Compact Refrigerator User manual

Frigidaire

Frigidaire Compact Refrigerator User manual

Frigidaire FGHS2355PF6B Owner's manual

Frigidaire

Frigidaire FGHS2355PF6B Owner's manual

Frigidaire FRT22IRSH User manual

Frigidaire

Frigidaire FRT22IRSH User manual

Frigidaire FRT18GS6A User manual

Frigidaire

Frigidaire FRT18GS6A User manual

Frigidaire FGHT2144KF - 21 CF Lery SS Group User manual

Frigidaire

Frigidaire FGHT2144KF - 21 CF Lery SS Group User manual

Frigidaire FRS24ZRH User manual

Frigidaire

Frigidaire FRS24ZRH User manual

Frigidaire FRT21G4A User manual

Frigidaire

Frigidaire FRT21G4A User manual

Frigidaire FRS23KF5D User manual

Frigidaire

Frigidaire FRS23KF5D User manual

Frigidaire FRT21ILRG User manual

Frigidaire

Frigidaire FRT21ILRG User manual

Frigidaire FRS6L7E User manual

Frigidaire

Frigidaire FRS6L7E User manual

Frigidaire FCRS201RFB5 Owner's manual

Frigidaire

Frigidaire FCRS201RFB5 Owner's manual

Popular Refrigerator manuals by other brands

Fisher Scientific 10ECEEFSA manual

Fisher Scientific

Fisher Scientific 10ECEEFSA manual

Summit FF22BDRSS user manual

Summit

Summit FF22BDRSS user manual

Hotpoint ENBGH 19xxx FW operating instructions

Hotpoint

Hotpoint ENBGH 19xxx FW operating instructions

Hitachi R-SG28KPH instruction manual

Hitachi

Hitachi R-SG28KPH instruction manual

Dometic RMH 7390 L operating instructions

Dometic

Dometic RMH 7390 L operating instructions

AEG S71700TSW0 user manual

AEG

AEG S71700TSW0 user manual

Electrolux ENB3669 Instruction book

Electrolux

Electrolux ENB3669 Instruction book

Electrolux ERN 2930 Instruction book

Electrolux

Electrolux ERN 2930 Instruction book

Beko GNE 60520 X user manual

Beko

Beko GNE 60520 X user manual

Jenn-Air JUR248LBES00 Use & care guide

Jenn-Air

Jenn-Air JUR248LBES00 Use & care guide

Dometic RGE 4000 Installation and operating manual

Dometic

Dometic RGE 4000 Installation and operating manual

Dometic L-0191B Brochure & specs

Dometic

Dometic L-0191B Brochure & specs

LG LRBP1031W - 10 Cu. Ft. Cabinet Depth Bottom Freezer... owner's guide

LG

LG LRBP1031W - 10 Cu. Ft. Cabinet Depth Bottom Freezer... owner's guide

Daewoo RN-33 Series user manual

Daewoo

Daewoo RN-33 Series user manual

Haier RF-8888-174 Service manual

Haier

Haier RF-8888-174 Service manual

Blaupunkt 5CK2 Series user manual

Blaupunkt

Blaupunkt 5CK2 Series user manual

Beko B5RCNE366HG user manual

Beko

Beko B5RCNE366HG user manual

GE TBX21 use and care manual

GE

GE TBX21 use and care manual

manuals.online logo
manuals.online logoBrands
  • About & Mission
  • Contact us
  • Privacy Policy
  • Terms and Conditions

Copyright 2025 Manuals.Online. All Rights Reserved.

Side by Side WeUcome ....................... 2
EspaSoi ........... 23
Safety instructions ............ 3
installation -- IncludesConnecting
Ice Maker To Water SuppJy ............ 4 - 5
Door RemovaU
instructions ................... 6
Features at a GUance ......... 7
Temperature ControUs ....... 7
Looking inside .......... 8 - 9
Automatic raceand Water
Dispenser ................ 10 -13
Food Storage
& Ener Savin Ti s ....... 14
NormaU O_ Sounds.. 15
Care & CUeaning ......... 16 - 17
Warranty ...................... 18
Before You Call
Solutions to
commonPrebmem_.............. 19 - 22
READ AND SAVE THESE INSTRUCTIONS P_N24os813oo(o5o_)
CongratuIations on your purchase of a new refrigerator! We
here at Electrolux Home Products, inc. are very proud of our
product and we are completely committed to providing you
with the best service possible. Your satisfaction is our #1
priority.
Please read this Use & Care Manual very carefully. It contains
valuable information on how to properly maintain your new
refrigerator.
We know you'll enjoy your new refrigerator and Thank You for
choosing our product. We hope you consider us for future
purchases.
PLEASE READ AND SAVETHESE INSTRUCTIONS
This Use & Care Manual provides specific operating
instructions for your model Use your refrigerator only as
instructed in this manual These instructions are not meant to
cover every possible condition and situation that may occur.
Common sense and caution must be practiced when installing,
operating and maintaining any appliance.
Pmeaserecord your modem and seriam numbers below for
future reference.This information is found on the serial
plate tocated inside the refrigerator compartment.
Model Number:
Serial Number:
Purchase Date:
Questions?
1-800-944-9044
(United States)
1-866-213-9397
(Canada)
or visit our web site at ww_',frigidaire, com
Extend Your Warranty Protection
With An
Extended Service Contract
OALL 1-800-944-9044
To Enjoy These Benefits:
Total freedom from repair bills so
unexpected repairs won't upset your budget,
Fast, convenient toll-free service isjust a
phone call away,
Top-quaJity repairs by factory-trained
experts,
Quick access to genuine repJacement
parts so you can rest assured your
refrigerator is repaired with the proper
components,
PLEASE COMPLETE AND MAIL IN THE PRODUCT
REGISTRATION CARD INCLUDED WITH YOUR
REFRIGERATOR.
Please attach sales receipt here for future reference.
FORYOURSAFETY
,, Donotstoreorusegasoline,orotherflammableHquidsin
thevicinityofthisoranyotherappliance.Readproduct
labelsforwarningsregardingflammabilityandother
hazards.
,, Donotoperatetherefrigeratorinthepresenceof
explosivefumes.
,, Avoidcontactwithanymovingpartsofautomaticice
maker.
,, RemovealIstaplesfromthecarton.Staplescancause
severecuts,andalsodestroyfinishesiftheycomein
contactwithotherappliancesorfurniture.
CHILDSAFETY
Destroyorrecyclethecarton,plasticbags,andanyexterior
wrappingmateriatimmediatelyaftertherefrigeratoris
unpacked.ChildrenshouldNEVERusetheseitemstoplay.
Cartonscoveredwithrugs,bedspreads,plasticsheetsor
stretchwrapmaybecomeairtightchambers,andcanquickly
causesuffocation.
PROPERDISPOSALOFYOURREFRIGERATOROR
FREEZER
Risk of child entrapment
Child entrapment and suffocation
are not problems of the past.
Junked or abandoned
refrigerators or freezers are still
dangerous - even if they wilI sit for
"just a few days." If you are getting
rid of your old refrigerator or
freezer, please follow the
instructions below to help prevent
accidents.
Before you throw away your old refrigerator/freezer:
o Remove doors.
_, Leave shelves in place so children may not easily climb
inside.
,, Have refrigerant removed by a qualified service
technician.
ELECTRICAL INFORMATION
,, The refrigerator must be plugged into its own dedicated
115 Volt, 60 Nz,, AC onmyelectric outlet. The power cord
of the appliance is equipped with a three-prong grounding
plug for your protection against electrical shock hazards. It
must be plugged directly into a properly grounded three-
prong receptacle. The receptacle must be installed in
accordance with local codes and ordinances. Consult a
qualified electrician. Do not use an extension cord or
adapter p_ug.
,, If the power cord is damaged, it should be replaced by the
manufacturer, service technician or a qualified person to
prevent any risk.
,, Never unplug the refrigerator by pulling on the power
cord. Always grip the plug firmly, and pulI straight out
from the receptacle to prevent damaging the power cord.
,, Unplug the refrigerator before cleaning and before
replacing a light bulb to avoid electrical shock.
,, Performance may be affected if the voltage varies by'
10% or more. Operating the refrigerator with insufficient
power can damage the compressor. Such damage is
not covered under your warranty.
Do not plug the unit into an outlet controlled by a walI
switch or pull cord to prevent the refrigerator from being
turned off accidentally.
Avoid connecting refrigerator to a Ground Fault Interruptor
(GFI) circuit.
3=prorlg g_suaded P!ug
This Owner's Guide provides specific operating instructions for
your model. Use the refrigerator onIy as instructed in this Use &
Care Manuai. Before starting the refrigerator, follow these
important first steps.
LOCATION
o Choose a ptace that is near a grounded electrical outleL
Do Not use an extension cord or an adapter plug.
o If possible, place the refrigerator out of direct sunlight
and away from the range, dishwasher or other heat
SOUrCeS,
. The refrigerator must be instaIIed on a floor that is level
and strong enough to support a fully loaded refrigerator.
.Consider water supply availability for models equipped
with an automatic ice maker.
INSTALLATION
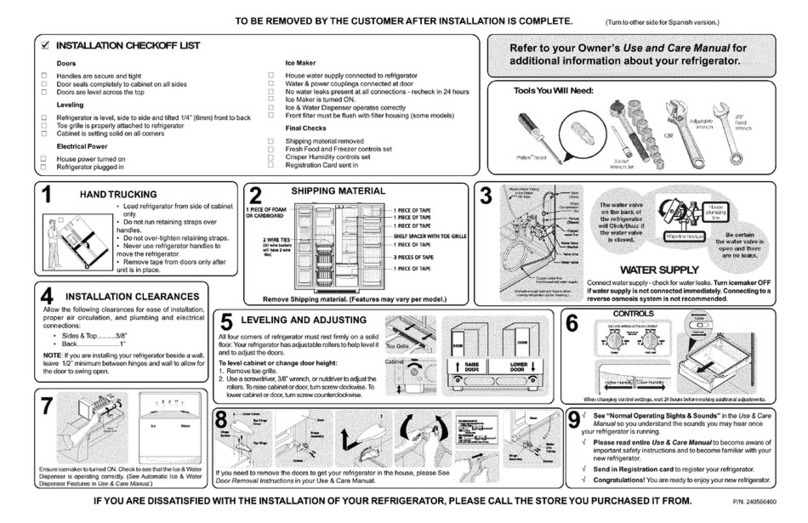
Installation Clearances
. Allow the following clearances for ease of installation,
proper air circulation, and plumbing and electrical
connections:
Sides & Top .................. 3/8"
Back ........................... 1"
DOOR OPENING
To Remove Toe Grille:
2. Open freezer and fresh food compartment doors.
Working from left side of toe grille, slip your fingers
between top of toe grille and cabinet. Gently pull
forward until first set of
tabs are free. Slide
your hand down past Cabinet
the free tabs and pulI
forward again until the
second set of tabs are
free. Continue this Grille /_-_.,
"i
process until all tabs . j_;
-<<.
are free and the toe __ _
grille can be removed. I1
(See graphic at top of
page in right column.)
LEVELING
Ali four corners of your refrigerator must rest firmly on asolid floor_
Your refrigerator is equipped with adiustabie front rollers to help level
your unit. Toensure proper door seal and assist door closing, the
refrigerator should be tilted 1/4" (6 ram), front to back.
ToLevel Your Refrigerator:
1. Remove toe grille, (See "To Remove ToeGri//e',)
2. Use flat-blade screwdriver or 3/8" socket wrench to adjust
front rollers.
Your refrigerator should be positioned to allow easy access to a
counter when removing food. For best use of drawers and
freezer baskets, the refrigerator should be in a position where
both the refrigerator and freezer doors can be fully opened.
TOE GRILLE INSTALLATION/REMOVAL
Toinstall Toe Grille:
1. Open freezer and fresh food compartment doors.
2. Line up toe grille at base of refrigerator, making sure the
four bottom tabs are resting through holes at base of
cabinet.
3. Starting from Ieft side of toe grille, press in on first top tab
using your thumb and push toe grille forward until it snaps
in place. Continue this process until al! tabs are snapped
in place and toe grille is secured to refrigerator.
3,
I Raise
i_iiiii
© s
Check both doors to be sure seals touch cabinet on atl four
sides.
To Connect Water Supply Line To lee Maker Inlet Valve
1. Disconnect refrigerator from electric power source.
2. Place end of water supply line into sink or bucket. Turn ON
water supply and flush suppty Iine until water is clear. Turn
OFF water supply at shutoff valve.
3. Unscrew plastic cap from water valve inlet and discard
cap.
4. Slide brass compression nut, then ferrule (sleeve) onto
water supply line, as shown.
5. Push water supply Iine into water vaive inlet as far as it will
go (¼ inch). SIide ferruIe (sleeve) into valve inIet and
finger tighten compression nut onto vaive. Tighten another
half turn with a wrench; DO NOT over tighten.
6. With steel clamp and screw, secure water suppiy line to
rear panel of refrigerator as shown.
7. Coil excess water suppIy line (about 2_/2turns) behind
refrigerator as shown and arrange coils so they do not
vibrate or wear against any other surface.
8. Turn ON water supply at shutoff vaIve and tighten any
connections that leak.
9. Reconnect refrigerator to electrical power source.
10. To turn ice maker on, lower wire signal arm (see ice maker
front cover for ON/OFF position of arm).
Before lnstafling The Water Supply Line, You Will Need:
,, Basic Tools: adjustable wrench, flat-blade screwdriver,
and Phillips TM screwdriver
,, Access to a household cold water line with water pressure
between 30 and 100 psi.
,, A water supply line made of ¼ inch (6=4 ram) OD, copper
tubing. To determine the length of copper tubing needed,
you wilI need to measure the distance from the ice maker
inlet valve at the back of the refrigerator to your cold water
pipe=Then add approximately 7 feet (2=1 meters), so the
refrigerator can be moved out for cleaning (as shown)=
,, A shutoff valve to connect the water supply line to your
household water system= DO NOT use a self-piercing type
shutoff valve=
,, A compression nut and ferrule (sleeve) for connecting the
water supply line to the ice maker inlet valve.
Plastic Water _bing
to Ice Maker
Fill Tube Clamo
Brass
Comoress_o_
water line
from household wate supply
3clude enougn _ueing in Iooc to allow
moving refrigerator out for cleaning.)
Jop
H _g_
Sc_e_
Hinge
Hinge
Assembmy
Screws i
Tools Necessor.
Ph r_s n@au
DOOR REMOVAL INSTRUCTIONS:
Jf it is necessary to move the refrigerator through narrow doorways, follow
these steps to remove the doors.
1. Disconnect electrical supply.
2. Open botf seers, then remove lee grille.
3. Close doors.
To Remove Refrigerator Door:
1 Remove lop h_nge cover screw on refrigerator door _nd remove cover.
2. Trace around hinge with soft lead oencik This will make _teas_er to realign doors
wnen they are reolaced.
3. Remove [o# hinge anu ift refrigerator door off bottom qlnge pin. Set door aside.
4. Remove co[tom h_nge, if necessary.
5. Reverse this :roceaure to reinstall refrigerator door.
To Remove Freezer Door:
1. Disconnect water line coming from ower hinge of freezer aoor at connection
located under trent of freezer: Press ouler nng against face of fitting, then pull to
remove tube.
2. Remove top h_nge cover screw on lreezer door and remove cover.
3. Disconnect wrong harness conneclor plug at ton htnge: D_aceyour thumbs on flat
sides of eaciq connector aria Denu both Earts PaCKand forth, then with firm grasp,
pull both pieces apart.
4. Trace around hinge with soft earl pencil. This wiI make _teas_er to realign doors
wnen the,, are reDIaced.
5. Remove [cs hinge allowing w_nng harness [o Dull through hinge and lift freezer
door off of bottom hinge Din Lay door dowr flat to avoid k_nking water line.
6. Remove co[tom h_nge, if necessary.
7. Reverse this procedure [o reinstall freezer door.
When Do[n doors have seen reinstalled, connect water I_neby inserting tube and
push until mark touches face of titting, reDace toe grille and ptug in electrical power
cord. Turn both [empera[ure comro_s [o center position. Adjust settings as necessary.
TO DISCONNECT
1. Press outer ringagainst face
[e_71ove 1ZUDG
lush until mark touches face of fitting
Door
Door Bin
RceContainer
Pica Shelf
Wire Bhelf
Small items
Door Bin
Wire Shelf
Door Bin
Small Basket
LB_e Basket
Door Bin
Large Basket
Door Bin
Dai_ Door
Door Bin
Witte Rack
Door Bin
Meat Keeper
and Cover
8pi((Safe"_
Fixed She(f
Door Din
EggTray
Speciam Item
•Rack
fa(mBottle
Retainer
Snugger
Crisper Pan
and Cover
Fixed
Door Bin
COOL DOWN PERIOD
To ensure safe food storage, aliow the refrigerator to operate
with the doors closed for at least 8 to 12 hours before loading
it with food=
REFRIGERATOR & FREEZER CONTROLS
TEMPERATURE ADJUSTMENT
, After 24 hours, adjust the controls as needed= Adjust
temperatures gradually; move the knob insmall
increments, allowing the temperature to stabilize,
, For cotder temperatures, turn the knob towards Colder=
, For warmer temperatures, turn the knob towards Co_d=
To maintain temperatures, a fan circulates air in the
refrigerator and freezer compartments= For good circulation,
do not block cold air vents with food items=
Factory Setting fa¢tof7 Settlng
Freezer co.T.o_ Fresh food
Refrigerator & Freezer Controls
(Features may vary according to modeL)
TEMPERATURE ADJUSTMENT GUIDE
if Fresh Food Compartment (s Too Warm Turn Fresh Food Control Slightly Towards Colder.
ff Fresh Food Compartment EsToo Cold Turn Fresh Food Control Slightly Towards Cold.
ff Freezer Compartment EsToo Warm Turn Freezer Control Slightly Towards Colder.
ff Freezer Compartment EsToo Cold Turn Freezer Control Slightly Towards Cold,
*To Turn Refrigerator Off Turn Freezer and Fresh Food Controls To O,
MODELS)
This shelf is attached to the
freezer wall beside the ice
dispenser container. This
convenient area allows for
storage of pizza and other tall
items placed vertically between
the ice dispenser container and
the freezer wall.
ICE CREAM SHELF (SOME Pizza Shelf
MODELS)
This shelf attaches to the top of
the ice dispenser container. It
allows storage of both round and
rectangular cartons of your
favorite ice cream.
TmP-UP SHELF (SOME
MODELS)
A Tip-Up shelf in the freezer
section atlows tall items to be
easily stored. Ice Cream Shelf
ADJUSTABLE DOOR BINS
Some models have adjustable door bins that can be moved to
suit individual needs_
To move door bins
1. Lift bin straight up.
2. Remove bin.
3. Place bin in desired position.
4. Lower bin onto supports untit locked in place.
ustable Door Bin
CANTILEVER SHELF ADJUSTMENT
Refrigerator shelves are easily adjusted to suit individual
needs. Before adjusting the shelves, remove all foe&
Cantilever shelves are supported at the back of the refrigeraton
To adjust cantilever shelves:
Lift front edge up,
Pull shelf out.
Replace the shelf by inserting the hooks at rear of the shelf into
the wail bracket. Lower the shelf into the desired slots and lock
into position.
* Spih'Safe7;_glass sheives (some models) catch and hoid
accidental spills. In some models, the * SpiflSafe TMshelves slide
out for easy access to food and for fast cleaning. The shelves
slide out independently of their mounting brackets. Just pull the
front of the shelf forward. Shelves can be extended as far as the
stopper wiil allow but are not removable from their mountinc
brackets.
i
Cantilever Sliding Glass Shelf
Cantilever Glass Shelf
DOOR STORAGE
Door bins and shelves are provided for convenient storage of
jars, bottles, and cans. Frequently used items can be quickly
selected.
Some models have door bins that can accommodate gallon-
sized plastic drink containers and economy-sized jars and
containers. Some bins are adjustable for maximum storage
capacity.
The dairy compartment, which is warmer than the general food
storage section, is intended for short term storage of cheese,
spreaos, or Du-€_er.
Fixed Door Bin
*WhiteWestinghouse - SpillFree TM
TALL BOTTLE RETAINER (SOME [VIODELB)
The Tail Bottle Retainer keeos _a containers in the bin frorr
falling forward when opening or closing the retngerator aoor.
To install, hold the retainer at the top, and slide it }ver [ne
outside wall of the bin. as ShOWnin the diagram. The Tal!
Bottle Retainer works best with a Bin Snugger.
SPECIAL ITEM RACK
(SOME MODELS)
The innovative design of
the Special Item Rack
allows you to store a six-
pack of 12 ounce drink
cans, a bottle of wine, a
two-Iiter soft drink bottle,
or a carton of eggs. The
Special Item Rack mounts
on the left side of your
refrigerator. To install, just
slide the Special Item
Rack onto any shelf as
shown in the drawing. Special ItemRack
Tall Bottle Retainer (Ieft) and Bin Snugger (right)
CRISPERS (SOME
MODELS)
The crispers, located under
the bottom refrigerator shelf,
are designed for storing
fruits, vegetables, and other
fresh produce. Wash items in
clear water and remove
excess water before placing
them in the crispers. Items
with strong odors or high
moisture content should be
wrapped before storing. Crisper Drawer
HUMIDITY CONTROL (SOME MODELS}
The Humidity Control, present on some models with crisper
drawers, allows you to adjust the humidity within the crisper.
This can extend the life of fresh vegetables that keep best in
high humidity.
f
Crisper Humidity Control
DELl DRAWER (SOME MODELS}
Some models are equipped with a Deli Drawer for storage of
luncheon meats, spreads, cheeses, and other deli items.
MEAT KEEPER (SOME MODELS}
Some models are equipped with a Meat Keeper. Meat Keeper
temperatures can be adjusted by sliding the Meat Keeper
Temperature Control in either direction. Use this pan for short
term storage of bulk meat items, if meats are to be kept Ionger
than one or two days, they should be frozen. The Meat Keeper
is fixed and cannot be moved up or down. if fruits or vegetables
are to be stored in the Meat Keeper, set the Meat Keeper
Temperature Control to a warmer setting to prevent freezing.
WiNE RACK (SO[VIE
MODELS)
The wine rack stores bottles of
wine, or single two-liter plastic
bottles of juice or soda pop. To
install, slide the Wine Rack
onto the shelf with the curve
facing in. To remove, slide the
Wine Rack out. Install on
side of shelf.
Meat Keeper with
Temperature Control
Wine Rack
AUTOMATIC iCE &WATER DISPENSER OPERATING iNSTRUCTiONS
@@@@
>
_!_!_!_!_!_!_!_!_!_!_!_!_!_!_!_!_!_!_!_!_!_!_!_!_!_!_!_!_!_!_!_!_!_!_!_!_!_!_!_!_!_!_!_!_!_!_!_!_!_!_!_!_!_!_!_!_!_!_!_!_!_!_!_!_!_!_
Features may vary according to model.
Crushed Pressthe Crushed TouchPad@to getcrushedice,A red indicatorwill appearabovetheTouchPad,Pressglassagainst
ICEdispensingpaddle@as far up as possibleto catchall ice,
Cubed Pressthe CubedTouchPad@ togetcubedice,A red indicatorwillappearabovetheTouchPad,Pressglass againstICE
dispensingpaddle@ as far upas possibleto catchall ice,
Light On PresstheLight On TouchPad@ to turnon dispenserlight,A red indicatorwill appearabovetheTouchPad,
Light Off PresstheLight Off TouchPad @ to turn off dispenserlight, A redindicatorwillappearabovetheTouchPad,
WATER Tooperate the water dispenser, pressa glassagainsttheWATERdispensingpaddle@, Tostop dispensingwater,pull
the glassawayfrom the dispensingpaddleQ ,Dispensedwateris notcold, Forcolderwater,add crushed iceor cubes
beforedispensingwater,A driptray'locatedat the baseof the dispensercatchessmall spillsand allowsthemto evaporate,
Thisdrip trayis removableand dishwashersafe.Donot pour water and excess ice inthis area becausethereisno drain,
HOWTHEWATER DISPENSERWORKS
The water tank, Iocated behind the drawers in the refrigerator
compartment, automatically fills as water is dispensed. For
proper dispenser operation, the recommended supply water
pressure should fall between 30 psi and 100 psi.
After the refrigerator is connected to the water supply, fill the
water tank by drawing one glass of water. It may take about
11/2minutes after activating the dispenser paddle before water
begins to filI this first glass. Continue flushing the system for 3
minutes to rid the tank and plumbing connections of any
impurities. The water dispenser has a built in shutoff device
that will stop the water flow after 3 minutes of continuous use.
Simply release the dispenser paddle to reset the shutoff
mechanism.
HOWTHE ICE DISPENSER WORKS
The ice maker and container are located in the top of the
freezer compartment. After the refrigerator is installed properly
and has cooled for several hours, the ice maker can begin
making ice within 24 hours. Air in new plumbing lines may
cause the ice maker to cycle two or three times before making
a full tray of ice. To begin ice production, lower the wire signal
arm to the "down" or ON position. With no usage it will take
approximately 2 days to fill the ice container. The ice maker
turns off automatically when the ice container becomes full. To
stop the ice maker, lift the wire signal arm until it clicks, and
locks in the "up" or OFF position.
Because of new plumbing I o,
connections, the first
production of ice cubes may
be discolored or have an
odd flavor. These should be
discarded until the cubes
made are free of
discoloration and taste.
10