FrontRow Pro Digital Assembly instructions

pro digital
INSTALLER guIdE

YOU’RE ABOUT TO MAKE
LEARNING MORE FUN
Welcome to Frontrow -- the teacher-friendly way to
improve the learning environment in every classroom.
With your new active learning system, you’ll enjoy
greater student attention, less teacher fatigue, and
very likely better test scores.
To help you start benefiting from your Frontrow Pro
Digital system right away, we recommend that you
first read the section in this guide called Before You
Begin, and from there proceed to Steps 1 through 6.
Be sure to consult the system user guide as well.
If you follow the steps set out in this Installer Guide
and organize everything you need beforehand, you’ll
find setting up your Frontrow Pro Digital system to
be quite simple. Of course, if you run into any obsta-
cles, you can always call us at the number below. Our
technical support representatives are happy to help.
Thank you for choosing Frontrow! You’re just six
steps away from a happier classroom.
USA
FrontRow
Corporate Headquarters
2080 Lakeville Highway
Petaluma, CA 94954-6713
toll-free: 800.227.0735
tel: 707.769.1110
fax: 707.769.9624
web: www.gofrontrow.com
Australia
Phonic Ear
512 Wickham Street
Fortitude Valley Qld 4051
toll-free: 1 800 PHONIC
tel: + 617 3250 0385
fax: + 617 3250 0386
web: www.gofrontrow.com
Canada
Phonic Ear
10-7475 Kimbel Street
Mississauga, ON L5S 1E7
toll-free: 800.340.9894
tel: 905.461.5300
fax: 905.677.7760
web: www.gofrontrow.com
Europe/ASIA
Phonic Ear A/S
Kongebakken 9
2765 Smørum
Denmark
tel: +45 3917 7101
fax: +45 3927 7900
web: www.gofrontrow.com
www.phonicear.com
New Zealand
Oticon New Zealand Ltd.
142 Lambton Quay
P.O. Box 9128
Te Aro. Wellington
toll-free: 800 OTICON
toll-free fax: 00800 FAX OTICON
web: www.oticon.co.nz
United Kingdom
PC Werth Limited
Audiology House
45 Nightingale Lane
London SW12 8SP
tel: 020 8772 2700
web: www.soundfield.info

Read
Me
CONTENTS
Getting started in six easy steps
Be sure to read the helpful tip boxes found throughout this guide. Of
course, if you need further assistance, you can always call us at one of the
numbers found on the previous page.
Beforeyoubegin......................................................................Pages1-6
A checklist of everything you need to install your active learning system
Step1...............................................................................Pages7-14
Plan placement of receiver, sensors, and speakers
Step2.................................................................................Pages15
Install receiver
Step3..............................................................................Pages16-18
Route cable
Step4..............................................................................Pages19-22
Install speakers
Step5..............................................................................Pages23-24
Install sensors
Step6..............................................................................Pages25-26
Testing/Baseline settings
SpecialSpeakerConnections..........................................................Pages27-28
If you’re installing more than four speakers
FrequentlyAskedQuestions..............................................................Pages29
Quick tips to help you solve common installation problems
Specifications.......................................................................Pages30-31
All the details professionals need

1
Make sure you’ve got everything you need to set up your Frontrow Pro Digital active learning system. By
taking a few minutes to prepare, you’ll help ensure the actual set-up is as quick and problem-free as possible.
Visualize your goal
When your FrontRow Pro Digital system is installed, it will look something like this:
General safety precautions
• Do not install or use the receiver near water or heat sources
• Clean only with a dry cloth
• Do not block any ventilation openings
• Protect all cables from wear and damage from foot traffic, doors, and other hazards
• Use only accessories specified by FrontRow
• Refer servicing to qualified service personnel
• Wear safety goggles when using power tools
• Follow all safety guidelines when using ladders
• Observe your local building, electrical, and fire codes when installing any electrical equipment
•
Use at least 18-gauge plenum speaker wire (included with system)
BEFORE YOU BEGIN

Get your classroom ready
1. Does your classroom meet the system requirements?
Check the table below to confirm that your classroom is set up properly for the Frontrow Pro Digital
system you have. While other classroom configurations may work with your Frontrow Pro Digital system,
we can only support those listed below.
2. Think about combining your other teaching technologies
Your Frontrow Pro Digital system is the communication center of your classroom. Take advantage of this
opportunity to connect your TV, VCR, computer, CD player, MP3 player and other teaching technology to
your active learning system. This will allow children to hear not only your voice, but also the rich multimedia
content you’re providing, regardless of where they’re seated.
Deciding what other devices you’ll want to connect to your FrontRow system now will make positioning the
receiver easier in Step 1. There are four ways to approach integration.
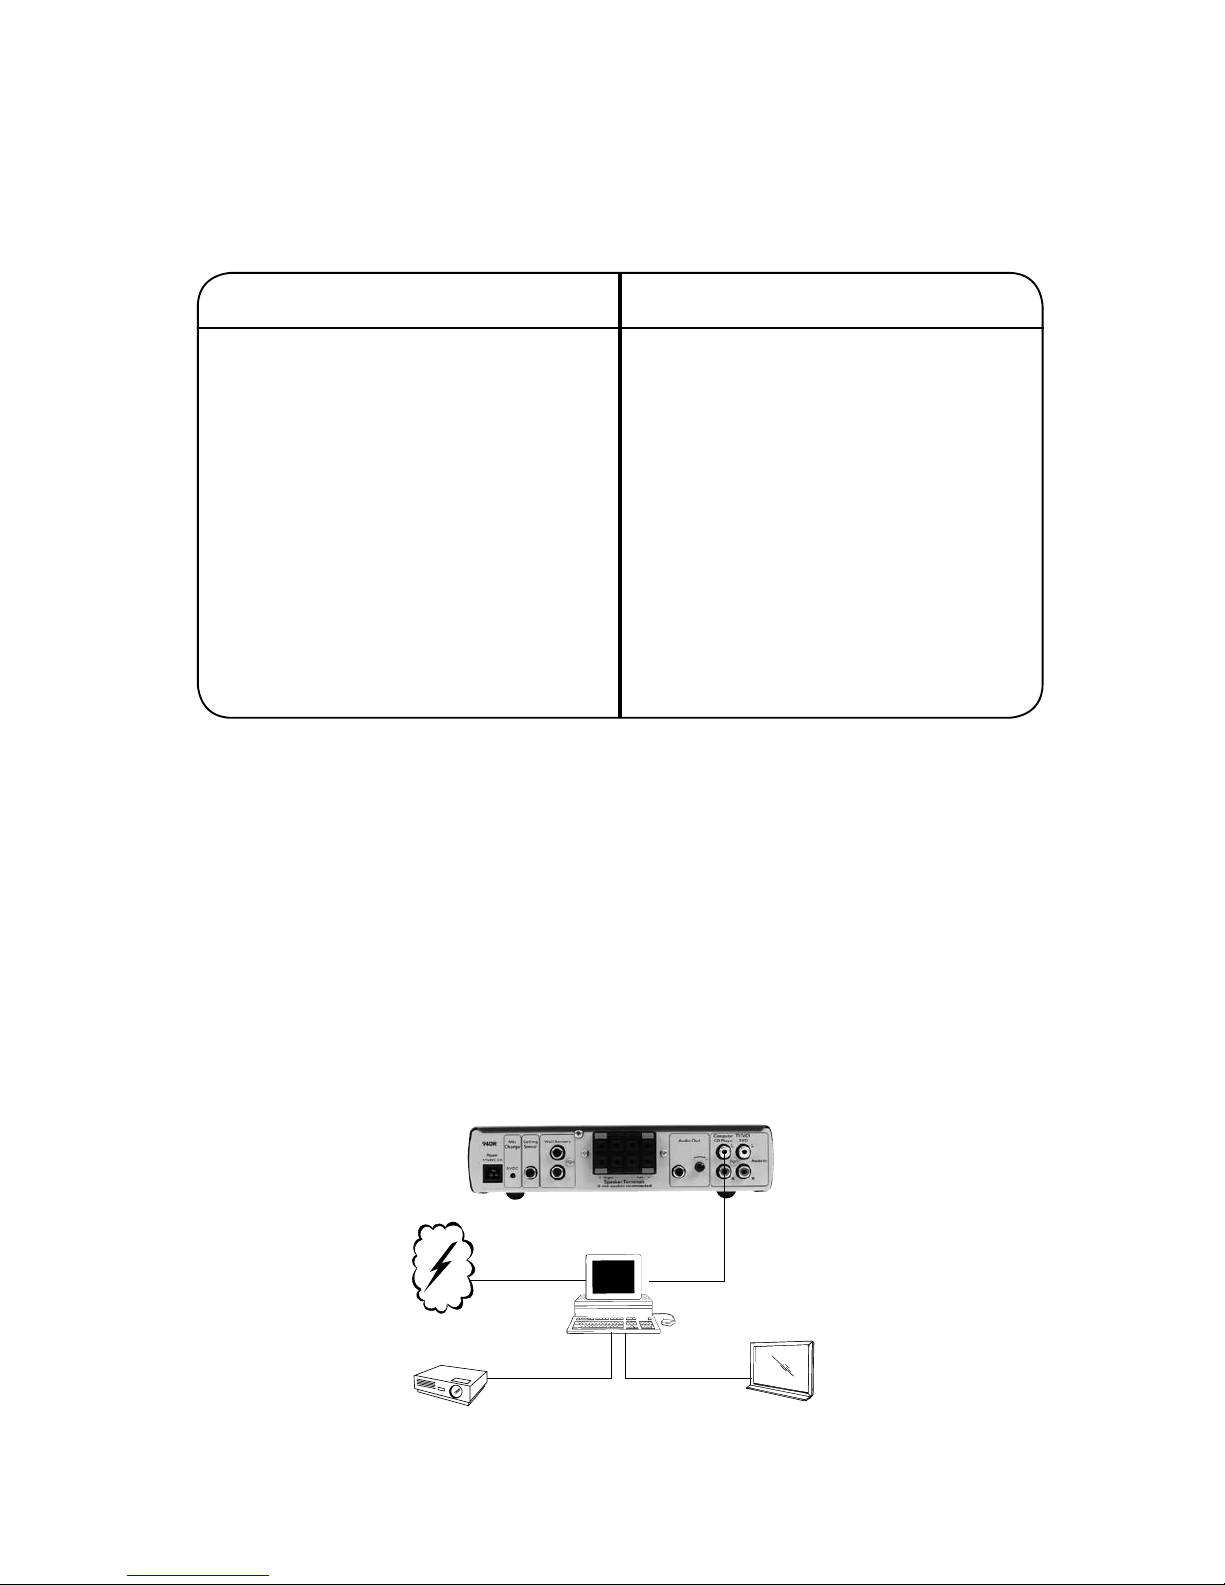
Option 1
Many classrooms use a computer as a multi-media "hub" (with an LCD projector), which is connected to
the internet or school network to download/stream all audio and video, and MP3 files. For these class-
rooms, you may only require one auxiliary audio input connection to the 940R.
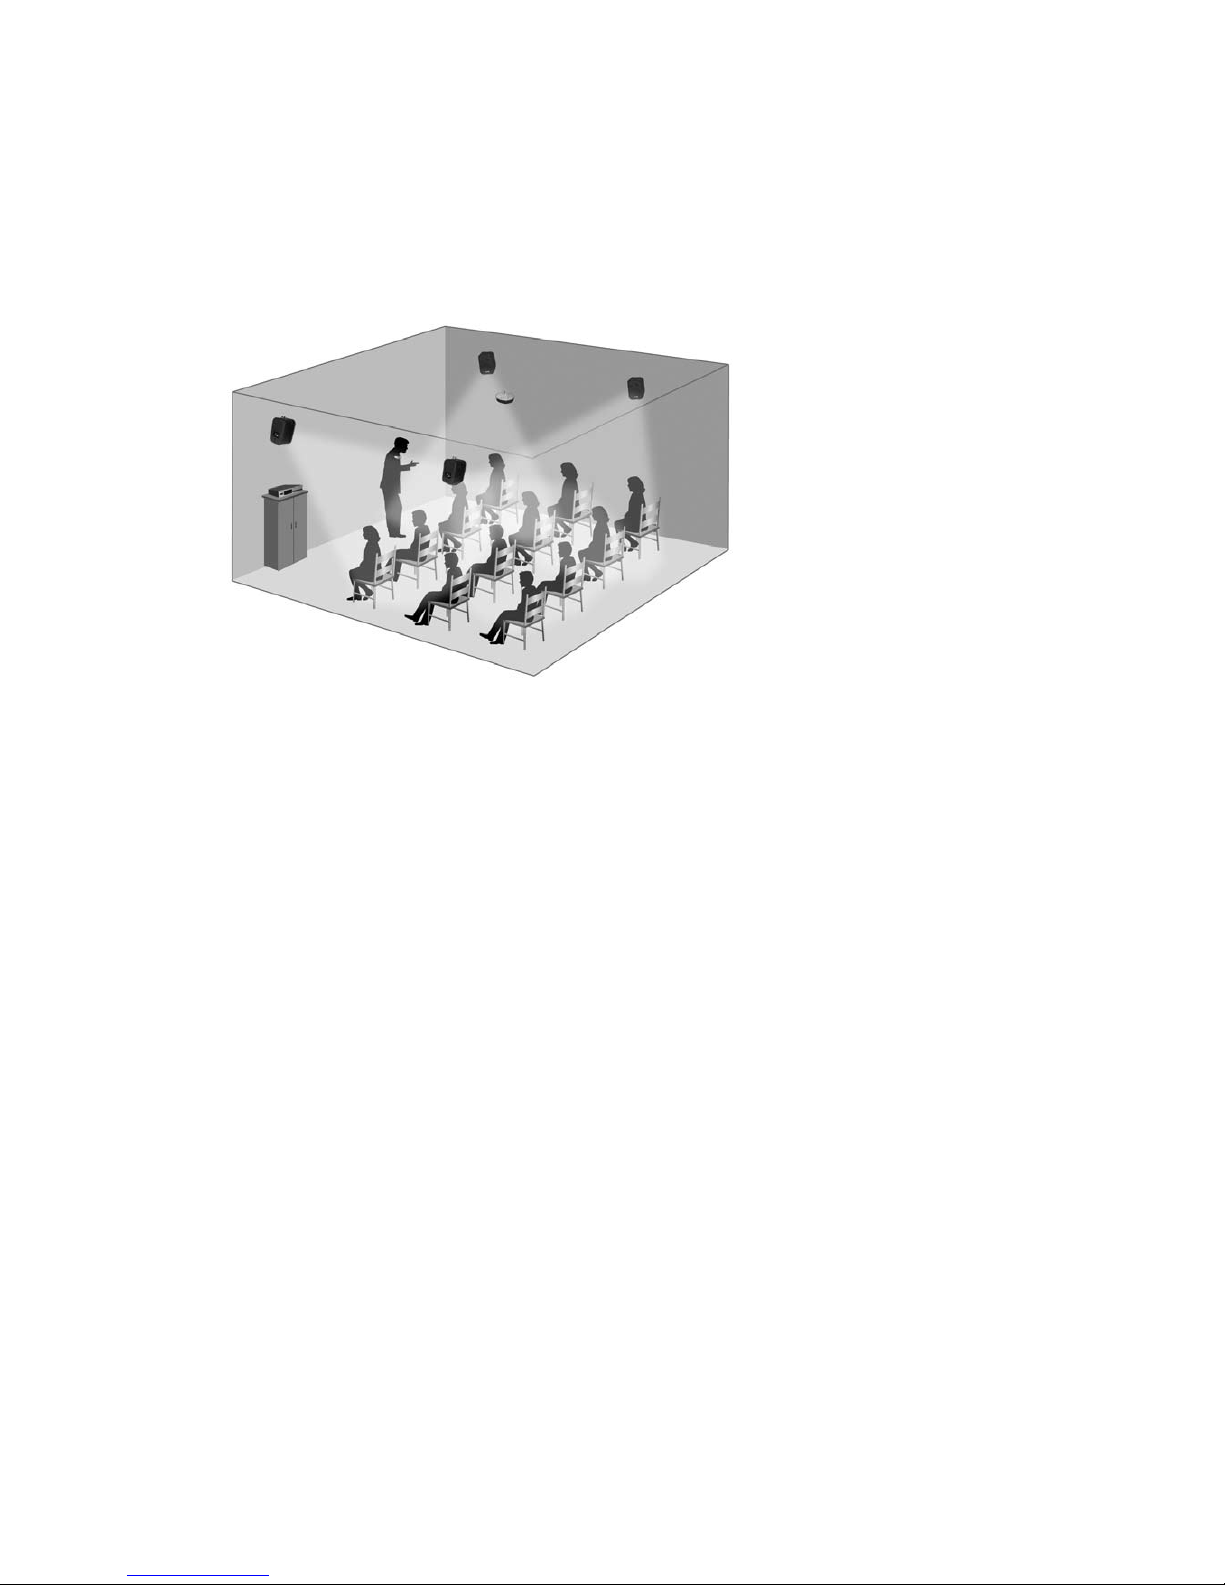
If your classroom has:
A drop ceiling more than 10ft high
A drop ceiling less than 10ft high
A drywall/concrete ceiling
Tall free-standing bookshelves, hanging art,
or other obstructions
Small size, light walls, few windows
Medium to dark-toned walls
Larger size darker walls, more windows
Large, odd shape, dark surfaces, lots of windows
Alcoves, bays, or other sheltered areas where
teachers may walk
You should have:
Ceiling or wall speakers
Wall speakers recommended
Wall speakers only
Ceiling or wall sensors
Ceiling sensor
Ceiling sensor and/or wall sensors
Several wall sensors (no more than 3)
Ceiling sensor and/or several wall sensors
Ceiling sensor and/or wall sensors
2www.gofrontrow.com
Computer
940R (back)
LCD Projector
Audio
Out
Screen or
Interactive White Board
Internet
Audio
Video

3
FrontRow
930R
VCR
TV
940R (back)
Audio
In
Computer LCD Projector
Wireless
Transmission
Audio In
Option 2
Some classrooms use a computer as the multi-media "hub", but it is connected to a TV instead of an LCD
projector. They also occasionally use the TV/DVD/VCR as a stand alone media. For these classrooms, you
may need to use both auxiliary audio input connections to the 940R.
DVD Player
VCR
TV
940R (back)
Audio
Out
Computer
Audio
Out
Internet
Audio
Video
Signal
Converter
Option 3
Some classrooms may have many different types of media, but because of the age of the equipment
or incompatible input/outputs, they may not integrate with each other. For these classrooms, you may
choose to use an auxiliary audio box to connect all the sources to one location, then connect it to one
audio input connection to the 940R.
CD Player
TV
DVD Player
VCR
Internet
Audio
Video
Option 4
This is less work for the installer, but slightly more involved for the teacher.

4www.gofrontrow.com
Get your FrontRow Pro Digital parts ready
Check the contents of your FrontRow Pro Digital installation kit against the parts listed below. To help you
stay organized, we recommend that you keep the parts needed for each step separate.
1. Open your main component box
940 System Box
940TM microphone
202-01-400-00
940TM microphone
AA (LR6) NiMH
Rechargeable Batteries
374-30-400-00
Aux-in Cord
384-01-210-08
Accessory Pack
890-88-664-00 (US)
890-88-665-00 (AU/NZ)
890-88-666-00 (EU)
940R Power Supply
890-60-180-00
940R Cord Kit
383-88-201-00
Two-unit charge cord
Mono RCA to mono 3.5mm
(12in/30cm)
Aux-in Cord Kit
383-88-200-00
Stereo RCA to stereo RCA
(20ft/6.5m)
Stereo RCA to stereo 3.5mm
(20ft/6.5m)
Power Supply
940R Pro Digital Receiver
202-00-400-00
940R Pro Digital Receiver
AC Power Cord
300-7402-110 (US)
384-88-020-00 (AUS)
384-88-021-00 (EU)
384-88-022-00 (NZ)
384-88-023-00 (UK)

940CS Ceiling Sensor Kit
204-01-006-00
(1) 940CS Ceiling Sensor
(1) Mounting Bracket
940WS Wall Sensor Kit
204-01-007-00
(2) 940WS Wall Sensor
(2) Mounting Brackets
(2) Sensor Cables
940H Student Mic Kit
202-01-420-00
940H Student Microphone
202-01-410-00
or
(1) Sensor Cable
940C Charger
204-01-005-00
940C Power Cord
890-60-180-00
(optional)
Receiver Tray
Drill
Drill bits
Phillips #2 driver bit
Level or ruler/tape measure
Crimp pliers or scissors
Hammer
Staple gun
Cable tacks/staples
Plastic cable (zip) ties
Plastic raceway with screws
Tin snips (optional)
Ladder
Safety goggles
or
4. Open your speaker box
This box should contain:
4 wall or ceiling speakers
4 wall speaker brackets or ceiling
tile bridges (depending on your order)
Get yourself ready
Nearly everything you need to install your FrontRow Pro system is included in the boxes we shipped. You
will need some basic tools and materials, depending on how your classroom is built:
1. What kind of walls do you have?
For drywall installations (similar to most houses) gather the following tools:
2. Open your sensor box 3. Open other optional boxes
5
wall speaker ceiling speaker
tile bridge
wall speaker bracket
(incl. w/speaker
UL tile bridge/
UL speaker cover
or
or
ceiling speaker
or

www.gofrontrow.com 6
For concrete walls, assemble the following tools:
Hammer drill
Masonry drill bits
Phillips #2 driver bit
Level or ruler/tape measure
Crimp pliers or scissors
Concrete screws
Hammer
Plastic cable (zip) ties
Plastic raceway with adhesive
Tin snips (optional)
Ladder
Safety goggles
2. Are you installing ceiling speakers?
If so, you’ll also need:
Keyhole saw or sabre saw or RotoZip
Electrical tape
Short length of string or twine

7
Tip
Want to install your FrontRow Pro Digital system in a cabinet?
No problem. Just be sure to install external sensors as shown later in this guide.
Step 1:
Plan your installation
Estimated time for this step: 5-10 minutes
Your classroom is ready and you’ve organized all the parts and tools you’ll need to set up your active learn-
ing system. Now it’s time to decide where you’ll place major components. To help you decide, we’ll use
the following layout of a typical classroom as an example:
Student desks
Teacher’s desk
TV / VCR / DVD
White board
Top view of an example classroom
1. Decide where to put the receiver
We recommend locating the receiver in a corner with good visibility of the classroom, at about the teacher’s
eye-level.
If you’re going to be connecting other audio sources to your receiver (see Before You Begin), consider a
location near the teacher’s computer or TV/VCR/DVD. There are probably convenient power sources near
these as well.
Windows

www.gofrontrow.com 8
2. Plan speaker placement
Proper speaker placement is critical to getting optimum benefit from any active learning system.
Improperly chosen or installed speakers can actually harm intelligibility, so please take the time to plan this
step thoroughly.
It’s useful to imagine each speaker as a flashlight, and that your goal is to light up the areas where students
are sitting. Speakers should therefore be focused on the students and facing them.
Speaker symbols:
= ceiling speakers
= wall speakers
Tip
Point your receiver away from windows
Your FrontRow Pro Digital system communicates using infrared light. Strong
sunlight can overwhelm that communication. Your receiver will perform best if
it is pointed away from windows that get direct sunlight.
A good place for the receiver
You’ll install the receiver
at teacher eye-level in a
corner from which it can
‘see’ the whole room
Windows

9
Each speaker fully covers
one-fourth of student
listening area
Avoid covering area in
front of white board
Install speakers in ceiling
tiles centered over
one-fourth of the student
listening area
Correct
✔
Inadequate coverage of
student listening area
Too much coverage in
front of white board
(feedback risk)
Incorrect
✘
a Installing ceiling speakers?
Use the following guidelines when choosing where to put your ceiling speakers:
Define the area where students are sitting -- this is the area you want to cover with speakers; not
the entire room.
Divide this area into four equal sections
Using a piece of tape, mark a ceiling tile in the center of each of the four sections -- these are the tiles
where you’ll mount your ceiling speakers
Avoid installing speakers directly in front of the white board -- this not only covers an area not used by
students but increases the chance of feedback

10
www.gofrontrow.com
Each speaker fully
covers one-fourth
of student
listening area
Avoid covering area in
front of white board
Install wall speakers
slightly in front of and
aimed at the center of
each section
Correct
✔
*Secondary option to accommodate different student arrangements
or
**
or
b Installing wall speakers?
Use the following guidelines when choosing where to put your wall speakers:
Define the area where students are sitting -- this is the area you want to cover with speakers; not the entire room.
Mentally divide this area into four equal sections
Using a piece of tape, mark a desk in the center of each of the four sections -- these are the targets at
which you’ll aim each of your wall speakers
For each section, choose a speaker location that is:
As close to the ceiling as possible
Slightly in front of each section (considering ‘front’ to be the direction of the white board)
In each section, the distance from the speaker to the farthest student should be
ideally no more than twice the distance from the speaker to the nearest student
Avoid installing speakers directly in front of the white board -- this not only covers an area not used by
students but increases the chance of feedback

11
Inadequate coverage of
student listening area
Too much coverage in
front of white board
(feedback risk)
Incorrect
✘

3. Planning sensor placement
IMPORTANT!
DO NOT ALTER THE IR SENSOR CABLE
Read the FrontRow Installer Guide thoroughly before installing sensor cable. The cable has
been rigorously tested and qualified to work with your FrontRow IR sensors.
• Do NOT shorten cable
• Do NOT alter or replace the RCA connectors
• Do NOT "splice" or split the cable
• Do NOT use a "Y" adaptor
• Do NOT use any other type of cable
Altering the cable in any way will result in decreased performance of your system and will
void your Manufacturer's Limited Warranty.
Your FrontRow Pro receiver has a powerful built-in sensor -- often sufficient to serve your entire classroom.
The walls or design of some classrooms may not allow for the direct transmission and reflections of infrared
light that your active learning system relies on. That’s why it’s a good idea to plan for external sensors.
Sensor symbols:
= ceiling sensor
= wall sensor
a Positioning a ceiling sensor
A ceiling sensor is designed to ‘see’ the entire room at once, and so can often fill in any gaps in reception
by the main receiver. Use the following guidelines when installing a dome sensor:
Mentally divide the room in half, with the main receiver contained within one half
Use a piece of tape to mark a spot on the ceiling that is centered within the other half of the room --
This is where you will install the dome sensor
12www.gofrontrow.com
Position ceiling sensor on the ceiling, centered
in the half of the room opposite the receiver
Receiver
Ceiling sensor placement
Single ceiling sensor placement conditions:
– walls and floors light colored (white or beige)
– less than 50% window to wall area
– rooms no larger than 50’ (15m) x 50’ (15m)
(2500 sq. ft./225 sq. m.) typical
– rooms without obstructions
Possible external sensor combinations:
sensor combinations maximum connections
ceiling sensor only 2*
wall sensor(s) only 3
ceiling & wall sensor 1 ceiling sensor, 2 wall sensors
*1 ceiling sensor can be connected to the wall sensor port.

13
Position wall sensors on
the wall, centered in
one-third of the room
Receiver
Wall sensor placement
Dual wall sensor placement conditions:
– walls and floors medium to dark-toned in color
– rooms no larger than 50’ (15m) x 50’ (15m) (2500 sq. ft./225 sq. m.) typical
– rooms with obstructions
b Positioning 2 wall sensors
Wall sensors are ideal for complete coverage of rooms, even those with non-reflective or obstructing walls.
Use the following guidelines when installing wall sensors:
Mentally divide the room into three equal sections, with the main receiver contained within one section
Use a piece of tape to mark a spot for each of the two wall sensors. The spot you choose should be:
– On the wall, as close to the ceiling as possible
– In a position that can ‘see’ the entire section

14www.gofrontrow.com
C Positioning ceiling and wall sensors
Combining external sensors is ideal for complete coverage of odd sized or oversized rooms with or without
non-reflecting or obstructing walls. Use the following guidelines when installing ceiling and wall sensors:
– Mentally divide an odd-shaped room into sections as shown. The receiver and ceiling sensor should
cover the larger sections of the room and the wall sensor should cover the alcove or smaller section.
– For larger sized rooms greater than 2500 sq. ft./225 sq. m. we recommend using external wall sensors
only (up to 3 wall sensors maximum) for optimum room coverage in IR challenging room environments.
– Use a piece of tape to mark a spot on the ceiling that is centered within one half of the large section
of the room – this is where you will install the ceiling sensor
– Use a piece of tape to mark a spot for each of the wall sensors. The spot you choose should be:
– on a wall, as close to the ceiling as possible
– in a position that can “see” the entire section
Ceiling sensor and wall sensor placement conditions:
– odd-shaped rooms with alcoves, bays or sheltered areas
– large sized rooms greater than 50’ (15m) x 50’ (15m) (2500 sq. ft./225 sq. m.) and less than
50’ (15m) x 60’ (18m) (3000 sq. ft./270 sq. m.)
– rooms with obstructions, dark-toned walls and ceilings
– rooms with greater than 50% window to wall area
Receiver
Receiver
or
single ceiling & wall sensor placement
(odd-sized room)
three wall sensor or two ceiling sensor placement
(larger room size)
or or
or

15
Step 2: Install the receiver
Estimated time for this step: 15 minutes
With the positions of all your major components settled, you can now install your receiver.
1. Attach wall mount bracket to wall at teacher
eye-level
2. Place receiver on tray
3. Slightly loosen tray joint and angle main sensor
toward center of room, and tighten tray joint
4. Plug power supply into receiver
5. Plug power supply into wall socket
6. Connect any other teaching technology —
TV / VCR / DVD, teacher’s computer, etc. —
to your FrontRow system through the Aux Input
jacks (cables supplied)
930R (Back)
6
5
4
12
3
eye level of teacher
You’ve now completed Step 2. Let’s proceed to routing your speaker and sensor cables.

16www.gofrontrow.com
Step 3:
Routing speaker and sensor cables
Estimated time for this step: 45 minutes
With your receiver installed, you now have a base for routing your cables.
Ceiling speakers
If you’re installing ceiling speakers, follow the
guidelines below. (If you’re installing wall speak-
ers, follow the instructions starting on page 17).
1. Remove selected ceiling tiles
Remove the ceiling tiles you marked in Step 1
Remove the ceiling tiles directly above the sensor
locations you marked in Step 1
Remove the ceiling tile directly above the receiver
you mounted in Step 2
2. Prepare and route cable
Tie an object, such as a roll of electrical tape, to
some twine to use as a pull line. This will help
you more accurately direct the cable in the area
above the ceiling.
Standing on a ladder with your head and shoul-
ders in the space where you’ll install a ceiling
speaker, toss the weighted end of your twine
through ceiling space into the open tile hole
above your receiver.
Connect the other end of the twine to the speaker
cable. Pull cable through to the receiver.
Your goal is to have the cable entirely above the
ceiling, with only the two ends protruding from the
open space above the receiver and your chosen
speaker tile.
Repeat these steps for the other three speakers
and for your sensors
Note: Do not shorten or lengthen the sensor cable. Doing so may reduce system performance.
Tip
Can’t get the pull line to the receiver in one throw?
Get the weighted end of the pull line as close to the receiver as you can.
Then move your ladder under the tile where your cable stopped, remove
that tile, and repeat until you’ve hit the mark.

17
Tip
For an especially neat installation
Cut your raceway long enough to extend into the ceiling space by about 5
centimeters. Notch the ceiling tile grid and the ceiling tile to fit your race-
way. This makes a neater installation and reduces flexing of the cable.
ceiling sensor wall sensor wall speaker ceiling speaker
or
3. Connect cables to receiver
To ensure faithful reproduction of stereo auxiliary inputs, be sure to properly match the red/black and left/right
speaker wires to the proper receiver terminals.
Connect all speaker and sensor cables as shown:
4. Install raceway
You can neatly conceal all cables running between the receiver
and the ceiling space using widely-available plastic raceway.
Cut enough raceway to extend from just behind your mounted
receiver to the ceiling
Using a level or tape measure to ensure straightness, attach the
raceway to the wall
Route all speaker and sensor cables in raceway and close
Other manuals for Pro Digital
1
Table of contents
Popular Electronic Dictionary manuals by other brands

Ectaco
Ectaco Partner PW800 user manual

Ectaco
Ectaco Partner EAF430TX user manual

Murata
Murata Femtet installation manual

Franklin
Franklin Dictionnaire Franais/Anglais DBF-116 user guide

Franklin
Franklin Collins DMQ-1490 user guide

Orion Control Systems
Orion Control Systems PT-Link II N2-3 Technical guide