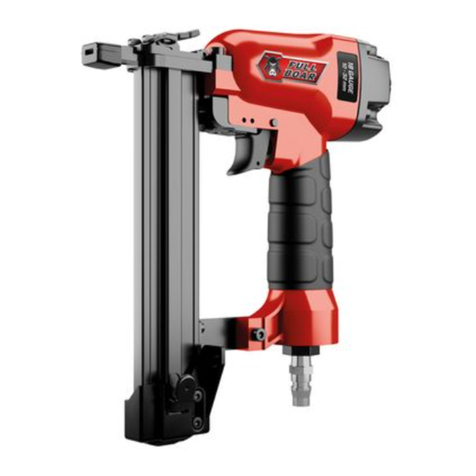
Full Boar FBABN-G15 User manual

KNOW YOUR PRODUCT
WARNING: Read all safety warnings and all instructions. Failure to follow the
warnings and instructions may result in electrical shock, fire and/or serious injury.
Save all warnings and instructions for future reference.
0921
15G DA SERIES
AIR BRAD NAIL
GUN
• 15 GAUGE (DA SERIES)
NAILS
• 100 NAIL CAPACITY
MAGAZINE
• 32 - 64MM NAIL LENGTH
INSTRUCTION MANUAL
WARNING: Please Read the
instructions and warnings
for this tool carefully
before use. Failure to do so
could lead to serious injury.

2
Operating air pressure: 70 - 120psi (4.8 - 8.3bar)
Air consumption: 1.3L/cycle @100psi
Max pressure: 120psi (8.3bar)
Nail type: 15 Gauge DA Series Brad
Nail length: 32 - 64 mm
Magazine capacity: 100pcs
Air inlet: 1/4” Nitto style male connector
Weight (tool only): 2.05kg
SPECIFICATIONS - MODEL NO. FBABN-G15
Fasteners: DA Series 15G Brad NAILS
Ø1.84mm
64mm
32mm
Paper Collated
340Angle

3
1. Drive Guide Cover
2. Cover latch
3. 360ºExhaust deflector
4. Depth adjustment selector
5. Handle
6. Trigger
7. Magazine
8. Air Inlet quick connector
9. Hex keys x 4
10. Oil bottle
11. Spare Drive Guide Cover
KNOW YOUR PRODUCT
OIL
7
3
5
6
8
9
10
2
1
4
11

4
SPECIFICATIONS....................................................... Page 02
KNOW YOUR PRODUCT........................................... Page 03
INTRODUCTION........................................................ Page 05
SAFETY INSTRUCTIONS........................................... Page 06
SET UP AND PREPARATION..................................... Page 12
OPERATION............................................................... Page 15
MAINTENANCE......................................................... Page 19
TROUBLE SHOOTING .............................................. Page 20
DESCRIPTION OF SYMBOLS.....................................Page 21
CONTENTS................................................................ Page 22
WARRANTY................................................................ Page 23
TABLE OF CONTENTS

5
This Full Boar 15G DA Series Air Brad Nail Gun is designed with power, reliability
and durability for high volume applications. Offering three firing methods: Single,
Sequential and Bump, this allows for greater operator control when working on
decks, fencing and general woodworking. Features include a large magazine
capacity of 100 nails and lengths from 32 to 64mm.
Read and understand the Owner’s Manual before operating the Air Nail Gun. Failure
to do so could result in personal injury or equipment damage.
INTRODUCTION
LUBRICATION
An automatic in-line filter, a pressure regulator and automatic oiler is
recommended as it increases the products service life. The in-line oiler should
be checked regularly and filled with air tool oil.
It is most important that the product be properly lubricated by keeping the
air line lubricator filled and correctly adjusted. Without proper lubrication the
product will not work properly and parts will wear prematurely.
Use correct lubricant in the air line lubricator. The lubricator should be of low
air flow or changing air flow type, and should be kept filled to the correct level.
Use only recommended lubricants, specially made for pneumatic applications.
Substitutes may harm the rubber compounds in the product’s O-rings and other
rubber parts.

6
1. Work area safety
a. Keep work area clean and well lit. Cluttered or dark areas invite accidents.
b. Do not operate power tools in explosive atmospheres, such as in the
presence of flammable liquids, gases or dust. Power tools create sparks
which may ignite the dust or fumes.
c. Keep children and bystanders away while operating a power tool.
Distractions can cause you to lose control.
d. Dress properly. Do not wear loose clothing or jewellery. Keep your hair,
clothing and gloves away from moving parts. Loose clothes, jewellery or
long hair can be caught in moving parts.
e. Check the maximum pressure rating of any tools or accessories that you
intend using with the compressor. The output pressure of the air from the
compressor must be regulated so that it never exceeds the rated pressure of
the tool or accessory.
f. Always wear high safety goggles or glasses when using the air tools. Never
point the nozzle of an accessory towards any part of your body or towards
another person.
g. Drain the moisture from the tank daily. It will help prevent corrosion.
h. Use safety equipment including safety goggles and ear protection, the tool
operator and all persons in the working area must wear safety goggles and ear
protection.
i. Air tools should not be used in a potentially explosive environment.
j. The tool must be used only for its prescribed purpose. Any use other than
those mentioned in this Manual will be considered a case of misuse. The user
and not the manufacturer shall be liable for any damage or injury resulting from
such cases of misuse.
GENERAL AIR TOOL SAFETY WARNINGS
WARNING! Read all safety warnings and all instructions. Failure to follow
the warnings and instructions may result in electric shock, fire and/or
serious injury.
Save all warnings and instructions for future reference. The term “power
tool” in the warnings refers to your mains-operated (corded) power tool or
battery-operated (cordless) power tool.
WARNING! In the event that an air line is cut or broken, the air supply
must be turned off at the compressor. A broken air line which is not
supported is extremely dangerous and can whip around very quickly, both
with the capability of striking people, and blowing foreign particles into
the air.
Do not attempt to catch the air line but immediately keep bystanders well
clear and turn off the air supply to the hose, turn off the compressor at the
On / Off button, and then remove the hose from the compressor.

7
•Please read and observe these operating instructions before using the tool. Basic
safety measures should always be strictly followed to protect against damage
to the equipment and personal injury to the user or other people working in the
vicinity of operation.
•This appliance is not intended for use by persons (including children) with
reduced physical, sensory or mental capabilities, or lack of experience and
knowledge, unless they have been given the supervision or instruction
concerning use of the appliance by a person responsible for their safety.
• Children should be supervised to ensure that they do not play with the
appliance.
GENERAL AIR TOOL SAFETY WARNINGS (cont.)

8
BRAD NAIL GUN SAFETY WARNINGS
• Read and understand instruction manual before using.
• Always wear impact-resistant eye protection during the operation of the
air tool.
• Do not use this product if it is not completely assembled or if any parts
appear to be missing or damaged. Use of a product that is not properly and
completely assembled could result in serious personal injury.
• Always assume that the tool contains fasteners. Careless handling of the
tool can result in unexpected firing of fasteners and personal injury.
• Do not point the tool towards yourself, anyone nearby or animals while
operating. Unexpected triggering will discharge the fastener causing an
injury.
• Do not actuate the tool unless the tool is placed firmly against the
workpiece. If the tool is not in contact with the workpiece, the fastener may
be deflected away from your target.
• Disconnect the tool from the air supply when the fastener jams in the
tool. While removing a jammed fastener, the tool may be accidentally
activated if it is connected to the air supply.
• Do not use this tool for fastening electrical cables. It is not designed for
electric cable installation and may damage the insulation of electric cables
thereby causing electric shock or fire hazards.
• Do not carry tool with finger on the trigger.
• Keep the tool pointed in a safe direction at all times.
• Never attempt to fire a fastener into material that is too hard, or at a too
steep of angle, or near the edge of the workpiece.
• Disconnect the tool from the air supply before removing fasteners,
clearing a jam fastener, leaving work area, moving tool to another location,
making any adjustments, performing maintenance, during non-operation
or handing tool to another person. Failure to do so could result in serious
personal injury.
• Clean and inspect the tool daily. Carefully check for proper operation of
trigger and safety mechanism.
• DO NOT use the tool unless both the trigger and safety mechanism are
functional, or if the tool is leaking air or needs any other repair.
• Be aware that the failure of the work piece, or accessories, or even of the
fastener driving tool itself, can generate high-velocity projectiles.
• Air under pressure can cause severe injury.
• Whipping hoses can cause severe injury. Always check for damaged or
loose hoses and fittings.
WARNING! Disconnect the tool from the air supply before removing
fasteners. Failure to do so could result in serious personal injury.

9
BRAD NAIL GUN SAFETY WARNINGS (cont.)
• DO NOT exceed the maximum pressure stated on the tool.
• Never carry an air tool by the hose.
• Only use fasteners listed in the specifications may be used in the
magazine.
• Quick connector couplings shall be used for connection to the compressed air
system and non-sealable air inlet connector must be fitted at the tool in such
a way that no compressed air remains in the tool after disconnection.
• Fastener driving tools shall only be connected to an air supply where the
maximum allowable pressure of the tool cannot be exceeded by more than
10%; in the case of higher pressure ,a pressure reducing valve which includes
a downstream safety valve shall be built into the compressed air supply.
• Check prior to each operation that the safety and triggering mechanism is
functioning properly and that all nuts and bolts are right.
• Do not carry out any alterations to the air tool.
• Avoid weakening or damaging the tool, for example by:
– punching or engraving;
– modification not authorized by the manufacturer;
– guiding against templates made of hard material such as steel;
– dropping or pushing across the floor;
– using the tool as a hammer;
– applying excessive force of any kind.
• Hold the fastener driving tool during the work operation in such a way that
no injuries can be caused to the head or to the body in the event of possible
recoil consequent upon a disruption in the compressed air supply or hard
areas within the workplace.
• Never actuate the fastener driving tool into free space. This will avoid any
hazard caused by free flying fasteners and excessive strain of the tool.
• Do not connect tool to pressure that potentially exceeds 120psi (8.3bar).
• Only use clean, dry and regulated compressed air at 70 - 120psi (4.8 -
8.3bar)
• Keep all body parts such as hands and legs, etc. away from firing direction
and ensure fastener cannot penetrate workpiece into parts of the body.
• When using the tool, be aware that the fastener could deflect and cause
injury.
• Only technically skilled operators should use the fastener driving tool.
• This tool is not intended for driving into hard surfaces such as steel or
concrete.
• Take care when handling fasteners, especially when loading and unloading, as
the fasteners have sharp points which could cause injury.
• Do not overreach. Only use in a safe working place. Keep proper footing and
balance at all times.

10
• Keep bystanders away (when working in an area where there is a likelihood of
through traffic of people). Clearly mark off your operating area.
• During operation be careful that fasteners penetrate material correctly and
cannot be deflected/misfired towards operator and/or any bystanders.
• Only wear gloves that provide adequate feel and safe control of triggers and
any adjusting devices.
• The tool must be disconnected from the air supply and rested on a flat
surface on its side when not in use.
• During operation, debris from workpiece and fastening/collation system may
be discharged.
• Always wear impact-resistant eye protection with side shields during
operation of the tool.
• Appropriate hearing protection shall be worn.
• The risks to others shall be assessed by the operator.
• Ensure tool is always safely engaged on the workpiece and cannot slip.
• Ensure the tool is correctly lubricated during use. Only use the correct
lubricant as specified in this manual.
• Slips, trips and falls are major causes of workplace injury. Be aware of slippery
surfaces caused by use of the tool and also of trip hazards caused by the
airline hose.
• Proceed with additional care in unfamiliar surroundings. Hidden hazards may
exist, such as electricity or other utility lines.
• This tool is not intended for use in potentially explosive atmospheres and is
not insulated from coming into contact with electric power.
• Never use oxygen or combustible gases for operating pneumatic tools as this
could create a fire and explosion hazard.
• Do not discard the manual and safety instructions.
BRAD NAIL GUN SAFETY WARNINGS (cont.)

11
BRAD NAIL GUN SAFETY WARNINGS (cont.)
WARNING! Do not rest your finger on the trigger
when picking up the tool, moving between operating
areas and positions or walking, as resting finger on
trigger can lead to inadvertent operation. Always
check the tool before use to ascertain the correct
mode is selected.
This tool has contact actuation. (Bump Fire) Its
intended uses are for production applications such as
pallets, furniture, manufactured housing, upholstery
and sheathing.
Do not use this tool in contact actuation for
applications such as closing boxes or crates and fitting
transportation safety systems on trailers and lorries.
Be careful when changing from one driving location to
another.

12
SET UP & PREPARATION
Connecting air supply
Under normal use conditions, the tool should be lubricated with air tool oil before
connecting the tool to an air supply. Add air tool lubricate into the air tool once
daily with minimal use, or twice a day with heavy use. Only a few drops of oil
at a time is necessary. Too much oil will only collect inside the tool and will be
noticeable in the exhaust cycle.
Before connecting the tool, check the air compressor gauge to be sure it is
functioning within the proper range 70 - 120psi (4.8 - 8.3bar).
Note: The tool and air hose must have a quick-connect hose coupling that allows
all pressure to be removed from the tool
when the coupling is disconnected.
1. Pull back the sleeve on female quick
connector hose coupling, insert male end
and release sleeve on quick connector
(fig. 1).
Note: For best performance use 3/8” I/D
supply air hose.
WARNING! Ensure the tool is in the off position before connecting to the
air supply.
WARNING! Ensure that the compressed air does not exceed 120psi
(8.3bar) while operating the tool. Too high an air pressure and unclean
air will shorten the product’s life due to excessive wear, and may be
dangerous causing damage and/or personal injury.
Fig. 1
WARNING! Always use a coupling that discharges all the compressed
air in the tool at the time the fitting or hose coupling is disconnected.
Using a coupling that does not discharge the compressed air could cause
unintended operation and serious personal injury..
WARNING! Do not climb rigging or scaffolding while carrying a tool
that is connected to an air hose. Doing so could result in serious personal
injury.
WARNING! The tool’s driving mechanism may cycle when the tool is first
connected to the air supply. Always connect the tool to pressurized air
supply before loading fasteners to prevent injury from unintended cycling.
Always make sure the tool’s magazine is empty at the beginning of each
work session, before connecting to an air supply.

13
360ºExhaust deflector
The adjustable exhaust defector on the top of the tool allows the operator to
direct the exhaust according to operator preference.
1. To adjust, rotate the exhaust deflector
in the desired direction for the current
application (fig. 2).
Fig. 2
WARNING! Do not attempt to modify this tool or create accessories not
recommended for use with this tool. Any such in a hazardous condition
leading to possible serious personal injury.
SET UP & PREPARATION (cont.)

14
SET UP & PREPARATION (cont.)
Loading fasteners
WARNING! Always connect the tool to pressured air supply before
loading fasteners. Only use fasteners specified in the Specifications in this
manual can be used. Keep the tool pointed away from yourself and others
at all times. Do not load fasteners with the trigger depressed.
1. Grip the handle firmly with one hand and
with the other hand feed a strip of collated
nails into the magazine(fig. 3).
2. Slide the magazine latch all the way to
the rear of the magazine. You will need to
depress the small leaver to allow the latch
to slide over the nails (fig. 4).
3. With the magazine latch behind the
strip of nails, release the lever allowing the latch to slide back up the magazine,
catching the strip of nails on the way. The magazine latch should push the
fasteners up to the driving mechanism (fig.
5). The tool is ready for use.
Note: Up to 100 fasteners may be loaded in
the magazine.
Fig. 4
Fig. 5
Fig. 3
WARNING! Do not carry tool with your finger on the trigger. Do not fire
the tool without fasteners in the magazine.

15
KNOW YOUR PRODUCT
Driving fasteners
This tool has three firing methods: Single fire, Sequential fire and Bump fire.
This allows for driving fasteners in different ways for precise accuracy or speed.
The tool will be fitted with a select fire switch from the box. If the user wants to
use bump fire, they must change the select fire switch to the multiple firing
position.
•Single fire - fires one fastener only (fig. 6-7)
This method will fire one fastener only when the tool is pushed against the work
surface and each time the trigger is pressed, this is an accurate and more precise
method of firing fasteners.
1. Grip the handle firmly.
2. Press the safety striker on the material until it is compressed completely and
press the trigger to fire one fastener.
3. To fire again; first remove the safety striker from the material.
Note: Aways remove your finger from the trigger after the fastener is driven into
the workpiece.
4. Repeat the procedure for the next fastener.
Fig. 6 Fig. 7
WARNING! Do not operate the tool without fasteners in the magazine.
Remove finger from trigger when not firing fasteners.
OPERATION
WARNING! Always wear eye protection. Make sure the eye protection
chosen has side shields or provides protection from flying debris both from
the front and sides.

16
KNOW YOUR PRODUCT
• Bump fire - Fires one fastener only each time the safety striker hits the
material. Ensure the select fire switch is in the multiple firing position.
This method will fire a fastener with the trigger pressed as you bump the tool
along the workpiece making contact at the points where you want to insert the
fastener. This method is less accurate but is a much faster firing method.
1. Grip the handle firmly.
2. Press the trigger and then
bump the safety striker
on the material to fire a
fastener; each time the
safety striker hits the material
with the trigger pressed a
single fastener will fire (fig.
8).
OPERATION (cont.)
WARNING! Do not clamp or hold the trigger with anything other then
your hand.
• Sequential fire - fires one fastener after the other when the trigger is
pressed.
This method will fire a fastener when the trigger is pressed as you drag the safety
striker along the work piece. This method is a much faster firing method.
1. Grip the handle firmly.
2. Press the safety striker on the material until it is compressed completely and
press the trigger to fire one fastener.
3. To fire again; keep the safety striker pressed to the material and drag along the
material whilst pressing and releasing the trigger to fire.
Note: Aways remove your finger from the trigger after the fastener is driven into
the work piece.
Fig. 8
WARNING! Do not over reach. Keep proper footing and balance at all
times.

17
OPERATION (cont.)
Removing fasteners from the magazine
1. Pull back the sleeve on female quick connector to disconnect the tool from the
air supply.
2. Grip the handle firmly with one hand and with the other hand press down on
the magazine latch to release the strip of nails.
3. Tilt the tool up and remove the strip of fasteners from the magazine.
4. Push the magazine latch forward until it is locked.
WARNING! Disconnect the tool from the air supply before removing
fasteners. Failure to do so could result in serious personal injury.
Drive depth adjustment
The driving depth of the fastener may be adjusted. The depth of drive is made by
rotating the Depth adjustment selector (fig. 9).
- If the fastener is driven into the work piece at an excessive depth (the fastener
head is driven below the work surface, the depth adjustment selector should be
rotated clockwise.
- If the fastener is protruding (the head is not
flush with the surface), the depth adjustment
selector should be rotated anti-clockwise.
WARNING! Keep the tool pointed in a safe direction. Disconnect the tool
from the air supply and remove all fasteners. Failure to do so could result
in serious personal injury.
Fig. 9

18
OPERATION (cont.)
Clearing a jammed fastener
If a fastener becomes jammed in the tool, disconnect the air hose and keep the
tool pointed away from you while clearing the jam.
1. Pull back the sleeve on female quick connector to disconnect the tool from the
air supply.
2. Remove fasteners from the tool.
3. Pull the front guide latch, releasing the
front guide (fig. 10).
4. Pivot front guide forward. Use a flat blade
screwdriver (not included) to remove the
jam (fig. 11)
5. Close the front guide and lock the front
guide latcH.
WARNING! Disconnect the tool from the air supply before clearing a
jammed fastener. Failure to do so could result in serious personal injury.
Fig. 10
Fig. 11

19
MAINTENANCE
WARNING! Disconnect the tool from the air supply and empty
the magazine before carrying out any maintenance procedure or
troubleshooting. Failure to do so could result in serious personal injury.
• If the enclosure of the tool requires cleaning, do not use solvents but a moist
soft cloth only. Never let any liquid get inside the tool; never immerse any part of
the tool into a liquid.
• Store the tool in a dry and safe place out of reach of children.
• Oil the air tool after each use with air tool oil.
• After approximately 300,000 nails, the air gun will require servicing. If any
servicing or repairs are required, the tool must be serviced by a qualified repairs
agent.
Note: TB Imports will not be responsible for any damage or injuries caused by the
repair of the tool by an unauthorised person or by mishandling of the tool.
Spare Parts
Limited spare parts are available subject to availability. Please contact your local
Bunnings Special Orders Desk to order the required spare parts.

20
KNOW YOUR PRODUCT
PROBLEM POSSIBLE CAUSE POSSIBLE REMEDY
Air leak near the top
of the tool or in the
trigger area.
Loose screws Tighten screws
Warn or damaged o-rings
or seals
Check/replace o-rings
Air leak near the
base of the tool
Loose screws Tighten screws
Warn or damages o-rings
or seals
Replace with new
Tool does nothing or
operates sluggishly
Insufficient air supply Increase air flow to tool
(Do not exceed 120psi)
Insufficient lubrication Lubricate tool
Worn or damaged o-rings Check/replace o-rings
Fasteners jam
frequently
Incorrect fasteners Check magazine for
correct fasteners
Damaged fasteners Replace fasteners
Dirty magazine Clean magazine
Fastener will not
drive completely into
the workpiece
Insufficient air supply Increase air flow to tool
(Do not exceed 120psi
Safety striker set
incorrectly
See Depth drive
adjustment
Fasteners penetrate
properly during
normal operation,
but won’t drive fully
at faster speeds.
Insufficient air supply Increase air flow to tool
(Do not exceed 120psi)
Use larger air lines (3/8”
I/D minimum)
Fastener drive is too
deep
Air pressure too high Reduce air pressure
Safety striker set incorrectly See Depth drive
adjustment
Tools skips during
operation - no
fasteners are driven
from time to time
Incorrect fasteners Check magazine for
correct fasteners
Dirty magazine or
magazine cover
Magazine latch should
slid freely. Clean as
needed to remove
debris
Insufficient air supply Use larger air lines (3/8”
I/D minimum)
TROUBLESHOOTING
Table of contents
Other Full Boar Nail Gun manuals
Popular Nail Gun manuals by other brands

Arrow
Arrow PT23G instruction manual

Makita
Makita GF600 instruction manual

Black & Decker
Black & Decker 90514937 instruction manual

EINHELL
EINHELL FIXETTO 18/50 N Original operating instructions

Senco
Senco FinishPro 42XP operating instructions

Campbell Hausfeld
Campbell Hausfeld IN724801AV operating instructions

RGN
RGN SRN10034 operating manual

Husky
Husky HDN104 operating instructions

Porter-Cable
Porter-Cable FN250B instruction manual

Lukas
Lukas AM 07/100 GH Operation instructions

Campbell Hausfeld
Campbell Hausfeld IN715501AV operating instructions

Clarke
Clarke Contractor CONSN18LIB Operation & maintenance instructions