Furrion ARCTIC FCR20DCAFA-SG User manual

ARCTIC 12 VOLTFRENCH DOOR REFRIGERATOR
ARCTIC RÉFRIGÉRATEUR À PORTE FRANÇAISE 12VOLTS
NEVERA DE PUERTAFRANCESA ARCTIC DE 12 VOLTIOS
FCR20DCAFA-SG / FCR20DCAFA-BG
[20221203 79 / 2022120380]
USER MANUAL / MANUEL DE L’UTILISATEUR / MANUAL DE USUARIO
* Picture shown here is for reference only.
* L’image présentée ici n’est qu’une référence.
* La imagen que se muestra es solo como referencia.

CCD-0007862 Rev: 05-16-23 - 1 -
Thank you and congratulations for purchasing this Furrion product. Before operating your new product, please read these
instructions carefully. This instruction manual contains information for safe use, installation and maintenance of the product.
Please keep this instruction manual in a safe place for future reference. This will ensure safe use and reduce the risk of injury.
Be sure to pass on this manual to new owners of this product.
The manufacturer does not accept responsibility for any damages due to not observing these instructions.
CONTENTS
EXPLANATION OF SYMBOLS.........................................................................................................................................................................2
IMPORTANT SAFETY INSTRUCTIONS .......................................................................................................................................................2
PRODUCT INTRODUCTION ............................................................................................................................................................................4
Product Features ..........................................................................................................................................................................................................................................4
PRODUCT OVERVIEW .......................................................................................................................................................................................4
Product Components.................................................................................................................................................................................................................................4
INSTALLATION ......................................................................................................................................................................................................5
What’s in the Box...........................................................................................................................................................................................................................................5
Before First Use .............................................................................................................................................................................................................................................5
Transportation................................................................................................................................................................................................................................................ 5
Installation Dimension................................................................................................................................................................................................................................ 5
Installation Preparation..............................................................................................................................................................................................................................5
Electrical Connection................................................................................................................................................................................................................................. 6
Water Pipe Installation ...............................................................................................................................................................................................................................7
Drainage Preparation..................................................................................................................................................................................................................................8
Securing the Refrigerator.........................................................................................................................................................................................................................8
Body Mounting...............................................................................................................................................................................................................................................8
Hinge Mounting..............................................................................................................................................................................................................................................8
OPERATION ...........................................................................................................................................................................................................8
Control Panel...................................................................................................................................................................................................................................................8
Open Door Alarm..........................................................................................................................................................................................................................................9
Fridge Compartment Switch Off/On ................................................................................................................................................................................................. 9
Food Storage ..................................................................................................................................................................................................................................................9
Storage of Foods ..........................................................................................................................................................................................................................................10
Freezing And Storing Food in The Freezer Compartment....................................................................................................................................................10
Purchasing Frozen Food...........................................................................................................................................................................................................................10
Storing Frozen Food....................................................................................................................................................................................................................................10
Freezing Fresh Food ................................................................................................................................................................................................................................... 11
Recommended Storage Times of Frozen Food in the Freezer Compartment ..........................................................................................................11
Refrigerator compartment.......................................................................................................................................................................................................................11
Freezer compartment.................................................................................................................................................................................................................................11
CLEANING AND MAINTENANCE ..................................................................................................................................................................12
Exterior Cleaning .......................................................................................................................................................................................................................................... 12
Interior Cleaning ............................................................................................................................................................................................................................................ 12
Defrosting..........................................................................................................................................................................................................................................................12
Door Seals Cleaning ................................................................................................................................................................................................................................... 12
Tips for Storage of Frozen Food...........................................................................................................................................................................................................12
Tips for Refrigeration.................................................................................................................................................................................................................................. 12
Traveling............................................................................................................................................................................................................................................................. 13
Storage/Winterization................................................................................................................................................................................................................................13
At Power Failure.............................................................................................................................................................................................................................................13
Shut Down ........................................................................................................................................................................................................................................................13
Energy Saving Tips......................................................................................................................................................................................................................................13
ICE MAKER INSTRUCTION .............................................................................................................................................................................. 13
Water Supply Connection........................................................................................................................................................................................................................ 13
Operating The Ice Maker..........................................................................................................................................................................................................................13
Off Grid Usage................................................................................................................................................................................................................................................14
Ice Maker Maintenance.............................................................................................................................................................................................................................14
Ice Maker Winterization.............................................................................................................................................................................................................................14
Ice Maker Sanitizing.................................................................................................................................................................................................................................... 14
TROUBLESHOOTING ........................................................................................................................................................................................14
SPECIFICATION....................................................................................................................................................................................................15
English
SPECIFICATION....................................................................................................................................................................................................15

CCD-0007862 Rev: 05-16-23
- 2 -
EXPLANATION OF SYMBOLS
This manual has safety information and instructions to help
you eliminate or reduce the risk of accidents and injuries.
Always respect all safety warnings identified with these
symbols. A signal word will identify safety messages and
property damage messages, and will indicate the degree or
level of hazard seriousness.
DANGER
Indicates an imminently hazardous situation which, if not
avoided, will result in death or serious injury.
WARNING
Indicates a potentially hazardous situation which, if not
avoided, could result in death or serious injury.
CAUTION
Indicates a potentially hazardous situation which, if not
avoided, may result in minor or moderate personal injury, or
property damage.
IMPORTANT SAFETY INSTRUCTIONS
General Safety
WARNING
●This appliance is intended to be used in household and
similar applications such as:
–Residential, mobile and recreational living homes.
–Staff kitchen areas in shops, offices and other
working environments;
–Farm houses and by clients in hotels, motels and
other residential type environments;
–Bed and breakfast type environments;
–Catering and similar non-retail applications.
●Do not store explosive substances such as aerosol
cans with a flammable propellant in this appliance.
●If the supply cord is damaged, it must be replaced by
the manufacturer, its service agent or similarly qualified
persons in order to avoid a hazard.
●Keep ventilation openings, in the appliance enclosure
or in the built-in structure, clear of obstruction.
●Do not use mechanical devices or other means to
accelerate the defrosting process, other than those
recommended by the manufacturer.
●Do not damage the refrigerant circuit.
●Do not use electrical appliances inside the food storage
compartments of the appliance, unless they are of the
type recommended by the manufacturer.
●The refrigerant and insulation blowing gas are
flammable. When disposing of the appliance, do so only
at an authorized waste disposal center. Do not expose
to flame.
●When positioning the appliance, ensure the supply cord
is not trapped or damaged.
●Do not locate multiple portable socket-outlets or
portable power supplies at the rear of the appliance.
●To avoid a hazard due to instability of the appliance, it
must be fixed in accordance with the instructions.
Refrigerant
DANGER
RISK OF FIRE OR EXPLOSION
●Flammable refrigerant used. Do not use mechanical
devices to defrost refrigerator. Do not puncture
refrigerant tubing.
●Flammable refrigerant used. To be repaired only by
trained service personnel. Do not puncture refrigerant
tubing.
CAUTION
RISK OF FIRE OR EXPLOSION
●Flammable refrigerant used. Consult repair manual/
owner’s guide before attempting to service this
product. All safety precautions must be followed.
●Dispose of property in accordance with federal or local
regulations. Flammable refrigerant used.
●Risk of fire or explosion due to puncture of refrigerant
tubing; Follow handling instructions carefully.
Flammable refrigerant used.
The refrigerant isobutane (R600a) is contained within the
refrigerant circuit of the appliance, a natural gas with a high
level of environmental compatibility, which is nevertheless
flammable.
Risk of Fire
During transportation and installation of the
appliance, be certain that none of the
components of the refrigerant circuit become
damaged.
●If the refrigerant circuit should become
damaged:
–Avoid open flames and sources of ignition;
–Thoroughly ventilate the room in which the appliance
is situated.
Daily Use
●This appliance is not intended for use by persons
(including children) with reduced physical, sensory or
mental capabilities, or lack of experience and knowledge,
unless they have been given supervision or instruction
concerning use of the appliance by a person responsible
for their safety.
English

CCD-0007862 Rev: 05-16-23 - 3 -
●Do not store flammable gas or liquids in the appliance as
there is a risk of an explosion.
●Do not operate any electrical appliances in the appliance
(e.g. electric ice cream makers, mixers etc.).
●Do not place hot items near the plastic components of
this appliance.
●Do not place food products directly against the air outlet
on the rear wall.
●Store prepacked frozen food in accordance with the
frozen food manufacturer’s instructions.
●The appliance manufacturers storage recommendations
should be strictly adhered to. Refer to relevant
instructions for storage.
●Do not place carbonated or fizzy drinks in the freezer
compartment as it creates pressure in the container,
which may cause it to explode, resulting in damage to the
appliance.
●Frozen food can cause frost burns if consumed straight
from the freezer compartment.
●Do not place the appliance in direct sunlight.
●Keep burning candles, lamps and other items with
naked flames away from the appliance as not to set the
appliance on fire.
●The appliance is intended for keeping food stuff and/
or beverages in normal household as explained in this
instruction booklet.
●The appliance is heavy. Care should be taken when moving
it.
●Do not remove or touch items from the freezer
compartment if your hands are damp/wet, as this could
cause skin abrasions or frost/freezer burns.
●Never use the base, drawers, doors etc, to stand on or as
supports.
●Frozen food must not be refrozen once it has been
thawed out.
●Do not consume ice Popsicles or ice cubes straight from
the freezer as this can cause freezer burn to the mouth
and lips.
●To avoid items falling and causing injury or damage to the
appliance, do not overload the door bins or put too much
food in the crisper drawers.
●Never cover or obstruct the ventilation slots on the
appliance.
Installation
●For electrical connection carefully follow the instructions
given in this manual.
●Unpack the appliance and check if there are damages on
it. Do not connect the appliance if it is damaged. Report
possible damages immediately to the place you bought it.
In this case retain packing.
●It is advisable to wait at least four hours before connecting
the appliance to allow the oil to flow back in the
compressor.
●Adequate air circulation should be around the appliance,
lacking this leads to overheating. To achieve sufficient
ventilation, follow the instructions relevant to installation.
Wherever possible the back of the product should not
be too close to a wall to avoid touching or catching warm
parts (compressor, condenser) to prevent the risk of a
fire, follow the instructions relevant to installation.
●The appliance must not be located close to radiators or
cookers.
Service
●Any electrical work required to do the servicing of the
appliance should be carried out by qualified electrician or
competent person.
●This product must be serviced by an authorized Service
Centre, and only genuine spare parts must be used.
In Case of Malfunction
●If a malfunction occurs on the appliance, please look first
in the “Troubleshooting” section of these instructions. If
the information given there does not help, please do not
perform any further repairs yourself.
●Under no circumstance should you attempt to repair the
appliance yourself. Repairs carried out by inexperienced
persons may cause injury or serious malfunctioning.
Remove Transport Packaging
The appliance and the interior fittings are protected for
transportation. Pull off the adhesive tape on the left and right
side of the door. You can remove any remnants of adhesive
using mineral spirit. Remove all adhesive tape and packing
pieces from the interior of the appliance.
Correct Disposal of This Product
WARNING
RISK OF CHILD ENTRAPMENT
Before you throw away your old refrigerator or freezer:
–Take off the doors
–Leave the shelves in place so that children may not
easily climb inside.
To prevent possible harm to the environment or human health
from uncontrolled waste disposal, recycle it responsibly to
promote the sustainable reuse of material resources. To
return your used device, please use the return and collection
systems or contact the retailer where the product was
purchased. They can take this product for environmental safe
recycling.
●Redundant appliances should not be disposed of with
normal household waste but delivered to a collection
and recycling center for electronic equipment. A symbol
shown on the product, the instruction manual or the
packaging shows that it is suitable for recycling.
●Materials used inside the appliance are recyclable and
are labeled with information concerning this. By recycling
materials or other parts from used devices, you are
making a significant contribution to the protection of our
environment. Information on appropriate disposal centers
for used devices can be provided by your local authority.
●The packaging for this appliance is only necessary to
provide effective protection during transport. These
materials can be recycled where possible.
English

CCD-0007862 Rev: 05-16-23
- 4 -
PRODUCT INTRODUCTION
Product Features
This refrigerator has the functions of saving energy, precise
temperature control and automatic defrosting.
Precise Temperature Control,Automatic Ice
Maker.
Microcomputer control systems are able to separately
control both the fridge and freezer more accurately.
Automatic Defrosting
This unit is equipped with a program that controls the
frequency and duration of defrosting your freezer. This
will make sure that you never need to manually defrost the
freezer.
Led Display And Temperature Controls
The control board respectively displays the fridge and
freezer temperatures. To change the setting in either section
simply press the temperature control button.
Tempered Glass,Safe And Reliable
Tempered glass, is safe and reliable, easy to clean and
durable.
Easy Clean And Removable Door Seal
The door seal(s) are easy to remove and clean, allowing the
product to operate efficiently for longer.
Door-Open Alarm System
If you leave any of your doors open for longer than 1-minute
the alarm system will remind you to close the door.
Automatic Ice Maker
The refrigerator has the function of automatic ice making.
PRODUCT OVERVIEW
Product Components
●The layout of items below are subject to change without notice, and may not look or come setup as seen in the picture
below.
●The appearance and specifications of the actual product may differ depending on the model.
1 1
5
2
6
3
7
4
8
Item Part name Item Part name
①Refrigerator Door Bins x 6 ⑤Vegetable Crispers with Glass Cover x 2
②Refrigerator Shelves x 2 ⑥Freezer Drawers x 2
③Refrigerator Light x 1 ⑦Ice maker Assembly Inside the Freezer Drawer x 1
④Refrigerator LED Light x 1 ⑧Plastic Drawer Inside the Freezer Drawer x 1
English

CCD-0007862 Rev: 05-16-23 - 5 -
INSTALLATION
WARNING
Before installing, read the instruction carefully for your
safety and correct operation of the appliance.
CAUTION
To avoid personal injury or damages at least 2 people are
required for the installation.
What’s in the Box
Make sure you have all the following items included in the
packaging. If any item is damaged or missing, contact your
dealer.
●Refrigerator x 1
●User Manual x 1
●Warranty Manual x 1
●Water Valve Connection x 1
●Water Pipe [External diameter:¼" (6.35mm) Length:98
⁄"(2500mm)] x 1
Installation and service must be performed by a
recommended installer, service agency or electric supplier.
Before First Use
●Remove all packaging, including the foam backing at the
bottom of refrigerator and the tapes fixing accessories in
the box.
●Place the refrigerator in a proper up-right position, let it
stand up-right for at least 4 hours before powering on.
●Remove the film: There is a layer of transparent film on
the panel surface to protect it from being scratched. You
can choose to remove or leave the film as needed.
●Review product specifications below to plan for proper
clearances in and around the enclosure.
Transportation
●Do not carry the refrigerator horizontally or by laying it
down.
●Do not carry the refrigerator by holding the door or
handle; the refrigerator shall be carried by lifting the
bottom.
●This unit should never be moved alone, two people are
required to safely lift or move your unit.
Installation Dimension
●Select a good location to place your appliance where it
is flat and easy to use. Avoid placing the unit near heat
sources,direct sunlight or moisture.
Dimension
A35 ⅞” (911 mm)
B70⅛” (1780 mm)
C27⁄” (706 mm)
D24½’’ (622 mm)
E15½” (393 mm)
F65⅜” (1661 mm)
G42⁄” (1088 mm)
B
C
D
A
F
G
EE
●The above figures are a guideline for installation
purposes. The actual dimensions of the unit may vary
slightly.
●To ensure that your unit works at peak efficiency please
maintain sufficient space around your unit as outlined on
the next page.
Installation Preparation
Select Location
●Your new refrigerator must stand on a flat surface which
should support a weight of 550lbs (250kg). Surface must
be level relative to the coach floor plane.
NOTE: A slope that is comfortable to live with, and from
normal transportation is acceptable.
●If the appliance is to be placed onto the carpet, support it
with a wooden board. Do not place the appliance directly
on the carpet, as the heat from the compressor may
cause the carpet to fade.
English

CCD-0007862 Rev: 05-16-23
- 6 -
●For best and most efficient operation, the refrigerator
should operate within 50°F ~ 109°F (10°C ~ 43°C). If
installing near large heat sources, such as furnaces,
fireplaces, etc. Ensure a thermal barrier, such as wood
paneling, isolates the refrigerator space as not to hinder
performance of the appliance.
Refrigerator Cabinet/Enclosure Preparation
●Position the appliance away from sources of heat such as
stoves, radiators, direct sunlight, direct weather such as
rain, etc.
WMin. 36’’ (914 mm)
HMin. 70½’’ (1790 mm)
DMin. 25’’ (635 mm)
H
D
W
Min. cabinet dimension
NOTE: Dimensions
include the required
clearance for venting
CAUTION
DO NOT USE THE FOAM PACKAGING AS CUSHIONING
BLOCKS!
●The unit shall be kept away from damp locations where
water is present. Water or dirt should be removed from
any surface of the unit as soon as possible using a soft
cloth. This will help prevent rust and will help your unit run
at peak efficiency.
●Keep the refrigerator away from heat source or direct
sunlight.
Electrical Connection
WARNING
Any electrical work required to install this appliance should
be carried out by a qualified or competent person.
All Furrion products referenced in this manual is to be
installed in accordance with local and national codes,
including the latest editions of the following standards:
USA:
–NFPA 1192
–NFPA 70
–ANSI/RVIA low Voltage
Canada:
–C22.1
–CSA Z240
The appliance is powered by Nominal DC 12V and must be
supplied at SAFETY EXTRA-LOW VOLTAGE circuit, a listed
power converter that conforms to UL 458 and/or C22.2 No.
107.1 is required.
Circuit Wiring Based on Voltage Drop:
Circuit wiring, gauge (AWG), length, and routing is to be
determined by the installer. It must not exceed a voltage drop
at the appliance of more than 0.4V DC.
To Measure:
Start the appliance from warm, isolate and measure the
voltage difference between each DC12V power source(s)
and the appliance connection. If the Voltage drop exceeds
0.4V DC the length of wire should be shortened, and/or Wire
gauge (AWG) increased.
Circuit Rating: Min 20Amp, Max 40Amp. Do not share circuit
with any other utilization equipment.
NOTE: The circuit must be fused appropriately for the wire
gauge (AWG) used, within 18” of the DC 12V power source.
Only a single blow fuse or manual resettable breaker is
allowed, auto-resetting breakers must not be used. Do not
add an additional fuse to the pigtail end of the appliance.
The following is a starting guideline for wire sizing and should
be adjusted based on actual voltage drop:
●15ft or less = 10AWG
●15ft to 25ft = 8AWG
●25ft to 40ft = 6AWG
Installation Tips
●Voltage drop can be reduced by terminating the -12V
(white) lead directly to the vehicle chassis.
●-12V (white) and Ground (Green) leads can be combined
at the appliance or individually terminated.
Supply Wire
Ground (Green)
-12V (White)
+12V (Red)
Pigtail Harness
from Refrigerator
Not Provided
●Enter supply wire into the cabinet space. It is acceptable
to enter through the cabinet floor, sidewall, backwall or
ceiling. Ensure that the wire enters within the free cabinet
space behind the refrigerator.
●Furrion recommends dropping the 12V supply wire from
the upper ceiling or upper rear wall. Temporarily affix the
wires to the upper half of the appliance with tape so that
excess wire will droop without risk of rubbing with the
appliance chassis and floor during installation.
English

CCD-0007862 Rev: 05-16-23 - 7 -
Water Pipe Installation
The icemaker must be connected to the cold water supply
line. You will need a ¼ (OD) copper tubing or ¼ (OD) plastic
tubing for the water supply line. Additionally, a ¼ water shut
off vale can be placed near the refrigerator. The shut off valve
shall be easily accessible, so that it can be activated during
winterization or the icemaker is not being used.
Connector Type
Verify the connector type and follow the instructions to finish
the water pipe connection.
Connector A Connector B
Connector A
1. In the lower right corner of the back of the refrigerator as
shown in the picture, remove the rubber cap on the inlet
water interface.
2. Take the water valve connector from the accessory
bag. Remove the blue clip from the connector, place the
connector to the water inlet and turn clockwise to make
it tight.
3. Take out the soft pipe from the freezer drawer, insert it
into the quick water valve connector and push it to the
end, the soft pipe should be¼ inch (6.35mm) in external
diameter
pipe
d=¼"
4. Put the blue clip back to the valve connector to lock the
connection.
5. Open the water shut off valve of the vehicle. Examine the
connections for leaks.
6. If testing for water leaks with compressed air, do not
exceed 100PSI of pressure.
Connector B
1. Remove the blue clip from the connector.
2. Take out the soft pipe from the freezer drawer, insert it
into the connector and push it to the end, the soft pipe
should be¼ inch (6.35mm) in external diameter.
pipe
d=¼"
3. Put the blue clip back to the connector to lock the
connection.
4. Open the water shut off valve of the vehicle. Examine the
connections for leaks.
5. If testing for water leaks with compressed air, do not
exceed 100PSI of pressure.
English

CCD-0007862 Rev: 05-16-23
- 8 -
Drainage Preparation
The cavity condensate drainage is captured in a drain pan
integrated with the unit. No external drainage needs to be
prepared at this point.
Securing the Refrigerator
WARNING
FIRE AND ELECTRICAL SHOCK HAZARD
●The appliance contains hidden refrigerant lines and
electrical wiring.
●Follow all guidance in this section to prevent death,
injury or property damage.
For mobile applications, it is imperative to determine a
sufficient securing method to prevent sliding/tipping of
the appliance. Furrion offers a mounting bracket
accessory, refer to the bracket installation instructions for
placement. The installer is responsible for any additional
brackets needed, but can reference this section for
placement of brackets. The doors/drawer include
integrated latches to keep them restrained during
traveling, additional door retention is not necessary.
Body Mounting
WARNING
FIRE AND ELECTRICAL SHOCK HAZARD
DO NOT pierce screws into any surface of the refrigerator
as there is a risk of refrigeration leak or electrical shock
hazard.
Top Restraints
●If restraints are used to mount or contact the top surface
of the appliance, avoid contact with the gray plastic
electrical cover to prevent damage.
Top View
Electrical Housing
Hinge Mounting
If selecting the hinge as a securing method, one hole
[⁄"(8mm) or ⁄"(12mm)] or both holes can be used,
secure the screws to fix the hinge through the holes with a
screwdriver(Fig. 1), support the bottom of the hinge with a
wood trim/block to prevent bending/damage to the hinge.
The wood block can also be used to choke the wheel from
moving. (Fig. 2).
2 ¼" (58 mm)
1 ½"(37 mm)
Fig. 2
d: ⁄"(8mm)/ ⁄"(12mm)
Fig. 1
OPERATION
Control Panel
●All functions and controls of the unit are accessible from a
control panel conveniently located on the left side edge of
the right refrigerator compartment door. A display circuit
board allows easy configuration of features and settings in
a simple and intuitive manner.
●The display board consists of four buttons. You will hear a
short beep when you press the buttons.
●The first time you turn the unit on, the unit will start at the
factory-set default temperature, which is 43°F (6°C) in the
refrigerator compartment and 5°F(-15°C) in the freezer
compartment.
●However, the exact setting should be chosen keeping in
mind that the temperature inside is dependent on:
−Room temperature
−How often the door is opened
−Quantity of food stored
−Appliance location
NOTE:
●To save energy and prolong the service life of LED lights.
The screen illuminates for 20s and then goes off.
●To ensure that the freezer compartment is thoroughly
chilled and the refrigerator compartment is stabilized, it
should run for at least 4 hours before placing food inside.
Refrigerator
temperature display
Freezer
temperature display
O grid vacation mode
(Holiday Mode) icon Lock Mode Icon
Super freezer icon
Super fridge icon
Refrigerator
temperature control
Freezer temperature
control
Lock/Unlock button
Mode button
English

CCD-0007862 Rev: 05-16-23 - 9 -
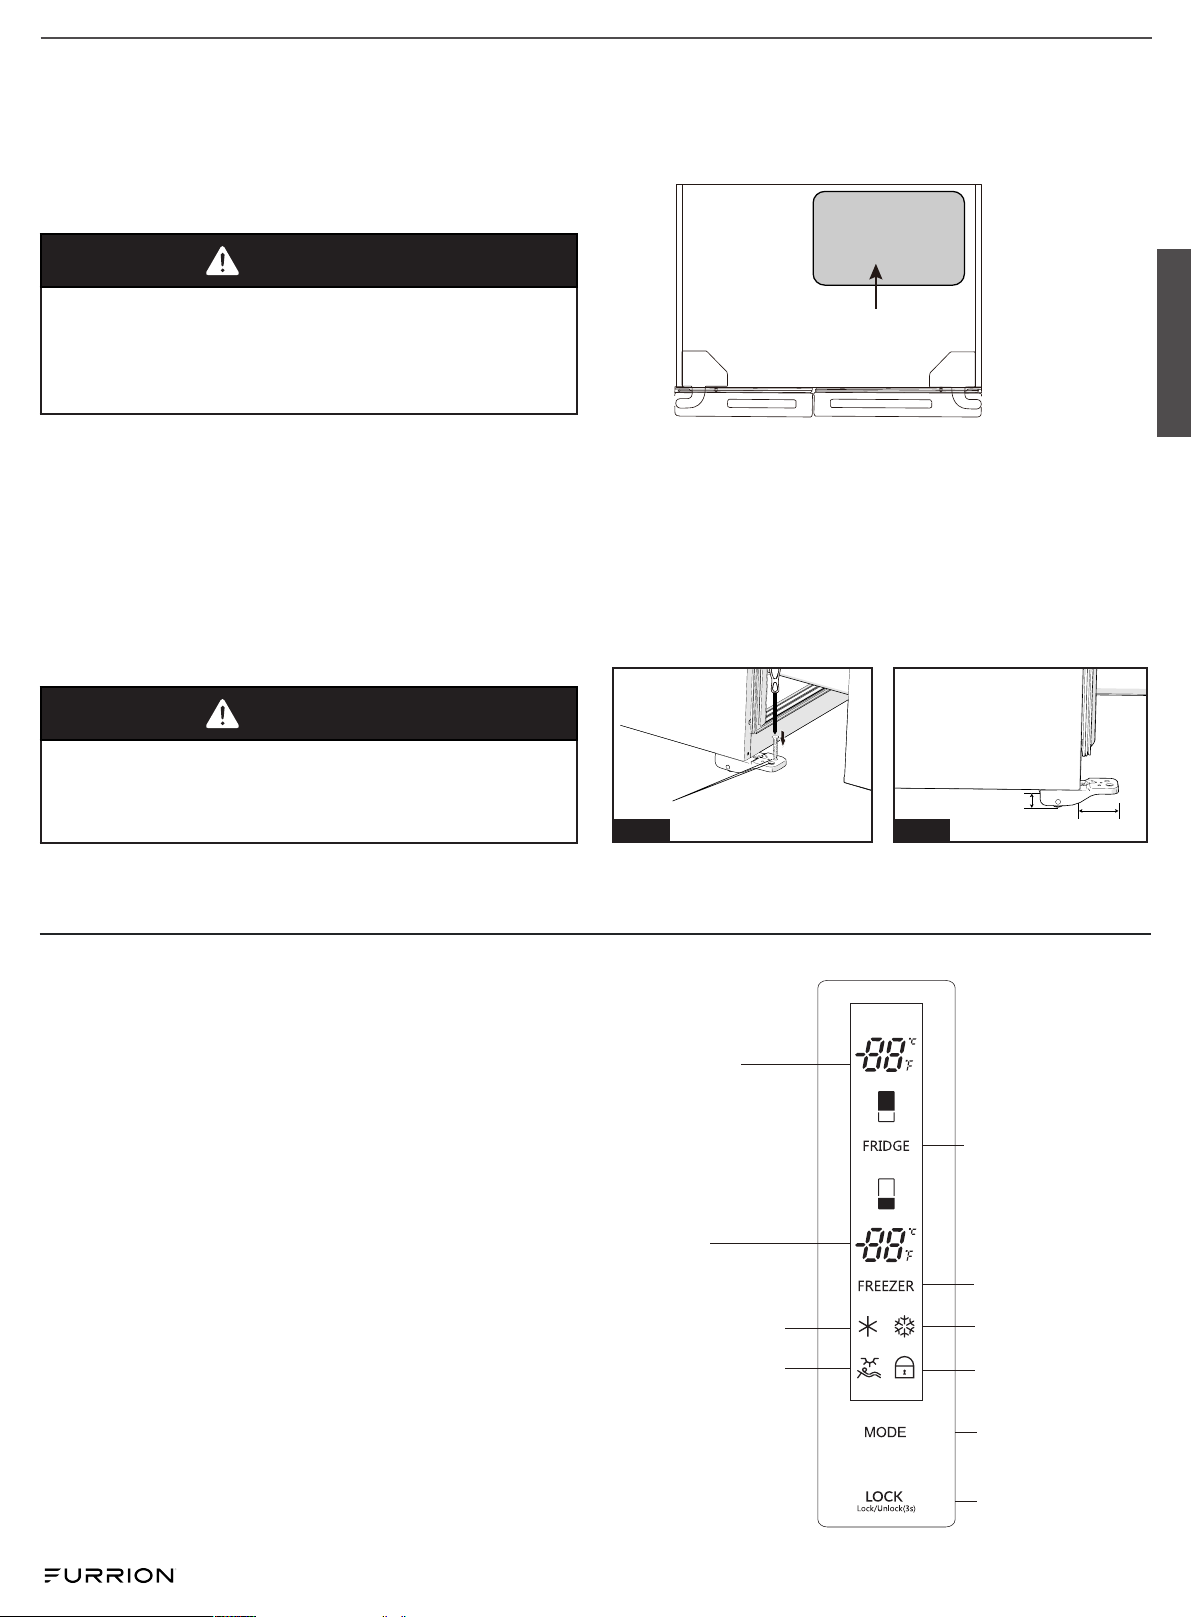
Temperature Mode Selection (°C /°F)
Default is°F, when the unit is powered on the first time.
To change to°C, press and hold the MODE button for 5
seconds. To change back to°F, press and hold the MODE
button again.Temperature adjustment range:
–Fridge compartment: +32 to +43°F(0 to 6°F)
–Freezer compartment: -10 to +5°F(-23 to -15°C)
Lock/Unlock
●This refrigerator is able to lock the control panel to stop
accidental operation.
●All buttons are locked if you press the Lock/Unlock
button.
●The lock icon is illuminated when the control panel is
locked.
●Hold the Lock/Unlock button for 3 seconds to Unlock.
And the lock icon is no longer displayed.
Setting the Temperature Control
●Your unit has one control for regulating the temperature.
The temperature control is located on the left side edge
of the right refrigerator compartment door.
●The first time you turn the unit on, run for at least 4
hours before placing food inside. This will ensure that
the freezer compartment is thoroughly chilled and the
refrigerator compartment is stabilized before food is
placed inside. Then adjust the temperature setting to
your desired setting.
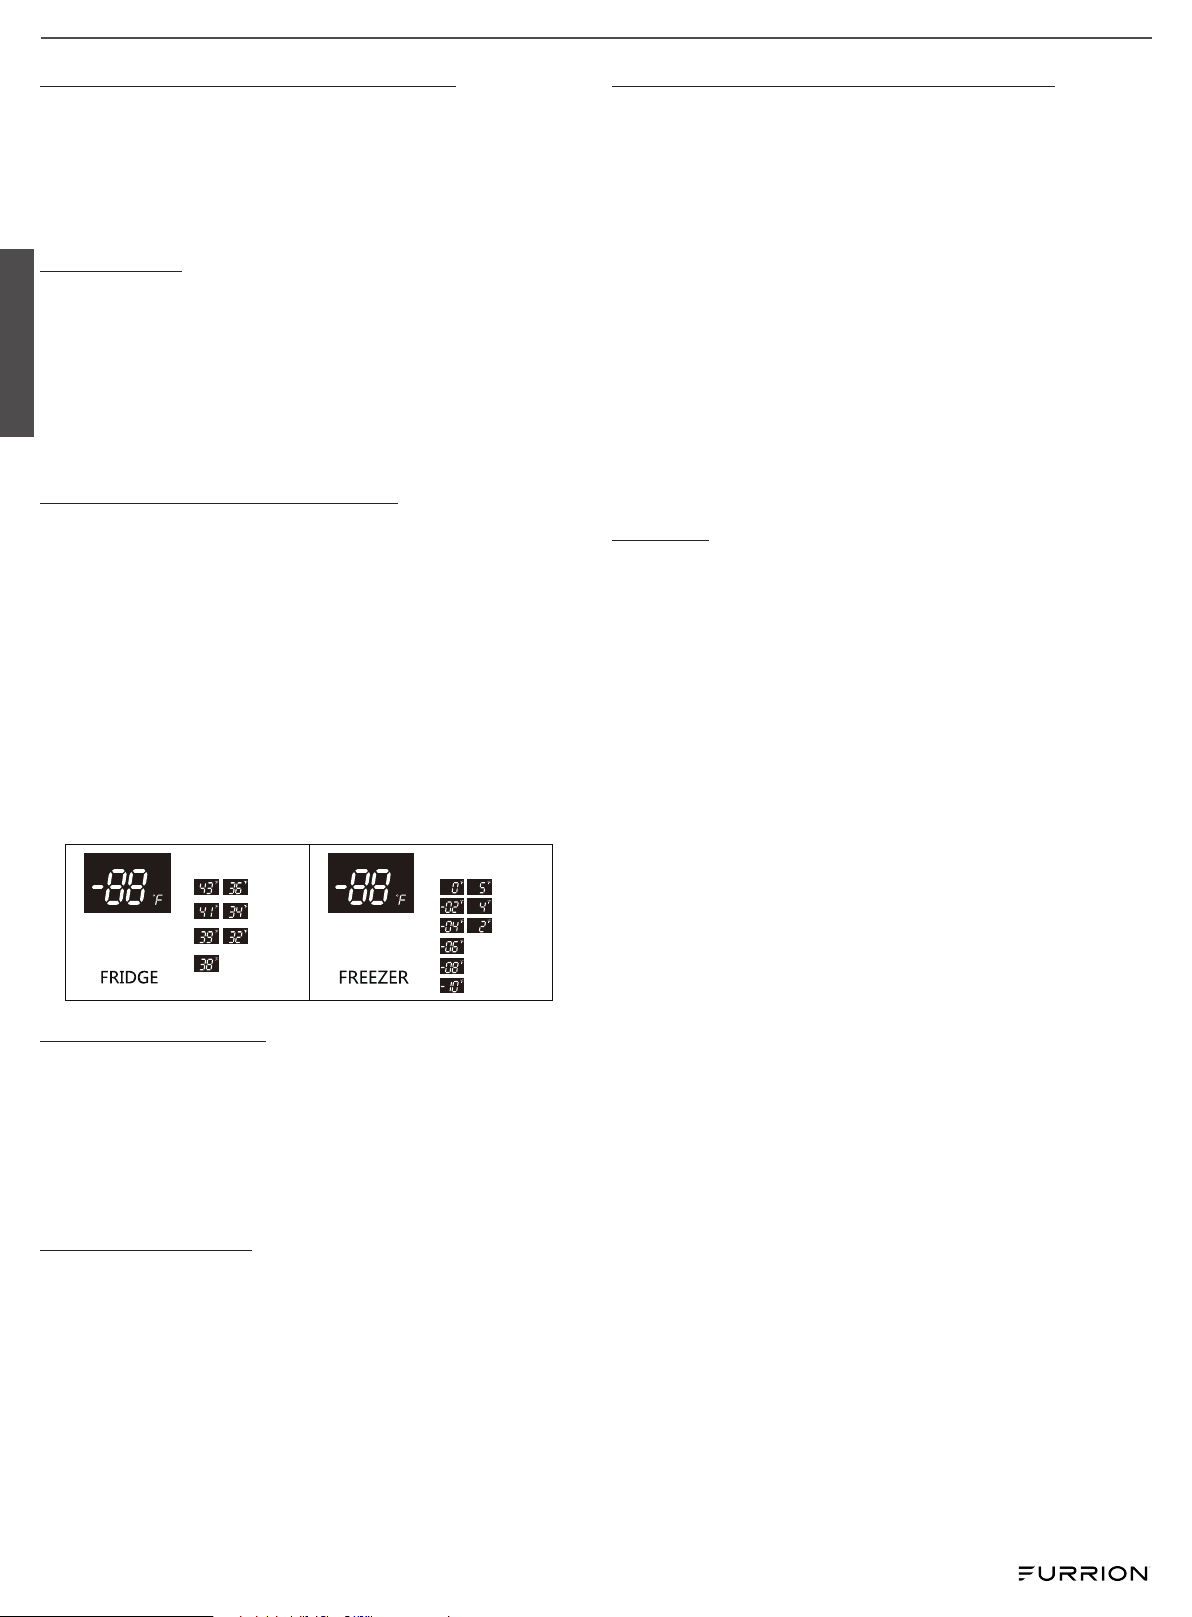
●To adjust the temperature in each zone, press the
appropriate zone button, and the selected zone will flash
on and off. The temperature will change according to the
pre-set temperatures as shown below. You will hear a bell
chime with each press of the control panel buttons.
Super Freezer Mode
When the Super Freezer Mode is selected, the compressor
will operate continuously to freeze foods faster, and keep
them fresh. The super freezer mode will automatically turn off
either after 24 hours of operation or when the freezer sensor
reaches -10°F( -23°C). The super freezer icon will turn off, and
the freezer will continue to operate at the last temperature
setting you have set before.
Super Fridge Mode
When the super fridge mode is selected, the fridge
compartment reaches the set temperature in the shortest
period, in order to keep the food as fresh as possible. In this
mode, the set temperature of the fridge compartment locks
on 32°F(0°C).
The program runs 150mins then exits automatically, the super
fridge icon goes out,which means the super fridge function
is disabled, the temperature setting returns to the last one
before the super fridge mode operates.
Off Grid Vacation Mode (Holiday Mode)
In this mode, the refrigerator runs at 43°F (6°C) and the
freezer runs at 5°F(-15°C).
Setting this mode can help conserve energy after
disconnecting from shore power, and using only DC12V
power source and solar power sources. Limit the frequency
of door openings, and length of time open. Sensitive foods
should be consumed more quickly, and stored toward the
rear of the fridge to maintain freshness.
To optimize DC12V power source runtime performance:
●Ensure the refrigerator and food stored is down to desired
temperature before disconnecting shore power.
●Avoid adding significant amounts of warm items,
especially beverages, at one time unless already cooled.
●Adding new items is best in the morning to utilize
solar power (if available) during the day to bring the
temperature back down without consuming DC12V power
source capacity.
ON/OFF
●Long press “MODE” and “LOCK” buttons at same time for
5 seconds to turn the refrigerator’s LOW POWER mode .
●Temperature displays illuminates with “--” after Low
power mode is on.
●Cavity lights will turn off after 3 minutes of the door being
open.
●Long press “MODE” and “LOCK” buttons at same time
for 5 seconds to turn off low power mode.
NOTE:
●If the appliance lost power, or it is turned off, it will need to
wait 3 to 5 minutes to restart.
Open Door Alarm
When the refrigerator door is open for more than 1 min, the
buzzer will alarm to remind users to close the door. After the
door is closed, the alarm sound will stop automatically.
Fridge Compartment Switch Off/On
Long press “FRIDGE” button for 5 seconds to turn off the
fridge compartment. - - will display for temperature.
The fridge compartment will not maintain temperature
and only the freezer section will operate, Do not store any
temperature sensitive food in the fridge.
Long press “FRIDGE” button for 5 seconds to turn on the
fridge compartment.
Food Storage
IMPORTANT!
●When storing freezing foods, put them to the inside of
freezer compartment, other than the bottle rack.
●Do not put bottled or canned foods into the freezer
compartment to prevent frost cracking. Before putting
hot foods into the refrigerator, cool them to room
temperature first; otherwise, they will increase power
consumption.
●Mark the freezing date on the packaging bag according
to different storage lives of foods, so as to prevent foods
from exceeding the time limit.
●Divide foods into proper pieces and package them
separately, which are easy to freeze thoroughly and will
not frozen together.
English

CCD-0007862 Rev: 05-16-23
- 10 -
●The packaging materials shall be odorless, airtight,
watertight and pollution-free, so packaged foods are not
easy to taint by other odor, without quality reduction.
●Do not put too many fresh foods into the freezer
compartment once, preferably not exceeding the freezing
capacity value of refrigerator.
●Melted foods can not be frozen again, unless they are
made into dishes; otherwise, their service quality will be
affected.
●Glass bottles or glass containers shall not be placed
into the freezer compartment or at the air outlet of
refrigerating chamber duct; otherwise, they may explode.
●Foods can not block the air outlet; otherwise, abnormal
air circulation will be caused.
Storage of Foods
Your appliance has the accessories, refer to the “product
componets” illustraion shown in the product overview
section. This section will instruct you on the correct way
to store your food. The glass shelves and crisper can be
removed to store food if needed.
NOTE: Food is not allowed to touch directly all surfaces
inside the appliance. It has to be wrapped separately in
aluminum sheet or in cellophane sheet or in airtight plastic
boxes.
●Dairy foods and eggs.
Most pre-packed dairy foods have a recommended use
by/best before/best by/date stamped on them. Store
them in the fridge compartment and use within the
recommended time.
●Butter can become tainted by strong smelling foods so it
is best stored in a sealed container.
●Eggs should be stored in the fridge compartment.
●Red meat
Place fresh red meat on a plate and loosely cover with
waxed paper, plastic wrap or foil.
Store cooked and raw meat on separate plates. This
will prevent any juice lost from the raw meat from
contaminating the cooked product.
●Poultry
Fresh whole birds should be rinsed inside and out with
cold running water, dried and placed on a plate. Cover
loosely with plastic wrap or foil Poultry pieces should also
be stored this way. Whole poultry should never be stuffed
until just before cooking, otherwise food poisoning may
result.
●Fish and seafood
Whole fish and fillets should be used on the day of
purchase. Until required refrigerate on a plate loosely
covered with plastic wrap, waxed paper or foil. If storing
overnight or longer, take particular care to select very
fresh fish. Whole fish should be rinsed in cold water to
remove loose scales and dirt and then patted dry with
paper towels. Place whole fish or fillets in a sealed plastic
bag. Keep shellfish chilled at all times. Use within 1-2
days.
●Precooked foods and leftovers
These should be stored in suitable covered containers so
that the food will not dry out.
Keep for only 1-2 days. Reheat leftovers only once and
until steaming hot.
●Vegetable container
The vegetable container is the optimum storage location
for fresh fruit and vegetables.
Take care not to store the following at temperatures
of less than 6°C for long periods: Citrus fruit, melons,
aborigines, pineapple, papaya, curette, passion fruit,
cucumber, peppers, tomatoes.
●Undesirable changes will occur at low temperatures such
as softening of the flesh, browning and/or accelerated
decaying
●Do not refrigerate avocados (until they are ripe), bananas
and mangoes.
Food Location(Refrigerator chamber)
Butter, cheese Upper door bin
Eggs Door bin
Fruit, vegetables,
salad
Crisper
Meat, sausage,
cheese, milk
Lower area (lowest shelf 1 crisper
cover)
Dairy products,
canned food, cans
Upper area or door bin
Drinks, bottles, tubes Door bin
Food Location (Freezer chamber)
Small frozen food Freezer drawer
Fish,meat,ice cream Lower area(lower shelf or drawer)
NOTE: Food is not allowed to touch directly all surfaces
inside the appliance. It has to be wrapped separately in
aluminum sheet or in cellophane sheet or in airtight plastic
boxes.
Freezing And Storing Food in The
Freezer Compartment
●To store deep-frozen food.
●To make ice cubes.
●To freeze food.
NOTE: Ensure that the freezer compartment door has been
closed properly.
Purchasing Frozen Food
●Packaging must not be damaged.
●Use by the ‘use by /best before/best by/’ date.
●If possible, transport deep-frozen food in an insulated
bag and place quickly in the freezer compartment.
Storing Frozen Food
●Store at -0.4°F(-18°C) or colder. Avoid opening the freezer
compartment door unnecessarily.
English

CCD-0007862 Rev: 05-16-23 - 11 -
Freezing Fresh Food
●Freeze fresh and undamaged food only. To retain the best
possible nutritional value, flavour and colour, vegetables
should be blanched before freezing. Aubergines,
peppers, zucchini and asparagus do not require
blanching.
●The following foods are suitable for freezing: Cakes
and pastries, fish and seafood, meat, game, poultry,
vegetables, fruit, herbs, eggs without shells,dairy
products such as cheese and butter, ready meals and
leftovers such as soups, stews, cooked meat and fish,
potato dishes, souffles and desserts.
●The following foods are not suitable for freezing: Types
of vegetables, which are usually consumed raw, such as
lettuce or radishes, eggs in shells, grapes,whole apples,
pears and peaches, hard-boiled eggs, yogurt, soured
milk, sour cream, and mayonnaise.
Recommended Storage Times of Frozen
Food in the Freezer Compartment
These times vary depending on the type of food. The
food that you freeze can be preserved from 1 to 12 months
[minimum at -0.4°F (-18°C)]
Food Storage time
Bacon, casseroles, milk 1 month
Bread, ice cream, sausages, pies,
prepared shellfish,oily fish 2months
Non-oily fish, shellfish, pizza, scones
and muffins 3months
Ham, cakes, biscuits, beef and lamb
chops, poultry pieces 4months
Butter, vegetables (blanched), eggs
whole and yolks,cooked cray fish,
minced meat (raw), pork (raw)
6months
Fruit (dry or in syrup), egg whites, beef
(raw), whole chicken, lamb (raw), fruit
cakes
12months
Refrigerator compartment
The fridge compartment should mainly be used to store food
that will be consumed in a short time
Item Part name
1Refrigerator Door Bins
2Refrigerator Shelves
3Vegetable Crispers with Glass Cover
Freezer compartment
The freezer compartment is used to freeze foods,store
deeply frozen foods and make ice cubes. It can preserve
foods for a long time.
The freezer compartment is suitable for retaining the
freshness of foods for a long time. When storing meat, it is
suggested to cut the meat into pieces which are easy to
take out, and mark the freezing date to prevent foods from
exceeding the time limit.
Item Part name
4Freezer drawer
5Ice maker
The ice maker can make about 4 pounds of ice every 24
hours, which is about a batch of ice every 1.5 hours.
Note: When the ice maker is operating, you may hear sounds
like; the water valve clicking, flowing water into the ice tray, or
falling sound of ice cubes.
CAUTION
Avoid direct contact between food and the cavity liner.
Staining, especially from oily foods, can occur which may
lead to liner corrosion or cracking.
Door Bin
This is the door shelf guide
door
liner of door
bin
Disassembly:
1. Hold both sides of the door bin with both hands.
2. Push it from the side without the guide and push it inward
as seen in the diagram. Push until the edge of the door bin
is separated from the grove of the liner.
Installation :
1. Hold both sides of the door bin with both hands.
2. Install the buckle of the guide side at first.
3. Then push the other side inward slightly
NOTE: The guide will then click into place and the door bin
will be installed. Please make sure it is installed properly
before use.
English

CCD-0007862 Rev: 05-16-23
- 12 -
CLEANING AND MAINTENANCE
DANGER
ELECTRIC SHOCK!
Always disconnect power before cleaning or maintenance
●Do not clean the appliance with metal objects, steam
cleaner, ethereal oils, organic solvents or abrasive
cleansers.
●Do not use sharp objects to remove frost from the
appliance.
●Use a plastic scraper.
Exterior Cleaning
CAUTION
Don’t use Thinner, Car detergent, Clorox, ethereal oil,
abrasive cleansers or organic solvent such as Benzene for
cleaning as they may damage the surface of the appliance
and may cause fire.
To maintain good appearance of your appliance, you should
clean it regularly.
Wipe the digital panel and display panel with a clean, soft
cloth.
Spray water onto the cleaning cloth instead of spraying
directly on the surface of the appliance. This helps ensure an
even distribution of moisture to the surface.
Clean the doors and cabinet surfaces with a mild detergent
and then wipe dry with a soft cloth.
IMPORTANT!
●Remove the food from the appliance before cleaning.
Store them in a cool place and well covered.
●Never clean the appliance with a steam cleaner. Moisture
could accumulate in electrical components.
Interior Cleaning
You should clean the appliance interior regularly. Follow the
below steps:
●Remove all food.
●Wipe the inside of the fridge freezer with a weak solution
of baking soda, and then rinse with warm water using a
wrung-out sponge or cloth.
●Wipe completely dry before replacing the shelves and
baskets. Thoroughly dry all surface and removable parts.
Although this appliance automatically defrosts, a layer of
frost may occur on the freezer compartment’s interior walls if
the freezer door is opened frequently or kept open too long.
If the frost is too thick proceed as follows: Remove existing
food and accessories baskets, switch off the power supply of
the refrigerator and leave the doors open.
●Ventilate the room thoroughly to accelerate the thawing
process.
●When defrosting is completed, clean your freezer as
described above.
CAUTION
Only after the interior is completely dry the appliance
should be switched back on.
Defrosting
This appliance has an automatic defrosting function without
manual operation.
Door Seals Cleaning
Take care to keep door seals clean. Sticky food and drinks
can cause seals to stick to the cabinet and tear when you
open the door.
Wash seals with a mild detergent and warm water.
Rinse and dry it thoroughly after cleaning.
NOTE: Only after the door seals are completely dry the
appliance should be powered on.
Tips for Storage of Frozen Food
To obtain the best performance from this appliance, you
should:
●Be sure that frozen foods are transferred from the food
store to the freezer in the shortest possible time.
●Do not open the door frequently or leave it open longer
than absolutely necessary.
●Once defrosted, food deteriorate rapidly and cannot be
re-frozen.
●Do not exceed the storage period indicated by the food
manufacturer.
●Hot vapours can lead to the damage of plastic parts.
●Ethereal oils and organic solvents can attack plastic parts,
e.g. lemon juice or the juice from orange peel, butyric acid,
a cleanser that contain acetic acid. Do not allow such
substances to come into contact with appliance parts.
●Do not use any abrasive cleansers.
●Clean the appliance and the interior accessories with
a cloth and lukewarm water. Commercially available
dishwashing detergents may also be used.
●After cleaning wipe with fresh water and clean dishcloth.
●Check the water drain hole on the rear wall of the
refrigerator compartment. Clear a blocked drain hole
with the aid of something like a soft green peg, take care
not to damage the cabinet.
●After everything is dry place appliance back into service.
Tips for Refrigeration
●Meat (all types): wrap in polyethylene (plastic) bags and
place on the glass shelf above the vegetable drawer. To
avoid food poising or contamination store meats properly
wrapped for one or two days only.
●Cooked foods, cold dishes; these should be covered and
may be placed on any shelf.
●Fruit and vegetables: thoroughly cleaned and placed in
the special drawer provided.
●Dairy: placed in aluminum foil or polyethylene (plastic)
bags while removing as much air as possible.
●Milk bottles: capped and stored in the bottle rack on the
door.
English

CCD-0007862 Rev: 05-16-23 - 13 -
Traveling
Your refrigerator is designed to operate during normal
transportation of your coach. Please refer to the following
guidelines to assist during transportation.
●Always travel with the doors closed and ensure will not
open during traveling.
●Ensure your refrigerator has reached desired temperature
before traveling to prevent excessive discharge of your
battery. Refer to the “off-grid” section of this manual for
more information.
●Use caution when storing food in the cavity while
traveling. Heavy and hard sided containers (glass/metal)
may shift and bounce which could cause damage to the
refrigerator or container. It is advised to secure/protect
items well or store in a separate container until reaching
your destination.
Storage/Winterization
●When your refrigerator or RV is not in use, it is considered
to be in storage. When in storage the refrigerator should
always be turned off by following the instructions in this
manual.
●A DC12V power source maintainer should be used for long
storage, to keep a full charge.
●If the appliance is in storage, and not intended to be in
operation, disconnect power, clean the inside thoroughly,
and leave the doors propped open to avoid abnormal
odors from developing.
●To prevent quick discharging of the batteries, the refrigerator
can be turned off to enter LOW POWER mode. Both the
temperature displays will show “--”. Press and hold the
MODE for 5 seconds to cycle between ON/OFF.
●In LOW POWER mode, the interior lights, compressor and
defroster are turned off.
●Ice maker winterization - see ice maker instructions page
for winterization.
●Ice maker sanitation - see ice maker instruction page for
sanitation.
At Power Failure
●Generally, short-term power failure will not affect the
temperature of the refrigerator. However, if power
failure lasts for a long time, you shall reduce the opening
frequency of refrigerator, and shall not put fresh foods
into the refrigerator (prevent rise in the temperature of
refrigerator from speeding up).
●If you know power failure is coming, you can turn on
the “Super Freezer” function in advance to keep the
temperature of refrigerator to the lowest value.
Shut Down
●Generally, it is not suggested to stop the refrigerator
or turn off the power switch, otherwise, the lifetime of
refrigerator may be affected.
Energy Saving Tips
●Make sure to keep the refrigerator away from heat
sources and direct sunlight.
●Before storing hot foods, cool them down to room
temperature and then put them into the refrigerator.
●Close the door timely, reduce the opening frequency, and
shorten the opening time.
●When unfreezing frozen foods, you can put them into the
refrigerator chamber, which will assist in refrigeration of
the refrigerator chamber.
●Make sure that the temperature sensor is not covered or
blocked by foods, and keep proper distance with foods.
ICE MAKER INSTRUCTION
Water Supply Connection
WARNING
Connect to potable water supply only,The water supply
system must be installed and connected by a professional
technician.
●When using the ice maker, make sure that the water
supply is connected and the water valve is opened.
●Ensure the water supply pressure is between:
Min. pressure: 29 PSI
Max. pressure: 100 PSI
Operating The Ice Maker
1. The ice maker will automatically make ice, and continue
to fill the ice bucket. Once the ice bucket is full, the
ice detecting bar will automatically turn off the ice
maker. If the ice bucket is low, the ice detector bar will
automatically turn on the ice maker to refill the ice bucket.
2. The ice maker can be manually turned on/off. Turn the ice
maker on/off using the ice detecting bar as a switch in the
direction marked on the ice maker.
ON
OFF
Caution: Do not force the ice detecting bar on when the ice
bucket is full. Damage could occur to the appliance.
Off Grid Usage
1. The ice maker consumes energy to operate. If planning
to use the refrigerator off grid, utilizing battery storage,
English

CCD-0007862 Rev: 05-16-23
- 14 -
consider filling up the ice bucket before switching to
battery and keeping the ice maker off. Manually turn it
back on if needed, or keeping off to conserve energy.
Ice Maker Maintenance
1. Turn off the ice maker if it is not in use for a long time.
2. For food safety, it is recommended to discard the first
round of ice when the ice maker is restarted, especially if
the fridge is powered off for a long time.
3. Ensure the water pressure is correct, or some water will
flow out from ice maker.
Ice Maker Winterization
During the winter months, you need to ensure that the water
connection to the refrigerator is not freezing up otherwise
this could lead to burst waterpipes, or damage to the
refrigerator.
1. Turn on your refrigerator and ice maker, and make sure
the ice bin is below.
2. Winterize your RV per the manufacturers instruction
which should include filling the water system with
antifreeze that is safe for potable water systems.
3. Let the ice maker purge anti-freeze through the icemaker
system
4. Discard any ice or water that accumulates in the ice bin,
and turn off your refrigerator.
Note: only use RV antifreeze for potable water applications.
To un-winterize:
In addition to following your RV manufacturers instruction:
1. Turn on your refrigerator and Icemaker.
2. Purge freshwater through the ice maker with several
rounds of ice production
3. Continue ice production until ice is clear, and antifreeze
has been purged.
4. Discard ice.
An additional method can be accomplished by removing
the ice maker, and bypassing the water line. Contact an
authorized service dealer.
Ice Maker Sanitizing
If unit is stored for a long period, the ice maker should be
cleaned by running fresh water through it and discarding the
first few batches of ice at the start of every season.
If the ice has a strange taste/odor/color, or as seasonal
practice, run a sanitizing solution through your RV water
system per the manufacturer’s instructions. Purge several
batches of Ice with fresh water to ensure the sanitizing
solution has been completely removed.
TROUBLESHOOTING
WARNING
Before troubleshooting, disconnect the power supply.
IMPORTANT!
When the compressor is being turned on, the refrigerator
creates some sounds / noises, like gurgling - this is perfectly
normal.
Repairs to refrigerators/freezers may only be performed by
competent service engineers. Improper repairs can give rise
to significant hazards for the user. If your appliance needs
repairing, please contact your specialist dealer or your local
Service Centre.
Normal Phenomena
Normal phenomena Cause
Button failure Please check the control board whether the fridge under lock mode. When under lock mode, all buttons can’t
work.
Low voltage,the compressor can’t
start Charge the RV-batteries by connecting the RV to the shore power.
Long time to start When the surrounding ambient temperature is high, it will take a while to feel the compartments cooling.
Middle beams feel hot Middle beams feel hot after a period of time of the appliance running, it belongs to the normal phenomenon.
Dew drops
When external air flows into the cool inner surface of the fridge,dew drops can be formed. If the humidity of the
installed location is high or during the rainy season,dew drops can form on the outer side of the fridge. This is a
natural phenomenon that occurs during the humid weather,Wipe the water drops with a dry cloth.
Noise
When you operate the fridge for the first time,the fridge will operate at high speed to cool fast and the sound can
seem louder.
When the internal temperature falls below a certain level,the noise will subside.
When the operation of the compressor is starting or ending;various parts expanding/ contracting or various
control devices operating or temperature change within the fridge,you will hear the sounds,these are normal
sounds.
Compressor hot When working, the temperature of the compressor housing may rise to more than 176 °F(80℃) - please do not
touch the compressor, it may cause serious injury.
Compressor long time running When the ambient temperature too high or put too much fresh foods into the fridge,it will take long time to cool
down until the appliance run at the setting temperature.
Abnormal odors in refrigerator Odorous foods shall be packaged tightly; check for bad foods; the inside of refrigerator shall be cleaned.
English

CCD-0007862 Rev: 05-16-23 - 15 -
Normal phenomena Cause
Ice maker failing to work normally
Check the ice maker switch is turned on; whether the freezer compartment door is closed or ajar; Whether
the water valve is opened; whether water supply is obstructed, or water pressure is too low; Whether the
temperature of freezer compartment is high due to just power connection or frequent use;
Water leakage from ice outlet upon
power-on for the first time
During power up, the system will undergo a self-check process which will allow a little water flow out of the ice
maker. This is normal, and should be dried up.
Ice frozen together when ice maker
operates stably
If ice is not used frequently, ice cubes may freeze together; take out the frozen ice cubes from the ice storage
box, break into pieces and then put back, or discard directly.
Troubleshooting
Before calling for service, review this list. It may save you both time and expense. This list includes common occurrences that
are not the result of defective workmanship or materials in this appliance.
Fault Possible cause Remedial action
No display on the
display panel The fuse for the domestic supply is switched off. Check whether the power is on ; the fuse must be switched on.
Alarm sound Door has been open for more than 1 minute. Close the door completely.
The compressor
is not working
●Compressor will turn on/off normally to maintain temperature.
●The unit is in defrosting mode, no power
●The unit was not turned off during storage, and over temped.
●Do the cavity compartments maintain a cold temperature -
everything is normal
●Check all wiring connections and fuses
●Disconnect power so that no display or cavity light illuminates,
and reconnect power. This will reset power to the unit.
Compressor runs
too long
The fridge has recently been disconnected for a period of time;
Put too much fresh or hot food ; Doors are opened too frequently
or too long.
lt takes some hours for the fridge to cool down completely ;
Hot food will cause the fridge to run longer until the desired
temperature is reached ; Warm air entering the fridge cause it to
run longer. Open the door less often.
Vibrating noise Floor is uneven or weak ; Items placed on the top of the fridge are
vibrating; Fridge is touching wall or cabinets.
Be sure floor is level and solid and can adequately support fridge;
Remove items; Move fridge so that does not touch the wall or
cabinets;
SPECIFICATION
Specifications
Total Capacity 19.6cu.ft.
Freezer Capacity 7.25cu.ft
Fridge Capacity 12.31cu.ft.
Noise (dB) ≤42dB
Door Type French door
Handle Recessed handle
Control Type LED Display with electronic control
No. of Shelves 3
No. of Crisper Total 4 drawers, 2 in fridge compartment, 2 in
freezer compartment
Cooling Type Compression cooling system
Specifications
Refrigerant R600a
Rated Voltage DC 12V
Rated Current 15A
Power Consumption 566kwh/year
Off-Grid Rating 4.9Ah@77°F(25°C)
Temperature Range Refrigerator: 32°F to 43°F (0°C to 6°C) adjustable-
Freezer: -10°F to 5°F (-23°C to -15°C) adjustable
Working Temperature
Range 50°F to 110°F (10°C to 43°C)
Defrost Automatic
Certification CSA
Climate Class:
●Extended temperate(SN): this refrigerating appliance is intended to be used at ambient temperatures ranging from 50 °F (10 °C) to 90
°F(32 °C);
●Temperate(N): this refrigerating appliance is intended to be used at ambient temperatures ranging from 61 °F(16 °C) to
90 °F(32 °C);
●Subtropical(ST): this refrigerating appliance is intended to be used at ambient temperatures ranging from 61 °F(16 °C) to 100 °F(38 °C);
●Tropical(T): this refrigerating appliance is intended to be used at ambient temperatures ranging from 61 °F(16 °C) to
109 °F(43 °C);
This marking indicates that this product should not be disposed with other household wastes. To prevent possible harm to the
environment or human health from uncontrolled waste disposal,recycle it responsibly to promote the sustainable reuse of
material resources.
To return your used device,please use the return and collection systems or contact the retailer where the product was purchased.
They can take this product for environmental safe recycling.
English

Nous vous remercions d’avoir acheté ce produit Furrion®. Avant d’utiliser votre nouvel appareil, veuillez lire attentivement ces
instructions. Ce manuel d’instruction contient des informations pour une utilisation, une installation et un entretien sûrs de l’appareil.
Veuillez conserver ce manuel d’instructions dans un endroit sûr afin de pouvoir vous y référer ultérieurement. Cela permettra de
garantir une utilisation sûre et de réduire les risques de blessures. Veillez à transmettre ce manuel aux nouveaux propriétaires de
l’appareil.
Le fabricant n’accepte aucune responsabilité pour tout dommage dû en ne tenant pas compte de ces instructions.
CONTENU
EXPLICATION DES SYMBOLES .....................................................................................................................................................................17
INSTRUCTIONS DE SÉCURITÉ IMPORTANTES ..................................................................................................................................... 17
INTRODUCTION DU PRODUIT .......................................................................................................................................................................19
Caractéristiques du produit ....................................................................................................................................................................................................................19
APERÇU DU PRODUIT .......................................................................................................................................................................................19
Composants du produit ............................................................................................................................................................................................................................19
INSTALLATION ......................................................................................................................................................................................................20
Contenu de la boîte......................................................................................................................................................................................................................................20
Avant la première utilisation....................................................................................................................................................................................................................20
Transport ...........................................................................................................................................................................................................................................................20
Dimension d’installation ............................................................................................................................................................................................................................20
Préparation de l’installation.....................................................................................................................................................................................................................20
Raccordement électrique ........................................................................................................................................................................................................................ 21
Installation de conduites d’eau.............................................................................................................................................................................................................. 21
Préparation du drainage ...........................................................................................................................................................................................................................22
Fixation du réfrigérateur............................................................................................................................................................................................................................22
Montage du corps ........................................................................................................................................................................................................................................23
Montage de la charnière...........................................................................................................................................................................................................................23
FONCTIONNEMENT ........................................................................................................................................................................................... 23
Panneau de commande............................................................................................................................................................................................................................23
Alarme de porte ouverte...........................................................................................................................................................................................................................24
Interrupteur du compartiment réfrigérateur Marche/Arrêt....................................................................................................................................................24
Stockage des aliments.............................................................................................................................................................................................................................. 24
Stockage des aliments.............................................................................................................................................................................................................................. 25
Congélation et stockage des aliments dans le compartiment congélateur................................................................................................................25
Achat de produits surgelés ..................................................................................................................................................................................................................... 25
Stockage des aliments congelés.........................................................................................................................................................................................................25
Congélation des aliments frais..............................................................................................................................................................................................................26
Durées de conservation recommandées pour les aliments congelés dans le compartiment congélateur.............................................. 26
Compartiment réfrigérateur....................................................................................................................................................................................................................26
Compartiment congélateur.....................................................................................................................................................................................................................26
NETTOYAGE ET ENTRETIEN ..........................................................................................................................................................................27
Nettoyage extérieur.....................................................................................................................................................................................................................................27
Nettoyage intérieur ......................................................................................................................................................................................................................................27
Dégivrage.......................................................................................................................................................................................................................................................... 27
Nettoyage des joints de porte ...............................................................................................................................................................................................................27
Conseils pour le stockage des aliments congelés.....................................................................................................................................................................27
Conseils pour la réfrigération.................................................................................................................................................................................................................27
Voyager ..............................................................................................................................................................................................................................................................27
Stockage/hivernage...................................................................................................................................................................................................................................28
En cas de coupure de courant .............................................................................................................................................................................................................. 28
Fermeture.......................................................................................................................................................................................................................................................... 28
Conseils pour économiser l’énergie................................................................................................................................................................................................... 28
INSTRUCTIONS POUR LA MACHINE À GLAÇONS ................................................................................................................................28
Raccordement de l’alimentation en eau ..........................................................................................................................................................................................28
Fonctionnement de la machine à glaçons......................................................................................................................................................................................28
Utilisation hors réseau................................................................................................................................................................................................................................28
Instructions pour la machine à glaçons ...........................................................................................................................................................................................29
Hivernage de la machine à glaçons................................................................................................................................................................................................... 29
Désinfection de la machine à glaçons..............................................................................................................................................................................................29
DÉPANNAGE ..........................................................................................................................................................................................................29
SPÉCIFICATIONS .................................................................................................................................................................................................30
Français
CCD-0007862 Rev: 05-16-23
- 16 -

EXPLICATION DES SYMBOLES
Ce manuel contient des informations et des instructions de
sécurité pour vous aider à éliminer ou à réduire les risques
d’accidents et de blessures. Respectez toujours tous les
avertissements de sécurité identifiés par ces symboles. Un
mot de signalisation identifiera les messages de sécurité et
les messages relatifs aux dommages matériels, et indiquera le
degré ou le niveau de gravité du danger.
DANGER
Indique une situation dangereuse imminente qui, si elle n’est
pas évitée, entraînera la mort ou des blessures graves.
AVERTISSEMENT
Indique une situation potentiellement dangereuse qui, si
elle n’est pas évitée, peut entraîner la mort ou des blessures
graves.
MISE EN GARDE
Indique une situation potentiellement dangereuse qui, si elle
n’est pas évitée, peut entraîner des blessures mineures ou
modérées, ou des dommages matériels.
INSTRUCTIONS DE SÉCURITÉ IMPORTANTES
Sécurité générale
AVERTISSEMENT
●Cet appareil est destiné à être utilisé dans des
applications domestiques et similaires telles que:
–Maisons résidentielles, mobiles et de loisirs.
–Les cuisines du personnel dans les magasins, les
bureaux et autres environnements de travail;
–Maisons de ferme et par les clients dans les hôtels, les
motels et autres environnements de type résidentiel;
–Environnements de type «Bed and Breakfast»;
–Restauration et applications non commerciales
similaires.
●Ne stockez pas de substances explosives telles que
des bombes aérosols contenant un gaz propulseur
inflammable dans cet appareil.
●Si le cordon d’alimentation est endommagé, il doit être
remplacé par le fabricant, son agent de service ou des
personnes de qualification similaire afin d’éviter tout
danger.
●Veillez à ce que les ouvertures de ventilation, dans le
boîtier de l’appareil ou dans la structure intégrée, ne soient
pas obstruées.
●N’utilisez pas de dispositifs mécaniques ou d’autres
moyens pour accélérer le processus de dégivrage, autres
que ceux recommandés par le fabricant.
●Ne pas endommager le circuit du réfrigérant.
●N’utilisez pas d’appareils électriques à l’intérieur des
compartiments de stockage des aliments de l’appareil,
sauf s’ils sont du type recommandé par le fabricant.
●Le réfrigérant et le gaz de soufflage de l’isolation sont
inflammables. Lorsque vous mettez l’appareil au rebut, ne
le faites que dans un centre de traitement des déchets
agréé. Ne pas exposer à la flamme.
●Lorsque vous positionnez l’appareil, assurez-vous que le
cordon d’alimentation n’est pas coincé ou endommagé.
●Ne placez pas plusieurs prises de courant ou
alimentations portables à l’arrière de l’appareil.
●Pour éviter tout danger dû à l’instabilité de l’appareil, celui-
ci doit être fixé conformément aux instructions.
Réfrigérant
DANGER
RISQUE D’INCENDIE OU D’EXPLOSION
●Fluide frigorigène inflammable utilisé. N’utilisez pas de
dispositifs mécaniques pour dégivrer le réfrigérateur. Ne
pas percer le tube de réfrigérant.
●Fluide frigorigène inflammable utilisé. Les réparations
doivent être effectuées uniquement par un personnel de
service qualifié. Ne pas percer le tube de réfrigérant.
MISE EN GARDE
RISQUE D’INCENDIE OU D’EXPLOSION
●Fluide frigorigène inflammable utilisé. Consultez le manuel
de réparation/le guide de l’utilisateur avant de tenter de
réparer ce produit. Toutes les précautions de sécurité
doivent être respectées.
●Éliminez les biens conformément à la réglementation
fédérale ou locale. Fluide frigorigène inflammable utilisé.
●Risque d’incendie ou d’explosion dû à la perforation
de la tubulure du réfrigérant; suivre attentivement
les instructions de manipulation. Fluide frigorigène
inflammable utilisé.
Le circuit frigorifique de l’appareil contient de l’isobutane
(R600a), un gaz naturel très respectueux de l’environnement,
mais inflammable.
Risk of Fire
Pendant le transport et l’installation de l’appareil,
veillez à ce qu’aucun des composants du circuit
frigorifique ne soit endommagé.
●Si le circuit de réfrigérant est endommagé:
–Évitez les flammes nues et les sources
d’ignition;
–Aérez soigneusement la pièce dans laquelle se trouve
l’appareil.
Utilisation quotidienne
●Cet appareil n’est pas destiné à être utilisé par des
personnes (y compris les enfants) dont les capacités
physiques, sensorielles ou mentales sont réduites, ou qui
manquent d’expérience et de connaissances, à moins
qu’elles n’aient reçu une surveillance ou des instructions
concernant l’utilisation de l’appareil par une personne
responsable de leur sécurité.
Français
CCD-0007862 Rev: 05-16-23 - 17 -

●Ne stockez pas de gaz ou de liquides inflammables dans
l’appareil, car il y a un risque d’explosion.
●Ne faites pas fonctionner d’appareils électriques dans l’appareil
(par exemple, sorbetières électriques, mélangeurs, etc.).
●Ne placez pas d’objets chauds à proximité des composants
en plastique de cet appareil.
●Ne placez pas de produits alimentaires directement contre
la sortie d’air de la paroi arrière.
●Stockez les aliments congelés préemballés conformément
aux instructions du fabricant des aliments congelés.
●Les recommandations de stockage du fabricant de
l’appareil doivent être strictement respectées. Se référer aux
instructions pertinentes pour le stockage.
●Ne placez pas de boissons gazeuses ou pétillantes dans le
compartiment congélateur, car cela crée une pression dans
le récipient, ce qui peut le faire exploser et endommager
l’appareil.
●Les aliments congelés peuvent provoquer des brûlures
par le gel s’ils sont consommés directement dans le
compartiment congélateur.
●Ne pas placer l’appareil à la lumière directe du soleil.
●Éloignez de l’appareil les bougies, lampes et autres objets à
flamme nue afin de ne pas mettre le feu à l’appareil.
●L’appareil est destiné à conserver des aliments et/ou des
boissons dans des conditions normales de ménage, comme
expliqué dans ce manuel d’instructions.
●L’appareil est lourd. Il faut faire attention en le déplaçant.
●Ne retirez pas et ne touchez pas les articles du
compartiment congélateur si vos mains sont humides ou
mouillées, car cela pourrait provoquer des abrasions de la
peau ou des brûlures dues au gel ou à la congélation.
●N’utilisez jamais la base, les tiroirs, les portes, etc. pour vous
tenir debout ou comme support.
●Les aliments congelés ne doivent pas être recongelés une
fois qu’ils ont été décongelés.
●Ne consommez pas de sucettes glacées ou de glaçons
directement sortis du congélateur, car cela peut provoquer
des brûlures de congélation dans la bouche et les lèvres.
●Pour éviter que des articles ne tombent et ne causent des
blessures ou des dommages à l’appareil, ne surchargez pas
les bacs de la porte et ne mettez pas trop d’aliments dans les
tiroirs à légumes.
●Ne jamais couvrir ou obstruer les fentes de ventilation de
l’appareil.
Installation
●Pour le raccordement électrique, suivez attentivement les
instructions données dans ce manuel.
●Déballez l’appareil et vérifiez s’il n’est pas endommagé.
Ne pas brancher l’appareil s’il est endommagé. Signalez
immédiatement les dommages éventuels à l’endroit où vous
l’avez acheté. Dans ce cas, conservez l’emballage.
●Il est conseillé d’attendre au moins quatre heures avant de
brancher l’appareil pour permettre à l’huile de refluer dans le
compresseur.
●L’appareil doit être entouré d’une circulation d’air suffisante,
faute de quoi il risque de surchauffer. Pour obtenir une
ventilation suffisante, suivez les instructions relatives
à l’installation. Dans la mesure du possible, l’arrière du
produit ne doit pas être trop proche d’un mur pour éviter de
toucher ou d’attraper les parties chaudes (compresseur,
condenseur). Pour éviter tout risque d’incendie, suivez les
instructions relatives à l’installation.
●L’appareil ne doit pas être placé à proximité de radiateurs ou
de cuisinières.
Service:
●Tout travail électrique nécessaire à l’entretien de l’appareil
doit être effectué par un électricien qualifié ou une personne
compétente.
●Ce produit doit être réparé par un centre de service agréé
et seules des pièces de rechange d’origine doivent être
utilisées.
En cas de dysfonctionnement
●Si un dysfonctionnement se produit sur l’appareil, veuillez
d’abord consulter la section «Dépannage» de ces
instructions. Si les informations fournies ne vous aident pas,
n’effectuez pas d’autres réparations vous-même.
●Vous ne devez en aucun cas tenter de réparer l’appareil
vous-même. Les réparations effectuées par des personnes
inexpérimentées peuvent provoquer des blessures ou des
dysfonctionnements graves.
Retirer l’emballage de transport
L’appareil et les aménagements intérieurs sont protégés pour le
transport. Retirez le ruban adhésif sur les côtés gauche et droit
de la porte. Vous pouvez enlever les restes de colle en utilisant
de l’essence minérale. Retirez tout le ruban adhésif et les pièces
d’emballage de l’intérieur de l’appareil.
Élimination correcte de ce produit
AVERTISSEMENT
RISQUE DE PIÉGEAGE DE L’ENFANT
Avant de jeter votre ancien réfrigérateur ou congélateur:
–Enlever les portes
–Laissez les étagères en place afin que les enfants ne
puissent pas facilement grimper à l’intérieur.
Afin d’éviter que l’élimination incontrôlée des déchets ne porte
atteinte à l’environnement ou à la santé humaine, recyclez-les
de manière responsable afin de promouvoir la réutilisation
durable des ressources matérielles. Pour retourner votre
appareil usagé, veuillez utiliser les systèmes de retour et de
collecte ou contacter le détaillant où le produit a été acheté. Ils
peuvent prendre ce produit pour un recyclage respectueux de
l’environnement.
●Les appareils redondants ne doivent pas être jetés avec
les déchets ménagers normaux, mais remis à un centre de
collecte et de recyclage des équipements électroniques. Un
symbole figurant sur le produit, le manuel d’instructions ou
l’emballage indique qu’il peut être recyclé.
●Les matériaux utilisés à l’intérieur de l’appareil sont
recyclables et sont étiquetés avec des informations à ce
sujet. En recyclant les matériaux ou autres pièces des
appareils usagés, vous contribuez de manière significative
à la protection de notre environnement. Des informations
sur les centres d’élimination appropriés pour les appareils
usagés peuvent être fournies par votre autorité locale.
●L’emballage de cet appareil est uniquement nécessaire pour
assurer une protection efficace pendant le transport. Ces
matériaux peuvent être recyclés dans la mesure du possible.
Français
CCD-0007862 Rev: 05-16-23
- 18 -

INTRODUCTION DU PRODUIT
Caractéristiques du produit
Ce réfrigérateur possède les fonctions d’économie d’énergie, de
contrôle précis de la température et de dégivrage automatique.
Contrôle précis de la température, machine à
glaçons automatique.
Les systèmes de contrôle par micro-ordinateur sont capables
de contrôler séparément le réfrigérateur et le congélateur avec
plus de précision.
Dégivrage automatique
Cet appareil est équipé d’un programme qui contrôle la
fréquence et la durée du dégivrage de votre congélateur.
Ainsi, vous n’aurez jamais besoin de dégivrer manuellement le
congélateur.
Affichage à DEL et contrôles de température
Le tableau de commande affiche respectivement les
températures du réfrigérateur et du congélateur. Pour modifier le
réglage de l’une ou l’autre des sections, il suffit d’appuyer sur le
bouton de réglage de la température.
Verre trempé, sûr et fiable
Le verre trempé est sûr et fiable, facile à nettoyer et durable.
Joint de porte amovible et facile à nettoyer
Le ou les joints de porte sont faciles à retirer et à nettoyer, ce qui
permet au produit de fonctionner efficacement plus longtemps.
Système d’alarme d’ouverture de porte
Si vous laissez l’une de vos portes ouvertes pendant plus d’une
minute, le système d’alarme vous rappellera de la fermer.
Machine à glaçons automatique
Le réfrigérateur a la fonction de fabrication automatique de
glace.
APERÇU DU PRODUIT
Composants du produit
●La disposition des articles ci-dessous est sujette à modification sans préavis, et peut ne pas ressembler à l’image ci-dessous.
●L’apparence et les spécifications du produit réel peuvent différer selon le modèle.
1 1
5
2
6
3
7
4
8
Article Nom de la pièce Article Nom de la pièce
①Bacs de porte de réfrigérateur x 6 ⑤Croustilleur de légumes avec couvercle en verre x 2
②Étagères de réfrigérateur x 2 ⑥Tiroirs de congélation x 2
③
Lumière du réfrigérateur x 1
⑦
Assemblage de la machine à glaçons à l’intérieur du tiroir
du congélateur x 1
④Lumière D.E.L. du réfrigérateur x 1 ⑧Tiroir en plastique à l’intérieur du tiroir du congélateur x 1
Français
CCD-0007862 Rev: 05-16-23 - 19 -
This manual suits for next models
3
Table of contents
Languages:
Other Furrion Refrigerator manuals

Furrion
Furrion FCR20DCAFA-SV User manual

Furrion
Furrion Arctic FCR08DCGTA-BL User manual

Furrion
Furrion FCR43ACA-BL User manual

Furrion
Furrion FCR08DCGTA-NR User manual

Furrion
Furrion FCR14ACBQA-BL User manual

Furrion
Furrion FCR10DCBTA-BL User manual

Furrion
Furrion FCR20ACAFA-SS User manual

Furrion
Furrion Arctic FCR10DCDTA Series User manual

Furrion
Furrion FCR10DCBTA-BL User manual

Furrion
Furrion FCR21ACASA-BL User manual