Furuno FA-170 User manual

www.furuno.com
Pub No. E42-01503-B
(1607, GREG) FA-170
00019109511
EAIS HANDBOOK FOR
MODEL FA-170
This manual covers the initial settings and operations for the FA-170. This manual is authored with refer-
ences to the installation manual (IME-44900-*) and operator’s manual (OME-44900-*) and should be used
together with those manuals.
Table of Contents
Initial settings and adjustments..................................................................................................... 1
Controls overview.......................................................................................................................... 1
How to adjust the STEDS settings................................................................................................ 2
SENSOR OUTPUT menu............................................................................................................. 3
KEY SET menu............................................................................................................................. 3
How to select an EAIS mode......................................................................................................... 5
NAV STATUS display.................................................................................................................... 5
VOYAGE tab................................................................................................................................. 5
SHIP’S INFO tab........................................................................................................................... 6
EAIS text messages...................................................................................................................... 6
How to create new messages and view messages....................................................................... 6


1
Initial settings and adjustments
Follow the procedures outlined in chapter 3 of the installation manual to set up the FA-170 for your
vessel.
Controls overview
No. Key name Description
1BRILL key • Displays brilliance setting pop-up window.
• Switches between Day and Night display modes.
2DISP key • Cycles through display screens.
• Switches between Day and Night display modes when the brilliance
setting pop-up window is active.
• Closes all active menu windows and returns to the last displayed
screen.
3MENU/ESC key • Opens the menu.
• Goes back one layer in the menu.
• Closes the settings screen, when displayed, and returns to the
menu.
4Power key • Short press to turn the unit on.
• Long press to turn the unit off.
5NAV STATUS key Opens the [NAV STATUS] settings window.
6ENT/ACK key • Confirms the currently selected item on the menu.
• Confirms adjusted settings.
• Acknowledges alerts.
7 Cursorpad • Move the selection cursor.
• AIS display: or changes display range.
• [TARGET LIST] display: or changes pages.
• [OWN INFORMATION] display: or switches between
information tabs.
• [ALERT] display: or switches between the alert list and the
alert log. or selects an alert.
B
: CURSOR
: SELECT : RANGE
ENT
: NEXT
DISP
7
6
1 2 3
45
CLASS A
MMSI
TYPE
POSN
SOG
RNG
HDG
COG
BRG
123123123
310º
135º
225º
10.0kn
3 .0NM
34º 31.1234´N
135º 24.5678´E
A
CPA
20'00"2 .0NM
EAIS icon
EAIS symbols
: EAIS aircraft
: EAIS ship
Blue EAIS symbols indicate
ships/aircraft which use the same
STEDS key as your FA-170.

2
How to adjust the STEDS settings
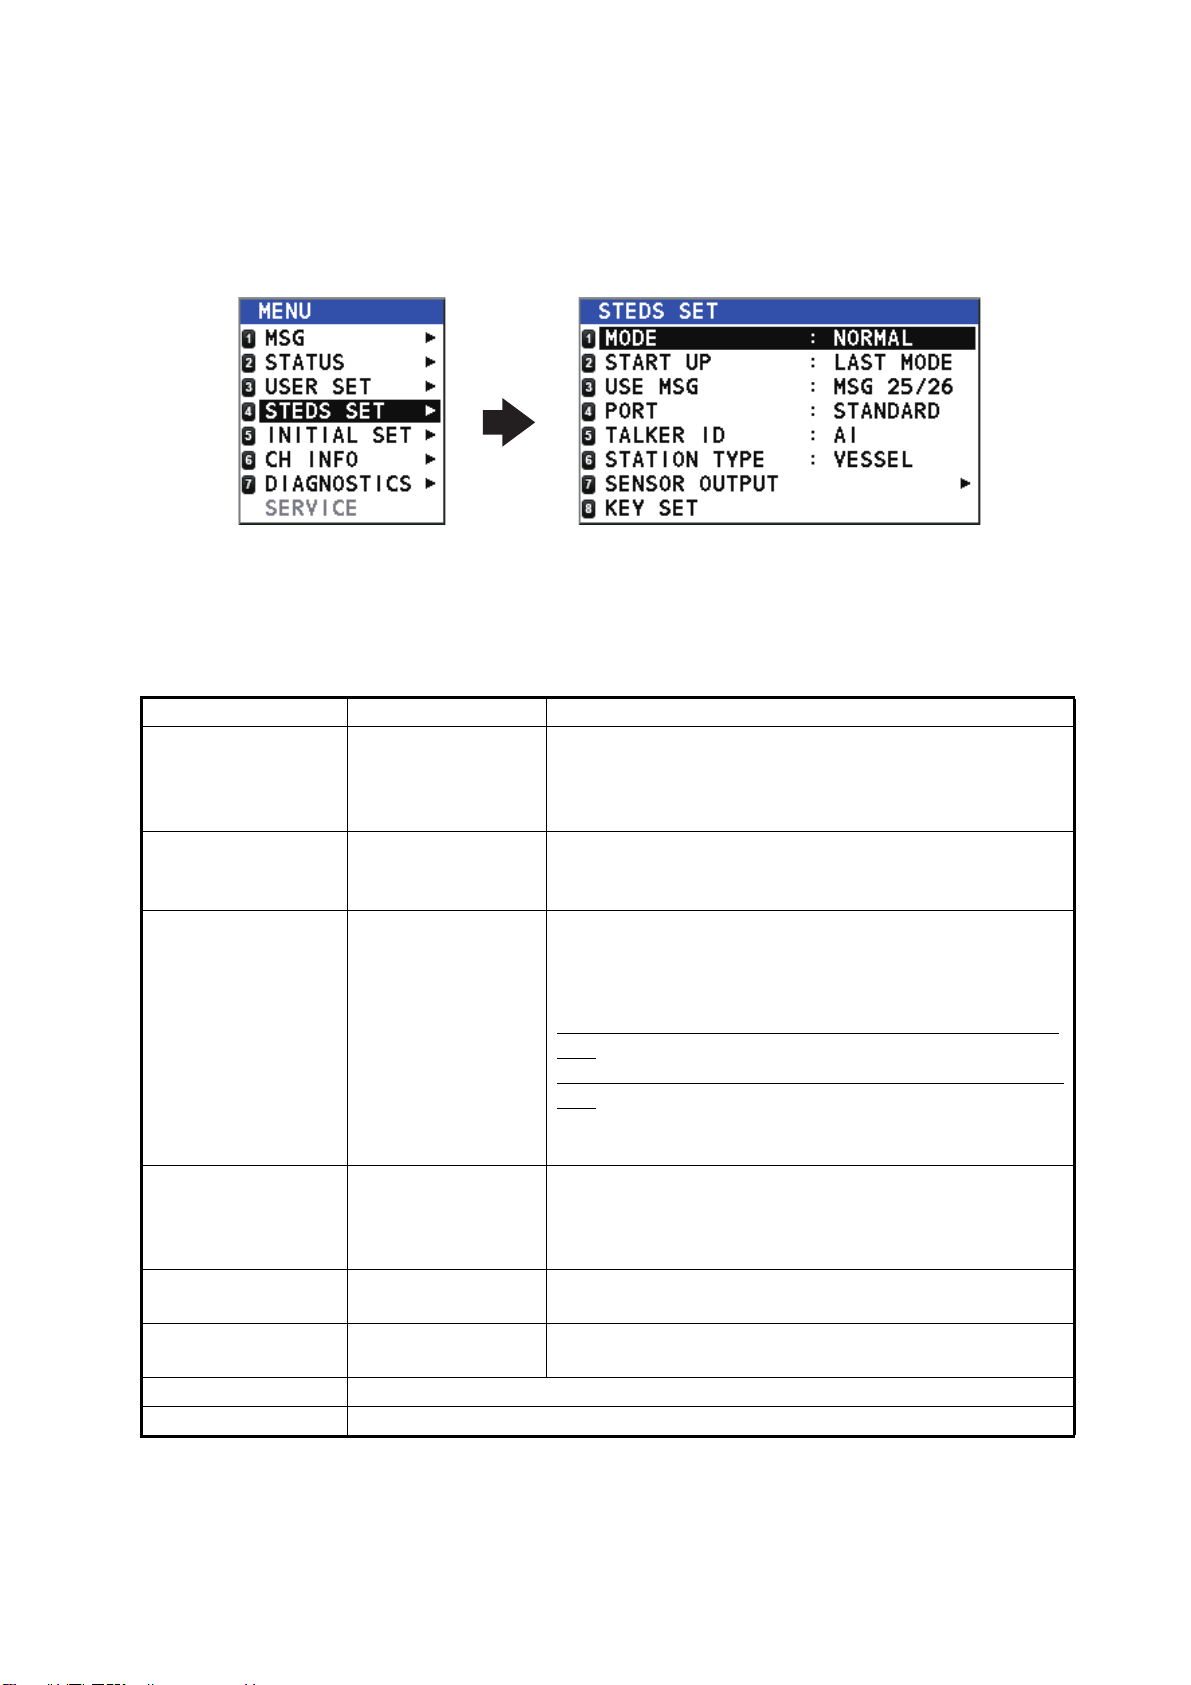
EAIS-related settings are found in the STEDS SET menu, in the main menu.
To access these settings, do the following:
1. Press the MENU/ESC key to open the main menu.
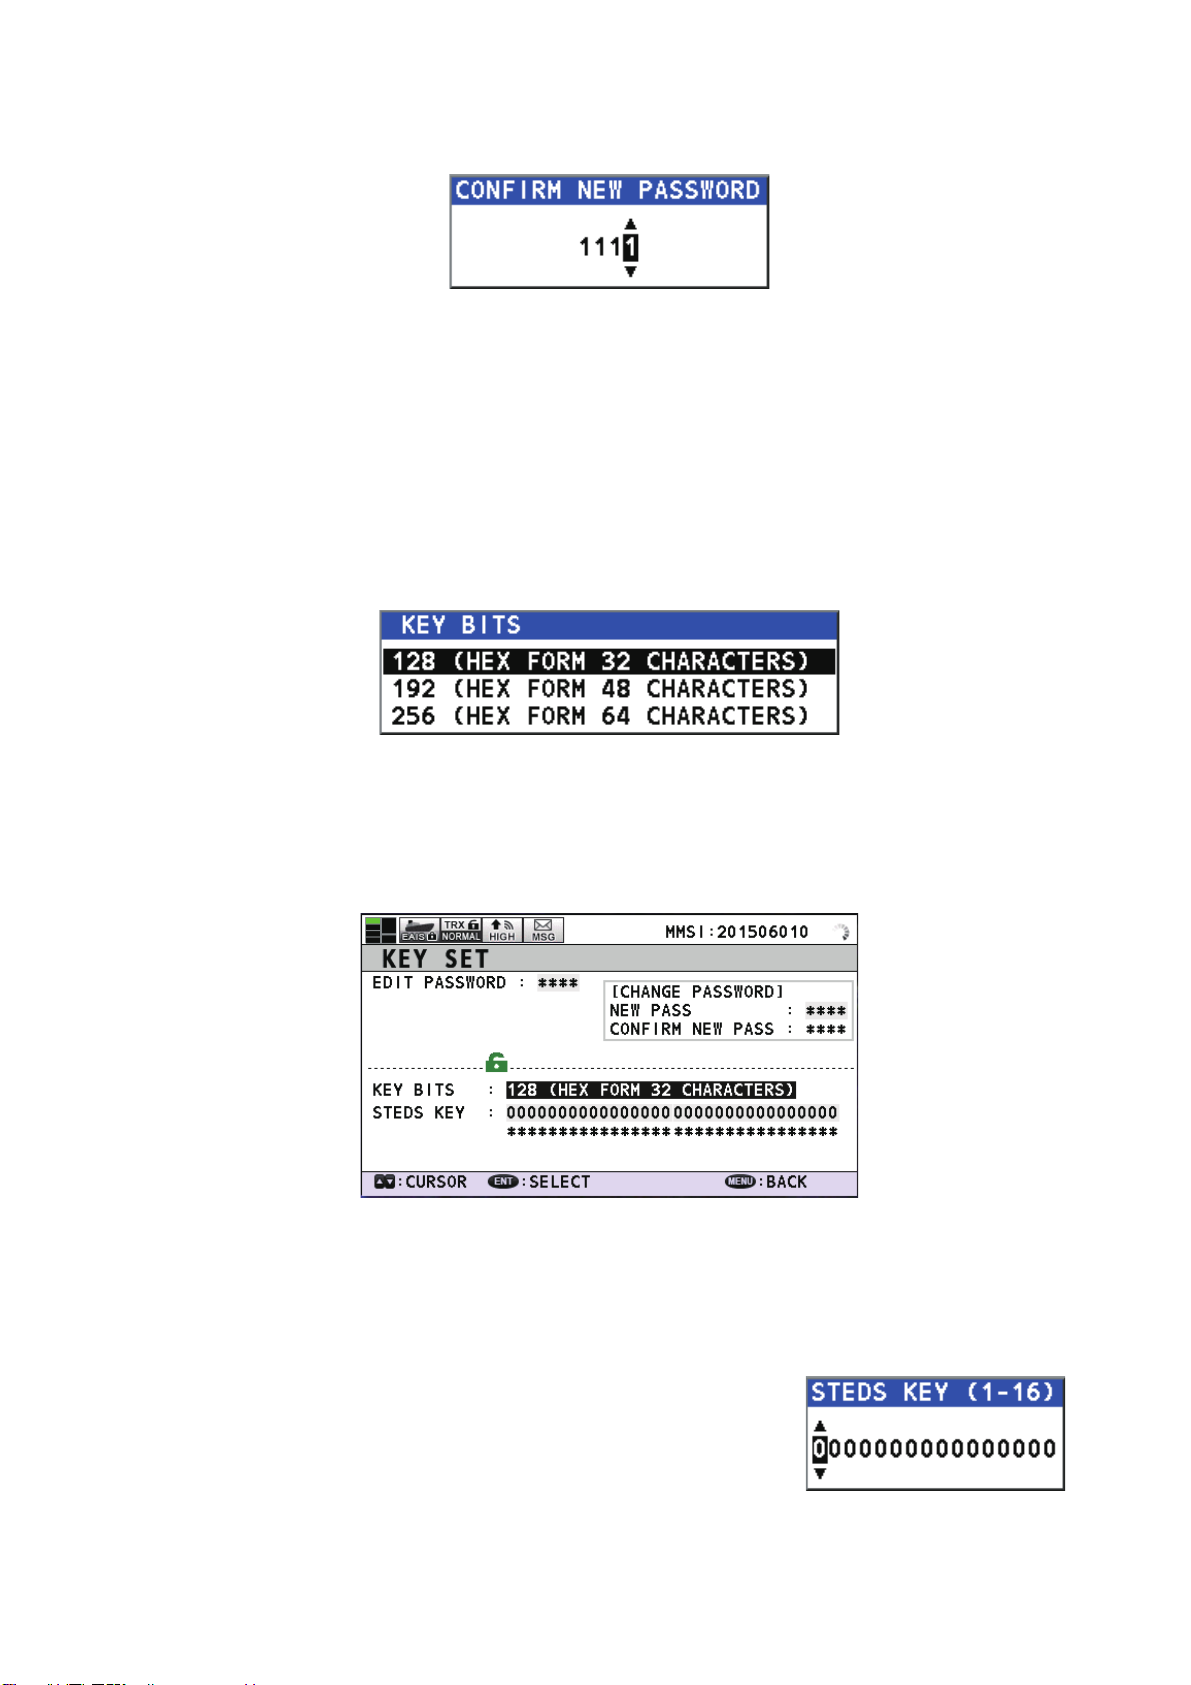
If a STEDS key is not set, the message “STEDS KEY REQUIRED. SET FROM “KEY SET”
MENU”. appears at the bottom of the screen. To set a STEDS KEY, follow the procedure
outlined in “KEY SET menu” on the following page.
2. Select [STEDS SET], then press the ENT/ACK key.
3. Referring to the table below, adjust the settings as appropriate.
*: Where MODE is set to RESTRICTED and USE MSG is set to MSG6/8, AIRCRAFT is not
available for selection as a station type.
4. Press the DISP key to close the menu.
Menu item Settings options Description
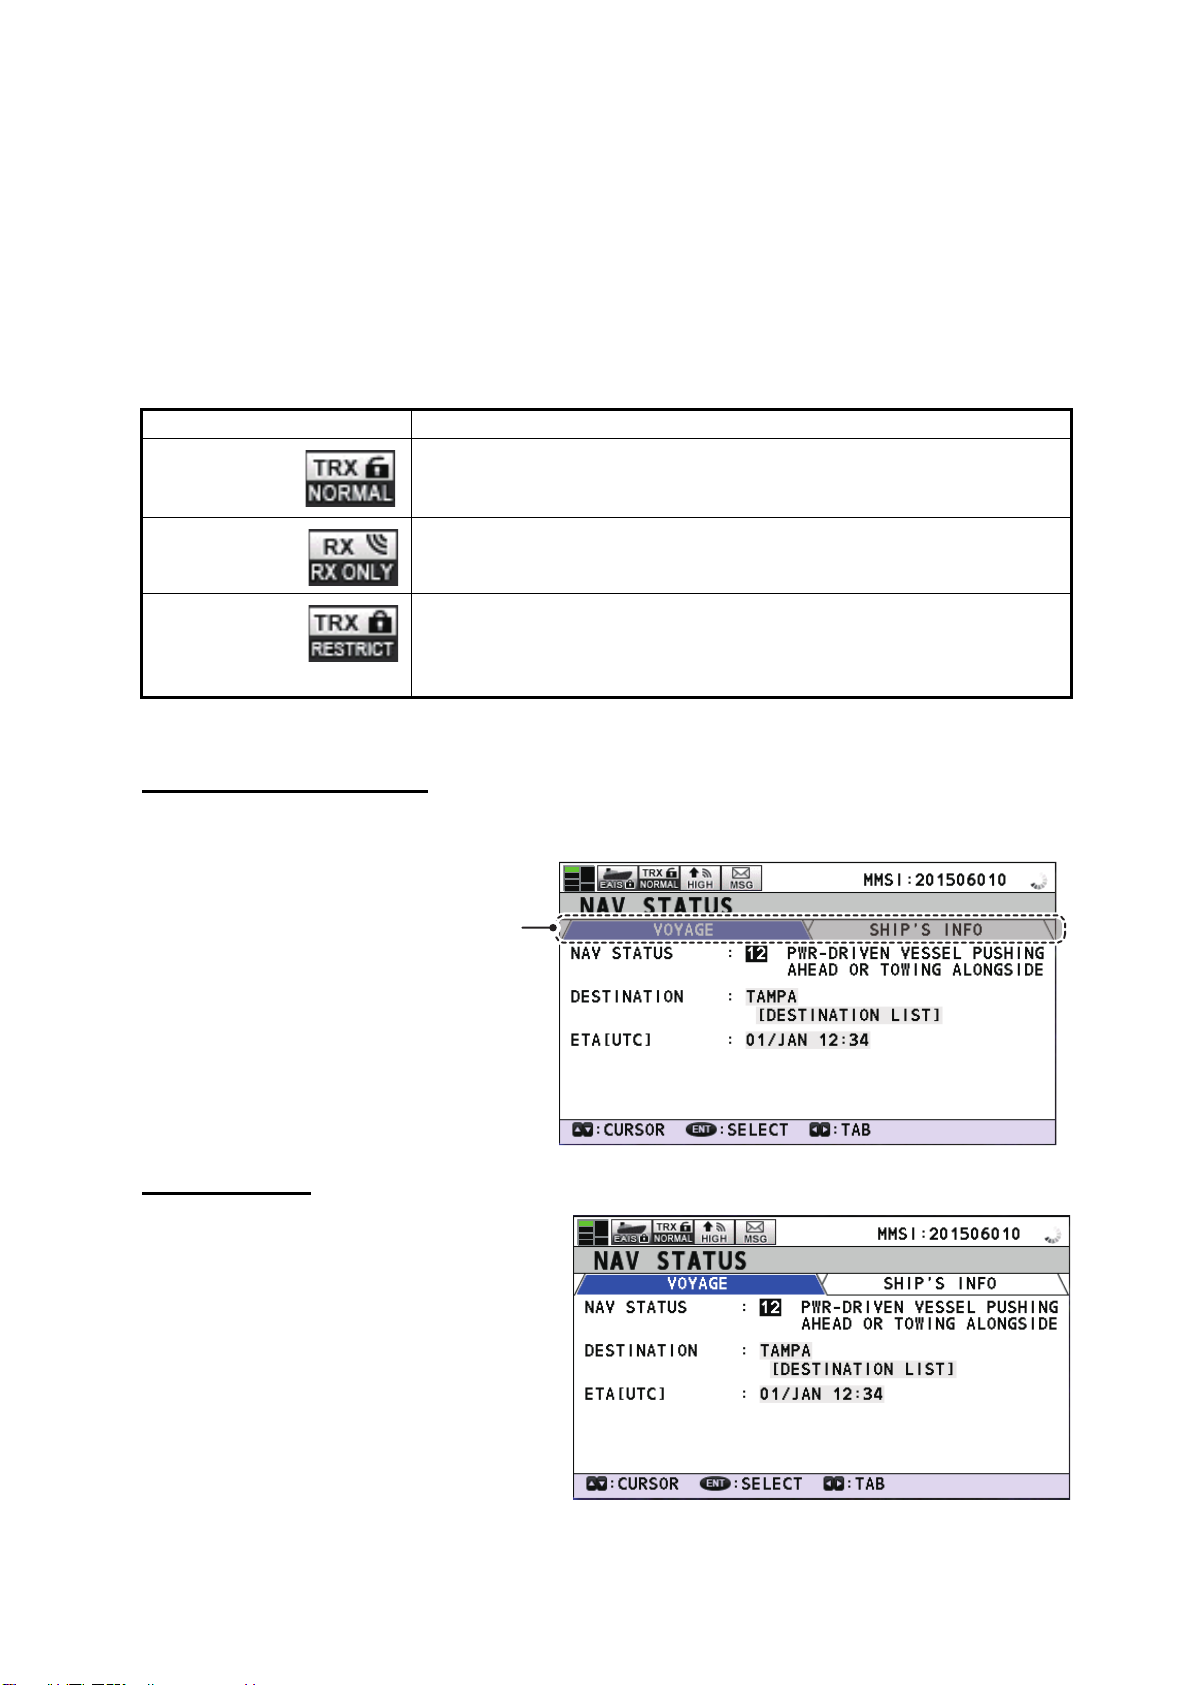
MODE • NORMAL
• RX ONLY
• RESTRICTED
• Sets the unit to normal CLASS-A AIS mode.
• Sets the unit to receive-only mode.
• Sets the unit to restricted mode. (Requires STEDS
key. See “KEY SET menu” on the following page.)
START UP • LAST MODE
• RESTRICTED
• The unit starts up in the mode last used when the
power was turned off.
• The unit starts in the restricted mode.
USE MSG • MSG 6/8
• MSG 25/26
Select the appropriate message format for this unit’s
communication group. The setting here must match the
setting for other vessels/aircraft using the same STEDS
key. (See “KEY SET menu” on the following page.)
Where MSG 6/8 is selected the following data are not
sent: ASSET NAME, ASSET TYPE.
Where MSG 25/26 is selected the following data are not
sent: IMO NO., NAME, CALL SIGN, TYPE OF SHIP,
CARGO TYPE, DESTINATION, ETA, DRAUGHT, AN-
TENNA POSITION, ROT, HDG.
PORT • STANDARD
• ALLOW COTS
IEC PI protocol settings. Select [STANDARD] to keep
transmitted data encrypted. Select [ALLOW COTS] to
convert encrypted data to standard messages for the PI
interface.
TALKER ID • AI
• EI
Select the appropriate talker ID for this unit.
STATION TYPE • VESSEL
• AIRCRAFT*
Select the appropriate station type (where the unit is
installed) for this unit.
SENSOR OUTPUT See “SENSOR OUTPUT menu” below.
KEY SET See “KEY SET menu” on the following page.

3
SENSOR OUTPUT menu
Data input from connected sensors and the unit’s internal GPS can be output to external
equipment. The available setting options are listed in the table below:
KEY SET menu
The [KEY SET] menu contains encryption settings for sent and received encrypted messages. A
password is required to access this menu.
The default factory-set password is “0000”. To change the password follow the procedure outlined
below.
1. From the [STEDS SET] menu, select [KEY SET], then press the ENT/ACK key.
2. Select [EDIT PASSWORD], then press the ENT/ACK key to show the password input pop up
window.
3. For initial setup, input “0000”, then press the ENT/ACK key. It is recommended that a new
password be set at this time. To set a new password, go to step 4. For access other than initial
setup, input the correct password to unlock the menu for editing, then go to step 7.
Note: If the password is correct, the lock icon indicated in the figure above changes to
unlocked status. You can now change the password or the [STEDS KEY] settings.
4. Press or to select [NEW], then press the ENT/ACK key to show the password
input pop up window.
Press or to cycle through digits, press or to move the input cursor.
5. Input the new password as required.
Input source Output settings
SENSOR1 [OFF], [COM1], [COM2], [COM3], [COM4], [COM5], [COM6].
Select the COM port to which the external equipment is connected, or select [OFF]
to disable throughput. The external equipment assigned to each port can be
viewed from the [INITIAL SET] menu’s [I/O PORT] menu. See section 3.5 of the
installation manual for details.
SENSOR2
SENSOR3
INT GPS
Lock icon.
= locked. (View only, no
edit functions enabled.)
= unlocked. (Edit functions
enabled for all items.)

4
6. Select [CONFIRM], then press the ENT/ACK key. The “CONFIRM NEW PASSWORD” input
pop up window is displayed.
Confirm the new password by inputting the same password set at step 5, then press the ENT/
ACK key.
If the passwords match, the [KEY SET] menu is reset to locked status. Repeat step 2 and step
3 to unlock the menu.
If the passwords do not match, two short beeps are released to indicate that the password is
not changed. Repeat step 6, taking care to input the correct password.
Note: Unconfirmed changes can be discarded. Press the DISP key to close all open menus,
then repeat this procedure.
7. Select [KEY BITS], then press the ENT/ACK key to show the [KEY BITS] settings pop up win-
dow.
This setting dictates the encryption key length for the [STEDS KEY]. The default setting is [128
(HEX FORM 32 CHARACTERS)].
8. Select the appropriate encryption, then press the ENT/ACK key. The [STEDS KEY] indication
changes depending on the string length selected. The example below shows the 128 bit en-
cryption length.
Note: The [STEDS KEY] must be set before selecting [RESTRICTED] mode in the [MODE]
settings.
9. Press or to select the [STEDS KEY] encryption string, then press the ENT/ACK key to
show the encryption key input pop up window. The example figure below shows the 128 bit
encryption.
Press or to cycle through digits, press or to move the
input cursor.
10. Input the first 16 alphanumeric characters of the encryption key
string, then press the ENT/ACK key.
11. Select and set the remaining encryption strings as necessary, referring to step 9 and step 10.
12. Press the DISP key to close the menu.

5
How to select an EAIS mode
The FA-170 has three mode settings when using EAIS: [NORMAL], [RX ONLY] and
[RESTRICTED].
1. Press the MENU/ESC key to open the main menu.
2. Select [STEDS SET], then press the ENT/ACK key.
3. Select [MODE], then press the ENT/ACK key.
4. Referring to the table below, select the appropriate mode of operation, then press the
ENT/ACK key. The selected mode’s icon is displayed at the top of the screen.
5. Press the DISP key to close the menu.
NAV STATUS Display
The [NAV STATUS] display has two tabs: [VOYAGE] and [SHIP’S INFO].
VOYAGE tab
Referring to section 1.6 of the operator’s
manual, set the voyage-related data prior to
each voyage.
Mode Description
NORMAL The FA-170 retains all standard CLASS-A AIS functionality.
Non-encrypted CLASS A AIS messages are transmitted.
CLASS A AIS messages and encrypted messages are received.
RX ONLY Transmission is completely disabled.
The FA-170 only receives messages (encrypted and non-encrypted).
RESTRICTED The FA-170 conforms to STEDS mode, not AIS standard.
Encrypted messages and CLASS A AIS messages are received.
MSG 6/8 or MSG 25/26 are used only for transmission of position re-
ports and text messages. These are always encrypted.
Press ► or ◄ to switch between the
[VOYAGE] tab and [SHIP’S INFO] tab.
Press ▲ or ▼ to select an item to edit.
Press the ENT key to confirm the
selection.
[VOYAGE] tab
and
[SHIP’S INFO] tab

6
SHIP’S INFO tab
Set the vessel’s information following the
procedure below.
1. Press the NAV STATUS key to open
the [NAV STATUS] display.
2. Press or to show the [SHIP’S
INFO] tab.
3. [ASSET NAME] is selected, press the
ENT/ACK key to change or input the
name of the vessel on which this unit is
installed. Refer to section 1.5.4 of the
operator’s manual for how to use the on-screen keyboard.
4. Select [ASSET TYPE], then press the ENT/ACK key.
5. Input the appropriate asset type, then press the ENT/ACK key.
For vessels whose asset type is not defined, set [ASSET TYPE] to [0].
6. Set [CARGO TYPE], [DRAUGHT] and [NO. OF PERSONS], referring to steps 6 through 12
of section 1.6 in the operator’s manual.
EAIS text messages
Depending on the STEDS mode in use, some messaging functions are changed or disabled. The
table below shows the modes and their respective functionality.
How to create new messages and view messages
The procedure to create new messages is the same as in all other AIS modes.
The procedure to view encrypted messages is the same as all other modes, provided the sender
has encrypted the message using the same STEDS KEY settings as your FA-170 unit.
See section 1.9 of the operator’s manual for details on how to create and view messages.
STEDS mode Functionality
NORMAL Only unencrypted messages can be sent.
RX ONLY No messages can be sent.
RESTRICTED Only encrypted messages can be sent.
0 : DEFAULT
Other manuals for FA-170
3
Table of contents
Other Furuno Transceiver manuals
Popular Transceiver manuals by other brands

Advanced Wireless Communications
Advanced Wireless Communications Mini 3 quick start guide

Comtech EF Data
Comtech EF Data CSAT-5060 Installation and operation manual

Kenwood
Kenwood TM-231A instruction manual

Microhard Systems
Microhard Systems pMDDL2450 operating manual

Sensus
Sensus 510R2 Installation Instructions-Draft

Midland
Midland VHF-FM 15 watt 220 MHz Mobile Transceiver user guide