G.A.D Hogklint User manual

Product
Produkt
Assembly manual
Monteringsanvisning
Högklint
Intro
Högklint is a exible shelving system that comes in two stan-
dard heights; 229 and 103 cm (including legs, with plinth 7
cm lower). The lenght of the unit is achieved by combining
sections of 44/42 or 86/84 cm. The unit can be extended
with one or more sections at any time. Put a personal touch
to your unit by adding shelves, dividers, glass doors, drawers
and slanted magazine shelves. Choose base; legs or plinth.
Furthermore you can choose to have doors or drawers pain-
ted in your favorite colour.
Outline
This is a general manual for all types of Högklint. Follow the
instructions applicable to your unit! Start by arranging all the
pieces, all movable shelves and dividers can be put to the
side for now. The frame will rst be screwed together section
by section, then the decorative top will be attached (if any)
and last the base (legs or plinth). Below is a list of all compo-
nents:
WWW.GAD.SE
G.A.D
Phone | +46 (0)498-248230
E-mail | [email protected]
A. Screw for plinth/legs 40 mm
B. Screw for decorative top 30 mm
C. Screw for angle bracket and hinge
15 mm
D. Nails for back piece 15 mm
E. Wooden dowel 30 mm
F. Cam dowel screw
G. Cam lock
H. Shelf support for magazine shelf
I. Angle bracket
J. Shelf support
K. Hinge
A.
J.
I.
H.
G.
F.
E.
D.
C.
B.
K.

Top 40, high Top 80, high
Top 40, low Top 80, low
Fixed shelf 40 (high) Fixed shelf 80 (high)
Bottom 40 Bottom 80
Movable shelves/dividers
Left side piece, low Right side piece, low Middle piece, low
inside
outside
inside
outside
Up
Up
Up
Up
Up
Up
Up Up
Down
Down
Down
Down
Down
Down
Down Down

Left side piece, high Right side pice, high Middle piece, high
inside
outside
inside
outside
Step by step
1. Make sure you have all pieces.
2. The shelf is easiest assembled with its back to the oor,
before it is lifted into place.
3. Start by laying out the side and middle pieces in front of
you. Put wooden dowels E and cam dowel screws F on
the inside of the side pieces and both sides of the middle
pieces.
4. Low: Get the top and bottom pieces. Start by assemling
the unit from its left. Push the top and bottom piece (40 or
80 cm wide depending on your layout) together with the
left side. Put cam locks G in the top and bottom pieces.
The arrow on the cam lock should be pointing towards the
cam dowel screw. Turn the cam lock using a screwdri-
ver ca 180 degrees until it grips and locks the cam dowel
screw. The top should be mounted with the cam locks
facing up and the bottom with them facing down.
5. High: Get the top, bottom and xed shelf pieces.
WWW.GAD.SE

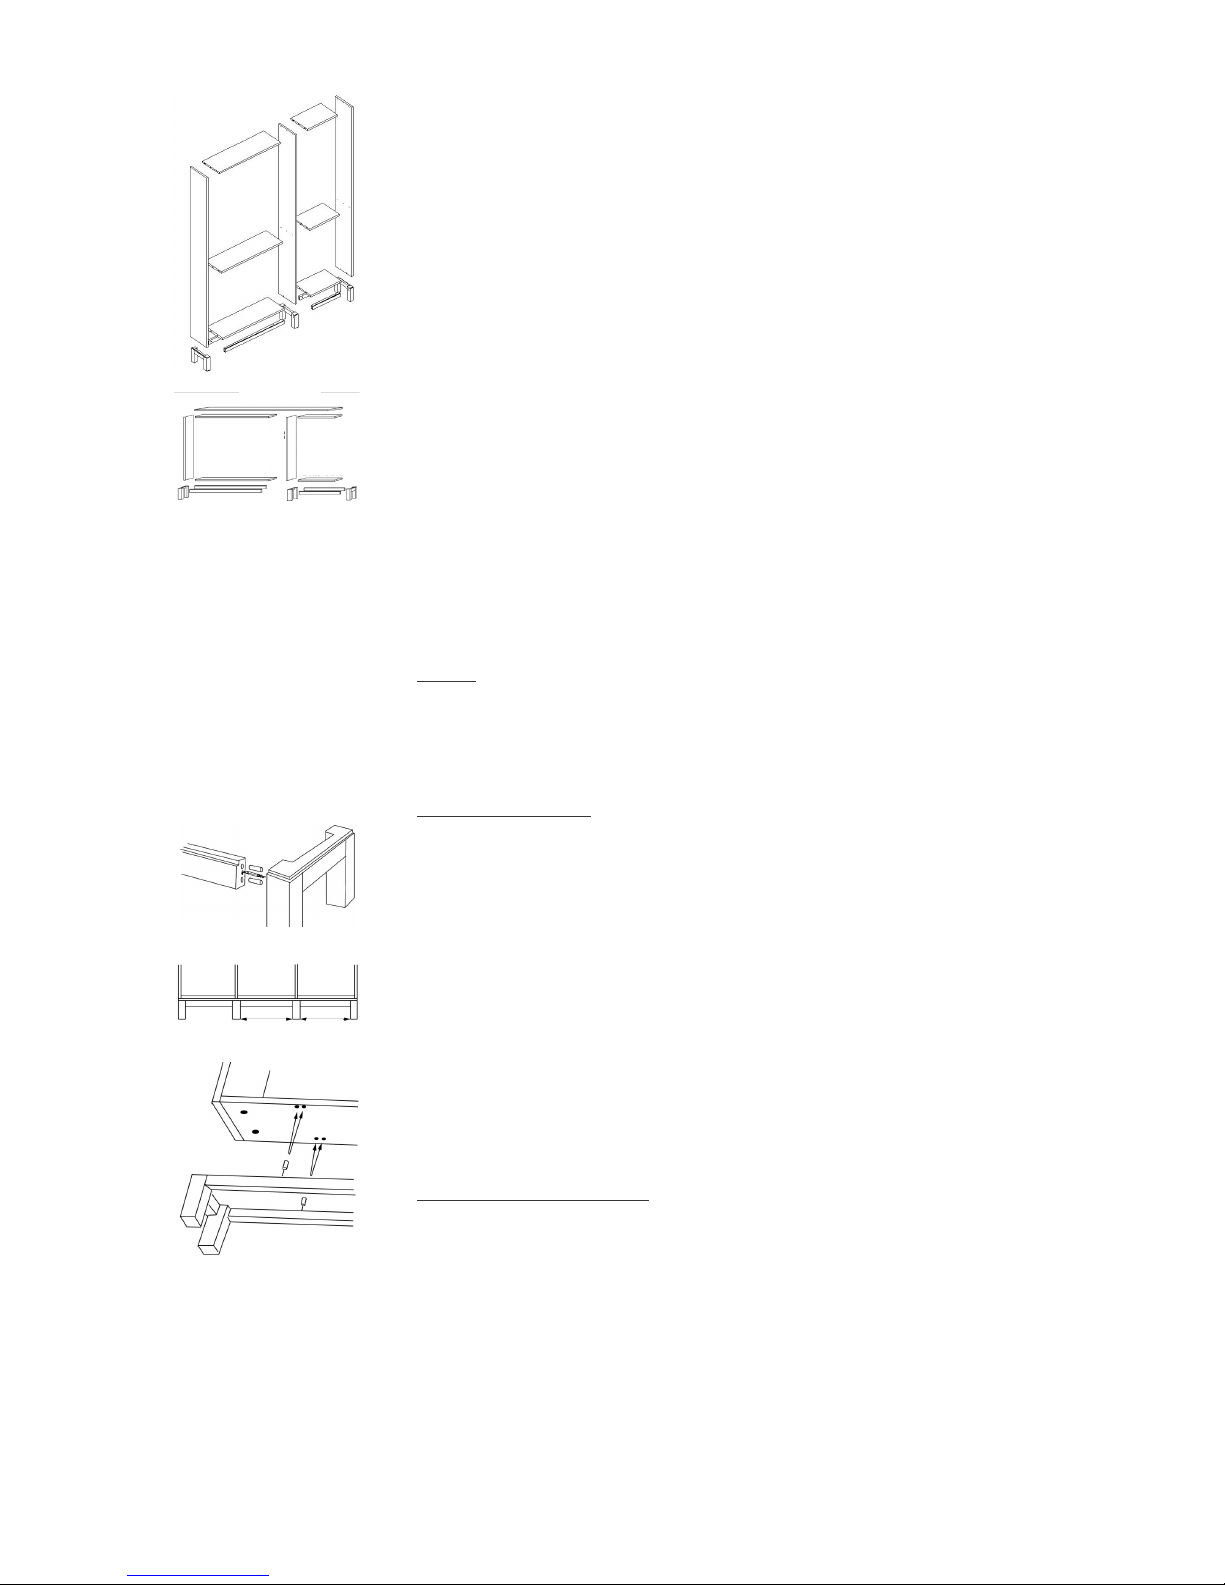
Start by assemling the unit from its left. Push the top,
bottom and shelf (40 or 80 cm wide depending on your
layout) together with the left side. Put cam locks G in the
top, bottom and shelf pieces. The arrow on the cam lock
should be pointing towards the cam dowel screw. Turn
the cam lock using a screwdriver ca 180 degrees until it
grips and lock the cam dowel screw. The top should be
mounted with the cam locks facing up and the bottom
and the xed shelf with the cam locks facing down.
6. If the unit is one section wide, push the right side together
with the rest of the frame. Fixate with cam locks.
7. If the unit has more than one section, push a middle piece
together with the rest of the frame. Fixate with cam locks.
Please note the pre drilled holes for hinges should be at
the front. Continue adding the sections from left to right.
Finish with the right side piece.
8. Low: Mount the decorative top. Place the decorative top
with the side you want visible facing down on the oor.
Place the unit upside down on top of the decorative top.
Measure all sides to get it in the middle. Fasten with screw
B in pre drilled countersunk holes.
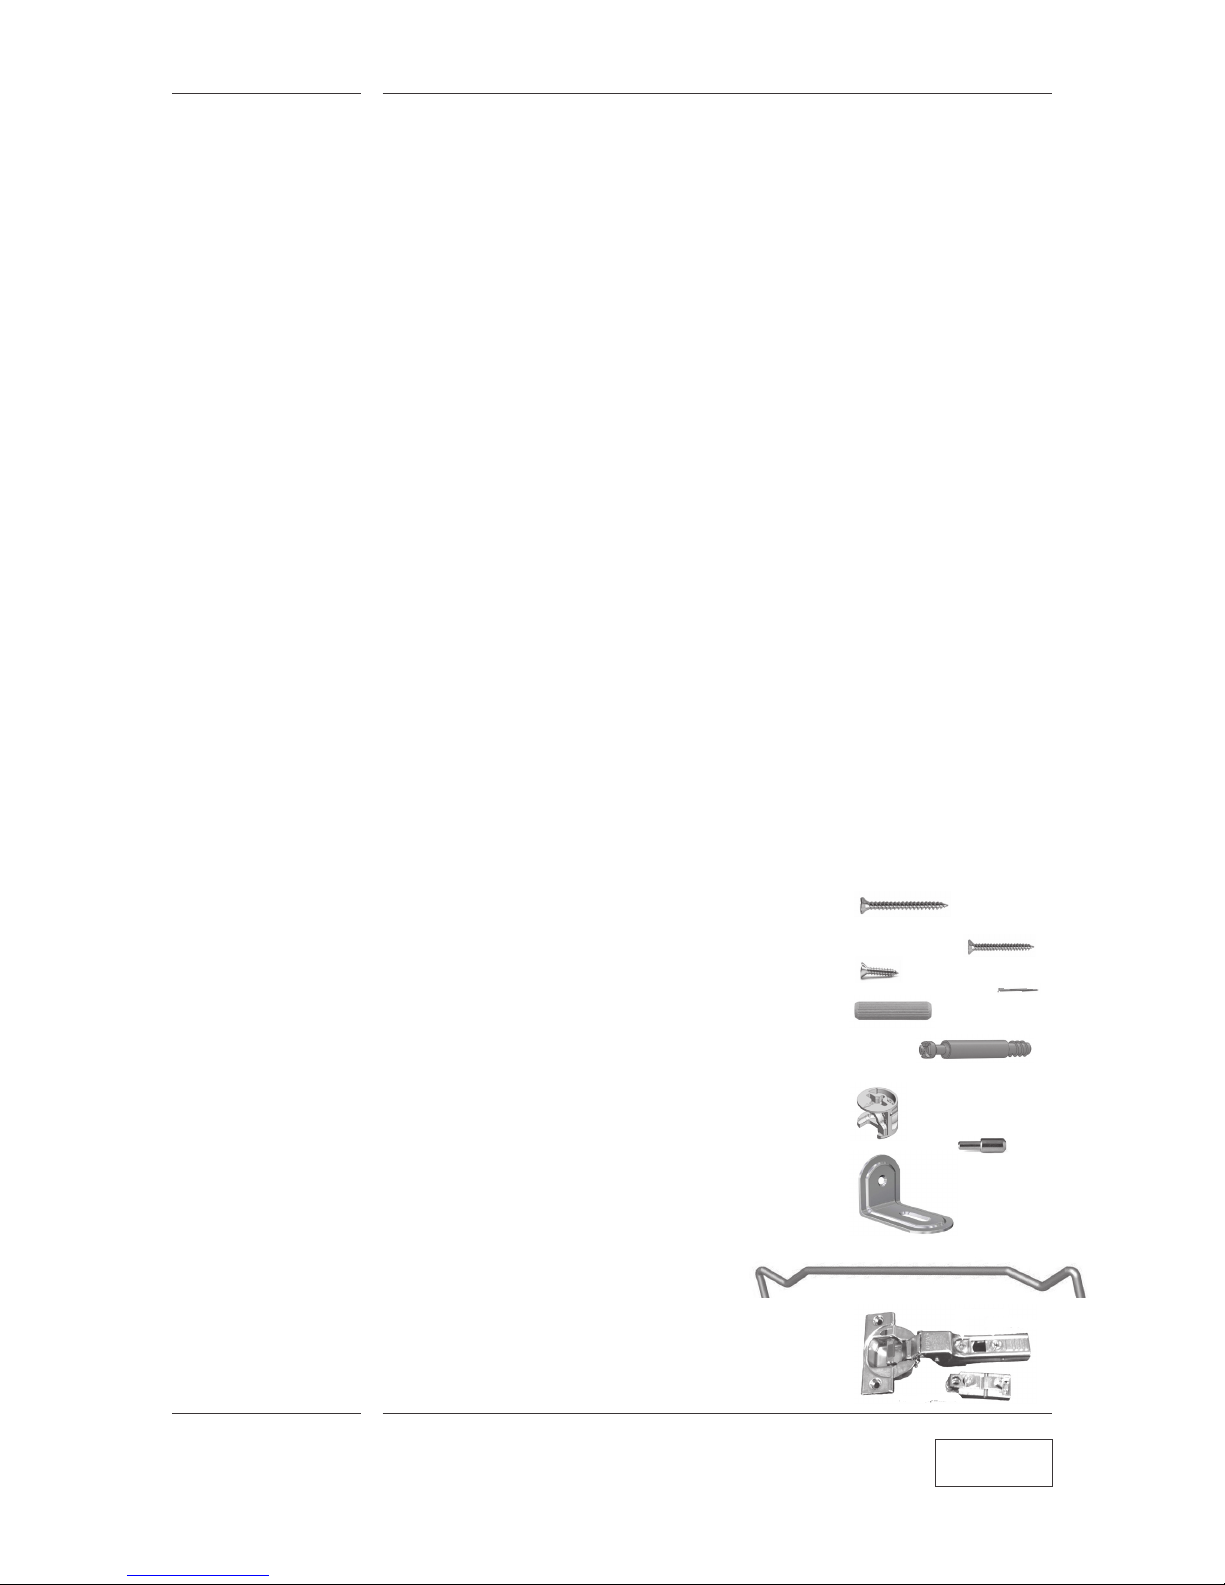
9. Plinth: Place wooden dowels E in the back of the plinth in
the holes that match the bottom piece. The G.A.D label
should be facing forward. Push the plinth into place at the
front of the frame (to make room for a skirting board at
the back). Fasten with screw A.
10. Assemble the legs: Screw the legs to the crossbars by
placing wooden dowels E and Cam dowel screw F in the
legs. Push together the legs and the crossbars. Place Cam
lock G in the crossbars and tighten. Make sure the G.A.D
lable is at the front right.
Please observe that a unit with more than one section of
the same with (40 or 80 cm) may have crossbars of dif-
ferent lenght. Side sections have slightly shorter crossbars
than a middle section.
Make sure the legs line up with side and middle pieces.
Put wooden dowels E in the top of the assembled leg-”fra-
me” where the holes line up with the ones in the bottom
piece. Push the parts together and screw it in place using
screw A.
11. Mounting the back piece: Put the unit on the oor with
its back facing up. Place the back piece on the unit and
make sure it lines up with the sides and the bottom. The
side with the pencil lines should be turned up (to the
back). Nail the back piece in place using nails D along the
pencil lines.
12. Lift the unit up and put it in place.
13. High: The high model of Högklint must be anchord to the
wall. Use the angle bracket I. Fasten the angle bracket to
the top of the unit using screw C.
Decorative top
Side piece
Middle piece
Top piece Top piece
Bottom piece Bottom piece
Long
crossbar
377 or
797 mm
Short
crossbar
365 or
785 mm

Fasten to the wall using a screw or plug/screw suitable for
your type of wall (not enclosed).
14. Place the movable shelves horizontal and vertical in the
places according to your drawing. Push the shelf support
J into the sides or top/bottom and slide the shelf into pla-
ce from the front.
15. Place slanted magazine shelves according to your
drawing. Put shelf support H in the pre drilled holes. The
shelf support at the front should be placed one step lower
than the one at the back.
16. Attaching the doors: Remove the hinge plate from the
hinge K and screw it to the inside of the unit in pre drilled
holes using screw C. The narrow side of the plate should
be turned to the front of the unit. Screw the hinge to the
door using screw C. Push the door hinges on to the plates
until you hear a click sound.
17. Adjustment of doors: The three screws on the hinge en-
ables adjustment of the doors. By turning the screws the
position is altered in height, depth and sideways. When
the door position is right push a G.A.D cover in place on
each hinge to cover the ajustment screws.
18. Place drawers in their intended place.
WWW.GAD.SE
Adjust sideways
Adjust in and out
Hinge plate

Maintenance
The unit is made from solid birch or oak. The solid wood has
a natural look and high quality that makes your unit last for a
very long time. Wood is a natural material that changes with
season. Sometimes it is easy to move shelves and drawers
and sometimes it can be tougher. It depends on the season
and the humidity and will change when the weather changes.
The wood is oiled with two coats as standard and is well
protected on delivery. A piece of furniture made from solid
wood should be maintained regularly to retain its protection
and functions. We recommend that you treat your unit about
six months after purchase with the oil enclosed and thereafter
when the wood feels or looks dry. After a few years the need
for more oil will reduce.
A soap treated piece of furniture also needs maintenance.
Pour a litre of tepid water into a container and put in a table
spoon of soapakes. Whisk and stir until the soapakes are
dissolved. Dip a rag or sponge in the soapy water and coat
the wood. Stains can be removed with a very ne sand paper
before applying the soap. Soap mix that is left over can be
kept in a container with lid.
Clean the shelf with a dry or moist rag. Many modern rags
clean perfectly with just water, otherwise add a drop of liquid
soap to your water. To remove tough stains or wash the glass
doors bile soap is the best choice for both unit and environ-
ment.
If you have any questions about assembly or maintenan-
ce please call our customer service at 0046 498 248230 or
e-mail [email protected].
G.A.D
Phone | +46 (0)498-248230
E-mail | [email protected]
Product
Produkt
Maintenance
Underhåll
Högklint
WWW.GAD.SE
Table of contents
Popular Indoor Furnishing manuals by other brands

TUHOME Furniture
TUHOME Furniture CLW5948 Assembly instructions

swenyo
swenyo ux4 flowchart Assembly instruction

Tradecraft Specialties
Tradecraft Specialties SURFBUS-1 instruction manual

Oak furnitureland
Oak furnitureland CARTER Assembly instructions

dadada
dadada Central Park Assembly instructions

Dorel Home Products
Dorel Home Products DA2027229MK manual

BOCK
BOCK floorline 9.5 80 Assembly and operation manual

Panorama Moveis
Panorama Moveis BHO 40 Assembly instructions

Home Decorators Collection
Home Decorators Collection ROSEBROOK FRA81324-ST Use and care guide

DUSK
DUSK Ascot manual

Southern Enterprises
Southern Enterprises Brandilyn CK843300TX Assembly instructions

Next
Next 283528 Assembly instructions