Gadget Labs WavePRO User manual

Macintosh User's Guide
Professional 24-bit
Digital Recording Interface
TM

Gadget Labs Software License Agreement
The software programs included with this product (the "Software") are owned or licensed by Gadget Labs, Inc. and are
protected by United States and international copyright laws and international trade provisions. All rights are reserved. The
purchaser is granted a license to use the software only, subject to the following restrictions and limitations.
License Gadget Labs grants you rights to use the Software on a single user computer, or on a single terminal or
workstation of a multi-user computer or local area network. A separate license must be obtained from
Gadget Labs for every other terminal or workstation on a multi-user computer or local area network.
Copy restrictions A. This Software and the accompanying written materials are copyrighted and are proprietary products
of Gadget Labs. You may make one copy of the Software for backup or archival purposes. All other
copying of the Software or written materials is expressly forbidden.
B. You may not decompile, reverse engineer, copy, transfer, make telecommunications data
transmissions of the Software or otherwise use the Software except as expressly stated in this
Agreement.
Termination This license is effective until terminated. You may terminate this license at any time by destroying all
copies of the Software. This license will terminate automatically, without notice from Gadget Labs, if
you fail to comply with this Agreement. Upon such termination, you shall destroy all copies of the
Software (together with all modifications and merged portions in any form).
Limited warranty
A. Gadget Labs warrants that the original disks are free from defects in material and workmanship,
assuming normal use, for a period of ninety (90) days from the date of purchase. If a defect occurs
during this time, you may return your faulty disk to Gadget Labs, along with a dated proof of purchase,
and it will be replaced free of charge.
B. Except for the express warranty set forth above, Gadget Labs grants no other warranties express or
implied, regarding the disks and documentation, their fitness for a particular purpose, their quality or
their merchantability. No oral or written information or advice given by Gadget Labs, its reseller, agents,
or employees shall create a warranty. Some states do not allow the exclusion or limitation of implied
warranties, so the above exclusions and/or limitations may not apply to you.
C. Gadget Labs' entire liability and your exclusive remedy shall be the replacement of the Software that
does not meet Gadget Labs' limited warranty and that is returned to Gadget Labs with a dated proof of
purchase.
No liability for
consequential
damages
In no event shall Gadget Labs be liable for any damages, including any loss of profits, or other
incidental or consequential damages, arising out of your use or inability to use the Software or written
materials, even if Gadget Labs has been advised of the possibility of such damages. Some states do
not allow the exclusion or limitation of liability for consequential damages or incidental damages, so the
above exclusions and/or limitations may not apply to you.
Miscellaneous
This Agreement is governed by the laws of the State of Oregon in the United States. If any provision of
this Agreement shall be unlawful, void, or for any reason unenforceable, then that provision shall be
deemed severed from this Agreement and shall not affect the validity or enforceability of the remaining
provisions of this Agreement.
Trademarks
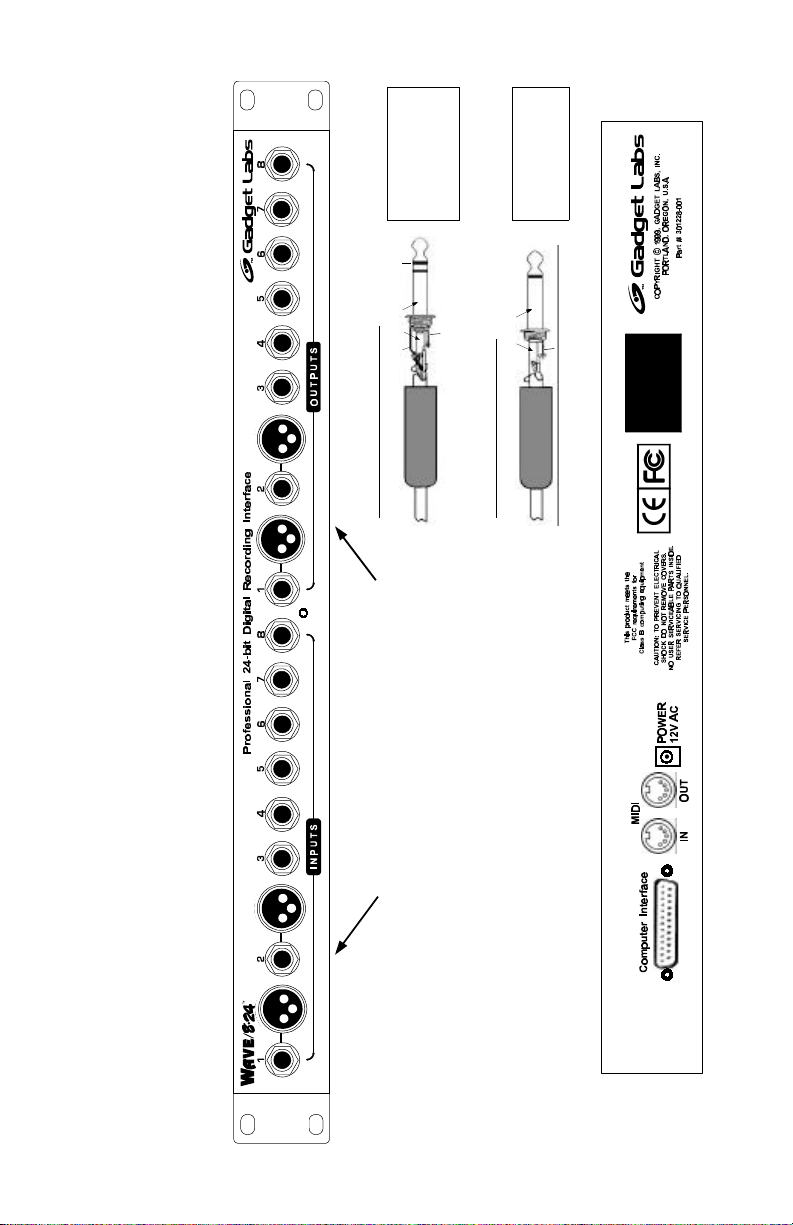
WavePRO, Wave/424, Wave/496, Wave/824, SoundCache and Gadget Labs are
trademarks of Gadget Labs, Inc. Other names are trademarks or
registered trademarks and are property of their respective owners.
i

Digital Recording Interface
Macintosh User's Guide
First things first!
Thank you for purchasing your WavePRO digital recording interface.
We "gadgeteers" genuinely appreciate your patronage. This guide
contains information on installing and using the interface, and we
tried to make it as brief as possible (because no one has time to read
manuals anyway).
If you have ideas about how we can improve our products, we'd like
to hear from you. Our contact information is on the back cover of
this manual. Also, if you have any difficulty installing or using the
WavePRO interface, please refer to the Support section of this guide.
Our goals
When we designed the WavePRO family, our primary focus was to
create a professional recording tool with a straight-forward design
that's easy to use. Our emphasis is on bringing you the very best
combination of quality and value. To that end, we didn't clutter the
product with lots of features that might be confusing or get in the
way of the primary reason you bought this thing in the first place: to
make great music & audio recordings! Thanks again and Have Fun!
TABLE OF CONTENTS
Getting started....................................................................2
Installing the WavePRO hardware and software drivers...................2
Connecting the WavePRO interface to your music studio system........9
Advanced Configuration: WavePRO Control Panel Applet .............. 11
Setting up applications for the WavePRO interface ...................... 14
Specific application configuration........................................... 15
A few basic tips about multi-track audio recording with you PC ...... 18
Troubleshooting................................................................. 19
Registration, Support & Warranty information............................ 20
FCC and other compliance stuff ............................................. 21
TM
1

2
INSTALLING THE WAVEPRO HARDWARE
& SOFTWARE DRIVERS
WavePRO interfaces are designed to be truly Plug and Play.
Installation in most systems should take only a few minutes.
If you have any difficulties with installation or operation of
WavePRO, check the Troubleshooting section later in this guide.
STEP ŒShut down and turn off your Mac
Before you begin installing your WavePRO interface please note:
Static electricity can damage electronic components!
Take the following precaution before you begin installation:
Shut down and turn off the Mac but leave it plugged in. Touch
the metal chassis of the Mac to drain the static from your
bod Jbefore you touch the WavePRO PCI card.
Next, unplug the Mac's power cable. Follow the steps in your Mac's
user manual and remove the Mac chassis cover.
GETTING STARTED
Here’s a list of stuff that’s included with this package:
Wave/824 Wave/496 Wave/424
WavePRO PCI card üü üü üü
Computer interface cable
(6 feet / 2 meters) üü üü
MIDI adapter cable üü üü
Patch Box: 4 in, 4 out half-rack üü
Patch Box: 8 in, 8 out rack-mount üü
AC Power Cube üü
4 Rubber feet for bottom of Patch
Box. For placing patch box on a
desktop instead of equipment rack. üü üü
WavePRO software drivers diskette üü üü üü
User’s Guide (duh) üü üü üü

9-pin connector
for MIDI cable
adapter
25-pin connector
for cable
to Patch box
STEP •Install the WavePRO PCI card
Select a PCI slot in your computer that has enough clearance for the
WavePRO card. The WavePRO cards have been specially designed to be
extremely immune to noise generated by other components in your
Mac.
3
Purcell, CA
P108-000
IN
OUT
RCA jacks
for SP DIF
digital I/O
option
(not included
with basic
Wave/824
interface)
nBe careful to avoid damaging any
components and plug the WavePRO
PCI card into the slot.
nMake sure the card fits securely
and then replace the PCIcard’s
mounting screw.
nReinstall the Mac's chassis cover
nDO NOT TURN ON THE COMPUTER
YET
WavePRO PCI card connections
Wave/824
Line INPUTS 1 & 2
Line OUTPUTS 3 & 4
Line INPUTS 3 & 4
Line OUTPUTS 1 & 2
Wave/496 Wave/424

IF YOU ARE INSTALLING THE WAVE/824, FOLLOW THE
NEXT STEPS 4 and 5
(note: if you are installing the Wave/496 or Wave/424, go to Step 6)
STEP •Connect the cord from the AC Power Cube to
the Patch Box
Plug the small connector on the end
of the cable from the Power Cube to
the Wave/824.
Make sure this connection is secure
since the Wave/824 must have power
to operate properly.
If you won't be using the Wave/824 in
an equipment rack, you should also
stick the rubber feet on the bottom
of the Patch Box.
4
Connect one end of the Computer
Interface Cable to the WavePRO
PCI card connection at the back of
the computer.
Connect the other end of the
Computer Interface Cable to the
back of the Patch Box.
For the Wave/824, you can
also connect MIDI cables to the
MIDI IN & OUT connections.
IF YOU ARE INSTALLING THE WAVE/824 OR WAVE/496,
FOLLOW THE NEXT STEP.
(note: if you are installing the Wave/424, go to Step 6)
STEP ŽConnect the PCI card to the Patch Box

STEP ‘INSTALLING THE SOFTWARE DRIVERS
nAfter installing the WavePRO hardware, reconnect the computer's
power cord, turn on the power switch and boot your computer.
nOnce your Mac is booted up, insert the diskette labeled ‘WavePRO
Macintosh Drivers’.
Note: If your Mac does not have a floppy disk drive, please surf to
our Internet Web site to download the drivers.
The URL address is:
http://www.gadgetlabs.com/support/downloads.htm
The software diskette includes unique Installer files for each
WavePRO product. For example, there is a file called, ‘Wave/824
Macintosh Installer’ and also one called, ‘Wave/424 Macintosh In-
staller’.
The Installer files include software drivers that support both Audio
(the ASIO driver) and for MIDI (the OMS ‘Open Music System’ driver).
nTo start the driver installation, double-click the Installer icon that
corresponds to your WavePRO product. You will see the End User
License Agreement, please read through this before hitting the
Continue button.
nAfter hitting Continue, the installer will prompt you for a location.
Select a location (remember where it was!), and hit the Install
button.
nThe Installer will now copy the necessary files onto your hard disk.
STEP •Connect the Power Cube to an AC outlet
Connect the Power Cube to an AC power outlet.
This can be directly into a wall outlet or a power
strip.
When this power is on, the green light on the
front of the Wave/824 will turn on.
The Patch Box does not have a power on/off
switch and it's OK to leave it powered on or off
when not in use.
5

nBelow is a list of the files, and where they are installed (*** = the
particular WavePRO product number):
Wave/*** Control PanelàControl Panels folder
Wave/*** Library àExtensions folder
Wave/*** ASIO àFolder you selected
Wave/*** OMS Driver àFolder you selected
README 1ST àFolder you selected
Setting up the Audio ASIO driver
After the software is installed, for each application you wish to use
with the Wave/824, you will need to copy the Wave824 ASIO file into
that application's ASIO Driver folder.
In other words, if you don't copy the Wave824 ASIO driver into an
applications ASIO folder, you will not be able to use the Wave/824
with the application.
If you have multiple audio applications that support ASIO, you will, of
course, have multiple copies of the Wave824 ASIO file in your system.
Setting up the MIDI OMS driver
nOMS Client Application setup: The OMS MIDI system has two parts,
the OMS client application and the hardware driver. If you have al-
ready installed your MIDI sequencing software (eg. Cubase VST or
Digital Performer), the OMS client application may already be in-
stalled. If not, you'll need to download the OMS client application
from Opcode's website, located at:
http://www.opcode.com/dl/oms/oms_mac.html
(as of this document, the latest version of OMS was 2.3.8).
After downloading OMS, run the installer to install the Open Music
System on your computer. The OMS installer will ask you to re-
boot, please do so.
nAfter rebooting, you will need to copy the Wave/*** OMS Driver file
into the OMS Folder, located in your System folder.
nOnce the Wave/*** OMS Driver file is in the OMS Folder, run the OMS
Setup Application, located in the Opcode: OMS Applications folder
on your computer's hard disk.
6

nOMS Setup will walk you thru creating a new Studio setup. During
the auto detection, it will show the Wave/*** Device, and list any
MIDI devices it finds currently attached (keyboards, tone genera-
tors, etc...).
nAfter the OMS Setup has finished, start your audio application. In
that application’s MIDI setup, make sure that OMS Functionality is
set for IN/OUT.
nPlease consult your software application and hardware documenta-
tion for instructions on setting up your other MIDI devices
(keyboards, tone generators, etc...) for use with OMS.
7

Wave/824 Audio connections
The audio connections for the Wave/824 are very versatile. They are LINE-LEVEL which means that you will need to preamplify
any microphone or low-level signal prior to connection. Almost any type of analog audio line-level signal can be connected to the
Wave/824. This includes both balanced (3-wire) and unbalanced (2-wire). Additionally, the strength of the input or output signal
can be switched to either the professional standard of +4 dBu (louder) or the consumer audio stan
dard of -10 dBV (about 12 dB
softer). The Control Panel software applet is used to switch signal levels.
For connection convenience, the first
2 audio channels have both
1/4" (6.35 mm) jacks and
professional XLR jacks.
Rear panel
Balanced TRS plug wiring
Ring
Sleeve
Tip
Ring
Tip
Tip = + (hot)
Ring = - (cold)
Sleeve = ground
Unbalanced plug wiring
Tip Tip
Tip = + (hot)
Sleeve = ground
Sleeve
8

9
At the heart of the system is the mixer whose inputs and outputs are
connected to all the other pieces of equipment. The mixer is the
router or traffic cop and it connects signals together and controls
volume levels and equalization. Thus, the mixer is an essential part
of the system and it's often built-in to mini-studio products such as
multi-track cassette recorders. In a professional environment, the
mixer is always a separate piece of equipment.
The mixer and the sound card
Typical low cost multimedia sound cards or a computer’s built-in au-
dio are not designed for multi-channel recording. They usually
include a low-quality, integrated mixer that controls the volume of
stereo audio streams from wave file output, music synthesizer and
CD-audio player that are produced by games and applications.
When you get started with serious music recording on your Mac, it's
important to recognize that achieving the full benefits of multiple
channels requires using an external audio mixer to route and mix the
channels down to two channel stereo.
CONNECTING A WAVEPRO INTERFACE TO YOUR
MUSIC STUDIO SYSTEM
The WavePRO interfaces are designed to work seamlessly within your
music recording system in a fashion similar to a traditional multi-track
recorder. Typically, major components of the recording system are:
nmulti-channel audio mixer console
nmicrophones and preamplifiers
neffects processors such as limiters, noise gates, reverb units
nmulti-channel audio recorder
npower amplifier and monitor speakers
NOTE: Microphones do not
have enough signal strength
and must be amplified by a
mixer or preamplifier prior to
connecting to WavePRO.
MIDI
cables
Audio cables
Mastering
Tape Recorder
(DAT, cassette, reel)
Audio
Mixer
Effects
Processors
Synth
Sound
Module
CD-R drive
OV7
Amp
& Monitor
Inside the PC
WWaveavePROPRO

10
Why isn't there extra mixer circuitry included with the WavePRO
interfaces? When we designed WavePRO, we concluded that having a
built-in mixer would make it more complicated to use the card in
conjunction with an external mixer. Also, when extra mixer circuitry is
included in an audio card, an extra level of amplification is required.
This can diminish audio quality and add noise. We decided to avoid
needless complexity and preserve the highest audio quality. Since the
WavePRO interface requires a line level signal, you will need to make
sure that any low-level signals, such as microphones, are preamplified.
Connecting a WavePRO interface to an audio mixer console
Below is a block diagram for connecting a WavePRO interface to a
mixer. A wide variety of mixers is are available from many different
manufacturers. If you are considering the purchase of a mixer for your
recording setup, you can buy small consoles with prices that start at
around $300 US.
We recommend that you use a mixer that has channel inserts (also
called patch points). For quietest operation, we recommend that you
directly patch the WavePRO inputs to the channel inserts jacks. This
offers maximum mixing flexibility.
Connections for WavePRO to mixer with Channel Insert Jacks
Mono plug
Example: mixer channel insert connection
M
I
X
E
R
Insert plug to first click of
channel insert jack
Guitar rig
Mixer Input
channels
Channel insert jacks Mixer outputs
Connect to monitor
amp, DAT, etc.
6 7 81 2 3 4 5
FROM WavePRO
OUTPUTS
Microphones
Keyboards, etc.
etc.
1 2 3 4 5
TO WavePRO
INPUTS
910 1211 13

The Wave/824 and Wave/496 are designed to connect to virtually
any preamplified, line-level audio signal. The connection can be 3-
conductor, balanced or 2-conductor, unbalanced. Additionally, the
signal level can be professional +4dBu (higher, i.e. "louder") or -
10dBV, the standard for consumer audio equipment. The Control
Panel applet switches whether an input or output level is set to +4
or -10. The facilitation of either Balanced or Unbalanced signals is
automatic.
ADVANCED CONFIGURATION: WavePRO Control Panel
We've included a control panel software applet to select the input and
output levels of the WavePRO interfaces and control other features.
To start the WavePRO applet, select 'Start | Settings | Control Panel'
and double click on the 'WavePRO' icon. For quick access, the applet
can also reside Windows system tray. This feature is enabled under
the Options menu.
Input and Output Gain Settings
The settings for input and output sensitivity are unique to the
different Wave/PRO models.
11
On the Wave/424, the
input and output levels
are set to the popular
semi-pro levels (-10 dBV
nominal).
If audio being input to the
Wave/424 is overloading
the inputs and causing
distortion, enable the
Input Pad settings by
checking the box next to
the appropriate channel
Note: Use Input Pad
settings to connect with
pro equipment that uses
+4 dBu levels.

12
These settings help you match the signal level (sensitivity and
loudness) of the audio inputs and outputs of the Wave/824. The
difference in the 2 levels is about 12 dB.
Inputs: -10 dBV setting is more sensitive than the +4 dBu setting.
Outputs: +4 dBu output is louder than the -10 dBV setting.
TIP: by default, the gain levels are set to -10 dBV. This is most
common setting for music and audio gear. It's best to try out this
setting first and then, change the levels to +4 dBu if you need
more output gain from the Wave/824 or Wave/496.
TIP: If you are experiencing overloading on the audio inputs,
change the setting to +4 dBu to decrease the input sensitivity.
Setting Input
and Output
Gain on
Wave/824
&
Wave/496

Input channel 1
Output channel 1
Audio to PC
Audio from PC
Input channel 1
Output channel 1
Audio to PC
Audio from PC
Normal operation (Monitor off)
Monitor ON
Monitor (Input monitor)
Unlike a tape recorder, WavePRO interfaces are full duplex audio
devices which means that you can record and play on all channels
simultaneously. We have also included an input monitoring feature
that allows the audio signal that is being input to WavePRO to be
"echoed" to the corresponding channel number output.
Important note
When Monitoring is enabled (ON) you will hear both the signal that is
being input to the WavePRO interface for recording and the audio
playback signal from the WavePRO interface. As noted in the
diagram, when monitoring, each input channel is monitored to its
corresponding output channel.
13

SETTING UP SOFTWARE APPLICATIONS FOR
WAVEPRO
To most audio software applications,the WavePRO interfaces appear as
multiple, stereo sound card devices. To use a WavePRO interface with
your software, its inputs and outputs must be selected as the active
devices.
The steps to accomplish this vary from application to application.
Refer to your software's user manual to establish the WavePRO
interface as the active audio device and to change audio the audio
settings and configuration.
Typically, there is a menu item in the application which brings up a
dialog box that’s used to select and setup devices. A list of available
audio or MIDI devices is displayed and you select the active devices. An
additional step of selecting the device for a specific track is often
required.
You will also need to enable the 24-bit mode. WavePRO interfaces also
support 16-bit mode for compatibility with all applications.
Once WavePRO is installed, the following devices will be found.
NOTE: In these setup tips, the characters, *** indicate your specific
WavePRO model number 424, 496, and 824)
nCh 1/2 In Wave/*** first, stereo wave audio input
nCh 3/4 In Wave/*** second, stereo wave audio input
nCh 1/2 Out Wave/*** first, stereo wave audio output
nCh 3/4 Out Wave/*** second, stereo wave audio output
nWave/*** MIDI In MIDI port input
nWave/*** MIDI Out MIDI port output
Additionally, for the Wave/824
nCh 5/6 In Wave/824 third, stereo wave audio input
nCh 7/8 In Wave/824 fourth, stereo wave audio input
nCh 5/6 Out Wave/824 third, stereo wave audio output
nCh 7/8 Out Wave/824 fourth, stereo wave audio output
After you enable the WavePRO devices, you will need to assign the
recording inputs and playback output for each audio track.
In many applications, the audio mixing concept of Aux buses is used.
This allows you to assign the multiple outputs of the WavePRO
interface as effects sends.
14

Music & audio software places special demands on the capabilities of your
Mac. Although ASIO and OMS provide standard audio and MIDI programming
interfacesto applications, there are differences and nuances in both
applications and audio cards. It’s pretty much guaranteed that some
tweaking of your application software’s settings will be required.
We accumulated the following information as we tested the WavePRO card
with various software. The settings represent starting points for your setup
and you may need to fine-tune them for your particular computer
configuration. This is important stuff; please take the time to review it.
To be bluntly honest, the likelihood of you having problems with your Mac
digital audio recording setup increases substantially if you ignore these
details.
Really important note! Configuring your application
SPECIFIC APPLICATION CONFIGURATION
Setting up Cubase VST/24 for WavePRO
Cubase VST/24 is a powerful MIDI & digital audio program from
Steinberg. Steinberg has defined a specification called ASIO that
helps applications communicate efficiently with audio cards. The
WavePRO drivers for the Macintosh support for ASIO.
Here are the steps to configure Cubase VST for the WavePRO. Any
settings not mentioned can remain in their default configurations.
nrun Cubase VST and select the menu item, 'Options'|'Audio
Setup'|'System'.
nin the section 'Audio Performance'
-set 'Number of Channels' to 16
-set 'Memory per channel' to 192KB
-set 'Disk Block Buffer Size' to 64KB
nIn the 'Monitoring' section, 'ASIO Direct Monitoring' should be
checked.
-set monitoring type to either 'Tape Type' or 'Record Enable
Type'.
NOTE: When using ‘ASIO Direct Monitoring’, the ‘WavePRO
Control Panel’ should have monitoring disabled (see the pre-
vious section about the WavePRO Control panel for details).
The WavePRO Control Panel monitoring feature 'echoes' the
input to the corresponding output in real-time with no delay.
However, Cubase will have a small amount of delay (albeit
small), and if both ASIO Direct Monitoring and the WavePRO
15

16
Control Panel monitoring are used simultaneously, you will
hear an undesirable 'echo' effect. The WavePRO Control Panel
monitoring feature should only be used when an ASIO-
compatible program does not support ASIO Direct Monitoring.
nIn the 'General' Section, 'Enable 24-bit Recording' should be
checked
nIn the 'Audio I/O' section, 'ASIO Device' should be set to 'Wave/***
ASIO' (substitute 424, 496 or 824 for '***')
NOTE: The 'ASIO Device Control Panel' is inactive, and is not re-
quired for the WavePRO audio interface to work properly.
-the 'Latency' setting should be set to 23 milliseconds by the
Wave/*** ASIO driver
-set 'Sample Rate' to either 32,000 kHz, 44,100 kHz, 48,000 or
96,000 kHz.
-set 'Audio Clock Source' to 'Internal'.
-set 'MIDI Sync Reference' to 'Audio Clock'.
-set 'MIDI to Audio Delay' '0'.
NOTE: this value sets the synchronization between MIDI and
Audio and is somewhat dependent on the speed of your Mac.
Thus, you may need to 'tweak’ this value. An easy way to test
MIDI to audio sync is to play a MIDI click track and then record
it to an Audio track. Listen to both the MIDI and the Audio
tracks and change this value until the clicks are in sync.
Setting up Digital Performer for WavePRO
Digital Performer is MIDI & digital audio program from Mark of the Uni-
corn. Here are the steps to configure Digital Performer for WavePRO.
Any settings not mentioned can remain in their default configurations.
nrun Digital Performer and select the menu item 'Basics' and se-
lect 'Audio System'. The 'MOTU Audio System' should be selected.
nselect the menu item 'Basics' and select 'MOTU Audio System Op-
tions'|'Configure Hardware Driver'.
-set 'Mode' to 'ASIO'.
-set 'ASIO Driver:' to 'Wave/*** ASIO'.
-set 'Sample Rate:' to your choice; either 32000, 41000, or
48000.
-set 'Clock Source:' to Internal.

17
Setting up Spark for WavePRO
Spark is a new digital audio editing program from TC Works. Here are
the steps to configure Spark for the WavePRO. Any settings not men-
tioned can remain in their default configurations.
nrun Spark and select the menu item 'Preferences'.
nclick the 'I/O' tab and select 'Wave 824 ASIO'.
-set 'Clock Source' to 'Internal'.
-set 'IO Sampling Frequency' to your choice; either 32000, 41000,
48000, or 96000.
-set 'Size of recording buffer' to 'default' (393216).
nOnce these settings are made hit the 'OK' button.
nSelecting the input channels: from the bottom left side of the
'Transport' control you will see the Wave/*** I/O section with a
'Setup' box to the right.
NOTE: The 'Setup' box is inactive, and is not required for
WavePRO to work properly.
nAbove the 'Setup' box you will see an arrow with a drop down
menu that specifies the stereo input source. You can select ei-
ther 1+2, 3+4, 5+6, or 7+8 for your input source.

A few basic tips about multi-track recording
with your Mac
Multi-channel, multi-track recording consumes a great deal of resources
on your Mac. Depending on how serious you are about the results and
how many tracks you need, you should have the fastest processor and
the biggest and fastest hard drive that you can afford. Of course, most
of us working folks can’t afford to rush out and buy the fastest Mac and
besides, at today’s pace of technology change, it would start to become
obsolete before we got it home. So in the interest of making the best
use of what we have, here’s a couple of very basic tips (most of which
are obvious, but sometimes forgotten).
ndon’t skimp on RAM —it’s really cheap and it can help
performance quite a bit. The OS swaps applications to and from
your hard disk disk when it runs out of RAM and this can wreak
havoc on your digital audio recording. Try to have at least 128MB.
nbefore recording, shut-down any applications that aren’t necessary
to the recording. You can never tell if an application is really idle;
it could be doing something stupid in the background that sucks up
some of the MAC’s processing power.
nturn off unnecessary background programs like screen savers, virus
scanners and power management
nclean up your hard drive: here's a tip, run your web browser and
delete all of those little files in the browser’s cache directory.
They take up more space then you might think and also cause drive
fragmentation.
nIf you can afford it, a wise incremental investment to your MAC
would be to purchase a good-sized Ultra DMA hard drive (6-12 GB
drives are a real bargain these days) and dedicate it to digital
audio. This can improve performance and reduce fragmentation
and clutter.
nfinally, immediately before you start recording, do the obvious and
run your systems hard disk defragmenter utility. Along with
processor speed, hard drive performance is the most important
factor in determining how many tracks you can record and whether
or not you’ll get any dropouts in your audio.
18
Other manuals for WavePRO
1
Table of contents