Gadgets and Gear Desktop Spy Clock Hidden Camera Assembly instructions

Desktop Spy Clock Hidden Camera Manual
Step 1: Put the on/off switch into the on position on the clock.
Step 2: Aim the remote at the clock and press the power button.
Step 3: The blue light will glow to indicate standby mode.
*Note: Switch the clock from off position to on position to reset it.
plug in here
*switch off*
lights will show here lights will show here
How to Turn On Your Device
How to Charge Your Device
Step 1:
Make sure the clock on/off switch is in the
off position. Plug the USB adapter into the
designated port on the clock.
Plug USB end of cable into included wall
outlet charger. Indicator light will glow
blue and red to indicate charging.
Step 2a:
Or plug USB end of cable into USB port on
computer to charge device. When device is
fully charged red light will stop glowing.
Step 2b:
plug here
Clock Key
Remote Control Key
Step 1: Press the video recording button on the remote.
Step 2: The blue light will flash 3 times and the device will
start recording automatically.
Step 3: Press the video recording button again to stop
recording, and your video file will be saved automatically.
Step 4: The device will then return to standby mode.
How to Record Video
Step 1: Press the motion detection video recording button on
the remote to get into motion detection video mode.
Step 2: The blue light will flash quickly 3 times, if a moving
object is detected the blue light will flash slowly twice and
begin recording.
Step 3: Footage will be saved automatically and if there is no
motion the device will return to motion detection video mode.
Step 4: Press the motion detection video recording button
again to return to standby mode.
How to Record Motion Detected Video
Step 1: Press the picture snapshot button to get into photo mode.
Step 2: Press the picture snapshot button again, the blue
light will flash once, and the device will take a photo.
Step 3: Your photo will be saved automatically and the
device will return to standby mode.
How to Take a Picture
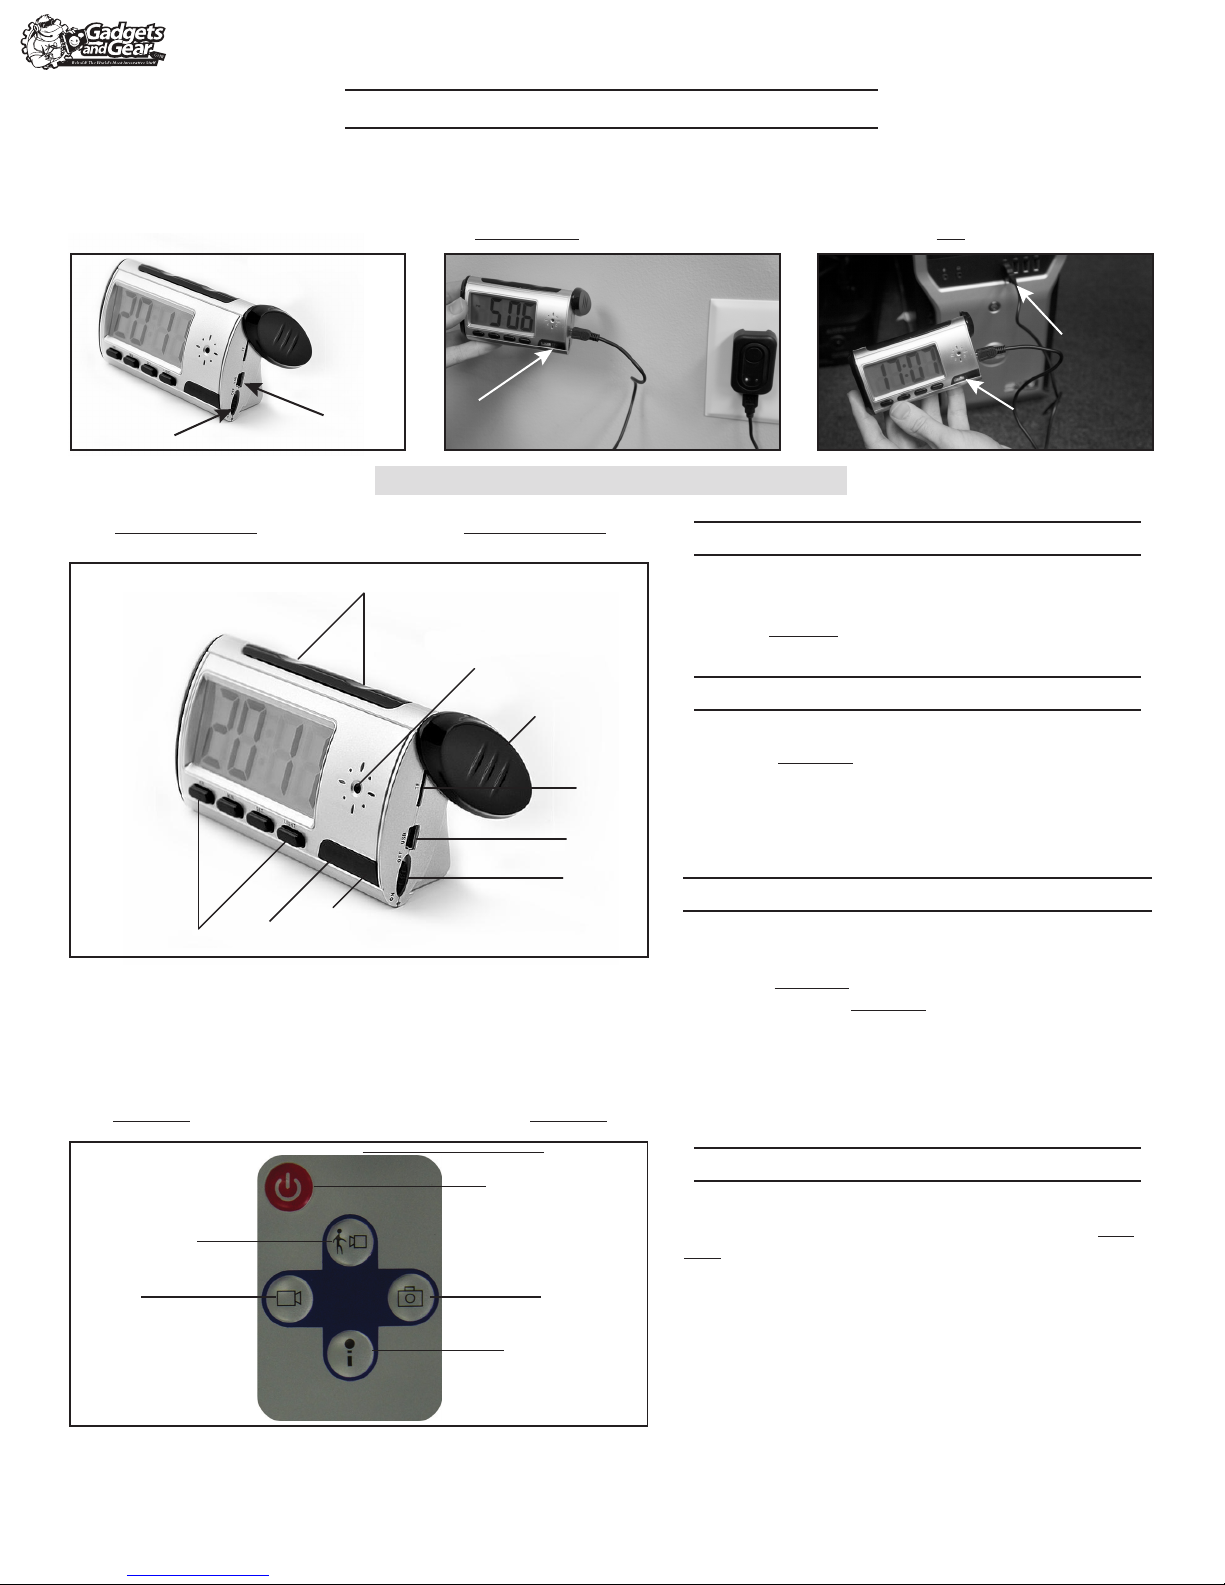
A
A
B
C
F
E
D
B
C
D
E
F
G
IH
*Charging Time - Wall Outlet: 4 hours | Computer: 12 hours
!
A. Audio Time-Telling/Snooze F. On/Off Switch
B. Lens G. Remote Signal Receiver
C. Rotational Cover H. Indicator Lights
D. Micro SD Card Slot I. Clock Function Buttons
E. USB Port
A. Remote Signal Sender D. Non Functioning Button
B. Power Button E. Video Recording
C. Picture Snapshot F. Motion Detection Video Recording

plug here
plug in here
*switch on*
Step 1:
Make sure the clock on/off switch is in the
on position. Plug the USB adapter into the
designated port on the clock.
Plug USB end of cable into USB port on
computer. Press the power button on the
remote to connect to the computer.
Step 2:
Open My Computer, click on the
removable drive that appears. Files will
be in the folder in the drive.
Step 3:
How to View Media Files on Your Computer
Step 1: Connect the clock to your computer via USB cable.
Step 2: In My Computer, the clock will show up as a “Removable Disk” drive.
Step 3: Load the included CD into your computer, and run the “writetime” file.
Step 4: The video’s time and date will then be the same as the computer’s time and date.
Set Current Time: Press the set button once, then press the hour and minute button to set the hour and minutes accordingly.
Set Alarm: Press the set button twice, then press the hour and minute button to set the wake time accordingly.
Set On-The-Hour Alarm: Press the set button three times, then press the hour button to set the alarm time and the minute button to set the alarm sound.
Snooze: When the alarm is ringing, press the audio time-telling/snooze button to snooze. The alarm will sound every 10 minutes for a max of 6 times.
Hear The Time Told Out Loud: Press the audio time-telling/snooze button to hear the time whenever the alarm isn’t ringing.
Turn Background Light On/Off: Press the light button to turn the background light on and off.
How to Set Time and Date
How to Set Basic Clock Functions
1. If the clock is not turning on, make sure the device is fully charged first and re-start it.
2. If the blue light flashes rapidly, you need to re-start the device, charge it, delete duplicate files from the micro SD card, make sure the
micro SD card is correctly installed in the slot, or replace the micro SD card altogether.
3. When the battery is low, the blue light will keep flashing or the screen display will be unclear.
3. This clock is ONLY to be used in lawfully ways. If you are unsure of your local laws involving audio and video recording, check with your
local government before using.
4. After not using the clock for a long time, you will need to charge the battery.
5. The working temperature of the clock is 0 - 45˚C, but it is better to use the watch in room temperature.
6. Do not get the clock wet or use in high humidity, and it is best not to use the clock in a dusty environment.
7. It cannot be used in high magnetic or electric fields.
*Please contact us if you need any more information or help with the clock.
Visit - www.GadgetsAndGear.com
Answers to Frequently Asked Questions
*Note: If having problems playing videos, please download and install VLC Player at www.videolan.org
!
Table of contents
Popular Color Camera manuals by other brands

Schäfter+Kirchhoff
Schäfter+Kirchhoff SK2048U3TDI instruction manual

Ikegami
Ikegami ICD-D1111 user manual

Sony
Sony SRG300H operating instructions

Ltl Acorn
Ltl Acorn Ltl-5210M Series user manual

Camera Corps
Camera Corps Q-Ball Operation manual

Securitytronix
Securitytronix ST-PTZMINI-IR10X installation manual