Gaggia Academia User manual

Operation and maintenance manual
Before using the machine, please read the attached operating instructions.
Carefully read the safety rules.
Mode d'emploi
Veuillez lire attentivement le mode d'emploi
(notamment les consignes de sécurité) avant d'utiliser l'appareil.
FOR HOUSEHOLD USE ONLY
USAGE DOMESTIQUE SEULEMENT

III
A
1 2 3
45 6 C
D
A
B B
8
E
7
CARAFE ASSEMBLY PROCEDURE SCHEMA DE MONTAGE DE LA CARAFE
For correct use of the carafe, refer to the instructions on page 12.
The maintenance instructions for the carafe circuits are described on page 36.
The disassembly and cleaning instructions for the components are described on page 41.
Pour l’utilisation correcte de la carafe, consulter les instructions à page 12.
Pour l'entretien des circuits de la carafe, consulter la page 36.
Le démontage et le nettoyage des composants sont décrits à page 41.
THOROUGHLY CLEAN THE CARAFE AT FIRST USE AND AFTER A LONG PERIOD OF INACTIVITY.
A THOROUGH SANITATION AND CLEANING OF THE CARAFE ENSURES CORRECT OPERATION AND PREVENTS THE
PROLIFERATION OF BACTERIAL LOADS WHICH MAY BE HARMFUL FOR HUMAN HEALTH.
S'ASSURER QU'ELLE EST BIEN PROPRE TANT LORS DE LA PREMIÈRE UTILISATION QU'APRÈS UN CERTAIN TEMPS
D'INACTIVITÉ.L'HYGIÈNE ET LE NETTOYAGE PARFAITS DE LA CARAFE GARANTISSENT UN FONCTIONNEMENT CORRECT
ET EMPÊCHENT LES CHARGES BACTÉRIENNES NOCIVES POUR LA SANTÉ DE PROLIFÉRER.

IV
21
25
22
26
23 24
2827
1
2
3
4
5
6
7
8
9
10
29
12
13
2011
14
15 16 17
18
19
ACCESSORIES ACCESSOIRES

V
TECHNICAL DATA
Nominal voltage See label on the appliance
Power rating See label on the appliance
Power supply See label on the appliance
Shell material Thermoplastic material/Metal
Size (w x h x d) 282 x 385 x 428 mm - 11.1 x 15.2 x 16.8 in
Weight 17 Kg - 37.5 lbs
Cord length 1200 mm - 47.24 in
Control panel Front
Water tank 1.6 liters - 54.1 oz (removable)
Coee bean hopper capacity 350 grams - 12.3 oz of coee beans
Pump pressure 15 bar
Boiler Stainless steel
Coee grinder Ceramic
Quantity of ground coee 7 - 10.5 grams / 0.25 - 0.37 oz.
Dregdrawer capacity about 15
Safety devices Boiler pressure safety valve – Double safety thermostat.
DONNÉES TECHNIQUES
Tension nominale Voir plaque signalétique placée sur l’appareil.
Puissance nominale Voir plaque signalétique placée sur l’appareil.
Alimentation Voir plaque signalétique placée sur l’appareil.
Matériau du corps Thermoplastique/Métal
Dimensions ( LxHxP) 282 x 385 x 428 mm
Poids 17 Kg
Longueur du câble 1200 mm
Tableau de commande Tableau de commande sur le devant
Réservoir d’eau 1,6 litre - Extractible
Capacité du réservoir à café 350 de café en grains
Pression de la pompe 15 bar
Chaudière Acier Inox
Moulin à café en céramique
Quantité de café moulu 7-10,5 g
Capacité du tiroir à marc 15 environ
Dispositifs de sécurité Soupape de sécurité pression chaudière – double thermostat de sécurité

VI

IMPORTANT SAFEGUARDS
When using electrical appliances, basic safety precautions should always be
followed, including the following:
1. Read all instructions.
2. Do not touch hot surfaces. Use handles or knobs.
3. To protect against fire, electric shock and injury to persons do not immerse
cord, plugs, or appliance in water or other liquid.
4. Close supervision is necessary when the appliance is used by or near
children.
5. Unplug from outlet when not in use and before cleaning. Allow to cool
before putting on or taking off parts, and before cleaning the appliance.
6. Do not operate any appliance with a damaged cord or plug or after the
appliance malfunctions, or has been damaged in any manner. Return
appliance to the nearest authorized service facility for examination, repair
or adjustment.
7. The use of accessory attachments not recommended by the appliance
manufacturer may result in fire, electric shock or injury to persons.
8. Do not use outdoors.
9. Do not let cord hang over edge of table or counter, or touch hot
surfaces.
10.Do not place on or near a hot gas or electric burner, or in a heated
oven.
11.Always attach plug to appliance first, then plug cord into wall outlet. To
disconnect, turn any control to “off”, then remove plug from wall outlet.
12.Do not use appliance for other than intended use.
13.Save these instructions.
SAVE THESE INSTRUCTIONS

CAUTION
This appliance is for household use only. Any servicing, other than cleaning
and user maintenance, should be performed by an authorized service
center. Do not immerse machine in water. To reduce the risk of fire or
electric shock, do not disassemble the machine. There are no parts inside
the machine serviceable by the user. Repair should be done by authorized
service personnel only.
1Check voltage to be sure that the voltage indicated on the nameplate
corresponds with your voltage.
2Never use warm or hot water to fill the water tank. Use cold water only.
3Keep your hands and the cord away from hot parts of the appliance
during operation.
4Never clean with scrubbing powders or harsh cleaners. Simply use a soft
cloth dampened with water.
5For optimal taste of your coffee, use purified or bottled water. Periodic
descaling is still recommended every 2-3 months.
6Do not use flavored or caramelized coffee.
INSTRUCTIONS FOR THE POWER SUPPLY
CORD
A. A short power-supply cord (or detachable power-supply cord) is to be
provided to reduce risks resulting from becoming entangled in or tripping
over a longer cord.
B. Longer detachable power-supply cords or extension cords are available
and may used if care is exercised in their use.
C. If a long detachable power-supply cord or extension cord is used,
1. The marked electrical rating of the detachable power-supply cord or extension
cord should be at least as great as the electrical rating of the appliance
2. If the appliance is of the grounded type, the extension cord should be a
grounding-type 3-wire cord, and
3. The longer cord should be arranged so that it will not drape over the counter
top or table top where it can be pulled on by children or tripped over.

1
INDEX
GENERAL INFORMATION ............................................................... 2
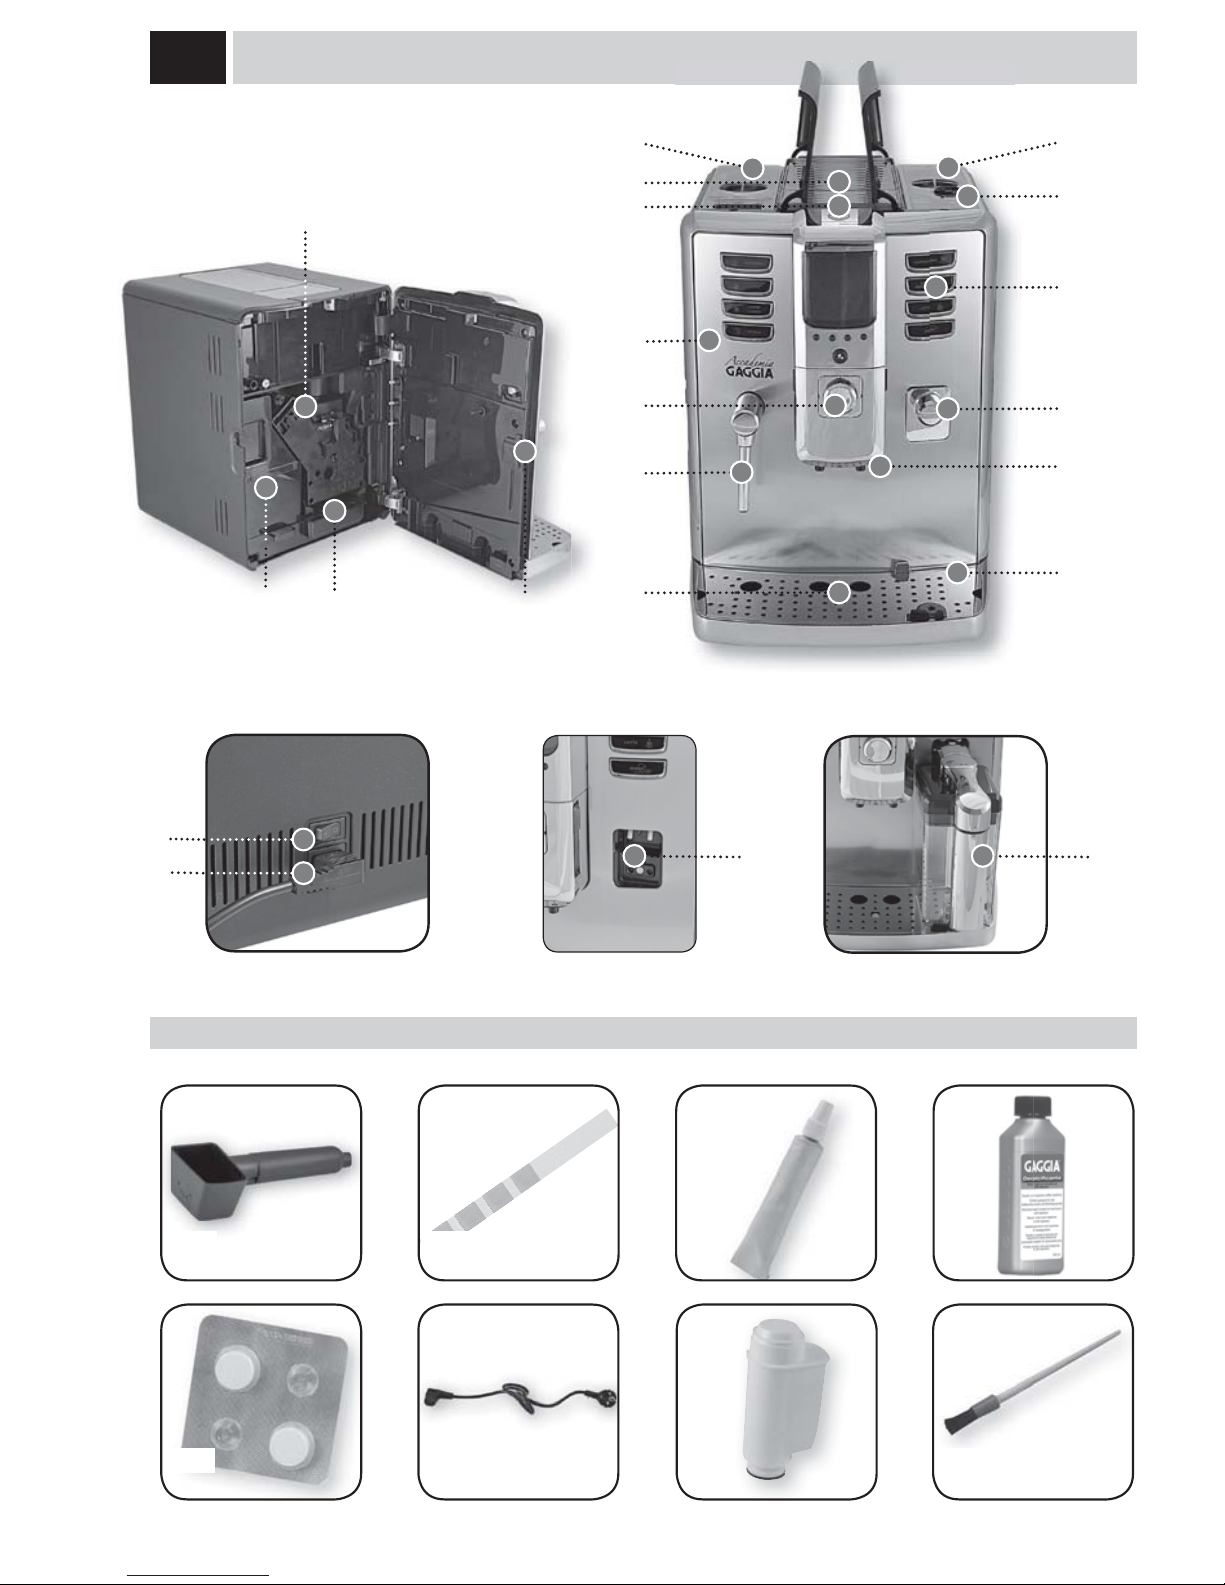
MACHINE COMPONENTS & ACCESSORIES CONTROL PANEL ................................. 3
INSTALLATION ........................................................................ 4
STARTINGTHE MACHINE......................................................................................4
SETTING THE LANGUAGE......................................................................................5
MEASURINGTHEWATER HARDNESS............................................................................5
FIRST USE USE AFTER A PERIOD OF INACTIVITY.................................................................6
INTENZA WATER FILTER.......................................................................................7
ADJUSTMENTS........................................................................ 8
OPTIDOSE ADJUSTSTHE AMOUNT OF COFFEETO GRIND ........................................................8
COFFEE STRENGTH GAGGIA BREWING SYSTEM .................................................................8
GAGGIA ADAPTING SYSTEM ...................................................................................9
COFFEE GRINDER ADJUSTMENT................................................................................9
DISPENSING SPOUT HEIGHT ADJUSTMENT .....................................................................10
STANDBY MODE ...........................................................................................11
MILK CARAFE USE ....................................................................12
COFFEE BREWING ....................................................................14
ESPRESSO / LONG COFFEE....................................................................................14
BEVERAGE BREWINGWITH PREGROUND COFFEE...............................................................15
CAPPUCCINO / LATTE MACCHIATO / MILK ................................................16
CLEANING CYCLE .....................................................................18
HOT WATER DISPENSING ..............................................................19
STEAM DISPENSING ..................................................................20
BEVERAGE LENGTH QUICK PROGRAMMING ..............................................21
BEVERAGE MENU.....................................................................22
MACHINE MENU......................................................................25
MAINTENANCE.......................................................................32
CLEANING...........................................................................38
MAINTENANCE DURING OPERATION...........................................................................38
GENERAL MACHINE CLEANING................................................................................39
BREW GROUP CLEANING.....................................................................................40
MILK CARAFE CLEANING.....................................................................................41
MILK CARAFE ASSEMBLY ....................................................................................42
MACHINE WARNINGS .................................................................43
SAFETY RULES .......................................................................45

2GENERAL INFORMATION
GENERAL INFORMATION
This coee machine is suitable for preparing espresso coee using coee beans and is equipped with a device to dispense
steam and hot water.
The machine is designed for domestic use and not suitable for heavy or professional use.
Warning: No liability is held for damage caused by:
t *ODPSSFDUVTFOPUJOBDDPSEBODFXJUIUIFJOUFOEFEQVSQPTFT
t 3FQBJSTOPUDBSSJFEPVUCZBVUIPSJ[FETFSWJDFDFOUFST
t 5BNQFSJOHXJUIUIFQPXFSDPSE
t 5BNQFSJOHXJUIBOZQBSUTPGUIFNBDIJOF
t 6TFPGOPOPSJHJOBMTQBSFQBSUTBOEBDDFTTPSJFT
t 'BJMVSFUPEFTDBMFUIFNBDIJOFPSNBDIJOFVTFBUUFNQFSBUVSFTCFMPX¡'¡$
IN THESE CASES, THE WARRANTY SHALL BE DEEMED NULL AND VOID.
THE WARNING TRIANGLE INDICATES ALL IMPORTANT INSTRUCTIONS FOR THE USER'S SAFETY. PLEASE FOLLOW
THESE INSTRUCTIONS CAREFULLY TO PREVENT SERIOUS INJURIES.
HOW TO USE THESE INSTRUCTIONS
,FFQUIFTFPQFSBUJOHJOTUSVDUJPOTJOBTBGFQMBDFBOENBLFUIFNBWBJMBCMFUPBOZPOFFMTFXIPXPVMEVTFUIFDPòFFNBDIJOF'PSGVSUIFS
information or in case of problems, please refer to the an authorized service center. For Gaggia customer service, call (800) 933-7876 in the
U.S. or (514) 385-5551 in Canada.
SAVE THESE INSTRUCTIONS
INSTRUCTIONS FOR THE POWER SUPPLY CORD
t "TIPSUQPXFSTVQQMZDPSEJTQSPWJEFEUPSFEVDFSJTLTSFTVMUJOHGSPNCFDPNJOHFOUBOHMFEJOPSUSJQQJOHPWFSBMPOHFSDPSE
t &YUFOTJPODPSETNBZCFVTFEJGDBSFJTFYFSDJTFEJOUIFJSVTF
If an extension cord is used, make sure:
a. The marker electrical rating of the extension cord should be at least as great as the electrical rating of the appliance.
C 5IFFYUFOTJPODPSETIPVMECFBSSBOHFETPUIBUJUXJMMOPUESBQFPWFSUIFDPVOUFSUPQPSUBCMFUPQXIFSFJUDBOCFQVMMFEPOCZ
children or tripped over.
D *GUIFBQQMJBODFJTPGUIFHSPVOEFEUZQFUIFFYUFOTJPODPSETIPVMECFBHSPVOEJOHUZQFXJSFDPSE
t %POPUVTFNVMUJTPDLFUT

3
MACHINE COMPONENTS AND ACCESSORIES CONTROL PANEL
'PSBDPSSFDUVTFPGUIFNBOVBMXFSFDPNNFOEUIBUZPVLFFQUIFDPWFSQBHFPQFOUIJTBMMPXTZPVUPCFUUFSVOEFSTUBOEUIFUFYU
MACHINE COMPONENTS AND ACCESSORIES
1 Water tank + cover
$VQXBSNJOHTVSGBDF
3 Pre-ground bypass doser
4 Service door
5 SBS dial
)PUXBUFSTUFBNXBOE
7 Full drip tray indicator
$PòFFCFBOIPQQFSXJUIMJE
9 Grinder adjustment
10 Control panel
11 Milk container couplings
12 Dispensing spout
13 Drip tray + grill + sealed support
#SFXHSPVQ
6TFEHSPVOETESBXFSQSPUFDUJPOFMFNFOU
16 Liquid recovery tray + cover
17 Service door button
1PXFSCVUUPO
1PXFSDPSEDPOOFDUPS
20 Milk carafe
21 Pre-ground coee measuring scoop
22 Water hardness test strip
#SFXHSPVQMVCSJDBOU
24 Descaling solution
#SFXHSPVQDMFBOJOHUBCMFUT
1PXFSDPSE
*OUFO[BXBUFSöMUFS
28 Cleaning brush
29 Carafe coupling cap
Cappuccino button
Cleaning cycle button
Stand-by button
Opti-dose buttonFunction buttons
Espresso button
Latte macchiato button
CONTROL PANEL
5IFDPOUSPMQBOFMIBTCFFOEFTJHOFEUPBMMPXBOFSHPOPNJDVTFPGBMMNBDIJOFGVODUJPOT
)PUXBUFSBOETUFBNEJTQFOTJOHCVUUPO
$PòFFCSFXJOHCVUUPO
)PUNJMLCSFXJOHCVUUPO
-POHDPòFFCSFXJOHCVUUPO

4
1
4
7 8
5 6
32
STARTING THE MACHINE
#FGPSFUVSOJOHPOUIFNBDIJOFNBLFTVSFUIBUUIFQPXFSCVUUPOJTTFUUP
Lift the right outer lid and remove the
inner lid.
3FNPWFUIFXBUFSUBOLVTJOHUIFIBOEMF
1SFTTUIFQPXFSCVUUPOUPUIF*
position to turn the machine on.
5IFEJTQMBZTIPXTBSFEøBTIJOHMFE
Press the stand-by button to start the
machine.
'JMMUIFUBOLXJUIGSFTIESJOLJOHXBUFS%P
OPUFYDFFEUIFNBYMFWFMJOEJDBUFEPO
UIFXBUFSUBOL1MBDFUIFXBUFSUBOLCBDL
into the machine.
Insert the plug into the socket located
on the back of the machine and insert
UIFPUIFSFOEJOUPBQPXFSPVUMFUXJUI
suitable current.
4MPXMZQPVSDPòFFCFBOTJOUPUIF
hopper.
Replace the inner lid and close the outer
lid.
Lift the left outer lid and remove the
inner lid.
When the correct temperature is
reached, the machine performs a
priming and rinsing cycle of the
internal circuits. A small amount of
XBUFSJTEJTQFOTFE8BJUGPSUIJTDZDMF
to be completed.
The screen for product dispensing
BQQFBSTPOUIFEJTQMBZTFFQBHF
INSTALLATION
"UöSTUTUBSUVQPOMZUIFTDSFFOXJMMCFEJTQMBZFEBTTIPXOPOQBHF5IFOUIFMBOHVBHFDBOCFTFUGSPNUIFSFMFWBOUNFOVPOMZ
(see page 25).

5
5
1 2
1234
ABC
Select the desired language by pressing
UIFBSSPXCVUUPOT ) or ( ).
Press the save button. 5IFNBDIJOFBDUJWBUFTUIFXBSNJOHVQ
phase.Wait until it is completed.
8IFOXBSNVQQIBTFJTDPNQMFUFUIF
machine performs a rinsing cycle of the
internal circuits. It is possible to interrupt
UIFDZDMFCZQSFTTJOHUIF4501CVUUPO
5IFNBDIJOFJTOPXSFBEZGPSVTF"TNBMMRVBOUJUZPGXBUFSJTEJTQFOTFE
Wait for this cycle to be completed
automatically.
SETTING THE LANGUAGE
5IJTTFUUJOHBMMPXTZPVUPDIPPTFUIFPQFSBUJOHMBOHVBHFPGUIFNBDIJOF*UBMTPBMMPXTZPVUPBEKVTUUIFQBSBNFUFSTPGUIFCFWFSBHFTUP
UIFUZQJDBMQBSBNFUFSTPGUIFDPVOUSZXIFSFUIFNBDIJOFJTVTFE5IJTJTXIZTPNFMBOHVBHFTBSFEJòFSFOUJBUFEBMTPCZDPVOUSZ
*GOPMBOHVBHFJTTFMFDUFEZPVXJMMCFSFRVFTUFEUPTFMFDUJUUIFOFYUUJNFUIFNBDIJOFJTTUBSUFE
MEASURING THE WATER HARDNESS
The test strip can only be used for one measurement.
*NNFSTFUIFXBUFSIBSEOFTTUFTUTUSJQ
QSPWJEFEXJUIUIFNBDIJOFJOXBUFSGPS
1 second.
$IFDLUIFXBUFSIBSEOFTTWBMVFBOETFU
5IFNBDIJOFXBUFSIBSEOFTTMFWFMQBHF
- The Intenza Aroma System (page 7).
Intenza Aroma System
.BDIJOFXBUFSIBSEOFTTTFUUJOH
ITALIANO
ITALIANO CH
ENGLISH
DEUTSCH
FRANÇAIS
ESPAÑOL
PORTOGUÊS
1
ITALIANO
ITALIANO CH
ENGLISH
DEUTSCH
FRANÇAIS
ESPAÑOL
PORTOGUÊS
2
RINSING
4
15/01/10
10:38
6
HEATING UP…
3

6
9
1
5
3
INSTALLATION
FIRST USE USE AFTER A PERIOD OF INACTIVITY
5PJNQSPWFUIFQSPEVDURVBMJUZDBSSZPVUUIJTQSPDFEVSFBUöSTUVTFPGUIFNBDIJOFBOEBGUFSMPOHQFSJPETPGJOBDUJWJUZ
A few simple operations are needed to ensure the quality of your favourite beverages over time.
Place a container of large size under the
coee dispensing spout.
Press the button once or more until the
icon is displayed.
Select the product by pressing the
CVUUPOTIPXO
1SFTTUIF0,CVUUPOUPTUBSUEJTQFOTJOH
XBUFSUISPVHIUIFEJTQFOTJOHTQPVU%0
NOT insert coee at this stage.
'JMMUIFXBUFSUBOLXJUIGSFTIESJOLJOH
XBUFSBTQSFWJPVTMZEFTDSJCFE:PVS
NBDIJOFJTOPXSFBEZUPCSFXFYDFMMFOU
beverages!
At the end of the dispensing phase, take
the container and place it under the hot
XBUFSXBOE
Repeat the process from step 5 to step 7
VOUJMUIFXBUFSUBOLJTFNQUZ
Dispensing can be interrupted by pressing
4501
At the end, remove the container and
empty it.
1SFTTUIF8"5&3CVUUPOBOEUIFOUIF
XBUFSEJTQFOTJOHCVUUPO8BJUGPSUIF
programmed quantity to be dispensed.
2
INSERT GROUND COFFEE
AND SELECT OK
LONG COFFEE
4
SELECT
HOT WATER OR
6
HOT WATER
7 8
5
7
1
2

7
1
4 5
32
INTENZA WATER FILTER
5PJNQSPWFUIFRVBMJUZPGUIFXBUFSZPVVTFBOEFYUFOEUIFMJGFPGZPVSNBDIJOFBUUIFTBNFUJNFJUJTSFDPNNFOEFEUIBUZPVJOTUBMMUIF
XBUFSöMUFS"GUFSJOTUBMMBUJPOHPUPUIFXBUFSöMUFSJOJUJBMJ[BUJPOQSPHSBNNFTFFUIF."$)*/&.&/6QBHF*OUIJTXBZUIFNBDIJOF
JOGPSNTUIFVTFSXIFOUIFXBUFSöMUFSNVTUCFSFQMBDFE
Remove the water lter from its packaging, immerse it vertically (with the opening positioned upwards) in cold water and
gently press its sides to let the air bubbles out.
3FNPWFUIFTNBMMXIJUFöMUFSGSPNUIF
tank and store it in a dry place sheltered
from dust.
'JMMUIFUBOLXJUIGSFTIESJOLJOHXBUFS
and re-insert it into the machine.
1MBDFBDPOUBJOFSCFOFBUIUIFIPUXBUFS
TUFBNXBOE
*OTFSUUIFöMUFSJOUIFFNQUZUBOL5IF
reference mark and the groove must
NBUDI1VTIöSNMZVOUJMJUJTDPNQMFUFMZ
inserted.
Set up the Intenza Aroma System:
"4PGUXBUFS
#.FEJVNXBUFSTUBOEBSE
$)BSEXBUFS
1SFTTUIF0,CVUUPO 1SFTTUIF0,CVUUPOUPDPOöSNUIF
JOUSPEVDUJPOPGUIFOFXXBUFSöMUFS
1SFTTUIF0,CVUUPOUPDPOöSN8BJU
until the cycle is completed and remove
the container.
"DDFTTUIF."$)*/&.&/6TFFQBHF
4FMFDU8"5&34&55*/(4BOE"$5*7"5&
'*-5&3UIFOQSFTT0,
NOTE: At the end of the procedure the display automatically returns to the product dispensing page.
If the Intenza water lter is not available, insert the small white lter previously removed (see point 1) into the tank.
3
OFF
WATER HARDNESS
ENABLE FILTER
ACTIVATE FILTER
2.4. WATER SETTINGS
6
2.4.3. WATER SETTINGS
ACTIVATE FILTER?
7
ACTIVATE FILTER
INSERT WATER FILTER
AND FILL THE WATER TANK
8
ACTIVATE FILTER
PLACE A CONTAINER
UNDER THE
HOT WATER SPOUT
9

8
21
ADJUSTMENTS
COFFEE STRENGTH SBS
The SBS dial has been carefully designed to give your coee the fullness and intensity you desire. Simply turn the dial and set the coee
GSPNNJMEJOUFOTJUZUPTUSPOHJOUFOTJUZBDDPSEJOHUPZPVSPXOUBTUF
SBS BREWING SYSTEM
5IF#SFXJOH4ZTUFN4#4BEKVTUTUIFGVMMOFTTPGUIFCSFXFEDPòFF5IFDPòFFNBZFWFOCFBEKVTUFEXIJMFCSFXJOH
5IJTBEKVTUNFOUIBTBOJNNFEJBUFFòFDUPOUIFTFMFDUFEUZQFPGCSFXJOH
MEDIUM
COFFEE
STRONG
COFFEE
MILD
COFFEE
OPTIDOSE ADJUSTS THE AMOUNT OF COFFEE TO GRIND
5IFNBDIJOFBMMPXTZPVUPBEKVTUUIFSJHIURVBOUJUZPGHSPVOEDPòFFGPSFBDIQSPEVDU
5IFTUBOEBSEBEKVTUNFOUGPSFBDIQSPEVDUDBOCFTFUJOUIF#&7&3"(&.&/6TFFQBHF
:PVNBZUFNQPSBSJMZDIBOHFUIFBNPVOUPGDPòFFHSPVOEBTXFMM5IJTDIBOHFBQQMJFTPOMZUPUIFCSFXJOHPGUIFOFYUDPòFF
1SFTTUIF CVUUPOPOUIFDPOUSPMQBOFMUPUFNQPSBSJMZDIBOHFUIFRVBOUJUZPGHSPVOEDPòFFPSTFMFDUUIFQSFHSPVOEGVODUJPO
= mild dose
= medium dose
= strong dose
5IFCFWFSBHFJTCSFXFECZVTJOHUIFQSFHSPVOEDPòFF

9
A B C
This setting provides a very coarse
grinding.
Press and turn. 5IJTTFUUJOHQSPWJEFTBWFSZöOFHSJOEJOH
GAGGIA ADAPTING SYSTEM
Coee is a natural product and its characteristics may change according to its origin, blend and roast.The Gaggia coee machine is
FRVJQQFEXJUIBTFMGBEKVTUJOHTZTUFNUIBUBMMPXTUIFVTFPGBMMUZQFTPGDPòFFCFBOTBWBJMBCMFPOUIFNBSLFUOPUJODMVEJOHøBWPSFEPS
carmelized).
t 5IFNBDIJOFBVUPNBUJDBMMZBEKVTUTJUTFMGJOPSEFSUPPQUJNJ[FUIFFYUSBDUJPOPGUIFDPòFFFOTVSJOHQFSGFDUDPNQSFTTJPOPGUIFCFBOTUP
obtain a creamy espresso coee that is able to release all the aromas, regardless of the type of coee used.
t 5IFPQUJNJ[BUJPOQSPDFTTJTBMFBSOJOHQSPDFTTUIBUSFRVJSFTUIFCSFXJOHPGBDFSUBJOOVNCFSPGDPòFFTUPBMMPXUIFNBDIJOFUPBEKVTUUIF
compactness of the ground coee.
t "UUFOUJPOTIPVMECFHJWFOUPTQFDJBMCMFOETXIJDISFRVJSFHSJOEFSBEKVTUNFOUTJOPSEFSUPPQUJNJ[FUIFFYUSBDUJPOPGUIFDPòFF
COFFEE GRINDER ADJUSTMENT
5IFNBDIJOFBMMPXTTMJHIUBEKVTUNFOUTUPUIFDPòFFHSJOEFSUPBEBQUJUUPUIFLJOEPGDPòFFVTFE
Important Note: Adjustments to the coee grinder can be made only when the grinder is being used. This phase takes
place during the rst part of a coee brewing.
5IFBEKVTUNFOUDBOCFDBSSJFEPVUCZVTJOHUIFEJBMJOTJEFUIFCFBOIPQQFSXJUIPVUDPNJOHJOUPDPOUBDUXJUIBOZNPWJOHQBSUT
Press and rotate the dial (one step at a time) according to the indications provided on the cover.
1SFTTBOEUVSOUIFEJBMPOFOPUDIBUBUJNFBOECSFXDVQTPGDPòFFUIJTJTUIFPOMZXBZUPOPUJDFEJòFSFODFTJOUIFHSJOE

10
1 2 3
4
DISPENSING SPOUT HEIGHT ADJUSTMENT
#FGPSFCSFXJOHBQSPEVDUBOEBDDPSEJOHUPUIFLJOEPGDVQBEKVTUUIFIFJHIUPGUIFEJTQFOTJOHTQPVU
5PBEKVTUNBOVBMMZNPWFUIFEJTQFOTJOHTQPVUBTTIPXOJOUIFQJDUVSF
Note: In some cases the dispensing spout can be removed to allow the use of very
large containers.
ADJUSTMENTS

11
A
STANDBY MODE
The machine is designed for energy saving. After 60 minutes of inactivity, the machine goes into stand-by mode, the boiler is no longer
heated and all the devices turn o.
1PXFSDPOTVNQUJPOJTSFEVDFEUPBNJOJNVN1SFTTBOZCVUUPOUPUVSOUIFNBDIJOFPOBHBJO
The machine status can be manually changed to stand-by mode by holding the stand-by button pressed for 3 seconds.
Note:
1 The stand-by mode cannot be activated if the service door is left open.
2 The stand-by activation time can be changed in the "MACHINE MENU" on
page 28.
3 When the stand-by mode is activated, the machine performs a rinse cycle
of the internal circuits. It is possible to interrupt the cycle by pressing the
"STOP" button.
5IFNBDIJOFDBOCFUVSOFEPOBHBJOCZFYFDVUJOHPOFPGUIFGPMMPXJOHBDUJPOT
1 By pressing any of the control panel buttons.
#ZPQFOJOHUIFTFSWJDFEPPSXIFODMPTJOHUIFEPPSUIFNBDIJOFHPFTCBDLUP
stand-by mode).
3 If a pre-set timer becomes active.
5IFCVUUPOCFDPNFTSFEBOECMJOLTXIFO
the machine is in stand-by mode.

12
I
II
1 2 3
4 5 6
5IFNBDIJOFJTFRVJQQFEXJUIBDBSBGFBMMPXJOHGPSPQUJNBMNJMLGSPUIJOHGPSUIFCSFXJOHPG
tasty cappuccinos, latte macchiatos and any milk-based beverage.
Note: Before using the carafe, make sure it is thoroughly clean and sanitary. If
milk is left in the carafe, make sure it is still suitable for food consumption before
using it.
5IFDPOUBJOFSBMMPXTGPSBOFBTZBOEQSBDUJDBMTUFBNJOHBOEGSPUIJOHPGNJML5IFDPOUBJOFS
can be easily removed from the machine after each use so that it can be placed back in the
refrigerator.
5IFCSFXJOHDJSDVJUJTBVUPNBUJDBMMZXBTIFECZBOBVUPNBUJDDMFBOJOHDZDMFBGUFSFBDIVTF
5IJTBVUPNBUJDDMFBOJOHDZDMFXPSLTPOMZJGBDUJWFTFFQBHFBOEDBOCFBMTPNBOVBMMZ
TUBSUFECZQSFTTJOHUIF$-&"/CVUUPOOFYUTFFQBHF
5IFDBSBGFNVTUCFSFNPWFEBUMFBTUPODFBXFFLUPBMMPXGPSQSPQFSDMFBOJOHPGBMM
DPNQPOFOUTBOELFFQBMMQBSUTGSFTIGPSPQUJNVNCSFXJOH'PSQSPQFSDMFBOJOHSFGFSUPUIF
.JML$BSBGF$MFBOJOHTFDUJPOTFFQBHF
Remove the protection cover from the
milk container connection and keep it in
a clean place. It is suggested to insert it
JOUIFXBUFSDPWFSTFBU
3PUBUFUIFIBOEMFDMPDLXJTFUP
disengage the lock. 1SFTTUIFEJTFOHBHFCVUUPOTUPBMMPXUIF
lid removal.
'JMMUIFDBSBGFXJUIDPMENJML'JMMNJMLUP
BCPWFUIF.*/MJOFCVUEPOPUFYDFFE
UIF."9MFWFMJOEJDBUFEPOUIFDBSBGF
MILK CARAFE USE
Place the lid back and ensure that it is
closed correctly. Move the handle back
UPJUTDFOUSBMQPTJUJPOUPBMMPXGPSQFSGFDU
closure.
*OTFSUUIFDBSBGFJODMJOFEUPXBSETUIF
front.
The carafe base should be positioned on
the hole (E) located on the drip tray.
A = Carafe holes
B = Carafe pins
C = Machine couplings
D = Guides for carafe pins
A
B
B
C
D

13
2
1
8
9
7C
D
A
B B
After use, remove the container from the machine and place it in the refrigerator for proper conservation.
We recommend NOT to keep the container at room temperature for too long. Maximum 10 minutes.
Store the milk according to producer's instructions and do NOT use it after best-before date.Wash the container as described in the
.*-,$"3"'&$-&"/*/(TFDUJPOTFFQBHF
REMOVING THE CARAFE
5IFGPMMPXJOHPQFSBUJPOTTIPXIPXUPQSPQFSMZSFNPWFUIFDBSBGFGSPNUIFNBDIJOF
DO NOT FORCE THE INCLINATION OF THE CARAFE.
At this stage the carafe holes (A) are
MPXFSUIBOUIFDPVQMJOHT$
The carafe pins (B) are located at the
same height of the guides (D).
*OTFSUUIFDBSBGFCZUVSOJOHJUUPXBSETUIFCBTFUISPVHIBSPVOENPWFNFOUBTTIPXO
JOUIFöHVSFVOUJMJUJTIPPLFEUPUIFIPMF&MPDBUFEJOUIFESJQUSBZ
1VMMUIFDBSBGFVQXBSETVOUJMJUTSFMFBTFGSPNUIFIPMF&MPDBUFEJOUIFESJQUSBZ5IFO
pull until it releases.
DO NOT FORCE THE INCLINATION OF THE CARAFE.
5IFDBSBGFXJMMCFOBUVSBMMZCBDLJO
place.
E
Table of contents
Other Gaggia Coffee Maker manuals

Gaggia
Gaggia Deco User manual

Gaggia
Gaggia Baby Gaggia User manual

Gaggia
Gaggia VIVA GAGGIA User manual

Gaggia
Gaggia SUP 020 User manual

Gaggia
Gaggia SYNCRONY DIGITAL User manual

Gaggia
Gaggia Unica User manual

Gaggia
Gaggia Achille User manual

Gaggia
Gaggia RI9380 User manual

Gaggia
Gaggia la Reale User manual

Gaggia
Gaggia Ruby PRO User manual

Gaggia
Gaggia SYNCRONY COMPACT User manual

Gaggia
Gaggia Brera User manual

Gaggia
Gaggia 10002842 User manual

Gaggia
Gaggia 10002841 User manual

Gaggia
Gaggia Achille User manual

Gaggia
Gaggia GD One User manual

Gaggia
Gaggia BABY DOSATA User manual

Gaggia
Gaggia GRAN GAGGIA User manual

Gaggia
Gaggia Brera User manual

Gaggia
Gaggia Espresso Color User manual