Gain Electronic SAGA1-L40 User manual

Gain Electronic Co., Ltd.
INSTALLATION &
OPERATION
MANUAL

1
TABLE OF CONTENTS
Chapter 1 Warranty
Chapter Precautions Of Operation
Chapter 3 Standard Accessories
Chapter 4 Operation
Chapter 5 PC Software Installation and Operation Guide
Chapter 6 The relationship of the relays, commands & cable outputs
APPENDIX Function Setting (Defined by Customer)
SAGA1- L40 Passive Antenna
Output of COM & Relay
Wiring Diagram

2
Chapter 1. Warranty
1-1 Warranty
Gain Electronic Co., Ltd. guarantees that this product meets its published
specifications at the time of shipment from the factory. Under proper
installation it should work as expected.
1-2 Warranty Period
This equipment is warranted against defects in material and manufacturing
for a period of one year from the date of shipment. During the warranty
period, GAIN is responsible for necessary repairs as long as the product can
be proved to be defective. For warranty service or repair this product must
be returned to a service facility designated by GAIN. Buyer will pay shipping
charges to GAIN while GAIN will pay return shipping charges.
1-3 Exc uded Items
This warranty does not include consumptive parts such as batteries, fuses,
joystick, buttons, and relays. Also this warranty does not cover defects
caused by improper installation, improper or insufficient maintenance,
unauthorized modification, improper operation, ignorance of environmental
specifications, or improper software or interfacing.
1-4 Remarks
◎ No other warranty is expressed or implied, except for the above
mentioned.
◎The remedies provided herein are the buyer’s sole and exclusive remedies.
GAIN shall not be liable for any direct, indirect, special, incidental or
consequential damages.

3
Chapter 2. Precautions of Operation
2-1 Precautions:
1. Please carefully read the manual before operating this device.
. Never dismantle the equipment by any unauthorized personnel, or
equipment may be damaged.
3. This manual is for reference only. Pleases consult your distributor for
further assistance.
4. The equipment has been strictly tested for quality before delivery from
our plant. However, this equipment must not be used in dangerous
situations or where damage may result.
5. After operation, shut off main power to the crane, power to receiver,
and turn the key to “OFF” position and remove it.
6. Transmitter should be placed in a safe area when not in use to avoid
accidental pressing of buttons.
7. The crane should be equipped with main power relay, limit switch and
other safety devices.
8. Don’t use equipment during lightening or high electrical interference
conditions.
9. Make sure that the batteries are in good condition and power for
receiver is correct.
10. Maintenance should only be done while the crane’s main power is off to
prevent electrical shock.
11. Operating in an industrial facility is highly dangerous; therefore,
operator must have adequate training in using SAGA1 system.
1 . Those who operate the machine should be healthy and have good
judgment in regards to safety.
13. Although the SAGA1 transmitter is very durable and weather resistant
care should be taken not to expose it to severe impact or pressure.
14. If the severe interference occurred you should stop using the
equipment at once.
15. Please take the battery out when the equipment will not be used for a
long time.
16. Be sure to know the “Procedures of Emergency “ as following.
2-2 Procedures of emergency:
In case of an Emergency, please follow the steps below and ask the
distributor for service immediately.
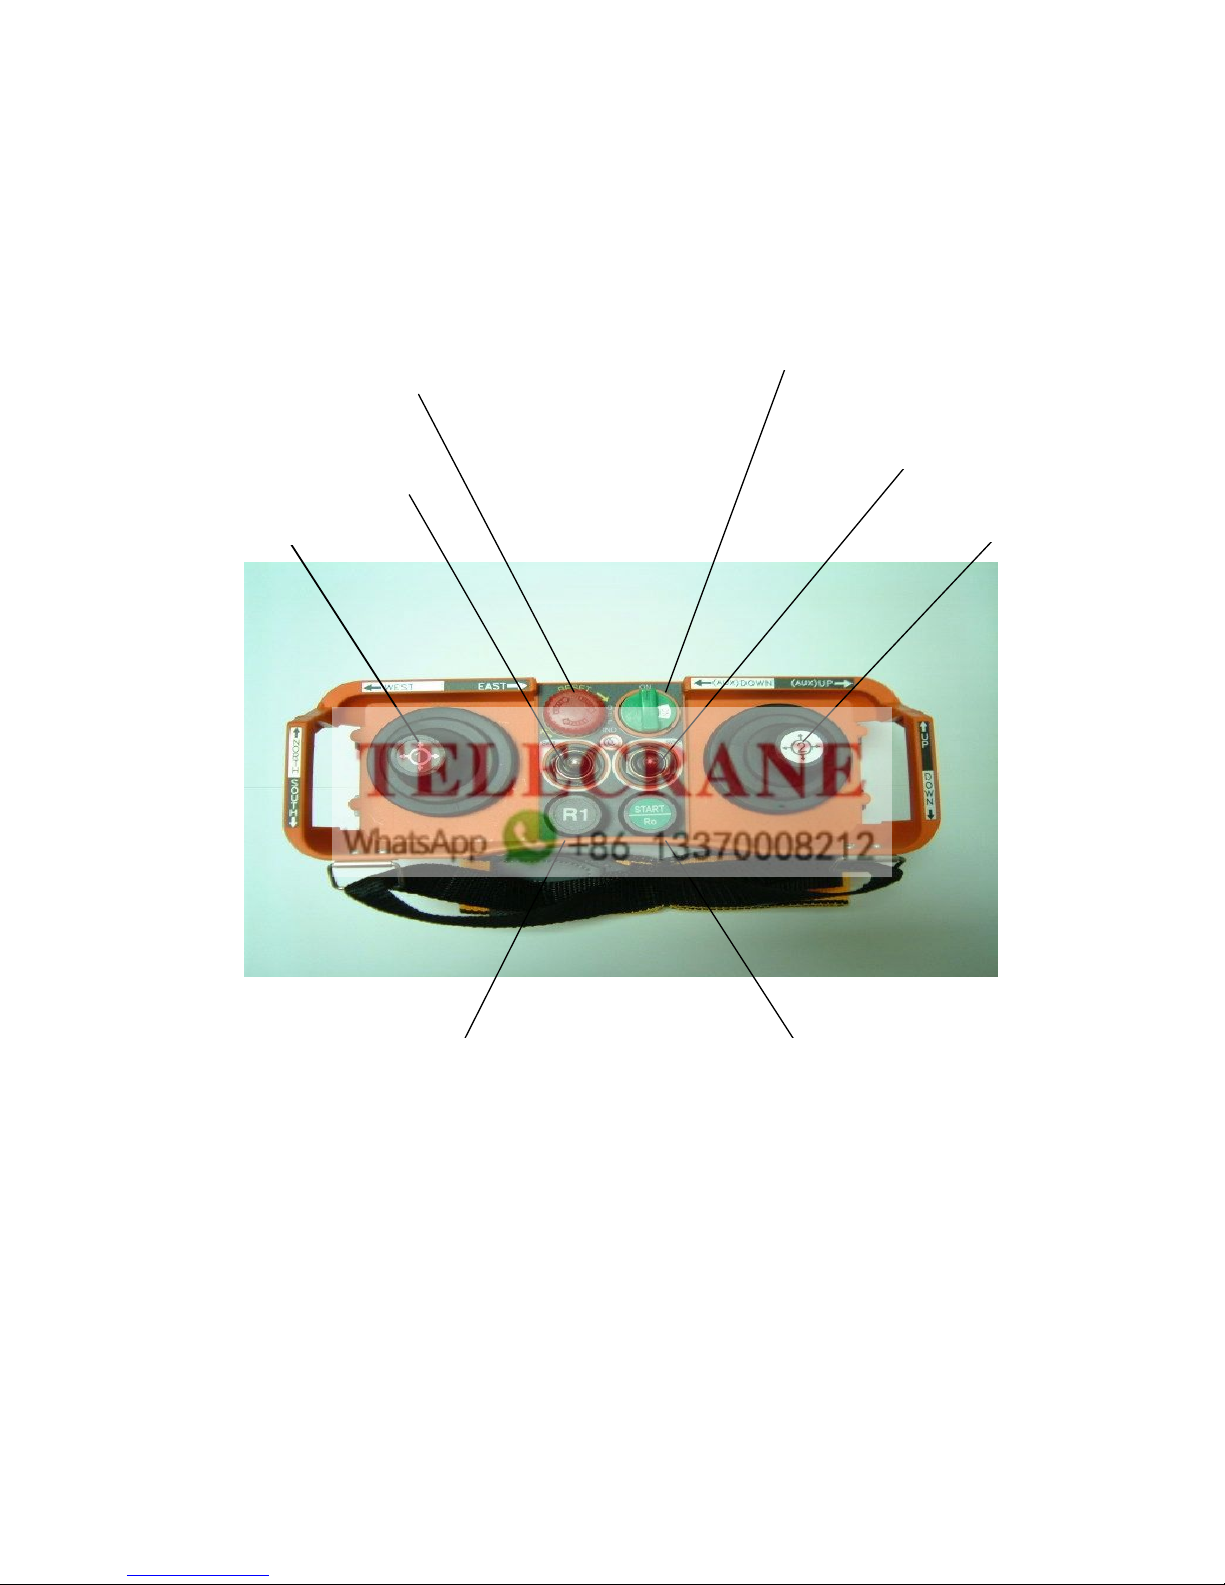
1. Press EMS button.
. Turn the “rotary key ” to “OFF” position and remove it.
3. Switch off the main power of crane.
4. Advise the distributor to check it out.

4
Chapter 3. SAGA1- L40 Standard Accessories
When you get a standard and full set of SAGA1-L40 system, it includes the
following items:
(3) Belts (4) Manual & Wiring Diagram
(1) Transmitter ( ) Receiver

5
Chapter 4. Operation
4-1. SAGA1- L40 Transmitter
Joystick #1 Joystick #2
Emergency
Stop button
Pushbutton
(R1)
Pushbutton
(R0/Start)
Se ected Switch #1
Se ected Switch #2
Rotary Key

6
4-2. SAGA1-L40 Receiver
Cab e Assemb e #2
Cab e Assemb e #1
Wiring Diagram of Contro Contact

7
4-3. Genera Operation
1) Turn on the main power switch of the equipment (Crane).
) Install four AA size batteries in the transmitter make sure the “+”and
“-” direction are correct.
3)Rotate “EMS” mushroom clockwise 45∘and pull out.
4)Turn the rotary key clockwise to "ON" position, then press the “Start”
pushbutton to Power-On.
5) Operate normally according to the function setting has done.
6) Please proceed the following procedure after operation.
a) Press EMS mushroom and turn the rotary key of the transmitter to
"OFF" position to shut off the motion of the receiver and remove
the key.
b) Switch off the main power switch of the equipment (Crane).
c) Remove the batteries when the equipment is not going to be in use
for a long period of time.
Note:
A) Four AA size batteries are required for the transmitter. There is a 3-
stage power indicating function with LED display.
“Green co or”: Sufficient power to operate transmitter.
“Ye ow co or”: Power is depleting. Operation must be stopped
immediately (for example: down the goods to ground) to replace
batteries.
“Red co or”: Insufficient power. Transmitter will send out an
emergency stop signal to the receiver due to insufficient power.
Operator should avoid this situation in order to maintain the safety of
operation.
B) Turn the rotary key of the transmitter to "OFF" position; it will not only
shut off the motion of the receiver but also save the power. Otherwise,
the transmitter will keep staying in the standby mode and causing
more power consumption.

8
4-4. The function of Copier
One can use the copier to pair a new transmitter or receiver, procedures as
follows:
1. Insert the six pins female plug of copier into the male socket inside the TX
or RX of SAGA1-L40.
. For copying and saving the data from TX or RX, put on the magnetic key
onto the receptor to connect; for transferring the saved data from copier
to TX or RX, release the magnetic key from the receptor.
3. Press and release “1” pushbutton (or , 3) to copy and save the data
(When magnetic key is on) from TX or RX, after the green indicator light
has flashed, the transfer is finished, disconnect the plug. Proceed the
same procedure to transfer the data from copier to TX or RX. (When
magnetic key is off)
Note:
1. Make sure the power of TX or RX is “OFF” when copying.
.The copier for SAGA1- L40 (dual colors on the appearance) can also
be used for existing SAGA1-L4/6/8/6B/8B/L10/L1 .
3.The copier can copy both function settings and ID-Code, but to pair the
crystal is still essential to match both TX and RX for communicating
each other.
4-5. Change of Frequency
It is easy to change frequency of the SAGA1-L series simply by replacing
correspondent frequency crystal in both the TX and RX.
Note
: To replace a new crystal, please note that there are two kinds of
frequencies (VHF and UHF) available The indication of VHF
or UHF is shown on PC board with a check mark “V” and
please make sure not to replace a VHF crystal unit into UHF
PC board or vice versa

9
Instructions:
(1). Pry up the crystal unit with a flat screwdriver.
( ). Remove the crystal unit from the system.
(3). Use a needle nose pliers to straighten both pins of the new crystal unit.
(4). Insert the new crystal unit vertically into the PC board.
(5). Press the new crystal down into the socket.
1
3
4
2
5
Attention: The frequency will e different when plugging the
same crystal into the TX or RX. For example:
T:311MHz Frequency for TX is 311 MHz
R:321.7MHz Frequency for RX is 321.7MHz

10
4-6. Receiver Vo tage Se ections
There are four input voltages available for the SAGA1-L40 as follows:
48/110VAC
48/ 0VAC
110/ 0VAC
0/380VAC.
Please disconnect the Rx’s power, select the proper voltage and plug inthe
connector.
Switch the p ug to choose vo tage

11
Chapter 5. PC Software Insta ation and Operation Guide
5-1. Software Insta ation:
1) Open CD-ROM of your computer and insert SAGA1- L40 PC software CD, the
program will run automatically. Select English Version or Chinese Version
then Click “Ok” to proceed installing, “Cancel” to exit.
Remark: USB driver must be installed at first time of using USB connect
cable, please click the bottom line of dialogue “ Click here to install USB
Driver” to install USB driver.
) Click “Next” when the screen shows as below
“Click here to install USB Driver”

12
3) Click “Finish” to end the installation, then remove the CD from the CD-ROM.
The program will add a shortcut on your desktop.
5-2. Software Operation and Function Setting
1) To activate the program, either double click on the desktop shortcut for
SAGA1- L40 software, or from the “start” menu of your Windows:
(StartProgramsSAGA1SAGA1- L40 Function Setting)

13
2) Defau t , Function, and Customer Info page of the program
Push utton/ Selected
Switches
corresponding Relay
Click here to
next page
Open File
Save File
Write Data
Read Data
Select Com Port/A out
Program
Print/Preview Connection
Diagram

14
-1) Function page of the program
It is a functional page used to modify the settings on pushbuttons, selected
switches, and joysticks.
By modifying the function page, it will meet the needs of all kind of
applications, and make operating remote controller easier. (For more
details please refer Appendix .)
- ) Customer Info Page
This page provides the basic information of end users & equipment as well.
The data of customer info page is useful for users on equipment
management and maintenance.

15
-3) Read Data
Getting the function settings were set by factory before shipping.
Use RS 3 or USB cable connecting Transmitter or Receiver to the
computer, click
“Read Data” to retrieve the setting, then click “OK” to see the result.
-4) Write Data
Updating with new date into Transmitter or Receiver.
To write to another TX or RX, disconnect the cable from present TX or RX
and connect to target TX or RX, click “Write Data”, and then click “OK”.
Read Data
Write Data

16
-5) Save File
After the function setting changed (refer to Appendix), either to save the
setting data to computer hard disk or write it to transmitter or receiver.
To save the data, click “Save File”, after destination chosen and file name
typed, click “Save”. Click “OK”
-6) Open File
To read data from saved file.
To click “Open File”, after the source file (*.L40) chosen, click “Open”, then
“OK”.
Save File
Open File

17
-7) Select Com Port / About Program
Select Com Port – Providing available COM port selections as Transmitter
or Receiver connected with PC.
About Program- showing the current version of software is being used
(reference only)
-8) Print/Preview Connection Diagram
Print: allows users print out the current page showing on the monitor.
Preview Connection Diagram: As a reference for technicians before
starting the wiring installation.
To print out the wiring diagram, click “Print”, and then select “ preview
connection diagram”. A wiring diagram will automatically be created in
accordance with the mapping relationship between relays and commands.
(Shown as Fig. -8-1)

18
Preview connection diagram
Fig. -8-1

19
Chapter 6 The re ationship of the re ays, commands & cab e outputs
6-1. Pushbuttons/ Se ected switches; Joysticks operation
1). Pushbuttons/ Selected switches
For knowing Pushbuttons and selected switches what corresponding relays
are, users can directly refer to “ corresponding Relay” on function setting
page.
For instance, as Fig. 6-1 shown, while R0 pushbutton pressed, RY1 will
energizes; R1 pushbutton pressed, RY energizes; Selected Switch1A
(SW1A), RY3 energizes; Selected Switch1B (SW1B) , RY4 energizes;
Selected Switch A (SW1A) , RY5 energizes; Selected Switch B (SW B) ,
RY6 energizes.
Fig. 6-1
Push utton/ Selected Switches
corresponding Relay
Table of contents
Other Gain Electronic Remote Control manuals