Galene GS Series User manual

Owner’s Manual
Improve your Water, Improve your Life.
Welcome to the GALENE family. Your new GALENE whole
house GS system was expertly engineered to reduce water
hardness throughout your entire home.
Start enjoying your fresh clear water every day.
Whole House Water Filter
GS Series –City Water
GS1, GS2 and GS3

1
TABLE OF CONTENTS
I. GENERAL INFORMATION .....................................................................................................................2
1. PRODUCT DESCRIPTION ............................................................................................................................... 2
2. PROCESS DESCRIPTION ................................................................................................................................ 2
Stage I ........................................................................................................................................................ 2
Stage II ....................................................................................................................................................... 2
Stage III (Optional)..................................................................................................................................... 2
II. BOX CONTENT .....................................................................................................................................3
III. INSTALATION PROCEDURE .................................................................................................................. 5
1. SYSTEM LAYOUT......................................................................................................................................... 5
2. SITE PREPARATION ..................................................................................................................................... 6
3. INSTALLATION............................................................................................................................................ 7
IV. OPERATION & MAINTENANCE....................................................................................................... 11
V. LIMITED WARRANTY ......................................................................................................................... 15

OPERATION AND MAINTENANCE MANUAL
WATER FILTRATION SYSTEM
2
I. GENERAL INFORMATION
1. Product Description
Model: GS1 / GS2 / GS3
Capacity: 1-3 Bath / 4-6 Bath / Estate
2. Process Description
Stage I
10 micron cartridge GAC filtration
Stage II
Media - Ion Exchange (softener)-based filter with electric actuated automatic
regeneration valve
Stage III (Optional)
Chemical free disinfection with UV light

OPERATION AND MAINTENANCE MANUAL
WATER FILTRATION SYSTEM
3
II. BOX CONTENT
Open the boxes delivered and make sure you have all the pieces.
The items should
include:

OPERATION AND MAINTENANCE MANUAL
WATER FILTRATION SYSTEM
4

OPERATION AND MAINTENANCE MANUAL
WATER FILTRATION SYSTEM
5
III. INSTALATION PROCEDURE
1. System Layout
Figure 1. System Layout based on main line side

OPERATION AND MAINTENANCE MANUAL
WATER FILTRATION SYSTEM
6
2. Site Preparation
Locate where the main water line enters your home.
Define the most convenient location to install the unit. In cold climate conditions,
install inside a protected area, or risk freezing and rupturing during winter time
with severe damage to the system. In hot weather conditions, keep away from
direct exposure to sunlight.
Stage the unit to make sure all pieces will fit in the desired location.
Dimensions of units vary. Make sure you allow clearance to service the unit if
required. It is advisable to leave 48” clearance above tank, and 24” on floor space,
on sides and front of unit.
Make sure you purchased required material for connecting the main water line to
the inlet/outlet connection to the system. Take into consideration the pipe
materials when defining what to buy.
Important Notes:
1. Assure the correct sequence is followed. Improper sequence of the filters will
affect performance and may damage the unit.
2. System is designed to operate between 20 psi –80 psi. DO NOT exceed 100 psi in
any case.
3. System is designed to operate on cold water lines only (40 deg –80 deg). DO NOT
install after water heater or on a hot line.
4. System shall always be installed upright.
5. If installing on metallic based pipes (copper pipe included), grounding clamps
with a #4 copper wire is required, tying the two ends of the pipe, otherwise you
risk electric shock hazard.
6. System should be installed in a protected area. Prolonged exposure to direct
sunlight damages components, and freezing temperatures expose the unit to
freezing and consequent rupture.
7. Make sure you comply with all state and local plumbing codes, use appropriate
tap for sealing, and properly tighten all fittings to ensure a leak-free assembly.
Anticipate the need of parts to finish the installation process, including required
material for hook-up to your main water line as well as additional pipe and
fittings if the installation kit is not purchased or the site requires change in
layout.

OPERATION AND MAINTENANCE MANUAL
WATER FILTRATION SYSTEM
7
3. Installation
With GALENE Installation Kit:
oTake out all the pre-assembled PVC lines included in the installation kit and
make sure you identify all the items from 1 to 6.
Figure 2. Component layout –Right Side Main Line
Figure 3. Component layout –Left Side Main Line

OPERATION AND MAINTENANCE MANUAL
WATER FILTRATION SYSTEM
8
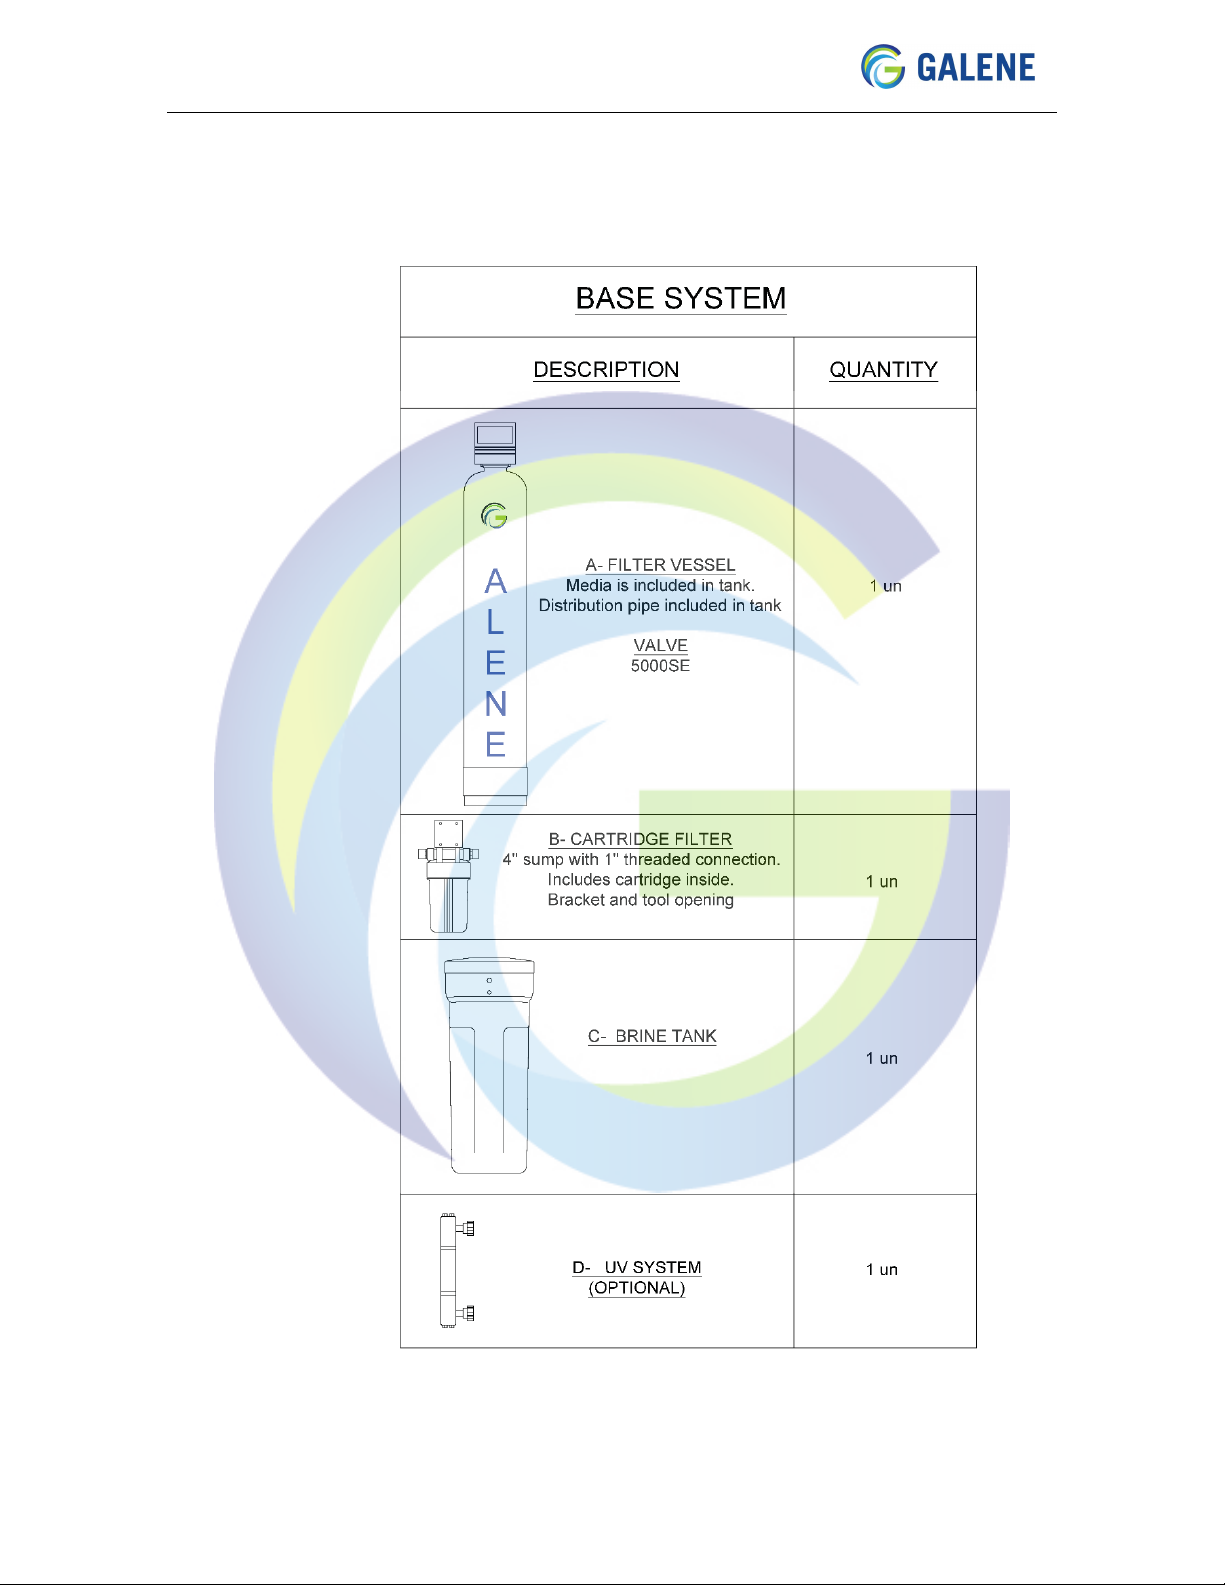
oAssemble the support bracket onto the cartridge filter (B) (blue canister).
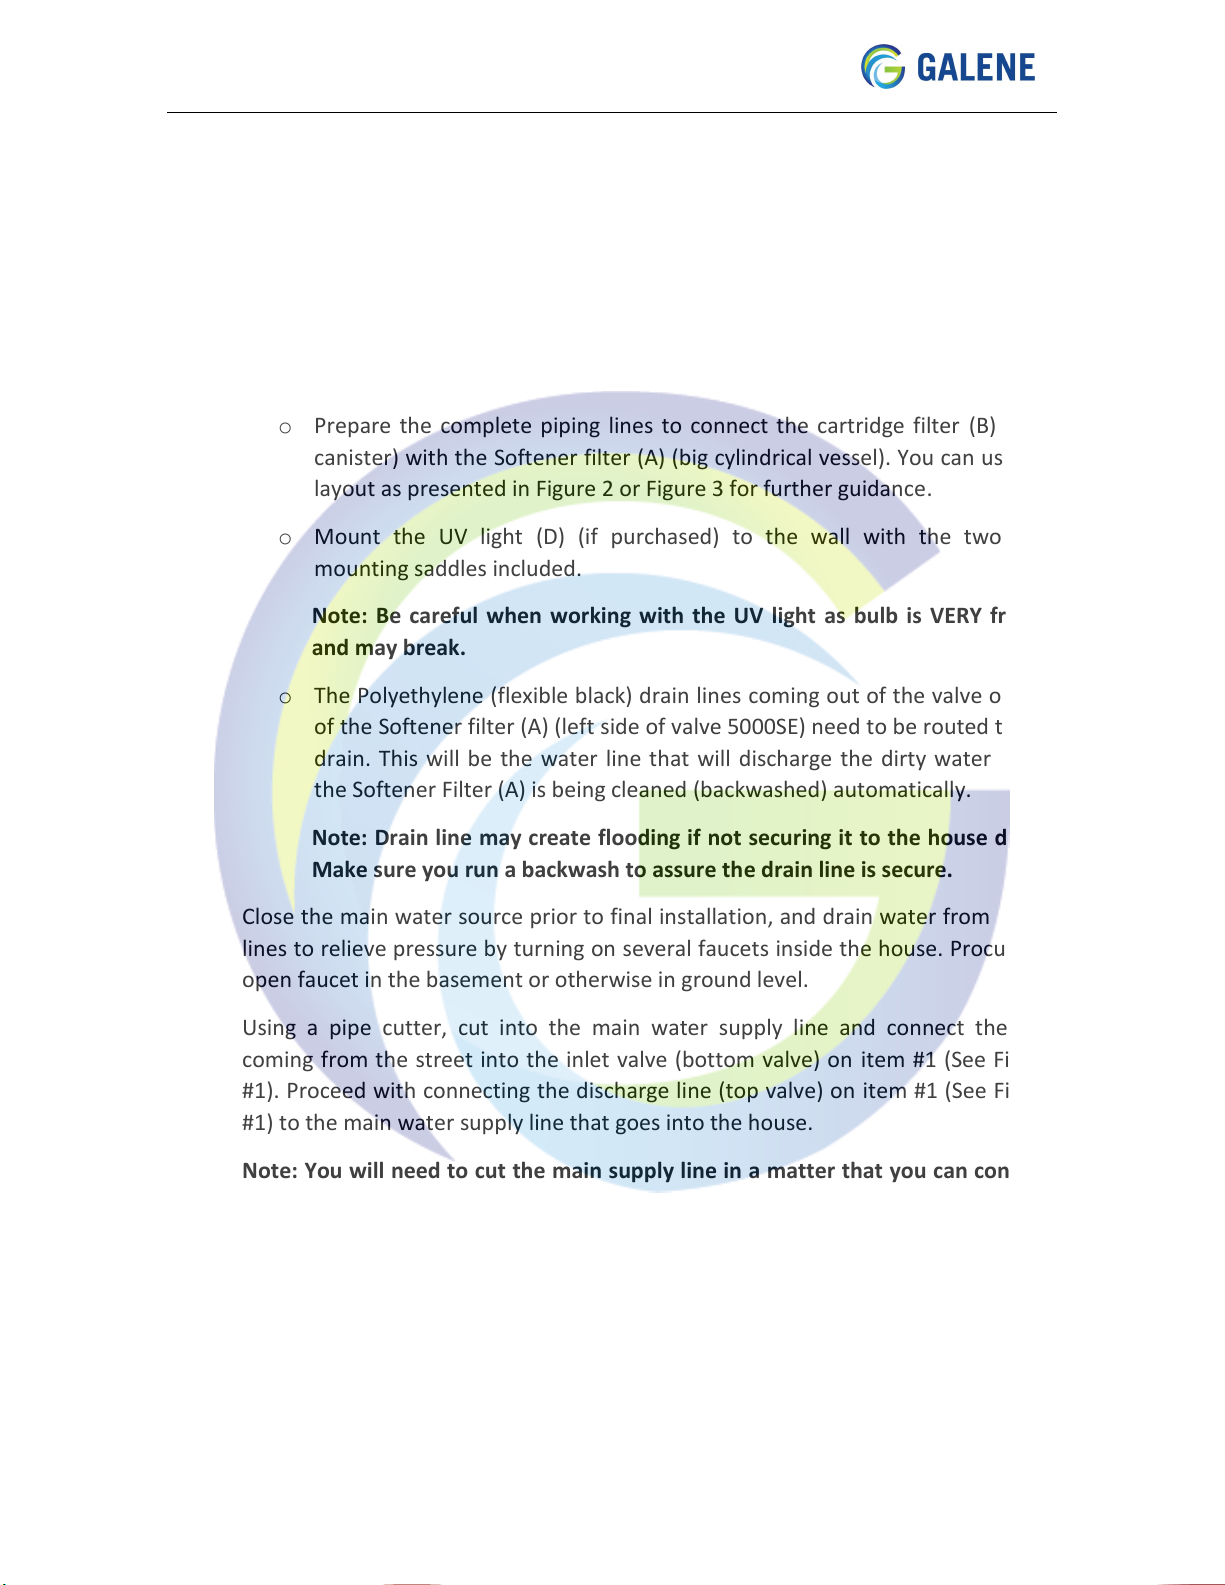
oPosition the cartridge filter (B) and the Softener filter (A) (big cylindrical
vessel) beside each other, in a way the PVC lines match, following the
system layout shown in Figure 2 or Figure 3.
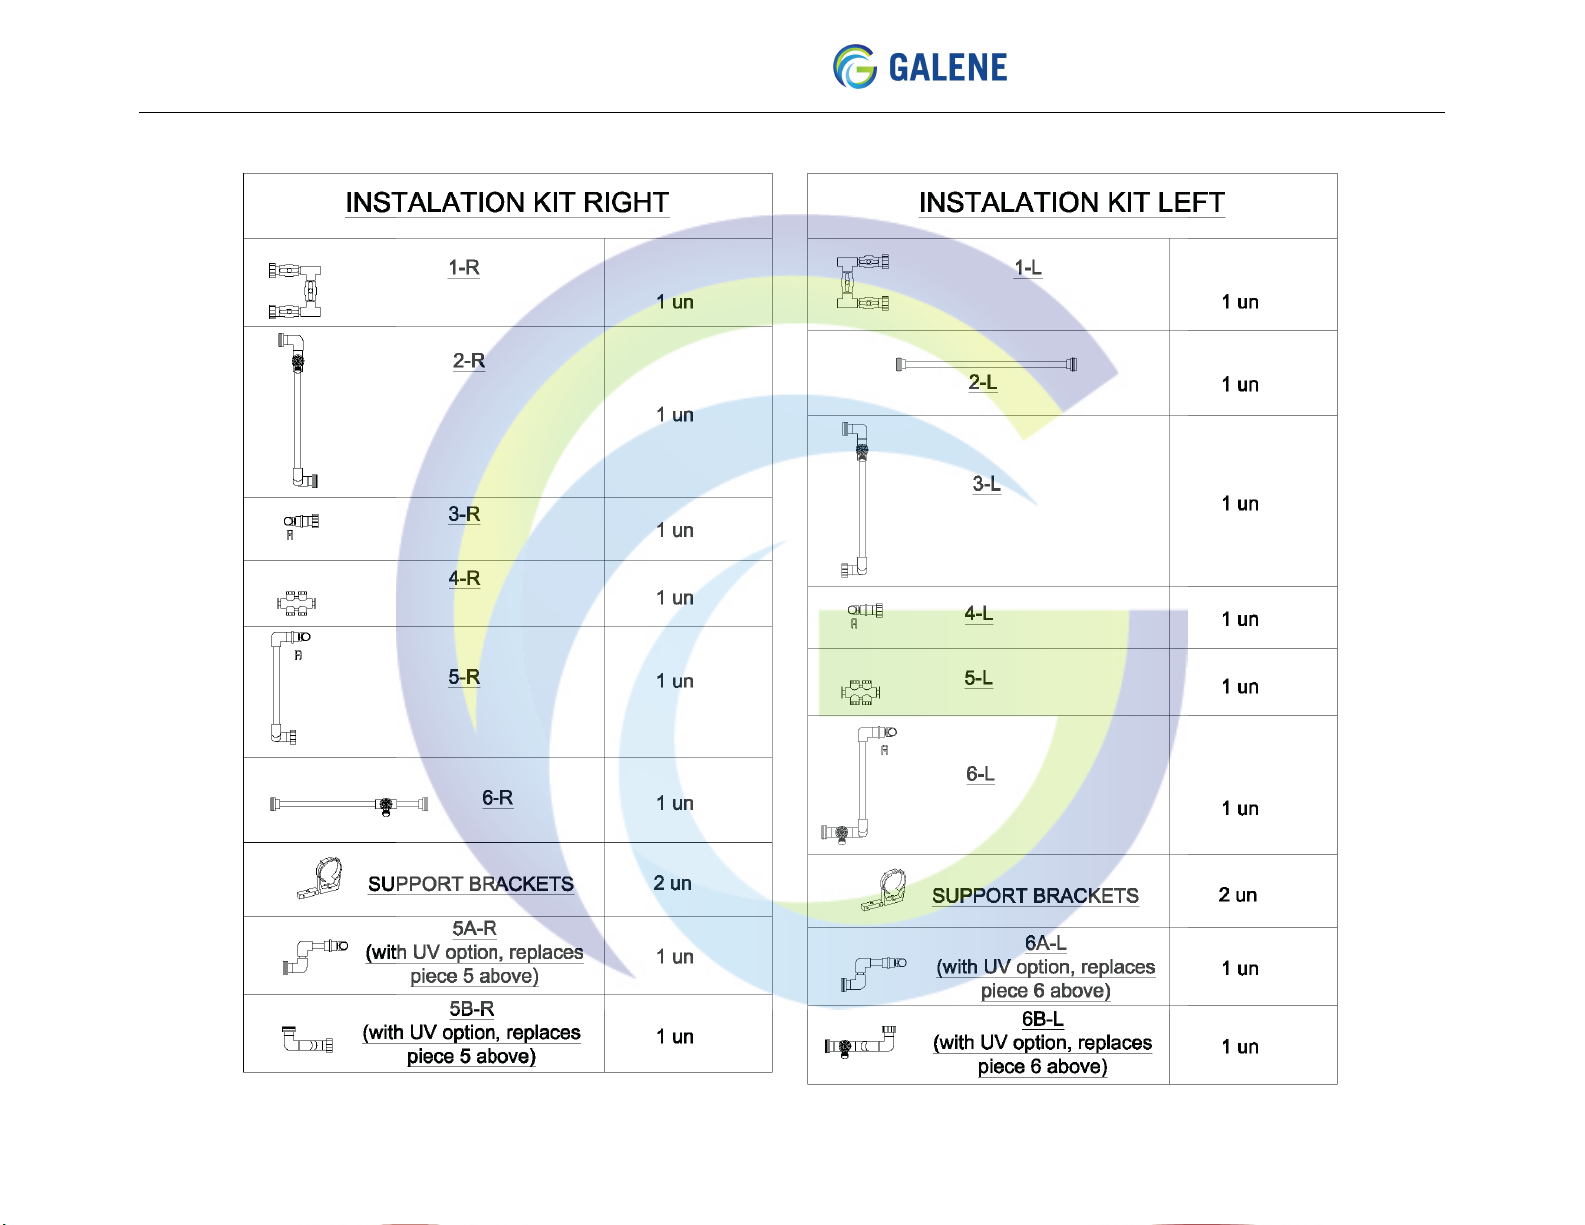
oConnect item #3R /4L (Right or Left installation)to the back of the 5000SE
valve (see Figure 1) on the Softener filter (A) using the connection pins.
Make sure you insert firmly before attempting to insert the pins.
oScrew cartridge filter (B) support bracket onto the wall (screws not
included).
oProceed to connect items #1 through #6 in order, following the above
system layout, strapping the pipe (item #6-R/#2-L) to the wall using the wall
mounts included. Make sure you initially support the cartridge filter
minimizing any weight or pressure onto the connecting pipes.
Note: It is important to assure your pipes are completely aligned prior to
closing the threaded unions, otherwise you will not have a good seal, and
will create leakage. Make sure you do not overtight the union with a
wrench. This can break the union, and will require to replace the piece.
For best results and to minimize risk of leakage, apply silicon ointment
(such as Dupont Molykote, 111 Compound) on the union gasket prior to
threading closed the union.
oBrine tank (C) should be placed near the softener filter (A), and be
accessible for easy filling access of salt as required. Overflow line on top
side of brine tank should be routed to your house drain, assuring any case
of spill is drained out without causing damage. The black flexible pipe
connected to the right side of the 5000SE valve (see Figure 1), should be
introduced to the brine tank through the white hole, making sure it is
connected to the down pipe located inside the white pipe fixed to the inner
part of the brine tank.
oIn case a UV disinfection system (D) is purchased, PVC fittings from
installation kit item #5-R or item #6-L will be replaced with item #5A, #5B or
item #6A, #6B respectively.
oMount the UV light (D) to the wall with the two wall mounting saddles
included.
Note: Be careful when working with the UV light as bulb is VERY fragile
and may break.

OPERATION AND MAINTENANCE MANUAL
WATER FILTRATION SYSTEM
9
oThe Polyethylene (flexible black) drain line coming out of the valve on top
of the Softener filter (A) (left side of valve 5000SE) need to be routed to the
drain. This will be the water line that will discharge the dirty water when
the Softener Filter (A) is being cleaned (backwashed) automatically.
Note: Drain line may create flooding if not securing it to the house drain.
Make sure you run a backwash to assure the drain line is secure.
Without Installation Kit:
oPrepare the complete piping lines to connect the cartridge filter (B) (blue
canister) with the Softener filter (A) (big cylindrical vessel). You can use the
layout as presented in Figure 2 or Figure 3 for further guidance.
oMount the UV light (D) (if purchased) to the wall with the two wall
mounting saddles included.
Note: Be careful when working with the UV light as bulb is VERY fragile
and may break.
oThe Polyethylene (flexible black) drain lines coming out of the valve on top
of the Softener filter (A) (left side of valve 5000SE) need to be routed to the
drain. This will be the water line that will discharge the dirty water when
the Softener Filter (A) is being cleaned (backwashed) automatically.
Note: Drain line may create flooding if not securing it to the house drain.
Make sure you run a backwash to assure the drain line is secure.
Close the main water source prior to final installation, and drain water from water
lines to relieve pressure by turning on several faucets inside the house. Procure to
open faucet in the basement or otherwise in ground level.
Using a pipe cutter, cut into the main water supply line and connect the line
coming from the street into the inlet valve (bottom valve) on item #1 (See Figure
#1). Proceed with connecting the discharge line (top valve) on item #1 (See Figure
#1) to the main water supply line that goes into the house.
Note: You will need to cut the main supply line in a matter that you can connect
the inlet and discharge line as seen in Figure 1. Make sure to use the correct
fittings for this installation. Cementing PVC requires primer and Solvent Cement
for PVC applications. Proper preparation is required, and drying time is of
extreme importance prior to opening the water. Make sure you follow
instructions on primer and solvent cement.

OPERATION AND MAINTENANCE MANUAL
WATER FILTRATION SYSTEM
10
IMPORTANT: When installing on metallic plumbing (including copper), ensure you
securely install two (2) grounding clamps (not include) and a #4 copper wire (not
included), as shown in the Figure 4 below.
Figure 4. Grounding clamps
WARNING –Electric Shock Hazard if not installing the grounding clamps with the #4
copper wire.
Connect the electric transformer on the valve to the electric outlet.
In case a UV light was purchased, connect the electric transformer to the electric
outlet.
IMPORTANT NOTE: Prior to turning on the water, make sure you read the Operation &
Maintenance section below.

OPERATION AND MAINTENANCE MANUAL
WATER FILTRATION SYSTEM
11
IV. OPERATION & MAINTENANCE
For best results with your GS series unit, make sure to follow the regular operating and
maintenance procedures. Remember that like any other equipment, correct operation
and service is extremely important.
After hook-up of system, you will need to backwash the Softener filter, based on
the following procedures.
oMake sure solvent cement is dry and has settled. DO NOT turn water when
solvent cement is still wet. This may cause drips or rupture.
oPosition valves on item # 1 to the “BACKWASH” position as illustrated in
Figure 5 below.
F
igur
e 5.
Byp
ass
Valv
es
oAssure you have salt in brine tank.
oPress the backwash button on the electric valve 5000SE.
oMake sure water flows out of Polyethylene drain line. Water may come out
dirty at first. Leave the flow running until the valve finishes automatically
the four (4) steps. This may take 45-60 minutes.
Note: If leaks are present, make sure to close main water line and correct
the leaks prior to resume regular operation of the system.
oWater is now good to introduce into the house, and normal consumption
may resume.
V-1
V-2
V-3
SERVICE
O
O
•
BYPASS
•
•
O
BACKWASH
O
•
O
O: Open
•: Closed
SERVICE BYPASS BACKWASH

OPERATION AND MAINTENANCE MANUAL
WATER FILTRATION SYSTEM
12
oTurn valves on item #1 to the “SERVICE” position as illustrated in Figure 5.
Note: Your system is equipped with a bypass valve for the Softener filter
(A). In case required, push nob firmly on Item #4-R/ #5-L (Right or Left
installation) moving the piston from right to left. At this point your filter
will be bypassed and no longer operate. If purchased an installation kit,
an additional bypass is included in item #1. Position the valves in
“BYPASS” as illustrated in Figure 5 to circumvent the whole system. This
will be used in case of a leak, or just regular service, assuring no water
flows through your unit.
Backwashing Softener Filter vessel
oBackwash and regeneration cycle will be done automatically based on a
preset time uploaded in factory. If required, call GALENE to change setting
on the timer.
Note: Do not attempt to change time on your own, as this may result in
the system malfunction.
Cartridge Filter
oReplace cartridge filter every 3 months
oPrior to replacing filter, make sure to position valves on item #1 on “BYPASS
position as illustrated in Figure 5.
oPress red button on top of cartridge filter to release pressure.
oUsing the special tool provided, open the blue filter sump. Make sure to
have a recipient on the bottom, to prevent water from spilling on floor.
oReplace cartridge in the sump, using a new GALENE cartridge. For best seal,
replace o-rings on sump and apply silicon ointment (such as Dupont
Molykote, 111 Compound).
oClose the blue filter sump using the special tool. Do not over tight the
sump.
oTurn valves on item #1 to the “SERVICE” position as illustrated in Figure 5
and resume normal operation.
Chlorine line wash
oIt is recommended to introduce city water into the house every 30 –60
days, for pipe and device disinfection with chlorinated water.

OPERATION AND MAINTENANCE MANUAL
WATER FILTRATION SYSTEM
13
oTurn valves on item #1 to “BYPASS” position as illustrated in Figure 5, and
let water out through all faucets, toilets and showers/tubs. For best results,
leave in “BYPASS” mode for 12 hours.
oResume to normal operation by turning valves on item #1 to “SERVICE”
position, as illustrated in Figure 5.
Replace media in Filter Vessel
oIt is recommended to replace media every 3-5 years for best results.
Note: Changing media should be done by an experienced water filter
technician.
Replace UV light (In case your system is equipped with one)
Figure 6. UV Lamp
oReplace UV light every year or when red light on ballast blinks. It is
recommended to use an experienced technician to do the replacement.
oPrior to replacing UV light, turn valves on item #1 to the “BYPASS” as illustrated
in Figure 5.
oDisconnect ballast from electric outlet.
oOpen Dust Cap (rubber casing) on the end of the UV stainless steel enclosure.
oCarefully pull the light bulb out of the enclosure by gently pulling out the
rubber Dust Cap at one end of the UV enclosure. Note that the light bulb will
come out with the electric connection on both ends. Make sure not to touch
the light bulb or damage the quartz sleeve inside the stainless-steel enclosure.

OPERATION AND MAINTENANCE MANUAL
WATER FILTRATION SYSTEM
14
oDisconnect electric connections from the Four Pin Lamp Holder and replace
light bulb with the new one. Make sure you maintain the same electric
configuration.
oReturn the light bulb gently into the enclosure, and secure the rubber cover.
oConnect the ballast to the electricity and make sure the green light turns ON
the ballast.
oIf red light turns on, pull out the light bulb and make sure the electric
connections are adequately installed.
oTurn valves on item #1 to the “SERVICE” position as illustrated in Figure 5.
NOTE: This filter system is designed and tested for use with genuine GALENE parts
including replacement filters and all hardware. Use of parts from other manufacturers
may result in loss of contaminant reduction performance, system damage or failure. Use
of parts from other manufactures will also void your warranty. Please call GALENE at
844-942 5363 or visit our website at www.galenewt.com for replacement parts.
Recommended preventive maintenance schedules:
NOTE: This product is for use with municipally treated water only. Do not use with water
that is microbiologically unsafe or of unknown water quality without adequate
disinfection before and/or after the system.
Cartridge Filter
Every 3 months
Softener Filter Vessel Media
Every 3 –5 years
UV Ligth
Every 12 months or when red light on ballast flashes
Backwash
Automatic

OPERATION AND MAINTENANCE MANUAL
WATER FILTRATION SYSTEM
15
VI. LIMITED WARRANTY
Who is covered
Galene Water Treatment AND ITS SUPPLIERS, (herein collectively referred to as “GALENE”) warrants to the owner of the home where the
water filter is initially installed (hereinafter “Owner”). The warranty is restricted to the water filter used in a single-family residence in the
United States of America and is void if moved from the original installation location.
The warranty set forth above is the exclusive remedy, the exclusive warranty, and is in lieu of all other warranties, expressed or implied by
law or trade usage, including the warranties of merchantability and fitness for a particular purpose. GALENE is not liable for defects or
damage due to negligence (other than that of GALENE) accident, abuse, improper installation (other than by GALENE), improper operation,
maintenance or other abnormal conditions.
GALENE shall not be liable for any incidental or consequential damages. GALENE’s total warranty liability is limited to the repair or
replacement of the goods and GALENE’s discretion. GALENE shall not be responsible for costs in excess of the purchase price of the unit.
What is covered and for how long
This Warranty is offered only on products and/or services provided by GALENE. GALENE warrants that the goods sold by GALENE to
CUSTOMER (i.e. Filtration System including sub-components purchased with original system that may or may not include pre-filter, post-
filter, and fittings) shall be free of defects in its design and will have a warranty for a period of three (3) years from the date of shipment.
Filtration tanks have a warranty of ten (10) years against manufacturers defects, as long as tank is protected from direct sunlight. Said
warranty specifically excludes products that are provided by Owner to GALENE for installation. GALENE warrants that installation work
performed by GALENE will have a three (3) month warranty on workmanship and if done by others, installation should be in accordance
with the specific manufacturer of the respective product directions. A one (1) month satisfaction guarantee is also offered on all products
sold by GALENE, from date of shipment or Invoice, whichever is earlier.
The product or products are warranted only when installed, operated and maintained in accordance with the instructions accompanying the
water filter package or as found on www.Galenewt.com, and done by a licensed professional.
A water filter should be installed in such a manner that, if the tank or any connection thereto should leak, the resulting flow of water will
not cause damage to the area in which it is installed.
GALENE will not recognize claims or make allowances for replacement of materials or correction of GALENE’S error unless GALENE is given
notice in writing of such defect at least 10 days prior to the Owner incurring any cost or expense on account thereof.
All goods shall be subject to normal manufacturing variations of Seller as are recognized in the water treatment industry.
No warranty coverage will be provided if the claimant is unable to provide proof of purchase. Water conditions and use rates may limit the
functional lifespan of your product. This Limited Warranty does not extend to the full estimated life span of the product.
What GALENE Water Treatment will do
1. If necessary, GALENE will provide a replacement that fulfills the remaining estimated lifespan/capacity of your original
purchase and send it to you with installation instructions. If industry standards, product improvements or product
obsolescence prohibit GALENE from furnishing an identical model replacement water filter under this warranty, the Owner
will be furnished with a replacement of comparable remaining capacity and functionality; however, the Owner will be charged
for the additional value of the item(s) which GALENE has incorporated in the replacement water filter.
2. Component Part –If any component part proves to Manufacturer’s satisfaction to be defective in material or workmanship
within the warranty period listed on the data plate label, the Manufacturer will furnish the Owner with a replacement for the
defective part(s).
3. Return of Defective Water Filter and Component Parts –GALENE reserves the right to examine the alleged defect in the
water filter or component part(s), and it will be the Owner’s obligation to return the water filter and/or component part(s) to
GALENE at GALENE’S request.
a) When returning a water filter, it must include all component parts.
b) When returning component part(s), they must be individually tagged and identified with the water filter’s model
number, date of purchase, and date of installation.
What is not covered
1. This warranty does not cover filter cartridges, the internal media and any systems that were not installed in compliance with
the instructions or that have been abused or operated incorrectly.
2. The Limited Warranty stated herein is in lieu of any and all warranties, express or implied (whether written or oral), including,
but not limited to, the implied warranties of merchantability and fitness for a particular purpose.
3. GALENE shall not be liable for any incidental, consequential, special, or contingent damages or expenses, arising, directly
or indirectly, from any defect in the water filter or the use of the water filter.

OPERATION AND MAINTENANCE MANUAL
WATER FILTRATION SYSTEM
16
4. GALENE shall not be liable for any water damage arising, directly or indirectly, from any defect in the water filter or
component part(s) or from its use.
5. GALENE shall not be liable for any damage or product failures caused by any of the following:
The water filter or any of its component parts have been subject to misuse, alteration, neglect or accident.
The water filter has not been installed in accordance with the applicable local plumbing and/or building code(s) and/or
regulations or in their absence.
The water filter is not installed, operated and maintained in accordance with the printed Manufacturer’s instructions,
including if the water filter has any additional aftermarket equipment introduced into the sealed system not approved by
the manufacturer.
The water filter is exposed to highly corrosive conditions.
The water filter is not continuously supplied with potable water.
The water filter is not operated within the factory calibrated temperature limits.
The water filter is removed from its original installation location.
The water filter is installed in direct sunlight or exposed to freezing temperatures.
The water filter or any of its component parts fail due to iron or sediment build-up.
Clogging due to purchaser’s failure to replace the Pre-Filter cartridge.
Damage caused by fire, flood or acts of God.
Damage caused by over-pressurization in the water line.
6. This warranty does not cover damage caused by the use of parts that are not genuine GALENE parts. This includes, but is
not limited to replacement filters, faucets, and/or diverter valves.
7. Except when specifically prohibited by the applicable state law, the Owner, and not GALENE, shall be liable for and shall
pay for all charges for labor or other expenses incurred in the removal, repair or replacement of the water filter or any
component part(s) claimed to be defective or any expense incurred to remedy any defect in the product. Such charges may
include, but are not necessarily limited to:
a) All freight, shipping, handling and delivery costs of forwarding a new water filter or replacement part(s) to the owner.
b) All costs necessary or incidental in removing the defective water filter or component part(s) and installing a new water filter
or component part(s).
c) Any material required to complete, and/or permits required for, installation of a new water filter or replacement part(s), and
d) All costs necessary or incidental in returning the water filter or component part(s) to a location designated by the
manufacturer.
How to get service
To receive service under this Warranty, you must contact GALENE Water Treatment @ 1-844-942-5363 or info@galenewt.com within the
Warranty Period to describe the problem to a customer service representative who will verify that the product is under warranty and
determine whether a part or the system will be replaced and whether you must send back the unit. You will be required to provide proof of
purchase and proof of proper installation
Arbitration: All disputes, controversies or claims of any sort, arising out of or in any way relating to this Agreement, its negotiation, and the
Services provided pursuant to it, whether based in contract, tort, regulation, or any other legal or equitable theory (collectively
“Disputes”), shall be resolved by binding arbitration. Arbitration shall be conducted within the geographical limits of the applicable federal
district court where the Covered Property is located, or such other location upon which both parties mutually agree. The commercial
Arbitration Rules and Supplementary Procedures for Consumer-Related Disputes of the American Arbitration Association
(the “Arbitration Rules”) in effect at the time arbitration is demanded by either party shall govern the arbitration proceeding and the
selection of one neutral arbitrator to preside over the proceeding. The arbitrator is empowered to decide all Disputes and all questions
related to the enforceability and scope of these Dispute Resolution provisions including but not limited to the validity, interpretation and
applicability of these Dispute Resolution Provisions.
Class Action and Jury trial waiver: Each party to this agreement may bring a Dispute against the other only in its individual capacity and not
as plaintiff or class member in any purported class or representative proceeding. Each party gives up or waives any right it may have to
have any Disputes between them resolved by a jury.
This manual suits for next models
3
Table of contents
Popular Water Dispenser manuals by other brands

Sodapop
Sodapop JOY ECO user manual

Youngwoo Waterline
Youngwoo Waterline Portable H2 Server User manual & warranty

Stilevs
Stilevs TRODOS 168 instruction manual

First Sales
First Sales NC Series Installation instructions and owner's manual

Elkay
Elkay VRC Series Installation, care & use manual

Blue Star
Blue Star GA Series user manual

Water Care
Water Care CareSoft Series Installation instructions & owner's manual

Eco Pure
Eco Pure EP31 Installation and operation manual

Magic Chef
Magic Chef MCWD40BB manual

W&H
W&H Osmo user manual

IMPORTcompany
IMPORTcompany Smart F3 FF900 instruction manual

Kenwood
Kenwood KTLD60X15 Installation instructions manual