Galiso OPTI-LITE User manual

OPTI-LITE
FIBER OPTIC LIGHT GUIDE
INSTRUCTION MANUAL
MANUAL NUMBER 21-11-1180
Revision A
Issued July 2013
Revised March 2022
Copyright 2013, Galiso, Inc.
22 Ponderosa Ct., Montrose, CO 81401
(970) 249-0233 (800) 854-3789
www.galiso.com

TABLE OF CONTENTS
Section/Title Page
1.0 Introduction ..................................................................................1-1
1.1 Specifications ..........................................................................1-2
2.0 Safety...........................................................................................2-1
2.1 General Safety .......................................................................2-1
3.0 Assembly......................................................................................3-1
3.1 Receiving and Placement......................................................3-1
4.0 OPTI-LITE Operations .................................................................4-1
4.1 Operation ...............................................................................4-1
4.2 Intensity .................................................................................4-1
5.0 Maintenance.................................................................................5-1
5.1 General..................................................................................5-1
5.2 Lamp Replacement ...............................................................5-1
5.3 Fuse Replacement ................................................................5-1
5.4 Nosepiece Adapter Insert ......................................................5-2
5.5 Troubleshooting.....................................................................5-3
ILLUSTRATIONS and TABLES
Section/Title Page
Figure 1-1, Opti-Lite Kit...........................................................1-2
Table 3-1, Minimum Clearance...............................................3-1
Figure 5-1, Lamp Replacement ..............................................5-2
Table 5-1, Spare and Accessory Parts ...................................5-3

!!!DANGER!!!
DO NOT USE THIS EQUIPMENT TO
PURGE TOXIC OR FLAMMABLE GAS
AND
DO NOT USE THIS EQUIPMENT UNDER
FLAMMABLE, VOLATILE OR TOXIC
ENVIRONMENTAL CONDITIONS

21-11-1180 Section 1 - 1
1.0 INTRODUCTION
The Galiso OPTI-LITE has been designed to provide a consistent, intense white light for
internal inspections of cylinders. A wide variety of Light Guides are available allowing for
a wide variety of lengths and output of light strength.
The light source provides up to 150 watts of radiometric output from a 21 volt tungsten
halogen lamp. The adjustable voltage supply governs output from 0 to 21 VAC. The
light source is CSA listed to UL-1571 (120 V version).
The updated OPTI-LITE features an ergonomic Handle, a Nosepiece Adapter with
locking design to keep Light Guides steady, and Intensity Control from 0-100 %.
Additional Nosepiece Adapters are available to provide capabilities of numerous
diameter Light Guides.
The OPTI-LITE light box also has a high output fan, lamp baffle, and unique Nosepiece
design to provide maximum airflow while restricting stray light from heating outer
surfaces.
This innovative design allows quick, and user-friendly, replacement of the Lamp. See
section 5.1, Lamp Replacement for more information on Lamp replacement.

Section 1 - 2 21-11-1180
1.1 Specifications
Figure 1-1, Opti-Lite Kit
Note: Light Guide Receptacle showing without adapter
Illuminator Box:
Overall Height: 4.9” (125 mm)
Overall Width: 8” (205 mm)
Overall Depth: 7” (180 mm)
Unit Weight: 9.9 lbs (4.5 kg) including cord
Light Guide: Light Guides are available in a variety of lengths.

21-11-1180 Section 2 - 1
2.0 SAFETY
Read all instructions before attempting to install or operate this machine. GALISO,
INCORPORATED IS NOT RESPONSIBLE FOR DAMAGE OR INJURY CAUSED BY
UNSAFE USE, MAINTENANCE, APPLICATION, MODIFICATION OR IMPROPER
INSTALLATION OF THIS MACHINE. Please contact Galiso, Inc. at (800) 854-3789 for
guidance when you are in doubt as to the proper safety precautions to be taken when
installing or operating this machine.
2.1 General Safety
!WARNING!
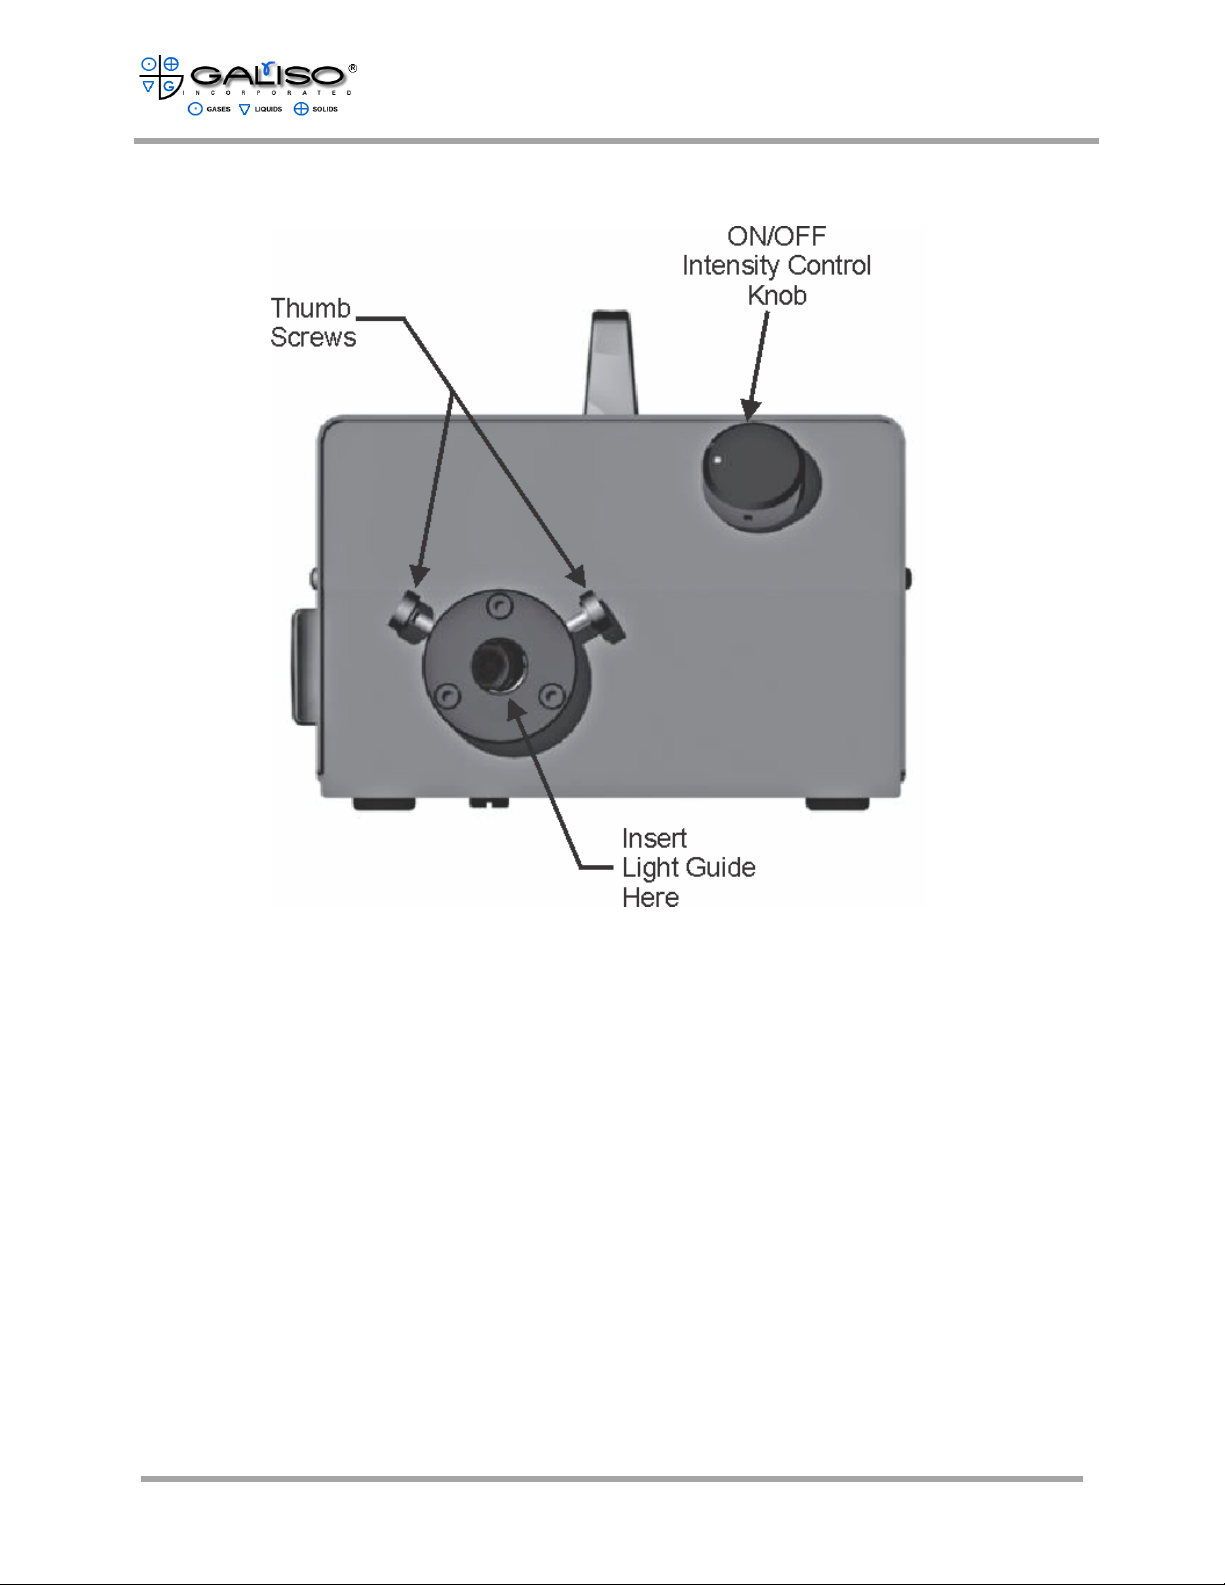
Damage to eyesight will occur by looking directly into the Fiber Optic Port or
Light Guide when the power is on. NEVER look directly into the Light Guide or
the Lamp when they are lit.
A. Do not use this unit near water or in an area with excessive water.
B. Do not place flammable materials near the unit. This unit should not be used
near flammable gases!
C. This unit may generate and transmit and/or radiate electromagnetic energy. Do
not place the device next to other sensitive electronic devices. Failure to do so
could result in errant operation of the nearby device.
D. Avoid using or storing the OPTI-LITE in, or on, areas of excessive vibration.
Vibration of the lamp could cause shortening of the life of the Lamp.
E. Do not operate the unit without mounting feet in place. If the mounting feet are
removed, air vents will be blocked.
Notice: Improper ventilation of the OPTI-LITE can cause intermittent operation
and/or failure of the electronics.
F. Do not block ventilation openings on the unit. Do not impede airflow. Always
be certain that the OPTI-LITE has proper clearance of the unit to allow for
ventilation to prevent overheating (see Assembly Sec. 3.0, for accurate
clearance requirements).
CAUTION:
Dust accumulation will restrict air flow which can cause damage the unit. (See
maintenance section for cleaning recommendations.)
G. Do not use unapproved Fiber Optic Light Guides (such as any form of plastic
fibers), as they may not be suitable for the high temperatures generated by the
focused beam of high intensity light and could cause a fire.

Section 2 - 2 21-11-1180
2.0 SAFETY, continued
2.1 General Safety, continued
H. Always turn off and unplug the unit for a minimum of 15 minutes before
attempting to open the Lamp Replacement Door. Never operate the unit with the
Lamp Replacement Door removed.
I. Do NOT touch the reflecting surface of the Lamp at any time. Oils from skin can
cause “hot spots” that will reduce the life of the Lamp.
!DANGER!
High voltage is present internally. This unit contains potentially lethal voltages!
Observe all safety procedures set forth in this manual. Failure to do so could
result in serious injury or death.
J. Do not direct wire for power or use any other power cord. Only use the 3-Prong,
grounding power cord, supplied with the unit. Route cord so that it will not be
pinched, severed or walked upon.
K. In the event of loss of power, the OPTI-LITE will remain off when power is
restored to the unit. When power is returned, turn the Intensity Knob to OFF and
then slowly turn up intensity until light is returned.
L. Do not defeat the purpose of the fuses. Replace only if necessary and only
replace with the fuse type described in Maintenance Section 5 - 1, or as marked
on the unit.
M. Take care when removing the Light Guide from the Opti-Lite. The Lamp and
surrounding surface may be hot or warm to the touch.
N. Do not attempt servicing the unit beyond the procedures described in this
manual.
O. Use only approved parts (Lamps, Fuses, Light Guides, etc)! Failure to do so
could result in malfunction and/or fire. Do not make any technical modifications
to the unit.
P. If liquid spills on the unit, do not operate and immediately remove power to the
machine. Allow to thoroughly dry before plugging in and operating.
Q. To disconnect the Power Cord, always grasp the cord itself – never pull the
cord/wires as this can cause internal damage to the cord.

21-11-1180 Section 3 - 1
3.0 ASSEMBLY
Read all instructions and familiarize yourself with the safety, assembly, and operation
procedures before assembling or operating the OPTI-LITE.
3.1 Receiving and Placement
A. Select a space for the assembly and operation of the OPTI-LITE. The location of
the machine should allow adequate clearance for ventilation (see Table 3-1
below, Minimum Clearance). Make certain that the mounting feet are on the
bottom of the illuminator box. The location selected should be an area that does
not have excessive vibration. The location should also be away from any
flammable items or gases.
Rear
Bottom
Sides and Top
1.5” (37 mm)
Do not remove feet
.5” (25mm)
Table 3-1, Minimum Clearance
B. Ensure the Lamp has not been dislodged from the Lamp Holder during shipment
by opening up the Lamp Replacement Door, and visually inspecting the Lamp.
The Lamp should fit symmetrically within the Lamp Holder.
C. Loosen the Locking Thumb Screws counter-clockwise to allowing the Light
Guide to be inserted into the Nosepiece.
D. Insert either end of the Light Guide into the Nosepiece on the Illuminator Box
and retighten the Locking Thumb Screws. Do not over tighten the Locking
Thumb Screws, only “hand-tight”, is necessary.
E. Make sure the Intensity Control Knob is in the OFF position.
F. Plug the Power Cord into the Illuminator Box and into the appropriate voltage
wall outlet. The OPTI-LITE is now ready for operation.
If at any time, during assembly or operation, a question should arise call or contact
Galiso, Inc. at (800) 854-3789 or online at www.galiso.com

Section 3 – 2 21-11-1180
This page intentionally left blank.

21-11-1180 Section 4 - 1
4.0 OPTI-LITE OPERATIONS
4.1 Operation
A. Once the Light Guide has been inserted and Illuminator box is plugged in,
turn the ON/Off Intensity Control Knob to power on.
B. NOTICE: When switching on a cold Illuminator Box, leave the intensity control
at low intensity for a minimum of ten seconds before increasing to full
intensity. This will allow the Lamp to warm-up, helping to extend the Lamp
life. After using the OPTI-LITE, return Intensity Control Knob to low and allow
a cool down time of one to two minutes before turning the unit off.
C. After the above steps have been performed, the Light Guide can be inserted
into the cylinder neck to proceed with inspections. Always avoid looking
directly into the Light Guide once the unit has been turned on.
4.2 Intensity
A. Although halogen lamps are an inexpensive and effective light source, they
can degrade by an average of 15% over the lifetime of the lamp. Furthermore,
new lamps of the same brand and model number may vary +/- 20% in
maximum intensity, depending on the batch.
B. Under normal conditions, lamp manufacturers recommend halogen lamps be
operated above 80% of their rated intensity for optimum and stable lamp
performance.

Section 4 - 2 21-11-1180
This page intentionally left blank.

21-11-1180 Section 5 - 1
5.0 MAINTENANCE
5.1 General
A. Other than periodical dusting, and wipe down, the OPTI-LITE and Light Guide
requires no other maintenance.
B. When cleaning is needed, use a commercial glass cleaner or common
household detergent to gently wipe down the exterior of the Illuminator Box
and Light Guide.
CAUTION!
Always unplug the power cord before performing any cleaning or servicing. Do
not use excess water, treated cloth, harsh cleaning agents or sprays. Use any
cleaning fluid sparingly. If moisture is present in the interior, allow the unit to
dry thoroughly before use.
C. Occasionally dust should be removed from the Illuminator Box by using
vacuum or commercial can of compressed air. Pay special attention to the fan
blades at the rear of t unit and the air vents in the front (around the
Nosepiece) and on the bottom of the Main Housing.
5.2 Lamp Replacement
A. Ensure the ON/OFF Intensity Knob is in the OFF position. Unplug the power
from the wall.
WARNING!
Always allow the Unit time to cool before attempting to replace a broken Lamp.
Surfaces may remain hot for a time, possibly causing a burn if touched.
B. Turn the Cover Lock Knob (on the bottom of the Illuminator Box) counter-
clockwise until the Lamp Access Panel opens. Gently pull the Lamp away from
the Main Housing.
C. Insert new Lamp into the Lamp Holder ensuring a snug fit. Reconnect the Lamp
Socket and close the Panel.

Section 5 - 2 21-11-1180
5.0 MAINTENANCE, continued
5.2 Lamp Replacement, continued
Figure 5-1, Lamp Replacement
D. Gently pull the Lamp from the ceramic Lamp Socket. See Figure 5-1, Lamp
Replacement.
Note: Remember to never touch the Bulb or the Reflector in the Lamp. Only
touch the sides when inserting a new Lamp!
E. Insert a new Lamp into the Lamp Bracket. Push the Lamp all the way down into
its holder. Connect the ceramic Lamp Socket to the prongs on the Lamp.
F. Hand-tighten the Cover Lock Knob.

21-11-1180 Section 5 - 3
5.0 MAINTENANCE, continued
5.3 Fuse Replacement
A. Under normal use, the fuse should not require replacement. The purpose of the
fuse is to protect the electronics from failure due to inrush.
B. Should it become necessary to change the fuse, replace with the same type (3
Amp/slow blow in most machines) to insure long life and performance.
C. On the back of the Illuminator Box, next to the Power Cord Plug, there is a small
plastic Fuse Holder. Gently pry the Holder up using a small screwdriver. Pull
completely out and replace the Fuses with the appropriate voltage Fuse.
Replace into the Illuminator Box, ensuring a snug fit.
5.4 Nosepiece Adapter Insert
A. If use of a different diameter Light Guide is needed a Nosepiece Adapter Insert
is necessary. To purchase additional Adapter Inserts, contact Galiso, Inc at
(800) 854-3789 or visit www.galiso.com.
B. To install the new Nosepiece Adapter, unscrew all three Thumb Screws. Turn
the Illuminator Box over to allow the Adapter to fall out. Insert the new
Nosepiece Adapter and re-tighten the Thumb Screws.
5.5 Troubleshooting
If the problem is not resolved by performing the following suggestions, please call
Galiso, Inc. at (800) 854-3789 or (970)249-0233.
A. Light has low output, Fan operates:
1. Check the lamp to ensure that it is fully seated and connected. See Section
5.2 Lamp Replacement.
2. Check to make sure the Light Guide is fully seated in the Nosepiece.
3. Check the intensity setting.
4. Check the Lamp. A partial short in the Lamp may cause low or intermittent
output.
B. Output is intermittent; Fan operates (Lamp turns on and off every few minutes.)
1. The Illuminator Box may be running too hot. (A thermal cutoff protects the
circuitry from heat failure.
2. Check air intakes and exhaust areas for dust or dirt accumulation. Make sure
minimum clearances are maintained. (See Section 3.1 Assembly and
Placement, for clearance information).
3. Move the OPTI-LITE to another location.

Section 5 – 4 21-11-1180
5.0 MAINTENANCE, continued
5.5 Troubleshooting, continued
C. The Light briefly turns on and then off; Fan operates
1. The Lamp may have a faulty filament. Turn the Intensity Control Knob to
maximum setting to the test lamp.
2. If the Lamp fails, replace the Lamp (See 5.2 Lamp Replacement).
3. Examine the Lamp Socket assembly for damage and continuity.
D. The Light will not turn on, Fan operates
1. Replace the Lamp (See 5.2 Lamp Replacement).
E. The Light is dim or non-existent; Fan does not operate
1. Make sure to use the correct model for the power available. Running a 240v
unit in 120/100v conditions will stop the fan and dim the lamp.
F. The Light is on; Fan does not operate
1. Return to Galiso, Inc. by calling (800) 854-3789 to receive a return
authorization number and shipping instructions.
G. The Light is off; Fan does not operate
1. Make sure the power cord is inserted completely into the IEC connector and
also into the correct power source.
2. Check the power cord for damage.
3. Check the fuse.
H. The Light Guide is burning
1. Check the fiber type. If a Light Guide is in use that is not a Galiso, Inc. fiber
optic Light Guide, it may be plastic and susceptible to burning. Using a glass
fiber Galiso, Inc. Light Guide is recommended.
2. Some epoxy types cannot withstand the high temperatures developed in the
light source. Call the supplier if there is any question as to the epoxy used to
manufacture the fiber optic input.
3. Check the Lamp type. Replace the Lamp with Galiso, Inc. approved part
number: 85-11-0028, EKE 150W, (See Table 5-1, Spare and Accessory
Parts). Light Guides damaged by use of non-approved Lamps will void the
fiber warranty.

21-11-1180 Section 5 - 5
5.0 MAINTENANCE, continued
5.6 Spare Parts
Item
Part No.
Description
1 85-11-0028
Lamp
Halogen, MR16 Quartz
2 85-11-0029 Light Guide, 1/4" x 20'L
3 85-11-0043 Light Guide, 1/4" x 5' ULG
4 85-11-0050 Light Guide, 1/4" x 6' L
5 85-11-0061 Light Guide, 1/8" x 5' L
6 85-11-0062 Light Guide, 1/8" x 10' L
7 85-11-0063 Light Guide, 1/4" x 5' L
8 85-11-0064 Light Guide, 1/4" x 10' L
9 85-11-0066 Light Guide, 1/8 x 5’, Hypo Tube End
10 85-11-0067
Light Guide, 3mm x 5' L, w/Plastic
Fiber
Table 5 - 1 Spare and Accessory Parts

Section 5 – 6 21-11-1180
This page intentionally left blank.

PRODUCT WARRANTY
1. DURATION: Galiso provides a one-year warranty from date of purchase, to the original purchaser, for
standard products, unless otherwise specified. For all spare parts purchases, Galiso provides a 90-day
warranty unless otherwise specified. Soft goods such as our speed seals, and O-rings, which are subject
to wear in the normal course of operation, are not covered under this warranty.
2. COVERAGE: Galiso manufactured equipment is warranted against defective materials or workmanship.
THIS WARRANTY IS VOID IF:
A) THE EQUIPMENT HAS BEEN DAMAGED BY ACCIDENT OR UNREASONABLE USE,
IMPROPER SERVICE/MAINTENANCE, IMPROPER INSTALLATION, ABNORMAL OPERATING
CONDITIONS, NEGLECT, REPAIR BY ANY PERSON NOT AUTHORIZED BY GALISO, INC.
OR OTHER CAUSES NOT RELATED TO MATERIAL DEFECTS OR WORKMANSHIP.
B) THE SERIAL NUMBER HAS BEEN ALTERED OR DEFACED.
3. PERFORMANCE: Galiso reserves the right to make warranty determination only after inspecting the item
at the Galiso manufacturing facility. If the warranty determination indicates that the defective item is
covered under warranty, the item will be repaired or replaced with the same parts/items or parts/items of
equivalent quality, at the option of Galiso. In the event of replacements, the replacement unit will continue
under the original equipment warranty or carry a 90-day warranty, whichever is longer. No charge will be
made for warranty repairs, and/or replacements. All freight charges to and from Galiso Inc. or a Galiso
Inc. authorized repair facility, are the responsibility of the customer requesting warranty service.
If the warranty determination indicates that the item is not covered by warranty, a repair/replacement cost
estimate will be submitted to the customer/purchaser for approval prior to initiating any repair work.
4. CLAIMS: In the case of equipment malfunction, notify Galiso (1-800-854-3789) and provide the Model
Name, Model Number, Serial Number and a description of the problem. Return Authorization Number,
shipping and/or service information will be provided on receipt of the required information.
5. SERVICE EQUIPMENT: Galiso attempts to make available, whenever possible, a limited amount of
service equipment at a minimal use charge, plus freight expense, for those customers wishing to avoid
downtime during repair of their equipment. Such items are available on a first come, first served basis and
are billable at the specific service charge applying with a one-month minimum.
6. MODEL CHANGES: Galiso reserves the right to make changes in materials and specifications, without
notice. Galiso may offer, for a stipulated fee, the opportunity to upgrade your equipment to the latest
configuration.
7. DISCLAIMERS: Galiso provides technical data and assistance to aid customers in the selection and use
of our products. There are no implied warranties of merchantability nor suitability for a particular purpose
associated with the transmittal of technical data and/or customer assistance.
Galiso does not assume liability for any consequential, incidental, or special damages. Liability under this
warranty is limited to repairing, or replacing Galiso equipment items returned to the factory or an
authorized facility.
8. COMPUTER AND NETWORK VIRUS PROTECTION: Galiso Inc. equipment, which utilizes internet
access, comes equipped with a subscription to virus protection software. It is the responsibility of the
equipment owner to maintain this virus protection subscription or other virus protection at their cost.
Current virus subscriptions are mandatory to maintain the benefits of this warranty. Galiso does not
assume liability for any or all damages related to or are the result of internet or network failure or malware
or computer viruses or any other type of internet or network malfunction or attack.
GSO9102-1E 05/31/12 Supersedes: 01/07/02
Table of contents
Other Galiso Industrial Equipment manuals