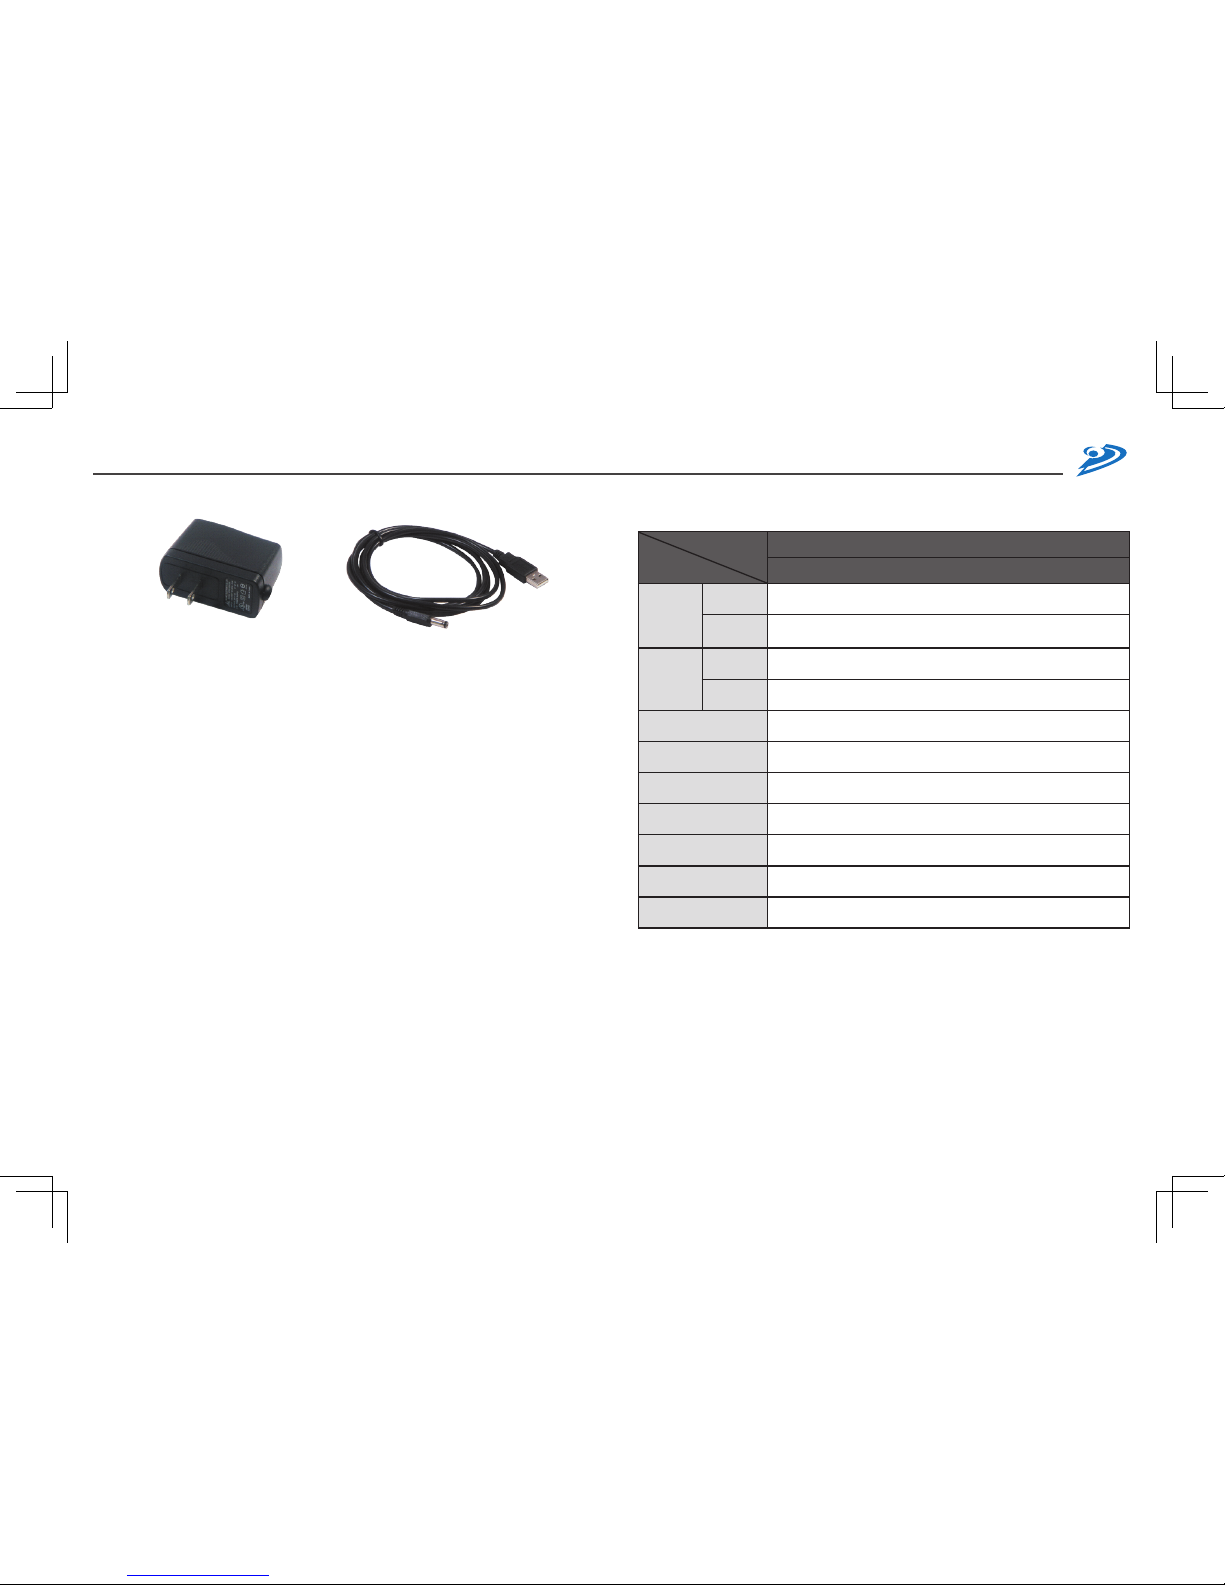
GAMESWITCH PS3-S201 User manual

GAMESWITCH
User Manual
PS3-S201
Play PlayStation® 3
on a DVI Monitor / LCD TV

User Manual
2
3
PS3-S201 TABLE OF CONTENTS
Introduction
Key Features
System Requirement
Panel Description
Installation and Operation
Specication
Order Information
Remarks
Appendix
4
5
5
5
6
13
14
14
15
(C) 2007 Green-Box Technology Co., Ltd.,
All Rights Reserved
Reserves in the hardware, packaging and
accompanying documentation.

User Manual
4
5
/ Key Features
1. Switch one HDMI source (Ex: SONY PlayStation®3) and one DVI
displayed PC to one DVI monitor and stereo speaker
2. Support 480p, 720p, 1080i, 1080p
3. Compliant with HDMI1.2, HDCP, and DVI1.0
4. Auto and manual channel selection, an external button is attached with
the cable connected to monitor
5. Electronic design and high quality signal transmission
6. LED status to indicate the source displayed
7. Magnetic pad and attachable metal plate to ease the installation
/ System Requirement
1. DVI monitor build in speaker or with an external speaker
2. PC with DVI output (optional)
/ Panel Description
/ Introduction
Play PS3 on a DVI monitor is not a dream anymore! GAMESWITCH makes
it become reality. It allows you to play PS3 on a regular DVI monitor, plus
its switching function, you can either play PS3 or operate PC* in the same
monitor. Furthermore, you don’t need to connect PS3 to an expensive LCD
TV and display mostly in 1080i; you can play over a DVI monitor and reach
1080p/720p resolution to enjoy professional multimedia game. If you are
still use traditional TV (480i resolution), GAMESWITCH is your greatest
choice, by adding a DVI monitor, you can use the most economic way to
enjoy high quality game. Now, enjoy PS3 not only in living room, but also
besides your PC!
Image Display of 480i Resolution (TV) Image Display of 1080p Resolution (HDTV)
❶Channel Status (Blue LED:Game ; Green LED:PC)
❷Spare Audio for other audio source
❸To Game Machine( EX:PS3)
❹To PC DVI Port
❺To PC Audio
❻To Monitor
❼To Speaker (Spare)
❽Power Jack
❶
❸ ❹ ❺ ❻ ❼ ❽❷
PlayStation ®
3 PC
rDVI Monito
GAMESWITCH
* PC must have a DVI display interface
* Port 2 audio has higher priority than Port 3 audio source, would override Port 3 audio if Port 2 is plugged
in; Port 5 audio has higher priority than Port 4 as well, would override Port 4 audio if Port 5 is plugged.
in.

User Manual
6
7
Scenario 1:
If this is your first time to connect PS3, please follow Scenario 1 to
install;
Scenario 2:
If your PS3 is connecting to LCD TV over HDMI/DVI and you prefer to
move PS3 to DVI monitor, please follow Scenario 2;
Scenario 3:
If your PS3 is connecting to TV over AV connector, please follow
Scenario 3 to reset your PS3 rst, then connect the whole system.
Scenario 1 - First Time Installation:
• If this is your first time to boot PS3, this machine should still stay
in Default Settings. If not, you can boot up PS3 by pressing power
button for 5 seconds to start from default status. Please follow Fig. 1
to connect the system. The cable used to connect your PC is using
the original cable(s) connected between PC and DVI monitor. And the
other cable and accessories are included in the device package
/ Installation and Operation
GAMESWITCH can use one DVI monitor to display DVI based PC and
HDMI based Game Machine, and by Auto/Manual method to change the
displayed source. In this manual, we will use PS3 (PlayStation®3) to
illustrate how to set up the system, the same principle can be applied in
other similar environment.
Please follow the step accordingly depends on the type of situation you are in : Figure 1: Connection Diagram of GAMESWITCH
2. Game Cable 3. Monitor Cable
4. USB Power Cable 5. DC5V, 2A Power Adaptor
(need to purchase separately)
❶To Game Port of GAMESWITCH
❷To HDMI Output of Game Machine
❸To AV Multi Port
❸ ❹❷❶ ❷❸ ❶
❶To Output Port of GAMESWITCH
❷To DVI Monitor
❸Select Button
❹To Audio Port of DVI Monitor
PlayStation ®
3PC
GAMESWITCH
PWR Cable
USB
Audio
DVI
AV Multi
HDMI
rDVI Monito
Select Button
Speaker (Optional)
Game Machine

User Manual
8
9
• Refer to Fig. 1 to connect the system. The cable used to connect
your PC is using the original cable(s) connected between PC and
DVI monitor. And the other cable and accessories are included in the
device package.
• Refer to Fig. 2 to place the select button under your DVI monitor and
simply touch the button to switch channels between Game and PC.*
• You may connect optional speaker to GAMESWITCH to have better
audio effect.
• Go to Step 1 to do further setup
Scenario 3 - Move from TV (AV Interface) to DVI Monitor :
• It will be needed to reset PS3 into default settings prior connecting
it to GAMESWITCH, please go to main menu to select “Restore
Default Settings” (See Fig. 4) and conrm the action. Please notice
all settings (BD/DVD Settings, Music Settings, Chat Settings, System
Settings, Date and Time Settings …) will be set as factory default
value. Another way to restore is by pressing power button for 5
seconds to boot PS3.
• While PS3 is restoring default settings, please DO NOT turn off the
system. After restore completed, then press ○ to restart, and you
should see a screen like Fig. 5.
• Refer to Fig. 2. Place the select button under your DVI monitor and
simply touch the button to switch channels between Game and PC*.
• You may connect optional speaker to GameSwitch to have better
audio effect.
• Go to Step 1 to do further setup
Scenario 2 – Move from LCD TV (HDMI Interface) to DVI Monitor
• Before moving PS3 from LCD TV to DVI monitor, please change
the Video Output Settings from PS3 and change the displayed
resolution as 720p to make sure the image can be displayed in your
DVI monitor later ( go to Video Output Settings – HDMI – Manual –
720p) or set “Automatic” mode.
Figure 4: Restore Default Settings Figure 5: Welcome Message of PS3
Figure 3: Options under Video Output Settings
Figure 2: Place the Select Button under DVI Monitor
*During switch there will be little waiting time involved due to re-initialing HDCP.

User Manual
10
11
• After nish above process, you can turn off PS3 and move the game
machine to your DVI monitor. Refer to Fig. 1 to connect the system.
The cable used to connect your PC is using the original cable(s)
connected between PC and DVI monitor. And the other cable and
accessories are included in the device package.
• Refer to Fig. 2 to place the select button under your DVI monitor and
simply touch the button and switch the channel between Game and
PC*.
• You may connect optional speaker to GAMESWITCH to have better
audio effect.
• Go to Step 1 to do further setup
Step 1 - Game Machine Setup :
• Use select button to switch the displayed channel to GAME port.(Blue
lit on GameSwitch).
• If you just nished restoring PS3, a Welcome Message should come
out to remind you to connect your controller using USB cable, and
then press the PS button. Follow the instruction to set up language,
set output video and audio using HDMI, and other sequences.
• Display Settings : To have a better display resolution in DVI monitor,
go to Settings – Display Settings – Video Output Settings –
HDMI, and then select the displayed resolution as 720p or 1080p, the
maximum supported resolution will depend on the capacity of your
DVI monitor.
• Sound Setting: Go to Settings – Sound Settings – Audio Output
Settings, and then change the setup as “Audio Input Connector or
AV MULTI”
• Now you are ready for the game. Enjoy and have fun by playing PS3
on your DVI monitor.
Step 2 – Switch Basic Operation :
• What you need to do is press the button to switch between two
different channels.
• Auto Switching : GameSwitch will switch to the rst device activated.
And if you turned off one of the displayed sources, it will automatically
switch to the other active channel.
• Optional Power Adaptor : If your PC doesn’t have USB port or the
USB power is not sufficient for GameSwitch to work, you may use
optional DC5V, 2A power adaptor with USB type A output port and
then have the USB power cable connect to it.
Figure 6: A 17” DVI monitor displayed at 1080p resolution (1920x1080@60Hz)
Figure 7: Sound Settings
*During switch there will be little waiting time involved due to re-initialing HDCP.

User Manual
12
13
/ Specification
Model
Spec.
GAMESWITCH
PS3-S201
Input
Connector Game: DVI Female x 1, Audio Female x 1;
PC: DVI Female x 1, Audio Female x 1
Cable Game: HD&AV to DVI cable; PC:
use primary monitor DVI and audio cable
Output
Connector DVI Female x 1, Audio Female x 1
Cable DVI to DVI+Select Button+Audio cable
Supported Resolution 480p, 720p, 1080i, 1080p
Select Method Auto or Select Button
Build in HDCP Yes
Power Consumption DC 5V, 700mA
Housing Metal
Dimension(LxWxH) Compact Size, 62 x 113 x 29 mm
Environmental
Condition
* Operation Temp.: 0~50 ℃* Storage Temp.: -20~60 ℃
* Humidity: 10~90%
DC5V, 2A Power Adaptor (Optional) USB Power Cable
Figure 8: Optional power adapter

User Manual
14
15
/ Order Information
Order Details Part
Number Remark
GAMESWITCH for All DVI
Monitor (build in HDCP
function)
PS3-S201
HD&AV to DVI cable x 1,
DVI to DVI+Select Button+Audio cable x 1,
USB Power Cable x 1
DC5V, 2A Power Adaptor - Optional, need to purchase separately
/ Remarks
1. Before operating this system, please read manual carefully.
2. Please use correct power adapter and high quality cable for optimum
operation.
3. To prevent potential power damage, please don’t use 2 –wire extension
cord and ensure AC outlets at relative devices on the same electronic
phase and have correct grounding.
4. Limited Warranty:
(1) In no events shall the direct vendor’s liability for direct or indirect,
special, incidental or consequential damages, loss of profit, loss of
business, or financial loss which may be caused by the use of the
product exceeds the price paid for the product.
(2) The direct vendor makes no warranty or representation, expressed
or implied with respect to the contents or use of this documentation,
and especially disclaims its quality, performance, merchantability, or
tness for any particular purpose.
(3) The direct vendor also reserves the right to revise or update the
product or documentation without obligation to notify any user of such
revisions or updates. For further information, please contact your
direct vendor.
5. When connecting with any HDMI devices, please use DVI-HDMI
converter to complete the connection.
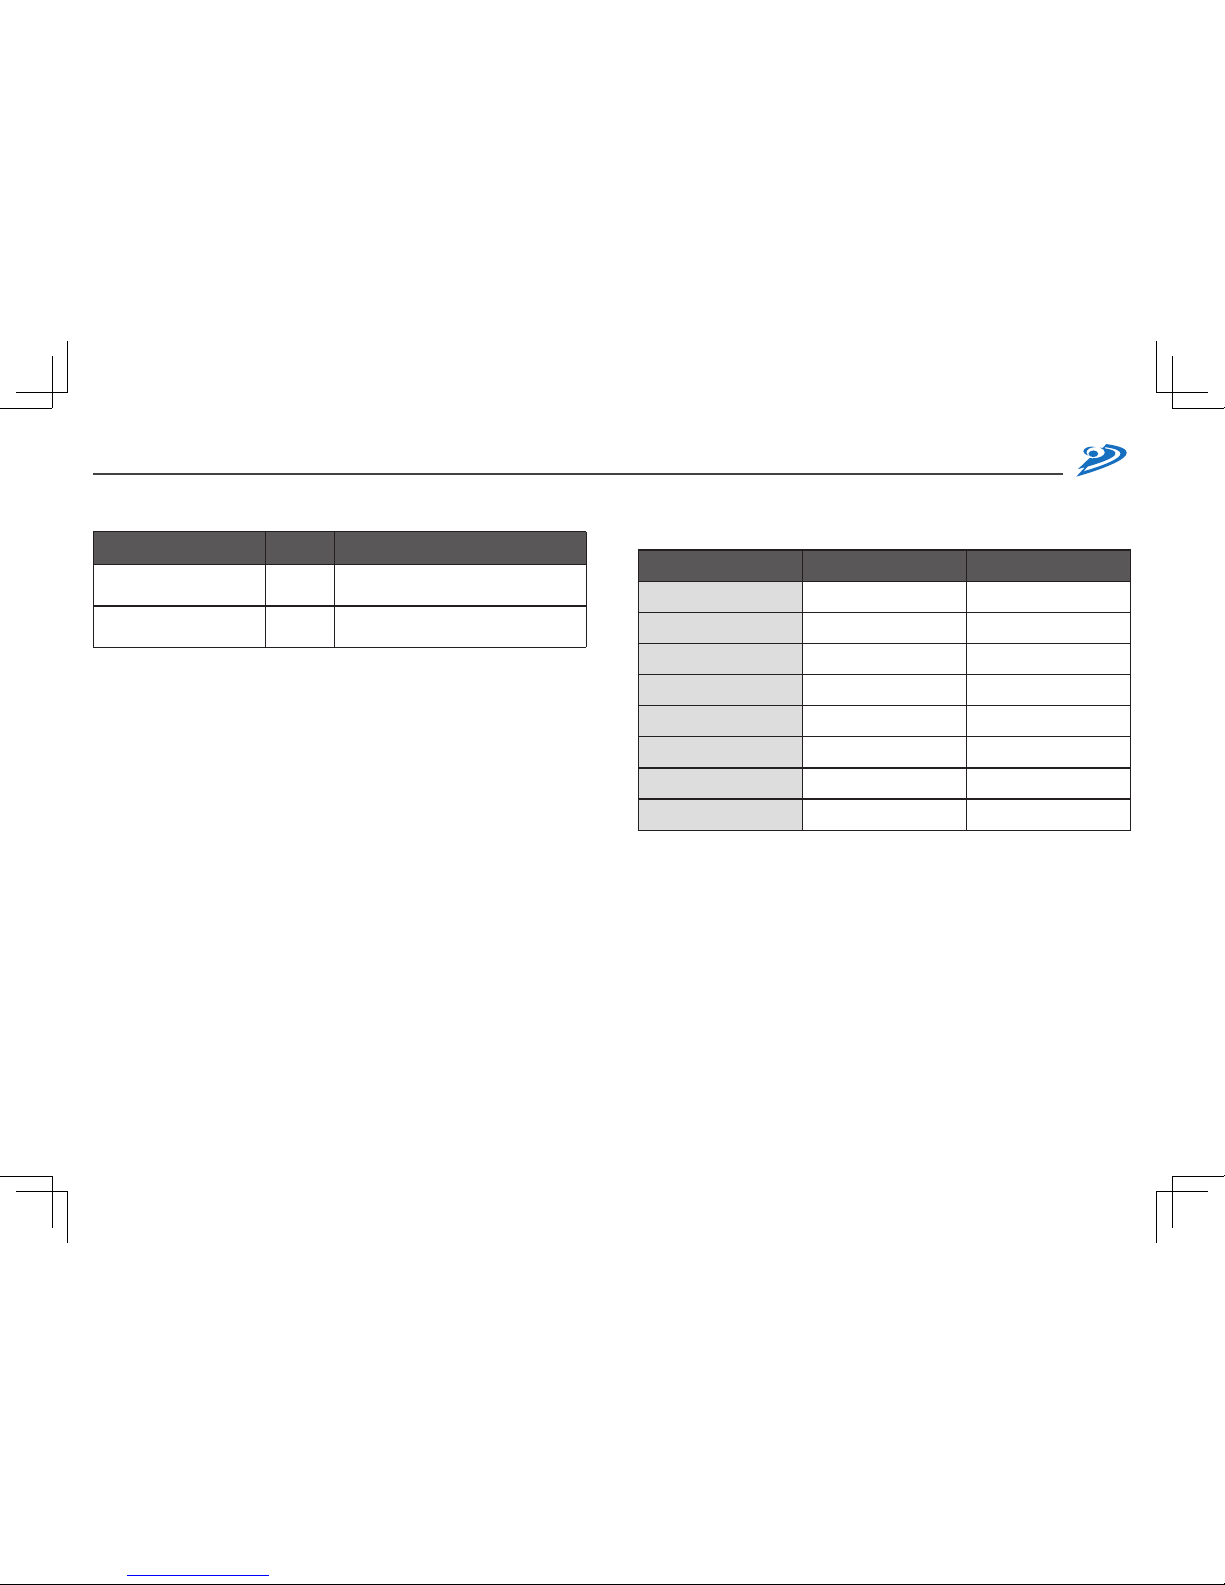
/ Appendix
TV Box VS GAMESWITCH
Traditional TV Box GameSwitch
Analog / Digital Signal Analogue Digital
Max Resolution Composite @ 480i DVI with 720p/1080p*
HD movie playable on DVI
LCD (eg: Blu-Ray, HD-DVD) No Yes,
with Blu-Ray ROM or PS3
PS3 play on DVI LCD Yes,
with Composite
Yes,
with DVI up to 1080p*
Windows Vista with HD
Quality Playback No Yes,
with DVI up to 1080p*
Audio Channel Stereo Stereo
Switching b/w PC and PS3 No Yes
HDCP Chipset Built-in No Yes
* Depends on the AD board used inside your LCD Monitor. Right now
we have tested the following LCD monitors that could run at 1080p
resolution:
Chimei(CMV) 934D, 938D, CT-726D; Viewsonic VX1945WM, VA-1912W;
HANNS.G GF191D; ACER AL2032W; VITO C3701; VITO C3703; DELL
2405FPW; ASUS PW201;
Tested in Jan 2007.
* GameSwitch would not be compatible with Apple Monitors.
* Only certain ATi graphic cards have special clock rate outputting when
displaying 1920x1080 resolution, which may cause few noise dots on
screen through GameSwitch. However, this kind of noise would not
appear when switching to PS3 channel.

Table of contents
Popular Media Converter manuals by other brands

ChamSys
ChamSys SnakeSys B4 user manual

Audio Authority
Audio Authority Digital Audio Converters 977TPO Specification sheet

Shinybow USA
Shinybow USA SB-3855 instruction manual

DirectOut Technologies
DirectOut Technologies split.converter user manual

DVTEL
DVTEL ioimage trk1 installation manual

Club 3D
Club 3D CAC-1070 Checklist