Gamma+ Nano Beam User manual

Nano Beam
60w LED Beam with RGBW Color Mixing
Nano Beam – GAMMA LED Vision
Page of 3
User Manual

Table of Contents
. Introduction and Setup.......................................................................................................................................3
Unpacking and In the Box.................................................................................................................................3
Mounting and Operation...................................................................................................................................3
Features......................................................................................................................................................................3
Safety Precautions.................................................................................................................................................3
Customer Support.................................................................................................................................................5
2. Setup and Operation...........................................................................................................................................6
Using the LCD Menu and Buttons................................................................................................................6
Menu Operation.....................................................................................................................................................7
DMX Setup...............................................................................................................................................................8
DMX Basics..........................................................................................................................................................8
DMX Wiring........................................................................................................................................................8
DMX Modes and Configuration................................................................................................................... 0
Standalone Mode and Configuration........................................................................................................
3. Maintenance.......................................................................................................................................................... 2
Routine Maintenance........................................................................................................................................ 2
Troubleshooting Problems............................................................................................................................. 2
A. The unit does not work:............................................................................................................................. 2
B. Not Responding to the DMX Controller............................................................................................ 2
4. Technical Specifications.................................................................................................................................... 3
Nano Beam – GAMMA LED Vision
Page 2 of 3

1. Introduction and Setup
Unpacking and In the Box
Thank you for choosing our Nano Beam. For your own safety, please read this manual before
installing or using the device. This manual covers the important information on installation and
applications. Please install and operate the fixture with following instructions. eanwhile,
please keep this manual for future needs.
In the box you will find:
•Nano Beam Fixture: 1
•IEC Power Cable: 1
•D X Signal Cable 1
•Omega Bracket 1
Mounting and peration
Clamp ounting: The Nano Beam moving head provides a unique mounting bracket
assembly that integrates the bottom of the base, and the safety cable rigging point in one
unit.
When mounting this fixture to truss be sure to secure an appropriately rated clamp to the
included omega bracket using a 10 screw fitted through the center hole of the “omega
bracket”.
As an added safety measure be sure to attached at least one properly rated safety cable
to the fixture using on of the safety cable rigging point integrated in the base assembly.
Features
•60w RGBW Beam LED fixture with a 2 degree beam angle.
•Fast 540 degree pan and 270 degree tilt.
•DMX, Master/Secondary, Sound-Active Modes
Safety Precautions
Please keep this User Guide for future consultation. If you sell the unit to another user, be
sure that they also receive this instruction manual.
Caution: For added protection mount the fixtures in areas outside walking paths, seating
areas, or in areas were the fixture might be reached by unauthorized personnel.
Nano Beam – GAMMA LED Vision
Page 3 of 3

Before mounting the fixture to any surface, make sure that the installation area can hold a
minimum point load of 10 items the device’s weight.
Fixture installation must always be secured with a secondary safety attachment, such as an
appropriate safety cable.
Never stand directly below the device when mounting, removing, or servicing the fixture.
From a ceiling, or set on a flat level surface (see illustration below). Be sure this fixture is kept
at least 0.5m (1.5ft) away from any flammable materials (decoration etc.).
Always use and install the supplied safety cable as a safety measure to prevent accidental
damage and/or injury in the event the clamp fails.
DO NOT connect the device to any dimmer pack.
During initial start-up some smoke or smell may arise. This is a normal process and does not
necessarily mean that the device is defective, and it will decrease gradually within 15 minutes.
Don’t try to modify the fixture without any instruction by the manufacturer.
Warranty is voided if there are any malfunctions from not following the user manual while
operating or any hazardous operation, like shock short circuit, electronic shock, lamp broken,
etc.
Nano Beam – GAMMA LED Vision
Page 4 of 3

Customer Support
WARRANTY POLICY
GAMMA LED Vision warrants its products for the periods set below from the date of
purchase to be free of manufacturer and workmanship defects. Warranty does not cover
normal wear and tear caused by force, negligence or misuse of products. GAMMA LED
Vision is not responsible for any damages or injury caused by misuse or improper
handling of the products and in accordance with instructions and specifications of manual.
Warranty terms are as follows:
LED Fixtures:
Indoor: 2 Years
Outdoor (IP 54 or higher): Year
Lamp Fixtures: year / excludes the lamp
LED Video Products:
Indoor: 2 Years
Outdoor (IP 54 or higher): Year
Controllers: 2 years
Batteries: 6 months
All Trussing Related Products and Accessories: Year
Please visit WWW.GAMMALEDVISON.COM for complete Limited Warranty terms and
contact information.
Nano Beam – GAMMA LED Vision
Page 5 of 3

2. Setup and peration
Using the LCD Menu and Buttons
Turn on the light, press the MENU button to enter the menu mode, use the UP and D WN
buttons to find the menu,
When the preset menu is displayed on the display screen, press the ENTER button to
confirm, use the UP and D WN buttons to select the sub menu, press the ENTER button to
save the settings or automatically return to the previous menu.
Press the MENU button to return, or wait for one minute and then exit the menu mode
automatically.
Nano Beam – GAMMA LED Vision
Page 6 of 3

Menu peration
MENU Addr Address -5 2
Chnd Channel
Mode
3CH
5CH
SLnd Secondary
Mode
Master
Secondary
Secondary 2
Shnd Show Mode Show -4
Sens 00-99 Sound Sensitivity Level, 00-99
LED On/Off Turn the LCD Display On/Off when the
menu is not active.
Disp On/Off Display Flip – On is for floor-mounted, Off
is for Hanging
Rpan On/Off Flip Pan
Rtil On/Off Flip Tilt
Rest Reset the Fixture
Nano Beam – GAMMA LED Vision
Page 7 of 3

DMX Setup
DMX Basics
DMX5 2 stands for digital multiplex 5 2. This means that 5 2 channels are controlled
digitally through data cable.
A channel is a set of 255 steps that are assigned to control attributes in each light. This
may be a color like red, green or blue, and intensity, strobe, pan/tilt or other attributes.
Multiple sets of 5 2 “universes” may be used. Only universe will travel on a DMX cable,
but through networked DMX (Art-Net or sACN E .3 ), many universes can travel over a
network.
DMX Wiring
DMX works by connecting or multiple lights to the output of a DMX lighting console or
software with a DMX interface.
DMX lights connect in what is called a “daisy-chain”. Your first DMX cable will plug it’s
male DMX connector into the female DMX connector on your lighting console. The
remaining female connector will then connect to the DMX input on your first light.
You may then connect your next fixture to the output of your first light, and continue the
chain.
32 Fixture Rule – DMX only allows you to connect up to 32 fixtures in a single daisy
chain for signal strength. Sometimes, depending on the fixtures and cable length, this
number is less (or more).
DMX Cables can be 3-pin or 5-pin. These use the same type of data, and in the 5-pin
only pins , 2, and 3 are used. The cable should be a 2 conductor, shielded cable of at
least 0 ohms resistance. Microphone cable is not DMX cable.
Please refer to the diagram below:
Nano Beam – GAMMA LED Vision
Page 8 of 3

For installations where the DMX cable has to run a long distance or is in an electrically
noisy environment, it is recommended to use a DMX terminator. This helps in preventing
corruption of the digital control signal by electrical noise and reflections. The DMX
terminator is simply an XLR plug with a 20 Ω resistor connected between pins 2 and 3,
which is then plugged into the output XLR socket of the last fixture in the chain. Please
see illustrations below:
Nano Beam – GAMMA LED Vision
Page 9 of 3

DMX Modes and Configuration
The Nano Beam has multiple DMX modes, sometimes called “personalities”, “profiles”, or
as we will use here “modes”.
In general, modes with more DMX channels offer a greater level of control or options but
take up more of your output channels on your lighting console or software.
Modes with less DMX channels often offer less control, but may be plenty for your needs.
Depending on your needs and control solution, you may not need channels for
automated programs, strobes, or macros – your console may have great effects! In this
case, you can use a lesser channel mode and fit more lights per DMX universe.
View the DMX mode charts below to find the mode that best suits your needs.
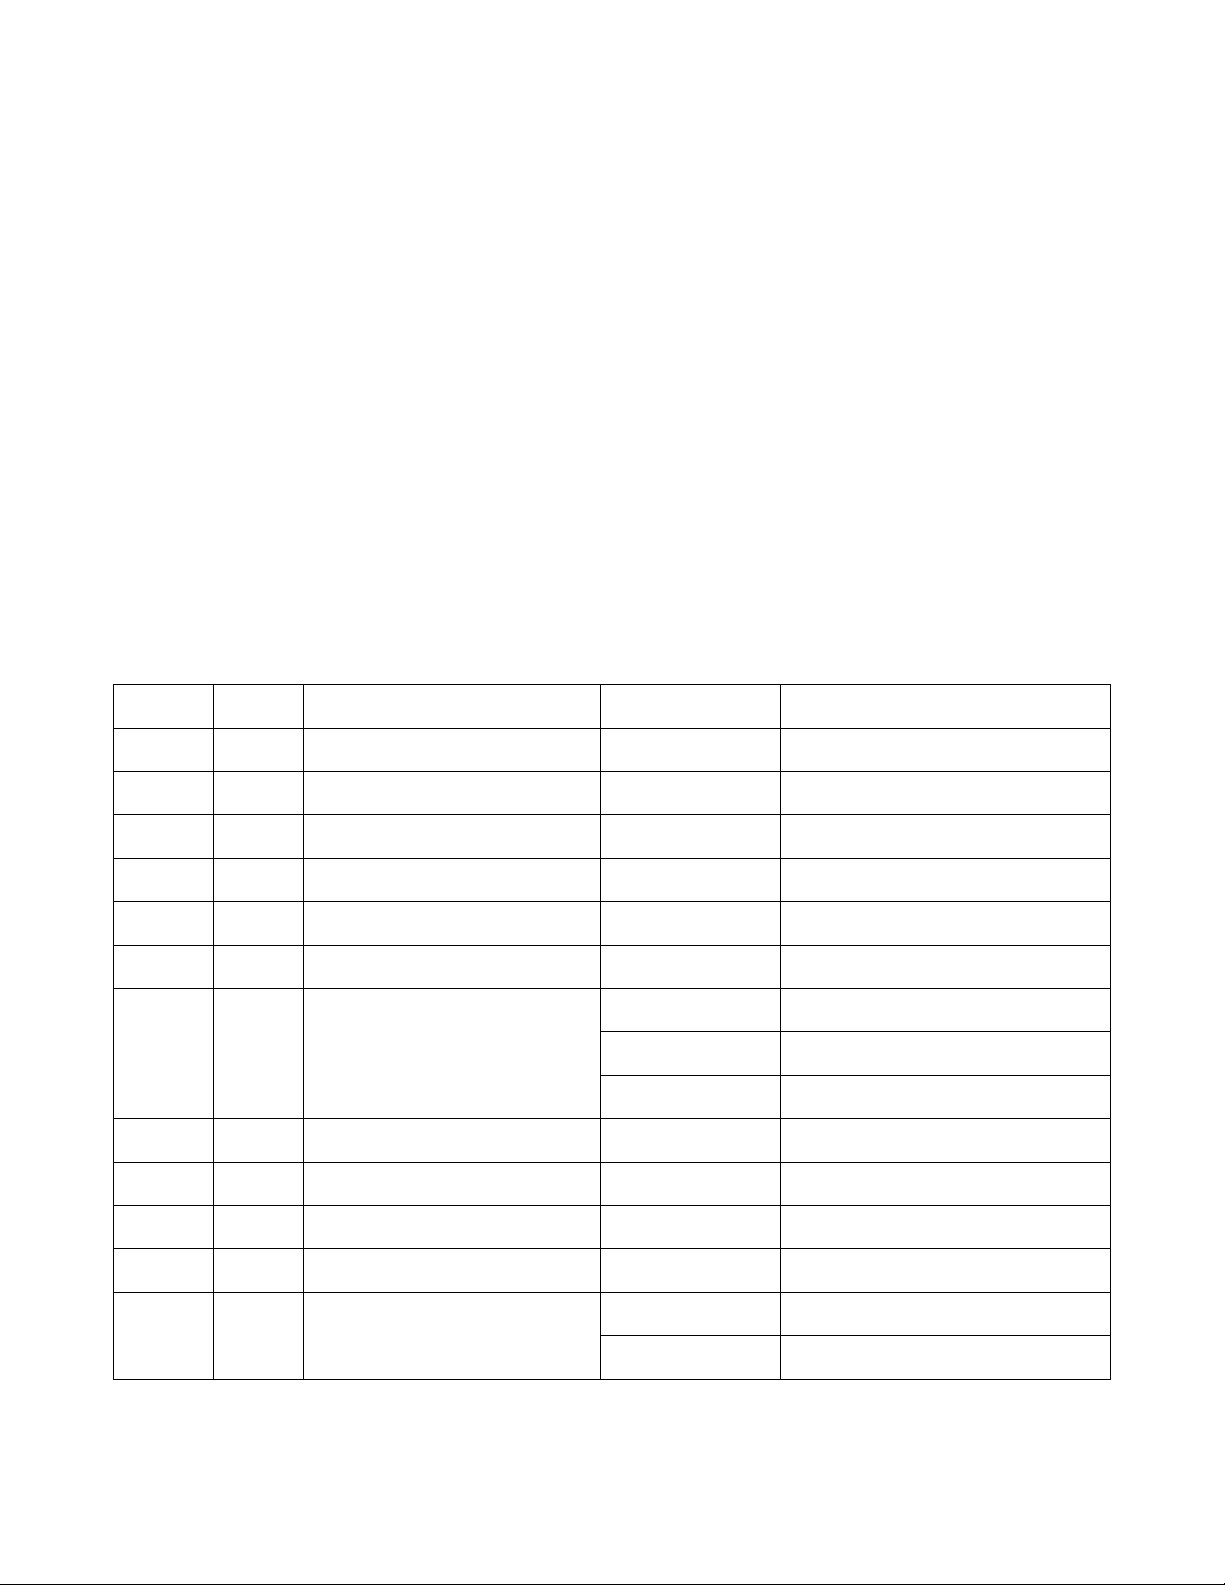
DMX Channel Mode Sheet:
On the left side of the sheet ou will see the different modes and which channel
corresponds to each function listed on the right in the given mode.
13CH 15CH Function Channel Value Description
Pan 0-255 540 Degree Pan
2 Pan Fine 0-255 Fine Pan Control
2 3 Tilt 0-255 270 Degree Tilt
4 Tilt Fine 0-255 Fine Tilt Control
3 5 Pan Tilt Speed 0-255 Fast to Slow
4 6 Dimmer 0-255 Intensity Level
5 7 Strobe 0-9 Open
0-250 Strobe, Slow to Fast
25 -255 Open
6 8 Red 0-255 Red Dimming
7 9 Green 0-255 Green Dimming
8 0 Blue 0-255 Blue Dimming
9 White 0-255 White Dimming
0 2 Color Macros 0-7 No Function
8- 27 Static Color Macros
Nano Beam – GAMMA LED Vision
Page 0 of 3

28-255 Flash Between Colors, Slow
to Fast
3 Movement Macros 0-59 No Function
60-255 Movement Macros
2 4 Movement Macros 2 and
Control
0-20 No Function
2 -249 Movement Macros 2
250-255 Fixture Reset
3 5 Reserved 0-255 Reserved
Standalone Mode and Configuration
By linking the units with DMX cable in a Master/Secondary connection, the first unit will
control the other units to give an automatic, sound-activated, synchronized light show
when the Nano Beam is placed into Standalone mode by the on-board menu and keys.
There are multiple Secondary unit id’s selected via the menu to make different units sync
with each other in different ways.
Nano Beam – GAMMA LED Vision
Page of 3

3. Maintenance
Routine Maintenance
The cleaning of lens must be carried out periodically to optimize light output. Cleaning
frequency depends on the environment in which the fixture operates: damp, smokey, or
particularly dirty surrounding can cause greater accumulation of dirt on the fixture’s
optics.
• Clean with a damp, soft cloth..
• Always dry the parts carefully.
• Clean the external optics at least every 20 days in demanding environments.
Troubleshooting Problems
The following are a few common problems that may occur during operation. Here are
some suggestions for easy troubleshooting:
A. The unit does not work:
•Check that the unit is plugged in to a working power connector.
•Press the menu button to confirm that the unit is powered on. If the screen does
not light up, the unit has no power.
B. Not Responding to the DMX Controller
•Check DMX cables to verify that they are plugged in and functional.
•Check the DMX address and mode – does it match the address and mode patched
in the lighting console or software?
•Plug the light directly into the DMX controller with a cable that you know is good.
Unplug all other lights – does it work?
•Try to use another DMX controller.
Nano Beam – GAMMA LED Vision
Page 2 of 3

4. Technical Specifications
◦Voltage: AC90-240V, 50/60HZ
◦Light source: * 60W red, green, blue, white
◦Control mode: DMX5 2, master, slave, voice control;
◦Pan: 540 °
◦Tilt: 270 °
◦Wattage: 80w Max
Nano Beam – GAMMA LED Vision
Page 3 of 3
Table of contents
Other Gamma+ Dj Equipment manuals